1
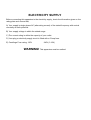
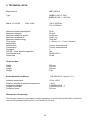
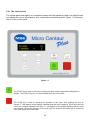
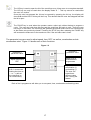
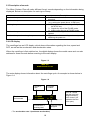
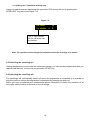
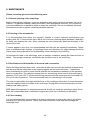
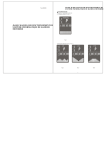
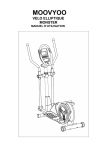
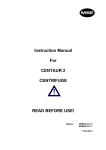
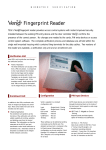
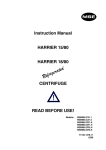
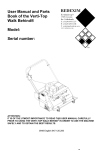
Instruction Manual MICRO CENTAUR PLUS CENTRIFUGE READ BEFORE USE! Models MSB010.CX3.5 MSB010.CX3.1 Rev 03 Thank you for buying a MSE Micro Centaur Plus. Please read this operating manual before using your centrifuge; it will provide you and your colleagues with useful information on all aspects of the equipment. As our customer, we would like to ensure that you are totally satisfied at all times. Do not hesitate to contact us. Your views are very important to us 2 MSE (UK) LTD Health and Safety at Work MSE (UK) Ltd is required under the Health and Safety at Work Act, 1974 and other UK legislation as designers, manufacturers, suppliers and importers of articles for use at work to ensure that, as far as is reasonably practicable, articles which we design, produce, supply or import are safe and without risk to health. We are required to provide information on the safety and handling precautions to be observed when installing, operating, maintaining and servicing our products. Such advice is contained in this manual. We are also obliged to update this information should circumstances change and to operate a system to this end. We should also like to point out, however that you as users have an important responsibility in the provision and maintenance of safe working practices and conditions. Accordingly, we draw the following matters to your attention: 1. This apparatus should only be used as intended and within its design parameters by suitably qualified and trained personnel who have read and understood the relevant sections of this manual. 2. This manual should be readily available to such personnel at all times. 3. In addition to that which is written in the manual, normal common-sense safety precautions must be taken at all times to avoid the possibility of accidents. Particular care is required when working with apparatus at high temperature or pressure. 4. Installation, maintenance, repairs and servicing should only be carried out by an MSE (UK) Ltd approved engineer, and connection to electrical supplies should only be carried out by suitably trained personnel. TECHNICAL SUPPORT, WARRANTY SERVICE AND MAINTENANCE UK customers; if you are in any doubt whatsoever regarding the correct use of this apparatus, or if you require any technical data or assistance, please contact the MSE (UK) Ltd Technical Support Department at: MSE (UK) Ltd Worsley Bridge Road Lower Sydenham London SE26 5AZ United Kingdom Tel: +44 (0) 870 609 4097 Fax: +44 (0) 208 650 8408 E-Mail: [email protected] www.mseuk.co.uk OVERSEAS CUSTOMERS: Should contact their local MSE (UK) Ltd distributor, details can be found on our website. ELECTRICITY SUPPLIES: Voltage and frequency MSE (UK) Ltd electrical apparatus is offered and labelled for one, or for a choice of two voltage ranges and, where necessary, different frequencies of mains supply. MSE (UK) Ltd does not accept any responsibility for the operation of any such apparatus should it be connected to electricity supplies which are normally outside, or vary outside, the stated voltage and frequency values for which it is designed, nor for any consequential loss, damage or injury, howsoever caused. 3 MSE (UK) Ltd PRODUCT WARRANTY Terms and Conditions We hope that you do not have the need to use the extensive warranty cover that MSE (UK) Ltd extends to you. However should you have a problem, our prompt response is greatly helped if you have filled in and posted the pre-paid Warranty Registration Card supplied with your new equipment. MSE (UK) Ltd gives a two year warranty from the date of delivery. During this period, component parts proven to be defective in materials or workmanship will be repaired or replaced at our expense. Installation, commissioning and calibration are not covered by this warranty agreement. The MSE (UK) Ltd approved service agent must be contacted for warranty determination and direction prior to any work being carried out. These warranties are only applicable to new products, and not second hand nor refurbished products even if repaired by MSE (UK) Ltd. Any such products are covered by separate warranty terms and conditions which will be made available on request. Replacement or repair of component parts or equipment under this warranty shall not extend the warranty to either the equipment or the component part beyond the original two year warranty period unless agreed in writing by MSE (UK) Ltd. The above warranties are extended to the original purchaser upon full invoice payment. A purchase receipt or other proof of purchase may be required before warranty service will be performed. These warranties only cover failures due to defective workmanship which occur during the normal operation of the product by the original purchaser, and not failures which result from accident, misuse, abuse, neglect, mishandling, misapplication, alteration, faulty installation, electrical power fluctuations, dust, or other environmental extremes, modification or service other than by an approved service agent or following the written authority of the manufacturer, or damage that is attributable to acts of God. Expendable items such as motor brushes, door seals, lid seals, "O" rings or lamps are excluded. MSE (UK) Ltd, or its approved service agent, reserves the right to repair defective equipment on the premises of the customer, or at a service station, at the sole discretion of MSE (UK) Ltd or their approved agent. In the event of return to an approved service centre the customer is responsible for the safe packaging of the instrument and notification to the service centre. Neither MSE (UK) Ltd nor its agents are responsible for any damage occurring during shipment. Specification and Material Changes:- MSE (UK) Ltd reserves the right to supply our latest and improved models at time of shipment. Taxes:- The prices quoted do not include any taxes imposed by the State or Country in which the purchase was made. Installation:- Installation of all equipment shall be by, and at the expense of the purchaser unless stated otherwise. Access to the site, and the provision of required utilities e.g. Power, water and drainage to suitable connections, will be the responsibility of the purchaser, and at the purchaser's expense. Limitation of liability:- In no event, whether as a result of breach of contract or warranty, shall MSE (UK) Ltd be liable for any consequential or incidental damages including, but not limited to, loss of profit or revenues, loss of use of the equipment or any associated equipment, down time costs, costs of substitute equipment, costs of labour, costs due to delays or claims of purchaser's own customers for such damages. The purchaser agrees to indemnify MSE (UK) Ltd and to hold them free from any and all liability, claims, demands, actions, suits, expenses or costs, including attorney's fees relating to such consequential or incidental damages. All expressed and implied warranties, including the warranties of merchantable quality and fitness for a particular purpose, are limited to the application period of two years. Validity:- Legal rights vary from country to country and states within countries, so some or all of the exclusions or limitations listed above may not apply, but if any part of these conditions shall be found to be unenforceable it shall not affect the validity or enforceability of the remainder of the conditions. 4 5 ELECTRICITY SUPPLY Before connecting this apparatus to the electricity supply, check the information given on the rating plate and ensure that; A) Your supply is single phase AC (alternating current) of the stated frequency with neutral nominally at earth potential. B) Your supply voltage is within the stated range. C) The current rating is within the capacity of your outlet. D) Your plug or electricity supply circuit is fitted with a 5 Amp fuse. E) Centrifuge Fuse rating: 120V 240V (3.15A) WARNING! This apparatus must be earthed. Please dispose of centrifuge carefully! MSE adheres to the WEEE (Waste Electrical and Electronic Equipment) directive, which ensures that all electrical equipment is disposed of carefully with consideration to the environment. As a responsible manufacturer of quality laboratory equipment, MSE will recycle your equipment once its life expires and therefore reduce the amount of waste electrical equipment that is sent to landfill. When you would like to dispose of your equipment, please contact us on +44 (0) 870 609 4097 to arrange a collection. 6 MSE (UK) Ltd Worsley Bridge Rd, Lower Sydenham, London, SE26 5AZ. Tel: +44 (0) 870 609 4097 Fax: +44 (0) 20 8650 8408 Email: [email protected] www.mseuk.co.uk EC DECLARATION OF CONFORMITY According to ISO 17050-1, ISO/IEC 17050-2 Type of device: Product name: Model numbers: Laboratory centrifuge Micro Centaur Plus MSB010.CX3.5, MSB010.CX3.1 EC guidelines and standards: 73/23/EWG, BS EN 61010-1, BS EN 61010-2-020 89/336/EEC, 92/31/EWG, 93/68/EWG, BS EN 61326-1, BS EN 61326-2-6 98/79/EC, BS EN 61010-2-101, BS EN 13612, BS EN 1658 Declaration I declare as the authorised representative, the above information in relation to the supply/manufacture of this product is in conformity with the stated standards and other related documents following the provisions of EEC Directives. Signature of authorised representative and date: …………………………………………………10.08.2007 P. Matharoo 7 Contents 1. Description of the centrifuge 1.1 General description 2. Technical data 2.1 Accessories 2.1.1 Basic accessories 2.1.2 Optional accessories 2.2 Manufacturer’s recommendations 3. Installation 3.1 Unpacking of the centrifuge 3.2 Location 3.3 Connection to power supply 3.4 Fuses 4. Safe working conditions 4.1 General information about your centrifuge 4.2 Operating personnel 4.3 Safety devices 4.3.1 Lid lock 4.3.2 Checking the rotor has stopped 4.4 Opening the lid manually 4.5 Good operator practice 4.6 Hazards and precautions 4.7 Maximum load 4.8 Storage 5. Operating the centrifuge 5.1 Getting started 5.2 Controls 5.2.1 The control panel 5.3 Description of sounds 5.4 LCD display 5.5 Switching the centrifuge on 5.6 Switching the centrifuge off 6. Maintenance 6.1 General cleaning of the centrifuge 6.2 Cleaning of the accessories 6.3 Sterilisation and disinfection of the bowl 6.4 Tube cracking 7. Servicing your centrifuge 7.1 Fault finding 7.2 Opening the lid manually 7.3 Safety inspections 7.4 Notes for engineers 7.5 Repairing your centrifuge 8. How to obtain service on your Micro Centaur Plus. 8.1 Warranty 8.2 Information about your distributor 8 1. DESCRIPTION OF THE CENTRIFUGE 1.1 General Description The MSE Micro Centaur plus is a laboratory micro centrifuge intended for in vitro diagnostic (IVD). Its construction ensures easy and safe operation, for a wide range of applications in laboratories engaged in routine medical analysis and biochemical research works. It is intended for separation of mixtures, suspensions and systemic fluids into constituents of different densities under influence of centrifugal force. This centrifuge is an air-cooled, brush-less instrument and therefore during centrifugation the samples should be spun in sealed containers and sealed rotors. This centrifuge is not intended to be used to centrifuge caustic, inflammable and explosive preparations. 9 2. TECHNICAL DATA Manufacturer MSE (UK) Ltd Type MSB010.CX3.5 230v MSB010.CX3.1 110/120v Mains L1+N+PE V/Hz ±10% 230 V 50/60 Hz, 110 V 50/60 Hz Maximum power consumption Maximum capacity Maximum rotational speed Maximum acceleration Maximum kinetic energy Time range adjustment) Acceleration Deceleration Programs PULSE – short duration operation Interference level Noise level 90 W 52.8 ml 14000 rpm 14243 x g 2300 Nm 1 - 99 min, or ∞ (1 min. intervals 3 linear characteristics 3 linear characteristics 9 Yes PN-EN-55011 56 dB Physical data: Depth Width Height Weight 270 mm 220 mm 180 mm 5 kg Environmental conditions: PN-EN-61010-1 (point 1.4.1.) Ambiant temperature Relative humidity at ambient temperature Installation category Degree of pollution Protection zone +5° to +40° C < 80 % II PN-EN 61010 - 1 2 PN-EN 61010 - 1 300 mm Statement of Conformity The following machine is in accordance with the regulations of the EU Directive 98/79/EC and with the harmonized standards PN-EN 61010-1 and PN-EN 61010-2-020. 10 2.1 Accessories 2.1.1 Basic accessories (enclosed with every centrifuge). Cat. No. 78500.001 76600.020 87900.001 32600.063 35020.151 35020.152 71100.1219 Type of accessories Hexagon key for the rotor Emergency release key for opening of the lid Rotor Clamp Fuses WTA-T 3.15 A 250V Power cord 230 V or Power cord 110 V Operating Instructions Number Of piece 1 1 1 2 1 (1) 1 2.1.2. Optional accessories Depending on customer’s needs the Micro Centaur Plus centrifuge will be provided with any one of the rotors below, as part of the package. Any additional rotors will be supplied at a cost. Cat. No. Type of rotor 43117-615 43117-616 43117-617 43117-618 Angle rotor with sealed lid Angle rotor with sealed lid Angle rotor with sealed lid Hematocrit rotor 34411-8160 34411-8162 34411-8161 34411-8150 81780.002 Rotor capacity 24x2.2/1.5 ml (2x8; 2x4)x0.2 ml 18x0.5 ml 24 capillary tubes 1.3 x 50 mm. Max. rpm RCF r= max r= min 14000 14000 14000 14000 14243 12271 12928 13586 6.5 5.6 5.9 6.2 2.5 3.8 3.8 1.2 TUBE: Glass capillary 50mm heparinised TUBE: Glass capillary tubes 50mm non-heparinised TUBE STOPPER: Capillary Micro Centaur Plus HEMATOCRIT READER: Micro Centaur Plus Adaptor 12x0.5ml and 24x0.4ml for 43117-615, 24-place rotor 2.2 Manufacturer’s recommendations Only the manufacturer-specified centrifuge capillaries, with the correct diameter, length and durability are suitable and should be used for spinning in this centrifuge. The use of equipment made by other manufacturers should be consulted with the manufacturer of the centrifuge. Disinfectants and cleaning agents generally used in medical care should be used in this centrifuge MSE recommend the use of Terminex 2 (available from Arrow Chemicals Ltd) Virkon (available from Antec International) 11 12 3. INSTALLATION 3.1 Unpacking the centrifuge Open the package carefully taking care not to damage the machine inside. Take the centrifuge out of the box and ensure that all accessories are checked and identified. Keep packaging materials at hand for possible transport in the future. 3.2 Location Almost all the energy supplied to the centrifuge is transformed into heat and then emitted to the environment. Therefore, proper ventilation is essential, and ventilation ducts must be kept clear at all times. Moreover, the centrifuge should not be located near any heat source such as radiators and should be kept away from direct sunlight. The bench that the centrifuge sits on should be stable and flat. Around the centrifuge, a 300mm radius safety zone must be established. The normal laboratory operating conditions are from 15° C to 35° C. In the case of changing machine location from extreme cold to warmer conditions, please allow the centrifuge to stand with the lid open for a minimum of 4 hours. This will reduce any chance of condensation taking place in side the centrifuge. 3.3 Connection to the power supply Supply voltage has to be consistent with that given on the rating plate. MSE centrifuges come with a 2-metre long IEC lead fitted with plugs resistant to the dynamic loadings. MSE recommends that an emergency cut -out should be installed far away from the centrifuge, near the exit door from the room or outside the room. Supply voltage should be either 230 V 50/60 Hz, or 110/220 V 50/60 Hz. 3.4 Fuses The centrifuge has standard protection with the WTA-T 3.15 Amp 250 V fuse, which is situated in the IEC socket at the back of the centrifuge. The fuse fitted in the plug of the IEC lead is 5A. 4. SAFE WORKING CONDITIONS 4.1 General information about your centrifuge The centrifuge has a rigid self-supporting structure. The case is made of Acrylonitrile Butadiene Styrene (ABS) plastic, the front and back is made of aluminium sheet. The rear of the lid is fixed in place by steel hinges and the front of the lid is locked with an electromagnetic lock, which stops the possibility of opening during centrifugation. The centrifuge is an air-cooled machine. 4.2 Operating personnel The Micro Centaur Plus centrifuge should only be operated by trained laboratory technicians who have read this user manual. The operating manual should be placed near the centrifuge at all times. 4.3 Safety devices Safety devices described below are incorporated in the design of the Micro Centaur Plus: 4.3.1 Lid lock The centrifuge will only run when the lid is properly closed. In turn, the lid will only open after the rotor has stopped. In the case of emergency opening of the lid during the operation, the centrifuge is immediately switched-off and the brake is automatically applied until the rotor has completely stopped. With the lid is open, the drive is completely disconnected from the power that makes it impossible to start the centrifuge. 4.3.2 Checking the rotor has stopped Opening of the centrifuge lid is only possible when the rotor has stopped. This stopped condition is verified by the microprocessor, which sends a signal to the display where the letter “S .” appears to show that the rotor has stopped and the lid can be opened. 4.4 Opening the lid manually It is possible to open the lid manually if there is a power failure or the centrifuge develops a fault. Please use the key provided with your centrifuge to press into the hole on the right hand side. The lid should now open. CAUTION: Do not attempt to open the lid whilst the centrifuge is running. 4.5 Good operator practice Below is a list important points that users should follow in order to get the most out of their centrifuge. 1. 2. 3. 4. 5. 6. 7. Set the centrifuge in horizontal position on a rigid bench. Ensure a safe position for the centrifuge. Ensure free space around the centrifuge (at least 30 cm). Firmly fix the rotor on the motor shaft. Avoid unbalanced loads. Load the rotor holes with the same tubes as recommended. Do not centrifuge the test tubes of different dimensions. The possibility to centrifuge test tubes of different dimensions should be avoided at all times. However, if it is absolutely necessary then opposite loads should be the same weight. 13 8. 9. 11. 12. 13. 14. 15. Care should be taken to load the rotor holes asymmetrically. Ensure that all holes are being used in the rotor. Only use tubes made from a plastic material. Never use glass test tubes. Fill in all test tubes equally in order to protect the centrifuge against imbalance. Always use tubes that are in good condition and discard any that show signs of wear. Infectious materials should be processed in closed test tubes only. It is prohibited to centrifuge explosive and inflammable materials. It is prohibited to centrifuge substances prone to reaction in result of delivery of high energy during centrifugation. 4.6 Hazards and precautions 1. 2. 3. 4. 5. 6. 7. 8. 9. 10. 11. 12. 13. 14. 15. 16. 17. 18. 19. 20. 21. 22. 23. In order to avoid damaging the centrifuge in any way, the user should read and understand the instruction manual before operating the Micro centaur Plus. Un-trained personnel should never operate the centrifuge. The centrifuge must not be transported with the rotor mounted on the motor shaft. The centrifuge should only be used in conjunction with original rotors and spare parts. If the user discovers a fault with the centrifuge, a qualified service engineer should be contacted through MSE (UK) Ltd. Do not switch the centrifuge on if it is not installed properly or if the rotor is not fitted correctly. The centrifuge must not be operated in places where there is a risk of extreme hot or cold temperatures. Do not use flammable or highly volatile materials in the centrifuge. Users are advised to take extreme care when centrifuging toxic or contaminated substances. The appropriate decontamination procedures should be adhered to when cleaning any parts of the centrifuge that has been in contact with any toxic or hazardous material. Do not open the lid manually when the rotor is still turning. Do not exceed the load limit set by the manufacturer. Rotors are intended for fluids of average homogeneous density equal to 1.2 g/cm3 or smaller when centrifugation is carried out at maximum speed. When fluids of higher density are used, then it may be necessary to reduce the speed. Do not use the rotors that have signs of corrosion or other mechanical defects. Do not use highly corrosive substances, which could cause material impairment and lower the mechanical properties of rotor. Do not use plastic rotors and accessories that have not been recommend by MSE (UK) Ltd. Only commercial plastic test tubes should be used. Ensure that the test tubes are in good condition and show no signs of damage or wear. Do not run the centrifuge without the rotor. Do not run the centrifuge without the lid on the rotor. Do not move the centrifuge whilst in use. Maintain a safe distance from the centrifuge whilst in use. Do not place objects on the centrifuge. 4.7 Maximum load In order to avoid overloading of the rotor the operator shall observe the maximum permitted load, which is specified on every rotor. Maximum permissible load is reached when all test3 tubes are filled with the fluid with 1.2 g/cm density. 14 If density of the centrifuged liquid is higher than 1.2 g/cm3, then test tubes can only be filled partially. Alternatively the operator can adjust the speed of the centrifuge by using the following formula. n perm = n max * G ; γ = specific gravity 3 ; n max [maximum rotational speed – r.p.m.] γ cm 1,2 4.8 Storage If your Micro Centaur Plus is stored away for more than 12 months, we recommend that the centrifuge be inspected by an authorised engineer before use. 5. OPERATING THE CENTRIFUGE 5.1 Getting started 1. 2. 3. 4. 5. 6. Connect the centrifuge to the mains socket. Switch the power supply on by using the on/off switch, situated on the right hand side of centrifuge. Open the centrifuge lid by pressing the LID key. Prior to fitting the rotor, the user should check that the bowl is free from foreign objects and impurities such as dust and residues of fluid. Mount the rotor on the motor shaft and tighten in a clockwise direction (using the supplied hexagon key). Rotor lids must be fully tightened on the rotor in order to ensure a good seal. Once in use, only use sample containers intended for the rotor. CAUTION: This Centrifuge compensates for a small weight difference. However, it is recommended that users load the rotor with equal loads to ensure minimal vibrations during operation. In order to prolong the life of your rotor, lubrication should be used on threaded parts of the rotor and vacuum grease on the “o” rings inside of the rotor lid. To take the rotor off, loosen the rotor nut by turning in an anti-clockwise direction. Take the rotor off by gently pulling in an upward direction. 5.2 Controls The microprocessor control system being used in the centrifuge ensures a wide range of parameters and operation can be set: 1. Stepped speed control within the range from 300 to 14000 rpm with increments of 100 rpm or RCF x g. 2. Selection of the centrifuging time within the range from 1 to 99 minutes with 1 minute interval adjustments, or continuous centrifugation. 3. Using the PULSE button to centrifuge for a short periods of time. 4. Program up to 9 different operations. 5. 3 different acceleration rates to choose from. 6. 3 different de-acceleration rates to choose from. 15 5.2.1 The control panel The control panel and display is a completely sealed unit that shows key data in a digital format and allows the user to adjust speed, time, acceleration and braking rates. Figure 1.1 shows the layout of the control panel: Figure 1.1 The START key is used to start the centrifuge program with the parameters displayed on display. The START key can only be activated when the lid is closed. The STOP key is used for aborting the operation at any time. After pressing the key an oblique (“\”) will appear on the display, indicating that the rotor is braking. When the rotor has come to a complete standstill, the letter “S .” will appear on the display signalling that the rotor has stopped. Sequential pressing of the stop key will increase the brake rate to maximum even if the brake rate is set lower. 16 The LID key is used to open the lid of the centrifuge once it has come to a complete standstill. The LID key can only be used when the display reads “S .” This key cannot be used whilst the rotor is in motion. Once the rotor has stopped the lid can be opened by pressing the lid key, the display will show S O and the LED in lid key will be lit up. This denoted that the rotor has stopped and that the lid is open. The PULSE key is used when the operator wants a short spin without having to program a cycle. The user can hold down this key and the centrifuge will begin to spin. Once the user has let go of the button, the centrifuge will gradually slow down and come to an eventual stop at the brake rate previously chosen. Pressing the STOP key after releasing the PULSE key will increase the brake rate to the maximum even if the set brake rate is lower. The parameter keys are used to adjust speed, time, RCF, as well as, acceleration and deacceleration rates. Figure 1.2 shows each of their functions: Figure 1.2 Increase a parameter value Decrease a parameter value Select up to 9 predetermined programmes Adjust speed and RCF Adjust acceleration (/) and braking (\) The user can select three different rates, with 1 being the fastest Adjust time and from 1-99 minutes. Setting the time as - - m - - s will set the centrifuge to run continuously. Each of the 9 programmes will allow you to set speed, time, acceleration and braking rates. 17 5.3 Description of sounds The Micro Centaur Plus will make different ‘beep’ sounds depending on the information being displayed. Below is a description for each type of beep: Sound Description Confirmation that the command has been accepted. The command has not been accepted. (e.g. setting the speed above 14 000 rpm) 1. Signals the start of braking after pressing the STOP key. 2. Signals the use of the PULSE mode. 3. braking after the use of PULSE mode. The rotor has stopped and the lid can be opened Signals that the centrifuge is ready after switching the power on. One short beep Two short beeps One long beep Five short beeps Five short beeps and one long beep 5.4 LCD display The centrifuge has an LCD display, which shows information regarding the time, speed and RCF, as well as the acceleration and deceleration rates. When the centrifuge is first switched on, the digital display shows the model name and our web address for three seconds before reverting to the main display. Figure 1.3 MSE UK www.mseuk.co.uk The main display shows information about the centrifuge cycle. An example is shown below in Figure 1.4. Figure 1.4 Speed in rpm Time in minutes and seconds Program number S:14000 T: 99m00s /1 Acceleration / braking rate \ / 1 = acceleration rate 1 (maximum acceleration) 18 (1) S. The rotor has stopped The “S .” shows that the rotor has stopped and the lid is closed. (“O” indicates that the lid is open) \ 1 = braking rate 1 (maximum braking rate) Users can switch between displaying the speed and RCF during the run by pressing the SPEED RCF key twice (see Figure 1.5) Figure 1.5 RC:14243 T = 99m00s /1 (1) S. The “=” sign indicates that the parameter can be changed. Note: The operator cannot change the parameters once the centrifuge is in motion. 5.5 Switching the centrifuge on Having familiarized your self with the instruction manual, you can set the programmers that you require load the rotor, shut the lid and press the START key. 5.6 Switching the centrifuge off The centrifuge will automatically switch off when the programme is completed. It is possible to stop the machine before the programme is completed by pressing the stop key. When you have completed your requirements please remember to switch the machine off at the mains switch located on the side of the centrifuge. 19 6. MAINTENANCE Please use safety gloves for the following work 6.1 General cleaning of the centrifuge Before cleaning the centrifuge, users are advised to wear safety gloves to minimise the risk of irritation. For general cleaning, water mixed with a mild detergent is sufficient. Do not use any corrosive substances or abrasive cloths to clean the centrifuge. Do not use alkaline solutions, flammable solvents or agents containing abrasive particles. 6.2 Cleaning of the accessories It is recommended that rotors are regularly cleaned to ensure optimum performance and prolong their life. This should be done with a non-corrosive cleaning agent (between 6 and 8pH) as these can weaken the rotor. When cleaning the rotor please pay particular attention to the holes of the rotor. If cracks appear in the rotor, we recommended that the rotor be replaced immediately. Rotors have to withstand high stresses of centrifugal force and therefore any slight damage would be made worse during operation and inadvertantly cause damage to the machine. All accessories used in the centrifuge, such as sample containers, should be clean and free of debris. The sample containers should also be dry before use in the centrifuge. 6.3 Sterilisation and disinfection of the bowl and accessories When sterilising the bowl and rotors, users should take into account the material of these items and be sure that the chemicals in the cleaning agents will not react with them. Furthermore, when autoclaving the rotors, users should consider the temperature resistance of the material used in construction. The optimum temperature for autoclaving rotors used in this centrifuge is between 121ºC and 124º C. When autoclaving users should also make sure not to exceed 215 kPa (2.15 bar) of pressure. The recommended time for autoclaving is 15 minutes. The user is responsible for proper disinfections of the centrifuge, particularly if some dangerous material is spilled inside or outside of the centrifuge. During above mentioned works you must always wear safety gloves. MSE appointed engineers or workshop personnel should not touch the centrifuge unless it has been de-contaminated and a certificate is signed by some one in authority to that effect. 6.4 Tube cracking It is recommended that users operate in a clean environment to reduce the risk of any debris entering your centrifuge system. Debris can crack tubes and rotors and also damage the centrifuge itself. 20 7. SERVICING YOUR CENTRIFUGE 7.1 Fault finding Below is a list of faults and their possible solutions: Fault The centrifuge has no display The centrifuge does not start The centrifuge starts, but it is not accelerating properly Lid is not opening Solution 1. Check that the power cable is properly plugged in and the mains is turned on 2. Check that the fuse hasn’t blown in the plug 3. Ensure that the power switch is on 1. Check that the lid is closed properly 2. Ensure that the display is not flashing. The centrifuge could be waiting for you to input some parameters Make sure that the rotor is not overloaded (the letter E will signify this on the display). Turn centrifuge off and on again to clear the error message. The lid lock or lid spring could have failed. Contact MSE for repair. If any problems persist, please contact your local MSE service agent 7.2 Opening the lid manually It is possible to open the lid manually if there is a power failure or a fault develops with the centrifuge. Please use the key provided with your centrifuge to press into the hole on the right hand side. The lid should now open. CAUTION: Do not attempt to open the lid whilst the centrifuge is running 7.3 Safety inspections From the point of view of operational safety the centrifuge has to be subjected to inspection carried out by authorised service engineer or especially trained experts at least once every year in the state of operational readiness. More frequent inspections could be required if the centrifuge or rotors have been subjected to a corrosion inducing environment. Results of inspections, repairs and tests have to be recorded and kept on file. This instruction manual should be stored near the centrifuge for reference. 7.4 Notes for engineers The Engineer will pay special attention to the most important parts of the machine and check that they are not damaged in any way. These include: 1. Motor anti vibration ring. 2. The motor shaft. 3. All Centrifuge accessories and especially their structural components. Check they are all free from corrosion. 4. All metal parts. Check they are free from cracks and abrasions. 5. Screws. Check that all screws are tight. 6. Earth connections. Check they are all connected inside the equipment. 7. Rubber sealing rings between the rotor and lid. Check they are in a good condition. 21 IMPORTANT! Please carry out a safety test for earth bonding, insulation and earth leakage before completing the service. 7.5 Repairing your centrifuge Your Micro Centaur Plus should provide you with years of trouble free centrifugation. However, there are occasions when, for various reasons, you centrifuge may need to be repaired. Warranty repairs will be carried out by authorised service personnel (such as Henderson Biomedical Ltd in the UK) or in an authorised service work shop designated by MSE (UK)Ltd. The user will be responsible for the disinfection and decontamination of the unit prior to any service engineer visit or if unit is to be sent back to an MSE (UK) Ltd authorised work shop. The centrifuge will only be accepted if the disinfection / de-contamination certificate is forwarded to the repair shop and a copy of the certificate accompanies the Centrifuge. Information about authorised service workshops can be obtained from the Manufacturer 8. HOW TO OBTAIN SERVICE ON YOUR MICRO CENTAUR PLUS 8.1 Warranty The Micro Centaur Plus comes with a 2 year warranty from the date of purchase. After the 2 years, an annual service of the centrifuge is recommended. This should be only be carried out by an authorised MSE service engineer. The service life of the centrifuge is approximately 10 years. If your centrifuge should require service at any time, please contact us at: MSE (UK) Ltd Worsley Bridge Road Lower Sydenham London SE26 5AZ United Kingdom Tel: +44 (0) 870 609 4097 Fax: +44 (0) 208 650 8408 E-mail: [email protected] www.mseuk.co.uk If you are located outside the UK, please contact your local distributor. If you do not know who your local distributor is, please contact our sales team via the details above. 22 Nomograph To determine the RCF (Relative Centrifugal Force) [r.p.m] Centrifuging radius [cm] R.C.F. (x "g") multiple of gravitational acceleration 50 20000 45 50000 40000 15000 14000 13000 12000 11000 10000 30000 9000 100000 40 35 Formula used for calculation of this nomogram : 2 R.C.F.= 11,18 * r * (n/1000) where : 30 29 28 27 26 25 24 23 22 21 20 19 A R.C.F. r n g - multiple of gravitational speed centrifuging radius (cm) rotational speed (r.p.m.) gravitational acceleration Example 16 10000 8000 6000 5000 4000 1500 1200 1000 800 600 500 400 15 14 300 13 200 Example of making use of the nomogram: 11 10 9 150 120 100 80 60 50 40 A=14,4 cm B=4600 r.p.m. C=3400 x g 30 25 20 8 7000 15000 3000 2400 2000 18 17 12 8000 20000 6000 B 5000 4500 C 4000 3500 3000 2500 2000 1500 1400 1300 1200 1100 1000 900 800 700 600 500 15 7 6 n = 1000 * r= RCF (11 ,18 * r ) RCF 2 11 ,18 * n 1000 5 400 10 8 6 5 4 300 3 200 23 8.2 Information about your distributor: YOUR DISTRIBUTOR MSE (UK) Ltd Worsley Bridge Road Lower Sydenham London SE26 5AZ United Kingdom (t) +44 (0) 870 609 4097 (f) +44(0) 208 6508408 (e) [email protected] www.mseuk.co.uk 24