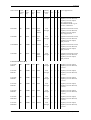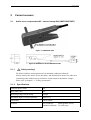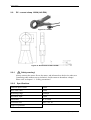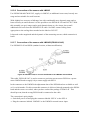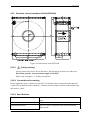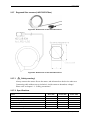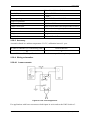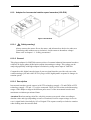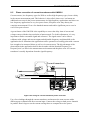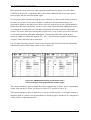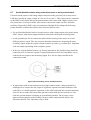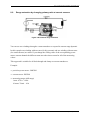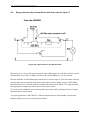
1
ZES Sensors
and Accessories
for precision power meters
LMG series
version:08. February 2011
ZES current and voltage sensors and accessories
This data book is the technical dokumentation of the current and voltage sensors from ZES
ZIMMER Electronic Systems GmbH to enlarge the measuring ranges of the power meters
series LMG.
The first section of this paper gives an survey of all ZES current sensors and the safety
precautions. Selection table and several arguments should help you to find a suitable sensor
family or fill out the support request form. The second section is about the general current
sensors, which you can use with every precision power meter of the LMG series. In the
following sections the special sensors, wiring cables and accessories for the different precision
power meters are described. Then you find a chapter with the precision high voltage divider
for meters of the LMG series. The last section with frequently asked questions will help you to
optimize the accuracy and give you some hints for the usage of our sensors.
But in all cases if you need more information or detailed support for your application please
don’t hesitate to contact us, the engineers of ZES ZIMMER will help you.
© Copyright 2011. No part of this document may be reproduced, in any form or by any means,
without the permission in writing from ZES ZIMMER Electronic Systems GmbH.
We reserve the right to implement technical changes at any time, particularly where these
changes will improve the performance.
• Headquarter Germany:
ZES ZIMMER Electronic Systems GmbH
Tabaksmühlenweg 30
D-61440 Oberursel (Taunus), Germany
phone ++49 (0)6171 628750
fax ++49 (0)6171 52086
email: [email protected]
internet: http://www.zes.com
• Subsidiary USA:
ZES ZIMMER Inc.
4808 Santa Monica Ave.
San Diego, CA 92107
phone +1 760 550 9371
email: [email protected]
internet: http://www.zes.com
ZES ZIMMER
2/218
Sensors and Accessories for precision power meters
Content
1 Introduction......................................................................................... 6
1.1 Safety precautions ....................................................................................... 6
1.2 Selection table - current sensors ................................................................. 9
1.3 Selection table - voltage sensors............................................................... 12
1.4 Advantages and disadvantages of different current sensor types ............ 13
1.5 Support request ......................................................................................... 15
2 Current sensors .................................................................................17
2.1 Active error compensated AC - current clamp 40A (LMG-Z406/-Z407) 17
2.2 Active error compensated AC - current clamp 40A (L45-Z06/-Z07) ...... 20
2.3 AC - current clamp 100A/0.1A (LMG-Z327) .......................................... 22
2.4 AC - current clamp 200A/0.2A (LMG-Z326) .......................................... 24
2.5 AC - current clamp 200A/1A (LMG-Z325) ............................................. 26
2.6 AC - current clamp 1000A/1A (LMG-Z322) ........................................... 28
2.7 Error compensated AC - current clamp 1000A (L45-Z10/-Z11) ............. 30
2.8 DC - current clamp 1000A (L45-Z26)...................................................... 32
2.9 AC - current clamp 3000A/1A (LMG-Z329) ........................................... 34
2.10 Error compensated AC - current clamp 3000A (L45-Z16/-Z17) ........... 36
2.11 Precision current transformer 1500A (LMG-Z502,-Z505,-Z510,-Z520)39
2.12 Precision current transformer 4000A (LMG-Z542,-Z545,-Z550) ......... 42
2.13 Precision current transformer 10kA (LMG-Z562, -Z570) ..................... 45
2.14 Precision current transformer 10kA (LMG-Z582, -Z590) ..................... 48
2.15 Precision current transducer 60A (PSU60) ............................................ 51
2.16 Precision current transducer 200A (PSU200) ........................................ 57
2.17 Precision current transducer 200A (PSU200HF) ................................... 63
2.18 Precision current transducer 400A (PSU400) ........................................ 68
2.19 Precision current transducer 600A (PSU600) ........................................ 74
2.20 Precision current transducer 700A (PSU700) ........................................ 82
2.21 Precision current transducer 1000A (PSU1000HF) ............................... 88
2.22 Precision current transducer 2000A (PSU2000) .................................... 93
2.23 Precision current transducer 2/5kA (SAT2000,SAT2000hf,SAT5000) 99
2.24 Hall current sensors, 50/100/200A (L45-Z28-HALLxx) ..................... 109
2.25 Hall current sensors, 300/500/1k/2kA (L45-Z29-HALLxx)................ 112
2.26 Hall current sensors, 300/500/1k/2kA (L50-Z29-HALLxx)................ 116
2.27 Rogowski flex sensors (L45-Z32-FLEXxx)......................................... 119
2.28 HF-summing current transformer (L95-Z06) ....................................... 122
2.29 Highvoltage HF-summing current transformer (L95-Z06-HV) ........... 127
2.30 Low current shunt (LMG-SHxx) .......................................................... 132
2.31 Low current shunt with overload protection (LMG-SHxx-P).............. 137
2.32 Precision wideband current transformer WCT100 (LMG-Z601) ........ 142
ZES ZIMMER
3/218
Sensors and Accessories for precision power meters
2.33 Precision wideband current transformer WCT1000 (LMG-Z602) ...... 145
3 LMG95 connection cables and adapter ..........................................149
3.1 Adapter for the use of HD15-Sensors with LMG95 (L95-Z07) ............ 149
3.2 Connect PSU60/200/400/700 to LMG95 (PSU60/200/400/700-K-L95)151
4 LMG450 connection cables and adapter ........................................153
4.1 BNC adapter to sensor input HD15 without EEPROM (L45-Z09) ....... 153
4.2 Adapter for isolated custom current sensors with 1A output (L45-Z22)154
5 LMG500 connection cables and adapter ........................................157
5.1 LMG500 current sensor adapter (L50-Z14) ........................................... 157
6 Accessories .....................................................................................159
6.1 Shielded DSUB9 extension cable, male/female (LMG-Z-DVxx) ......... 159
6.2 Sensor supply unit for up to 4 current sensors (SSU4) .......................... 160
6.3 Artificial mid point for multi phase power meters (LMG-AMP)........... 166
6.4 Adaptor for measurement at Schuko devices (LMG-MAS)................... 167
6.5 Adaptor for measurement at IEC connector devices (LMG-MAK1)..... 168
6.6 Adaptor for measurement at 16A/3phase devices (LMG-MAK3)......... 169
6.7 Safety Grip for current and voltage connection (LMG-Z301/302/305) 171
6.8 DSUB25 Adapter for LMG process signal interfaces (L5-IOBOX-S/-F) 172
6.9 Adapter for incremental rotation speed encoders (L45-Z18)................. 173
6.10 Adapter for incremental rotation speed encoders (L50-Z18)............... 177
6.11 Synchronisation adapter with adjustable lowpass filter (L50-Z19) ..... 181
6.12 Ethernet Adapter (L95-Z318, L45-Z318, L50-Z318, LMG-Z318) ...... 183
6.13 USB-RS232 Adapter (LMG-Z316)....................................................... 189
6.14 IEEE488 bus cable (LMG-Z312 /-Z313 /-Z314) .................................. 191
6.15 RS232 interface cable (LMG-Z317) ..................................................... 192
6.16 Safety laboratory leads (LMG-Z307/308)............................................. 193
7 Voltage sensors...............................................................................195
7.1 Precision high voltage divider (HST3/6/9/12) ....................................... 195
8 FAQ - frequently asked questions / Knowledge base ....................203
8.1 The Burden resistor................................................................................. 203
8.2 Example of an error calculation: general derivation .............................. 205
8.3 Example of an error calculation: LMG500 with external shunt............. 209
8.4 Example of an error calculation: LMG500 with HST3.......................... 210
8.5 Phase correction of current transducers with LMG500.......................... 211
8.6 Multiple external sensors in a test bench with LMG450 / LMG500 ..... 213
8.7 Avoid distortion when using external sensors in noisy environment .... 215
8.8 Range extension by changing primary ratio at current sensors.............. 217
ZES ZIMMER
4/218
Sensors and Accessories for precision power meters
8.9 Range extension by external Shunt and direct current input I*/I........... 218
ZES ZIMMER
5/218
Sensors and Accessories for precision power meters
Introduction
1
1.1
Introduction
Safety precautions
The following precautions are recommended to insure your safety and to provide the best
conditions for the instruments.
• The installation of powermeter and current sensors may be accomplished only by trained
technical personnel!
• Read the user manual carefully and respect the safety precautions!
• Do not use these products in medical-related or any other equipment that may have a
potential effect on human lives.
• Always observe the operating conditions and environmental requirements as indicated in
this dokumentation when operating the product.
• Do not exceed the maximum specified voltage or current or use outside its measurement
category.
• Always check the condition of the case and leads before use. Never operate the unit if it has
a damaged cord or plug, if it is not working properly, or if it has been dropped or damaged
or dropped into water.
• Avoid severe impacts or rough handling that could damage the instrument.
Do not place any heavy object on the instrument.
• Keep the instruments away from water and other liquids.
• Use electrostatic discharge precautions while handling and making connections to the
instrument.
• Do not block or obstruct the ventilation openings.
• Use suitable connection cables. Different current sensors have unique connection cables for
each different precision power meter LMG. For example: the connection cable between
PSU200 and LMG500 ‘PSU200-K-L50’ is neither suitable for PSU600 nor for LMG450.
• To avoid the risk of electrical shock, do not disassemble or attempt to repair the unit.
Incorrect repair can cause risk of electrical shock or injury to persons when unit is used.
ZES ZIMMER
6/218
Sensors and Accessories for precision power meters
Introduction
For all repairs please return the devices to your distributor or to ZES ZIMMER Electronic
Systems.
• Do not touch energized circuits.
1.1.1
Terms and symbols
These terms and symbols may appear in this manual or on the product.
Warning, risk of danger! Refer to the operating instructions before using the device.
In these operating instructions, failure to follow or carry out instructions preceded by
this symbol may result in personal injury or damage to the device.
Caution, risk of electric shock
Earth (ground) terminal
Protective conductor terminal
Equipment protected throughout by double insulation or reinforced insulation.
Application around and removal from hazardous live conductors is permitted.
Do not apply around or remove from hazardous live conductors.
This symbol indicates that this product is to be collected separately. This product is
designated for separate collection at an appropriate collection point. Do not dispose of
as household waste. For more information, contact the retailer or the local authorities
in charge of waste management.
1.1.2
Definition of measurement categories
• Measurement category IV corresponds to measurements taken at the source of low voltage
installations.
• Measurement category III corresponds to measurements on building installations.
ZES ZIMMER
7/218
Sensors and Accessories for precision power meters
Introduction
• Measurement category II corresponds to measurements taken on circuits directly connected
to low voltage installations.
• Measurement category I corresponds to measurements taken on circuits not directly
connected to mains.
ZES ZIMMER
8/218
Sensors and Accessories for precision power meters
Introduction
1.2
Selection table - current sensors
Sensor name lower upper
corner corner
freq.
freq.
basic
accuracy
current
range
primary
connection
L
95
L
45
L typical applications
50
Current clamps
LMG-Z327
45Hz
10kHz
1%
100A
clamp on
x
-
x
general purpose
LMG-Z326
40Hz
10kHz
0.8%
200A
clamp on
x
-
x
general purpose
LMG-Z325
40 Hz
5kHz
2%
200A
clamp on
x
-
x
general purpose
LMG-Z322
30Hz
10kHz
0.5%
1000A
clamp on
x
x
x
general purpose
LMG-Z329
45Hz
5kHz
0.5%
3000A
clamp on
x
x
x
general purpose
LMG-Z406/- 5Hz
Z407
50kHz
0.2%
40A
clamp on
x
x
x
frequency inverter output
L45-Z06/Z07
5Hz
50kHz
0.2%
40A
clamp on
x
x
x
frequency inverter output
L45-Z10/Z11
2Hz
40kHz
0.15% 1000A
clamp on
x
x
x
frequency inverter output
L45-Z16/Z17
5Hz
10kHz
0.15% 3000A
clamp on
x
x
x
frequency inverter output
L45-Z26
DC
2kHz
1.6%
1000A
clamp on
x
x
x
the only clamp on solution for
DC applications
Rogowski clamps
L45-Z32Flex500
10Hz
5kHz
1.1%
500A
clamp on
x
x
x
50Hz power quality,
very flexible clamp on
L45-Z32Flex1000
10Hz
5kHz
1.1%
1000A
clamp on
x
x
x
50Hz power quality,
very flexible clamp on
L45-Z32Flex3000
10Hz
5kHz
1.1%
3000A
clamp on
x
x
x
50Hz power quality,
very flexible clamp on
Precision Transformer
LMG-Z502
15Hz
5kHz
0.02% 1500A
feed
through
x
x
x
high current, no DC,
very high precision
LMG-Z505
15Hz
5kHz
0.05% 1500A
feed
through
x
x
x
high current, no DC,
very high precision
LMG-Z510
15Hz
5kHz
0.1%
1500A
feed
through
x
x
x
high current, no DC,
high precision
LMG-Z520
15Hz
5kHz
0.2%
1500A
feed
through
x
x
x
high current, no DC,
high precision
LMG-Z542
15Hz
5kHz
0.02% 4000A
feed
through
x
x
x
high current, no DC,
very high precision
ZES ZIMMER
9/218
Sensors and Accessories for precision power meters
Introduction
Sensor name lower upper
corner corner
freq.
freq.
basic
accuracy
current
range
primary
connection
L
95
L
45
L typical applications
50
LMG-Z545
15Hz
5kHz
0.05% 4000A
feed
through
x
x
x
high current, no DC,
very high precision
LMG-Z550
15Hz
5kHz
0.1%
feed
through
x
x
x
high current, no DC,
high precision
LMG-Z562
15Hz
5kHz
0.02% 10kA
feed
through
x
x
x
high current, no DC,
high precision
LMG-Z570
15Hz
5kHz
0.1%
10kA
feed
through
x
x
x
high current, no DC,
high precision
LMG-Z582
15Hz
5kHz
0.02% 10kA
feed
through
x
x
x
high current, no DC,
high precision, for huge
primary busbars
LMG-Z590
15Hz
5kHz
0.1%
feed
through
x
x
x
high current, no DC,
high precision, for huge
primary busbars
4000A
10kA
Precision current transducer
PSU60
DC
100kHz
0.02% 60A
feed
through
x
x
x
applications with DC current,
frequency inverter DC link,
frequency inverter output,
very high precision
PSU200
DC
100kHz
0.02% 200A
feed
through
x
x
x
applications with DC current,
frequency inverter DC link,
frequency inverter output,
very high precision
PSU200HF
DC
1MHz
0.02% 200A
feed
through
x
-
x
applications with DC current,
frequency inverter DC link,
frequency inverter output,
very high precision
extended bandwidth e.g. for
avionics, automotive
PSU400
DC
100kHz
0.02% 400A
feed
through
x
x
x
applications with DC current,
frequency inverter DC link,
frequency inverter output,
very high precision
PSU600
DC
100kHz
0.02% 600A
feed
through
x
x
x
applications with DC current,
frequency inverter DC link,
frequency inverter output,
very high precision
PSU700
DC
100kHz
0.02% 700A
feed
through
x
x
x
applications with DC current,
frequency inverter DC link,
frequency inverter output,
very high precision
ZES ZIMMER
10/218
Sensors and Accessories for precision power meters
Introduction
Sensor name lower upper
corner corner
freq.
freq.
basic
accuracy
current
range
primary
connection
L
95
L
45
L typical applications
50
PSU1000HF DC
500kHz
0.02% 1000A
feed
through
x
x
x
applications with DC current,
frequency inverter DC link,
frequency inverter output,
very high precision
extended bandwidth e.g. for
avionics, automotive
PSU2000
DC
100kHz
0.02% select
10002000A
feed
through
x
x
x
applications with DC current,
frequency inverter DC link,
frequency inverter output,
very high precision
SAT2000
DC
50kHz
0.02% select
1252000A
feed
through
x
x
x
applications with DC current,
frequency inverter DC link,
frequency inverter output,
high precision
SAT2000hf
DC
300kHz
0.02% 2000A
feed
through
x
x
x
applications with DC current,
frequency inverter DC link,
frequency inverter output,
high precision
SAT5000
DC
50kHz
0.02% select
25005000A
feed
through
x
x
x
applications with DC current,
frequency inverter DC link,
frequency inverter output,
high precision
Current transducer Hall
L45-Z28Hall50
DC
200kHz
0.9%
50A
feed
through
x
x
x
frequency inverter output,
frequency inverter DC link,
low cost
L45-Z28Hall100
DC
200kHz
0.7%
100A
feed
through
x
x
x
frequency inverter output,
frequency inverter DC link,
low cost
L45-Z28Hall200
DC
100kHz
0.65% 200A
feed
through
x
x
x
frequency inverter output,
frequency inverter DC link,
low cost
L45-Z29Hall300
DC
100kHz
0.4%
300A
feed
through
x
x
-
frequency inverter output,
frequency inverter DC link,
low cost
L45-Z29Hall500
DC
100kHz
0.8%
500A
feed
through
x
x
-
frequency inverter output,
frequency inverter DC link,
low cost
L45-Z29Hall1000
DC
150kHz
0.4%
1000A
feed
through
x
x
-
frequency inverter output,
frequency inverter DC link,
low cost
L45-Z29Hall2000
DC
100kHz
0.3%
2000A
feed
through
x
x
-
frequency inverter output,
frequency inverter DC link,
low cost
ZES ZIMMER
11/218
Sensors and Accessories for precision power meters
Introduction
Sensor name lower upper
corner corner
freq.
freq.
basic
accuracy
current
range
primary
connection
L
95
L
45
L typical applications
50
L50-Z29Hall300
DC
100kHz
0.4%
300A
feed
through
-
-
x
frequency inverter output,
frequency inverter DC link,
low cost
L50-Z29Hall500
DC
100kHz
0.8%
500A
feed
through
-
-
x
frequency inverter output,
frequency inverter DC link,
low cost
L50-Z29Hall1000
DC
150kHz
0.4%
1000A
feed
through
-
-
x
frequency inverter output,
frequency inverter DC link,
low cost
L50-Z29Hall2000
DC
100kHz
0.3%
2000A
feed
through
-
-
x
frequency inverter output,
frequency inverter DC link,
low cost
15A
terminal
x
-
x
summing current transducer,
lighting applications,
ultrasonic
High frequency sensors
L95-Z06
L95-Z06HV
5kHz
500kHz
0.5%
LMG-Z601
30Hz
1MHz
0.25% 100A
feed
through
x
(x)
x
very high frequency
applications, avionics,
ultrasonic
External shunt, low current
LMGSHxx
DC
100kHz
0.15% select
uA-1A
terminal
x
no!
x
very low current
LMGSHxx-P
DC
10kHz
0.15% select
0.3% uA-0.5A
terminal
x
no!
x
50Hz standby current,
overload protection 20A for 1
minute
primary
connection
L
95
L
45
L typical applications
50
1.3
Selection table - voltage sensors
Sensor name lower upper
corner corner
freq.
freq.
basic
accuracy
voltage
range
High voltage divider HST
HST3
DC
300kHz
0.05% 3kV
volt. lead
x
x
x
general purpose
HST6
DC
300kHz
0.05% 6kV
volt. lead
x
x
x
general purpose
HST9
DC
300kHz
0.05% 9kV
volt. lead
x
x
x
general purpose
HST12
DC
300kHz
0.05% 12kV
volt. lead
x
x
x
general purpose
ZES ZIMMER
12/218
Sensors and Accessories for precision power meters
Introduction
1.4
Advantages and disadvantages of different current sensor types
This section should give you a help to choose the best sensor for your application. First of all
you should know that the exactest measurement you can do is to use the direct inputs of the
meter. The errors of the phase shift and the delay of the channels are optimised for a precise
power measurement. If you must use an external sensor you should know the following points
about the different kinds of the sensors:
DC current clamps:
• easy to use, the sensor can be clamped on the circuit to be measured without interrupting
the circuit
• small bandwidth, low accuracy
AC current clamps:
• easy to use, the sensor can be clamped on the circuit to be measured without interrupting
the circuit
• small bandwidth, medium accuracy, no DC measurement
Rogowski flex sensors:
• easy to use, especially if few space is available, the sensor can be clamped on the circuit to
be measured without interrupting the circuit
• medium bandwidth, low accuracy, no DC measurement
Error compensated AC current clamps:
• easy to use, the sensor can be clamped on the circuit to be measured without interrupting
the circuit
• medium bandwidth, high accuracy, no DC measurement
Precision current transformers Z5xx:
• very high accuracy
• the circuit to be measured has to be opened and then connected to the transformer
• small bandwidth, no DC measurement
Current transducer Hall:
ZES ZIMMER
13/218
Sensors and Accessories for precision power meters
Introduction
• low cost
• medium to high bandwidth, medium accuracy, low DC measurement accuracy
• the circuit to be measured has to be opened to mount the Hall sensor
Current transducer PSU:
• very high DC accuracy, excellent linearity
• very high accuracy at 50/60 Hz
• high small signal bandwidth, medium bandwidth at full scale level
• the circuit to be measured has to be opened to mount the PSU sensor
Current transducer SAT:
• very high DC accuracy, excellent linearity
• medium accuracy at 50/60 Hz
• high small signal bandwidth, medium bandwidth at full scale level
• the circuit to be measured has to be opened to mount the PSU sensor
External shunts:
• very exact measurement on high frequencies, small phase error
• no galvanic isolation
• especially at high currents significant power losses and errors due to self-heating
• very small burden voltage at high voltage potential may cause differential input errors
Precision wideband current transformer WCT:
• best bandwidth, excellent power accuracy because of low phase error
• galvanic separation, user defined isolation with isolated primary measuring line
• good reliability with passive design, no power supply needed
• no DC measurement
ZES ZIMMER
14/218
Sensors and Accessories for precision power meters
Introduction
1.5
Support request
If you need help finding the best suitable current sensors for your application, please don’t
hesitate to contact ZES, the engineers will help you. Please fill out this fax form (two pages!)
and send it to +49 6171 52086 or describe the following points in an email send to
[email protected].
name
company
street
city, country
phone, fax
email
-------------------------------------------------------------------------------------------------------------------------------------------------------------------------------------------------------------------------------------------------------------------------------------------------------------------------------------------------------------------------------------------------------
project name
------------------------------------------------------------------
1
current range:
1.1
1.2
lowest current to measure (Irms)?
maximum current to measure (Irms, Ipeak)?
2
overload:
(not to be measured, only withstand)
2.1
2.2
peak current and duration?
or
rms current, frequency and duration?
3
frequency range, bandwidth:
3.1
3.2
3.3
lowest frequency to measure? DC?
maximum frequency to measure?
you know about the wave shape (dc, sin,
square, pulse)?
di/dt to be followed exactly (A/us)?
ripple (Apeak-peak), ripple frequency?
optionally: please provide a graphic sketch of
your signal
3.4
3.5
3.6
4
which accuracy at which current value and
frequency is aspired?
ZES ZIMMER
15/218
Sensors and Accessories for precision power meters
Introduction
5
which type of connection is applicable:
5.1
5.2
5.3
clamp on, feed through or terminal?
min. L__mm x W__mm or diameter __mm?
any other mechanical requirements?
6
are there restrictions on the inserted
impedance in the current path?
7
at which working voltage does the current
sensor operate:
7.1
7.4
working voltage against earth
(Utrms, Upeak, CAT__, frequency)?
nominal voltage between phases?
current measurement at low voltage return or
at high voltage potential?
du/dt applied on primary?
8
which type of application will be measured?
9
you know the approximatly power factor?
10
combined with which type of power meter:
7.2
7.3
10.1 LMG90/310/95/450/500?
10.2 other instrument?
11
environmental conditions:
11.1 temperature range?
11.2 pollution degree?
12
additional requirements? comments?
ZES ZIMMER
16/218
Sensors and Accessories for precision power meters
Current sensors
2
2.1
Current sensors
Active error compensated AC - current clamp 40A (LMG-Z406/-Z407)
Figure 1: LMG-Z406/-Z407
Figure 2: Dimensions of the LMG-Z406/-Z407
2.1.1
Safety warning!
No safety isolation, measurements only at insulated conductors allowed!
Always connect the sensor first to the meter, and afterwards to the device under test.
Connecting cable without savety isolation! Avoid contact to hazardous voltage!
Please refer to chapter 1.1: ‘Safety precautions’!
2.1.2
Specifications
Nominal input current
40A
Max. trms value
80A
Measuring range current clamp
120Apk
Maximum input, overload capability
500A for 1s
Bandwidth
5Hz to 50kHz
Isolation
bare conductor:
phase/ground 30Veff
insulated conductor: see cable spec.
ZES ZIMMER
17/218
Sensors and Accessories for precision power meters
Current sensors
Degree of pollution
2
Temperature range
-10°C to +50°C
Weight
120g
Output connection
HD15 (with EEPROM) for LMG sensor input
With its high basic accuracy, the lower cut-off frequency of 5Hz and the upper cut-off
frequency of 50kHz this clamp fits best for measurements at frequency inverter output. The
internal error compensation circuit is designed especial for this application.
2.1.3
Accuracy
Accuracies based on: sinusoidal current, ambient temperature 23±3°C, calibration interval 1
year, conductor in the middle of the clamp. The values are in ±(% of measuring value + % of
measuring range current clamp) and in ±(phase error in degree)
Influence of coupling mode: This current clamp can transfer only AC currents. The
compensation circuit may cause a DC signal wich is interpreted by the instrument as a DC
current. This could cause additional errors. Therefore this clamp should only be used with the
LMG setting: AC coupling. The accuracies are only valid for this case.
Frequency
Current
Phase
5Hz to 10Hz to 45Hz to 65Hz to 1kHz to
10Hz
45Hz
65Hz
1kHz
5kHz
1.5+0.25 0.4+0.15 0.15+0.05 0.15+0.05 0.3+0.15
6
3
0.5
0.5
2
5kHz to
20kHz
1+0.25
6
20kHz to
50kHz
4+0.5
20
Use LMG-Z406/-Z407 and LMG specifications to calculate the accuracy of the complete
system.
2.1.4
Ordering guide
The current clamp LMG-Z406 is available in a package with 4 clamps, it is called LMG-Z407.
The standard connection length is 3m. Optionally can be ordered a custom defined length
between 1m .. 10m.
2.1.5
Sensor operation without supply
It is important to assure a stable power supply of the sensor before switching on the load
current! The operation of the sensor with load current and without supply will cause
damage of the sensor and/or of the LMG.
ZES ZIMMER
18/218
Sensors and Accessories for precision power meters
Current sensors
2.1.6
Connection of the sensor with LMG90/310
The use with LMG90 and LMG310 is not possible.
2.1.7
Connection of the sensor with LMG95
Use L95-Z07, internal supply via LMG and the Isensor/external shunt input. Set LMG current
scaling factor appropriate to the scaling factor marked on the label on L95-Z07.
2.1.8
Connection of the sensor with LMG450
Use the sensor input, you get the following ranges:
nominal value
max. trms value
max. peak value
2.1.9
1.25A
2.5A
3.75A
2.5A
5A
7.5A
5A
10A
15A
10A
20A
30A
20A
40A
60A
40A
80A
120A
Connection of the sensor with LMG500
Use L50-Z14, you get the following ranges:
nominal value
max. trms value
max. peak value
ZES ZIMMER
0.3A
0.6A
0.94A
0.6A
1.25A
1.88A
1.25A
2.5A
3.75A
2.5A
5A
7.5A
19/218
5A
10A
15A
10A
20A
30A
20A
40A
60A
40A
80A
120A
Sensors and Accessories for precision power meters
Current sensors
2.2
Active error compensated AC - current clamp 40A (L45-Z06/-Z07)
Figure 3: Dimensions of the L45-Z06
2.2.1
Safety warning!
Always connect the sensor first to the meter, and afterwards to the device under test.
Connecting cable without savety isolation! Avoid contact to hazardous voltage!
Please refer to chapter 1.1: ‘Safety precautions’!
2.2.2
Specifications
Nominal input current
40A
Max. trms value
80A
Measuring range current clamp
120Apk
Maximum input, overload capability
500A for 1s
Bandwidth
5Hz to 50kHz
Protection class
300V / CAT III
Degree of pollution
2
Temperature range
-10°C to +50°C
Weight
120g
Output connection
HD15 (with EEPROM) for LMG sensor input
2.2.3
Accuracy
Accuracies based on: sinusoidal current, ambient temperature 23±3°C, calibration interval 1
year, conductor in the middle of the clamp. The values are in ±(% of measuring value + % of
measuring range current clamp) and in ±(phase error in degree)
Influence of coupling mode: This current clamp can transfer only AC currents. The
compensation circuit may cause a DC signal wich is interpreted by the instrument as a DC
current. This could cause additional errors. Therefore this clamp should only be used with the
LMG setting: AC coupling. The accuracies are only valid for this case.
ZES ZIMMER
20/218
Sensors and Accessories for precision power meters
Current sensors
Frequency
Current
Phase
5Hz to 10Hz to 45Hz to 65Hz to 1kHz to
10Hz
45Hz
65Hz
1kHz
5kHz
1.5+0.25 0.4+0.15 0.15+0.05 0.15+0.05 0.3+0.15
6
3
0.5
0.5
2
5kHz to
20kHz
1+0.25
6
20kHz to
50kHz
4+0.5
20
Use L45-Z06 and LMG specifications to calculate the accuracy of the complete system.
Earthing jack:
The earthing jack of this clamp can be used to connect the core of the clamp with earth
potential. By this you can reduce the errors caused by capacitive coupling of the very steep
voltage signal for example at the output of frequency converters very much. In all other
applications it is not necessary to connect this jack.
2.2.4
Sensor operation without supply
It is important to assure a stable power supply of the sensor before switching on the load
current! The operation of the sensor with load current and without supply will cause
damage of the sensor and/or of the LMG.
2.2.5
Connection of the sensor with LMG90/310
The use with LMG90 and LMG310 is not possible.
2.2.6
Connection of the sensor with LMG95
Use L95-Z07, internal supply via LMG and the Isensor/external shunt input. Set LMG current
scaling factor appropriate to the scaling factor marked on the label on L95-Z07.
2.2.7
Connection of the sensor with LMG450
Use the sensor input, you get the following ranges:
nominal value
max. trms value
max. peak value
2.2.8
1.25A
2.5A
3.75A
2.5A
5A
7.5A
5A
10A
15A
10A
20A
30A
20A
40A
60A
40A
80A
120A
Connection of the sensor with LMG500
Use L50-Z14, you get the following ranges:
nominal value
max. trms value
max. peak value
ZES ZIMMER
0.3A
0.6A
0.94A
0.6A
1.25A
1.88A
1.25A
2.5A
3.75A
2.5A
5A
7.5A
21/218
5A
10A
15A
10A
20A
30A
20A
40A
60A
40A
80A
120A
Sensors and Accessories for precision power meters
Current sensors
2.3
AC - current clamp 100A/0.1A (LMG-Z327)
Figure 4: Dimensions of the LMG-Z327
2.3.1
Safety warning!
Always connect the sensor first to the meter, and afterwards to the device under test.
Please refer to chapter 1.1: ‘Safety precautions’!
2.3.2
Specifications
Nominal input current
100A
Transformation ratio
1000:1
Measuring range
100A
Maximum input
120A for 5min
Bandwidth
45Hz to 10kHz
Burden
<0.1VA
Isolation
bare conductor:
phase/ground 30Veff
insulated conductor: see cable spec.
Degree of pollution
2
Temperature range
-10°C to +50°C
Weight
110g
Output connection
2 laboratory sockets 4mm
2.3.3
Accuracy
Accuracies based on: sinusoidal current, ambient temperature 23±3°C, calibration interval 1
year, conductor in the middle of the clamp, signal frequency 50..60 Hz
Current
Amplitude error ±(% of measuring value)
Phase error
1A to 10A
10A to 100A
2
1
3.5°
2.5°
Use LMG-Z327 and LMG specifications to calculate the accuracy of the complete system.
ZES ZIMMER
22/218
Sensors and Accessories for precision power meters
Current sensors
2.3.4
Sensor operation without connection to LMG
It is important to assure a good connection from the sensor to the LMG before switching on
the load current! The operation of the sensor with load current and without connection to
the LMG will cause damage of the sensor and is dangerous for the user!
2.3.5
Connection of the sensor with LMG90/310 or other instruments with
current input
Use direct current inputs I* and I.
2.3.6
Connection of the sensor with LMG95
Use direct current inputs I* and I.
2.3.7
Connection of the sensor with LMG450
Use direct current inputs I* and I.
Alternative use L45-Z06/07 because of improved dynamic range with more ranges and better
bandwidth.
2.3.8
Connection of the sensor with LMG500
Use direct current inputs I* and I.
Alternative use L45-Z06/07 because of improved dynamic range with more ranges and better
bandwidth.
ZES ZIMMER
23/218
Sensors and Accessories for precision power meters
Current sensors
2.4
AC - current clamp 200A/0.2A (LMG-Z326)
Figure 5: LMG-Z326
Figure 6: Dimensions of the LMG-Z326
2.4.1
Safety warning!
No safety isolation, measurements only at insulated conductors allowed!
Always connect the sensor first to the meter, and afterwards to the device under test.
Please refer to chapter 1.1: ‘Safety precautions’!
2.4.2
Specifications
Nominal input current
200A
Transformation ratio
1000:1
Measuring range
600A
Maximum input
600A for 30s / 400A for 3min
Bandwidth
40Hz to 10kHz
Burden
<0.4VA
Isolation
bare conductor:
ZES ZIMMER
24/218
phase/ground 30Veff
Sensors and Accessories for precision power meters
Current sensors
insulated conductor: see cable spec.
Degree of pollution
2
Temperature range
-10°C to +50°C
Weight
105g
Output connection
2 safety sockets for 4mm plugs
2.4.3
Accuracy
Accuracies based on: sinusoidal current, ambient temperature 23±3°C, calibration interval 1
year, conductor in the middle of the clamp, signal frequency 50..60 Hz.
Current
Amplitude error ±(% of measuring value)
Phase error
1A to 10A
10A to 100A
100A to 400A
400A to 600A
2
1
0.8
1
2.5°
1.5°
0.5°
1°
Use LMG-Z326 and LMG specifications to calculate the accuracy of the complete system.
2.4.4
Sensor operation without connection to LMG
It is important to assure a good connection from the sensor to the LMG before switching on
the load current! The operation of the sensor with load current and without connection to
the LMG will cause damage of the sensor and is dangerous for the user!
2.4.5
Connection of the sensor with LMG90/310 or other instruments with
current input
Use direct current inputs I* and I.
2.4.6
Connection of the sensor with LMG95
Use direct current inputs I* and I.
2.4.7
Connection of the sensor with LMG450
Use direct current inputs I* and I.
2.4.8
Connection of the sensor with LMG500
Use direct current inputs I* and I.
ZES ZIMMER
25/218
Sensors and Accessories for precision power meters
Current sensors
2.5
AC - current clamp 200A/1A (LMG-Z325)
Figure 7: LMG-Z325
Figure 8: Dimensions of the LMG-Z325
2.5.1
Safety warning!
No safety isolation, measurements only at insulated conductors allowed!
Always connect the sensor first to the meter, and afterwards to the device under test.
Please refer to chapter 1.1: ‘Safety precautions’!
2.5.2
Specifications
Nominal input current
200A
Transformation ratio
200:1
Measuring range
300A
Maximum input
400A for 3min
Bandwidth
40Hz to 5kHz
ZES ZIMMER
26/218
Sensors and Accessories for precision power meters
Current sensors
Burden
0.1 to 0.7 ohms
Isolation
bare conductor:
phase/ground 30Veff
insulated conductor: see cable spec.
Degree of pollution
2
Temperature range
-10°C to +50°C
Weight
115g
Output connection
safety sockets for 4mm plugs
2.5.3
Accuracy
Accuracies based on: sinusoidal current, ambient temperature 23±3°C, conductor in the
middle of the clamp, signal frequency 50..60 Hz.
Current
Amplitude error ±(% of measuring value)
Phase error
20A to 240A
2
2.5°
Use LMG-Z325 and LMG specifications to calculate the accuracy of the complete system.
2.5.4
Sensor operation without connection to LMG
It is important to assure a good connection from the sensor to the LMG before switching on
the load current! The operation of the sensor with load current and without connection to
the LMG will cause damage of the sensor and is dangerous for the user!
2.5.5
Connection of the sensor with LMG90/310 or other instruments with
current input
Use direct current inputs I* and I.
2.5.6
Connection of the sensor with LMG95
Use direct current inputs I* and I.
2.5.7
Connection of the sensor with LMG450
Use direct current inputs I* and I.
2.5.8
Connection of the sensor with LMG500
Use direct current inputs I* and I.
ZES ZIMMER
27/218
Sensors and Accessories for precision power meters
Current sensors
2.6
AC - current clamp 1000A/1A (LMG-Z322)
Figure 9: LMG-Z322
Figure 10: Dimensions of the LMG-Z322
2.6.1
Safety warning!
Always connect the sensor first to the meter, and afterwards to the device under test.
Please refer to chapter 1.1: ‘Safety precautions’!
2.6.2
Specifications
Nominal input current
1000A
Transformation ratio
1000:1
Measuring range
1200A
Maximum input
1200A for 30min
Bandwidth
30Hz to 10kHz
Burden
<2.5VA
Protection class
600V CAT. III
Degree of pollution
2
Temperature range
-10°C to +50°C
ZES ZIMMER
28/218
Sensors and Accessories for precision power meters
Current sensors
Weight
650g
Output connection
2m fixed lead with safety plugs 4mm
2.6.3
Accuracy
Accuracies based on: sinusoidal current, ambient temperature 23±3°C, calibration interval 1
year, conductor in the middle of the clamp, signal frequency 50..60 Hz.
Current
Amplitude error ±(% of measuring value)
Phase error
10A to 200A
200A to 1000A
1000A to 1200A
1.5%
0.75%
0.5%
2°
0.75°
0.5°
Use LMG-Z322 and LMG specifications to calculate the accuracy of the complete system.
2.6.4
Sensor operation without connection to LMG
It is important to assure a good connection from the sensor to the LMG before switching on
the load current! The operation of the sensor with load current and without connection to
the LMG will cause damage of the sensor and is dangerous for the user!
2.6.5
Connection of the sensor with LMG90/310 or other instruments with
current input
Use direct current inputs I* and I.
2.6.6
Connection of the sensor with LMG95
Use direct current inputs I* and I.
2.6.7
Connection of the sensor with LMG450
Use direct current inputs I* and I.
Alternative use L45-Z10/11 because of improved dynamic range with more ranges and better
bandwidth.
2.6.8
Connection of the sensor with LMG500
Use direct current inputs I* and I.
Alternative use L45-Z10/11 because of improved dynamic range with more ranges and better
bandwidth.
ZES ZIMMER
29/218
Sensors and Accessories for precision power meters
Current sensors
2.7
Error compensated AC - current clamp 1000A (L45-Z10/-Z11)
Figure 11: L45-Z10/-Z11
Figure 12: Dimensions of the L45-Z10/-Z11
2.7.1
Safety warning!
Always connect the sensor first to the meter, and afterwards to the device under test.
Connecting cable without savety isolation! Avoid contact to hazardous voltage!
Please refer to chapter 1.1: ‘Safety precautions’!
2.7.2
Specifications
Nominal input current
1000A
Max. trms value
1200A
Measuring range current clamp
3000Apk
Maximum input
1200A for 30min
Bandwidth
2Hz to 40kHz
Protection class
600V CAT. III
Degree of pollution
2
Temperature range
-10°C to +50°C
Weight
650g
Output connection
HD15 (with EEPROM) for LMG sensor input
ZES ZIMMER
30/218
Sensors and Accessories for precision power meters
Current sensors
2.7.3
Accuracy
Accuracies based on: sinusoidal current, ambient temperature 23±3°C, calibration interval 1
year, conductor in the middle of the clamp.
The values are in ±(% of measuring value + % of measuring range current clamp)
and in ±( phase error in degree)
Frequency 2Hz to 10Hz to 45Hz to 65Hz to 1kHz to 5kHz to 10kHz to 20kHz to
10Hz
45Hz
65Hz
1kHz
5kHz
10kHz 20kHz
40kHz
Current
0.7+0.2 0.2+0.05 0.1+0.05 0.1+0.05 0.3+0.05 0.4+0.1 0.5+0.2
2+0.4
Phase
5
1
0.3
0.3
1
2
5
30
Use L45-Z10 and LMG specifications to calculate the accuracy of the complete system.
Influence of coupling mode: This current clamp can transfer only AC currents. The
compensation circuit may cause a DC signal wich is interpreted by the instrument as a DC
current. This could cause additional errors. Therefore this clamp should only be used with the
LMG setting: AC coupling. The accuracies are only valid for this case.
2.7.4
Connection of the sensor with LMG90/310
The use with LMG90 and LMG310 is not possible.
2.7.5
Connection of the sensor with LMG95
Use L95-Z07, internal supply via LMG and the Isensor/external shunt input. Set LMG current
scaling factor appropriate to the scaling factor marked on the label on L95-Z07.
2.7.6
Connection of the sensor with LMG450
Use sensor input, you get the following ranges:
nominal value
max. trms value
max. peak value
2.7.7
31.2A
37.5A
93.8A
62.5A
75A
188A
125A
150A
375A
250A
300A
750A
500A
600A
1500A
1000A
1200A
3000A
Connection of the sensor with LMG500
Use L50-Z14, you get the following ranges:
nominal value
max. trms value
max. peak value
ZES ZIMMER
7.5A
9.4A
23.4A
15A
18.8A
46.9A
30A
37.5A
93.8A
62.5A
75A
188A
31/218
125A
150A
375A
250A
300A
750A
500A
600A
1500A
1000A
1200A
3000A
Sensors and Accessories for precision power meters
Current sensors
2.8
DC - current clamp 1000A (L45-Z26)
Figure 13: L45-Z26
Figure 14: Dimensions of the L45-Z26
2.8.1
Safety warning!
Always connect the sensor first to the meter, and afterwards to the device under test.
Connecting cable without savety isolation! Avoid contact to hazardous voltage!
Please refer to chapter 1.1: ‘Safety precautions’!
2.8.2
Specifications
Nominal input current
1000A
Max. trms value
1000A
Measuring range
1500Apk
Maximum input
1500A
Bandwidth
DC to 2kHz
Protection class
600V CAT. III
Degree of pollution
2
ZES ZIMMER
32/218
Sensors and Accessories for precision power meters
Current sensors
Temperature range
-5°C to +50°C
Weight
0.6kg
Output connection
HD15 (with EEPROM) for LMG sensor input
2.8.3
Accuracy
Accuracies based on: sinusoidal current, ambient temperature 23±3°C, calibration interval 1
year, conductor in the middle of the clamp.
The accuracy is valid only with manual zero adjustment at the DC-Clamp prior clamp on!
The values are in ±(% of measuring value+% of nominal input current)
Current
Amplitude error
DC to 2kHz
Phase error
at 45 to 66Hz
Phase error
at 1kHz
10A to 1500A
1.5+0.1
<0.3°
<3°
Use L45-Z26 and LMG specifications to calculate the accuracy of the complete system.
2.8.4
Connection of the sensor with LMG90/310
The use with LMG90 and LMG310 is not possible.
2.8.5
Connection of the sensor with LMG95
Use L95-Z07, internal supply via LMG and the Isensor/external shunt input. Set LMG current
scaling factor appropriate to the scaling factor marked on the label on L95-Z07.
2.8.6
Connection of the sensor with LMG450
Use sensor input, , internal supply via LMG, you get the following ranges:
nominal value
max. trms value
max. peak value
2.8.7
31.3A
31.3A
46.9A
62.5A
62.5A
93.8A
125A
125A
188A
250A
250A
375A
500A
500A
750A
1000A
1000A
1500A
Connection of the sensor with LMG500
Use L50-Z14, internal supply via LMG, you get the following ranges:
nominal value
max. trms value
max. peak value
ZES ZIMMER
7.8A
7.8A
11.7A
15.6A
15.6A
23.4A
31.3A
31.3A
46.9A
62.5A
62.5A
93.8A
33/218
125A
125A
188A
250A
250A
375A
500A
500A
750A
1000A
1000A
1500A
Sensors and Accessories for precision power meters
Current sensors
2.9
AC - current clamp 3000A/1A (LMG-Z329)
Figure 15: LMG-Z329
Figure 16: Dimensions of the LMG-Z329
2.9.1
Safety warning!
Always connect the sensor first to the meter, and afterwards to the device under test.
Please refer to chapter 1.1: ‘Safety precautions’!
2.9.2
Specifications
Nominal input current
3000A
Transformation ratio
3000:1
Measuring range
3600A
Maximum input
6000A for 5min
Bandwidth
45Hz to 5kHz
Burden
<2.5VA
Protection class
600V CAT. III
Degree of pollution
2
ZES ZIMMER
34/218
Sensors and Accessories for precision power meters
Current sensors
Temperature range
-5°C to +50°C
Weight
1.6kg
Output connection
2m fixed lead with safety plugs 4mm
2.9.3
Accuracy
Accuracies based on: sinusoidal current, ambient temperature 23±3°C, calibration interval 1
year, conductor in the middle of the clamp, signal frequency 50..60 Hz.
Current
Amplitude error ±(% of measuring value)
Phase error
30A to 600A
600A to 3000A
3000A to 3600A
1.5
0.75
0.5
2°
0.75°
0.5°
Use LMG-Z329 and LMG specifications to calculate the accuracy of the complete system.
2.9.4
Sensor operation without connection to LMG
It is important to assure a good connection from the sensor to the LMG before switching on
the load current! The operation of the sensor with load current and without connection to
the LMG will cause damage of the sensor and is dangerous for the user!
2.9.5
Connection of the sensor with LMG90/310 or other instruments with
current input
Use direct current inputs I* and I.
2.9.6
Connection of the sensor with LMG95
Use direct current inputs I* and I.
2.9.7
Connection of the sensor with LMG450
Use direct current inputs I* and I.
Alternative use L45-Z16/17 because of improved dynamic range with more ranges and better
bandwidth.
2.9.8
Connection of the sensor with LMG500
Use direct current inputs I* and I.
Alternative use L45-Z16/17 because of improved dynamic range with more ranges and better
bandwidth.
ZES ZIMMER
35/218
Sensors and Accessories for precision power meters
Current sensors
2.10 Error compensated AC - current clamp 3000A (L45-Z16/-Z17)
Figure 17: L45-Z16/-Z17
Figure 18: Dimensions of the L45-Z16/-Z17
2.10.1
Safety warning!
Always connect the sensor first to the meter, and afterwards to the device under test.
Connecting cable without savety isolation! Avoid contact to hazardous voltage!
Please refer to chapter 1.1: ‘Safety precautions’!
2.10.2 Specifications
Nominal input current
3000A
Max. trms value
3600A
Measuring range current clamp
9000Apk
ZES ZIMMER
36/218
Sensors and Accessories for precision power meters
Current sensors
Maximum input
6000A for 5min
Bandwidth
5Hz to 10kHz
Protection class
600V CAT. III
Degree of pollution
2
Temperature range
-5°C to +50°C
Weight
1,6kg
Output connection
HD15 (with EEPROM) for LMG sensor input
2.10.3 Accuracy
Accuracies based on: sinusoidal current, ambient temperature 23±3°C, calibration interval 1
year, conductor in the middle of the clamp. The values are in ±(% of measuring value + % of
measuring range current clamp) and in ±( phase error in degree)
Frequency/Hz
Current
Phase
2Hz to 10Hz to 45Hz to
10Hz
45Hz
65Hz
0.7+0.2 0.2+0.05 0.1+0.05
5
1
0.3
65Hz to
1kHz
0.2+0.05
0.5
1kHz to 2.5kHz
2.5kHz to 5kHz
0.4+0.1
1+0.3
2
10
5kHz to
10kHz
2+0.4
30
Use L45-Z16 and LMG specifications to calculate the accuracy of the complete system.
Influence of coupling mode: This current clamp can transfer only AC currents. The
compensation circuit may cause a DC signal wich is interpreted by the instrument as a DC
current. This could cause additional errors. Therefore this clamp should only be used with the
LMG setting: AC coupling. The accuracies are only valid for this case.
2.10.4 Connection of the sensor with LMG90/310
The use with LMG90 and LMG310 is not possible.
2.10.5 Connection of the sensor with LMG95
Use L95-Z07, internal supply via LMG and the Isensor/external shunt input. Set LMG current
scaling factor appropriate to the scaling factor marked on the label on L95-Z07.
2.10.6 Connection of the sensor with LMG450
Use sensor input, you get the following ranges:
nominal value
max. trms value
max. peak value
ZES ZIMMER
100A
113A
281A
200A
225A
563A
400A
450A
1125A
800A
900A
2250A
37/218
1600A
1800A
4500A
3200A
3600A
9000A
Sensors and Accessories for precision power meters
Current sensors
2.10.7 Connection of the sensor with LMG500
Use L50-Z14, you get the following ranges:
nominal value
max. trms value
max. peak value
ZES ZIMMER
25A
28A
70A
50A
56A
141A
100A
113A
281A
200A
225A
563A
38/218
400A
450A
1125A
800A
900A
2250A
1600A
1800A
4500A
3200A
3600A
9000A
Sensors and Accessories for precision power meters
Current sensors
2.11 Precision current transformer 1500A (LMG-Z502,-Z505,-Z510,-Z520)
Figure 19: LMG-Z502, -Z505, -Z510, -Z520
Figure 20: Dimensions of LMG-Z502, -Z505, -Z510, -Z520
Figure 21: LMG-Z502, -Z505, -Z510, -Z520 suitable bus bars
ZES ZIMMER
39/218
Sensors and Accessories for precision power meters
Current sensors
Figure 22: LMG-Z502, -Z505, -Z510, -Z520 connection diagram
2.11.1
Safety warning!
Always connect the sensor first to the meter, and afterwards to the device under test.
If no burden is connected, secondary terminals have to be short-circuited!
Please refer to chapter 1.1: ‘Safety precautions’!
2.11.2 Specifications
Measuring range
Secondary current
Transformation ratio
Maximum input, overload
Rated short time thermal current for 1s
Bandwidth
Nominal burden
Protection class
Degree of pollution
Temperature range
Weight
Bus bar
Output connection
ZES ZIMMER
1500Aeff continuous
2Aeff
750:1
1650Aeff for 5min.
40kA
15Hz to 5kHz
2.5VA
600V CAT. III / 1000V CAT. II
2
-20°C to +50°C
2.1kg
1x
60mm x 10mm or
2x
50mm x 10mm or
1x
40mm x 34mm or
round, diameter 51mm
primary fixing device M4x40,
slotted headless screw, max. 2Nm
screw terminals M5,
Philips recessed head screw,
max. 4mm^2(flexible) / 6mm^2(solid),
tightening torque 3.5Nm
40/218
Sensors and Accessories for precision power meters
Current sensors
2.11.3 Accuracy
Accuracies based on: sinusoidal current, ambient temperature 23±3°C, calibration interval 1
year, conductor in the middle of the transformer.
Amplitude error ±(% of measuring value) / Phase error (at 48 to 66Hz)
Current
Z502
Z505
Z510
Z520
7.5A to 37.5A
≤0.05 / ≤0.1°
≤0.1 / ≤0.1°
≤0.3 / ≤0.15°
≤0.5 / ≤0.3°
37.5A to 150A
≤0.03 / ≤0.07°
≤0.07 / ≤0.07°
≤0.15 / ≤0.1°
≤0.3 / ≤0.2°
150A to 375A
≤0.02 / ≤0.05°
≤0.05 / ≤0.05°
≤0.1 / ≤0.08°
≤0.2 / ≤0.16°
375A to 900A
≤0.02 / ≤0.04°
≤0.05 / ≤0.04°
≤0.1 / ≤0.06°
≤0.2 / ≤0.12°
900A to 1500A
≤0.02 / ≤0.05°
≤0.05 / ≤0.05°
≤0.1 / ≤0.08°
≤0.2 / ≤0.16°
at 30Hz to 48Hz and 66Hz to 440Hz twofold errors,
at 15Hz to 30Hz and 440Hz to 5kHz threefold errors.
Use LMG-Z502,-05,-10,-20 and LMG specifications to calculate the accuracy of the complete
system.
2.11.4 Sensor operation without connection to LMG
It is important to assure a good connection from the sensor to the LMG before switching on
the load current! The operation of the sensor with load current and without connection to
the LMG will cause damage of the sensor and is dangerous for the user!
2.11.5 Connection of the sensor with LMG90/310 or other instruments with
current input
Use direct current inputs I* and I.
2.11.6 Connection of the sensor with LMG95
Use direct current inputs I* and I.
2.11.7 Connection of the sensor with LMG450
Use direct current inputs I* and I.
Or use L45-Z22 and sensor input for better dynamic range, but small additional error term.
2.11.8 Connection of the sensor with LMG500
Use direct current inputs I* and I.
ZES ZIMMER
41/218
Sensors and Accessories for precision power meters
Current sensors
2.12 Precision current transformer 4000A (LMG-Z542,-Z545,-Z550)
Figure 23: Dimensions of LMG-Z542,-Z545,-Z550
Figure 24: LMG-Z542,-Z545,-Z550 suitable bus bars
ZES ZIMMER
42/218
Sensors and Accessories for precision power meters
Current sensors
Figure 25: LMG-Z542, -Z545, -Z550 connection diagram
2.12.1
Safety warning!
Always connect the sensor first to the meter, and afterwards to the device under test.
If no burden is connected, secondary terminals have to be short-circuited!
Please refer to chapter 1.1: ‘Safety precautions’!
2.12.2 Specifications
Measuring range
Secondary current
Transformation ratio
Maximum input, overload
Rated short time thermal current for 1s
Bandwidth
Nominal burden
Protection class
Degree of pollution
Temperature range
Weight
Bus bar
Output connection
ZES ZIMMER
4000Aeff continuous
2Aeff
2000:1
4400Aeff for 5min.
100kA
15Hz to 5kHz
2.5VA
600V CAT. III / 1000V CAT. II
2
-20°C to +50°C
3.1kg
2x
100mm x 10mm or
3x
80mm x 10mm or
round, diameter 83mm
screw terminals M5,
Philips recessed head screw,
max. 4mm^2(flexible) / 6mm^2(solid),
tightening torque 3.5Nm
43/218
Sensors and Accessories for precision power meters
Current sensors
2.12.3 Accuracy
Accuracies based on: sinusoidal current, ambient temperature 23±3°C, calibration interval 1
year, conductor in the middle of the transformer.
Amplitude error ±(% of measuring value) / Phase error (at 48 to 66Hz)
Current
Z542
Z545
Z550
20A to 100A
≤0.1 / ≤0.1°
≤0.15 / ≤0.1°
≤0.3 / ≤0.15°
100A to 400A
≤0.04 / ≤0.07°
≤0.08 / ≤0.07°
≤0.15 / ≤0.1°
400A to 1000A
≤0.02 / ≤0.05°
≤0.05 / ≤0.05°
≤0.1 / ≤0.08°
1000A to 2400A
≤0.02 / ≤0.04°
≤0.05 / ≤0.04°
≤0.1 / ≤0.06°
2400A to 4000A
≤0.02 / ≤0.05°
≤0.05 / ≤0.05°
≤0.1 / ≤0.08°
at 30Hz to 48Hz and 66Hz to 440Hz twofold errors,
at 15Hz to 30Hz and 440Hz to 5kHz threefold errors
Use LMG-Z542,-Z545,-Z550 and LMG specifications to calculate the accuracy of the
complete system.
2.12.4 Sensor operation without connection to LMG
It is important to assure a good connection from the sensor to the LMG before switching on
the load current! The operation of the sensor with load current and without connection to
the LMG will cause damage of the sensor and is dangerous for the user!
2.12.5 Connection of the sensor with LMG90/310 or other instruments with
current input
Use direct current inputs I* and I.
2.12.6 Connection of the sensor with LMG95
Use direct current inputs I* and I.
2.12.7 Connection of the sensor with LMG450
Use direct current inputs I* and I.
Or use L45-Z22 and sensor input for better dynamic range, but small additional error term.
2.12.8 Connection of the sensor with LMG500
Use direct current inputs I* and I.
ZES ZIMMER
44/218
Sensors and Accessories for precision power meters
Current sensors
2.13 Precision current transformer 10kA (LMG-Z562, -Z570)
Figure 26: LMG-Z562,-Z570
Figure 27: Dimensions of LMG-Z562,-Z570
Figure 28: LMG-Z562,-Z570 suitable bus bars
ZES ZIMMER
45/218
Sensors and Accessories for precision power meters
Current sensors
Figure 29: LMG-Z562, -Z570 connection diagram
2.13.1
Safety warning!
Always connect the sensor first to the meter, and afterwards to the device under test.
If no burden is connected, secondary terminals have to be short-circuited!
Please refer to chapter 1.1: ‘Safety precautions’!
2.13.2 Specifications
Measuring range
Secondary current
Transformation ratio
Maximum input, overload
Rated short time thermal current for 1s
Bandwidth
Nominal burden
Protection class
Degree of pollution
Temperature range
Weight
Bus bar
Output connection
10kAeff continuous
2Aeff
5000:1
11kAeff for 5min.
100kA
15Hz to 5kHz
2.5VA
600V CAT. III / 1000V CAT. II
2
-20°C to +50°C
19kg
3x
160mm x 10mm
primary fixing device M5,
slotted headless screw, max. 2.5Nm
screw terminals M5,
Philips recessed head screw,
max. 4mm^2(flexible) / 6mm^2(solid),
tightening torque 3.5Nm
2.13.3 Accuracy
Accuracies based on: sinusoidal current, ambient temperature 23±3°C, calibration interval 1
year, conductor in the middle of the transformer.
ZES ZIMMER
46/218
Sensors and Accessories for precision power meters
Current sensors
Amplitude error ±(% of measuring value) / Phase error (at 48 to 66Hz)
Current
Z562
Z570
50A to 250A
≤0.05 / ≤0.1°
≤0.3 / ≤0.15°
250A to 1000A
≤0.03 / ≤0.07°
≤0.15 / ≤0.1°
1000A to 2500A
≤0.02 / ≤0.05°
≤0.1 / ≤0.08°
2500A to 6000A
≤0.02 / ≤0.04°
≤0.1 / ≤0.06°
6000A to 10kA
≤0.02 / ≤0.05°
≤0.1 / ≤0.08°
at 30Hz to 48Hz and 66Hz to 440Hz twofold errors,
at 15Hz to 30Hz and 440Hz to 5kHz threefold errors
Use LMG-Z562,-Z570 and LMG specifications to calculate the accuracy of the complete
system.
2.13.4 Sensor operation without connection to LMG
It is important to assure a good connection from the sensor to the LMG before switching on
the load current! The operation of the sensor with load current and without connection to
the LMG will cause damage of the sensor and is dangerous for the user!
2.13.5 Connection of the sensor with LMG90/310 or other instruments with
current input
Use direct current inputs I* and I.
2.13.6 Connection of the sensor with LMG95
Use direct current inputs I* and I.
2.13.7 Connection of the sensor with LMG450
Use direct current inputs I* and I.
Or use L45-Z22 and sensor input for better dynamic range, but small additional error term.
2.13.8 Connection of the sensor with LMG500
Use direct current inputs I* and I.
ZES ZIMMER
47/218
Sensors and Accessories for precision power meters
Current sensors
2.14 Precision current transformer 10kA (LMG-Z582, -Z590)
Figure 30: LMG-Z582,-Z590 (picture similar)
Figure 31: Dimensions of LMG-Z582,-Z590
Figure 32: LMG-Z582,-Z590 suitable bus bars
ZES ZIMMER
48/218
Sensors and Accessories for precision power meters
Current sensors
Figure 33: LMG-Z582, -Z590 connection diagram
2.14.1
Safety warning!
Always connect the sensor first to the meter, and afterwards to the device under test.
If no burden is connected, secondary terminals have to be short-circuited!
Please refer to chapter 1.1: ‘Safety precautions’!
2.14.2 Specifications
Measuring range
Secondary current
Transformation ratio
Maximum input, overload
Rated short time thermal current for 1s
Bandwidth
Nominal burden
Protection class
Degree of pollution
Temperature range
Weight
Bus bar
Output connection
10kAeff continuous
2Aeff
5000:1
11kAeff for 5min.
100kA
15Hz to 5kHz
2.5VA
600V CAT. III / 1000V CAT. II
2
-20°C to +50°C
14kg
4x
200mm x 10mm
primary fixing device M5,
slotted headless screw, max. 2.5Nm
screw terminals M5,
Philips recessed head screw,
max. 4mm^2(flexible) / 6mm^2(solid),
tightening torque 3.5Nm
2.14.3 Accuracy
Accuracies based on: sinusoidal current, ambient temperature 23±3°C, calibration interval 1
year, conductor in the middle of the transformer.
ZES ZIMMER
49/218
Sensors and Accessories for precision power meters
Current sensors
Amplitude error ±(% of measuring value) / Phase error (at 48 to 66Hz)
Current
Z582
Z590
50A to 250A
≤0.05 / ≤0.1°
≤0.3 / ≤0.15°
250A to 1000A
≤0.03 / ≤0.07°
≤0.15 / ≤0.1°
1000A to 2500A
≤0.02 / ≤0.05°
≤0.1 / ≤0.08°
2500A to 6000A
≤0.02 / ≤0.04°
≤0.1 / ≤0.06°
6000A to 10kA
≤0.02 / ≤0.05°
≤0.1 / ≤0.08°
at 30Hz to 48Hz and 66Hz to 440Hz twofold errors,
at 15Hz to 30Hz and 440Hz to 5kHz threefold errors
Use LMG-Z582,-Z590 and LMG specifications to calculate the accuracy of the complete
system.
2.14.4 Sensor operation without connection to LMG
It is important to assure a good connection from the sensor to the LMG before switching on
the load current! The operation of the sensor with load current and without connection to
the LMG will cause damage of the sensor and is dangerous for the user!
2.14.5 Connection of the sensor with LMG90/310 or other instruments with
current input
Use direct current inputs I* and I.
2.14.6 Connection of the sensor with LMG95
Use direct current inputs I* and I.
2.14.7 Connection of the sensor with LMG450
Use direct current inputs I* and I.
Or use L45-Z22 and sensor input for better dynamic range, but small additional error term.
2.14.8 Connection of the sensor with LMG500
Use direct current inputs I* and I.
ZES ZIMMER
50/218
Sensors and Accessories for precision power meters
Current sensors
2.15 Precision current transducer 60A (PSU60)
Figure 34: PSU60
Figure 35: Dimensions of the PSU60
2.15.1
Safety warning!
Always connect the sensor first to the meter, and afterwards to the device under test.
Dont allow primary current without supply of the PSU!
Please refer to chapter 1.1: ‘Safety precautions’!
ZES ZIMMER
51/218
Sensors and Accessories for precision power meters
Current sensors
2.15.2 Specifications
Nominal input current
60A
Transformation ratio
600:1
Measuring range PSU
60Apk
Maximum input overload
300A for 0.1s
Bandwidth (small signal 0.5%
of nominal input current)
±1dB
±3dB
DC to 500kHz
DC to >800kHz
Slew rate (10%-90%)
>25A/us
Response time (to 90% of
nominal input current)
<1us
Burden Rb
0 .. 20 ohms
Isolation
• rated isolation voltage rms, reinforced isolation: 600V
rated isolation voltage rms, single isolation:
2000V
with IEC 61010-1 standards and following conditions:
over voltage category III, pollution degree 2
• rms voltage, AC isolation test, 50/60Hz, 1min: 5.4kV
• impuls withstand voltage 1.2/50us:
9.9kV
• rated isolation voltage rms, reinforced isolation: 600V
rated isolation voltage rms, single isolation:
1000V
with EN50178 standards and following conditions: over
voltage category III, pollution degree 2
• creepage distance:
11mm
• clearance distance:
11mm
• comparative tracking index CTI:
600V
Attention: when using Busbar without isolation regard
DSUB cable isolation or avoid contact!!
Degree of pollution
2
Temperature range
+10°C to +50°C
Weight
approx. 0.3kg
Output connection
depending on adapter cable to LMGxx
supply
±15V / 180mA
2.15.3 Accuracy
Accuracies based on: sinusoidal current, frequency DC to 100Hz, ambient temperature
23±3°C, calibration interval 1 year, conductor in the middle of the transducer.
ZES ZIMMER
52/218
Sensors and Accessories for precision power meters
Current sensors
PSU60
Amplitude error
±(% of meas.value+% of measuring range PSU)
Phase error
0.015+0.005
0.02°
See specification of the LMG connection cable for the LMG measuring ranges and to
calculate the accuracy of the complete system.
2.15.4 Sensor operation without supply
It is important to assure a stable power supply of the sensor before switching on the load
current! The operation of the sensor with load current and without supply will cause
damage of the sensor and/or of the LMG/supply unit!
To remove the LMG/supply unit from the test location without removing the PSU sensors
from the current path, you can do alternatively:
• Leave the PSU at the current path and disconnect the cable at the PSU side.
Disconnect the DSUB9 plug from the PSU and interconnect all of the 9 pins with the shield
at the PSU plug.
or:
• Leave the PSU and the connection cable at the current path and disconnect the cable at the
LMG/supply unit side.
1. Systems with supply via LMG:
Disconnect the HDSUB15 plug from the LMG and connect all of the 15 pins and the shield
at the cable plug together
2. Systems with supply via supply unit SSU4:
Disconnect the HDSUB15 plug from the LMG and disconnect the DSUB9 plug from the
supply unit SSU4. Connect all of the 15 pins and the shield at the LMG cable plug
together and connect all of the 9 pins and the shield at the SSU4 cable plug together
To do this, the load current has to be switched off!
2.15.5 Connection of the sensor with LMG90/310 or other instruments with
current input
Use sensor suppy unit SSU4 with modification for PSU60/200/400/700 (SSU4-MOD) and
PSU-K3/K5/K10 and SSU4-K-L31 and direct current inputs I* and I.
ZES ZIMMER
53/218
Sensors and Accessories for precision power meters
Current sensors
2.15.6 Connection of the sensor with LMG95
Use PSU60/200/400/700-K-L95, supply via LMG95, no additional error terms, but only one
range and not suitable for small currents.
With slightly less accuracy at fullrange, but with considerably more dynamic range and so
better accuracy at small currents it is also possible to use PSU60-K-L50 and L95-Z07. With
this assembly you get 8 ranges and a good dynamic down to a few Amps, but a small
additional error term from the PSU60-K-L50 cable. Set LMG current scaling factor
appropriate to the scaling factor marked on the label on L95-Z07.
It depends on the magnitude and the dynamic of the measuring current, which connection is
better.
2.15.7 Connection of the sensor with LMG450 (PSU60-K-L45)
Use PSU60-K-L45 and SSU4 (standard version, without modification).
Figure 36: PSU60-K-L45, to connect the PSU60 to the LMG450 and the SSU4
This cable ‘PSU60-K-L45’ is used to connect a precision current sensor PSU60 to a power
meter LMG450 and to supply it by a sensor supply unit SSU4.
In the connector to the LMG450 the adjustment data of the PSU60 head are available as well
as it’s serial number. For this reason this connector is delivered already mounted to the PSU60
head and the screws are sealed, when you have ordered the package ‘PSU60-L45’. This
should prevent, that the wrong PSU60 head is connected to the cable.
The connection is quiet simple:
• Switch all power off and plug the connector labeled ‘SSU-4’ to the SSU-4.
• Plug the connector labeled ‘LMG450’ to the LMG450 external sensor input.
ZES ZIMMER
54/218
Sensors and Accessories for precision power meters
Current sensors
• Now you can switch on the power and make your measurements. The power of the EUT
should be switched on at least.
Measuring ranges (sensor input)
nominal value
max. trms value
max. peak value
1A
1.875A
1.875A
2A
3.75A
3.75A
4A
7.5A
7.5A
8A
15A
15A
16A
30A
30A
32A
60A
60A
limited by PSU60 to max. 60Apk!
Accuracy
Use PSU60 and LMG450 specifications to calculate the accuracy of the complete system.
Add ±9mA (to the primary current) DC offset tolerance.
2.15.8 Connection of the sensor with LMG500 (PSU60-K-L50)
Use PSU60-K-L50 and L50-Z14, supply via LMG500.
Figure 37: PSU60-K-L50, to connect PSU60 and LMG500
This cable ‘PSU60-K-L50’ is used to connect a precision current sensor PSU60 to the power
meter LMG500.
In the connector to the LMG500 the adjustment data of the PSU60 head are available as well
as it’s serial number. For this reason this connector is delivered already mounted to the PSU60
head and the screws are sealed, when you have ordered the package ‘PSU60-L50’. This
should prevent, that the wrong PSU60 head is connected to the cable.
The connection is quiet simple:
ZES ZIMMER
55/218
Sensors and Accessories for precision power meters
Current sensors
Switch all power off, plug the connector labeled ‘LMG500’ to the adapter L50-Z14 mounted
on the LMG500 current channel. Now you can switch on the power and make the
measurements. The range names of LMG500, the sensor name and calibration data are read
out of the sensor EEPROM automaticaly.
Measuring ranges (sensor input)
nominal value
max. trms value
max. peak value
0.25A
0.469A
0.469A
0.5A
0.938A
0.938A
1A
1.875A
1.875A
2A
3.75A
3.75A
4A
7.5A
7.5A
8A
15A
15A
16A
30A
30A
32A
60A
60A
limited by PSU60 to max. 60Apk!
Accuracy
Use PSU60 and LMG500 specifications to calculate the accuracy of the complete system.
Add ±9mA (to the primary current) DC offset tolerance.
2.15.9 Connection elongation
To use the current sensor with a longer connection length between power meter and PSU
connect a well shielded 1:1 extention cable between the PSU (DSUB9f plug) and the PSU
connection cable (DSUB9m plug) and screw both plugs together. This extention cable is
available at ZES (LMG-Z-DVxx). Required length (up to 15m) is to be given by customer
along with the order. Interference from strong electromagnetical disturbed environments may
affect the measurement accuracy. This depends from the respective installation in the
complete system and is out of responsibility of ZES ZIMMER.
ZES ZIMMER
56/218
Sensors and Accessories for precision power meters
Current sensors
2.16 Precision current transducer 200A (PSU200)
Figure 38: PSU200
Figure 39: Dimensions of the PSU200
2.16.1
Safety warning!
Always connect the sensor first to the meter, and afterwards to the device under test.
Dont allow primary current without supply of the PSU!
Please refer to chapter 1.1: ‘Safety precautions’!
ZES ZIMMER
57/218
Sensors and Accessories for precision power meters
Current sensors
2.16.2 Specifications
Nominal input current
200A
Transformation ratio
1000:1
Measuring range PSU
200Apk
Maximum input overload
1kA for 0.1s
Bandwidth (small signal 0.5%
of nominal input current)
±1dB
±3dB
DC to 150kHz
DC to >500kHz
Slew rate (10%-90%)
>100A/us
Response time (to 90% of
nominal input current)
<1us
Burden Rb
0 .. 30 ohms
Isolation
• rated isolation voltage rms, reinforced isolation: 600V
rated isolation voltage rms, single isolation:
2000V
with IEC 61010-1 standards and following conditions:
over voltage category III, pollution degree 2
• rms voltage, AC isolation test, 50/60Hz, 1min: 5.4kV
• impuls withstand voltage 1.2/50us:
9.9kV
• rated isolation voltage rms, reinforced isolation: 600V
rated isolation voltage rms, single isolation:
1000V
with EN50178 standards and following conditions: over
voltage category III, pollution degree 2
• creepage distance:
11mm
• clearance distance:
11mm
• comparative tracking index CTI:
600V
Attention: when using Busbar without isolation regard
DSUB cable isolation or avoid contact!!
Degree of pollution
2
Temperature range
+10°C to +50°C
Weight
approx. 0.3kg
Output connection
depending on adapter cable to LMGxx
supply
±15V / 280mA
2.16.3 Accuracy
Accuracies based on: sinusoidal current, frequency DC to 100Hz, ambient temperature
23±3°C, calibration interval 1 year, conductor in the middle of the transducer.
ZES ZIMMER
58/218
Sensors and Accessories for precision power meters
Current sensors
PSU200
Amplitude error
±(% of meas.value+% of measuring range PSU)
Phase error
0.015+0.005
0.02°
See specification of the LMG connection cable for the LMG measuring ranges and to
calculate the accuracy of the complete system.
2.16.4 Sensor operation without supply
It is important to assure a stable power supply of the sensor before switching on the load
current! The operation of the sensor with load current and without supply will cause
damage of the sensor and/or of the LMG/supply unit!
To remove the LMG/supply unit from the test location without removing the PSU sensors
from the current path, you can do alternatively:
• Leave the PSU at the current path and disconnect the cable at the PSU side.
Disconnect the DSUB9 plug from the PSU and interconnect all of the 9 pins with the shield
at the PSU plug.
or:
• Leave the PSU and the connection cable at the current path and disconnect the cable at the
LMG/supply unit side.
1. Systems with supply via LMG:
Disconnect the HDSUB15 plug from the LMG and connect all of the 15 pins and the shield
at the cable plug together
2. Systems with supply via supply unit SSU4:
Disconnect the HDSUB15 plug from the LMG and disconnect the DSUB9 plug from the
supply unit SSU4. Connect all of the 15 pins and the shield at the LMG cable plug
together and connect all of the 9 pins and the shield at the SSU4 cable plug together
To do this, the load current has to be switched off!
2.16.5 Connection of the sensor with LMG90/310 or other instruments with
current input
Use sensor suppy unit SSU4 with modification for PSU60/200/400/700 and PSU-K3/K5/K10
and SSU4-K-L31 and direct current inputs I* and I.
ZES ZIMMER
59/218
Sensors and Accessories for precision power meters
Current sensors
2.16.6 Connection of the sensor with LMG95
Use PSU60/200/400/700-K-L95, supply via LMG95, no additional error terms, but only one
range and not suitable for small currents.
With slightly less accuracy at fullrange, but with considerably more dynamic range and so
better accuracy at small currents it is also possible to use PSU200-K-L50 and L95-Z07. With
this assembly you get 8 ranges and a good dynamic down to a few Amps, but a small
additional error term from the PSU200-K-L50 cable. Set LMG current scaling factor
appropriate to the scaling factor marked on the label on L95-Z07.
It depends on the magnitude and the dynamic of the measuring current, which connection is
better.
2.16.7 Connection of the sensor with LMG450 (PSU200-K-L45)
Use PSU200-K-L45 and SSU4 (standard version, without modification).
Figure 40: PSU200-K-L45, to connect the PSU200 to the LMG450 and the SSU4
This cable ‘PSU200-K-L45’ is used to connect a precision current sensor PSU200 to a power
meter LMG450 and to supply it by a sensor supply unit SSU4.
In the connector to the LMG450 the adjustment data of the PSU200 head are available as well
as it’s serial number. For this reason this connector is delivered already mounted to the
PSU200 head and the screws are sealed, when you have ordered the package ‘PSU200-L45’.
This should prevent, that the wrong PSU200 head is connected to the cable.
The connection is quiet simple:
• Switch all power off and plug the connector labeled ‘SSU-4’ to the SSU-4.
• Plug the connector labeled ‘LMG450’ to the LMG450 external sensor input.
ZES ZIMMER
60/218
Sensors and Accessories for precision power meters
Current sensors
• Now you can switch on the power and make your measurements. The power of the EUT
should be switched on at least.
Measuring ranges (sensor input)
nominal value
max. trms value
max. peak value
3.13A
6.25A
6.25A
6.25A
12.5A
12.5A
12.5A
25A
25A
25A
50A
50A
50A
100A
100A
100A
200A
200A
limited by PSU200 to max. 200Apk!
Accuracy
Use PSU200 and LMG450 specifications to calculate the accuracy of the complete system.
Add ±30mA (to the primary current) DC offset tolerance.
2.16.8 Connection of the sensor with LMG500 (PSU200-K-L50)
Use PSU200-K-L50 and L50-Z14, supply via LMG500.
Figure 41: PSU200-K-L50, to connect PSU200 and LMG500
This cable ‘PSU200-K-L50’ is used to connect a precision current sensor PSU200 to the
power meter LMG500.
In the connector to the LMG500 the adjustment data of the PSU200 head are available as well
as it’s serial number. For this reason this connector is delivered already mounted to the
PSU200 head and the screws are sealed, when you have ordered the package ‘PSU200-L50’.
This should prevent, that the wrong PSU200 head is connected to the cable.
The connection is quiet simple:
ZES ZIMMER
61/218
Sensors and Accessories for precision power meters
Current sensors
Switch all power off, plug the connector labeled ‘LMG500’ to the adapter L50-Z14 mounted
on the LMG500 current channel. Now you can switch on the power and make the
measurements. The rangenames of LMG500, the sensor name and calibration data are read out
of the sensor EEPROM automaticaly.
Measuring ranges (sensor input)
nominal value
max. trms value
max. peak value
0.75A
1.56A
1.56A
1.5A
3.13A
3.13A
3.13A
6.25A
6.25A
6.25A
12.5A
12.5A
12.5A
25A
25A
25A
50A
50A
50A
100A
100A
100A
200A
200A
limited by PSU200 to max. 200Apk!
Accuracy
Use PSU200 and LMG500 specifications to calculate the accuracy of the complete system.
Add ±30mA (to the primary current) DC offset tolerance.
2.16.9 Connection elongation
To use the current sensor with a longer connection length between power meter and PSU
connect a well shielded 1:1 extention cable between the PSU (DSUB9f plug) and the PSU
connection cable (DSUB9m plug) and screw both plugs together. This extention cable is
available at ZES (LMG-Z-DVxx). Required length (up to 15m) is to be given by customer
along with the order. Interference from strong electromagnetical disturbed environments may
affect the measurement accuracy. This depends from the respective installation in the
complete system and is out of responsibility of ZES ZIMMER.
ZES ZIMMER
62/218
Sensors and Accessories for precision power meters
Current sensors
2.17 Precision current transducer 200A (PSU200HF)
Figure 42: PSU200HF
Figure 43: Dimensions of the PSU200HF
2.17.1
Safety warning!
Always connect the sensor first to the meter, and afterwards to the device under test.
Dont allow primary current without supply of the PSU!
Please refer to chapter 1.1: ‘Safety precautions’!
ZES ZIMMER
63/218
Sensors and Accessories for precision power meters
Current sensors
2.17.2 Specifications
Nominal input current
200A
Transformation ratio
1000:1
Measuring range PSU
200Apk
Maximum input overload
1kA for 0.1s
Bandwidth (small signal 20App,
Rb=2.5Ohm, primary current in
the middle of the transducer
head)
±0.4dB (is equivalent to ±4.7%) DC to 150kHz
±3dB (typical)
DC to >1MHz
Slew rate (10%-90%)
>100A/us
Burden Rb
0 .. 30 ohms
Isolation
• rated isolation voltage rms, reinforced isolation: 600V
rated isolation voltage rms, single isolation:
2000V
with IEC 61010-1 standards and following conditions:
over voltage category III, pollution degree 2
• rms voltage, AC isolation test, 50/60Hz, 1min: 5.4kV
• impuls withstand voltage 1.2/50us:
9.9kV
• rated isolation voltage rms, reinforced isolation: 600V
rated isolation voltage rms, single isolation:
1000V
with EN50178 standards and following conditions: over
voltage category III, pollution degree 2
• creepage distance:
11mm
• clearance distance:
11mm
• comparative tracking index CTI:
600V
Attention: when using Busbar without isolation regard
DSUB cable isolation or avoid contact!!
Degree of pollution
2
Temperature range
+10°C to +50°C
Weight
approx. 0.3kg
Output connection
depending on adapter cable to LMGxx
supply
±15V / 280mA
2.17.3 Accuracy
Accuracies based on: sinusoidal current, frequency DC to 100Hz, ambient temperature
23±3°C, calibration interval 1 year, conductor in the middle of the transducer.
ZES ZIMMER
64/218
Sensors and Accessories for precision power meters
Current sensors
PSU200
Amplitude error
±(% of meas.value+% of measuring range PSU)
Phase error
0.015+0.005
0.02°
See specification of the LMG connection cable for the LMG measuring ranges and to
calculate the accuracy of the complete system.
2.17.4 Sensor operation without supply
It is important to assure a stable power supply of the sensor before switching on the load
current! The operation of the sensor with load current and without supply will cause
damage of the sensor and/or of the LMG/supply unit!
To remove the LMG/supply unit from the test location without removing the PSU sensors
from the current path, you can do alternatively:
• Leave the PSU at the current path and disconnect the cable at the PSU side.
Disconnect the DSUB9 plug from the PSU and interconnect all of the 9 pins with the shield
at the PSU plug.
or:
• Leave the PSU and the connection cable at the current path and disconnect the cable at the
LMG/supply unit side.
1. Systems with supply via LMG:
Disconnect the HDSUB15 plug from the LMG and connect all of the 15 pins and the shield
at the cable plug together
2. Systems with supply via supply unit SSU4:
Disconnect the HDSUB15 plug from the LMG and disconnect the DSUB9 plug from the
supply unit SSU4. Connect all of the 15 pins and the shield at the LMG cable plug
together and connect all of the 9 pins and the shield at the SSU4 cable plug together
To do this, the load current has to be switched off!
2.17.5 Connection of the sensor with LMG90/310 or other instruments with
current input
Use sensor suppy unit SSU4 with modification for PSU60/200/400/700 and PSU-K3/K5/K10
and SSU4-K-L31 and direct current inputs I* and I.
ZES ZIMMER
65/218
Sensors and Accessories for precision power meters
Current sensors
2.17.6 Connection of the sensor with LMG95
Use PSU60/200/400/700-K-L95, supply via LMG95, no additional error terms, but only one
range and not suitable for small currents.
With slightly less accuracy at fullrange, but with considerably more dynamic range and so
better accuracy at small currents it is also possible to use PSU200HF-K-L50 and L95-Z07.
With this assembly you get 8 ranges and a good dynamic down to a few Amps, but a small
additional error term from the PSU200HF-K-L50 cable. Set LMG current scaling factor
appropriate to the scaling factor marked on the label on L95-Z07.
It depends on the magnitude and the dynamic of the measuring current, which connection is
better.
2.17.7 Connection of the sensor with LMG450
You can use PSU200-K-L45 and SSU4 (standard version, without modification), but it is not
recommended to use this high frequency sensor with the LMG450.
2.17.8 Connection of the sensor with LMG500 (PSU200HF-K-L50)
Use PSU200HF-K-L50 and L50-Z14, supply via LMG500.
Figure 44: PSU200HF-K-L50, to connect PSU200HF and LMG500
This cable ‘PSU200HF-K-L50’ is used to connect a precision current sensor PSU200HF to
the power meter LMG500.
In the connector to the LMG500 the adjustment data of the PSU200HF head are available as
well as it’s serial number. For this reason this connector is delivered already mounted to the
PSU200HF head and the screws are sealed, when you have ordered the package ‘PSU200HFL50’. This should prevent, that the wrong PSU200HF head is connected to the cable.
ZES ZIMMER
66/218
Sensors and Accessories for precision power meters
Current sensors
The connection is quiet simple:
Switch all power off, plug the connector labeled ‘LMG500’ to the adapter L50-Z14 mounted
on the LMG500 current channel. Now you can switch on the power and make the
measurements. The rangenames of LMG500, the sensor name and calibration data are read out
of the sensor EEPROM automaticaly.
Measuring ranges (sensor input)
nominal value
max. trms value
max. peak value
0.75A
1.56A
1.56A
1.5A
3.13A
3.13A
3.13A
6.25A
6.25A
6.25A
12.5A
12.5A
12.5A
25A
25A
25A
50A
50A
50A
100A
100A
100A
200A
200A
limited by PSU200HF to max. 200Apk!
Accuracy
Use PSU200HF and LMG500 specifications to calculate the accuracy of the complete system.
Add ±30mA (to the primary current) DC offset tolerance.
2.17.9 Connection elongation
To use the current sensor with a longer connection length between power meter and PSU
connect a well shielded 1:1 extention cable between the PSU (DSUB9f plug) and the PSU
connection cable (DSUB9m plug) and screw both plugs together. This extention cable is
available at ZES (LMG-Z-DVxx). Required length (up to 15m) is to be given by customer
along with the order. Interference from strong electromagnetical disturbed environments may
affect the measurement accuracy. This depends from the respective installation in the
complete system and is out of responsibility of ZES ZIMMER.
ZES ZIMMER
67/218
Sensors and Accessories for precision power meters
Current sensors
2.18 Precision current transducer 400A (PSU400)
Figure 45: PSU400
Figure 46: Dimensions of the PSU400
2.18.1
Safety warning!
Always connect the sensor first to the meter, and afterwards to the device under test.
Dont allow primary current without supply of the PSU!
Please refer to chapter 1.1: ‘Safety precautions’!
ZES ZIMMER
68/218
Sensors and Accessories for precision power meters
Current sensors
2.18.2 Specifications
Nominal input current
400A
Transformation ratio
2000:1
Measuring range PSU
400Apk
Maximum input overload
2kA for 0.1s
Bandwidth (small signal 0.5%
of nominal input current)
±1dB
±3dB
DC to 150kHz
DC to >500kHz
Slew rate (10%-90%)
>80A/us
Response time (to 90% of
nominal input current)
<1us
Burden
0 .. 2.5ohms
Isolation
• rated isolation voltage rms, reinforced isolation: 600V
rated isolation voltage rms, single isolation:
2000V
with IEC 61010-1 standards and following conditions:
over voltage category III, pollution degree 2
• rms voltage, AC isolation test, 50/60Hz, 1min: 5.4kV
• impuls withstand voltage 1.2/50us:
9.9kV
• rated isolation voltage rms, reinforced isolation: 600V
rated isolation voltage rms, single isolation:
1000V
with EN50178 standards and following conditions: over
voltage category III, pollution degree 2
• creepage distance:
11mm
• clearance distance:
11mm
• comparative tracking index CTI:
600V
Attention: when using Busbar without isolation regard
DSUB cable isolation or avoid contact!!
Degree of pollution
2
Temperature range
+10°C to +50°C
Weight
approx. 0.3kg
Output connection
depending on adapter cable to LMGxx
supply
±15V / 280mA
2.18.3 Accuracy
Accuracies based on: sinusoidal current, frequency DC to 100Hz, ambient temperature
23±3°C, calibration interval 1 year, conductor in the middle of the transducer.
ZES ZIMMER
69/218
Sensors and Accessories for precision power meters
Current sensors
PSU400
Amplitude error
±(% of meas.value+% of measuring range PSU)
Phase error
0.015+0.005
0.02°
See specification of the LMG connection cable for the LMG measuring ranges and to
calculate the accuracy of the complete system.
2.18.4 Sensor operation without supply
It is important to assure a stable power supply of the sensor before switching on the load
current! The operation of the sensor with load current and without supply will cause
damage of the sensor and/or of the LMG/supply unit!
To remove the LMG/supply unit from the test location without removing the PSU sensors
from the current path, you can do alternatively:
• Leave the PSU at the current path and disconnect the cable at the PSU side.
Disconnect the DSUB9 plug from the PSU and interconnect all of the 9 pins with the shield
at the PSU plug.
or:
• Leave the PSU and the connection cable at the current path and disconnect the cable at the
LMG/supply unit side.
1. Systems with supply via LMG:
Disconnect the HDSUB15 plug from the LMG and connect all of the 15 pins and the shield
at the cable plug together
2. Systems with supply via supply unit SSU4:
Disconnect the HDSUB15 plug from the LMG and disconnect the DSUB9 plug from the
supply unit SSU4. Connect all of the 15 pins and the shield at the LMG cable plug
together and connect all of the 9 pins and the shield at the SSU4 cable plug together
To do this, the load current has to be switched off!
2.18.5 Connection of the sensor with LMG90/310 or other instruments with
current input
Use sensor suppy unit SSU4 with modification for PSU60/200/400/700 and PSU-K3/K5/K10
and SSU4-K-L31 and direct current inputs I* and I.
ZES ZIMMER
70/218
Sensors and Accessories for precision power meters
Current sensors
2.18.6 Connection of the sensor with LMG95
Use PSU60/200/400/700-K-L95, supply via LMG95, no additional error terms, but only one
range and not suitable for small currents.
With slightly less accuracy at fullrange, but with considerably more dynamic range and so
better accuracy at small currents it is also possible to use PSU400-K-L50 and L95-Z07. With
this assembly you get 8 ranges and a good dynamic down to a few Amps, but a small
additional error term from the PSU400-K-L50 cable. Set LMG current scaling factor
appropriate to the scaling factor marked on the label on L95-Z07.
It depends on the magnitude and the dynamic of the measuring current, which connection is
better.
2.18.7 Connection of the sensor with LMG450 (PSU400-K-L45)
Use PSU400-K-L45 and SSU4 (standard version, without modification).
Figure 47: PSU400-K-L45, to connect the PSU400 to the LMG450 and the SSU4
This cable ‘PSU400-K-L45’ is used to connect a precision current sensor PSU400 to a power
meter LMG450 and to supply it by a sensor supply unit SSU4.
In the connector to the LMG450 the adjustment data of the PSU400 head are available as well
as it’s serial number. For this reason this connector is delivered already mounted to the
PSU400 head and the screws are sealed, when you have ordered the package ‘PSU400-L45’.
This should prevent, that the wrong PSU400 head is connected to the cable.
The connection is quiet simple:
• Switch all power off and plug the connector labeled ‘SSU-4’ to the SSU-4.
• Plug the connector labeled ‘LMG450’ to the LMG450 external sensor input.
• Now you can switch on the power and make your measurements. The power of the EUT
should be switched on at least.
ZES ZIMMER
71/218
Sensors and Accessories for precision power meters
Current sensors
Measuring ranges (sensor input)
nominal value
max. trms value
max. peak value
6.25A
12.5A
12.5A
12.5A
25A
25A
25A
50A
50A
50A
100A
100A
100A
200A
200A
200A
400A
400A
limited by PSU400 to max. 400Apk!
Accuracy
Use PSU400 and LMG450 specifications to calculate the accuracy of the complete system.
Add ±60mA (to the primary current) DC offset tolerance.
2.18.8 Connection of the sensor with LMG500 (PSU400-K-L50)
Use PSU400-K-L50 and L50-Z14, supply via LMG500.
Figure 48: PSU400-K-L50, to connect PSU400 and LMG500
This cable ‘PSU400-K-L50’ is used to connect a precision current sensor PSU400 to the
power meter LMG500.
In the connector to the LMG500 the adjustment data of the PSU400 head are available as well
as it’s serial number. For this reason this connector is delivered already mounted to the
PSU400 head and the screws are sealed, when you have ordered the package ‘PSU400-L50’.
This should prevent, that the wrong PSU400 head is connected to the cable.
The connection is quiet simple:
Switch all power off, plug the connector labeled ‘LMG500’ to the adapter L50-Z14 mounted
on the LMG500 current channel. Now you can switch on the power and make the
measurements. The rangenames of LMG500, the sensor name and calibration data are read out
of the sensor EEPROM automaticaly.
ZES ZIMMER
72/218
Sensors and Accessories for precision power meters
Current sensors
Measuring ranges (sensor input)
nominal value
max. trms value
max. peak value
1.56A
3.13A
3.13A
3.13A
6.25A
6.25A
6.25A
12.5A
12.5A
12.5A
25A
25A
25A
50A
50A
50A
100A
100A
100A
200A
200A
200A
400A
400A
limited by PSU400 to max. 400Apk!
Accuracy
Use PSU400 and LMG500 specifications to calculate the accuracy of the complete system.
Add ±60mA (to the primary current) DC offset tolerance.
2.18.9 Connection elongation
To use the current sensor with a longer connection length between power meter and PSU
connect a well shielded 1:1 extention cable between the PSU (DSUB9f plug) and the PSU
connection cable (DSUB9m plug) and screw both plugs together. This extention cable is
available at ZES (LMG-Z-DVxx). Required length (up to 15m) is to be given by customer
along with the order. Interference from strong electromagnetical disturbed environments may
affect the measurement accuracy. This depends from the respective installation in the
complete system and is out of responsibility of ZES ZIMMER.
ZES ZIMMER
73/218
Sensors and Accessories for precision power meters
Current sensors
2.19 Precision current transducer 600A (PSU600)
Figure 49: Dimensions of the PSU600
2.19.1
Safety warning!
Always connect the sensor first to the meter, and afterwards to the device under test.
Dont allow primary current without supply of the PSU!
Please refer to chapter 1.1: ‘Safety precautions’!
2.19.2 Specifications
Nominal input current
600A
Transformation ratio
1500:1
Measuring range PSU
600Apk
Maximum input overload
3kA for 0.1s
Bandwidth (small signal 0.5%
of nominal input current)
±3dB
DC to >100kHz
Slew rate (10%-90%)
>100A/us
Response time (to 90% of
nominal input current)
<1us
Burden
2.5 ohms
ZES ZIMMER
74/218
Sensors and Accessories for precision power meters
Current sensors
• rated isolation voltage rms, reinforced isolation: 300V
rated isolation voltage rms, single isolation:
2000V
with IEC 61010-1 standards and following conditions:
over voltage category III, pollution degree 2
• rms voltage, AC isolation test, 50/60Hz, 1min: 4.9kV
• impuls withstand voltage 1.2/50us:
9.1kV
• rated isolation voltage rms, reinforced isolation: 600V
rated isolation voltage rms, single isolation:
1000V
with EN50178 standards and following conditions: over
voltage category III, pollution degree 2
• creepage distance:
10mm
• clearance distance:
10mm
• comparative tracking index CTI:
600V
Isolation
Attention: when using Busbar without isolation regard
DSUB cable isolation or avoid contact!!
Degree of pollution
2
Temperature range
+10°C to +50°C
Weight
1kg
Output connection
depending on adapter cable to LMGxx
supply
±15V / 600mA
2.19.3 Accuracy
Accuracies based on: sinusoidal current, ambient temperature 23±3°C, calibration interval 1
year, conductor in the middle of the transducer.
Frequency
Amplitude error±(% of meas.value+% of measuring range PSU)
Phase error
DC to 100Hz
100Hz to 2.5kHz
2.5kHz to 10kHz
10kHz to 30kHz
30kHz to 100kHz
0.015+0.005
0.015+0.005
0.05+0.025
0.6 to 0.2
6+3
0.02°
0.1°
0.2°
0.7°
3°
See specification of the LMG connection cable for the LMG measuring ranges and to
calculate the accuracy of the complete system.
2.19.4 Sensor operation without supply
It is important to assure a stable power supply of the sensor before switching on the load
current! The operation of the sensor with load current and without supply will cause
damage of the sensor and/or of the LMG/supply unit!
ZES ZIMMER
75/218
Sensors and Accessories for precision power meters
Current sensors
To remove the LMG/supply unit from the test location without removing the PSU sensors
from the current path, you can do alternatively:
• Leave the PSU at the current path and disconnect the cable at the PSU side.
Disconnect the DSUB9 plug from the PSU and interconnect all of the 9 pins with the shield
at the PSU plug.
or:
• Leave the PSU and the connection cable at the current path and disconnect the cable at the
LMG/supply unit side.
1. Systems with supply via LMG:
Disconnect the HDSUB15 plug from the LMG and connect all of the 15 pins and the shield
at the cable plug together
2. Systems with supply via supply unit SSU4:
Disconnect the HDSUB15 plug from the LMG and disconnect the DSUB9 plug from the
supply unit SSU4. Connect all of the 15 pins and the shield at the LMG cable plug
together and connect all of the 9 pins and the shield at the SSU4 cable plug together
To do this, the load current has to be switched off!
2.19.5 Connection of the sensor with LMG90/310 or other instruments with
current input
Use sensor suppy unit SSU4 and PSU-K3/K5/K10 and SSU4-K-L31 and direct current inputs
I* and I.
2.19.6 Connection of the sensor with LMG95
You can use PSU600-K3-L95, supply via LMG95, no additional error terms, but only two
ranges and not suitable for small currents.
With slightly less accuracy at fullrange, but with considerably more dynamic range and so
better accuracy at small currents it is better to use PSU600-BUR15.
It depends on the magnitude and the dynamic of the measuring current, which connection is
better.
ZES ZIMMER
76/218
Sensors and Accessories for precision power meters
Current sensors
2.19.6.1 PSU600-K3-L95
Figure 50: PSU600-K3-L95, for direct connection of the
PSU600 to the current input of the LMG95
Figure 51: Connection of one PSU600 to the LMG95
Accuracy
Use PSU600 and LMG95 specifications to calculate the accuracy of the complete system.
Measuring ranges
nominal value
225A
max. trms value 450A
max. peak value 703.5A
450A
900A
1407A
limited by PSU600 to max. 600Apk!
ZES ZIMMER
77/218
Sensors and Accessories for precision power meters
Current sensors
2.19.6.2 Precision burden for PSU600 and LMG95 (PSU600-BUR15)
Figure 52: PSU 600 - BUR15, to connect the PSU600 to the shunt input of the LMG95 directly.
Figure 53:Connection of PSU600 and BUR15 to the LMG95
Specifications
Range
(Selected with internal slide switch of the
PSU600-BUR15)
Necessary scale setting at the LMG95
100
1000
Displayed measurement ranges at the
LMG95
3/6/12/25/50/100/200/
400A
30/60/120/250/500/
1000/2000/4000A
Measurable Peak Current
*
9/18/36/75/150/300/
350*/350*Apk
90/180/360/600*/600*/
600*/600*/600*Apk
Maximum input
3kA for 0.1s
ZES ZIMMER
78/218
limited by the PSU600
Low
High
Sensors and Accessories for precision power meters
Current sensors
Bandwidth
DC to 100kHz
Protection class
300V CATIII; 600V CATII
Degree of pollution
2
Temperature range
+10°C to +50°C
Weight
0.25kg
Output connection
2x SUBD to PSU and Aux. supply socket of the
LMG95; 2x laboratory plugs to ext. Shunt
Accuracy
Accuracies based on: sinusoidal current, ambient temperature 23±3°C, calibration interval 1
year, conductor in the middle of the transducer.
Values including errors of PSU600 and PSU600-BUR15
Frequency in kHz Amplitude error±(% of measuring value+% of measuring range) Phase error
DC to 0.1
0.035+0.005
0.02°
0.1 to 2.5
0.035+0.005
0.1°
2.5 to 10
0.06+0.025
0.2°
10 to 30
0.6 to 0.2
0.7°
30 to 100
6+3
3°
Use this table and LMG specifications to calculate the accuracy of the complete system.
2.19.7 Connection of the sensor with LMG450 (PSU600-K-L45)
Use PSU600-K-L45 and SSU4.
Figure 54: PSU600-K-L45, to connect the PSU600 to the LMG450 and the SSU4
This cable ‘PSU600-K-L45’ is used to connect a precision current sensor PSU600 to a power
meter LMG450 and to supply it by a sensor supply unit SSU4.
In the connector to the LMG450 the adjustment data of the PSU600 head are available as well
as it’s serial number. For this reason this connector is delivered already mounted to the
PSU600 head and the screws are sealed, when you have ordered the package ‘PSU600-L45’.
This should prevent, that the wrong PSU600 head is connected to the cable.
ZES ZIMMER
79/218
Sensors and Accessories for precision power meters
Current sensors
The connection is quiet simple:
• Switch all power off and plug the connector labeled ‘SSU-4’ to the SSU-4.
• Plug the connector labeled ‘LMG450’ to the LMG450 external sensor input.
• Now you can switch on the power and make your measurements. The power of the EUT
should be switched on at least.
Measuring ranges (sensor input)
nominal value
max. trms value
max. peak value
10A
18.75A
18.75A
20A
37.5A
37.5A
40A
75A
75A
80A
150A
150A
160A
300A
300A
320A
600A
600A
limited by PSU600 to max. 600Apk!
Accuracy
Use PSU600 and LMG450 specifications to calculate the accuracy of the complete system.
Add ±90mA (to the primary current) DC offset tolerance.
2.19.8 Connection of the sensor with LMG500 (PSU600-K-L50)
Use PSU600-K-L50 and L50-Z14, supply via LMG500.
Figure 55: PSU600-K-L50, to connect PSU600 and LMG500
This cable ‘PSU600-K-L50’ is used to connect a precision current sensor PSU600 to the
power meter LMG500.
In the connector to the LMG500 the adjustment data of the PSU600 head are available as well
as it’s serial number. For this reason this connector is delivered already mounted to the
PSU600 head and the screws are sealed, when you have ordered the package ‘PSU600-L50’.
This should prevent, that the wrong PSU600 head is connected to the cable.
ZES ZIMMER
80/218
Sensors and Accessories for precision power meters
Current sensors
The connection is quiet simple:
Switch all power off, plug the connector labeled ‘LMG500’ to the adapter L50-Z14 mounted
on the LMG500 current channel. Now you can switch on the power and make the
measurements. The rangenames of LMG500, the sensor name and calibration data are read out
of the sensor EEPROM automaticaly.
Measuring ranges (sensor input)
nominal value
max. trms value
max. peak value
2.5A
4.69A
4.69A
5A
9.38A
9.38A
10A
18.75A
18.75A
20A
37.5A
37.5A
40A
75A
75A
80A
150A
150A
160A
300A
300A
320A
600A
600A
limited by PSU600 to max. 600Apk!
Accuracy
Use PSU600 and LMG500 specifications to calculate the accuracy of the complete system.
Add ±90mA (to the primary current) DC offset tolerance.
2.19.9 Connection elongation
To use the current sensor with a longer connection length between power meter and PSU
connect a well shielded 1:1 extention cable between the PSU (DSUB9f plug) and the PSU
connection cable (DSUB9m plug) and screw both plugs together. This extention cable is
available at ZES (LMG-Z-DVxx). Required length (up to 15m) is to be given by customer
along with the order. Interference from strong electromagnetical disturbed environments may
affect the measurement accuracy. This depends from the respective installation in the
complete system and is out of responsibility of ZES ZIMMER.
ZES ZIMMER
81/218
Sensors and Accessories for precision power meters
Current sensors
2.20 Precision current transducer 700A (PSU700)
Figure 56: PSU700
Figure 57: Dimensions of the PSU700
2.20.1
Safety warning!
Always connect the sensor first to the meter, and afterwards to the device under test.
Dont allow primary current without supply of the PSU!
Please refer to chapter 1.1: ‘Safety precautions’!
ZES ZIMMER
82/218
Sensors and Accessories for precision power meters
Current sensors
2.20.2 Specifications
Nominal input current
700A
Transformation ratio
1750:1
Measuring range PSU
700Apk
Maximum input overload
3.5kA for 0.1s
Bandwidth (small signal 0.5%
of nominal input current)
±1dB
±3dB
DC to 50kHz
DC to >100kHz
Slew rate (10%-90%)
>100A/us
Response time (to 90% of
nominal input current)
<1us
Burden
0 .. 2.5 ohms
Isolation
• rated isolation voltage rms, reinforced isolation: 300V
rated isolation voltage rms, single isolation:
1600V
with IEC 61010-1 standards and following conditions:
over voltage category III, pollution degree 2
• rms voltage, AC isolation test, 50/60Hz, 1min: 4.6kV
• impuls withstand voltage 1.2/50us:
8.5kV
• rated isolation voltage rms, reinforced isolation: 600V
rated isolation voltage rms, single isolation:
1000V
with EN50178 standards and following conditions: over
voltage category III, pollution degree 2
• creepage distance:
9mm
• clearance distance:
9mm
• comparative tracking index CTI:
600V
Attention: when using Busbar without isolation regard
DSUB cable isolation or avoid contact!!
Degree of pollution
2
Temperature range
+10°C to +50°C
Weight
approx. 0.8kg
Output connection
depending on adapter cable to LMGxx
supply
±15V / 480mA
2.20.3 Accuracy
Accuracies based on: sinusoidal current, frequency DC to 100Hz, ambient temperature
23±3°C, calibration interval 1 year, conductor in the middle of the transducer.
ZES ZIMMER
83/218
Sensors and Accessories for precision power meters
Current sensors
PSU700
Amplitude error
±(% of meas.value+% of measuring range PSU)
Phase error
0.015+0.005
0.02°
See specification of the LMG connection cable for the LMG measuring ranges and to
calculate the accuracy of the complete system.
2.20.4 Sensor operation without supply
It is important to assure a stable power supply of the sensor before switching on the load
current! The operation of the sensor with load current and without supply will cause
damage of the sensor and/or of the LMG/supply unit!
To remove the LMG/supply unit from the test location without removing the PSU sensors
from the current path, you can do alternatively:
• Leave the PSU at the current path and disconnect the cable at the PSU side.
Disconnect the DSUB9 plug from the PSU and interconnect all of the 9 pins with the shield
at the PSU plug.
or:
• Leave the PSU and the connection cable at the current path and disconnect the cable at the
LMG/supply unit side.
1. Systems with supply via LMG:
Disconnect the HDSUB15 plug from the LMG and connect all of the 15 pins and the shield
at the cable plug together
2. Systems with supply via supply unit SSU4:
Disconnect the HDSUB15 plug from the LMG and disconnect the DSUB9 plug from the
supply unit SSU4. Connect all of the 15 pins and the shield at the LMG cable plug
together and connect all of the 9 pins and the shield at the SSU4 cable plug together
To do this, the load current has to be switched off!
2.20.5 Connection of the sensor with LMG90/310 or other instruments with
current input
Use sensor suppy unit SSU4 with modification for PSU60/200/400/700 and PSU-K3/K5/K10
and SSU4-K-L31 and direct current inputs I* and I.
ZES ZIMMER
84/218
Sensors and Accessories for precision power meters
Current sensors
2.20.6 Connection of the sensor with LMG95
Use PSU60/200/400/700-K-L95, supply via LMG95, no additional error terms, but only one
range and not suitable for small currents.
With slightly less accuracy at fullrange, but with considerably more dynamic range and so
better accuracy at small currents it is also possible to use PSU700-K-L50 and L95-Z07. With
this assembly you get 8 ranges and a good dynamic down to a few Amps, but a small
additional error term from the PSU700-K-L50 cable. Set LMG current scaling factor
appropriate to the scaling factor marked on the label on L95-Z07.
It depends on the magnitude and the dynamic of the measuring current, which connection is
better.
2.20.7 Connection of the sensor with LMG450 (PSU700-K-L45)
Use PSU700-K-L45 and SSU4 (standard version, without modification).
Figure 58: PSU700-K-L45, to connect the PSU700 to the LMG450 and the SSU4
This cable ‘PSU700-K-L45’ is used to connect a precision current sensor PSU700 to a power
meter LMG450 and to supply it by a sensor supply unit SSU4.
In the connector to the LMG450 the adjustment data of the PSU700 head are available as well
as it’s serial number. For this reason this connector is delivered already mounted to the
PSU700 head and the screws are sealed, when you have ordered the package ‘PSU700-L45’.
This should prevent, that the wrong PSU700 head is connected to the cable.
The connection is quiet simple:
• Switch all power off and plug the connector labeled ‘SSU-4’ to the SSU-4.
• Plug the connector labeled ‘LMG450’ to the LMG450 external sensor input.
• Now you can switch on the power and make your measurements. The power of the EUT
should be switched on at least.
ZES ZIMMER
85/218
Sensors and Accessories for precision power meters
Current sensors
Measuring ranges (sensor input)
nominal value
max. trms value
max. peak value
10A
21.88A
21.88A
20A
43.75A
43.75A
40A
87.5A
87.5A
80A
175A
175A
160A
350A
350A
320A
700A
700A
limited by PSU700 to max. 700Apk!
Accuracy
Use PSU700 and LMG450 specifications to calculate the accuracy of the complete system.
Add ±105mA (to the primary current) DC offset tolerance.
2.20.8 Connection of the sensor with LMG500 (PSU700-K-L50)
Use PSU700-K-L50 and L50-Z14, supply via LMG500.
Figure 59: PSU700-K-L50, to connect PSU700 and LMG500
This cable ‘PSU700-K-L50’ is used to connect a precision current sensor PSU700 to the
power meter LMG500.
In the connector to the LMG500 the adjustment data of the PSU700 head are available as well
as it’s serial number. For this reason this connector is delivered already mounted to the
PSU700 head and the screws are sealed, when you have ordered the package ‘PSU700-L50’.
This should prevent, that the wrong PSU700 head is connected to the cable.
The connection is quiet simple:
Switch all power off, plug the connector labeled ‘LMG500’ to the adapter L50-Z14 mounted
on the LMG500 current channel. Now you can switch on the power and make the
measurements. The rangenames of LMG500, the sensor name and calibration data are read out
of the sensor EEPROM automaticaly.
ZES ZIMMER
86/218
Sensors and Accessories for precision power meters
Current sensors
Measuring ranges (sensor input)
nominal value
max. trms value
max. peak value
2.5A
5.47A
5.47A
5A
10.94A
10.94A
10A
21.88A
21.88A
20A
43.75A
43.75A
40A
87.5A
87.5A
80A
175A
175A
160A
350A
350A
320A
700A
700A
limited by PSU700 to max. 700Apk!
Accuracy
Use PSU700 and LMG500 specifications to calculate the accuracy of the complete system.
Add ±105mA (to the primary current) DC offset tolerance.
2.20.9 Connection elongation
To use the current sensor with a longer connection length between power meter and PSU
connect a well shielded 1:1 extention cable between the PSU (DSUB9f plug) and the PSU
connection cable (DSUB9m plug) and screw both plugs together. This extention cable is
available at ZES (LMG-Z-DVxx). Required length (up to 15m) is to be given by customer
along with the order. Interference from strong electromagnetical disturbed environments may
affect the measurement accuracy. This depends from the respective installation in the
complete system and is out of responsibility of ZES ZIMMER.
ZES ZIMMER
87/218
Sensors and Accessories for precision power meters
Current sensors
2.21 Precision current transducer 1000A (PSU1000HF)
Figure 60: Dimensions of the PSU1000HF
2.21.1
Safety warning!
Always connect the sensor first to the meter, and afterwards to the device under test.
Dont allow primary current without supply of the PSU!
Please refer to chapter 1.1: ‘Safety precautions’!
2.21.2 Specifications
Nominal input current
1000A
Transformation ratio
1000:1
Measuring range PSU
1000Apk
Maximum input overload
4kA for 0.1s
Bandwidth (small signal)
ZES ZIMMER
88/218
Sensors and Accessories for precision power meters
Current sensors
±3dB
DC to >500kHz
Slew rate (10%-90%)
>100A/us
Response time (to 90% of
nominal input current)
<1us
Burden
0 .. 3 ohms
Isolation
• rated isolation voltage rms, reinforced isolation: 150V
rated isolation voltage rms, single isolation:
300V
with IEC 61010-1 standards and following conditions:
over voltage category III, pollution degree 2
• rms voltage, AC isolation test, 50/60Hz, 1min: 3.1kV
• impuls withstand voltage 1.2/50us:
5.7kV
• rated isolation voltage rms, reinforced isolation: 150V
rated isolation voltage rms, single isolation:
300V
with EN50178 standards and following conditions: over
voltage category III, pollution degree 2
• creepage distance:
5mm
• clearance distance:
5mm
• comparative tracking index CTI:
600V
Attention: when using Busbar without isolation regard
DSUB cable isolation or avoid contact!!
Degree of pollution
2
Temperature range
+10°C to +50°C
Weight
approx. 1.0 kg
Output connection
depending on adapter cable to LMGxx
supply
±15V / 1.08A
2.21.3 Accuracy
Accuracies based on: sinusoidal current, frequency DC to 100Hz, ambient temperature
23±3°C, calibration interval 1 year, conductor in the middle of the transducer.
PSU1000HF
Amplitude error
±(% of meas.value+% of measuring range PSU)
Phase error
0.015+0.005
0.02°
See specification of the LMG connection cable for the LMG measuring ranges and to
calculate the accuracy of the complete system.
ZES ZIMMER
89/218
Sensors and Accessories for precision power meters
Current sensors
2.21.4 Sensor operation without supply
It is important to assure a stable power supply of the sensor before switching on the load
current! The operation of the sensor with load current and without supply will cause
damage of the sensor and/or of the LMG/supply unit!
2.21.5 Connection of the sensor with LMG90/310 or other instruments with
current input
Use SSU4 with modification for PSU1000HF and PSU-K3/K5/K10 to connect PSU1000HF
with SSU4 and SSU4-K-L31 to connect current output of SSU4 with LMG90/310 I* and I.
2.21.6 Connection of the sensor with LMG95
Use SSU4 with modification for PSU1000HF and PSU-K3/K5/K10 to connect PSU1000HF
with SSU4 and SSU4-K-L31 to connect current output of SSU4 with LMG95 I* and I.
2.21.7 Connection of the sensor with LMG450
Use PSU1000HF-K and SSU4 with modifikation for PSU1000HF.
Figure 61: PSU1000HF-K, to connect the PSU1000HF to the LMG450 and the SSU4
This cable ‘PSU1000HF-K’ is used to connect a precision current sensor PSU1000HF to the
power meter LMG450 and to supply it by a sensor supply unit SSU4.
In the connector to the LMG the adjustment data of the PSU head is available as well as it’s
serial number. For this reason this connector is delivered already mounted to the PSU head
and the screws are sealed. This should prevent, that the wrong PSU head is connected to the
cable.
The connection is quiet simple:
• Switch all power off and plug the connector labeled ‘SSU-4’ to the SSU-4.
• Plug the connector labeled ‘LMG’ to the LMG450 external sensor input
ZES ZIMMER
90/218
Sensors and Accessories for precision power meters
Current sensors
• Now you can switch on the power and make your measurements. The power of the EUT
should be switched on at least.
Measuring ranges (sensor input)
nominal value
15A
31.25A 62.5A
max. trms value 31.25A 62.5A 125A
max. peak value 31.25A 62.5A 125A
125A
250A
250A
250A
500A
500A
500A
1000A
1000A
limited by PSU1000HF to max. 1000Apk!
Accuracy
Use PSU1000HF and LMG450 specifications to calculate the accuracy of the complete
system. Add ±150mA (to the primary current) DC offset tolerance.
2.21.8 Connection of the sensor with LMG500
Use PSU1000HF-K and SSU4 with modifikation for PSU1000HF.
Figure 62: PSU1000HF-K, to connect the PSU1000HF to the LMG500 and the SSU4
This cable ‘PSU1000HF-K’ is used to connect a precision current sensor PSU1000HF to the
power meter LMG500 and to supply it by a sensor supply unit SSU4.
In the connector to the LMG the adjustment data of the PSU head is available as well as it’s
serial number. For this reason this connector is delivered already mounted to the PSU head
and the screws are sealed. This should prevent, that the wrong PSU head is connected to the
cable.
The connection is quiet simple:
• Switch all power off and plug the connector labeled ‘SSU-4’ to the SSU-4.
• Plug the connector labeled ‘LMG’ to the LMG500 with Sensoradapter L50-Z14.
ZES ZIMMER
91/218
Sensors and Accessories for precision power meters
Current sensors
• Now you can switch on the power and make your measurements. The power of the EUT
should be switched on at least.
Figure 63: L50-Z14
Measuring ranges (sensor input)
nominal value
3.75A
max. trms value 7A
max. peak value 7A
7.5A
15.625A
15.625A
15A
31.25A 62.5A
31.25A 62.5A 125A
31.25A 62.5A 125A
125A
250A
250A
250A
500A
500A
500A
1000A
1000A
limited by PSU1000HF to max. 1000Apk!
Accuracy
Use PSU1000HF and LMG500 specifications to calculate the accuracy of the complete
system. Add ±150mA (to the primary current) DC offset tolerance.
2.21.9 Connection elongation
To use the current sensor with a longer connection length between power meter and PSU
connect a well shielded 1:1 extention cable between the PSU (DSUB9f plug) and the PSU
connection cable (DSUB9m plug) and screw both plugs together. This extention cable is
available at ZES (LMG-Z-DVxx). Required length (up to 15m) is to be given by customer
along with the order. Interference from strong electromagnetical disturbed environments may
affect the measurement accuracy. This depends from the respective installation in the
complete system and is out of responsibility of ZES ZIMMER.
ZES ZIMMER
92/218
Sensors and Accessories for precision power meters
Current sensors
2.22 Precision current transducer 2000A (PSU2000)
Figure 64: Dimensions of the PSU2000
2.22.1
Safety warning!
Always connect the sensor first to the meter, and afterwards to the device under test.
Dont allow primary current without supply of the PSU!
Please refer to chapter 1.1: ‘Safety precautions’!
2.22.2 Current direction marking
Please regard the arrow ‘technical current flow’ in the figure above! Sometimes the physical
current flow is marked on the transducer, in doubt: please compare with the technical drawing,
this arrow is valid.
2.22.3 Specifications
Nominal input current
Nominal secondary current
Transformation ratio
ZES ZIMMER
±1000Apk to ±2000Apk, user selectable in 125Apk
steps
±1Apk
1000:1 to 2000:1, depends on the selected nominal
input current
93/218
Sensors and Accessories for precision power meters
Current sensors
Measuring range PSU (normal
operation)
Overload capacity (fault)
Bandwidth ±3dB (small signal 0.5%
Inom)
Slew rate (10%-90%)
Burden
Isolation
Degree of pollution
Temperature range
Weight
Output connection
±1150Apk to ±2300Apk, depends on the selected
nominal input current
500kA for 0.1s
DC to 100kHz
>20kA/ms
<1.2 ohms
Test voltage secondary connector to busbar
5kV AC
Attention: when using Busbar without isolation
regard DSUB cable isolation or avoid contact!!
2
transducer head:
0°C to +60°C
electronics:
+10°C to +40°C
transducer head:
3.5kg
25 pole Sub-D from sensor head to measuring
electronics mounted in a separate rack (PSU-S20)
2.22.4 Accuracy
Accuracies based on: sinusoidal current, frequency DC to 100Hz, ambient temperature
23±3°C, calibration interval 1 year, conductor in the middle of the transducer.
Phase error
Amplitude error ±(% of measuring value +
% of measuring range PSU)
PSU2000
0.015+0.005
0.02°
Use PSU2000 and LMG specifications to calculate the accuracy of the complete system.
2.22.5 Programming the PSU2000 with the programming plug
If the programming plug is used, always connect the programming plug to the
transducer head side of the cable, NOT to the PSU-S20!
For the current range 1000A no programming plug is required.
Connection
PIN No.
Current
1000A
ZES ZIMMER
Jumper wiring
P2
P1
male
female
only at P1
No programming plug required, connect cable directly to the head
94/218
Sensors and Accessories for precision power meters
Current sensors
1125A
1250A
1375A
1500A
1625A
1750A
1875A
12
to
6
7
to
12
24
to
18
19
to
24
12
to
8
9
to
12
24
to
20
21
to
24
12
to
6
7
to
8
9
to
12
24
to
18
19
to
20
21
to
24
12
to
10
11
to
12
24
to
22
23
to
24
12
to
6
7
to
10
11
to
12
24
to
18
19
to
22
23
to
24
12
to
8
9
to
10
11
to
12
24
to
20
21
to
22
23
to
24
12
to
6
7
to
8
9
to
10
11
to
12
19
to
20
21
to
22
23
to
24
7
to
8
9
to
10
11
to
12
17
to
18
19
to
20
21
to
22
23
to
24
(refer
example
24
to
18
2.22.6)
2000A
12
24
to
to
6
16
1
to
1
2
to
2
Fixed
4
to
4
connections
5
to
5
all jumper wirings depend on the
for all
13
to
13
currents to be measured
currents
14
to
14
15
to
15
25
to
25
P1 is connected to the PSU2000 head, P2 to the cable, refer 2.22.8.
2.22.6 Programming example of the Programming plug
In the following figure you can see an programming example for 1875 Ampere.
ZES ZIMMER
95/218
Sensors and Accessories for precision power meters
Current sensors
Figure 65: Schematic of the PSU2000 programming plug for 1875A
2.22.7 Supply unit PSU-S20
Magazin (19“) for electronic board and supply of 1 to 3 PSU2000.
Input voltage
Dimensions W*D*H
Weight
Connection PSU-S20 to PSU2000
230V (115V on request) ±10%, 50-60Hz,
40W per sensor
19“ * 300mm * 3 units
10kg
standard length: 2.5m special 25 pole DSUB cable
optional available on request: 5m, 10m
ZES part number: PSU2000-K-xxx (where xxx is the
cable length in m)
2.22.8 Pictures of the PSU2000 connection
Single channel PSU2000 system
ZES ZIMMER
96/218
Sensors and Accessories for precision power meters
Current sensors
Electronic rack
Transducer head
Programming plug
2.22.9 Connection of the sensor with LMG90/310 or other instruments with
current input
Use direct current inputs I* and I.
2.22.10 Connection of the sensor with LMG95
direct current input I* and I
with L95-O8-2 modification
with LMG-SH001 (1 ohm)
ZES ZIMMER
150mA .. 1.2A range
10mA .. 1.2A range
30mA .. 1A range
97/218
4 ranges
8 ranges
6 ranges
Sensors and Accessories for precision power meters
Current sensors
2.22.11 Connection of the sensor with LMG450
direct current input I* and I
with L45-Z22
600mA .. 1.2A range
30mA .. 1A range
2 ranges
6 ranges
2.22.12 Connection of the sensor with LMG500
direct current input I* and I
ZES ZIMMER
20mA .. 1.2A range
98/218
7 ranges
Sensors and Accessories for precision power meters
Current sensors
2.23 Precision current transducer 2/5kA (SAT2000,SAT2000hf,SAT5000)
Figure 66: Dimensions of the SAT2000 / SAT2000hf transducer head
Figure 67: Dimensions of the SAT5000 transducer head
ZES ZIMMER
99/218
Sensors and Accessories for precision power meters
Current sensors
Figure 68: Dimensions of the SAT supply unit and electronics
Figure 69:SAT5000 three phase system
Figure 70:SAT technical current direction
2.23.1
Safety warning!
All transducer heads must be connected to earth ground!
First connect the transducer head to the unit using the transducer head cable and mount
the programming plug in the connector on the head (not necessary with SAT2000hf),
connect the power meter, switch on the SAT supply rack and afterwards switch on the
device under test. Dont allow primary current without supply of the SAT unit!
ZES ZIMMER
100/218
Sensors and Accessories for precision power meters
Current sensors
This transducer must be used in electric/electronic equipment with respect to
applicable standards and safety requirements in accordance with the manufacturer’s
operating instructions. When operating the transducer, certain parts of the module can
carry hazardous voltage (e.g. primary busbar, power supply). Ignoring this warning can
lead to injury and/or cause serious damage. This transducer is a build-in device, whose
conducting parts must be inaccessible after installation. A protective housing or
additional shield could be used. Main supply must be able to be disconnected.
Please refer to chapter 1.1: ‘Safety precautions’!
2.23.2 Grounding the transducer head
For safety reasons, all transducer heads must be connected to earth ground! Connect the earth
wire to the transducer head using a M10 ring terminal fastened to one of the 4 mounting holes
on the brackets.
2.23.3 Quick start / power up the system
To quickly get your SAT system up and running follow the instructions:
• Connect the transducer head to the electronics and supply unit using the supplied
transducer head cable and mount the programming plug head (not necessary with
SAT2000hf) in the connector on the head.
• Connect the precision power meter LMG to the SAT analogue current output using the
supplied cable. Connect the red wire with I* and the black wire with I of the power meter.
• See that the transducer head is connected to earth!
• Make sure the voltage selector on the IEC inlet is set to the local voltage and connect the
power cord.
• Switch on the system. The SAT will now measure the current running through the
transducer head. On the front plate the status of the unit can be monitored using the 7
LEDs.
ZES ZIMMER
101/218
Sensors and Accessories for precision power meters
Current sensors
Figure 71:SAT installation
2.23.4 LEDs on the front
On the front of the electronics and supply rack there are 7 LEDs for indication of system
status, warning and error:
POWER:
STATUS:
Ip LOW:
This LED is lit (blue) when the electronics and supply rack is on.
This LED is lit (green) when the status of the unit is OK.
This LED is lit (yellow) when the current passing through the transducer head
is below 0.5% of the programmed maximum current.
600A:
not used
2000A:
This LED is lit (yellow) when a SAT2000 transducer head is connected to the
electronics and supply rack.
5000A:
This LED is lit (yellow) when a SAT5000 transducer head is connected to the
electronics and supply rack.
OVERLOAD: This LED is lit (red) when the current passing through the transducer head
exceeds 130% of the maximum current for the transducer head (including
programming) or the transducer head saturates.
ZES ZIMMER
102/218
Sensors and Accessories for precision power meters
Current sensors
2.23.5 Status / Interlock connector
All signals on the Status / Interlock port are floating relay type. All signals are therefore
isolated from the electrical circuits of the unit. Maximum allowed voltage on the relay
switches is 33VAC or 70VDC. Exceeding this limit may cause malfunction or damage the
equipment. DSUB9 male, pin assignment:
pin1: Normal operation on. When the unit status is OK (Normal operation) this pin is
connected to the Normal operation common pin.
pin2: Normal operation off. When the unit status is not OK (error, overload warning etc.)
this pin is connected to the Normal operation common.
pin3: Ip Low common: This pin is connected to either Ip Low on or Ip Low off depending on
the unit’s status.
pin4: Overload warning on: This pin is connected to the Overload common pin when the
current through the transducer head exceeds 10% of the maximum programmed
current.
pin5: Overload warning Off: This pin is connected to the Overload common pin when the
unit is in normal mode and the current through the transducer head is within the
measurement area.
pin6: Normal operation common: This pin is connected to either Normal operation on or the
Normal operation off depending on the unit’s status.
pin7: Ip Low on: This pin is connected to Ip Low common when the current through the
transducer head is below 0.5% of the programmed current.
pin8: Ip Low off: This pin is connected to the Ip Low common when the current through the
transducer head is above 0.5% of the programmed current.
pin9: Overload warning common: This pin is connected to either Overload warning on or
Overload warning off pin depending on the unit’s status.
2.23.6 Analogue output connection
DSUB15 female, pin assignment:
pin1,2:
pin9,10:
pin3,4,5,6,7,8,11,12,13,14,15:
current return (Ilow)
current out (I*)
do not connect!
Two adaptors are included in delivery:
1. DSUB15f to three 4mm plugs, 1.5m, red: current output / black: current return / blue:
guard.
2. DSUB15f to two 4mm plugs, 10cm, red: current output / black: current return
ZES ZIMMER
103/218
Sensors and Accessories for precision power meters
Current sensors
2.23.7 Mounting requirements
The electronics and supply unit must be mounted horizontally. To ensure proper cooling the
heat sink on the right and the air inlet on the left side of the unit must be kept free. Failure to
do this may result in improper cooling of the system which may lead to malfunction of the
unit.
Transducer heads are mounted using four M10 screws inserted into the holes on the brackets.
The heads can be installed in any directions.
2.23.8 General specifications
degree of pollution
operating environment
power supply
connection cable between
transducer and supply unit
analogue output connector
status/interlock connector
2
temperature transducer head: +0°C to +55°C
temperature electronics rack: +10°C to +40°C
humidity (noncondensing): 20-80%RH
ambient storage temperature: -20°C to +85°C
100/115/230V ±10% (user-selectable), 50..60Hz,
SAT2000: 50VA / SAT2000hf: 50VA / SAT5000: 100VA
standard:
10m
optional on request: 2.5m, 5m, 20m, 30m
DSUB15 female, use analogue current output adapter to
connect with the power meter LMG
DSUB9 male
2.23.9 Specifications SAT2000
nominal input current
nominal secondary current
transformation ratio
overload capacity
DC accuracy
offset error:
offset stability (no load):
linearity error:
temperature coefficient of I
(10°C .. 40°C):
ZES ZIMMER
±125Apk to ±2000Apk,
user selectable in 125Apk steps, please specify at order
±1Apk
depends on programming adapter (max. nominal input
current):
125:1 ... 2000:1
±10kA for 100ms
<2ppm
<1ppm/month
<2ppm
<0.1ppm/K
104/218
Sensors and Accessories for precision power meters
Current sensors
bandwidth ±3dB (<1% Inom)
dynamic response, di/dt
external burden
busbar free zone
isolation characteristics
weight
Use SAT2000 and LMG specifications to calculate the
accuracy of the complete system.
DC .. 50kHz
slew rate (10%-90%): >20A/us
delay time: <1us
0 .. 1.5 ohms
l = 110mm, r = 110mm
• rated isolation voltage rms, reinforced isolation: 1250V
rated isolation voltage rms, single isolation:
2500V
with IEC 61010-1 standards and following conditions:
over voltage category III, pollution degree 2
• rms voltage, AC isolation test, 50/60Hz, 1min: 10.8kV
• impuls withstand voltage 1.2/50us:
19.9kV
• rated isolation voltage rms, reinforced isolation: 1250V
rated isolation voltage rms, single isolation:
2500V
with EN50178 standards and following conditions: over
voltage category III, pollution degree 2
• creepage distance:
25mm
• clearance distance:
25mm
• comparative tracking index CTI:
100V
Attention: when using Busbar without isolation regard
output cable isolation or avoid contact!!
transducer head:
approx. 4.5kg
supply rack:
approx. 5kg
2.23.10 Specifications SAT2000hf
nominal input current
nominal secondary current
transformation ratio
overload capacity
DC accuracy
offset error:
offset stability (no load):
linearity error:
temperature coefficient of I
(10°C .. 40°C):
ZES ZIMMER
±2000Apk,
±2Apk
1000:1
±10kA for 100ms
<2ppm
<1ppm/month
<2ppm
<0.1ppm/K
Use SAT2000hf and LMG specifications to calculate the
105/218
Sensors and Accessories for precision power meters
Current sensors
bandwidth ±3dB (<1% Inom)
dynamic response, di/dt
external burden
busbar free zone
isolation characteristics
weight
accuracy of the complete system.
DC .. 300kHz
TBD
0 .. 1.5 ohms
l = 110mm, r = 110mm
• rated isolation voltage rms, reinforced isolation: 1250V
rated isolation voltage rms, single isolation:
2500V
with IEC 61010-1 standards and following conditions:
over voltage category III, pollution degree 2
• rms voltage, AC isolation test, 50/60Hz, 1min: 10.8kV
• impuls withstand voltage 1.2/50us:
19.9kV
• rated isolation voltage rms, reinforced isolation: 1250V
rated isolation voltage rms, single isolation:
2500V
with EN50178 standards and following conditions: over
voltage category III, pollution degree 2
• creepage distance:
25mm
• clearance distance:
25mm
• comparative tracking index CTI:
100V
Attention: when using Busbar without isolation regard
output cable isolation or avoid contact!!
transducer head:
approx. 4.5kg
supply rack:
approx. 5kg
2.23.11 Specifications SAT5000
nominal input current
nominal secondary current
transformation ratio
overload capacity
DC accuracy
offset error:
offset stability (no load):
linearity error:
temperature coefficient of I
(10°C .. 40°C):
ZES ZIMMER
±2500Apk to ±5000Apk,
user selectable in 250Apk steps, please specify at order
±2Apk
depends on programming adapter (max. nominal input
current):
1250:1 ... 2500:1
±50kA for 100ms
<2ppm
<1ppm/month
<3ppm
<0.1ppm/K
106/218
Sensors and Accessories for precision power meters
Current sensors
bandwidth ±3dB (<0.5% Inom)
dynamic response, di/dt
external burden
busbar free zone
isolation characteristics
weight
Use SAT5000 and LMG specifications to calculate the
accuracy of the complete system.
DC .. 50kHz
slew rate (10%-90%): >20A/us
delay time: <1us
0 .. 0.75 ohms
l = 450mm, r = 225mm
• rated isolation voltage rms, reinforced isolation: 1250V
rated isolation voltage rms, single isolation:
2500V
with IEC 61010-1 standards and following conditions:
over voltage category III, pollution degree 2
• rms voltage, AC isolation test, 50/60Hz, 1min: 10.8kV
• impuls withstand voltage 1.2/50us:
19.9kV
• rated isolation voltage rms, reinforced isolation: 1250V
rated isolation voltage rms, single isolation:
2500V
with EN50178 standards and following conditions: over
voltage category III, pollution degree 2
• creepage distance:
25mm
• clearance distance:
25mm
• comparative tracking index CTI:
100V
Attention: when using Busbar without isolation regard
output cable isolation or avoid contact!!
transducer head:
approx. 17kg
supply rack:
approx. 5kg
2.23.12 Connection of the sensors with LMG90/310 or other instruments with
current input
Use direct current inputs I* and I.
2.23.13 Connection of the SAT2000 / SAT2000hf sensor with LMG95
direct current input I* and I
with L95-O8-3 modification
150mA .. 1.2A range
40mA .. 1.2A range
4 ranges
6 ranges
2.23.14 Connection of the SAT2000 / SAT2000hf sensor with LMG450
direct current input I* and I
ZES ZIMMER
600mA .. 1.2A range
107/218
2 ranges
Sensors and Accessories for precision power meters
Current sensors
2.23.15 Connection of the SAT2000 / SAT2000hf sensor with LMG500
direct current input I* and I
20mA .. 1.2A range
7 ranges
2.23.16 Connection of the SAT5000 sensor with LMG95
direct current input I* and I
with L95-O8-3 modification
150mA .. 2.5A range
40mA .. 2.5A range
5 ranges
7 ranges
2.23.17 Connection of the SAT5000 sensor with LMG450
direct current input I* and I
600mA .. 2.5A range
3 ranges
2.23.18 Connection of the SAT5000 sensor with LMG500
direct current input I* and I
20mA .. 2.5A range
8 ranges
2.23.19 Included in delivery
•
•
•
•
transducer head
connection cable between transducer head and electronics rack standard length 10m
rack with supply and electronics, including AC power cord
programming plug, please specify the current range at order!
(not necessary with SAT2000hf)
• analogue current output adapter for the connection with the precision powermeter LMG
DSUB15 female to three 4mm plugs (current output, current return, guard), 1.5m, can be
extended to up to 15m by using standard laboratory leads
• analogue current output adapter for the connection with the precision powermeter LMG
DSUB15female to two 4mm plugs (current output, current return), 10cm, can be extended
to up to 15m by using standard laboratory leads
ZES ZIMMER
108/218
Sensors and Accessories for precision power meters
Current sensors
2.24 Hall current sensors, 50/100/200A (L45-Z28-HALLxx)
Figure 72: Dimensions of the L45-Z28-HALL50 and HALL100
Figure 73: Dimensions of the L45-Z28-HALL200
2.24.1
Safety warning!
Always connect the sensor first to the meter, and afterwards to the device under test.
Connecting cable without savety isolation! Avoid contact to hazardous voltage!
Do not overload any current sensor with more than the measurable TRMS value!
Please refer to chapter 1.1: ‘Safety precautions’!
2.24.2 Specifications and accuracies
Accuracies based on: sinusoidal current, ambient temperature 23±3°C, calibration interval 1
year, conductor in the middle of the hall sensor.
ZES ZIMMER
109/218
Sensors and Accessories for precision power meters
Current sensors
Sensor
Rated range value
Measurable TRMS value
Permissible peak value
Accuracies in % of measurable TRMS value at 50Hz
HALL50
35A
50A
70A
HALL100
60A
100A
120A
HALL200
120A
200A
240A
±0.9
±0.7
±0.65
DC offset error at 25°C
±0.2A
±0.2A
±0.4A
DC offset thermal drift (0°C.. 70°C)
±0.5A
±0.5A
±0.5A
Response time at 90% of measurable TRMS value
<1µs
<1µs
<1µs
> 200A/µs
DC to 200kHz
> 200A/µs
DC to 200kHz
> 200A/µs
DC to 100kHz
di/dt accurately followed
Bandwidth (-1dB)
Use HALLxx and LMG specifications to calculate the accuracy of the complete system.
This sensors are supplied by the HD15 sensor connector of the LMG.
2.24.3 Sensor operation without supply
It is important to assure a stable power supply of the sensor before switching on the load
current! The operation of the sensor with load current and without supply will cause
damage of the sensor and/or of the LMG/supply unit!
To remove the LMG/supply unit from the test location without removing the sensors from the
current path, disconnect the HD15 plug from the LMG and connect all of the 15pins together
with ground (shield of the plug). To do this, the load current has to be switched off!
2.24.4 Connection of the sensor with LMG90/310
The use with LMG90 and LMG310 is not possible.
2.24.5 Connection of the sensor with LMG95
Use L95-Z07, internal supply via LMG and the Isensor/external shunt input. Set LMG current
scaling factor appropriate to the scaling factor marked on the label on L95-Z07.
2.24.6 Connection of the sensor with LMG450
Use sensor input, you get the following ranges:
HALL50:
nominal value
max. trms value
max. peak value
1.09A
1.57A
2.19A
2.19A
3.13A
4.38A
4.38A
6.25A
8.75A
8.75A
12.5A
17.5A
17.5A
25A
35A
35A
50A
70A
HALL100:
ZES ZIMMER
110/218
Sensors and Accessories for precision power meters
Current sensors
nominal value
max. trms value
max. peak value
1.88A
3.13A
3.75A
3.75A
6.25A
7.5A
7.5A
12.5A
15A
3.75A
6.25A
7.5A
7.5A
12.5A
15A
15A
25A
30A
15A
25A
30A
30A
50A
60A
60A
100A
120A
60A
100A
120A
120A
200A
240A
HALL200:
nominal value
max. trms value
max. peak value
30A
50A
60A
2.24.7 Connection of the sensor with LMG500
Use L50-Z14, you get the following ranges:
HALL50:
nominal value
max. trms value
max. peak value
0.27A
0.39A
0.55A
0.55A
0.79A
1.09A
1.09A
1.57A
2.19A
2.19A
3.13A
4.38A
4.38A
6.25A
8.75A
8.75A
12.5A
17.5A
0.47A
0.79A
0.94A
0.94A
1.57A
1.88A
1.88A
3.13A
3.75A
3.75A
6.25A
7.5A
7.5A
12.5A
15A
15A
25A
30A
0.94A
1.57A
1.88A
1.88A
3.13A
3.75A
3.75A
6.25A
7.5A
7.5A
12.5A
15A
15A
25A
30A
17.5A
25A
35A
35A
50A
70A
HALL100:
nominal value
max. trms value
max. peak value
30A
50A
60A
60A
100A
120A
60A
100A
120A
120A
200A
240A
HALL200:
nominal value
max. trms value
max. peak value
ZES ZIMMER
111/218
30A
50A
60A
Sensors and Accessories for precision power meters
Current sensors
2.25 Hall current sensors, 300/500/1k/2kA (L45-Z29-HALLxx)
Figure 74: Dimensions of the L45-Z29-HALL300
Figure 75: Dimensons of the L45-Z29-HALL500
Figure 76: Dimensions of the L45-Z29-HALL1000
ZES ZIMMER
112/218
Sensors and Accessories for precision power meters
Current sensors
Figure 77: Dimensions of the L45-Z29-HALL2000
2.25.1
Safety warning!
Always connect the sensor first to the meter, and afterwards to the device under test.
Connecting cable without savety isolation! Avoid contact to hazardous voltage!
Do not overload any current sensor with more than the measurable TRMS value!
Please refer to chapter 1.1: ‘Safety precautions’!
2.25.2 Specifications and accuracies
Accuracies based on: sinusoidal current, ambient temperature 23±3°C, calibration interval 1
year, conductor in the middle of the hall sensor.
Sensor
Rated range value
Measurable TRMS value
Permissible peak value
Accuracies in % of measurable TRMS value at
50Hz
DC offset error at 25°C
HALL300
250A
300A
500A
HALL500
400A
500A
800A
HALL1000
600A
1000A
1200A
HALL2000
1000A
2000A
2100A
±0.4
±0.8
±0.4
±0.3
±0.4A
±0.5A
±2A
±4A
DC offset thermal drift (0°C.. 70°C)
±1.3A
±0.6A
±2.5A
±1.5A
Response time at 90% of measurable TRMS value
<1µs
<1µs
<1µs
<1µs
> 100A/µs
DC..100kHz
270mA
> 100A/µs
DC..100kHz
420mA
> 50A/µs
DC..150kHz
270mA
> 50A/µs
DC..100kHz
460mA
di/dt accurately followed
Bandwidth (-1dB)
Supply current @ ±15V
Use HALLxx and LMG specifications to calculate the accuracy of the complete system.
This sensors have an additional 9 pin SUB-D connector for an external supply (for example
SSU4). If you want to use your own supply, you have to use the following pins of the 9 pin
SUB-D connector:
ZES ZIMMER
113/218
Sensors and Accessories for precision power meters
Current sensors
GND: Pin 3 and Pin 4 (always connect both)
-15V Pin 5
+15V Pin 9
Please make sure, that your own power supply can drive the needed supply current. If you
offer too few current you will get distortions and other accuracy losses in your measured
current without warning!
2.25.3 Sensor operation without supply
It is important to assure a stable power supply of the sensor before switching on the load
current! The operation of the sensor with load current and without supply will cause
damage of the sensor and/or of the LMG/supply unit!
To remove the LMG/supply unit from the test location without removing the sensors from the
current path, disconnect the DSUB9 plug and the HD15 plug from the LMG and connect all
of the 9pins and all of the 15pins together with ground (shield of the plugs). To do this, the
load current has to be switched off!
2.25.4 Connection of the sensor with LMG90/310
The use with LMG90 and LMG310 is not possible.
2.25.5 Connection of the sensor with LMG95
The use with LMG95 is not recommended, better use: L50-Z29-Hallxx and L95-Z07. Set
LMG current scaling factor appropriate to the scaling factor marked on the label on L95-Z07.
2.25.6 Connection of the sensor with LMG450
Use sensor input, you get the following ranges:
HALL300:
nominal value
max. trms value
max. peak value
7.8A
9.4A
15.6A
15.6A
18.7A
31.1A
31.1A
37.5A
62.5A
62.5A
75A
125A
125A
150A
250A
250A
300A
500A
12.5A
15.6A
25A
25A
31.1A
50A
50A
62.5A
100A
100A
125A
200A
200A
250A
400A
400A
500A
800A
HALL500:
nominal value
max. trms value
max. peak value
HALL1000:
ZES ZIMMER
114/218
Sensors and Accessories for precision power meters
Current sensors
nominal value
max. trms value
max. peak value
18.7A
31.1A
37.5A
37.5A
62.5A
75A
75A
125A
150A
150A
250A
300A
300A
500A
600A
31.1A
62.5A
65.6A
62.5A
125A
131A
125A
250A
263A
250A
500A
525A
500A
1000A
1050A
600A
1000A
1200A
HALL2000:
nominal value
max. trms value
max. peak value
1000A
2000A
2100A
2.25.7 Connection of the sensor with LMG500
The use with LMG500 is not recommended, please see L50-Z29-Hallxx
ZES ZIMMER
115/218
Sensors and Accessories for precision power meters
Current sensors
2.26 Hall current sensors, 300/500/1k/2kA (L50-Z29-HALLxx)
Figure 78: Dimensions of the L50-Z29-Hall300
Figure 79: Dimensons of the L50-Z29-Hall500
Figure 80: Dimensions of the L50-Z29-Hall1000
Figure 81: Dimensions of the L50-Z29-Hall2000
ZES ZIMMER
116/218
Sensors and Accessories for precision power meters
Current sensors
2.26.1
Safety warning!
Always connect the sensor first to the meter, and afterwards to the device under test.
Connecting cable without savety isolation! Avoid contact to hazardous voltage!
Do not overload any current sensor with more than the measurable TRMS value!
Please refer to chapter 1.1: ‘Safety precautions’!
2.26.2 Specifications and accuracies
Accuracies based on: sinusoidal current, ambient temperature 23±3°C, calibration interval 1
year, conductor in the middle of the hall sensor.
Sensor
Rated range value
Measurable TRMS value
Permissible peak value
Accuracies in % of measurable TRMS value at
50Hz
DC offset error at 25°C
HALL300
250A
300A
500A
HALL500
400A
500A
800A
HALL1000
600A
1000A
1200A
HALL2000
1000A
2000A
2100A
±0.4
±0.8
±0.4
±0.3
±0.4A
±0.5A
±2A
±4A
DC offset thermal drift (0°C.. 70°C)
±1.3A
±0.6A
±2.5A
±1.5A
Response time at 90% of measurable TRMS value
<1µs
<1µs
<1µs
<1µs
> 100A/µs
DC..100kHz
> 100A/µs
DC..100kHz
> 50A/µs
DC..150kHz
> 50A/µs
DC..100kHz
di/dt accurately followed
Bandwidth (-1dB)
Use HALLxx and LMG specifications to calculate the accuracy of the complete system.
2.26.3 Sensor operation without supply
It is important to assure a stable power supply of the sensor before switching on the load
current! The operation of the sensor with load current and without supply will cause
damage of the sensor and/or of the LMG/supply unit!
To remove the LMG/supply unit from the test location without removing the sensors from the
current path, disconnect the HD15 plug from the LMG and connect all of the 15pins together
with ground (shield of the plug). To do this, the load current has to be switched off!
2.26.4 Connection of the sensor with LMG90/310
The use with LMG90 and LMG310 is not possible.
2.26.5 Connection of the sensor with LMG95
Use L95-Z07, internal supply via LMG and the Isensor/external shunt input. Set LMG current
scaling factor appropriate to the scaling factor marked on the label on L95-Z07.
ZES ZIMMER
117/218
Sensors and Accessories for precision power meters
Current sensors
2.26.6 Connection of the sensor with LMG450
The use with LMG450 is not possible!
2.26.7 Connection of the sensor with LMG500
Use L50-Z14, internal supply via LMG, you get the following ranges:
HALL300:
nominal value
max. trms value
max. peak value
2A
2.4A
3.9A
3.9A
4.7A
7.8A
7.8A
9.4A
15.6A
15.6A
18.7A
31.1A
31.1A
37.5A
62.5A
62.5A
75A
125A
125A
150A
250A
250A
300A
500A
HALL500:
nominal value
max. trms value
max. peak value
3.13A
3.9A
6.25A
6.25A
7.8A
12.5A
12.5A
15.6A
25A
25A
31.1A
50A
50A
62.5A
100A
100A
125A
200A
200A
250A
400A
400A
500A
800A
HALL1000:
nominal value
max. trms value
max. peak value
4.7A
7.8A
9.4A
9.4A
15.6A
18.7A
18.7A
31.1A
37.5A
37.5A
62.5A
75A
75A
125A
150A
150A
250A
300A
300A
500A
600A
600A
1000A
1200A
HALL2000:
nominal value
max. trms value
max. peak value
ZES ZIMMER
7.8A
15.6A
16.4A
15.6A
31.1A
32.8A
31.1A
62.5A
65.6A
62.5A
125A
131A
118/218
125A
250A
263A
250A
500A
525A
500A
1000A
1050A
1000A
2000A
2100A
Sensors and Accessories for precision power meters
Current sensors
2.27 Rogowski flex sensors (L45-Z32-FLEXxx)
Figure 82: Dimensions of the L45-Z32-FLEX xx
Figure 83: Dimensions of the L45-Z32-FLEX xx
2.27.1
Safety warning!
Always connect the sensor first to the meter, and afterwards to the device under test.
Connecting cable without savety isolation! Avoid contact to hazardous voltage!
Please refer to chapter 1.1: ‘Safety precautions’!
2.27.2 Specifications
Sensor
Rated range value
FLEX 500
500A
FLEX 1000
1000A
FLEX 3000
3000A
Permissible peak range value
700A
1400A
4200A
Position sensitivity
±5%
±2%
±2%
10Hz .. 5kHz
10Hz .. 5kHz
10Hz .. 5kHz
Frequency range
Phase Shift (at 50/60Hz, cable in middle of the head)
0.1°
0.1°
0.1°
Rogowski sensor length
30cm
40cm
75cm
ZES ZIMMER
119/218
Sensors and Accessories for precision power meters
Current sensors
Connection cable length
Clip on round (diameter)
Clip on rectangular (a x b)
2m
75mm
2m
110mm
2m
200mm
20mm x 85mm
30mm x 120mm
60mm x 250mm
1
1
3
100g
120g
160g
max. loops
Weight
Temperature range
-20°C .. +85°C
Protection class
600V / CATIII
Degree of pollution
2
Output connection
HD15 plug (with EEPROM) for LMG sensor input
2.27.3 Accuracy
Accuracies based on: sinusoidal current, ambient temperature 23±3°C, calibration interval 1
year, conductor in the middle of the clamp.
The values are: ±(% of measuring value + % of rated range value)
Frequency/Hz
FLEX xx current accuracy
10Hz to 45Hz 45Hz to 65Hz 65Hz to 1kHz 1kHz to 5kHz
0.5+1.5
0.5+0.6
0.5+1.5
5+5
Use FLEXxx and LMG specifications to calculate the accuracy of the complete system.
2.27.4 Sensor operation without supply
It is important to assure a stable power supply of the sensor before switching on the load
current! The operation of the sensor with load current and without supply will cause
damage of the sensor and/or of the LMG/supply unit!
To remove the LMG/supply unit from the test location without removing the sensors from the
current path, disconnect the HD15 plug from the LMG and connect all of the 15pins together
with ground (shield of the plug). To do this, the load current has to be switched off!
2.27.5 Connection of the sensor with LMG90/310
The use with LMG90 and LMG310 is not possible.
2.27.6 Connection of the sensor with LMG95
Use L95-Z07, internal supply via LMG and the Isensor/external shunt input. Set LMG current
scaling factor appropriate to the scaling factor marked on the label on L95-Z07.
2.27.7 Connection of the sensor with LMG450
Use sensor input, internal supply via LMG, you get the following ranges:
FLEX500:
ZES ZIMMER
120/218
Sensors and Accessories for precision power meters
Current sensors
nominal value
max. trms value
max. peak value
15.6A
15.6A
21.9A
31.3A
31.3A
43.8A
62.5A
62.5A
87.5A
125A
125A
175A
250A
250A
350A
500A
500A
700A
31.3A
31.3A
43.8A
62.5A
62.5A
87.5A
125A
125A
175A
250A
250A
350A
500A
500A
700A
1000A
1000A
1400A
93.8A
93.8A
131A
188A
188A
263A
375A
375A
525A
750A
750A
1050A
1500A
1500A
2100A
FLEX1000:
nominal value
max. trms value
max. peak value
FLEX3000:
nominal value
max. trms value
max. peak value
3000A
3000A
4200A
2.27.8 Connection of the sensor with LMG500
Use L50-Z14, internal supply via LMG, you get the following ranges:
FLEX500:
nominal value
max. trms value
max. peak value
3.9A
3.9A
5.5A
7.8A
7.8A
10.9A
15.6A
15.6A
21.9A
31.3A
31.3A
43.8A
62.5A
62.5A
87.5A
125A
125A
175A
250A
250A
350A
500A
500A
700A
1000A
1000A
1400A
FLEX1000:
nominal value
max. trms value
max. peak value
7.8A
7.8A
10.9A
15.6A
15.6A
21.9A
31.3A
31.3A
43.8A
62.5A
62.5A
87.5A
125A
125A
175A
250A
250A
350A
500A
500A
700A
23.5A
23.5A
32.8A
46.9A
46.9A
65.6A
93.8A
93.8A
131A
188A
188A
263A
375A
375A
525A
750A
750A
1050A
1500A
1500A
2100A
FLEX3000:
nominal value
max. trms value
max. peak value
ZES ZIMMER
121/218
3000A
3000A
4200A
Sensors and Accessories for precision power meters
Current sensors
2.28 HF-summing current transformer (L95-Z06)
Figure 84: L95-Z06
2.28.1
Safety warning!
Always connect the sensor first to the meter, and afterwards to the device under test.
Please refer to chapter 1.1: ‘Safety precautions’!
L95-Z06 is an accessory for the precision power meters LMG with a high bandwidth. It
simplifies the measurement of output power in high frequency applications with floating
potential. For example: lighting applications, ultrasonic systems, loss power measurement at
television deflection coils. The high frequency design provides best accuracy at high
frequencies. The current transformer has a voltage output, for the direct connetion to the LMG
external Shunt-/ Transformer input.
The two galvanically separated primary windings are suitable to use in series to increase the
sensitivity for small currents. And it can be used as well to build the difference of two (e.g.
lamp-) currents. If not needed the second primary winding can be left open.
The guard terminal may be grounded to bypass capacitiv currents from input to output. This
reduce errors introduced by common mode voltage.
2.28.2 Specifications
Nominal input current
Transformer ratio
Measuring range
ZES ZIMMER
15A at I1 or I2 or (I1+I2)
18A:3V (set Iscale to 6)
18A (sum of I1+I2)
122/218
Sensors and Accessories for precision power meters
Current sensors
Maximum input
Bandwidth
output burden
20A at I1 and 20A at I2 for 1s
5kHz to 500kHz
≥ 100kΩ
600V CAT. III, 1000V CAT II
2
-10°C to +50°C
safety sockets 4mm (use twisted leads to LMG)
safety socket 4mm, green/yellow
safety sockets 4mm
200g
120mm*65mm*45mm
Working voltage
Degree of pollution
Temperature range
Output connection
Guard connection
Input connection
Weight
Size l*w*h
2.28.3 Accuracy
Accuracies based on: ambient temperature 23±3°C, calibration interval 1 year.
at 5kHz to 500kHz ±(% of measuring value)
Phase difference
0.5
1°
Use L95-Z06 and LMG specifications to calculate the accuracy of the complete system.
2.28.4 Wiring schematics
2.28.4.1 Lower currents
Figure 85: Low current application
For applications with lower currents use both inputs in series and set the LMG Iscale to 3.
ZES ZIMMER
123/218
Sensors and Accessories for precision power meters
Current sensors
2.28.4.2 Higher currents
Figure 86: High current application
For applications with higher currents use both inputs parallel and set the LMG Iscale to 6.
2.28.4.3 Arithmetic mean value
Figure 87: Arithmetic mean value application
To determine the arithmetic mean value of two currents: Imean = (I1+I2)/2, set the LMG
Iscale to 3. In high frequency lightning applications where a earth current worth mentioning is
present, the light density is proportional to the arithmetic mean value of the two currents I1
and I2.
ZES ZIMMER
124/218
Sensors and Accessories for precision power meters
Current sensors
2.28.4.4 Difference of two currents
Figure 88: Difference of two currents
To determine the difference of two currents: Ilamp=Isum-Istarter, set the LMG Iscale to: 6.
The lamp current Ilamp is the difference of Isum and the current through the starter electronic
during the operation.
2.28.4.5 Improving the accuracy due to common mode effects
In high frequency applications with current measurement on high common mode voltage
potential it is advantageous to connect the low output of this current transformer with earth.
There is a double galvanic separation: in the LMG and inside the current transformer itself. So
the secondary side has neither galvanic contact with the load current nor with earth: the
current channel is floating on an undefined potential. The HF-accuracy can be improved by
draging down the floating voltage to about earth potential.
2.28.5 Connection of the sensor with LMG90/310 or other instruments with
current input
The use with LMG90 is not possible. With LMG310 use Isensor/external Shunt input.
2.28.6 Connection of the sensor with LMG95
Use Isensor/external Shunt input.
ZES ZIMMER
125/218
Sensors and Accessories for precision power meters
Current sensors
2.28.7 Connection of the sensor with LMG450
You can use L45-Z09, but it is not recommended to use this high frequency sensor with the
LMG450.
2.28.8 Connection of the sensor with LMG500
Use Isensor/external sensor input.
ZES ZIMMER
126/218
Sensors and Accessories for precision power meters
Current sensors
2.29 Highvoltage HF-summing current transformer (L95-Z06-HV)
Figure 89: L95-Z06-HV
2.29.1
Safety warning!
Always connect the sensor first to the meter and earth the guard terminal, and
afterwards to the device under test.
The guard terminal must be grounded to bypass capacitiv currents from input to
output. This also reduce errors by common mode voltage.
Please refer to chapter 1.1: ‘Safety precautions’!
L95-Z06-HV is an accessory for the precision power meters LMG with a high bandwidth. The
high voltage version of L95-Z06 eliminate the 4mm safety sockets as input terminals. The
limited clearances and creepage distances are removed by usage of highvoltage wire. All other
specifications are the same as L95-Z06.
It simplifies the measurement of output power in high frequency applications with floating
potential. For example: lighting applications, ultrasonic systems, loss power measurement at
television deflection coils. The high frequency design provides best accuracy at high
frequencies. The current transformer has a voltage output, for the direct connetion to the LMG
external Shunt-/ Transformer input.
The two galvanically separated primary windings are suitable to use in series to increase the
sensitivity for small currents. And it can be used as well to build the difference of two (e.g.
lamp-) currents. If not needed the second primary winding should be used in parallel to the
first primary winding.
ZES ZIMMER
127/218
Sensors and Accessories for precision power meters
Current sensors
2.29.2 Specifications
Nominal input current
Transformer ratio
Measuring range
Maximum input
Bandwidth
Output burden
15A at I1 or I2 or (I1+I2)
18A:3V (set Iscale to 6)
18A (sum of I1+I2)
20A at I1 and 20A at I2 for 1s
5kHz to 500kHz
≥ 100kΩ
5kVtrms
10kVpk
2
-10°C to +50°C
safety sockets 4mm (use twisted leads to LMG)
safety socket 4mm, green/yellow
free highvoltage wire approx. 0.8m
300g
120mm*65mm*125mm
Working voltage
Transient overvoltage
Degree of pollution
Temperature range
Output connection
PE connection
Input connection
Weight
Size l*w*h
2.29.3 Accuracy
Accuracies based on: ambient temperature 23±3°C, calibration interval 1 year.
at 5kHz to 500kHz ±(% of measuring value)
Phase difference
0.5
1°
Use L95-Z06 and LMG specifications to calculate the accuracy of the complete system.
ZES ZIMMER
128/218
Sensors and Accessories for precision power meters
Current sensors
2.29.4 Wiring schematics
2.29.4.1 Lower currents
Figure 90: Low current application
For applications with lower currents use both inputs in series and set the LMG Iscale to 3.
2.29.4.2 Higher currents
Figure 91: High current application
ZES ZIMMER
129/218
Sensors and Accessories for precision power meters
Current sensors
For applications with higher currents use both inputs parallel and set the LMG Iscale to 6.
2.29.4.3 Arithmetic mean value
Figure 92: Arithmetic mean value application
To determine the arithmetic mean value of two currents: Imean = (I1+I2)/2, set the LMG
Iscale to 3. In high frequency lightning applications where a earth current worth mentioning is
present, the light density is proportional to the arithmetic mean value of the two currents I1
and I2.
2.29.4.4 Difference of two currents
Figure 93: Difference of two currents
To determine the difference of two currents: Ilamp=Isum-Istarter, set the LMG Iscale to: 6.
The lamp current Ilamp is the difference of Isum and the current through the starter electronic
during the operation.
ZES ZIMMER
130/218
Sensors and Accessories for precision power meters
Current sensors
2.29.4.5 Improving the accuracy due to common mode effects
In high frequency applications with current measurement on high common mode voltage
potential it is advantageous to connect the low output of this current transformer with earth.
There is a double galvanic separation: in the LMG and inside the current transformer itself. So
the secondary side has neither galvanic contact with the load current nor with earth: the
current channel is floating on an undefined potential. The HF-accuracy can be improved by
draging down the floating voltage to about earth potential.
2.29.5 Connection of the sensor with LMG90/310 or other instruments with
current input
The use with LMG90 is not possible.
With LMG310 use Isensor/external Shunt input.
2.29.6 Connection of the sensor with LMG95
Use Isensor/external Shunt input.
2.29.7 Connection of the sensor with LMG450
You can use L45-Z09, but it is not recommended to use this high frequency sensor with the
LMG450.
2.29.8 Connection of the sensor with LMG500
Use Isensor/external sensor input.
ZES ZIMMER
131/218
Sensors and Accessories for precision power meters
Current sensors
2.30 Low current shunt (LMG-SHxx)
Figure 94: LMG-SHxx
2.30.1
Safety warning!
Always connect the sensor first to the meter, and afterwards to the device under test.
Please regard that there is no isolation inside the Sensor, therefore the instrument
needs isolated inputs! The Sensor is suitable for LMG95, LMG500 and LMG310, but
not for LMG450!
Please refer to chapter 1.1: ‘Safety precautions’!
2.30.2 Selection of the resistance value
Select an applicable shunt resistance according to the necessary load current range. Values
between 1 ohm and 1000 ohms are available. But take into concern, that this shunt resistance
is connected in series to your device under test. Oversized resistors may distort and take
influence on the load current.
2.30.3 Specifications, Accuracy
The specified accuracy is valid in combination with the LMG95 / LMG500 sensor input
impedance of 100kOhm and the correct setting of the scaling ratio (see table). Accuracies
based on: sinusoidal current, frequency 45-65 Hz, ambient temperature 23±3°C, calibration
interval 1 year. The values are in ±(% of measuring value). Use LMG-SHxx and LMG
specifications to calculate the accuracy of the complete system.
nominal
resistance
scaling ratio
1
ohm
2
ohms
5
ohms
10
ohms
20
ohms
50
ohms
100
ohms
200
ohms
500
ohms
1000
ohms
1.00001
0.50001
0.20001
0.10001
0.05001
0.02001
0.01001
0.00501
0.00201
0.00101
70
mA
50
mA
31
mA
22
mA
accuracy
0.15%
maximum trms 1000
input current
mA
710
mA
bandwidth
DC to 100kHz
protection
600V CAT III
ZES ZIMMER
450
mA
320
mA
160
mA
132/218
100
mA
Sensors and Accessories for precision power meters
Current sensors
class
degree of
pollution
2
temperature
range
0°C to +40°C
weight
100g
output
connection
Security BNC cable and adapter
2.30.4 Connection of the sensor with LMG90/310
The use with LMG90 is not possible. With LMG310 use Isensor/external Shunt input.
2.30.5 Connection of the sensor with LMG95
Use external Shunt input, you get the following ranges (all in A):
1ohm:
nominal value
max. trms value
max. peak value
30m
60m
97.7m
60m
130m
195.3m
120m
270m
390.6m
250m
540m
781.3m
500m
1
1.563
1
(2)
3.125
(2)
(4)
(6.25)
(4)
(8)
(12.5)
(regard maximum trms input current!)
2ohms:
nominal value
max. trms value
max. peak value
15m
30m
60m
30m
65m
135m
48.85m 97.65m 195.3m
125m
270m
390.7m
250m
500m
781.5m
500m
(1)
1.563
(1)
(2)
(3.125)
(2)
(4)
(6.25)
400m
(0.8)
1.25
(800m)
(1.6)
(2.5)
6m
12m
25m
50m
100m
200m
13m
27m
54m
100m
200m
(0.4)
19.53m 39.06m 78.13m 156.3m 312.5m 625m
(400m)
(800m)
(1.25)
(regard maximum trms input current!)
5ohms:
nominal value
6m
max. trms value 12m
max. peak value 19.54m
12m
26m
39.06m
24m
54m
78.12m
50m
108m
156.3m
100m
200m
312.6m
200m
400m
625m
(regard maximum trms input current!)
10ohms:
nominal value
max. trms value
max. peak value
ZES ZIMMER
3m
6m
9.77m
133/218
Sensors and Accessories for precision power meters
Current sensors
(regard maximum trms input current!)
20ohms:
nominal value
max. trms value
max. peak value
1.5m
3m
6m
12.5m 25m
50m
100m
(200m)
3m
6.5m
13.5m 27m
50m
100m
(0.2)
(400m)
4.885m 9.765m 19.53m 39.07m 78.15m 156.3m 312.5m (625m)
(regard maximum trms input current!)
50ohms:
nominal value
max. trms value
max. peak value
600u
1.2m
2.4m
5m
10m
20m
1.2m
2.6m
5.4m
10.8m 20m
40m
1.954m 3.906m 7.812m 15.63m 31.26m 62.5m
40m
80m
125m
80m
(0.16)
0.25
300u
600u
977u
20m
40m
62.5m
40m
(80m)
125m
100ohms:
nominal value
max. trms value
max. peak value
600u
1.3m
1.953m
1.2m
2.7m
3.906m
2.5m
5.4m
7.813m
5m
10m
15.63m
10m
20m
31.25m
200ohms:
nominal value
max. trms value
max. peak value
150u
300u
488.5u
300u
650u
976.5u
600u
1.25m 2.5m
5m
10m
20m
1.35m 2.7m
5m
10m
20m
40m
1.953m 3.907m 7.815m 15.63m 31.25m 62.5m
60u
120u
195.4u
120u
260u
390.6u
240u
540u
781.2u
500ohms:
nominal value
max. trms value
max. peak value
500u
1.08m
1.563m
1m
2m
3.126m
2m
4m
6.25m
4m
8m
12.5m
8m
16m
25m
1000ohms:
nominal value
max. trms value
max. peak value
ZES ZIMMER
30u
60u
97.7u
60u
130u
195.3u
120u
270u
390.6u
250u
540u
781.3u
134/218
500u
1m
1.563m
1m
2m
3.125m
2m
4m
6.25m
4m
8m
12.5m
Sensors and Accessories for precision power meters
Current sensors
2.30.6 Connection of the sensor with LMG450
The use with LMG450 is not possible!
2.30.7 Connection of the sensor with LMG500
Use external sensor input, you get the following ranges (all in A):
1ohm:
nominal value
max. trms value
max. peak value
30m
37m
63m
60m
75m
125m
120m
150m
250m
250m
300m
500m
500m
600m
1
1
(1.2)
2
(2)
(2.5)
(4)
(4)
(5)
(8)
(regard maximum trms input current!)
2ohms:
nominal value
max. trms value
max. peak value
15m
18.5m
31.5m
30m
37.5m
62.5m
60m
75m
125m
125m
150m
250m
250m
300m
500m
500m
600m
1
(1)
(1.25)
(2)
(2)
(2.5)
(4)
(regard maximum trms input current!)
5ohms:
nominal value
max. trms value
max. peak value
6m
7.4m
12.6m
12m
15m
25m
24m
30m
50m
50m
60m
100m
100m
120m
200m
200m
240m
400m
400m
(0.5)
800m
(800m)
(1)
(1.6)
12m
15m
25m
25m
30m
50m
50m
60m
100m
100m
120m
200m
200m
250m
400m
(400m)
(500m)
(800m)
(regard maximum trms input current!)
10ohms:
nominal value
max. trms value
max. peak value
3m
3.7m
6.3m
6m
7.5m
12.5m
(regard maximum trms input current!)
20ohms:
nominal value
max. trms value
max. peak value
ZES ZIMMER
1.5m
1.85m
3.15m
3m
3.75m
6.25m
6m
7.5m
12.5m
12.5m
15m
25m
135/218
25m
30m
50m
50m
60m
100m
100m
125m
200m
(200m)
(250m)
(400m)
Sensors and Accessories for precision power meters
Current sensors
(regard maximum trms input current!)
50ohms:
nominal value
max. trms value
max. peak value
600u
740u
1.26m
1.2m
1.5m
2.5m
2.4m
3m
5m
5m
6m
10m
10m
12m
20m
20m
24m
40m
40m
50m
80m
80m
100m
160m
1.2m
1.5m
2.5m
2.5m
3m
5m
5m
6m
10m
10m
12m
20m
20m
25m
40m
40m
50m
80m
600u
750u
1.25m
1.25m
1.5m
2.5m
(regard maximum trms input current!)
100ohms:
nominal value
max. trms value
max. peak value
300u
370u
630u
600u
750u
1.25m
(regard maximum trms input current!)
200ohms:
nominal value
max. trms value
max. peak value
150u
185u
315u
300u
375u
625u
2.5m
3m
5m
5m
6m
10m
10m
12.5m
20m
20m
25m
40m
(regard maximum trms input current!)
500ohms:
nominal value
max. trms value
max. peak value
60u
74u
126u
120u
150u
250u
240u
300u
500u
500u
600u
1m
1m
1.2m
2m
2m
2.4m
4m
4m
5m
8m
8m
10m
16m
2m
2.5m
4m
4m
5m
8m
(regard maximum trms input current!)
1000ohms:
nominal value
max. trms value
max. peak value
30u
37u
63u
60u
75u
125u
120u
150u
250u
250u
300u
500u
500u
600u
1m
1m
1.2m
2m
(regard maximum trms input current!)
ZES ZIMMER
136/218
Sensors and Accessories for precision power meters
Current sensors
2.31 Low current shunt with overload protection (LMG-SHxx-P)
Figure 95: LMG-SHxx-P
2.31.1
Safety warning!
Always connect the sensor first to the meter, and afterwards to the device under test.
Please regard that there is no isolation inside the Sensor, therefore the instrument
needs isolated inputs! The Sensor is suitable for LMG95, LMG500 and LMG310, but
not for LMG450!
Please refer to chapter 1.1: ‘Safety precautions’!
2.31.2 Selection of the resistance value
Select an applicable shunt resistance according to the necessary load current range. Values
between 1 ohm and 200 ohms are available. But take into concern, that this shunt resistance is
connected in series to your device under test. Oversized resistors may distort and take
influence on the load current.
2.31.3 Specifications, Accuracy
The specified accuracy is valid in combination with the LMG95 / LMG500 sensor input
impedance of 100kOhm and the correct setting of the scaling ratio (see table). Accuracies
based on: sinusoidal current, frequency 45-65 Hz, ambient temperature 23±3°C, calibration
interval 1 year. The values are in ±(% of measuring value). Use LMG-SHxx-P and LMG
specifications to calculate the accuracy of the complete system.
nominal
resistance
scaling ratio
accuracy
1
ohm
2
ohms
5
ohms
10
ohms
20
ohms
50
ohms
100
ohms
200
ohms
1.00001
0.50001
0.20001
0.10001
0.05001
0.02001
0.01001
0.00501
0.15%
maximum peak
710
350
140
input current for mApk mApk mApk
specified
accuracy
maximum trms
ZES ZIMMER
0.3%
70
35
10
5
2.5
mApk mApk mApk mApk mApk
20A (overload protection) for max. 1 minute
137/218
Sensors and Accessories for precision power meters
Current sensors
input current,
overload
bandwidth
DC to 10kHz
protection class
600V CAT III
degree of
pollution
2
temp. range
0°C to +40°C
weight
150g
output
connection
Security BNC cable and adapter
2.31.4 Connection of the sensor with LMG90/310
The use with LMG90 is not possible. With LMG310 use Isensor/external Shunt input.
2.31.5 Connection of the sensor with LMG95
Use external Shunt input, you get the following ranges (all in A):
1ohm:
nominal value
max. trms value
max. peak value
30m
60m
97.7m
60m
130m
195.3m
120m
270m
390.6m
250m
540m
781.3m
500m
1
1.563
1
2
3.125
2
4
6.25
4
8
12.5
(don’t use the upper ranges, outside accuracy specification!)
2ohms:
nominal value
max. trms value
max. peak value
15m
30m
60m
30m
65m
135m
48.85m 97.65m 195.3m
125m
270m
390.7m
250m
500m
781.5m
500m
1
1.563
1
2
3.125
2
4
6.25
200m
400m
625m
400m
800m
1.25
800m
1.6
2.5
200m
400m
(don’t use the upper ranges, outside accuracy specification!)
5ohms:
nominal value
6m
max. trms value 12m
max. peak value 19.54m
12m
26m
39.06m
24m
50m
54m
108m
78.12m 156.3m
100m
200m
312.6m
(don’t use the upper ranges, outside accuracy specification!)
10ohms:
nominal value
ZES ZIMMER
3m
6m
12m
25m
138/218
50m
100m
Sensors and Accessories for precision power meters
Current sensors
max. trms value
max. peak value
6m
9.77m
13m
27m
54m
100m
200m
400m
19.53m 39.06m 78.13m 156.3m 312.5m 625m
800m
1.25
(don’t use the upper ranges, outside accuracy specification!)
20ohms:
nominal value
max. trms value
max. peak value
1.5m
3m
6m
12.5m 25m
50m
100m
200m
3m
6.5m
13.5m 27m
50m
100m
200m
400m
4.885m 9.765m 19.53m 39.07m 78.15m 156.3m 312.5m 625m
(don’t use the upper ranges, outside accuracy specification!)
50ohms:
nominal value
max. trms value
max. peak value
600u
1.2m
2.4m
5m
10m
1.2m
2.6m
5.4m
10.8m 20m
1.954m 3.906m 7.812m 15.63m 31.26m
20m
40m
62.5m
40m
80m
125m
80m
160m
250m
10m
20m
31.25m
20m
40m
62.5m
40m
80m
125m
(don’t use the upper ranges, outside accuracy specification!)
100ohms:
nominal value
max. trms value
max. peak value
300u
600u
977u
600u
1.3m
1.953m
1.2m
2.7m
3.906m
2.5m
5.4m
7.813m
5m
10m
15.63m
(don’t use the upper ranges, outside accuracy specification!)
200ohms:
nominal value
max. trms value
max. peak value
150u
300u
488.5u
300u
650u
976.5u
600u
1.25m 2.5m
5m
10m
20m
1.35m 2.7m
5m
10m
20m
40m
1.953m 3.907m 7.815m 15.63m 31.25m 62.5m
(don’t use the upper ranges, outside accuracy specification!)
2.31.6 Connection of the sensor with LMG450
The use with LMG450 is not possible!
2.31.7 Connection of the sensor with LMG500
Use external sensor input, you get the following ranges (all in A):
1ohm:
ZES ZIMMER
139/218
Sensors and Accessories for precision power meters
Current sensors
nominal value
max. trms value
max. peak value
30m
37m
63m
60m
75m
125m
120m
150m
250m
250m
300m
500m
500m
600m
1
1
1.2
2
2
2.5
4
4
5
8
(don’t use the upper ranges, outside accuracy specification!)
2ohms:
nominal value
max. trms value
max. peak value
15m
18.5m
31.5m
30m
37.5m
62.5m
60m
75m
125m
125m
150m
250m
250m
300m
500m
500m
600m
1
1
1.25
2
2
2.5
4
(don’t use the upper ranges, outside accuracy specification!)
5ohms:
nominal value
max. trms value
max. peak value
6m
7.4m
12.6m
12m
15m
25m
24m
30m
50m
50m
60m
100m
100m
120m
200m
200m
240m
400m
400m
500m
800m
800m
1
1.6
100m
120m
200m
200m
250m
400m
400m
500m
800m
(don’t use the upper ranges, outside accuracy specification!)
10ohms:
nominal value
max. trms value
max. peak value
3m
3.7m
6.3m
6m
7.5m
12.5m
12m
15m
25m
25m
30m
50m
50m
60m
100m
(don’t use the upper ranges, outside accuracy specification!)
20ohms:
nominal value
max. trms value
max. peak value
1.5m
1.85m
3.15m
3m
3.75m
6.25m
6m
7.5m
12.5m
12.5m
15m
25m
25m
30m
50m
50m
60m
100m
100m
125m
200m
200m
250m
400m
(don’t use the upper ranges, outside accuracy specification!)
50ohms:
nominal value
max. trms value
max. peak value
600u
740u
1.26m
1.2m
1.5m
2.5m
2.4m
3m
5m
5m
6m
10m
10m
12m
20m
20m
24m
40m
40m
50m
80m
80m
100m
160m
(don’t use the upper ranges, outside accuracy specification!)
100ohms:
ZES ZIMMER
140/218
Sensors and Accessories for precision power meters
Current sensors
nominal value
max. trms value
max. peak value
300u
370u
630u
600u
750u
1.25m
1.2m
1.5m
2.5m
2.5m
3m
5m
5m
6m
10m
10m
12m
20m
20m
25m
40m
40m
50m
80m
(don’t use the upper ranges, outside accuracy specification!)
200ohms:
nominal value
max. trms value
max. peak value
150u
185u
315u
300u
375u
625u
600u
750u
1.25m
1.25m
1.5m
2.5m
2.5m
3m
5m
5m
6m
10m
10m
12.5m
20m
20m
25m
40m
(don’t use the upper ranges, outside accuracy specification!)
ZES ZIMMER
141/218
Sensors and Accessories for precision power meters
Current sensors
2.32 Precision wideband current transformer WCT100 (LMG-Z601)
Figure 96: LMG-Z601
Figure 97: LMG-Z601
2.32.1
Safety warning!
Always connect the sensor first to the meter, and afterwards to the device under test!
An open connection on the secondary side will cause hazardous voltage and might
destroy the transformer.
Please refer to chapter 1.1: ‘Safety precautions’!
LMG-Z601 is an accessory for the precision power meters LMG with a high bandwidth. The
high frequency design provides best accuracy at high frequencies. It also simplifies the
measurement of output power in high frequency applications with floating potential. The
current transformer has a 1A current output, for the direct connection to the LMG current
input.
LMG-Z601 is optimized for the LMG500 and its Ihf input. Because of the low and over all
ZES ZIMMER
142/218
Sensors and Accessories for precision power meters
Current sensors
measuring ranges constant impedance of this input best accuracy can be achieved.
For the connection of LMG-Z601 to the precision power meter LMG use narrow twisted
laboratory leads (not longer than needed) or, in HF applications slightly better: 4mm to BNC
adaptor and coaxial cable.
2.32.2 Specifications
Nominal input current
Measuring range
Transformer ratio
Maximum input
Bandwidth
Output burden
Isolation
100A
250Apk
100A:1A (set Iscale to 100)
120A continuous / 200A for 1 minute
30Hz .. 1MHz
max. 100mOhms for the specified accuracy
600V CATIII, 1000V CATII
Test voltage: output Ilow to 20mm busbar.
(for higher voltages, the primary lead has to be
isolated according to the working voltage of the
system!)
safety sockets, 4mm
-10°C to +70°C
23mm
about 350g
120mm * 95mm * 65mm
Output connection
Temperature range
Through hole diameter
Weight
Size l*w*h
2.32.3 Accuracy
Accuracies based on: no DC current component, ambient temperature 23±3°C, calibration
interval 1 year, burden 100mOhms, max. 1m twisted laboratory leads or coaxial cable.
Full power accuracy, for measuring current from 1A to 100A! Accuracy and bandwidth
specification is for small signal as well as for wide signal level.
Frequency range
Current ±(% of measuring value)
Phase ±(phase error in degree)
30Hz to 100Hz to 100kHz to 300kHz to
100Hz 100kHz
300kHz
1MHz
0.25%
0.6°
0.25%
0.3°
1%
0.4°
2%
0.6°
Use LMG-Z601 and LMG specifications to calculate the accuracy of the complete system.
ZES ZIMMER
143/218
Sensors and Accessories for precision power meters
Current sensors
2.32.4 Improving the accuracy due to common mode effects
In high frequency applications with current measurement on high common mode voltage
potential it might be advantageous to connect the yellow plug with earth. There is a double
galvanic separation: inside the LMG and inside the current transformer itself and a capacitive
coupling from the isolated primary lead to the current transformer. So the secondary side has
neither galvanic contact with the load current nor with earth, the current channel is floating on
an undefined potential. The HF-accuracy can be improved by draging down the floating
voltage to about earth potential, but this might also cause resonance, so beware not to distort
the measurement accuracy.
2.32.5 Sensor without LMG
The secondary side of this current transformer has to be connected under all circumstances! If
the LMG has to be removed and the sensor can not be disconnected, be sure to short circuit
the current output I* with I of the sensor to avoid dangerous voltages. This open loop voltages
would be hazardous for the user and might damage the sensor!
2.32.6 Connection of the sensor with LMG90/310 or other instruments with
current input
Use direct current inputs I* and I.
2.32.7 Connection of the sensor with LMG95
Use direct current inputs I* and I.
2.32.8 Connection of the sensor with LMG450
Use direct current inputs I* and I.
2.32.9 Connection of the sensor with LMG500
Use HF current inputs Ihf and I.
You get the following measuring ranges:
nominal value
max. trms value
max. peak value
ZES ZIMMER
15A
22.5A
31.3A
30A
45A
62.5A
60A
90A
125A
120A
180A
250A
144/218
Sensors and Accessories for precision power meters
Current sensors
2.33 Precision wideband current transformer WCT1000 (LMG-Z602)
Figure 98: LMG-Z602
2.33.1
Safety warning!
Always connect the sensor first to the meter, and afterwards to the device under test!
An open connection on the secondary side will cause hazardous voltage and might
destroy the transformer.
Please refer to chapter 1.1: ‘Safety precautions’!
LMG-Z602 is an accessory for the precision power meters LMG with a high bandwidth. The
high frequency design provides best accuracy at high frequencies. It also simplifies the
measurement of output power in high frequency applications with floating potential. The
current transformer has a 1A current output, for the direct connection to the LMG current
input.
LMG-Z602 is optimized for the LMG500 and its Ihf input. Because of the low and over all
measuring ranges constant impedance of this input best accuracy can be achieved.
For the connection of LMG-Z602 to the precision power meter LMG use narrow twisted
laboratory leads (not longer than needed) or, in HF applications slightly better: 4mm to BNC
adaptor and coaxial cable.
2.33.2 Specifications
Nominal input current
Measuring range
Transformer ratio
Maximum input
Bandwidth
Output burden
Isolation
Output connection
Temperature range
ZES ZIMMER
1000A
2500Apk
1000A:1A (set Iscale to 1000)
1200A continuous / 2000A for 1 minute
30Hz .. 1MHz
max. 100mOhms for the specified accuracy
600V CATIII, 1000V CATII
Test voltage: output Ilow to busbar.
(for higher voltages, the primary lead has to be
isolated according to the working voltage of the
system!)
safety sockets, 4mm
0°C to +50°C
145/218
Sensors and Accessories for precision power meters
Current sensors
Through hole diameter
Weight
Size l*w*h
44mm
ca. 3kg
160mm * 160mm * 91mm
2.33.3 Accuracy
Accuracies based on: no DC current component, ambient temperature 23±3°C, calibration
interval 1 year, burden 100mOhms, max. 1m twisted laboratory leads or coaxial cable.
Full power accuracy, for measuring current from 10A to 1000A! Accuracy and bandwidth
specification is for small signal as well as for wide signal level.
Frequency range
Current ±(% of measuring value)
Phase ±(phase error in degree)
30Hz to 100Hz to 100kHz to 500kHz to
100Hz 100kHz
500kHz
1MHz
0.25%
1.5°
0.25%
0.8°
1%
0.5°
2%
2.5°
Use LMG-Z602 and LMG specifications to calculate the accuracy of the complete system.
2.33.4 Sensor without LMG
The secondary side of this current transformer has to be connected under all circumstances! If
the LMG has to be removed and the sensor can not be disconnected, be sure to short circuit
the current output I* with I of the sensor to avoid dangerous voltages. This open loop voltages
would be hazardous for the user and might damage the sensor!
2.33.5 Connection of the sensor with LMG90/310 or other instruments with
current input
Use direct current inputs I* and I.
2.33.6 Connection of the sensor with LMG95
Use direct current inputs I* and I.
2.33.7 Connection of the sensor with LMG450
Use direct current inputs I* and I.
2.33.8 Connection of the sensor with LMG500
Use HF current inputs Ihf and I.
You get the following measuring ranges:
ZES ZIMMER
146/218
Sensors and Accessories for precision power meters
Current sensors
nominal value
max. trms value
max. peak value
ZES ZIMMER
150A
225A
313A
300A
450A
625A
600A
900A
1250A
1200A
1800A
2500A
147/218
Sensors and Accessories for precision power meters
LMG95 connection cables and adapter
3
3.1
LMG95 connection cables and adapter
Adapter for the use of HD15-Sensors with LMG95 (L95-Z07)
Figure 99:Adapter for the use of HD15-Sensors with LMG95 (L95-Z07)
3.1.1
Safety warning!
Always connect the sensor first to the meter, and afterwards to the device under test
Connecting cables without savety isolation! Avoid contact to hazardous voltage!
Please refer to chapter 1.1: ‘Safety precautions’!
3.1.2
Specifications
suitable sensors
remarks
L45-Z26
DC current clamp 1000A
L45-Z28-HALLxx
Hall-transducer 50A, 100A, 200A
L50-Z29-HALLxx
Hall-transducer 300A, 500A, 1000A, 2000A
L45-Z32-FLEXxx
Rogowski-transducer 500A, 1000A, 3000A
PSUxx-K-L50
PSU60, -200, -400, -700
L45-Z06
better use: LMG-Z327
L45-Z10
better use: LMG-Z322
L45-Z16
better use: LMG-Z329
Plug the DSUB connector to LMG95 external supply and the two 4mm jacks to LMG95
ext.Shunt/I.
ZES ZIMMER
149/218
Sensors and Accessories for precision power meters
LMG95 connection cables and adapter
3.1.3
Accuracy
If you order the accessory L95-Z07 together with the suitable current sensor, then you can find
a label with the scaling factor on L95-Z07. Please set this current scaling in the range menue
of the LMG95. For the use of different current sensors e.g. alternating with LMG450 (not
ordered at the same time with L95-Z07) you have to calibrate the sensor together with the
LMG95 to find the correct scaling. Use the sensor- and LMG specifications to calculate the
accuracy of the complete system.
ZES ZIMMER
150/218
Sensors and Accessories for precision power meters
LMG95 connection cables and adapter
3.2
Connect PSU60/200/400/700 to LMG95 (PSU60/200/400/700-K-L95)
Figure 100: PSU60/200/400/700-K-L95, for direct connection of the
PSU60/200/400/700 to the current input of the LMG95
Figure 101: Connection of PSU60/200/400/700 to the LMG95
3.2.1
Safety warning!
Always connect the sensor first to the meter, and afterwards to the device under test
Connecting cables without savety isolation! Avoid contact to hazardous voltage!
Please refer to chapter 1.1: ‘Safety precautions’!
3.2.2
Installation
No additional supply needed. Cable length between PSU and LMG: 2.5m
ZES ZIMMER
151/218
Sensors and Accessories for precision power meters
LMG95 connection cables and adapter
3.2.3
LMG95 ranges (direct current input) with PSU200
Iscale=1000
nominal value
150A
max. trms value 300A
max. peak value 469A
limited by PSU200 to max. 200Apk!
3.2.4
LMG95 ranges (direct current input) with PSU400
Iscale=2000
nominal value
300A
max. trms value 600A
max. peak value 938A
limited by PSU400 to max. 400Apk!
3.2.5
LMG95 ranges (direct current input) with PSU700
Iscale=1750
nominal value
262.5A 525A
max. trms value 525A
1050A
max. peak value 820.75A 1641.5A
limited by PSU700 to max. 700Apk!
3.2.6
Accuracy
Use PSU and LMG95 specifications to calculate the accuracy of the complete system.
3.2.7
Sensor operation without supply
It is important to assure a stable power supply of the sensor before switching on the load
current! The operation of the sensor with load current and without supply will cause
damage of the sensor and/or of the LMG/supply unit!
To remove the LMG/supply unit from the test location without removing the sensors from the
current path, disconnect the DSUB9 plug and the savety laboratory plugs from the LMG and
connect all of the 9pins together with ground (shield of the plug) and together with the hotwired savety laboratory plugs. To do this, the load current has to be switched off!
ZES ZIMMER
152/218
Sensors and Accessories for precision power meters
LMG450 connection cables and adapter
4
LMG450 connection cables and adapter
The special design of all LMG450 sensors makes them very easy and comfortable to use. The
HD15 SUB D plug contains the identification of the sensor type, the measuring ranges,
including the needed scaling and several more parameters. The LMG450 reads this values and
the meter will automatically configured to the optimum adjustments for using this special
sensor. The LMG range setup is automaticaly taken from the sensor EEPROM. Further on we
correct some of the sensor errors (transfer error, delay time, ...). So you get the best measuring
results with each sensor.
4.1
BNC adapter to sensor input HD15 without EEPROM (L45-Z09)
Figure 102: L45-Z09
By this adapter you can connect a voltage via a BNC cable to the LMG450 external current
sensor input. This voltage has to be isolated, because the BNC screen is electrically connected
to the case of the LMG450!
This is a simple electrical adapter. No values can be stored!
ZES ZIMMER
153/218
Sensors and Accessories for precision power meters
LMG450 connection cables and adapter
4.2
Adapter for isolated custom current sensors with 1A output (L45-Z22)
Figure 103: L45-Z22
4.2.1
Safety warning!
Use only galvanic separating current sensors! There is no potential separation in this
adapter and in the LMG450 sensor input! NOT FOR DIRECT CURRENT
MEASUREMENT!!
Please refer to chapter 1.1: ‘Safety precautions’!
4.2.2
Specifications
L45-Z22 is an accessory for the precision power meter LMG450. Its benefit is the usage of
isolated custom current sensors with 1A output current e.g. current transducers or clamps with
the LMG450 sensor input. In comparison to the usage of the direct current inputs of the
LMG450, the accessory L45-Z22 is optimized for the sensor output current of 1A and a
dynamic range down to 31.25mA as full range.
Nominal input current
1A
Max. trms value
1.2A
Measuring range
3Apk
Input resistance
340mOhms
Bandwidth
DC to 20kHz
Isolation
NO ISOLATION! NOT FOR DIRECT CURRENT
MEASUREMENT!
Connection
HD15 (with EEPROM) for LMG sensor input, length about 80cm
4.2.3
Accuracy
Accuracies based on: sinusoidal current, ambient temperature 23±3°C, calibration interval 1
year. The values are: ±(% of measuring value + % of measuring range)
ZES ZIMMER
154/218
Sensors and Accessories for precision power meters
LMG450 connection cables and adapter
Frequency/Hz
Current
DC to 45Hz
0.05+0.05
45Hz to 65Hz
0.05+0.05
45Hz to 5kHz
0.1+0.1
5kHz to 20kHz
0.25+0.25
Use L45-Z22 and LMG specifications to calculate the accuracy of the complete system.
4.2.4
Connection of the sensor with LMG90/310
not possible
4.2.5
Connection of the sensor with LMG95
not possible
4.2.6
Connection of the sensor with LMG450
nominal value
max. trms value
max. peak value
4.2.7
0.03A
0.04A
0.09A
0.06A
0.08A
0.19A
0.12A
0.15A
0.375A
0.25A
0.3A
0.75A
0.5A
0.6A
1.5A
1A
1.2A
3A
Connection of the sensor with LMG500
not necessary, because of good current dynamic range of LMG500
ZES ZIMMER
155/218
Sensors and Accessories for precision power meters
LMG500 connection cables and adapter
5
5.1
LMG500 connection cables and adapter
LMG500 current sensor adapter (L50-Z14)
Figure 104: L50-Z14
The special design of all LMG500 sensors makes them very easy and comfortable to use. The
HD15 SUB D plug contains the identification of the sensor type, the measuring ranges,
including the needed scaling and several more parameters. The LMG500 reads this values and
the meter will automatically configured to the optimum adjustments for using this special
sensor. The LMG range setup is automaticaly taken from the sensor EEPROM. Further on we
correct some of the sensor errors (transfer error, delay time, ...). So you get the best measuring
results with each sensor.
For all LMG500 sensors the Adapter L50-Z14 is needed, because internally it is necessary to
connect the system ground (CPU, Sensor supply, ...) with the ground of the measuring
channel. Both signals are connected with a HD15 SUB D plug, without galvanic separation.
The adapter L50-Z14 guarantees that no measuring leads are connected to the measuring
channel at the same time and prevents electrical shock.
ZES ZIMMER
157/218
Sensors and Accessories for precision power meters
Accessories
6
6.1
Accessories
Shielded DSUB9 extension cable, male/female (LMG-Z-DVxx)
Figure 105: Shielded DSUB9 extension cable (LMG-Z-DVxx)
6.1.1
Safety warning!
Attention: No safety isolation, working voltage max. 50V!
When using Busbar without isolation or other not insulated items, assure safety
distance between the extension cable and hazardous voltages.
Please refer to chapter 1.1: ‘Safety precautions’!
6.1.2
General
This is a high quality very well shielded DSUB9 extension cable, high immunity against
EMC. It is screwable with UNC4-40 threads at both connectors.
It can be used to extend the cable length of the PSU connection cables. In this case it is used
between the precision current sensor PSU60/200/400/600/700 and the LMG specific
connection cable to the LMG.
6.1.3
Specifications
Isolation
Connectors
Cable length
ZES ZIMMER
No safety isolation, working voltage max. 50V
DSUB9 male / DSUB9 female / 1:1
user selectable: 3m or 5m or 10m or 15m
159/218
Sensors and Accessories for precision power meters
Accessories
6.2
Sensor supply unit for up to 4 current sensors (SSU4)
The SSU4 is a supply unit to feed up to 4 pieces of current sensors. Each sensor can be
supplied with +15V / 500mA, -15V / 500mA at the same time. The transducers are connected
to the four 9 pin SUB-D connectors. Depending on the sensor the output signal can be
accessed directly from the sensor or via the 15 pin SUB-D connector.
6.2.1
Technical data
Mains supply
Protection method
Protection class
EMC
Safety
Dimensions
Output voltage
Output current
Climatic class
Storage temperature
Weight
ZES ZIMMER
85...264V, 47...440Hz, ca. 40W, Fuse 5x20mm T1A/250V IEC127-2/3
IP20 according DIN40050
I; Mains supply: Overvoltage class II and pollution degree 2 according
IEC61010-1
EN55011, EN50082
EN61010
Desktop:
320mm (W) x 49mm (H) x 307mm (D)
19“ rack:
63DU x 1HU x 360mm
±15V ±2%
max. 500mA on each jack
KYG according to DIN 40040
0°C...40°C, humidity max. 85%, annual average 65%, no dewing
-20°C to +55°C
3kg
160/218
Sensors and Accessories for precision power meters
Accessories
6.2.2
Technical drawings
Figure 106: Dimensions of the SSU4
In the Figure 106 you see the desktop instrument, also attended the angles for rack mounting
6.2.3
Connectors
6.2.3.1
9 Pin SUB-D connectors for the sensors
Via the following connector the sensors (e.g. PSU600, L45-Z29-xxxx, ...) are connected to the
SSU4 sensor supply unit. For each channel there is one connector.
Connector to the sensors
ZES ZIMMER
161/218
Sensors and Accessories for precision power meters
Accessories
Pin
Usage
1, 2
3, 4
5
6
7
8
Not used. Do not connect!
Ground (GND)
-15V. max. 500mA
Current output signal of the sensor (max. 500mA!)
Not used. Do not connect!
Signal input to indicate a proper operation of the sensor:
+15V or n.c.: The red LED is on
GND:
The green LED is on
+15V, max. 500mA
9
The current output signal of the sensor is connected via a 2.7Ω resistor to the corresponding
channel of the 15 pin connector for the instrument. When the current returns from the
instrument it is fed into ground.
6.2.3.2
15 Pin SUB-D connectors for the measuring instrument
Via the following connector the measuring instrument can be connected to the sensor supply
unit:
Connector to the instrument
Pin
Usage
1, 2
3, 4
5, 6
7, 8
9-15
Current output channel 1
Current output channel 2
Current output channel 3
Current output channel 4
Ground
The output current of each channel can be measured and has then to be returned to Ground.
ZES ZIMMER
162/218
Sensors and Accessories for precision power meters
Accessories
6.2.4
Mounting
6.2.4.1
Rack mounting
Fix the two rack mounting metal sheets with the four screws at the two sides of the SSU4
case. Now you can mount it into any 19“ rack.
6.2.4.2
Instrument mounting
You can mount the SSU4 directly under a LMG95 or LMG450. Please do this in follwing
order:
• Switch off both instruments and remove all cables.
• Remove the four feets of the LMG450 or LMG95 case. To do this, just remove the four
screws. The nuts are fixed inside the LMG450 or LMG95.
• Remove the four feets of the SSU4 case. The four screws are mounted into the four screwnuts which are accessable from the top of the case. Remove also this nuts.
• With the four M4x55 screws (which are added) you mount now the four feets of the SSU4
with following orientation:
LMG95: mount the front feets in the 2nd position from the front plate.
mount the rear feets in the 2nd position from the rear plate.
LMG450: mount the front feets in the position closest to the front plate.
mount the rear feets in the position closest to the rear plate.
In both cases: The small white rubber on the feets has to be mounted in direction to the
rear/front plate. The four screws are fixed into the nuts of the LMG450/LMG95 bottom
(where the original feeds were fixed).
Figure 107: SSU4 mounted under LMG450
Dimensions W*D*H
ZES ZIMMER
320mm * 306.7mm * 224.6mm with feets, 176.9 without feets
163/218
Sensors and Accessories for precision power meters
Accessories
6.2.5
SSU4 connector cables
6.2.5.1
Cable to connect measuring signal plugs of SSU4 with LMG310
current inputs (SSU4-K-L31)
Figure 108: SSU4-K-L31, to connect measuring signal plug of SSU4 to LMG310 current inputs.
Cable to connect up to four PSU600 to the current input channels of:
1 LMG310
1 LMG310 and 1 LMG95
1 LMG450 (but better using PSU600-K-L45)
2 LMG310 in Aron wiring
or any other amperemeter
6.2.5.2
Connection cable PSU600 to SSU4 (PSU600-K3, K5, K10)
Figure 109: PSU600-K3, to connect the PSU600 to the SSU4 (length 3m).
Connection cable from SSU4 to PSU600; length 3m, 5m or 10m.
ZES ZIMMER
164/218
Sensors and Accessories for precision power meters
Accessories
6.2.6
Modification option of SSU4 available for the use of PSU60, PSU200,
PSU400 and PSU700 together with SSU4-K-L31
The modification is needed only for the use of PSU60, PSU200, PSU400 or PSU700 with
SSU4-K-L31, no modification is necessary for PSU200-K-L45 or something like that.
The following changes concerning this documentation are done:
1. In the four connector to the sensors: pin1 is connected with gnd for current return
2. The current output signal of the sensor is connected via a 0 ohms resistor to the
corresponding channel of the 15 pin connector for the instrument. When the current returns
from the instrument it is fed into ground.
3. The SSU4 with modification can not be used with PSU600!
6.2.7
Modification option of SSU4 available for the use of PSU1000HF
together with LMG450 and LMG500
The following changes concerning this documentation are done:
1. DSUB9 connectors for the sensors:
Pin
Usage
5
6
-15V. max. 1000mA
Current output signal of the sensor (max. 1000mA)
9
+15V, max. 1000mA
ZES ZIMMER
165/218
Sensors and Accessories for precision power meters
Accessories
6.3
Artificial mid point for multi phase power meters (LMG-AMP)
Figure 110: Artificial mid point (LMG-AMP)
6.3.1
Safety warning!
Please refer to chapter 1.1: ‘Safety precautions’!
6.3.2
General
When measuring at three-phase systems without accessible star point (typical for frequency
inverters), an artificial star point is needed for measurements in star connections. If necessary,
the losses of the artificial star point have to be considered. They can be determined exactly.
The formula editor can be used to automatically calculate these losses and correct them.
6.3.3
Connection to the LMG
The LMG-AMP is connected to the LMG using the six added cables. Connect each channel U
with U and U* with U*. At the U* jack (at LMG-AMP or at LMG) you can connect your
voltage. This is usually accessable at the I or I* jacks. The three grey sockets U1, U2 and U3
(they represent the artificial mid point) are interconnected!
6.3.4
Specifications
Umax line-to-line
Umax against earth
Rtyp.
Accuracy of the phase resistors in relation to each other
Weight
Dimensions:
ZES ZIMMER
166/218
850V
600V
66.57kohms
±0.01%
220g
120mm x 52mm x 65mm
Sensors and Accessories for precision power meters
Accessories
6.4
Adaptor for measurement at Schuko devices (LMG-MAS)
Figure 111: Adaptor for Schuko devices (LMG-MAS)
6.4.1
Safety warning!
Attention! The PE jack should not be used for earthing external devices. It is only
allowed to use it for measuring purposes.
Please refer to chapter 1.1: ‘Safety precautions’!
6.4.2
General
The MAS is a adaptor for measuring at single phase devices with Schuko inlet connector up to
16A. It was developed for the instrument series LMG. The supply is done by the fix mounted
Schuko inlet. The load is connected to the fixed mounted Schuko jack. With the LMG-MAS
you can measure the voltage (jacks U and U*). The current is also accessable (from I* to I).
This jacks have to be connected to the jacks of the measuring instrument.
Important!
If you dont want to measure the current, the jacks I* and I have to be short circuit to enable the
current to flow.
The internal wiring is done so that the load is measured with correct current. This wiring is
perfect suited for the measurement of stand by power.
An important point is the safety. The MAS is in compliance with IEC61010-1 and was
constructed for voltages up to 250V CAT III.
ZES ZIMMER
167/218
Sensors and Accessories for precision power meters
Accessories
6.5
Adaptor for measurement at IEC connector devices (LMG-MAK1)
Figure 112: Adaptor for IEC connector devices (LMG-MAK1)
6.5.1
Safety warning!
Please refer to chapter 1.1: ‘Safety precautions’!
6.5.2
General
The MAK1 is an adaptor for measuring at single phase devices with IEC inlet connector up to
10A. It was developed for the instrument series LMG90 and LMG95, but you can also
connect other instruments like LMG310, LMG450 or LMG500.
The supply is done by a IEC inlet cord which must be connected to the MAK1. The load is
connected by the fixed mounted cord.
With the MAK1 you can measure the voltage (jacks U and U*). The current is also accessable
(from I* to I). This jacks have to be connected to the jacks of the measuring instrument.
Important!
If you dont want to measure the current, the jacks I* and I have to be short circuit to enable the
current to flow!
The internal wiring is done so that the load is measured with correct current. This wiring is
perfect suited for the measurement of stand by power.
An important point is the safety. The MAK1 is in compliance with IEC61010-1 and was
constructed for voltages up to 300V CAT III.
ZES ZIMMER
168/218
Sensors and Accessories for precision power meters
Accessories
6.6
Adaptor for measurement at 16A/3phase devices (LMG-MAK3)
Figure 113: Adaptor for 16A/3phase devices (LMG-MAK3)
6.6.1
Safety warning!
Attention: Ensure in any case, that the N (neutral) on the patch panel is connected from
the input side to the output side! Either via a current measurement path or with a short
circuit on the patch panel. An open N (neutral) can lead to dangerous voltage at the
output and may destroy the connected load!! If you dont want to measure the current in
L1/L2 orL3, the jacks Ix* and Ix have to be short circuit to enable the current to flow!
Please refer to chapter 1.1: ‘Safety precautions’!
6.6.2
General
The MAK3 is an adaptor for measuring at 3 phase systems up to 16A per phase. It was
developed for the instrument series LMG310, LMG450 and LMG500, but you can also
connect other instruments.
The supply is done by a about 2m long wire. The schuko jack is to supply the instrument. If
you are measuring a load, the power consumption of the instrument is not taken into account,
because it is supplied befor the measuring connectors. If you are measuring a generator, you
should supply the instrument from another jack to avoid measuring errors.
With the MAK3 you can measure the voltage of the three phases (jacks U1*, U2* and U3*)
against the neutral connector (U1, U2 and U3). But you can also measure the linked voltages.
The three currents are also accessable (from I1*, I2* and I3* to I1, I2 and I3). Further on by using
a 4-channel instrument you can measure the voltage between neutral and earth (U4* against
U4) as well as the current in the neutral (I4* to I4).
ZES ZIMMER
169/218
Sensors and Accessories for precision power meters
Accessories
Important!
If you dont want to measure the current in a wire, the jacks Ix* and Ix have to be short circuit to
enable the current to flow!
The load is connected to the CEE jack. The load is measured with correct currents. If
measuring a generator the voltage is correct.
An important point is the safety. The MAK3 is in compliance with IEC61010-1 and was
constructed for voltages up to 300/520V CAT III.
ZES ZIMMER
170/218
Sensors and Accessories for precision power meters
Accessories
6.7
Safety Grip for current and voltage connection (LMG-Z301/302/305)
Figure 114: Safety claw grip, type C, 16A/1000V (LMG-Z301)
Figure 115: Safety clamp grip, type A, 1A/1000V (LMG-Z302)
Figure 116: Safety claw grip, type D, 16A/500V, power fuse 100kA switch capability (LMG-Z305)
ZES ZIMMER
171/218
Sensors and Accessories for precision power meters
Accessories
6.8
DSUB25 Adapter for LMG process signal interfaces (L5-IOBOX-S/-F)
Figure 117: Adapter from DSUB25 to screw cage connection (L5-IOBOX-S)
Figure 118: Adapter from DSUB25 to spring cage connection (L5-IOBOX-F)
6.8.1
Included in delivery
• 2m connection cable DSUB25f to DSUB25m to connect this adapter to LMG process
signal interface
ZES ZIMMER
172/218
Sensors and Accessories for precision power meters
Accessories
6.9
Adapter for incremental rotation speed encoders (L45-Z18)
Figure 119:L45-Z18
6.9.1
Safety warning!
Always connect the sensor first to the meter, and afterwards to the device under test.
Connecting cable without savety isolation! Avoid contact to hazardous voltage!
Please refer to chapter 1.1: ‘Safety precautions’!
6.9.2
General
This plugon adapter for LMG450 converts pulses of common industrial incremental encoders
with two 90 degree phase shifted pulse outputs into analogue voltage. This voltage can be
analysed graphically with high temporal resolution by using sensor input of LMG450.
Compared to this, digital encoder input of process signal interface provides only one value
each measuring cycle and with L45-Z18 you get a fast, high dynamic response to changes in
rotation speed!
6.9.3
Description
Incremental encoders (speed sensors) with TTL technology (supply +5V and GND) or HTL
technology (supply +5V and –5V) can be connected. There are four colour coded measuring
ranges of the adapter to align with different pulse rates Z of the incremental encoder and
maximum revolutions per minute Nmax.
Attention! Read measuring value Idc, only this presents exact speed values according to
absolute value and sign (depending on sense of rotation)! Positive output voltage is seen in
ZES ZIMMER
173/218
Sensors and Accessories for precision power meters
Accessories
case A signal leads electrically by 90° to B signal. This equates usually to clockwise rotation
when looking onto the encoder shaft.
6.9.4
Ripple
As a matter of principle of frequency to voltage conversion there is a ripple at low revolution
on output voltage. Built-in filters are optimised for short settling time without overshooting. In
case that remaining ripple is too high, this can be reduced with the settings of LMG, for
example:
• Select adjustable lowpass filter in measuring channel
• Extend the measuring cycle time
• Average over a couple of measurement cycles
Selection of the filter is always a compromise of fast reaction on variation of input signal and
reduction of ripple on output signal. The user can find optimal setting weighing these
antithetic approaches.
6.9.5
Incremental encoders with two 90 degree phase shifted pulse outputs
Measuring range
LED Colour
Red
Yellow
Green
Blue
Unit
Left most
Left
Right
Right most
Z*Nmax
(Pulse rate * max.
revolution speed)
1 / min
144000
576000
2304000
9216000
Specified tolerance
% of m.value
+ % of
m.range
±(0.1+0.1)
±(0.1+0.1)
±(0.1+0.1)
±(0.1+0.1)
Hz
2400
9600
38400
153600
1152000 / Z
1152000 / Z
Position of the slide
switch adjacent of
the LEDs
Max. pulse input
frequency using
input A and B
Formula for "Scale"
1 / min
1152000 / Z 1152000 / Z
“Z” is the number of pulses per rotation of the used incremental encoder (speed sensor)
ZES ZIMMER
174/218
Sensors and Accessories for precision power meters
Accessories
6.9.6
Incremental encoders with single pulse outputs
Measuring range
LED Colour
Red
Yellow
Green
Blue
Unit
Left most
Left
Right
Right most
1 / min
288000
1152000
4608000
9216000
% of m.value
+ % of
m.range
±(0.1+0.1)
±(0.1+0.1)
±(0.1+0.1)
±(0.1+0.1)
Hz
4800
19200
76800
153600
2304000 / Z
1152000 / Z
Position of the slide
switch adjacent of
the LEDs
Z*Nmax
(Pulse rate * max.
revolution speed)
Specified tolerance
Max. pulse input
frequency using
input A
Formula for "Scale"
1 / min
2304000 / Z 2304000 / Z
“Z” is the number of pulses per rotation of the used incremental encoder (speed sensor)
The recognition of the rotating direction is not possible.
The output voltage is always negative if input B is left open.
The output voltage is always positive if input B is tied to pin ‘supply +5V’
6.9.7
Scaling
In range menu of LMG450 you can set the calculated scale value of the last line from above
mentioned chart, depending on the pulse rate Z per rotation of the used incremental encoder.
Then the revolution will be presented correctly in value 1/min on the display. The unit will
however be A (or V)! Displayed 1.465kA means 1465 1/min. For further user-friendly
presentation utilise capabilities of LMG450 built-in formula editor and user defined menu.
6.9.8
Pin assignment
9 pin D-Sub connector (male) to incremental encoder
Pin No.
1
2
Function Supply Supply
+5V
-5V
ZES ZIMMER
3
4
5
GND Input A Input B
(on
screen)
175/218
6
7
8
9
No connection
(internal test pins)
Screen
Screen
(on GND)
Sensors and Accessories for precision power meters
Accessories
6.9.9
Pulse input A and B
Permissible input voltage:
Ulowmin = -30V at -1.4mA, Ulowmax=+0.8V at 0.001mA
Uhighmin=+2V at 0.002mA, Uhighmax=+30V at 1.2mA
Input resistance:
1Mohms at 0V<Uin<+5V
22kohms at -30V<Uin<+30V
6.9.10 Encoder supply
Voltage:
Load:
±5V, ±10%
max. ±100mA
6.9.11 Connection of the sensor with LMG90/310/95
not possible
6.9.12 Connection of the sensor with LMG450
Plug-and-use solution like current sensors. Use current channel.
6.9.13 Connection of the sensor with LMG500
not possible, use L50-Z18
ZES ZIMMER
176/218
Sensors and Accessories for precision power meters
Accessories
6.10 Adapter for incremental rotation speed encoders (L50-Z18)
Figure 120:L50-Z18
6.10.1
Safety warning!
Always connect the sensor first to the meter, and afterwards to the device under test.
Connecting cable without savety isolation! Avoid contact to hazardous voltage!
Please refer to chapter 1.1: ‘Safety precautions’!
6.10.2 General
This plugon adapter for LMG500 converts pulses of common industrial incremental encoders
with two 90 degree phase shifted pulse outputs into analogue voltage. This voltage can be
analysed graphically with high temporal resolution by using sensor input of LMG500.
Compared to this, digital encoder input of process signal interface provides only one value
each measuring cycle and with L50-Z18 you get a fast, high dynamic response to changes in
rotation speed!
6.10.3 Description
Incremental encoders (speed sensors) with TTL technology (supply +5V and GND) or HTL
technology (supply +5V and –5V) can be connected. There are four colour coded measuring
ranges of the adapter to align with different pulse rates Z of the incremental encoder and
maximum revolutions per minute Nmax.
Attention! Read measuring value Idc, only this presents exact speed values according to
absolute value and sign (depending on sense of rotation)! Positive output voltage is seen in
case A signal leads electrically by 90° to B signal. This equates usually to clockwise rotation
when looking onto the encoder shaft.
ZES ZIMMER
177/218
Sensors and Accessories for precision power meters
Accessories
6.10.4 Ripple
As a matter of principle of frequency to voltage conversion there is a ripple at low revolution
on output voltage. Built-in filters are optimised for short settling time without overshooting. In
case that remaining ripple is too high, this can be reduced with the settings of LMG, for
example:
• Select adjustable lowpass filter in measuring channel
• Extend the measuring cycle time
• Average over a couple of measurement cycles
Selection of the filter is always a compromise of fast reaction on variation of input signal and
reduction of ripple on output signal. The user can find optimal setting weighing these
antithetic approaches.
6.10.5 Incremental encoders with two 90 degree phase shifted pulse outputs
Measuring range
LED Colour
Red
Yellow
Green
Blue
Unit
Left most
Left
Right
Right most
Z*Nmax
(Pulse rate * max.
revolution speed)
1 / min
144000
576000
2304000
9216000
Specified tolerance
% of m.value
+ % of
m.range
±(0.1+0.1)
±(0.1+0.1)
±(0.1+0.1)
±(0.1+0.1)
Hz
2400
9600
38400
153600
1152000 / Z
1152000 / Z
Position of the slide
switch adjacent of
the LEDs
Max. pulse input
frequency using
input A and B
Formula for "Scale"
1 / min
1152000 / Z 1152000 / Z
“Z” is the number of pulses per rotation of the used incremental encoder (speed sensor)
ZES ZIMMER
178/218
Sensors and Accessories for precision power meters
Accessories
6.10.6 Incremental encoders with single pulse outputs
Measuring range
LED Colour
Red
Yellow
Green
Blue
Unit
Left most
Left
Right
Right most
1 / min
288000
1152000
4608000
9216000
% of m.value
+ % of
m.range
±(0.1+0.1)
±(0.1+0.1)
±(0.1+0.1)
±(0.1+0.1)
Hz
4800
19200
76800
153600
2304000 / Z
1152000 / Z
Position of the slide
switch adjacent of
the LEDs
Z*Nmax
(Pulse rate * max.
revolution speed)
Specified tolerance
Max. pulse input
frequency using
input A
Formula for "Scale"
1 / min
2304000 / Z 2304000 / Z
“Z” is the number of pulses per rotation of the used incremental encoder (speed sensor)
The recognition of the rotating direction is not possible.
The output voltage is always negative if input B is left open.
The output voltage is always positive if input B is tied to pin ‘supply +5V’
6.10.7 Scaling
In range menu of LMG500 you can set the calculated scale value of the last line from above
mentioned chart, depending on the pulse rate Z per rotation of the used incremental encoder.
Then the revolution will be presented correctly in value 1/min on the display. The unit will
however be A (or V)! Displayed 1.465kA means 1465 1/min. For further user-friendly
presentation utilise capabilities of LMG500 built-in formula editor and user defined menu.
6.10.8 Pin assignment
9 pin D-Sub connector (male) to incremental encoder
Pin No.
1
2
Function Supply Supply
+5V
-5V
ZES ZIMMER
3
4
5
GND Input A Input B
(on
screen)
179/218
6
7
8
9
No connection
(internal test pins)
Screen
Screen
(on GND)
Sensors and Accessories for precision power meters
Accessories
6.10.9 Pulse input A and B
Permissible input voltage:
Ulowmin = -30V at -1.4mA, Ulowmax=+0.8V at 0.001mA
Uhighmin=+2V at 0.002mA, Uhighmax=+30V at 1.2mA
Input resistance:
1Mohms at 0V<Uin<+5V
22kohms at -30V<Uin<+30V
6.10.10 Encoder supply
Voltage:
Load:
±5V, ±10%
max. ±100mA
6.10.11 Connection of the sensor with LMG90/310/95
not possible
6.10.12 Connection of the sensor with LMG450
not possible, use L45-Z18
6.10.13 Connection of the sensor with LMG500
Plug-and-use solution like current sensors. Use current channel.
ZES ZIMMER
180/218
Sensors and Accessories for precision power meters
Accessories
6.11 Synchronisation adapter with adjustable lowpass filter (L50-Z19)
Figure 121:L50-Z19
6.11.1
Safety warning!
1.) first connect the clamp to L50-Z19
2.) connect L50-Z19 to LMG500 Sync.input and switch the power meter on
3.) then connect the clamp to the device under test.
Synchronisation adapter without safety isolation! Only for current clamps with
galvanic isolation! NO DIRECT CONNECTION TO ANY EXTERNAL
VOLTAGES!!
Please refer to chapter 1.1: ‘Safety precautions’!
L50-Z19 is an accessory for the precision power meter LMG500. It can be used with any
xxA:1A current clamp, e.g. LMG-Z325, LMG-Z326, LMG-Z322 or LMG-Z329. A burden
resistor, a high sensitivity amplifier and a 8th order Butterworth lowpass filter are included in
the DSUB15 plug to assure stable synchronisation to any disturbed signal.
It simplifies the synchronisation to the fundamental current frequency of a frequency inverter
output. It needs about 100uA fundamental current at the signal input. That means with a
1000A:1A current clamp it is possible to detect the fundamental in a wide current range from
100mA to 1000A. If the fundamental current is lower than 100mA, several load current
windings in the clamp can be used to enlarge the sensitivity or use an other clamp with
100A:1A ratio. LMG500 settings in the measure menue: set ‘Sync’ to ‘ExClmp’ and adjust
the lowpass corner frequency.
Important: L50-Z19 can be configured only in Group A, if it is configured in Group A, it can
be used in Group B as well via ‘Sync ext.’.
ZES ZIMMER
181/218
Sensors and Accessories for precision power meters
Accessories
Figure 122:L50-Z19
Select a filter with a lowpass frequency bigger than every possible fundamental frequency
and(!) lower than every possible switching frequency, under all conditions of starting,
breaking and acceleration of the motor.
6.11.2 Specifications
filter name
-3dB corner frequency
filter type
min. current for stable
synchronisation
max. current
isolation
connection length
200Hz
500Hz 1kHz
312.5Hz 625Hz 1.25kHz
8th order Butterworth
about 100uA
2kHz
2.5kHz
5kHz
5kHz
10kHz
10kHz
20kHz
20kHz
1Atrms
NO ISOLATION! (see safety warning)
about 50cm
(but can be extended with usual savety laboratory leads)
6.11.3 Connection of the sensor with LMG90/310/95/450
not possible
ZES ZIMMER
182/218
Sensors and Accessories for precision power meters
Accessories
6.12 Ethernet Adapter (L95-Z318, L45-Z318, L50-Z318, LMG-Z318)
Figure 123: L95-Z318, L45-Z318, L50-Z318 - supply via LMG
Figure 124: L95-Z318, L45-Z318, L50-Z318 - supply via LMG
Figure 125: LMG-Z318 - external supply via wall wart
This LAN adapter Z318 is useful for the communication with a power meter LMG located
anywhere in a local area network LAN via a virtual COM port simulation. The
communication is transmitted by the driver over LAN to the LMG for user purposes in the
same way as e.g. the direct connection of PC/COM1 to LMG/COMa. The power meter LMG
will be accessible via this virtual COM port. Perfect suitable for LMG Control software.
6.12.1
Safety warning!
Please refer to chapter 1.1: ‘Safety precautions’!
ZES ZIMMER
183/218
Sensors and Accessories for precision power meters
Accessories
6.12.2 System requirements, hardware specifications
• Windows XP home / Windows XP professional / Windows7 / 32bit or 64bit.
For other operating systems (including Windows: 98 / 2000 / NT /Vista, Linux: Debian /
Mandriva / RedHat / Suse / Ubuntu) see http://www.digi.com -> support -> drivers and
download the driver appropriate for your operating system for ‘Digi Connect SP’.
• auto-sensing to 10/100 Mbit/s Ethernet
• throughput up to 230.400 baud
• data flow control with RTS/CTS, hardware reset with ‘break’
• data throughput with LMG95/450/500
binary mode:
about 3000 measuring values (trms, ac, dc, ..., harmonics, flicker,
sample values, ...) per second!
ascii mode:
about 1000 measuring values per second
6.12.3 Connection of the adapter L95-Z318 with LMG95
• Plug the connector of L95-Z318 labeled with „to LMG’s COM B conn.“ to the LMG95
COM B jack.
• Plug the connector of L95-Z318 labeled with „supply“ to the LMG95 auxilary transducer
supply jack, if your application uses the supply jack e.g. for PSU600, then use LMG-Z318
with external supply via wall wart.
• Switch on the power meter and connect the LAN cable.
• assure that the LMG firmware is 3v136 or newer
6.12.4 Connection of the adapter L45-Z318 with LMG450
• Plug the connector of L45-Z318 labeled with „to LMG’s COM B conn.“ to the LMG450
COM B jack.
• Plug the connector of L45-Z318 labeled with „supply“ to one of the LMG450 current
clamp 1/2/3/4 jacks whichever is free, if your application uses four current sensors, then
use LMG-Z318 with external supply via wall wart.
• Switch on the power meter and connect the LAN cable.
• assure that the LMG firmware is 2v121 or newer
ZES ZIMMER
184/218
Sensors and Accessories for precision power meters
Accessories
6.12.5 Connection of the adapter L50-Z318 with LMG500
• Plug the connector of L50-Z318 labeled with „to LMG’s COM B conn.“ to the LMG500
COM B jack.
• Plug the connector of L50-Z318 labeled with „supply“ to one of the LMG500 sensor ID
jacks whichever is free.
• Switch on the power meter and connect the LAN cable.
• assure that the LMG firmware is 4v077 or newer
6.12.6 Connection of the adapter LMG-Z318 with any LMGxx
• Connect the DSUB9 jack of LMG-Z318 with a 1:1 serial connection cable to LMGs
COMa.
• Connect the wall wart with power input of LMG-Z318.
• Switch on the power meter and connect the LAN cable.
6.12.7 Configure the LAN connection with the Realport setup wizard
• You will find the setup wizard on the ZES support CD under driver\z318 or on the
webpage http://www.zes.com. Start setup32.exe for 32-bit systems or setup64.exe for 64bit systems.
Press ‘next’, the wizard trys to find the ethernet adapter. If it is not found, press reset for
about 3 seconds at the backside of the ethernet adapterbox to remove possible given prior
IP address and wait for about 1 minute before searching again.
This is the most important point in the installation. If the wizard still can not find the Z318
in your LAN, please ask your system administrator before you contact the support hotline
of ZES. The support engineers of ZES will need a lot of detailed information about your
local network to consult.
• If the wizard found one or more devices choose the appropriate one and press ‘next’.
• Take care, that Z318 gets the same IP address after its next startup. Configure your local
DHCP server that the fix MAC address of Z318 gets everytime the same IP address or set a
fix (and free!) IP address manually. This is important, because in the next step you assign a
virtual COM port to this IP address and if the IP address was different after the next
startup, the virtual COM port would be not available.
ZES ZIMMER
185/218
Sensors and Accessories for precision power meters
Accessories
• Select: ‘add a new device’. It might be necessary to remove previous installed drivers with
‘remove an existing device’.
Figure 126
• Select the device ..
Figure 127
• .. and assign a virtual COM port:
ZES ZIMMER
186/218
Sensors and Accessories for precision power meters
Accessories
Figure 128
The power meter LMG is now accessible via this virtual COM port.
6.12.8 Configuration and Management by web interface
• Start your Browser and login to the IP adress obtained to your LAN adapter Z318
http://192.168.x.xx/login.htm with the username ‘root’ and the password ‘dbps’:
Figure 129
• Here you can manage the settings in a comfortable way: e.g. check MAC Address, IP
Adress, firmware update and so on.
ZES ZIMMER
187/218
Sensors and Accessories for precision power meters
Accessories
Figure 130
6.12.9 Troubleshooting
The following problems may appear while installing the ethernet adapter. If the problem
remains after checking the following points, please contact ZES at [email protected] or
++49 6171 628750
• please check all connections: supply, RS232, LAN,
in case of LMG-Z318 and LMGx COMa: use 1:1 serial cable, no nullmodem
• connect the ethernet adapter to the power supply, press reset, wait for about 1 minute and try
again
• switch off your antivirus protection software, the firewall may block the communication
ZES ZIMMER
188/218
Sensors and Accessories for precision power meters
Accessories
6.13 USB-RS232 Adapter (LMG-Z316)
Figure 131: LMG-Z316
This USB-RS232 adapter Z316 is useful for the communication with a power meter LMG and
a PC with USB port via a virtual COM port simulation. The communication is transmitted by
the driver over USB to the adapter for user purposes in the same way as e.g. the direct
connection of PC/COMx to LMG/COMa. The power meter LMG will be accessible via this
virtual COM port. Perfect suitable for LMG Control software.
6.13.1
Safety warning!
Please refer to chapter 1.1: ‘Safety precautions’!
6.13.2 System requirements, hardware specifications
• Windows: driver available for Windows XP home or professional / Windows Vista,
see ZES support CD ‘LMG500 USB driver’
• Linux: driver is part of the kernel 2.4.x or newer (ftdi_sio Modul)
• throughput up to 230.400 baud
• supports data flow control with RTS/CTS, hardware reset with ‘break’
• adapter length about 1m, standard RS232 DSUB9 male with UNC nuts and USB typ A
plug
• connection to LMG with standard 1:1 serial cable, elongation possible up to 15m
ZES ZIMMER
189/218
Sensors and Accessories for precision power meters
Accessories
6.13.3 RS232 plug
DSUB9 male connector with UNC screw nuts, pin assignment:
pin1:
pin2:
pin3:
pin4:
pin5:
pin6:
pin7:
pin8:
pin9:
CD (carrier detect)
RX (receive data)
TX (transmit data)
DTR (data terminal ready)
GND
DSR (dataset ready)
RTS (request to send)
CTS (clear to send)
RI (ring indicator)
6.13.4 Included in delivery
• USB-RS232 Adapter
• DSUB9m to DSUB9f connection cable, pin assignment 1:1, about 1.8m
ZES ZIMMER
190/218
Sensors and Accessories for precision power meters
Accessories
6.14 IEEE488 bus cable (LMG-Z312 /-Z313 /-Z314)
Figure 132: LMG-Z312 /-Z313 /-Z314
IEEE 488 bus cable, full screened metal-plug socket case to maintain the excellent noise
immunity of all LMG instruments.
Cable length:
LMG-Z312 1m
LMG-Z313 2m
LMG-Z314 4m
6.14.1
Safety warning!
Please refer to chapter 1.1: ‘Safety precautions’!
ZES ZIMMER
191/218
Sensors and Accessories for precision power meters
Accessories
6.15 RS232 interface cable (LMG-Z317)
Figure 133: LMG-Z317
RS232 interface cable, DSUB 9 male to DSUB 9 female, length about 1.8m.
6.15.1
Safety warning!
Please refer to chapter 1.1: ‘Safety precautions’!
ZES ZIMMER
192/218
Sensors and Accessories for precision power meters
Accessories
6.16 Safety laboratory leads (LMG-Z307/308)
Figure 134: LMG-Z307/308
6.16.1
Safety warning!
Please refer to chapter 1.1: ‘Safety precautions’!
6.16.2 Specifications
Rated current
32A
Protection class
1000V / CAT III
Temperature range
-10°C to +80°C
Length
LMG-Z307: 0.25m
LMG-Z308: 1.25m
ZES ZIMMER
193/218
Sensors and Accessories for precision power meters
Voltage sensors
7
7.1
Voltage sensors
Precision high voltage divider (HST3/6/9/12)
Figure 135: precision high voltage divider HST12-3
7.1.1
Safety warning!
The normal use of the HST3/ 6/ 9/ 12 series needs a connection to high voltages. To
fulfill the safety requirements it is under all conditions absolutely necessary to earth
the case of the HST3/ 6/ 9/ 12 to obtain safety and functionality! Use sufficient cross
section of the earthing conductor!
Please refer to chapter 1.1: ‘Safety precautions’!
7.1.2
General
The wide band precision high voltage divider of series HST expand the voltage measuring
range of ZES ZIMMER precision power meter LMG for use at power grid of nominal voltage
over 1000V. The high voltage inputs are equipped with 2m leads that is attached to the
voltage measured against earth. The open leads can be aligned by the customer.
The HST 3 (resp. HST6/9/12) divides DC, AC or any distorted voltages with very high
accuracy by the factor 1000 (resp. 2000/3000/4000). The divided voltage is available at the
buffered low impedance BNC output. To avoid noise interference it is recommended to use
shielded cables to the measuring input of the LMG.
The HST can be delivered in one, two or three channel version as to match the particular
measuring task.
ZES ZIMMER
195/218
Sensors and Accessories for precision power meters
Voltage sensors
The single phase HST is used in single ended systems (e.g. overhead traction line, ultrasonic
applications). Line to line voltages can be measured as difference between the output signals
of the channels. For floating (difference) voltage measuring therewith the 2-phase HST is best
suitable.
Typical application fields for the 3-channel HSTx-3 are frequency inverter fed medium
voltage drives and power quality analysis at the distribution network.
7.1.3
Specifications
Series
ordering type
no. of channels
maximum trms
input value
maximum peak
value for full
scale
maximum sine
trms value for
full scale
input impedance
dividing ratio
accuracy
HST3
HST6
HST9
HST12
HST HST HST HST HST HST HST HST HST HST HST HST
3-1 3-2 3-3 6-1 6-2 6-3 9-1 9-2 9-3 12-1 12-2 12-3
1
2
3
1
2
3
1
2
3
1
2
3
4.2kV
8.4kV
12.6kV
16.8kV
5kV
10kV
15kV
20kV
3.5kV
7kV
10.5kV
14kV
measurement
input
10MOhms||50pF 20MOhms||25pF 30MOhms||22pF 40MOhms||20pF
1/1000
1/2000
1/3000
1/4000
frequency range
tolerance of ratio
tolerance of phase
DC
max. ±0.1%
0.05Hz ... 45Hz
max. ±0.1%
0.06°
45Hz ... 65Hz
max. ± 0.05%
0.06°
65Hz ... 2.5kHz
max. ±0.1%
0.2°
2.5kHz ... 10kHz
max. ±0.2%
0.4°
10kHz ... 100kHz
max. ± 0.3%
0.5°
300kHz; max. 100pF burden typ. ± 2%
2.5°
one fixed high voltage lead (length 2m) for each channel,
earth jack as the common reference point
signal output
one BNC socket for each channel
output burden
min. 1kohms; max. 1nF
ZES ZIMMER
196/218
Sensors and Accessories for precision power meters
Voltage sensors
safety class
class I; Device must be earthed additional to mains supply!
enclosure
robust aluminium case
protection class
IP54
temperature
range
0..50°C
size (L x W x H)
in mm
330 x 230 x 110
400 x 230 x 110
installation
dimension (L x
W x H) in mm
490 x 230 x 110
590 x 230 x 110
weight
approx. 6.1kg
supply
7.1.4
approx. 7.2kg
85..265V; 45..65Hz; ca. 20VA
Overvoltage capabilities of high voltage input against earthed case
For serial numbers starting with ‘E...’:
Series
maximum DC or 50/60Hz trms working voltage
maximum periodic peak working voltage
maximum transient overvoltage
Non repetitive maximum peak voltage
HST3
4.2kV
HST6
8.4kV
HST9
12.6kV
HST12
16.8kV
6kV
12kV
18kV
24kV
9.2kV
15.2kV
14.2kV
26.2kV
18kV
36kV
21.3kV
45.3kV
Note: The working and transient voltages are calculated in accordance to EN61010:2001,
valid for max. altitude 2000m over sea level.
ZES ZIMMER
197/218
Sensors and Accessories for precision power meters
Voltage sensors
7.1.5
Measurement principle HST
Figure 136: principle structure of different HST types
7.1.6
Example wirings
Figure 137: example wirings HST6-2
Two possible example wirings are shown: A two channel measurement in the upper part of
the figure and a differential voltage measurement in the lower part of the figure.
ZES ZIMMER
198/218
Sensors and Accessories for precision power meters
Voltage sensors
7.1.7
HST wiring of 3-phase systems
Figure 138: HST wiring of 3-phase systems
On the highvoltage side HST input1, input2 and input3 connects to L1, L2 and L3. All voltage
measurements have the same reference potential: earth.
Note that also isolated power systems have an important capacitance against earth, therefore
measurement of the isolated line voltages against earth with the HST works properly. Isolated
mains, mains with connection to earth / neutral, isolated frequency inverters as well as
frequency inverters with connection to earth / neutral are measurable this way.
On the low voltage side, the connection to the power meter LMG or other instruments can be
done in two different ways:
1. Instruments with internal star-delta conversion are connected like shown in the upper part
of the drawing. Advantage is that unbalanced sources are measured correctly, the total
power is determined correctly as well as the power of each phase.
2. Instruments without star-delta conversion are connected like shown in the lower part of the
drawing. The line voltages with reference potential earth can be tapped directly at the BNC
jacks. Even with unbalanced sources, the total power is determined correctly.
7.1.8
Included in delivery
• precision high voltage divider (HST)
ZES ZIMMER
199/218
Sensors and Accessories for precision power meters
Voltage sensors
• about 3m BNC connection cable from HST to the power meter LMG
• adapter BNC to 4mm plugs
7.1.9
Option mounting clips (HST-Z01/Z02)
This Option has to be specified at the order, respectively a refitting can be only made by ZES
ZIMMER.
Figure 139: HST mounting clips, Dimensions in mm
Figure 140: HST-Z01
Figure 141: HST-Z02
ZES ZIMMER
200/218
Sensors and Accessories for precision power meters
Voltage sensors
HST
HST3
HST6
HST9
HST12
Option
HST-Z01
a
180mm
b
380mm
HST-Z02
250mm
310mm
HST-Z01
180mm
450mm
HST-Z02
250mm
380mm
7.1.10 Option HST-O1 supply connection via IEC320 connector
Supply connection mating to commonly used IEC-320-C13 appliance connectors.
Figure 142: HST-O1
ZES ZIMMER
201/218
Sensors and Accessories for precision power meters
FAQ - frequently asked questions / Knowledge base
8
8.1
FAQ - frequently asked questions / Knowledge base
The Burden resistor
For measurements with the specified accuracies the burden of a sensor has to be between 50%
and 100% of the rated burden in the data sheet (at the rated frequency range). This burden can
be given as ohmic resistor or as an apparent power value. Here an example how you can
convert the two values:
R=
S
2.5VA
=
= 100mΩ
2
(I ) (5A )2
The burden resistor is built up from the ohmic load of the cables and additional from the
burden of the meter. The sensor will not work at the specified accuracy, if the operation
burden is not reached. Because of the very low consumption of the elektronic meter inputs the
rated operation burden is mostly not reached and an additional operation resistor has to be
fitted. This resistor can also be built up from a correctly dimensioned connection cabel from
the sensor to the meter.
Rcable
Radditional
Rmeter
CT
ZES ZIMMER
ohmic value of the cable
additional ohmic resistor (may be cable)
ohmic value of the meter input
current sensor
203/218
Sensors and Accessories for precision power meters
FAQ - frequently asked questions / Knowledge base
8.1.1
Example
Sensor
Cable
100A/5A
l = 2m (total length)
2
rated burden:Rrate = 2.5VA
ρ = 0.0175 Ω mm
m
operation burden: 50% of 2.5VA
2
A = 1.5mm
8.1.2
Meter
Burden: R meter =
2.5VA
I2
For the CT
S 2.5VA
=
= 100mΩ
I2
(5A)2
R rate =
The rated burden of the CT is:
⇒ Roperation = 50mΩ
Burden of the meter:
R meter =
Ohmic value of the cable:
R cable =
S 0.2VA
=
= 8mΩ
I 2 (5A)2
ρ ⋅l
A
=
0.0175Ω ⋅ mm 2 ⋅ 2m
= 23.3mΩ
m ⋅ 1.5mm 2
Now the additional resistor can be calculated to:
Radditional = Roperation-Rcable-Rmeter = 50mΩ-23.3mΩ-8mΩ=18.7mΩ
If you want to use a longer cable to built up this additional resistor the length is calculated:
l=
Rcable ⋅ A
ρ
=
(Roperation − Rmeter ) ⋅ A
ρ
=
(50mΩ - 8mΩ ) ⋅ m ⋅ 1.5mm2
0.0175Ω ⋅ mm 2
= 3.6m
(Please note the maximum current loading capability of the cable!)
ZES ZIMMER
204/218
Sensors and Accessories for precision power meters
FAQ - frequently asked questions / Knowledge base
8.2
Example of an error calculation: general derivation
The calculations illustrate how to calculate the errors of U, I or P when using an external
sensor. The following parameters of the measurement are given:
The measurement is made with a LMG95, the accuracies of the channels are in ±(% of
measuring value + % of measuring range):
Frequency/Hz
45 to 65
Voltage
Current
Active Power
0.01+0.02
0.01+0.02
0.015+0.02
The clamp with which is measured is the LMG-Z322 with an accuracy of:
Current
Amplitude error
Phase error
10A to 200A
200A to 1000A
1000A to 1200A
1.5%
0.75%
0.5%
2°
0.75°
0.5°
Ratio of 1000:1.
At the I channel we are using a scaling of 1000 to get the correct currents at the display. In the
following examples all values are calculated for the primary side, what means on measured
signal level. The readings are:
Utrms: 230.000V, range 250V ⇒ range peak value 400V
Itrms: 100.000A primary ⇒ 0.1A secondary; range 150mA ⇒ range peak value 469mA
calculated back to the primary side: range 150A ⇒ range peak value 469A
f:
50Hz
ϕ:
45°
P:
16.2635kW, range 37.5kW ⇒ range peak value 187.6kW
AC coupling mode for the signal is selected (what means you have no errors because of the
DC offset of the signal).
From the table above the following errors of the LMG95 itself for voltage and current can be
determined (using the peak values of the respective measuring range):
∆U = ±(0.01% of Rdg. + 0.02% of Rng.) = ±(0.023V + 0.08V) = ±0.103V
∆I LMG 95 = ±(0.01% of Rdg.+ 0.02% of Rng.) = ±( 0.01A + 0.0938 A) = ±0.1038 A
ZES ZIMMER
205/218
Sensors and Accessories for precision power meters
FAQ - frequently asked questions / Knowledge base
∆PLMG 95 = ±(0.015% of Rdg.+ 0.02% of Rng.) = ±( 0.00244kW + 0.03752kW) = ±0.03996kW
Additional to these three errors there is the error caused by the current clamp. First the
amplitude error which will be added to the ∆ILMG95:
∆I clamp = ±( 1.5% of rdg. ) = ±1.5 A
So you get a total current error of:
∆I total = ∆I LMG 95 + ∆I clamp = ±1.6038 A
The second error which is caused by the clamp is the error of the additional phase shift of 2°.
This error will influence the active power. In this example the power can be calculated as:
P = U * I * cos ϕ
So the total differential gives you the error:
∆Pclamp =
∂P
∂P
∂P
* ∆U +
* ∆I total +
* ∆ϕ
∂U
∂I
∂ϕ
you get:
∆Pclamp = I * cos ϕ * ∆U + U * cos ϕ * ∆I total + − U * I * sin ϕ * ∆ϕ
At this point only the errors of the clamp are used, the errors of the LMG are already calculated:
∆U=0!
∆I=∆Iclamp
2° * 2π
∆ϕ = 2°:
= 0.035 rad.
360°
For the angles you have to use the radient: 45° =
∆Pclamp = 100 A * cos
π
4
* 0.0V + 230V * cos
π
4
π
4
rad
* 1.5A + - 230V * 100A * sin
π
4
* 0.035
= 0.0W + 243.95W + − 569.22W = 813.17W
At this point the error values caused by the clamp should be marked:
The amplitude error of the clamp 243.95W and the phase shift causes 569.22W, what means
813.17W error are caused by the clamp.
ZES ZIMMER
206/218
Sensors and Accessories for precision power meters
FAQ - frequently asked questions / Knowledge base
The total error of the active power is:
∆Ptotal = ∆PLMG 95 + ∆Pclamp = ± (0.03996kW + 0.81317 kW ) = 0.85313kW
The relative error of the active power is:
∆P
∆Prelative = total = 0.0525 =ˆ 5.25%
P
8.2.1
Improving the accuracy
If you use a current clamp like in this example with a nominal current of 1000A and your current
is only 10% what means 100A a simple trick to increase the accuracy is to wind the conductor
several times through the clamp. In the example the accuracy of the clamp changes with three
windings to 0.75%, because of the primary current of 300A, the phase shift is 0.75°. The next
example of calculation is done for three windigs:
Utrms:
230.000V, range 250V ⇒ range peak value 400V
1000
= 333.333 , what means all current values are divided by 3, even the
3
errors! The ratio of the clamp stays at 1000:1!
Values: 300.000A primary ⇒ 0.3A secondary; range 300mA ⇒ range peak value
0.938A calculated back to the primary side: range 100A ⇒ range peak value 312.7A
Itrms:
Scaling
f:
ϕ:
P:
50Hz
45°
16.2635kW, range 25kW ⇒ range peak value 125.080kW
∆U = ±(0.01% of Rdg. + 0.02% of Rng.) = ±(0.023V + 0.08V) = ±0.103V
∆I LMG 95 = ±(0.01% of Rdg.+ 0.02% of Rng.) = ±( 0.01A + 0.06254 A) = ±0.07254 A
∆PLMG 95 = ±(0.015% of Rdg.+ 0.02% of Rng.) = ±( 0.00244kW + 0.02502kW) = ±0.027456kW
∆I clamp = ±( 0.75% of primary current = in this case the " reading" ) = ±2.25 A , now with the
scaling this error is divided by 3 as well, what means:
∆I clamp = ±( 0.75% of Rdg.) = ±0.75 A
∆I total = ∆I LMG 95 + ∆I clamp = ±0.82254 A
Again the total differential has to be used, but now with the following values:
ZES ZIMMER
207/218
Sensors and Accessories for precision power meters
FAQ - frequently asked questions / Knowledge base
∆U=0!
∆I=∆Iclamp
∆ϕ = 0.75°:
0.75° * 2π
= 0.013 rad.
360°
With this the error of the clamp of the active power is:
∆Pclamp = 100 A * cos
π
4
* 0.0V + 230V * cos
π
4
* 0.75A + - 230V * 100A * sin
π
4
* 0.013
= 333.40W
∆Ptotal = ∆PLMG 95 + ∆Pclamp = ±(0.027456kW + 0.33340kW ) = 0.360856kW
The relative error of the active power is:
∆Prelative =
∆Ptotal
= 0.0222 =ˆ 2.22%
P
With this simple trick the error of the current amplitude could be reduced by 51.2%. The error of
the active power even by 42.3%.
ZES ZIMMER
208/218
Sensors and Accessories for precision power meters
FAQ - frequently asked questions / Knowledge base
8.3
Example of an error calculation: LMG500 with external shunt
Particularly with regard to the standby power measurements compliant to EN62301 and
ENERGY STAR it might be profitable and necessary to use an external shunt to increase the
current dynamic and accuracy at low currents. This example shows how to calculate the
measuring tolerance of the complete system consisting of LMG500 and the external shunt
LMG-SH100.
• External shunt
LMG-SH100, 100ohms, ±0.15%
• Voltage measurement
Ueff=230V
LMG500 Urange=250V / 400Vpk (range spec.: see documentation of LMG500)
(in 115V supply networks: Urange=130V / 200Vpk, the remaining calculation is the same)
• Current measurement
Ieff=4mA
LMG500 Irange=5mA / 15.63mApk (range spec.: see documentation of LMG-SHxx)
LMG500 I measuring accuracy: ±(0.01% of measuring value+0.02% of measuring range)
• Power measurement
PF=0.1
f=50Hz (or 60Hz)
S=0.92VA
P=92mW
LMG500 Prange=Urange*Irange=400V*15.63mA=6.252W
LMG500 P measuring accuracy: ±(0.015% of measuring value+0.01% of measuring range)
• Tolerance of current and power measurement
Because the shunt tolerance is a purely scaling error without a term of measuring range, the
error analysis can be simplified to the following calculation:
shunt error term
LMG error of meas.value
LMG error of meas.range
∆I = ±( 0.15/100*4mA
+ 0.01/100*4mA
+ 0.02/100*15.63mA)
= ±( 6uA
+ 0.4uA
+ 3.126uA)
= ±9.526uA
∆P = ±( 0.15/100*92mW
= ±( 138uW
= ±777uW
ZES ZIMMER
+ 0.015/100*92mW
+ 13.8uW
+ 0.01/100*6.252W)
+ 625.2uW)
209/218
Sensors and Accessories for precision power meters
FAQ - frequently asked questions / Knowledge base
8.4
Example of an error calculation: LMG500 with HST3
In this example an error calculation is shown with the LMG500 and HST3 measuring the loss
power of a 3000V / 10A / 60Hz, pure sinewave voltage and current / PF=0.3 device under test
• HST high voltage divider
HST3 scale = 1000:1
HST3 tolerance: ±0.05% / ±0.06° @ 45 .. 65Hz
∆phi_HST3 = ±0.06°/360°*2*pi = ±0.001047197551 rad
• Voltage measurement
Ueff = 3000V / 60Hz
LMG500 Uscale = 1000
LMG500 Urange = (3V / 6Vpk) = 3000V / 6000Vpk
LMG500 U measuring accuracy: ±(0.01% of measuring value+0.02% of measuring range)
• Current measurement
Ieff = 10A / 60Hz
LMG500 Irange = 10A / 30Apk, direct current input
LMG500 I measuring accuracy: ±(0.01% of measuring value+0.02% of measuring range)
• Power measurement
PF = 0.3, pure sinewave voltage and current -> phi = acos(PF)
f = 60Hz
S = Ueff*Ieff = 30kVA
P = Ueff*Ieff*PF = 9kW
LMG500 Prange = Urange*Irange = 6000V*30A = 180kW
LMG500 P measuring accuracy: ±(0.015% of measuring value+0.01% of measuring range)
• Tolerance of voltage and power measurement
∆U_LMG500 = ±(0.01/100*3000V + 0.02/100*6250V) = ±(0.3V + 1.25V) = ±1.55V
∆U_HST3 = ±(3000V*0.05/100) = ±1.5V
∆U_total = ±(∆U LMG500 + ∆U HST3) = ±3.05V
∆P_LMG500 = ±(0.015/100*P + 0.01/100*Prange) = ±(1.35W + 18W) = ±19.35W
with P = U*I*cos(phi)
∆P_HST3 = ±( |dP/dU*∆U_HST3| + |dP/dI*∆I_HST3| + |dP/dphi*∆phi_HST3| )
with ∆I_HST3=0 (current measurement has no influence on voltage measurement)
∆P_HST3 = ±( |I*cos(phi)* ∆U_HST3| + |U*I*sin(phi)* ∆phi_HST3| )
∆P_HST3 = ±( 10A*0.3*1.5V + 3000*10*sin(acos(0.3))*0.001047197551) = ±34.47W
∆P_total = ∆P_LMG500 + ∆P_HST3 = ±53.82W
ZES ZIMMER
210/218
Sensors and Accessories for precision power meters
FAQ - frequently asked questions / Knowledge base
8.5
Phase correction of current transducers with LMG500
Current sensors, low frequency types for 50Hz as well as high frequency types, insert a delay
in the current measurement path. This behavior is also called ‘phase error’ and means an
additional error term in the power measurement. At high frequency applications and also even
low frequency applications at very low power factor, this phase error may destroy the
complete measurement! Even a few hundred nanoseconds add a significant power error in
case of low power factor.
A great feature of the LMG500 is the capability to correct the delay time of current and
voltage sensors with the time resolution of nanoseconds. To do this adjustment, it is very
important to find a reasonable signal and reference! The signal source can be either a
calibrator with voltage and current output and adjustable frequency and phaseshift or the
application itself. Sometimes the application can be operated in a working point with a current
low enough to be measured direct as well as via current sensor. The big advantage of the
phase adjust in the application itself is that its made with the identical frequency (or:
frequency mix!) as later in the measurement environment and the phase error of a current
transducer is usually dependent from the signal frequency.
Current transducer
I
U
IH F *
U s en s o r
I
U
I*
U*
Is e n s o r
Is e n s o r
IH F *
U s en s o r
I
U
I*
U*
L50-Z14
Sensor
Ch 1
Sensor ID I1
Ch 2
Sensor ID U1
Sensor ID I2
Sensor ID U2
Figure 143: wiring for current transducer phase correction
Use a few windings through the current transducer and measure the same current with a
different power channel and direct current input. Connect the voltage to both power channels
in parallel. Don’t forget to set the current scaling factor to compare the active power.
ZES ZIMMER
211/218
Sensors and Accessories for precision power meters
FAQ - frequently asked questions / Knowledge base
Best sensitivity can be achieved with a signal phaseshift near 90 degree. Now switch the
LMG500 to the menue: /range/delay and set the current channel delay for the same power
factor display like the direct measured signal.
For the proper phase adjustment bring the power channel 2 (with external current sensor) to
the same power factor as the power channel 1 (with direct current measurement). It is
important to adjust to the same power factor, not to the same active power (which should be
both nearly! the same conclusion), because every current sensor has also slightly gain errors.
To compensate a small gain error with delay adjustment will lead to spurious measuring
results! The power factor does not depend on gain errors, so its is better to use this value not
to mix gain adjustment with phase adjustment. To understand this, take a look at pure
sinewave signal for voltage and current: PF = P/S = (Utrms*Itrms*cos(phi))/(Utrms*Itrms) =
cos(phi). Utrms and Itrms can be truncated.
For very high frequency signal it is best to use not more than 5Aeff, because the bandwidth
and phase accuracy of this range (20mA to 5A) is the best.
Figure 144: LMG500 before delay compensation (left) /
with succsessfull delay compensation of 280ns (right)
The current transducer in the example above has a signal delay of 280ns, this is compensated
with a delay setting of -280ns, see the power factor ‘PF’ and active power ‘P’!
The current transducer delay or phase error is not necessarily positive, so at higher frequency
the phase shift of a passive current transformer is usually negative and has to be compensated
with a positive compensation value.
ZES ZIMMER
212/218
Sensors and Accessories for precision power meters
FAQ - frequently asked questions / Knowledge base
8.6
Multiple external sensors in a test bench with LMG450 / LMG500
A common situation in a test bench is, that different sensors have to be connected alternately
to the same power meter channel, controlled by a PC program. For ZES sensors with included
eeprom and error compensation (HDSUB15 plug) the relevant signals have to be redirected,
e.g. by a relais. Relevant are all 10 signals of the pins 6 to 15 of the 15 pin jack in the
LMG450 or L50-Z14!
Important!
• first you have to disconnect the active sensor: therefore please disconnect or switch off the
primary current, then disconnect pins 6 to 15 with a relais
• wait for at least 3s
• now you can connect the new sensor: connect pins 6 to 15 with a relais, then connect or
switch on the primary current.
• don’t allow primary current without secondary connection and supply of the sensor!!
• please use very short and shielded connection cables from the LMG to the switchbox, and
inside the switchbox to aviod EMC problems! a maximum length of 1m between LMG
and the HD15 plug of the sensor is allowed
• pin assignment of the HDSUB15 connector of LMG450 or L50-Z14:
pin1 to pin5
nc
pin6
negative supply (-12V/LMG450 or -15V/LMG500)
pin7
positive supply (+12V/LMG450 or +15V/LMG500)
pin8
EEPROM clk
pin9
EEPROM data
pin10
EEPROM vcc
pin11
signal out
pin12
gnd
pin13
gnd
pin14
gnd
pin15
sensor detection
ZES ZIMMER
213/218
Sensors and Accessories for precision power meters
FAQ - frequently asked questions / Knowledge base
• In case of supply via sensor supply unit SSU4 you can supply the sensors continuously with
an additional SSU4. Or supply both sensors in parallel with one output of the SSU4, but
allow primary current only to the active sensor!
pin assignment of the DSUB9 connector of SSU4:
pin1
nc
pin2
nc
pin3
gnd
pin4
gnd
pin5
-15V
pin6
signal
pin7
nc
pin8
status
pin9
+15V
ZES ZIMMER
214/218
Sensors and Accessories for precision power meters
FAQ - frequently asked questions / Knowledge base
8.7
Avoid distortion when using external sensors in noisy environment
External current sensors with voltage output connected to the precision power meter series
LMG have usually an output voltage of a few mV to several V. This sensors can be connected
to the LMG Isensor input and current measurements can be done with a high accuracy, but a
few points have to be kept in mind. Also sensors with current output can have distortion
problems. Especially in EMC noisy environments with high dU/dt voltages the following
points should be considered to achieve best accuracy and low noise:
• Use well shielded koaxial cable to connect sensors with voltage output to the power meter
LMG. Sensors with current output should be connected with twisted measuring leads.
• Avoid ground loops, do not connect the shield and/or housing of the sensor at several
different points to earth. Take into concern, that other instruments, measuring the same
secondary signal, might have inputs without isolation to earth, e.g. oscilloscopes. Important
is the star-shaped grounding of the complete system.
• In the case of well shielded sensors e.g. Pearson transducers, the shield housing should be
connected to PE to allow the capacitiv coupled distortion to find a low impedance way to
earth and do not couple to the measuring signal. If so, the low input I should not be
connected to earth.
Figure 145: Grounding of well shielded sensors
• In applications with current measurement on high common mode voltage potential it is
advantageous to connect the low output of a galvanic separated current transformer with
earth. There is a double galvanic separation: in the LMG and inside the current transformer
itself. So the secondary side has neither galvanic contact with the load current nor with
earth: the current channel is floating on an undefined potential. The accuracy can be
improved by draging down the floating voltage to about earth potential and give the
distortion currents a low impedance way to earth.
ZES ZIMMER
215/218
Sensors and Accessories for precision power meters
FAQ - frequently asked questions / Knowledge base
Figure 146: Grounding of common current sensor signals
• In applications with a high dU/dt and sensors with onboard electronics it might be
profitable to shield the isolated primary conductor e.g. with copper foil connected only at
one side! to earth. This shield ought to bleed of the capacitive coupled distortion to earth
and keep them away from the sensor electronics. This policy can also be used to enhance
accuracy and reject distortion with other current transducers.
Figure 147: Shielding of sensors with onboard electronics
• In all cases you should adapt the bandwidth of the power meter to the bandwidth of the
current sensor and the signal. It is useless to measure the active power with a 5kHz
bandwidth current clamp and a power meter bandwidth of 10MHz, in this case a signal
filter of e.g. 10kHz will not affect the measuring signal significantly, but will highly reduce
HF distortion and noise!
ZES ZIMMER
216/218
Sensors and Accessories for precision power meters
FAQ - frequently asked questions / Knowledge base
8.8
Range extension by changing primary ratio at current sensors
Figure 148: external range extension
You can use two windings through a current transducer to expand its current range dynamic.
In this example one winding with one turn (for big currents) and one winding with ten turns
(for small currents) are taken. If you change the scaling value of the corresponding power
meters current channel the different turns are taken into account for all of the measuring
values.
This approach is suitable for all feed through and clamp on current transducers.
Example:
• precision power meter: LMG500
• current sensor: PSU200
• measuring ranges (full range)
1 turn: 0.78A .. 100A
10 turns: 78mA .. 10A
ZES ZIMMER
217/218
Sensors and Accessories for precision power meters
FAQ - frequently asked questions / Knowledge base
8.9
Range extension by external Shunt and direct current input I*/I
Figure 149: range extension by external shunt
Measuring over a very wide current dynamic range might require to switch from direct current
measurement via I* and I for higher current to an external Shunt for very low current.
Because both the external Shunt input and the direct current input I*/I have the same reference
ground and to prevent that the measuring current flows via the voltage sense of LMG-SHxx,
the current has to be switched with two switches like shown in the figure. The input jack and
the appropriate scaling factor has to be set at the power meter.
S3 can be used in addition, not to interrupt the load current while switching between external
shunt and direct current input.
A typical application is the EN62301 conform measurement of small standby currents and
high operating currents in an automated testbench.
ZES ZIMMER
218/218
Sensors and Accessories for precision power meters