1
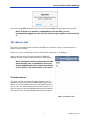
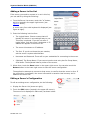
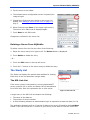
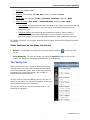
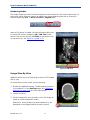
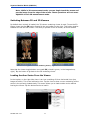
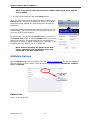
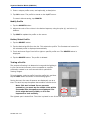
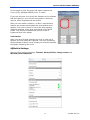
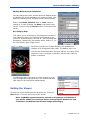
Symbols used in the label:
Symbol
Meaning
Consult Instructions for Use.
The CE 0197 mark applies to iNtuition and AquariusAPS Software. The CE
mark is affixed on the software and computer containing the aforementioned software.
Manufacturer
The name and address of the manufacturer are listed next to this symbol.
Date of Manufacture
The year of manufacture is listed next to this symbol.
Authorized Representative in the European Community
The name and address of TeraRecon’s authorized representative in the
European Community are listed next to this symbol.
GOST-R Mark
Mark of conformity certifying that Russian Federation safety requirements
have been met.
IN-MBL-EN-2.2A
Notice
TeraRecon, Inc., reserves all rights in this document, which is copyrighted, Copyright 2011-2015 by
TeraRecon, Inc., (“TeraRecon”). Reproduction of this document in any form is strictly prohibited, unless
specific written consent from TeraRecon has been obtained. Contents are subject to change without
notice. This document may only be used if the reader releases TeraRecon from all claims relating to or
arising from any errors it may contain. Use by the reader herewith constitutes such an understanding.
This provision may only be modified on an individual basis, in a separate written agreement executed
between TeraRecon and the owner or licensee of a specific instance of the product to which this
documentation relates.
Apart from any warranty that may be stated in a specific written agreement between a party and
TeraRecon, TeraRecon makes no warranty of any kind, whether expressed or implied, relating to the
contents of this document, or any software provided by TeraRecon, including, but not limited to
iNtuition, Aquarius Workstation, Aquarius Workstation iNtuition Edition, AquariusGATE, AquariusNET,
AquariusBLUE, AquariusAPS and AquariusNET Client software. TeraRecon will not be liable in any event
for incidental or consequential damages in connection with, or arising out of, the provision,
performance, or use of this documentation or any software product to which it may relate, or any
software or hardware product supplied by TeraRecon for use with any such software product or this
documentation itself.
Microsoft Windows, Windows NT, Windows 2000, Windows XP, Windows 7, Windows Server 2003 and
Windows Server 2008 are registered trademarks of Microsoft Corporation.
This document contains important, helpful, use and precautionary information. Please review carefully
all precautionary statements and advisories, whether onscreen or contained herein, as these are
essential to the effective and authorized use of the products and applications discussed.
Note: Any beta features extended are not to be used clinically, and can ONLY be
authorized, obtained or accessed through an appropriate beta agreement.
TeraRecon, iNtuition, Aquarius, and AquariusNet are either registered trademarks or trademarks of
TeraRecon, Inc. in the United States and/or other countries. Copyright© 2011-2015 TeraRecon, Inc. All
rights reserved.
i
IN-MBL-EN-2.2A
Indications For Use
To receive, store, transmit, post-process, display and allow manipulation of reports and medical images
from acquisition devices, including optical or other non-DICOM format images, DICOM images with
modality type XA, US, CR, DR, SPECT, NM and MG, and images from volumetric medical scanning
devices such as EBT, CT, PET or MRI. To provide access to images derived data and derived images via
client-server software, web browser and mobile technology.
Visualization in 2D, 3D and 4D are supported for single or multiple datasets, or combinations thereof.
Tools are provided to define and edit paths through structures such as centerlines, which may be used
to analyze cross-sections of structures, or to provide flythrough visualizations rendered along such a
centerline. Segmentation of regions of interest and quantitative analysis tools are provided, for images
of vasculature, pathology and morphology, including distance, angle, volume, histogram, ratios thereof,
and tracking of quantities over time. A database is provided to track and compare results using
published comparison techniques such as RECIST and WHO. Calcium scoring for quantification of
atherosclerotic plaque is supported.
Support is provided for digital image processing to derive metadata or new images from input image
sets, for internal use or for forwarding to other devices using the DICOM protocol. Image processing
tools are provided to extract metadata to derive parametric images from combinations of multiple input
images, such as temporal phases, or images co-located in space but acquired with different imaging
parameters, such as different MR pulse sequences, or different CT image parameters (e.g. dual
energy).
iNtuition is designed for use by healthcare professionals and is intended to assist the physician in
diagnosis, who is responsible for making all final patient management decisions.
Interpretation of mammographic images or digitized film screen images is supported only
when the software is used without compression and with an FDA-approved monitor that
offers at least 5Mpixel resolution and meets other technical specifications reviewed and
accepted by the FDA.
iNtuitionMOBILE provides wireless and portable access to medical images. This device is not
intended to replace full workstations and should be used only when there is no access to a
workstation. Not intended for diagnostic use when used via a web browser or mobile device.
Precautions Related to Display
The Auto-brightness feature changes the screen brightness automatically. It might not adjust properly
under some circumstances, in which case, the feature should be disabled. If you do not know how to
disable Auto-brightness, consult the user manual for your device or contact Apple Customer Support for
instructions.
Outdoor lighting conditions can reduce the contrast of images being viewed, and may hinder your
ability to distinguish subtle changes in the image. See “The Contrast Tool” on page 17 for
instructions on how to use the Contrast Tool to configure the device for different lighting environments.
A cracked or scratched screen, protective sheet or smudges on the device’s screen surface may affect
the viewing capability.
Patent Information
The product described in this document is protected by the following patents:
http://www.terarecon.com/wordpress/patents
IN-MBL-EN-2.2A
ii
Contents
Introduction
- - - - - - - - - - - - - - - - - - - - - - - 1
Requirements - - - - - - - - - - - - - - - - - - - - - - - 1
Downloading and Installing - - - - - - - - - - - - - - - - 1
Startup - - - - - - - - - - - - - - - - - - - - - - - - - - 2
The Server List - - - - - - - - - - - - - - - - - - - - - - 3
Adding a Server to the List .............................................................4
Editing a Server’s Configuration ....................................................4
Deleting a Server From AQMobile ................................................5
The Study List
- - - - - - - - - - - - - - - - - - - - - - 5
The URL Link List .........................................................................5
The Patient List ...............................................................................6
Study List Filtering .........................................................................6
Other Functions on the Study List Screen ......................................7
The Series list - - - - - - - - - - - - - - - - - - - - - - - 7
The Sub-series List .........................................................................8
Workflow Scene or Subseries List - - - - - - - - - - - - - 8
The Viewer - - - - - - - - - - - - - - - - - - - - - - - - 8
Viewer Settings ............................................................................9
Manipulating the Image ..................................................................10
Image Rendering ............................................................................11
Image Slice-By-Slice ......................................................................12
2D Measurements ...........................................................................13
Switching Between 2D and 3D Viewers ........................................14
Loading Another Series From the Viewer ......................................14
Importing Non-DICOM Images .....................................................15
AQMobile Options - - - - - - - - - - - - - - - - - - - - 16
Patient List ......................................................................................16
The Contrast Tool ...........................................................................17
AQMobile Settings .........................................................................19
Window/Level Preset Context Menu .............................................20
Exiting the Viewer
- - - - - - - - - - - - - - - - - - - - 21
iii
IN-MBL-EN-2.2A
IN-MBL-EN-2.2A
iv
Aquarius iNtuition Mobile (AQMobile)
Aquarius iNtuition Mobile (AQMobile)
Introduction
This product is for medical professionals to view clinical data on mobile devices, including the
iPod, iPhone, iPad and iPad Mini.
WARNING: Aquarius iNtuition Mobile is not for diagnostic review.
CAUTION: U.S. Federal law restricts use of this device to trained
physicians, or other suitably qualified and trained personnel on the
order of a physician.
Requirements
The following is required in order to use Aquarius iNtuition Mobile v2.2 and above:
•
A mobile device running iOS 7.1 or above.
•
A user account authorizing you to access a TeraRecon AquariusNET server, version 4.4.5
or above.
•
One of the following:
•
•
Local access through a wifi connection to the AquariusNET server.
From an external location, a VPN connection to the AquariusNET server.
Downloading and Installing
You can download the AQMobile application from the Apple Store using iTunes.
1. Enter “terarecon” or “aqmobile” in the search bar.
1
IN-MBL-EN-2.2A
Aquarius iNtuition Mobile (AQMobile)
The search results are displayed as follows:
2. Click the appropriate link for your device.
The description page for the application is shown:
3. From the description page, click the Free button to begin the download.
Note: if you do not have an Apple Store account, you will need to set up an
account before downloading.
Startup
To start the AQMobile app, first make sure you are connected to the Internet. Then
touch the AQMobile icon (see image at right) to start the application.
When the application starts, the AQMobile splash screen is displayed, immediately
followed by a message box describing the agreement.
IN-MBL-EN-2.2A
2
Aquarius iNtuition Mobile (AQMobile)
You must touch OK to proceed. Once you have touched OK, the application can continue.
Note: If there is no activity on AQMobile for ten minutes, you are
automatically logged out, and you will need to log in again to continue using
it.
The Server List
The server list shows the list of servers available to connect to. Server list information is
stored in local memory.
Each server entry contains the server name and its hostname or IP address.
When you select one of the server entries, AQMobile
displays the list of patient data available on that server.
Note: The top bar of the screens shown in this
manual might vary in appearance from your
device, depending on the product and version
of your device. The functionality is the same.
The Demo Server
The Demo server is a special TeraRecon server that is
available to anyone who has installed AQMobile 2.0 and
above. You do not need to have your own AqNET server or
any of your own study data to use the Demo server. It is
there so that you can test AQMobile and learn its features.
The Demo server provides sample data for this purpose.
Figure 1: The Server List
3
IN-MBL-EN-2.2A
Aquarius iNtuition Mobile (AQMobile)
Adding a Server to the List
If the server you need to connect to is not in this list,
you can add it by doing the following:
1. From the Server List screen, touch the “+” button,
which is located in the upper-right corner (see
Figure 1 above).
A server entry form with keyboard is displayed (see
figure at right).
2. Enter the following into the form:
•
The Logical Name. Choose a name that will
identify this server in a meaningful way to you.
This entry is optional. If you do not enter a
logical name, only the server’s hostname or IP
address will appear in the server list.
•
The server’s hostname or IP address.
•
The Port. If you do not know the port number,
ask the server’s system administrator.
•
Username and Password. These will be your credentials for connecting to the server.
•
(Optional) The Group Name. If you can not see the text entry box for Group Name,
scroll down. The keyboard hides a portion of the screen.
3. When done, touch the Save button in the upper-right corner. You can also touch the
Return button in the lower-right corner to save the server configuration.
The application attempts to connect to that server, to confirm that the server is alive. If
the connection is successful, the server information is saved to local memory and is
added to the server list.
Editing a Server’s Configuration
To edit an existing server configuration, do the following:
1. Display the Server List (shown at right).
2. Touch the Edit button (located in the upper-left corner).
The server list is displayed in Edit mode, as shown below:
IN-MBL-EN-2.2A
4
Aquarius iNtuition Mobile (AQMobile)
3. Tap the server to be edited.
4. The selected server configuration screen is opened (see
image at right.
5. Change any of the text entry boxes in the screen. For
details, see “Adding a Server to the List” on page 1-4,
Step 2.
6. When finished, touch Save (in the upper-right corner).
The server list in Edit mode is displayed again.
7. Touch Done to exit Edit mode.
Changes are reflected in the server list.
Deleting a Server From AQMobile
To delete a server from the list, do either of the following:
1. Swipe the server entry from right to left. The Delete button is displayed.
2. Touch Delete to delete the entry.
- Or 1. Touch the Edit button in the top left corner.
2. Touch the “-” button on the server entry to delete the entry.
The Study List
The Study List displays the patient data available for viewing.
Each entry in the list represents a single study.
The URL Link List
If the server you are connected to is running AquariusNET
server version 4.4.6 or earlier, the Study List is presented as a
list of URL links. Each link represents one or more series.
Figure 2: URL Link List
A single entry in the URL link list contains the following:
•
•
•
The name of the data set
The number of series included
A field indicating whether an authentication login is required to access the data (Y or N)
The application displays the first 17 entries of data on the server, followed by the Load Next
button. If you can not see all 17 entries on your device, scroll down to view the rest of the
5
IN-MBL-EN-2.2A
Aquarius iNtuition Mobile (AQMobile)
list. To retrieve more data, touch Load Next. The application loads the next 17 entries and
displays them below the current list.
If you select a URL link entry that does not require a login, the application retrieves the link
detail information from the server, and opens one of the following: the series list, the subseries list, the Workflow scene activity list or the viewer, depending on how many items are in
each of the subordinate lists.
When you select a URL link entry that requires authentication (login), a pop-up dialog is
displayed with a keyboard to allow you to type in the password. Then the application opens
the series list, sub-series list, workflow scene activity list or the viewer.
The Patient List
If the server you are connected to is running
AquariusNET version 4.4.6 Patch1 or later,
the Study List is presented as a Patient List
(as shown in the image at right).
A single entry in the Study List contains the
following:
•
•
•
•
The
The
The
The
patient name
modality of the study
Patient ID
number of series included
Figure 3: Study List
To avoid confusion, the list of studies, whether in the form of a Patient List or a URL Link List,
will be referred to from here on as the Study List.
Study List Filtering
In the top bar, on the right side, there is an icon that
looks like a funnel. This is the study filtering icon (see
image at right). Tap this icon to open the filter menu.
These settings determine which studies are displayed in the Study List.
IN-MBL-EN-2.2A
6
Aquarius iNtuition Mobile (AQMobile)
•
Page size: Default is 17.
•
Modality: For example, CT, MG, MR, and so on. Default is None.
•
Study date: For example: Today, Yesterday, Last2Days. Default is None.
•
Study list types: User study or Published study. Default is User study.
•
User studies are those that have been assigned to you. When you connect and log
in to the AquariusNET server, you have access to all studies that have been
assigned to you.
•
Published studies are those that are accessible to anyone. When a study is
published, it becomes publicly accessible. If you choose to view the list of
published studies, you will see all studies that have been published by anyone.
The Study List allows you to toggle between the two types. Please see the following section
for details.
Other Functions on the Study List Screen
•
Refresh - To redisplay the Study list, touch the Refresh button (
corner.
) in the top right
•
Close Study list - To close the Study list, touch the Options button in the top left
corner. The Study list is closed and the Options list is displayed.
The Series list
When you select an entry from the Study list that has
multiple series, the series list is displayed showing the
series included in the study. Each series entry shows a
thumbnail icon, the series number, the number of
images and series description.
To open a series, touch the desired entry in the list. If
there is a sub-series list, that list is displayed. Otherwise,
the workflow activity list is displayed.
To close the series list, touch the top left button. The
Study list is displayed.
7
IN-MBL-EN-2.2A
Aquarius iNtuition Mobile (AQMobile)
The Sub-series List
When a series is selected that has multiple sub-series,
this list is displayed. Each sub-series entry shows a
thumbnail icon and sub-series number.
When an item in the sub-series list is selected, the
viewer is opened, displaying the image.
To close the sub-series list, touch the Series button in
the top left corner. The previously displayed list is
redisplayed.
Workflow Scene or Subseries List
When you select a series that is a workflow scene, and if
the series has multiple workflow scene activity, the
workflow scene activity list is displayed. Each workflow
scene activity shows a thumbnail icon and the name of
the workflow activity.
To display the image in a workflow scene activity, select
the item from the list. The image is opened in the viewer.
To close the workflow scene activity list, touch the
Series button in the top left corner. The application
closes the workflow scene activity list and displays the
previous list.
The Viewer
When you select a single image from a list, the Viewer is launched. The data is loaded and
the image is rendered and displayed in the Viewer with patient annotation.
IN-MBL-EN-2.2A
8
Aquarius iNtuition Mobile (AQMobile)
Note: A warning message, reading
"WARNING: Not intended for diagnostic
use" is displayed at the bottom of the
viewer screen, on a strip of yellow
background color (see image at right).
Viewer Settings
The setting icon is located in the top-right corner of the
viewer screen.
The settings allow you to configure viewer settings
from within view screen. Tap the setting icon to display
a menu of setting options. See the following image.
The menu contains the following image viewer settings:
•
Image viewer settings
See “AQMobile Options” on page 1-16 for a complete description of these and other
AQMobile settings.
9
IN-MBL-EN-2.2A
Aquarius iNtuition Mobile (AQMobile)
•
User manual
Open the user manual (this manual) on your
device. This menu item opens a screen that
contains a link to the manual in PDF format (see
image at right).
•
Link to
User Manual
About
Display the product name and version number.
•
Cancel (iPod and iPhone)
On the iPad and iPad Mini, the settings menu
disappears automatically when you tap on one of
the options, or on any area outside of the dialog. If
you are viewing AQMobile on an iPod or iPhone,
you can also tap the Cancel menu item.
Manipulating the Image
The AQMobile Viewer supports some finger gestures for performing operations on the image
that change its orientation, scale, position, and window/level.
Gestures
Single-touch gestures use one finger to touch and move around the center or the lower
right corner of the image.
Dual-touch gestures use two fingers on the screen simultaneously, in three different
configurations:
•
Horizontal - The two fingers are placed side-by-side horizontally, and the distance
between them does not change during movement.
•
Vertical - The two fingers are placed one above the other, and the distance between
them does not change during movement. (It is recommended that you use your index
finger and thumb for this gesture.)
•
Pinch - The two fingers are pulled together or pushed apart.
Operations
The AQMobile Viewer supports the following operations on images: Rotate, W/L, Zoom and
Pan. Some gestures are used in conjunction with the four control buttons in the bottom left
half of the screen:
IN-MBL-EN-2.2A
10
Aquarius iNtuition Mobile (AQMobile)
Operation
Rotate
Gesture
Single touch
Description
When the
button is selected, the image is rotated
in the direction of finger movement.
W/L
Single touch
When the
button is selected, finger movement
upward causes the W/L to increase; finger movement
down causes it to decrease.
Zoom
Dual horizontal touch
Movement upward causes the W/L to increase;
movement down causes it to decrease.
Single touch
When the
button is selected, finger movement
upward causes the image to zoom in; finger movement
down causes zoom out.
Pan
Pinch
Opening the fingers wider zooms the image out.
Closing them together zooms the image in.
Single touch
When the
button is selected, the image is panned
in the direction of the finger movement.
Single touch and move
from the screen edge
This gesture pans the image, regardless of the
operation selected with the control buttons. However,
when the Viewer is not in pan mode, it is important to
touch the very edge of the screen before panning.
Otherwise, finger gestures are interpreted according to
the selected mode.
Dual vertical touch
Pans the image in the direction of the movement.
Image Rendering
•
Normal series or sub-series image
If the data is from a normal series or sub-series, the image is rendered in 3D VR using
the default color template.
•
Scene or workflow activity scene
If the data is a scene or one of the workflow activity scenes, the scene is displayed in the
rendering mode that was used to create it.
•
Secondary capture image
If the data is from secondary capture images, the image is displayed in the rendering
mode used to create the secondary capture.
11
IN-MBL-EN-2.2A
Aquarius iNtuition Mobile (AQMobile)
Rendering Modes
The image rendering mode is selected using the control buttons in the bottom right corner of
the screen. When a normal volume is loaded, the control buttons allow you to choose 3D
Volume Rendering (3D), or Axial, Coronal or Sagittal MPR.
When a CPR scene is loaded, the control buttons allow you
to choose 3D volume rendering (3D), CPR, Red (cross
section view on the red line) and Blue (cross section view
on the blue line). See Figure 4 on page 1-12.
Figure 4: CPR View
Image Slice-By-Slice
AQMobile allows you to slice through a series of 2D images
one by one.
To access slice-by-slice mode, do the following:
1. Disable the AQMobile setting, “Enable loading volume in
low resolution” on the Settings page. See “AQMobile
Settings” on page 1-19 for more instructions.
2. Load a 2D series.
3. Tap the rotate/slice icon (circled in red in the image at
right) to enable rotate/slice mode.
Buttons for slicing forward (+) and backward (-) are
displayed in the image window (circled in green).
IN-MBL-EN-2.2A
12
Aquarius iNtuition Mobile (AQMobile)
2D Measurements
Note: The server must be configured for 2D Measurements. Please contact
Customer Support for more information.
This tool allows you to obtain distance measurements on a 2D image. To enter measurement
mode, tap the ruler button at the bottom of the Viewer screen (circled in Figure 5 on page 113).
To obtain the most accurate measurements, we recommend that you first magnify the
image. When TeraRecon software distance measurements were tested against a digital
phantom, the measurement error was shown to be under 1%. The measurement was tested
using the iPad/iPad Mini, enlarging the image to greater than 200 pixels. Please note that this
error estimation does not take into account image modality error.
Add New Line
1. Make sure 2D measurement mode is enabled. The ruler
icon should be darker than the other icons at the bottom of
the screen (see image at right).
2. Touch the image at the start point of the measurement.
You can pinpoint the start point with greater precision by
moving your finger before lifting it.
3. When you have located the correct start point, lift your
finger off the screen.
4. Touch the image at the end point of the measurement. The
length of the line is calculated and displayed. If you need
to move your finger to find the precise end point, the
length is continuously updated.
Figure 5: Measurement Icon
5. Lift your finger to complete the measurement.
Modify an existing line
To modify an existing measurement, touch the line. The line enters edit mode, indicated by
small red circles at the endpoints. You can adjust the distance and position of the line by
touching the start or end point and moving your finger. Tap the line a second time to exit edit
mode.
Delete an existing line
1. Tap the line that you want to delete. It changes to edit mode.
2. Touch either one of the endpoints.
3. Without lifting your finger, move toward the other endpoint.
4. When your finger is as close as possible to the second endpoint, lift your finger. The line is
deleted when the distance is very small.
13
IN-MBL-EN-2.2A
Aquarius iNtuition Mobile (AQMobile)
Note: While in 2D measurement mode, you can single-touch the screen and
pan the image from the edge of the screen. These operations will not cause
AQMobile to exit 2D measurement mode.
Switching Between 2D and 3D Viewers
By default when a study is loaded, the 3D volume rendering viewer is used. To use the 2D
image viewer, tap the 2D button located in the top toolbar on the right. This button toggles
between the 2D and 3D viewers. The study is opened in the 2D viewer, as shown below:
Figure 6: Left - 3D Rendering Viewer; Right - 2D Viewer
Note that the viewer toggle button now reads 3D (circled in green, in the image above,
right). Tap the button to go back to the 3D rendering viewer.
Loading Another Series From the Viewer
In the top bar, on the right side, there is an icon consisting of three horizontal lines (see
image at below). This is the load series icon. Tap the icon to show a menu containing all the
series in the currently loaded study. This menu allows you to load another series without
leaving the Viewer. Tap the desired series to load it.
IN-MBL-EN-2.2A
14
Aquarius iNtuition Mobile (AQMobile)
If the series selected has subseries or workflow scenes, those lists are displayed instead of
an image in the viewer, so that you can select a subseries or workflow scene from that list.
Note: Displaying subseries or workflow scene lists from the viewer is not
supported in earlier versions of the AqNet Server. Instead, the first subseries
or workflow scene is loaded. If you need to load more than one subseries or
workflow scene, you will need to leave the Viewer and go back to the Series
list.
Importing Non-DICOM Images
You can upload non-DICOM images to AQMobile.
Note: The server must be configured for nonDICOM file uploading. Please contact Customer
Support for more information.
Note: This feature is available only when
AQMobile is connected to an AqNET Server
version 4.4.11.82 or later.
1.Tap the Upload button. A screen that shows all saved
photos in the device is opened (see image at left).
2.Tap the desired photo to select it. The selected photo is
loaded into the screen, as shown in the image below:
15
IN-MBL-EN-2.2A
Aquarius iNtuition Mobile (AQMobile)
Note: To go back to the previous screen without selecting a photo, tap the
Cancel button.
3. To confirm the selection, tap the Choose button.
Once you have confirmed the photo selection by tapping the
Choose button, a screen is opened that allows you to enter
the patient name, patient ID, study description and series
description.
If you had already selected a study before importing the nonDICOM image, the first three items (in the screen shown at
right) are filled in automatically.
On this screen, you can tap the Cancel button to go back to
the Patient List screen, or tap the Upload button to send the
photo to the server. The photo will then be converted to a
DICOM file and sent to AqNet DICOM server. Eventually, it will
be displayed in the Patient List as a DICOM file.
Note: Before uploading the photo to the web
server, you must enter the patient name and
patient ID in the text input boxes.
AQMobile Options
Tap the Options button from the Study List (see Figure 3 on page 1-6) to open the AQMobile
Options screen, as shown below. There are three options available: Patient list, Contrast
tool and Settings.
Patient List
Return to the Study List.
IN-MBL-EN-2.2A
16
Aquarius iNtuition Mobile (AQMobile)
The Contrast Tool
The Contrast Tool allows you to create and save profiles of the
lighting conditions in various environments. For example, if
you are in a good environment for image viewing, you can
create and save a contrast profile of that environment. This
profile can later be compared to other environments where
the lighting might be different.
A contrast profile contains four color squares. Each square
contains a circle that can be adjusted to four levels of color.
Using the Contrast Tool, you can add, modify, delete or test
the contrast profile.
Add New Profile
In the Contrast Tool screen, tap the ADD NEW button
(circled in the previous image) to open the screen shown at
right, Adding New Profile.
Adjust the color of each circle as follows:
1. Tap a square to select it.
2. To darken the circle, tap the minus (-) button.
3. Continue to tap the minus button, making the circle darker
until it is so similar to the color of the square that it is
barely visible. If the circle becomes completely invisible,
tap the plus (+) button to make it slightly lighter.
Note: You can also make the circle lighter or
darker by touching the circle and moving in an
upward or downward direction on the screen,
respectively.
When all four circles have been modified so that they are all just barely visible, save the
contrast profile, if desired.
Save Profile
To save a profile, do the following:
1. Tap the SAVE button.
A dialog opens, where you can provide the profile name and description.
17
IN-MBL-EN-2.2A
Aquarius iNtuition Mobile (AQMobile)
2. Enter a unique profile name, and optionally, a description.
3. Tap OK to save. The profile is stored on the AqNET server.
To cancel without saving, tap CANCEL.
Modify Profile
1. Tap the MODIFY button.
2. Adjust the color of the circles in the desired squares, using the plus (+) and minus (-)
buttons.
3. Tap SAVE to update the profile on the server.
Delete/Select Profile
1. Tap the SELECT button.
2. Tap the desired profile from the list. This selects the profile. The Contrast tool screen for
the selected profile is displayed automatically.
3. Touch and move finger from left to right on specific profile row. The DELETE button is
displayed.
4. Tap the DELETE button. The profile is deleted.
Testing a Profile
The purpose of testing is to determine how good the lighting is
in your current environment, when compared to a profile
previously created in an environment that is optimal for
viewing images.
To begin testing, select a profile from the profile list, and then
tap the TEST button as shown in the following figure:.
During the test, four sets of squares are displayed, one at a
time. For each set, tap the square that contains a visible circle.
Note: This test is timed. For an accurate
evaluation, you must tap the visible circle within
5 seconds after the squares are displayed. The
circle might be barely visible, so it is also
important to look carefully.
The lightest spot is tested first. The circle is placed in one of the four squares at random.
IN-MBL-EN-2.2A
18
Aquarius iNtuition Mobile (AQMobile)
In the image at right, the upper-left square contains the
circle, which, although difficult to see, is visible.
If you can not see a circle at all, this indicates to the software
that the lighting in your current environment is less than
optimal, when compared with this profile.
After you have made a selection, or after 5 seconds have
passed, the contrast tool displays the next-darkest set of
squares. The circle is shown in one of the other squares,
randomly selected, at the gray level stored in the saved
profile. This process continues until all four levels of
brightness have been tested.
Test Results
When you have finished selecting the circle in each set of
squares, the test results are reported. The score represents
the percentage of times (out of 4) that you correctly identified
the square containing the circle.
AQMobile Settings
There are four groups of settings: Timeout, Study list filter, Image viewer and
Window/Level Templates.
19
IN-MBL-EN-2.2A
Aquarius iNtuition Mobile (AQMobile)
•
Timeout
•
•
•
Server connection timeout. Default is 10 seconds.
Server service call timeout. Default is 35 seconds.
Study list filter
These settings determine which studies are displayed in the User Study/Published Study.
•
•
•
•
•
Page size: Default is 17.
Modality: For example, CT, MG, MR, and so on. Default is None.
Study date: For example: Today, Yesterday, Last2Days. Default is None.
Study list types: User study or Published study. Default is User study.
Image viewer
•
•
•
Image quality: Default is 75.
Enable image JPEG Lossy compression: On/Off. Default value is On.
Enable loading volume in low resolution: On/Off. Default value is On.
Note: You do not need to exit AQMobile to access these settings.
•
Window/Level Templates
AQMobile has four default window/level templates. The numbers in parentheses (window,
level) are the default values:
•
•
•
•
Adb (350, 75)
Head (100, 45)
Lung (1500, 700)
Bone (2200, 200)
These templates are used as preset window/level values, which is discussed in the
“Window/Level Preset Context Menu” section below.
Window/Level Preset Context Menu
When you tap the W/L icon ( ) in the Viewer, a context menu is displayed on the screen
showing each of the four templates, plus a Reset button (see image below).
Tap the button for the desired window/level to apply the preset values. To apply the initial
recommended window/level for the image, tap the Reset button.
IN-MBL-EN-2.2A
20
Aquarius iNtuition Mobile (AQMobile)
Editing Window/Level Templates
You can change the name, window and level default values
by tapping one of the templates (see image at right). This
opens the Window/Level Template screen (shown below).
Enter a new Name, Window value or Level value to
change it. To save changes, tap Save in the upper-right
corner. To cancel, tap the Cancel button in the upper-left
corner.
W/L Step by Step
This allows you to increment or decrement the window or
level values by steps. Four buttons are displayed on the
screen for these functions: W+ and W-, for increasing and
decreasing, respectively, the window values, and L+/L-, for
the level values. (See image below.)
Each time you tap one of these buttons, the window/level
changes by a configurable step value. The default step is 10.
You can also touch the button and hold it down. The value of the
window or level is changed continually, step by step, until the
button is released.
To change the size of the step for either window or level,
open the AQMobile settings screen. The window and level
step sizes can be configured independently.
Exiting the Viewer
To close the viewer and display the previous list, touch the
Back button in the top left corner of the screen.
Note: AQMobile supports both the portrait and landscape orientations of
your device. When you rotate the device, the application detects the new
orientation and displays the GUI and images accordingly.
21
IN-MBL-EN-2.2A
Aquarius iNtuition Mobile (AQMobile)
IN-MBL-EN-2.2A
22