1
HD PILOT Application
Installation Instructions and
User Manual
For Professional HD VIDEO SYSTEM
HD-V9000
Manual Version 1.01
June, 2010
Pioneer Corporation
Table of Contents
1. Outline of HD PILOT ………………… ……………………………………………………………… ……3
2. Install ……………………………………………………………………………………………….………… 4
2.1 Preparation ……………………………………………………………………………………….……… 4
2.2 HD PILOT download and usage ……………………………………………………..…………..…… 5
2.3 Attention of during starting HD PILOT first time …………………………………………….…… 6
3. Usage ………………………………………………………………..………………………………..……….. 7
-2-
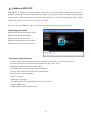
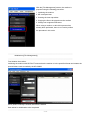
1.Outline of HD PILOT
'HD PILOT' is Pioneer’s support software that allows users of the HD-V-9000 memory player to
perform remote operations via the LAN. The ability to change the player’s settings, replace/change
video content – (file management), create/edit video playlists, schedule video playback, and remotely
monitor the player’s status are a few features available.
Users can download 'HD from the www.pioneerprovideo.com web page. (Free of charge).
・Operating environment
Windows XP Professional (Since SP2)
Windows XP Home (Since SP2)
Windows Vista business (SP1)
Windows Vista Home premium (SP1)
NOTE: Windows 7 is scheduled for support
・The player’s main function(s)
- Change units on-board settings (located in software’s file player set-up drop down box)
- Creation of playlist and their scheduled playback. (day, date, time)
- RS-232C command communication support
- Network remote control and the ability to monitor
- Change video contents (Via LAN only not RS-232C)
- Player power on/off capabilities
- Firmware update
- 4GB video file division
- Time Map Table file (required for frame control of data)
- Format SDHC Card
- SDHC speed transfer measurement
-3-
2.
Install
2.1.
Preparation
For functional use of HD PILOT’ it requires use with a PC that has “.net Framework “ installed.
This is distributed by Microsoft Corp.
Please download the full package of “.net Framework 3.5 SP1” from the home page of the Microsoft
corporation, and install it on your PC.
If the above-mentioned framework is required, or correct version not installed, the following error
messages are displayed.
If this is the case, please open "Add or Remove Programs" of the Control Panel to confirm whether
".net Framework 3.5 SP1" is installed on the PC using “HD-Pilot”.
-4-
NOTE: When .net Framework 3.5 SP1 is installed, the installation of Windows Installer 3.1 might
be requested according to the PC environment (XP SP3 formerly) used. If this is the case please
install Windows Installer 3.1.
・Required HDD capacity
PC’s HDD requires 500MB or less of free space for the installation of “.net Framework 3.5 SP1”.
Please refer to the download site of Microsoft Corporation for details.
2.2.
HD PILOT download and usage
Please download the .EXE file of “HD-Pilot” from the www.pioneerprovideo.com website, and extract
to an arbitrarily user created folder.
User can create on the computers desktop a short cut of “HDPILOT.exe” file that is located in the
uncompressed folder. Once done end user can start HD PILOT usage with the HD-V9000 unit.
-5-
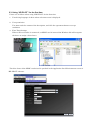
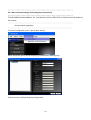
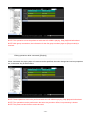
2.3. Using “HD PILOT” for the first time
Please set as follows when using “HD PILOT” for the first time.
1. Your dialog language of choice when selection screen is displayed.
2. User permission
You must read the content of the description, and click the agreement button to accept
conditions.
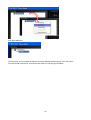
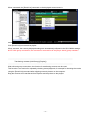
3. First Time Settings
When a SD card reader is connected, an SDHC card is inserted the Windows OS will recognize
the drive an assign a drive letter.
The drive letter of the SDHC reader/card is specified in the Application Local Environment screen of
“HD PILOT” software.
-6-
3.
Usage
The manual of HD PILOT is an online manual available via HTML, and also within this manual
Please open and refer to HD PILOT help file for HTML version.
-7-
1.Introduction
2.Setup
2.1Application Local Environment
3. Using Offline
3.1Preparing the medium – [File Management]
initialization ([File Management])
SD card speed test ([Local SD Speed Test])
Creating time map tables ([File Management])
Copying the files to be played onto the medium [(File Management)]
Changing non-supported filenames ([File Management])
3.2Creating playlist settings files ([Playlist])
Getting the media's information ([Playlist])
Specifying the order of playback for videos ([Playlist])
Specifying the order of playback for pictures and text ([Playlist])
Detailed settings for playback ([Playlist])
Adding, inserting and deleting playlists ([Playlist])
Playlist [Repeat], [Go to] and [Used Memory] functions ([Playlist])
Undo/Redo([Playlist])
Saving the playlist settings file you have created ([Playlist])
3.3Creating schedule settings files ([Schedule])
Setting for enabling the schedule function ([Schedule])
Setting the date or day of the week ([Schedule])
Setting the time ([Schedule])
Setting the [Mode] ([Schedule])
Checking the input values ([Schedule])
Batch changing of settings ([Schedule])
Saving the schedule settings file you have created ([Schedule])
3.4Creating settings files ([Player Setup])
Video Output tab ([Player Setup])
Video Settings tab ([Player Setup])
Display tab ([Player Setup])
Audio Settings tab ([Player Setup])
Play Mode tab ([Player Setup])
Network Settings tab [Player Setup])
Options tab ([Player Setup])
3.5 Reflecting the various settings on the HD-V9000
4.Using Online
-8-
4.1Types of connections
4.2Procedure for using while connected
Serial connection settings
4.4 LAN connection settings (LAN and group connections)
Group member registration
Group registration
Connecting
Simple member registration procedure
4.5 Connection status and disconnecting
4.6Remote control
HD-V9000 boot request ([Boot Players])
HD-V9000 play request ([Start Players])
HD-V9000 stop request ([Stop Players])
Schedule start request ([Start Schedule On Players])
Schedule stop request ([Stop Schedule On Players])
Reboot request ([Reboot Players])
Shutdown request ([Shut Down Players])
HD-V9000 clock setting ([Clock Adjust Players])
4.7Remote editing of playlists ([Playlist])
Receiving the current settings ([Playlist])
Editing operations while connected ([Playlist])
Sending the current settings ([Playlist])
Remote SD and Remote USB functions (LAN/Group) ([Playlist])
Test playing of edited settings ([Playlist])
Transferring contents (LAN/Group) ([Playlist])
4.8Remote editing of schedules ([Schedule])
Receiving the current settings ([Schedule])
Editing operations while connected ([Schedule])
Sending the current settings ([Schedule])
Remote SD and Remote USB functions (LAN/Group) ([Schedule])
4.9Remote editing of settings ([Player Setup])
Receiving the current settings ([Player Setup])
Editing operations while connected ([Player Setup])
Sending the current settings ([Player Setup])
Remote SD and Remote USB functions (LAN/Group) ([Player Setup])
4.10Remote editing of media ([File Management])
Sending contents to a connected HD-V9000 ([File Management])
Retrieving contents from a connected HD-V9000 ([File Management])
Deleting contents from a connected HD-V9000 ([File Management])
-9-
Sending and receiving contents between a USB storage device and an SD card on connected
HD-V9000s ([File Management])
4.11 Remote monitoring ([Remote Watch])
Monitoring the summary information of all registered HD-V9000s
Viewing the detailed information for a specific HD-V9000 ([Remote Watch])
Outputting a detailed information report for a specific HD-V9000 ([Remote Watch])
4.12 Command send monitor ([Command Send Monitor])
Command input and execution ([Command Send Monitor])
Command input assistance and help ([Command Send Monitor])
4.13 Updating the firmware (LAN/Group connections only) ([Firmware Update])
5.Software End User License Agreement.
- 10 -
1. Introduction
HD PILOT is an application for preparing HD-V9000 settings and media on which contents are stored.
When connected in a network or by RS-232C, settings and media maintenance can be performed remotely.
Playlists are edited and map files created using HD PILOT.
HD PILOT Operating Environment
[Operating System] : 32-bit version of Windows XP Professional SP2 or later (Japanese or English)
32-bit version of Windows Vista Business SP1 or later (Japanese or English)
[Others] : ".net Framework 3.5 SP1" must be installed.
[Supported Languages] : Japanese and English
[Connected Devices] : An SD card reader is required to edit SD memory cards directly on a computer.
Also, one of the following is required to use the communications functions:
- RS-232C interface
The device must be recognized with a standard COM port.
- LAN interface
The device must be recognized with a standard LAN port.
2. Setup
Here we set HD PILOT operations.
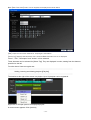
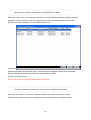
2.1Application Local Environment
The various HD PILOT settings can be made here.
Click [Application Local Environment] on the [Configuration] menu to open the settings screen.
- 11 -
- [Target SD Drive]
Specify the drive letter of the SD card reader connected to the computer.
Only drives recognized by the operating system are displayed, so connect the SD card reader before
opening this screen.
- [Work Directory]
Specify the folder in which temporary files created when executing HD PILOT are to be stored.
When the application is first launched, the work directory is automatically set to the folder in which the
application's executable file is located.
- [Log Directory]
Specify the folder in which log messages output by this application are to be stored.
When the application is first launched, the log directory is automatically set to the folder in which the
application's executable file is located.
- [Log Size (MB)]
Set the maximum message log size. Once the set size is reached, one generation of log messages is
stored and a new file is created.
- [Language]
Set the languages in which messages are displayed.
- [Rename Omission Sign]
This is the omission sign used when naming files.
- [Admin Password]
Specify the HD PILOT log-in password. When a password is input here, a message requesting that the
password be input appears when HD PILOT is launched.
- 12 -
- [Re-entry Password]
Input the same password as input at [Admin Password].
This item is provided to prevent misspellings since the password is not displayed.
3. Using Offline
HD PILOT can be used to make settings on the HD-V9000 when connected in a network or by RS-232C,
but it is also possible to store the settings files on USB devices or SD cards then load these files on the
HD-V9000 to reflect the settings on the HD-V9000.
Settings files stored using the HD-V9000's load/save function can also be edited with HD PILOT.
HD PILOT is designed to set playback plans on the HD-V9000 (power schedule, order of playback and
various settings) using the following procedure:
->Preparing the medium
-> Initialize the medium.
-> Create map files.
-> Copy the files to be played on the SD card.
-> Creating the playlists
-> Set the order in which the files are to be played.
->Creating the schedules
-> Set the HD-V9000's power on/standby plan by specifying times.
-> Also set the playlist to be played when the power is turned on and specifications for playing videos.
->Creating the settings file
-> Set the HD-V9000's operation (picture quality settings, etc.)
->Reflecting the settings onto the HD-V9000
-> Apply the series of settings created with HD PILOT to the HD-V9000.
3.1Preparing the medium – [File Management]
Preparation of the medium is performed at the [File Management] screen. Click the button shown below.
- 13 -
With the [File Management] screen, the medium is
prepared using the following procedure:
1. Initializing the medium
2. SD card speed test
3. Creating the time map tables
4. Copying the files to be played onto the medium
5. Change non-supported filenames.
When using a medium on which this process has
already been performed, there is no need to perform
the procedure in this order.
Initialization ([File Management])
First initialize the medium.
Initializing the medium with HD PILOT ensures that the medium is in the specified format and creates the
special folders used as media by the HD-V9000.
When [Media Initialize] is clicked, the format is started.
Wait awhile for initialization to be completed.
- 14 -
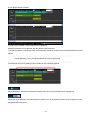
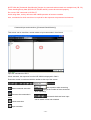
SD card speed test ([Local SD Speed Test])
The performance required of the SD card depends on the videos to be played.
With HD PILOT, it is not possible to guarantee actually reading time on the HD-V9000, but it is possible to
measure the SD card's reading speed on the computer as a rough indication.
When [Local SD Speed Test] is selected from the menu, the [SD Speed Test] screen appears.
Click [Ready] to start measuring.
- 15 -
The results show the minimum, maximum and average values for five tests.
If the results shown values below the bit rates of the videos to be played, one can assume that it is likely the
video will not play on the HD-V9000.
Also, even if the results are good, it may happen that the video may not actually be playable on the
HD-V9000.
This test should only be considered a rough indication.
NOTE: The results of this test on the computer and on the HD-V9000 differ greatly for media formatted in
NTFS.
For media formatted in NTFS, use the HD-V9000's measurement function.
Creating time map tables ([File Management])
Time map tables of video files must be created in advance to enable playback using playlists and all special
playback functions.
Creating time map tables takes time. We recommend using a computer that is as fast as possible.
- 16 -
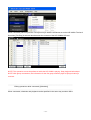
Click [Free Select] under [PC] in the [Operation Machine] section.
The folder selection screen opens.
Click the [Get Info] button to display a list of the files stored in the specified folder.
- 17 -
Map files have not been created for video files for which [unknown] is indicated in the [Codec] column.
To create time map tables, select the files, right-click, and then click [Make Time Map Table] from the
context menu.
Multiple files can be selected at once.
To do so, either click the first and last rows of the selection range while pressing the [Shift] key on the
keyboard, or click the individual rows to be selected while pressing the [Ctrl] key.
NOTE: Files whose filenames are displayed in red on the list cannot be handled.
The following restrictions apply to files:
- Filenames must have no more than 120 characters
- Filenames must be in ASCII characters (one-byte alphanumeric characters and symbols 0x20 to 0x7f).
Names in Japanese cannot be handled.
- Filenames must have extensions.
- Video contents must have the extensions ".mpeg", ".mpg", ".m2t" or ".ts".
- Filenames must not include the following characters: $, ', `, @, ~ (tilde), [ and ]
NOTE: Generally, various parameters can be specified when creating video files. For details on types of
files supported on the HD-V9000, see the HD-V9000's operating instructions.
When [Make Time Map Table] is clicked, the screen for specifying the options when creating the map tables
appears.
- 18 -
The meanings of these options are, in order from top to bottom:
- Turn the computer's power off after processing is completed.
- Quit the application after processing is completed.
- When creating the time map tables, divide files if they are larger than 4 gigabytes in size.
NOTE: When using split files, even if the content is below 4GB, the assigned drive will require "the size of
the content + 1MB".
After the file is divided, it becomes the following.
Ex) 001OPEN.mpg
-> 001OPEN.mpg.lst
001OPEN.mpg.prt01
001OPEN.mpg.prt02
001OPEN.mpg.prt03
001OPEN.mpg.map
NOTE: The proper authority for the access folder is required to execute the process. Without proper
authority, the process is not executed. For details, contact the system administrator.
NOTE: For the applicable file format, the container must be TS/TTS compatible, the codec H.264/MPEG2
compatible. Time map table creation will fail for other files.
NOTE: When changing File name or replacing video files after creating Time Map Table, please recreate
Time Map Table.
After setting the options, click the [Make Map Table] button.
The progress is displayed at the bottom left of the screen.
- 19 -
When the time map tables are created, the values are displayed in the video file's [Codec] and [Play Time]
columns.
Copying the files to be played onto the medium [(File Management)]
Like when creating the map files, select the contents then right-click.
- 20 -
Select [Copy To ] > [PC] > [SD] to copy files to the SD card.
Also copy bitmap files for the Image Overlay function and text files for the Text Crawl function to the SD
card in the same way.
The file copies are automatically distributed into the proper folders.
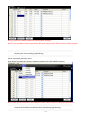
Changing non-supported filenames ([File Management])
Like when creating the map files, select the files with non-supported names (displayed in red) then
right-click.
- 21 -
Click [Auto Rename]. A sub-screen like the one below appears.
Input the new filename in the [New File name] column.
With [Auto Rename], the [New File name] column displays the filenames with non-supported characters
replaced with the character specified at [Rename Omission Sign] under [Application Local Environment].
Filenames with 121 characters or more are shortened to 120 characters and the end is replaced with the
specified character and a serial number.
The filenames are changed by clicking the [Apply] button.
NOTE: The [Auto Rename] function will not work for filenames including multi-byte characters and cases in
which the extension is incorrect.
- 22 -
3.2 Creating playlist settings files ([Playlist])
Playlists are created on the [Playlist] screen. Click the button shown below.
Playlists allow you to specify the order in which
contents are to be played, the repeat setting, and
the timing at which images and text are played.
Videos, images and text can each be displayed
one at a time.
At the [Playlist] screen, the playlist is created
using the following procedure:
1. Getting the media's information
2. Specifying the order of playback for videos
3. Specifying the order of playback for pictures
and text
4. Making the detailed settings for playback
5. Saving the playlist settings file you have
created
The following editing functions are also provided:
- Adding, inserting and deleting playlists
- Playlist [Repeat], [Go to] and [Used Memory]
functions
- Undoing and redoing
Getting the media's information ([Playlist])
Use this function to obtain the information on the files to be played as prepared on the [File Management]
screen.
- 23 -
Click the [Get Info] button. A list of the files is displayed.
NOTE: Files whose filenames are displayed in red on the list cannot be handled.
The following restrictions apply to files:
- Filenames must have no more than 120 characters
- Filenames must be in ASCII characters (one-byte alphanumeric characters a symbols 0x20 to 0x7f).
Names in Japanese, for example, cannot be handled.
- Filenames must have extensions.
- Video contents must have the extensions ".mpeg", ".mpg", ".m2t" or ".ts".
- Filenames must not include the following characters: $, ', `, @, ~ (tilde), [ and ]
- Time map table must be created in order to add video files to playlists.
- 24 -
Specifying the order of playback for videos ([Playlist])
Video files are displayed in the [Video] section of the file list.
Drag and drop them to the timeline on the right side of the screen.
If the playing time is short, the bar displayed on the timeline may be extremely short.
In this case, use the [Zoom] button in the lower right of the screen to adjust by specifying the desired
display magnification.
The video files are displayed with a bar with a length corresponding to the playing time, which grows as files
are added.
- 25 -
Drag and drop files to add them to the list
To change the order of playback, use the mouse to move the bar created when the file was dropped.
- 26 -
Fill in the empty space.
Specifying the order of playback for pictures and text ([Playlist])
Picture and text files are subordinate to video files. Drag and drop the picture and text files to assign them
to the video files.
When dragged, the video to which the file is to be assigned is highlighted. Drop when the desired video is
highlighted.
Multiple picture and text files can be assigned to the same video file, as long as they fit within the video's
playing time.
This way, it is possible to switch the picture or text at the specified time during playback of the video.
- 27 -
First, drag the right edge of the picture's bar to shorten its playing time.
Assign the picture file to the video file.
The file is added to the free space.
NOTE: The following restrictions apply to the bitmap files that can be handled as picture files:
- They must have a size of 640 x 360.
- They must be 24-bit bitmap files.
Add text files using the same procedure.
- 28 -
NOTE: Adjust the display timing so that the picture display does not switch during text playback. Playlists may not
play properly if the picture display switches.
Check the timing by playing the playlist with the actual playback operation.
NOTE: The Text Crawl start time is the time at which preparations to display the text begin. Depending on the text
content and type (RSS/Text), there may be a delay between the start time and the time the text is displayed.
Check the operation beforehand.
NOTE: Text in UTF-8 format can be handled with the text function.
NOTE: There are restrictions to the amount of characters that can be handled with the text function. See
below for approximate figures. Always check how actual playback operates beforehand.
<Maximum number of characters for the Text Crawl function>
Font size
European
Japanese/Korean
characters (*1)
characters
Min. (30 dots)
178 characters
136 characters
Small (35 dots)
151 characters
117 characters
Medium (40 dots)
136 characters
102 characters
Large (45 dots)
120 characters
91 characters
*1: 1 byte code calculated as width of the character "W".
NOTE: When "Moving Speed" is set to "Hold", the amount of characters that can be handled with the text
function is restricted as shown below.
Font size
European
Japanese/Korean
characters (*1)
characters
Min. (30 dots)
24 characters
18 characters
Small (35 dots)
21 characters
16 characters
Medium (40 dots)
19 characters
14 characters
Large (45 dots)
16 characters
12 characters
NOTE: When text is displayed on the screen in the hold mode, the left edge
may be cut off, depending on the monitor. If this happens, adjust by inserting
spaces in front of the first characters displayed.
Detailed settings for playback ([Playlist])
The bar located on the timeline holds the various detailed settings.
Highlight the bar, then right-click.
- 29 -
A context menu appears. Click [Property] to open the detailed settings screen.
Video bar properties
[File Name]
The name of the relevant file.
[Start Time]
The time at which the video starts in the playlist (on the timeline).
Specify the starting position in the playlist (on the timeline) as the range
in which this file can be played.
In the front direction, the time can be set to up to 00H00M00S or up to
the end time of the previous file.
A blank section can be set before the previous file if set in the rear
direction (in which case the playlist time advances, but no operation is
performed).
[End Time]
The time at which the video ends in the playlist (on the timeline).
Specify the ending position in the playlist (on the timeline) as the range
in which this file can be played. In the rear direction, it is not possible to
specify a time above the file's total number of frames.
[Audio]
Sets the audio output.
- 30 -
[Video]
Sets the video output.
[Audio Adjust]
Adjusts the volume.
[Lip Sync]
Sets the amount of audio delay. Off: Auto, On: Manual
[Lip Sync
Use this to adjust the audio delay manually.
Adjust]
[Search Frame]
Specifies the frame from which playback is to start within this file.
[Mark Frame]
Specifies the frame at which playback is to stop within this file.
Set so that the total number of frames specified fits within the starting and
ending time in the playlist.
Ex.: To play frames 501 to 800 in the file from 00H00M00S to 00H00M10S in the playlist:
Start Time: 00H00M00S
End Time: 00H00M10S
Search Frame: 501
Mark Frame: 800
The setting is reflected when the [Apply] button is clicked.
Picture bar properties
[File Name]: The name of the relevant file.
[Start Time]: The start time in the playlist (on the timeline). Same as the Video bar.
[End Time]: The end time in the playlist (on the timeline). Same as the Video bar.
[Transparent Color]: Specifies the color to be transparent. Areas corresponding to the specified color are
completely transparent.
- 31 -
[Transparent Rate]: Specifies the picture's overall transparency.
The picture's transparent colors correspond to the RGB values below.
When creating the bitmap files, specify the RGB values below for the background color.
Color
RGB value
Black
0/0/0
White
255/255/255
Blue
0/0/255
Green
0/255/0
Yellow
255/255/0
Red
255/0/0
The transparency can be tested in the Preview section.
In the bitmap file and settings in this example, [Transparent Color] is set to "White", so the white parts of the
bitmap file are transparent and can be seen through the green, the background color.
This lets you check whether the [Transparent Color] setting is proper, whether there is any dirt on the
picture, etc.
NOTE: This function cannot be used when online.
- 32 -
Text bar properties
[File Name]: The name of the relevant file.
[Start Time]: The start time in the playlist (on the timeline). Same as the Video bar.
[End Time]: The end time in the playlist (on the timeline). Same as the Video bar.
[Text Line]: The position in which the text is displayed.
[Text Size]: The size of the text.
[Text Color]: The color specified for the text's characters.
[Background Color]: The text's background color.
[Transparent Rate]: The transparency of the text's background.
[Moving Speed]: The speed at which the characters scroll.
RSS Text Crawl
With the text function, it is possible to display not only text stored in files, but also RSS information provided on
the Internet, etc.
- 33 -
When [RSS Text Crawl] under Text is dropped, the display items shown below
d.
[URL]: Input the connection address for acquiring the information.
[Select Tag]: Specify what elements of the acquired RSS information are to be displayed.
"None", "Title", "Description" and "Author" can be selected.
Three elements can be selected for [Select Tag]. They are displayed in order, starting from the element
specified on the left.
For other items: Same as regular text.
Adding, inserting and deleting playlists ([Playlist])
The timeline at the right of the screen is a playlist. Up to 20 playlists can be registered.
Right-click on an open part on the displayed playlist.
A context menu appears. Click [Add list].
- 34 -
A new playlist frame is added.
If [Insert List] is clicked, a new playlist frame is inserted.
Undesired playlists can be deleted with the [Delete List] command.
To combine playlists, click [Merge List]. Its immediately following contiguous list is added behind the current
playlist.
Playlist [Repeat], [Go to] and [Used Memory] functions ([Playlist])
The [Repeat] and [Go to] settings can be made for the individual playlists.
When [Repeat] is checked, that playlist is played to the end, then repeated from the beginning.
When [Go to] is specified, once that playlist is played to the end, playback starts from the beginning of the
playlist specified at [Go to].
- 35 -
There is a limit to the number of contents and settings that can be included in playlists.
This limit is indicated at [Used Memory].
If you exceed 100%, right-click on the video file's bar and select [Divide List]. The part from the specified
video bar on is moved into a new playlist.
Connect the divided playlists using the [Go to] function.
Undo/Redo ([Playlist])
The [Playlist] function keeps the editing history in memory.
This can come in handy for example if you realize you have made a mistake editing.
- 36 -
Undo’s the last editing step.
Re-applies the next editing step.
The editing history is cleared when a new settings file is loaded or written.
Saving the playlist settings file you have created ([Playlist])
Use this procedure to save the settings you have created in a file.
Click the save icon on the action bar at the top of the screen.
Click [Local SD].
The file save dialog appears.
The SD card's System folder is browsed to automatically and its contents are displayed.
Input the filename, then click [Save].
- 37 -
Settings files stored in the System folder can be loaded using the Load/Save function when the SD card is
inserted into the HD-V9000.
3.3 Creating schedule settings files ([Schedule])
Schedules are created at the [Schedule] screen. Click the button shown below.
Schedules allow you to set the day of the week/date
and time for turning the power on and off, and the
files or playlists to be played when the power is
turned on.
With the [Schedule] screen, playlists are created
using the following procedure:
1. Setting for enabling the schedule function
2. Setting the date or day of the week
3. Setting the time
4. Setting the [Mode]
5. Checking the input values
6. Saving the schedule settings file you have created
The function below is provided as input assistance:
- Batch changing of settings
- 38 -
Setting for enabling the schedule function ([Schedule])
By default, the schedule function is disabled ([Disable All]).
Click [Enable All] to enable the schedule function.
Setting the date or day of the week ([Schedule])
Click the cell for the [Day] item.
The sub-window below appears.
- 39 -
To specify a day of the week, select the desired day at [Weekly], and then click [OK].
To specify the date, select the date at [Yearly Special Day], then click [OK].
Setting the time ([Schedule])
Click the cell for the [On] or [Off] item.
Input the time using the keyboard.
Memo: The time for the [On] and [Off] items is input with the format "HH:MM", but the input assistance
function works for these items.
When "1234" is input, it is automatically corrected to "12:34".
When "12" is input, it is automatically corrected to "12:00".
Setting the [Mode] ([Schedule])
- 40 -
Pull down the [Mode] item.
From the choices displayed, select [Playlist] or [File Play].
When [File Play] is selected, a file selection sub-screen appears. Select the file to be played.
When [Playlist] is selected, a sub-screen for inputting the playlist number appears. Select the number of the
playlist to be played.
Checking the input values ([Schedule])
Checking whether the times overlap
If the [On] and [Off] times for multiple schedules overlap, the "Overlap" warning is displayed in the [Status]
column.
NOTE: This warning is only displayed if the same day of the week is set. The date setting is not checked.
Viewing the schedule on a chart
Click [Viewer] at the bottom right of the screen.
- 41 -
The chart can be displayed at the [Schedule Viewer] screen.
Summaries of the settings are displayed at the "Select" buttons at the top of the screen.
Days displayed in white are days for which a schedule is set.
Days displayed with a red bar underneath them are days for which schedules overlap.
When a day of the week button is clicked, a chart of the schedules set only for that day of the week is
displayed.
- 42 -
A chart of the schedules set for that day of the week is displayed at the top of the screen.
Red is used as a warning about overlapping schedules. Green indicates there is no problem.
A chart of the schedules set by date is displayed at the bottom of the screen.
No matter what day of the week is selected, it is not possible to select a chart displaying only the settings for
a specific date; all dates are displayed.
When the mouse is pointed to a bar, a balloon showing the settings appears.
When a bar is double-clicked, the [Schedule] screen reappears, jumping to the row for the schedule that
was clicked.
Turning the grid on and off
These buttons are used to turn the chart's grid on and off.
Pressing the [Edit] button after selecting the row has the same effect as double-clicking.
Click [Close] to close the screen.
Batch changing of settings ([Schedule])
Check the box in the [Select] column for the schedules for batch changing.
- 43 -
Memo: It is also possible to select all the items by clicking [All Select].
Click [Batch Edit].
The Batch Edit screen appears.
The numbers of the selected schedules are displayed at the [Data Index] item.
When a day of the week is specified at the [Day] item, all the selected schedules are set for the day
specified at this item.
The [On] and [Off] times can be changed in a batch with the [Time] item.
When [Change To] is selected, all the selected schedules are changed to the times that are input.
- 44 -
When [Shift] is selected, the times are shifted by the times that are input.
The [Mode] and [Parameter] settings can be set in a batch with the [Execution] item.
After inputting, click [OK] to reflect the changes in the schedules.
Saving the schedule settings file you have created ([Schedule])
Use this procedure to save the settings you have created in a file.
Click the save icon on the action bar at the top of the screen.
Click [Local SD].
- 45 -
The file save dialog appears.
The SD card's System folder is browsed to automatically and its contents are displayed.
Input the filename, then click [Save].
Settings files stored in the System folder can be loaded using the [Load Save] function when the SD card is
inserted into the HD-V9000.
3.4 Creating settings files ([Player Setup])
Player settings are created at the [Player Setup] screen.
- 46 -
he [Player Setup] screen is divided into the tab pages shown
below.
[Video Output]: Default settings - Video output settings
[Video Settings]: Picture quality settings
[Display]: Display settings
[Audio Settings]: Audio settings
[Play Mode]: Power on start settings
[Network Settings]: Network settings
[Option]: Default settings – Other settings
Click the tab title to display the settings items.
See the HD-V9000's operating instructions for descriptions of the
meanings of the items and the setting values.
Video Output tab ([Player Setup])
- 47 -
See the HD-V9000's operating instructions for a description of the meanings of the items and setting
values.
Video Settings tab ([Player Setup])
[Default] and [Memory1] to [Memory3] can be selected at the VideoOutput tab.
The settings for the [Memory] modes can be edited by clicking the [Detail>>] buttons.
See the HD-V9000's operating instructions for a description of the meanings of the items and setting
values.
Display tab ([Player Setup])
- 48 -
See the HD-V9000's operating instructions for descriptions of the meanings of the items and the setting
values.
Audio Settings tab ([Player Setup])
See the HD-V9000's operating instructions for descriptions of the meanings of the items and the setting
values.
- 49 -
Play Mode tab ([Player Setup])
See the HD-V9000's operating instructions for descriptions of the meanings of the items and the setting
values.
Network Settings tab [Player Setup])
See the HD-V9000's operating instructions for descriptions of the meanings of the items and the setting
values.
- 50 -
Options tab ([Player Setup])
User settings can be recorded at the [Extend Terminal] item. The details screen appears when the
[Detail>>] button is clicked.
See the HD-V9000's operating instructions for descriptions of the meanings of the items and the setting
values.
NOTE: There is an item for setting the time on the HD-V9000's GUI screen, but not on the HD PILOT's
Options screen.
To set the HD-V9000's time from HD PILOT, see the "Using Online" section of these instructions.
Also note that the HD-V9000 cannot be initialized from HD PILOT.
3.5 Reflecting the various settings on the HD-V9000
The various settings created with HD PILOT are stored in files with the formats shown below.
Type
Extension
Place where saved
Playlist
.plt
SD card system folder or the desired
place (USB device, etc.)
Schedule
.sch
SD card system folder or the desired
place (USB device, etc.)
- 51 -
Type
Extension
Place where saved
Settings
.ust
SD card system folder or the desired
place (USB device, etc.)
Files to be played that are copied onto the medium at the [File Management] screen are copied into the SD
card contents folders shown below.
Type
Extension
Place where saved
Video
Any
SD card Video folder
Picture
.bmp
SD card Picture folder
Text
.txt
card Text folder
As indicated above, the contents to be played and the set of settings are stored on the SD card.
Insert the prepared SD card into the HD-V9000.
Refer to the "Advanced setting menu – Loading and saving settings" section of the HD-V9000's operating
instructions and execute the following commands:
Load Setup
Load Playlist
Load Schedule
After loading the settings, reboot the HD-V9000 to reflect the set of settings.
4. Using Online
HD PILOT is equipped with functions for applying various settings to the HD-V9000 via LAN or serial
connections.
HD PILOT can also be used to check the HD-V9000's status and control the HD-V9000 in various ways.
With LAN connections, it is also possible to upload and download content files, to upload firmware, etc.
4.1 Types of connections
Three types of connections are possible.
- Serial connections: Control of the HD-V9000 is performed via RS-232C cable.
- LAN connections: One-to-one communications between the computer and HD-V9000 are performed via
LAN.
- 52 -
- Group connections: One-to-many communications between the computer and multiple units of the
HD-V9000 are performed via LAN.
These different types of connections have the following distinctive features.
- Serial connections: Communications are possible simply with a computer equipped with a COM port and
an RS-232C cable.
- LAN connections: A LAN environment is required, but these connections allow contents to be sent and
received remotely.
- Group connections: A LAN environment is required, but with these connections the same settings can be
applied in a batch to multiple players, contents can be sent and received, etc. Group connections are
convenient when operating multiple players with the same settings.
4.2 Procedure for using while connected
When connected, maintenance of the settings (changing of settings, copying of contents, etc.) can be
performed remotely from HD PILOT, but basically not while the HD-V9000 is playing.
Also, the HD-V9000 must be rebooted after the settings are rewritten.
Because of this, maintenance can be performed most smoothly if operations are performed following the
procedure below.
1. Connecting to the HD-V9000
2. Stopping the HD-V9000's schedules (when managing the power by schedule)
3. Instructing the HD-V9000 to stop playing
4. Replacing the contents
5. Operations for changing the settings (playlists, schedules, etc.)
6. Starting the HD-V9000's schedules (when managing the power by schedule)
7. Rebooting the HD-V9000 (when playing repeatedly with the power on play setting)
8. Or shutting down the HD-V9000 (when managing the power by schedule)
- 53 -
Note that the HD-V9000 only accepts one LAN connection.
When for example the HD-V9000 is associated with other systems by LAN connections, the connection to
the other system must be disconnected.
Serial connection settings
With serial connections, no special settings are required. Click the [Connect To] button to display the
[Connection Settings] screen.
With serial connections, no special settings are required. Click the [Connect To] button to display the
[Connection Settings] screen.
Check the [Serial Connection] radio button, and then select the [Serial Port] and [Serial Baud rate] settings.
All the COM ports recognized by the computer are listed in the [Serial Port] pull-down menu. Select the
HD-V9000's COM port to which the RS-232C cable is connected.
At [Serial Baud rate], select the same value as selected in the HD-V9000's settings ([Initial Settings] ->
[Options]).
Click the [Connect] button to connect.
- 54 -
4.4 LAN connection settings (LAN and group connections)
The HD-V9000's network address, etc., must be set in order for HD PILOT to connect to the HD-V9000 via
the network.
Group member registration
From the [Configuration] menu, open [Player Admin].
When the screen opens, [Single Players] is provided as the default group.
Point the mouse to [Single Players] and right-click.
- 55 -
Click [New Member].
The "No name" group member is added to the [New Member] default group. Click "No name".
For normal LAN connections, connections are made in units of group members.
- 56 -
The connection settings at the bottom right of the screen become active. Input the various items.
The input values for the various items can be checked at [Network Settings] at the connected HD-V9000's
Setup screen.
[Name]: The connection settings name in HD PILOT.
[IP Address]: Input the IP address of the HD-V9000 to be connected.
[Remote Port]: Input the remote port of the HD-V9000 to be connected.
[MAC Address]: Input the MAC address of the HD-V9000 to be connected.
[Description]: This is a memo space. Input anything you wish.
[FTP User]: Input the FTP user name of the HD-V9000 to be connected.
[FTP Password]: Input the FTP password of the HD-V9000 to be connected.
[FTP Port]: Input the FTP port of the HD-V9000 to be connected.
The [MAC Address] field can be left empty, but the MAC address is required to use the WOL function.
Multiple group members can be registered under a group.
Even if the IP address is not input, communications are possible as long as the MAC address is input, but
only within the same segment.
- 57 -
Group registration
Group connections are made in units of groups defined on this screen.
To make group connections, add group members using the same procedure.
If a new group is needed, the new group can be defined by selecting [NewGroup] (right-click).
Once the required members have been registered, click [Apply] to close the screen.
The connection settings are saved.
Connecting
Click the [Connect To] button to display the [Connection Settings] screen.
- 58 -
For regular LAN connections, check the [LAN Connection] radio button and select the HD-V9000 to be
connected to at [Player Name].
For group connections, check the [Group Connection] radio button and select the name of the group to be
connected to at [Group Name].
Click [Connect] to connect
NOTE: The HD-V9000 does not accept multiple connections simultaneously. Note that if you attempt to
connect to the same player from multiple computers, the last computer that tried to connect is connected,
and previously established HD PILOT communications are disconnected.
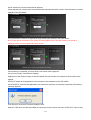
- 59 -
NOTE: If the firewall function is enabled in Windows, a sub-window like the one above may appear when
you attempt to establish LAN/group connections.
When Windows detects that HD PILOT has attempted to start communications, it uses this screen to ask
the user whether or not to permit HD PILOT communications.
HD PILOT's LAN/group functions cannot be used unless you permit HD PILOT communications.
For any doubts, contact the system administrator.
HD PILOT conducts the types of communications shown below via LAN.
To use the communications functions, remove any obstacles on the communication path.
Type
Protocol/Direction
Port/Remarks
Control command
TCP outbound
Depends on remote port setting. Default:
communications
10001
Required for online use.
FTP
TCP outbound
Depends on remote port setting. Default: 21
Required for sending/receiving contents,
etc., online.
Also, PASV mode used for
sending/receiving contents.
Attempts to connect to data
transmission/reception port according to
HD-V9000's FTP instructions.
Net Search
UDP inbound
Fixed: 10001
MAC address
Required for simple member registration
conversion
and communicating using only the MAC
address, without inputting the IP address.
- 60 -
Type
Protocol/Direction
Port/Remarks
Net Search
UDP outbound
Fixed: 10001
MAC address
Broadcast
Required for simple member registration
conversion
and communicating using only the MAC
address, without inputting the IP address.
Simple member registration procedure
With HD PILOT, it is possible to search for the units of HD-V9000s present on the LAN and register
members based on the search results.
Using this function eliminates the trouble of checking the HD-V9000s' IP and MAC addresses.
Right-click on the added group name, then click [Net Search].
The search results are displayed as a list. Select the HD-V9000 to be added, and then click [Apply].
The selected HD-V9000 is added to the group.
- 61 -
NOTE: The IP addresses displayed are the current IP addresses. If the HD-V9000 is set to
"DHCP/AUTOIP", however, the IP address will not be constant. In this case, leave the member's IP address
field empty.
NOTE: It is only possible to search for HD-V9000s on the same segment. Because of this, it is not possible
to search on external networks separated by routers, etc.
NOTE: Depending on the timing, the MAC address may not be detected easily. In this case, wait awhile.
4.5 Connection status and disconnecting
When connections are established successfully, the name of the connected HD-V9000 is displayed on the
connection icon.
Once connected, various HD PILOT functions become active.
To disconnect, click the connection icon, then click the [Disconnect] button.
- 62 -
4.6 Remote control
When connected, HD PILOT can be used to send various control commands to the HD-V9000.
These are convenient for playing the HD-V9000, stopping it, etc., before and after the HD-V9000's settings
are made.
With group connections, all the players can be controlled simultaneously.
Note that depending on the HD-V9000's status, it might not be possible to execute some of the commands.
HD-V9000 boot request ([Boot Players])
When the HD-V9000 is in the standby mode, it accepts requests to boot from the standby mode.
With LAN connections, this function does not work if Wake Up On LAN is disabled.
If the HD-V9000 is already booted, the command is ignored and the HD-V9000 is connected.
The normal connections screen appears.
From the [Tasks] menu, select [Boot
Select the type of connection and the
Players].
HD-V9000(s) to be connected, and then
click [Connect]. The HD-V9000(s) are
booted, and then connected.
NOTE: With LAN connections, the [MAC Address] field at the [Player Admin] screen must have been input.
HD-V9000 play request ([Start Players])
The operation is the same as when the remote control play button is pressed.
From the [Tasks] menu, select [Start Players].
- 63 -
HD-V9000 stop request ([Stop Players])
The operation is the same as when the remote control stop button is pressed.
From the [Tasks] menu, select [Stop Players].
- 64 -
Schedule start request ([Start Schedule On Players])
This sets the schedulesetting to [Enable All].
From the [Tasks] menu, select [Start Schedule On Players])
Schedule stop request ([Stop Schedule On Players])
This sets the schedule setting to [Disable All].
From the [Tasks] menu, select [Stop Schedule On Players])
- 65 -
Reboot request ([Reboot Players])
This reboots the HD-V9000s. HD PILOT waits for the rebooting to be completed, then attempts to
reconnect.
Note that connection will fail if the connection settings have been changed.
From the [Tasks] menu, select [Reboot Players].
Shutdown request ([Shut Down Players])
- 66 -
This sets the HD-V9000s to the standby mode.
From the [Tasks] menu, select [Shut down Players].
HD-V9000 clock setting ([Clock Adjust Players])
This command can be used to set the clock on the HD-V9000s.
- 67 -
From the [Tasks] menu, select [Clock Adjust
A calendar screen appears. Select the date
Players].
to be set, input the time, and then click [Set
Input Date time]. The HD-V9000 is set to the
date and time that was input.
When [Set System Clock] is clicked, the
HD-V9000 is set to the date and time of the
computer's system clock.
NOTE: Because of network delays and processing delays, the HD-V9000 is not perfectly synchronized with
the computer.
NOTE: When NTP is activated on the main unit, this request is denied.
4.7 Remote editing of playlists ([Playlist])
When connected, HD PILOT can be used to remotely edit the playlist settings set on the HD-V9000.
Receiving the current settings ([Playlist])
When connected, [Receive] is active. Click [Receive] to load the playlists set on the HD-V9000.
The list of contents on the left side of the screen show the contents of the SD card connected to the
HD-V9000.
- 68 -
NOTE: This operation cannot be performed while the HD-V9000 is playing. Stop playback beforehand.
NOTE: With group connections, the information for the first group member player at [Player Admin] is
received.
Editing operations while connected ([Playlist])
When connected, the playing order of contents can be specified, the order changed and various properties
set, in the same way as when offline.
NOTE: These operations cannot be performed while the HD-V9000 is playing. Stop playback beforehand.
NOTE: The operations can be performed in the same way as when offline, but processing is slower.
NOTE: The picture review function cannot be used.
- 69 -
Sending the current settings ([Playlist])
When connected, [Send] is active.
Click [Send] to reflect the currently displayed settings in the HD-V9000's settings.
NOTE: With group connections, the settings are sent to all the [Player Admin] group members.
Remote SD and Remote USB functions (LAN/Group) ([Playlist])
When connected, the [Remote SD] and [Remote USB] load icons are active. These commands allow you to
load playlist settings stored on SD cards inserted into or USB storage devices connected to the HD-V9000.
The [Remote SD] and [Remote USB] save icons are also active.
These allow you to save playlist settings onto SD cards inserted into or USB storage devices connected to
the HD-V9000.
NOTE: This function cannot be used with serial connections.
NOTE: With group connections, the settings are saved on all the [Player Admin] group members.
Test playing of edited settings ([Playlist])
Right-click in an empty space of the playlist to be test played.
- 70 -
When connected, the [Recall List] command on the displayed context menu is
active.
Click [Recall List] to execute that playlist.
When executed, the currently displayed settings are automatically reflected in the HD-V9000's settings.
NOTE: With group connections, the command is executed for all the [Player Admin] group members.
Transferring contents (LAN/Group) ([Playlist])
With LAN and group connections, the function for transferring contents can be used.
This function is convenient for repeatedly checking actual playback, for example for checking the results
using the [Recall List] command after adjusting text and pictures on the computer.
Drag the contents to be transferred from Explorer and drop them on the playlist.
- 71 -
Picture and text files are added to the trees on the left.
Video files are both added to the trees on the left and added at the end of the playlist. The time map tables
are generated automatically.
NOTE: Much time may be required to send video contents.
NOTE: This function cannot be used with serial connections.
NOTE: With group connections, the files are sent to all the [Player Admin] group members.
4.8 Remote editing of schedules ([Schedule])
When connected, HD PILOT can be used to remotely edit the schedule settings set on the HD-V9000.
Receiving the current settings ([Schedule])
When connected, HD PILOT can be used to remotely edit the schedule settings set on the HD-V9000.
- 72 -
When connected, [Receive] is active. Click [Receive] to load the schedules set on the HD-V9000. The list of
files when [File Play] is selected also becomes the contents of the HD-V9000's SD card.
NOTE: This operation cannot be performed while the HD-V9000 is playing. Stop playback beforehand.
NOTE: With group connections, the information for the first group member player at [Player Admin] is
received.
Editing operations while connected ([Schedule])
When connected, schedules and playback can be specified in the same way as when offline.
- 73 -
NOTE: Perform the editing operations with playback stopped.
NOTE: The operations can be performed in the same way as when offline, but they will be sluggish.
Sending the current settings ([Schedule])
When connected, [Send] is active.
Click [Send] to reflect the currently displayed settings in the HD-V9000's settings.
NOTE: With group connections, the settings are sent to all the [Player Admin] group members.
Remote SD and Remote USB functions (LAN/Group) ([Schedule])
- 74 -
When connected, the [Remote SD] and [Remote USB] load icons are active. These commands allow you to
load schedule settings stored on SD cards inserted into or USB storage devices connected to the
HD-V9000.
The [Remote SD] and [Remote USB] save icons are also active.
These allow you to save schedule settings onto SD cards inserted into or USB storage devices connected
to the HD-V9000.
NOTE: This function cannot be used with serial connections.
NOTE: With group connections, the settings are saved on all the [Player Admin] group members.
4.9 Remote editing of settings ([PlayerSetup])
When connected, HD PILOT can be used to remotely edit the settings set on the HD-V9000.
Receiving the current settings ([Player Setup])
When connected, HD PILOT can be used to remotely edit the HD-V9000's settings.
When connected, [Receive] is active. Click [Receive] to load the HD-V9000's settings. The list of files when
[File Play] at [Power On Play] is selected also becomes the contents of the HD-V9000's SD card.
- 75 -
NOTE: Do not perform this operation while the HD-V9000 is playing. Stop playback beforehand.
NOTE: With group connections, the HD-V9000's information for the first group member player at [Player
Admin] is received.
Editing operations while connected ([Player Setup])
When connected, settings can be changed in the same way as when offline.
NOTE: Perform the editing operations with playback stopped.
NOTE: The operations can be performed in the same way as when offline, but they will be sluggish.
Sending the current settings ([Player Setup])
When connected, [Send] is active.
- 76 -
Click [Send] to reflect the currently displayed settings in the HD-V9000's settings.
NOTE: With group connections, the settings are sent to all the [Player Admin] group members.
NOTE: With group connections, the [Network Settings] settings are not overwritten. To change the
[Network Settings] settings, use either regular LAN connections or serial connections.
NOTE: After the settings are sent to the HD-V9000, be sure to reboot the HD-V9000 before using it for
actual operations. If not, operation may be unstable.
Remote SD and Remote USB functions (LAN/Group) ([PlayerSetup])
When connected, the [RemoteSD] and [RemoteUSB] load icons are active. These commands allow you to
load the settings stored on SD cards inserted into or USB storage devices connected to the HD-V9000.
The [RemoteSD] and [RemoteUSB] save icons are also active.
These allow you to save the settings onto SD cards inserted into or USB storage devices connected to the
HD-V9000.
NOTE: This function cannot be used with serial connections.
NOTE: With group connections, the settings are saved on all the [Player Admin] group members.
4.10 Remote editing of media ([File Management])
When connected, HD PILOT can be used for such operations as sending and receiving contents via LAN to
and from the SD card inserted into the HD-V9000 and copying contents recorded on a USB storage device
onto an SD card.
- 77 -
However, the following restrictions apply:
- Contents cannot be sent and received with serial connections.
- Regardless of the type of connection, time map tables of video files on the HD-V9000 cannot be created.
- Regardless of the type of connection, files on USB storage devices connected to the HD-V9000 cannot be
deleted or moved.
- Regardless of the type of connection, filenames cannot be changed.
- More time is required to send and receive content files between HD PILOT and the HD-V9000 than with
regular file copying using a network.
Sending contents to a connected HD-V9000 ([File Management])
When connected, [SD] and [USB Root] under [Copy To] -> [Player] on the [File Management] screen are
active.
Select the file to be transferred, and then select the device to which the file is to be sent from the context
menu that appears when the file is right-clicked.
When [Copy To] -> [Player] -> [SD] is selected as shown above, the content file is sent to the SD card
inserted into the HD-V9000.
When files are sent to an SD card, they are put in specific folders on the SD card, determined automatically
according to the extensions of the files being sent.
Files can be moved using the same procedure. To move, select [Move To].
Retrieving contents from a connected HD-V9000 ([File Management])
To receive content files from an SD card or USB device connected to the HD-V9000 onto the computer, first
display the list of files on the [File Management] screen.
- 78 -
When connected, [SD] and [USB Root] under [Player] in the [Operation Machine] section of the [File
Management] screen are active. Select the folder in which the contents to be received are located, and then
click [Get Info].
A list of the content files on the HD-V9000 is displayed, as shown below.
Select the file to be transferred, and then select the device to which the file is to be sent from the context
menu that appears when the file is right-clicked.
When files are sent to an SD card, they are put in specific folders on the SD card, determined automatically
according to the extensions of the files being sent. When [Free Select] is selected, a sub-screen for
selecting the folder in which the file is to be stored appears, so specify the folder. Files can be moved using
the same procedure. To move, select [Move To].
NOTE: It is not possible to move files stored on USB devices connected to the HD-V9000.
Deleting contents from a connected HD-V9000 ([File Management])
To receive content files from an SD card or USB device connected to the HD-V9000 onto the computer, first
display the list of files on the [File Management] screen.
- 79 -
When connected, [SD] and [USB Root] under [Player] in the [Operation Machine] section of the [File
Management] screen are active. Select the folder in which the contents to be received are located, and then
click [Get Info].
A list of the content files on the HD-V9000 is displayed, as shown below.
Select the file to be deleted, then select [Delete] from the context menu that appears when the file is
right-clicked.
NOTE: It is not possible to move files stored on USB devices connected to the HD-V9000.
Sending and receiving contents between a USB storage device and an SD card on connected
HD-V9000s ([File Management])
When connected, [SD] and [USB Root] under [Player] in the [Operation Machine] section of the [File
Management] screen are active. Select [Player] -> [USB Root], then click [Get Info].
- 80 -
After this, file transfer begins when the destination is selected from the context menu.
4.11 Remote monitoring ([Remote Watch])
When HD PILOT is connected, [Remote Watch] is active.
The [Remote Watch] function can be used to load and display the information of connected HD-V9000s.
When [Remote Watch] is connected, the screen shown below appears.
The [Remote Watch] function can be used with both
LAN and serial connections, but with serial connections
it is limited to the directly connected HD-V9000.
With LAN connections, the summary information and
detailed information of all HD-V9000s registered at
[Player Admin] is displayed.
NOTE: The HD-V9000 only accepts one connection.
The latest connection attempt is given priority.
When summary information is displayed, connection is
made to all HD-V9000s registered at [Player Admin] in
order to acquire their status.
In this case, previous connections are disconnected
from the HD-V9000 unconditionally.
Use of other connections must be stopped when using
this function.
Simultaneous use is not possible.
Be careful when using this function in environments in
which the HD-V9000 is associated with other systems.
- 81 -
Monitoring the summary information of all registered HD-V9000s
With this function, a list of the summary information of all HD-V9000s registered at [Player Admin] is
displayed. The list shows the names of currently playing files, their frames and their time codes.
[Request Timeout] is displayed for HD-V9000s that have not
responded.
[Refresh]: Requests the information again. The information is updated with the latest information.
[Detail]: Displays the detailed information for the selected HD-V9000.
[Close]: Closes this screen.
NOTE: This screen is not displayed with serial connections.
Viewing the detailed information for a specific HD-V9000 ([Remote Watch])
With serial connections, this screen is displayed directly when [Remote Watch] is clicked.
With LAN connections, this screen is displayed by clicking [Detail] at the list display screen.
- 82 -
[Get Info]: Downloads the error log.
[Refresh Info]: Refreshes the information.
[Save Error Log]: Saves the downloaded error log as a local file.
When saving, the file saved differs according to the saving options.
A filename is assigned according to the rules below.
For [Error Log], the file is saved in the specified folder with the name "Input filename. err".
For [Detailed Log], the following files are saved in the specified folder:
"Input filename. messages"
"Input filename.messages.0"
"Input filename.dmesg"
[Close]: Closes this screen.
Outputting a detailed information report for a specific HD-V9000 ([Remote Watch])
When HD PILOT is connected, [Export Setup Report] on the [Tasks] menu is active.
This function stores all the HD-V9000's settings in a file.
Files can be in CSV or Excel format.
- 83 -
A report of the HD PILOT settings can be output by selecting [Export Management Report].
NOTE: Excel must be installed on the computer when selecting Excel for the output. Depending on the
environment, outputting in Excel may not work. If so, output in CSV.
4.12 Command send monitor ([Command Send Monitor])
When HD PILOT is connected, [Command Send Monitor] is active.
When [Command Send Monitor] is clicked, the command send monitor screen appears.
The HD-V9000 is equipped with various serial
interface commands, and it is troublesome to
grasp the behavior of the vast number of
commands.
With the [Command Send Monitor] function,
commands can be input and executed using the
keyboard, allowing you to check the effects of
those commands.
Command help, input assistance and step
execution functions are also included, increasing
the learning effect.
- 84 -
NOTE: With the [Command Send Monitor] function, the returned values extend over multiple lines (?B, ?O).
Those handling binary data (WD,WU,GP,GS,BD and BU) cannot be executed properly.
Do not use "CM" command in HD PILOT.
Avoid using them, as they will cause HD-V9000 operation to become unstable.
Also, commands for which much time is required for the response are processed as timeouts.
Command input and execution ([Command Send Monitor])
This screen can be used like a screen editor to input commands in free format.
Input the commands in field 1.
When executed, the response from the HD-V9000 is displayed in field 2.
Execution control is conducted with the toolbar at the top of the screen.
Sets repetition when executing.
Starts command execution
Displays the number of times executed
when repeating.
Executes the commands in
steps.
Commands that have been input
can be saved in files and reloaded.
Pauses execution.
Stops execution.
- 85 -
Command input assistance and help ([Command Send Monitor])
The [Command Send Monitor] function is equipped with an input assistance function.
Right-click in the command input field. A context menu appears.
[Command List]: Displays a description of the
command and a help screen on which
examples are displayed.
[Insert Path]: Displays a file selection dialog.
The selected file's path is posted in the
command input field.
[Cut]: Deletes the selected field, putting it in
memory.
[Copy]: Puts the selected field in memory.
[Paste]: Pastes the field selected stored in the
memory.
[Undo]: Undoes the last step.
[Clear All]: Clears all.
At the [Command List] screen, a list of the
commands is displayed in the upper section of
the screen.
When a command is selected, a description of
that command is displayed in the lower section
of the screen.
When the list is double-clicked or [Copy/Paste]
is clicked, the command is posted in the
command input field.
The commands that can be used with the
[Command Send Monitor] function include not
only the serial interface commands used on the
HD-V9000; program execution control syntaxes
used on the application (conditional branching,
jump, sub-routine call, sleep, etc.) are also
supported.
The help entries for these commands can be
viewed by selecting [HD PILOT Command List]
from the drop-down list at the bottom of the
screen.
- 86 -
4.13 Updating the firmware (LAN/Group connections only) ([Firmware Update])
When HD PILOT is connected, [Firmware Update Players] on the [Tasks] menu is active.
Click this to open the [Firmware Update] screen.
This can be used to upload the firmware to the HD-V9000.
First, click the [browse] button to select the firmware file.
- 87 -
When selected, the screen shown below appears.
Check that the new version of the firmware has been selected and which version of the firmware is currently
applied on the HD-V9000.
If the information is correct, click [send] to begin sending the firmware, then wait awhile.
NOTE: With group connections, the version currently applied on the first HD-V9000 in the group is
displayed as the currently applied firmware version.
Once sending is completed, a screen like the one shown above appears.
Once you are ready, click [Remote Update].
Application of the firmware starts on the HD-V9000. Several minutes are required for the firmware to be
applied.
HD PILOT stands by for application of the firmware to be completed on the HD-V9000.
Once HD PILOT confirms that application of the firmware has been successfully completed, the following
message appears:
Click [Close] to close the [Firmware Update] screen.
After this, HD PILOT and the HD-V9000 are connected, and the online functions of HD PILOT can be used.
- 88 -
NOTE: Do not turn off the HD-V9000's power during the process.
NOTE: Before executing, insert an SD card with at least 40 MB of free space into the HD-V9000.
NOTE: This function cannot be executed with serial connections.
NOTE: The screens shown above are from the development stages: the actual firmware filenames and
version indications differ.
NOTE: With group connections, the selected firmware is applied to all HD-V9000s.
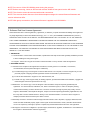
5. Software End User License Agreement.
This Software End User License Agreement ("Agreement") is between you (both the individual installing the Program and
any single legal entity for which the individual is acting) ("You" or "Your") and PIONEER CORPORATION ("Pioneer").
TAKING ANY STEP TO SET UP OR INSTALL THE PROGRAM MEANS THAT YOU ACCEPT ALL OF THE TERMS OF
THIS LICENSE AGREEMENT. PERMISSION TO DOWNLOAD AND/OR USE THE PROGRAM IS EXPRESSLY
CONDITIONED ON YOUR FOLLOWING THESE TERMS. WRITTEN OR ELECTRONIC APPROVAL IS NOT REQUIRED
TO MAKE THIS AGREEMENT VALID AND ENFORCEABLE. IF YOU DO NOT AGREE TO ALL OF THE TERMS OF THIS
AGREEMENT, YOU ARE NOT AUTHORIZED TO USE THE PROGRAM AND MUST STOP INSTALLING IT OR
UNINSTALL IT, AS APPLICABLE.
1. DEFINITIONS
1.1 "Documentation" means written documentation, specifications and help content made generally available by Pioneer
to aid in installing and using the Program.
1.2 "Program" means all or any part of Pioneer's software licensed to You by Pioneer under this Agreement.
2. PROGRAM LICENSE
2.1 Limited License. Subject to this Agreement's restrictions, Pioneer grants to You a limited, non-exclusive,
non-transferable, license (without the right to sublicense):
(a) To install a single copy of the Program on the hard disk drive of Your computer, to use the Program only for Your
personal purpose complying with this Agreement and the Documentation ("Authorized Use");
(b) To use the Documentation in support of Your Authorized Use; and
(c) To make one copy of the Program solely for backup purposes, provided that all titles and trademark, copyright and
restricted rights notices are reproduced on the copy.
2.2 Restrictions. You will not copy or use the Program or Documentation except as expressly permitted by this
Agreement. You will not transfer, sublicense, rent, lease or lend the Program, or use it for third-party training,
commercial time-sharing or service bureau use. You will not Yourself or through any third party modify, reverse
engineer, disassemble or decompile the Program, except to the extent expressly permitted by applicable law, and
then only after You have notified Pioneer in writing of Your intended activities. You will not use the Program on
multiple processors without Pioneer's prior written consent.
2.3 Ownership. Pioneer or its licensor retains all right, title and interest in and to all patent, copyright, trademark, trade
secret and other intellectual property rights in the Program and Documentation, and any derivative works thereof.
You do not acquire any other rights, express or implied, beyond the limited license set forth in this Agreement.
2.4 No Support. Pioneer has no obligation to provide support, maintenance, upgrades, modifications or new releases for
the Program or Documentation under this Agreement.
- 89 -
2.5 Modification. Pioneer may modify subsequent versions of the Program without notice to make technical
improvements or for other reasons.
3. WARRANTY DISCLAIMER
THE PROGRAM AND DOCUMENTATION ARE PROVIDED "AS IS" WITHOUT ANY REPRESENTATIONS OR
WARRANTIES, AND YOU AGREE TO USE THEM AT YOUR SOLE RISK. TO THE FULLEST EXTENT PERMISSIBLE
BY LAW, PIONEER EXPRESSLY DISCLAIMS ALL WARRANTIES OF ANY KIND WITH RESPECT TO THE
PROGRAM AND DOCUMENTATION, WHETHER EXPRESS, IMPLIED, STATUTORY, OR ARISING OUT OF
COURSE OF PERFORMANCE, COURSE OF DEALING OR USAGE OF TRADE, INCLUDING ANY WARRANTIES OF
MERCHANTABILITY, FITNESS FOR A PARTICULAR PURPOSE, SATISFACTORY QUALITY, ACCURACY, TITLE OR
NON-INFRINGEMENT.
4. DAMAGES AND REMEDIES FOR BREACH
You agree that any breach of this Agreement's restrictions would cause Pioneer irreparable harm for which money
damages alone would be inadequate. In addition to damages and any other remedies to which Pioneer may be entitled,
You agree that Pioneer may seek injunctive relief to prevent the actual, threatened or continued breach of this
Agreement.
5. TERMINATION
Pioneer may terminate this Agreement at any time upon Your breach of any provision. If this Agreement is terminated,
You will stop using the Program, permanently delete it from the computer where it resides, and destroy all copies of the
Program and Documentation in Your possession, confirming to Pioneer in writing that You have done so. Sections 2.2,
2.3, 2.4, 3, 4, 5 and 6 will continue in effect after this Agreement's termination.
6. GENERAL TERMS
6.1 Limitation of Liability. In no event will Pioneer or its subsidiaries be liable in connection with this Agreement or its
subject matter, under any theory of liability, for any indirect, incidental, special, consequential or punitive damages,
or damages for lost profits, revenue, business, savings, data, use, or cost of substitute procurement, even if advised
of the possibility of such damages or if such damages are foreseeable. In no event will Pioneer's liability for all
damages exceed the amounts actually paid by You to Pioneer or its subsidiaries for the Program. The parties
acknowledge that the liability limits and risk allocation in this Agreement are reflected in the Program price and are
essential elements of the bargain between the parties, without which Pioneer would not have provided the Program
or entered into this Agreement.
6.2 The limitations or exclusions of warranties and liability contained in this Agreement do not affect or prejudice Your
statutory rights as consumer and shall apply to You only to the extent such limitations or exclusions are permitted
under the laws of the jurisdiction where You are located.
6.3 Severability and Waiver. If any provision of this Agreement is held to be illegal, invalid or otherwise unenforceable,
that provision will be enforced to the extent possible or, if incapable of enforcement, deemed to be severed and
deleted from this Agreement, and the remainder will continue in full force and effect. The waiver by either party of
any default or breach of this Agreement will not waive any other or subsequent default or breach.
6.4 No Assignment. You may not assign, sell, transfer, delegate or otherwise dispose of this Agreement or any rights or
obligations under it, whether voluntarily or involuntarily, by operation of law or otherwise, without Pioneer's prior
written consent. Any purported assignment, transfer or delegation by You will be null and void. Subject to the
foregoing, this Agreement will be binding upon and will inure to the benefit of the parties and their respective
successors and assigns.
- 90 -
6.5 Entire Agreement. This Agreement constitutes the entire agreement between the parties and supersedes all prior or
contemporaneous agreements or representations, whether written or oral, concerning its subject matter. This
Agreement may not be modified or amended without Pioneer's prior and express written consent, and no other act,
document, usage or custom will be deemed to amend or modify this Agreement.
- 91 -