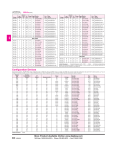
1
Application Note
Name:
Author:
eMail:
AE0032GV.PDF
Gerhard Vieweg
[email protected]
Subject:
Version: 1.4
Create: 01.03.2013
BScan / JTAG
Testbus Failures –
how to tackle?
This Application Note explains Testbus failure reports gives
suggestions and comments for design and troubleshooting.
The sections FAQ as well as „Typical Mistakes and
Misunderstandings“ should be understood as further help.
Some special cases from the practice are discussed, too.
Application Note
Content
Testbus: Basics ..........................................................................................................................................................................3
Introduction ......................................................................................................................................................... 3
Conditions for the „perfect“ BScan / JTAG Testbus........................................................................................... 3
Testbus Design: Needs and Mistakes .................................................................................................................. 4
Testbus Failures.........................................................................................................................................................................5
Detection of Testbus Failures .............................................................................................................................. 5
Specialities ...................................................................................................................................................... 5
The Testbus Failure Message .............................................................................................................................. 5
Reasons for Testbus Failures............................................................................................................................... 5
Static Testbus Failures ........................................................................................................................................ 6
Dynamic Testbus Failures ................................................................................................................................... 7
Analysis Methods of Testbus Failures ................................................................................................................ 7
Failure Message .........................................................................................................................................................................8
Testbus Failure – how is it defined?.................................................................................................................... 8
Typical Testbus Failure –Messages by CASCON™ .......................................................................................... 9
Further Analysis, Trouble Shooting Strategy .......................................................................................................................12
General Guideline for Troubleshooting ............................................................................................................ 12
CASLAN Program „TCK Check-up” ............................................................................................................... 13
Tests on TDO Output ........................................................................................................................................ 14
Further Possibilities by the Boundary Scan Probe ........................................................................................ 16
Troubleshooting at Testbus Failures during Test Run Time ............................................................................. 18
Troubleshooting at dynamic Failures by means of Scope ................................................................................. 22
Special Cases in Practice ................................................................................................................................... 22
Question Catalog, Index, Hyperlinks .....................................................................................................................................25
Question Catalog ............................................................................................................................................... 25
FAQs ................................................................................................................................................................. 26
Typical Mistakes and Misunderstandings ......................................................................................................... 28
Terms and Abbreviations .................................................................................................................................. 29
More Help needed? ........................................................................................................................................... 29
Appendix ..................................................................................................................................................................................30
Test Program “TCK Check-up” ........................................................................................................................ 30
Literature ........................................................................................................................................................... 34
Application Note
Testbus: Basics
Introduction
The Boundary Scan / JTAG Test utilizes a serial transfer protocol. It’s error-free transmission requires some
conditions, that – if not fulfilled – make the test useless or even impossible.
This document helps to recognize the failures and to understand the reactions of the system properly. A guideline
for troubleshooting in different situations is contained.
Basic knowledge on Standard IEEE 1149.1 and knowledge on basic operation of the system CASCON ™ are
assumed to be known.
All in the document used screenshots are based on CASCON ™ version 4.4.2.
Conditions for the „perfect“ BScan / JTAG Testbus
1.
2.
3.
4.
5.
6.
All BScan ICs understand the signals TMS and TCK such that all of them are in the same TAP state.
This requires TCK and TMS have to be connected in parallel to all BScan ICs on the board.
The maximum applied TCK frequency is chosen to such value that the clearance of minimum 3 MHz to
the maximum TCK of the slowest BScan IC in the chain.
The settings of signal delay compensation (ADYCS™) are chosen to such levels, that the system
operation is guaranteed over the complete range between TCKmin and TCKmax.
The voltage levels are defined to needs of the respective BScan ICs. If needed level shifters are applied.
There is no crosstalk between the Testbus lines.
There is no crosstalk between Testbus lines and other signals on the board.
Dynamic Conditions:
1. The signal quality des TCK is such that no essential ringing can occur. For this, a good cable design and
an appropriate line termination is required.
2. The signal quality des TCK such that signal edges are free of dips. For this, the fan-out of the drivers
must be considered.
3. The ADYCS™ parameters are optimized. This will allow the system to sample the data coming from
the UUT at the correct time.
Static Conditions:
1. The actual length of the data registers and the instruction register correspond to the BSDL File.
2. The relationship between instructions and herewith selected data register is according to the BSDL File.
3. Possible Compliance Patterns are defined in the BSDL file and are realized on board.
4. Count and order of the BScan ICs in the scan chain are properly described in the Scanpath
Configuration File (CON). The same is required for possible Scan Router ICs.
5. Existing Scan Router ICs are applied with the correct address given in the CON file.
Application Note
Testbus Design: Needs and Mistakes
Observe the board design in the run-up for:
1. TAP connection. They can be fed via a special connector, via the system connector, or via fixture
probes. In any case however, GND connections must be provided as well.
2. The TAP cable requires on both sides GND connections. It is not a matter of shield but of carry back
the current of the TAP signals.
3. GND connections should be located close to the TAP connections. They should be available
independent from Power Supply GND connections.
4. Line terminations shall be ideally located on the end. For small or medium size boards, the can be
closed to the edge connector for the TAP.
Possible Variants of line termination.
This variant ensures Low level when the driver is not
connected.
It is the most popular scenario.
Here the termination resistor is split in two individual
resistors. Due to RF parallel connection of VCC and
GND by bypass capacitors, both resistors can be
treated as parallel connection. The logic level is High
when the driver is not connected.
The scenario on the left ensures a particular low load
for the driver. The level is not defined, when the
driver is not connected but this can be compensated by
parallel connection with a high-omic resistor.
(Low-ohmic) serial resistor on the driver output is
possible, but works only well for single receiver
scenarios. There is a voltage drop along the line.
Minimum load for the driver.
Note there is voltage drop along Rs.
This should be avoided:
1. Too many BScan ICs in parallel on TCK and TMS. Rule of thumb: Spend one buffer for 5 ICs.
2. Direct neighborhood of TCK to other signals including TAP signals on cables or on the board over long
distance.
3. Direct coupling of /TRST and System reset.
4. “Star wiring” of TAP signals TCK and TMS.
5. Complicate jumper scenarios in order to achieve a certain scan chain design. Misunderstandings can
easily a time waster.
Application Note
Testbus Failures
Detection of Testbus Failures
Testbus Failures are detected only when executing CASLAN tests and during IEEE-1532 programming.
Along every scan instruction (DRSHIFT, IRSHIFT) a Testbyte is transferred in addition to the actual required
data stream. In other words: The Testbyte is put through the UUT’s scan chain. In the case the Testbyte comes
back faulty a Testbus failure message is generated and the test is aborted. If the faulty scan operation was a
DRSHIFT automatically an IRSHIFT will follow in order to allow deeper diagnosis.
For more details see section 0: Testbus Failure – how is it defined?
Specialities
1.
2.
3.
4.
In multiple TAP scenarios the individual scan chains get their own Testbyte. This ensures a TAPdepending failure message.
In scenarios with ScanRouters, implicit DRSHIFT and IRSHIFT instructions are used within the
LOCALPATH instructions.
For Multidrop configurations based on ScanBridges or Addressable Scan Ports, for every ScanRouter
an individual Testbyte is used.
Because of missing information, there is no diagnosis for Testbus failures possible during FLASH
programming.
The Testbus Failure Message
Example, more examples in section 0, Typical Testbus Failure –Messages by CASCON™.
<0104> Testbus failure at DRShift; Diagnosis by IRShift:
HIGH starting from U1; check U2-TDI and U1-TCK, -TMS, -TDO
<117> 12 DRSHIFTs have been executed.
No
1
Information Content
Art der failurehaften Scanoperation
2
Faulty measured level
3
Failure localization within the Scan chain
4
Failure localization within the CASLAN
program.
Possible Value
Testbus failure at DRSHIFT; Diagnosis by IRSHIFT:
Testbus failure at DRSHIFT; Diagnosis by IRSHIFT
without Testbus failure:
HIGH starting from U1
LOW starting from
FAIL starting from
Check U2-TDI and U1-TCK, -TMS, -TDO
Check <dev1>- TDI and <dev2>-TCK, -TMS, -TDO
<dev1> and <dev2> are adjacent scan components. One of
them can be the controller.
12 DRSHIFTs have been executed
For more details about failure message see section „F“.
Reasons for Testbus Failures
The possible Testbus failures can be sorted in categories as shown below.
For more detailed differentiation see the following sections.
Nr
1
2
3
Reason
Manufacturing defect
Wrong parameterization
(TCK frequency, delays, voltages)
poor Testbus signal quality
Typical Pattern of Defect
Happens only on certain boards
Can be excluded by low frequency (1 MHz or less) and
setup of the voltages
Typically change of fault locations and messages;
At lower TCK frequencies better but not error-free
Application Note
4
Wrong wiring Controller – UUT; in particular
TDI / TDO mismatched
5
Asynchronous Reset of the Testbus
(TRST, Power, Compliance-Pins, Watchdog)
6
Wrong modelling / description
(Scanpath Configuration File, BSDL-Files)
7
„strange“(external) pins on the Testbus
(buffer in Testbus not transparent, other pins
active illegally)
Board design failure
Non-compliant behavior of components
8
function
Every test fails at the first SHIFT.
LOW starting from <TDO Device of the
UUT> and controller TDI.
Low/High depends on Pull-Down/-Up resistor.
Reset can be active static, then the same as faulty wiring.
At dynamic resets the Testbus failure happens typically
always on the same position of CASLAN (exception:
Watchdogs) and on the same H/W position in the
Scanchain.
Testbus failure constant on the same position in
CASLAN, when wrong register lengths occur. IRSHIFT
mostly failure-free;
possible asynchronous reset due to wrong cell – port
allocation
The same as asynchronous reset.
Failure when utilizing certain registers
Static Testbus Failures
There is no relation between the TCK frequency and the pattern of defect. The defect is constant.
Typical cases:
Pattern of defect
Possible Reason
Diagnose
1
TDO (Test Data Out) of the
Wrong BSDL File. Register
Diagnosis in Debugger, TCK Step
UUT provides different pattern, lengths (Instruction register or
Mode is possible, when the
however they are different from Data registers) differ.
difference is small. There is a
„0“ or „1“.
chance to recognize the dislocated
Testbyte, provided the actual chain
length is shorter. When it is longer,
a few or all bits of the Testbyte are
„swallowed“- so the diagnosis
becomes unsure.
A dummy BSDL with large
Boundary Scan register can help to
find the location of the Testbyte.
2
TDO (Test Data Out) of the
UUT drives constant „0“ or „1“.
3
IRSHIFT is failure-free,
DRSHIFT is faulty after loading
the instruction SAMPLE or
EXTEST
-
Design mistake of the
TAP cable
- Design mistake on TAP
of the board
- Compliance Pattern not
satisfied
- System-Reset or /TRST
active
- TDO is shorted to GND
or driver with fix level
Wrong BSDL file.
Length of the BScan Register
differs.
Diagnosis by BCcan-Probe, see
section „Further Possibilities by the
Boundary Scan Probe“
Check if TDO of the BScan IC is
active only in the TAP states
SHIFT-IR / SHIFT-DR
See 1, related to the data register
selected by the previously loaded
instruction
Application Note
Dynamic Testbus Failures
The TAP (Test Access Port) operation is based on edge-triggered protocol. The TCK signal serves for
synchronization. That’s why it is the moist critical signal among the TAP ones.
In particular ringing caused by wrong or missing termination of the signal line can be interpreted as extra clocks.
Cable design between controller and UUT and UUT design itself shall follow the rules of RF- design.
Dynamic Testbus failures show a relation to the TCK frequency. Change of the TCK frequency can result in
PASS or FAIL.
TCK Signal
This image shows a source of problems
for unstable synchronisation on the
Testbus. Because of no observance of
the fan-out, there are dips that may be
treated as extra clocks.
Such spikes can be sometimes very small
and are visible only by means of scopes
with a high bandwidth.
Over- and under-shots – the
most often reason for instable
Testbus. In the examples the
termination is obviously
missing. There is no chance
for synchronisation.
Also the change of the TCK
frequency does not have any
effect.
Analysis Methods of Testbus Failures
For effective search for the Testbus failure reason, some questions get answered before using additional
measurement technique. For this, sometimes a few extra tests are required.
Nr
1
2
3
4
5
6
Frage
Does the Testbus failure occur with the first DRSHIFT / IRSHIFT?
Does the failure message contain HIGH or LOW and „Controller TDI“?
Does the Testbus failure occur in all retries?
Does the Testbus failure occur in all tests?
Does the Testbus failure occur at low frequencies (TCK < 1 MHz)
Does the Testbus failure occur on all boards?
Application Note
If all questions get a „yes“, there is typically a general problem because the Testbus does not show any reaction
at all. Here mainly as the failure reasons are „faulty wiring“, „static asynchronous reset“, (in particular due to
missing power) and „strange pins on Testbus“.
Alternatively can be the last IC in the chain (that is driving the TDO of the UUT) the reason. Check: Compliance
pins, TRST or testbus pins.
If one of the question get a „no“, the Testbus works at least partially and based on the functional part, further
diagnosis steps ca be added.
Failure Message
Testbus Failure – how is it defined?
A Testbus failure happens if the Testbyte has not been detected properly.
One bit difference is enough for that. The exitcode is always 65534.
The testbyte is a CASCON ™ - built in feature to check for transparency of the Testbus. It is provided in extra
to the actual on the board existing chain length during SHIFT-DR and SHIFT-IR. Because the Testbyte is issued
in addition, at first leaves the controller, it has to arrive at the end of the shift operation (Shift) on the serial
output of the UUT.
The Testbyte is a 100% guarantee for the synchronization of the BScan ICs on the board and the controller.
However it is no 100% guarantee for the total failure-free Testbus operation, because also single bits apart from
the Testbytes can be falsified anyway. Fortunately, this happens more seldom.
Prove by the testbytes is therefore a good option to prove the chain length. The calculated chain length is given
in the BScan ICs within the chain and their actual situation. The CASLAN instructions for activating the Testbus
are IRSHIFT and DRSHIFT. They result in a walkthrough graph ranges IR-Scan and DR-Scan. Note: The chain
length is constant at IRSHIFT but depends on the previously chosen data register at DRSHIFT. An instruction
selects a data register that is connected between TDI and TDO for following DRSHIFTs.
A data register is selected by an Instruction or is selected per „default“ as defined in the Standard. The default
data register is the Idcode register (if exist), otherwise the Bypass register.
Caution:
Do not disable the Testbyte when executing tests. Otherwise you lose the safety for the UUT during the test
execution. Only in rare exceptions, those are technically required can / must the Testbyte temporarily disabled.
A Testbus failure can be stable. However, it can behave dynamically. See following chapters for more failure
cases and their typical reasons.
Application Note
Typical Testbus Failure –Messages by CASCON™
Meaning ,
possible
Failure
Message
Meaning ,
possible
Failure
Message
Meaning ,
possible
Failure
Message
Example 1 – simple test set-up
*.CON
(SCANPATH 1
(DEV U2 ‘EPM7032AETC44’)
(DEV U1 ‘XC9572XL_TQ100’)
)
Testing boundary register U2 …
<0108> Testbus failure at DRShift; IRShift without Testbus
failure:
FAIL starting from BScan controller; check U1-TDI and BScan
controller-TCK, -TMS, -TDO.
<117> 4 DRSHIFTs have been executed.
• Length IR OK, data register (here the BScan register) wrong length
• Check BSDL and Compliance Pattern
<0104> Testbus failure at DRShift; Diagnosis by IRShift:
HIGH starting from U1; check U2-TDI and U1-TCK, -TMS, -TDO.
<117> 1 DRSHIFTs have been executed.
•
•
•
•
Connection U1:TDO => U2:TDI has problems
U1 has no TMS or TCK
U1 stays in Reset Mode
U1 Compliance Pattern not satisfied
<0101> Testbus failure at DRShift; Diagnosis by IRShift:
LOW starting from BScan controller;
check U1-TDI and BScan controller-TCK, -TMS, -TDO.
<117> 1 DRSHIFTs have been executed.
• Connection controller:TDO => U1:TDI has problems
Meaning , possible
Failure
Message
Application Note
<0101> Testbus failure at DRShift; Diagnosis by IRShift:
LOW starting from U2;
Check BScan controller-TDI and U2-TCK, -TMS, -TDO.
<117>
•
•
•
•
•
•
•
•
1 DRSHIFTs have been executed.
UUT no Power supply
SFX-TAP module of the UUT not allocated
SFX-TAP module wrong TAP voltage settings
Testbus cable defective
Connection U2:TDO => Controller:TDI has problems
U2 has no TMS or TCK
U2 stays in Reset Mode
U2 Compliance Pattern not satisfied
Meaning ,
possible Failure
Message
Example 2 – Scanpath multidrop by
Scanrouter IC
*.CON
(SCANPATH 1
(SCANROUTER U100 ‘scansta112_B0’
(ADDRESS 03h)
(LOCALPATH 7
(DEV U204 ‘XC9536XL-10VQ44C’ )
)
(LOCALPATH 6
)
(LOCALPATH 5
(DEV U203 ‘XCR3064XL-VQ44C’ )
)
(LOCALPATH 4
(DEV U202 ‘XC9572XL-10VQ44C’ )
)
(LOCALPATH 3
)
(LOCALPATH 2
(DEV U201 ‘XCR3064XL-VQ44C’ )
)
(LOCALPATH 1
(DEV U200 ‘XC9536XL-10VQ44C’ )
)
)
)
<0103> Testbus failure at IRShift:
LOW starting from U100;
Check BScan controller TDI and U100-TCK, -TMS, -TDO.
<117> 0 DRSHIFTs have been executed.
Scan Bridge (Address 3H) not found
This message contains two information:
• Testbus failure for the Scan Router-own Scanpath (primary TAP) and addressing failure.
•
UUT no Power supply
•
•
Testbuscable is defective
Address is wrong
Meaning ,
possible
Failure
Message
Application Note
<0106> Testbus failure at IRShift:
HIGH starting from U202;
Check U203-TDI and U202-TCK, -TMS, -TDO.
<117>
•
•
•
•
2 DRSHIFTs have been executed.
U202 has no TMS or TCK
U202 in Reset Mode
U202 Compliance Pattern not satisfied
Connection U202:TDO => U203:TDI has problems
Application Note
Further Analysis, Trouble Shooting Strategy
These questiones needs to be answered:
Nr
Question
1
Is the failure sporadic?
Use Run – Continuous Run
2
Does the content of the failure message change?
3
4
Is the failure TCK frequency-depending?
Does the failure occur only on certain test programs?
5
6
Does the failure occur at the begin of the testprogram?
Does the failure occur in the middle of the
testprogram?
Is the faulty test step constant and independend from
the TCK frequency?
7
8
9
10
11
12
13
Does the failure occur on a „new“ board?
Does the failure occur only on certain boards?
Is the failure location at the begin of the chain = TDI
UUT?
Is the failure location at the end of the chain = TDO
UUT?
Is the failure location in the middle of the chain?
Does the failure occur in a certain cable configuration?
How to continue
Yes: Continue with 3
Yes: Check stability of the Testbus, see section
„CASLAN Program „TCK Check Up”
Check ADYCS™, check cable design
Yes: continue with 5
No: Check Sie die Stability des Testbus, see
section „CASLAN Program „TCK Check Up”
Yes: continue with Section „Static Testbus “
Yes: continue with 7
Yes: continue with Section „Troubleshooting at
Testbus Failures during Test Run Time“
No: check for asynchrones Reset
Yes: possibly program faulty; Debug required
Yes: possibly manufacturing defect
Yes: cable to controller, possibly level
Yes: continue in section „Static Testbus “
Jumper, resistors (TDI-TDO)
Yes: check cable design
General Guideline for Troubleshooting
A simple method is the execution of one IRSHIFT instruction in a manually written test program. No particular
instruction code is required. This will result in loading the instruction BYPASS by default. As also no IC name is
addressed, all scan components will get the instruction BYPASS.
Sequence:
Executables / Manually / New / <test_name>
BEGIN
CASLAN
IRSHIFT;
Files / CASLAN /
END.
For check versus TCK frequency dependency you
may change in Execute options of the test the TCK.
„Use Special TCK Frequency“.
The target is to see if there are TCK ranges without
faults.
More efficient is, to change the TCK frequency inside the test program. This is done with the CASLAN test
„TCK Check-Up“, moreover, the Frequency and PASS / FAIL information is displayed.
The Debugger / Command Window allows to use directly IRSHIFT in a test program (Exceptions: In-SystemProgramming – FLASH, SVF, JAM/STAPL). For this, just launch the program in Debug mode, open the
Command Window and type in IRSHIFT;.
Application Note
Debugger start, the program waits at the
first instruction.
Open the Command Window, type in
IRSHIFT;
CASLAN Program „TCK Check Up”
That test program can be imported in any CASCON project because no IC is addressed.
The kernel is the two instructions IRSHIFT and TCK. The Testbyte is disabled exceptionally, in order to
recognize possible interruptions of PASS ranges.
For the CASLAN code see the appendix. The content of the result window consists of a TCK frequency scale
and underneath a dot „.“ for PASS or „F“ for FAIL. FAIL happens when the measured Instruction register’s
Capture value is different from the expected one.
Optimum setting, there is no
essential interruptions of the
PASS (…) stream.
Faulty line termination or
wrong ADYCS™ setting.
There are alternating „Good“
and „Bad“ sections.
It would not be a good idea to
chose a „Good“ TCK for
testing. Instead the reason
must be found and fixed.
Application Note
The ADYCS™ settings can
made by hand;
Starting from CASCON 4.4.1
the ADYCS™ parameter can be
checked by the system under
„Measure TCK-TDO Delay“ at
SFX-TAP transceivers:
Second panel.
Tests on TDO Output
Debugger, TCK Step Mode:
Get the Step Mode in Debugger via these two
possible ways:
Options / Step Mode
or
Click on the right lower edge in Debug window.
The highest priority has „TCK“, the options „IR“
and „DR“ are not treated then.
Application Note
Signal names and headlines correspond to the signals of the controller. Alternating colors for different BScan ICs
and the Testbyte makes the pattern easier to understand.
The Testbyte is shifted out
of the controller first. It’s
vector is 52h.
The LSB comes out first.
The signal names of the
TCK Step Window
correspond to the controller
signals. This means, ‚TDO‘
is the TDO of the controller
and so on.
Since 8 bit are shifted in
addition to the actual chain
length on the board, the
Testbyte must arrive at the
end of the transport in the
controller.
The un-modified value of that
vector 52H proves the correct
function of the Scan chain
and the identity between
library model (BSDL) and
reality regarding IRSHIFT.
Application Note
The Boundary Scan Probe allows the check of a TDO output for
correct function:
In debugger / TCK-Step Mode an IRSHIFT is executed.
Check for
♦ the TDO is active only in the TAP state „ShiftIR / ShiftDR“
♦ the first two bits at ShiftIR are …01b (LSB=1)
This is because of the fact that the two LSB bits capture values of the
instruction register are constant and defined according to the Std. with
…01b.
This behavior is identical on all BScan ICs. All BScan ICs provide
simultaneously on TDO …01b, that may be checked by the debugger.
Just the following bits are depending on the chip design and can be
found in the BSDL file / Library / Instruction Capture Values.
This check proves the correct function of the device-under-test:
♦ TCK
♦ TMS
♦ TDO
♦ Chip power supply
♦ Reset of the TAP controller (is here not active)
In case of differences check the signal levels (logic and voltages).
In particular at constant 0 or 1 check for possible short circuits to power nets or to active drivers.
Further Possibilities by the Boundary Scan Probe
Beside the obove mentioned features you may use the Boundary Scan Probe use also for:
♦ to check the lengths of IR and data registers
♦ to check the IDCode
♦ to check the relation between IR code and data register length
♦ to check the allocation of BScan register cells and pins
♦ to trace the signals TMS, TCK, and TDO on a board
For further informationen see the section „
Application Note
Li“
Application Note
Troubleshooting at Testbus Failures during Test Run Time
In the beginning the Testbus is error-free but is disturbed before normal end of the test.
Because of the cancelation the diagnosis report cannot be generated. Just the Testbus failure message is
generated.
Use the following method when the failure appears constantly at the same test step.
Note: In case of time-pendent failures the faulty step can be changed when operating the Debugger.
Target
Strategy
Method
Procedure
Step 1:
Failure report
Find out which BScan driver causes the problem.
See in Debugger: which test step, which BScan driver, which level
Insert in CAS additional DRSHIFT (automatic in debugger from CASCON ™ 4.4.1)
Find the CAS line: Debugger STEP mode
Find the BScan driver: Debugger Command Window, break up the CAS line
<0101> Testbus failure at DRShift; Diagnosis by IRShift:
LOW starting at U2;
check BScan-Controller-TDI and U2-TCK, -TMS, -TDO
<118> 4 DRSHIFTs and 1 DRSHIFTs/ATG have been executed.
Schritt 2:
Debugger
No breakpoints are set. Options
for Pin Toggler are de-activated.
Start the test in the normal way.
Test cancels at Drive 3.
The yellow arrow indicates
which DrShift was causing the
failure.
Arrow to left = the line has been
executed.
Application Note
Step 3:
Debugger
Options /
Insert DrShifts
Test is called after the line 65
Step 4:
Debugger
Copy line 65 to Command
Window and insert device name
Insert 2x DRSHIFT
Application Note
Step 5:
Debugger
Source Window
Set breakpoint to line 65
Step 6:
Debugger
Debugger: Reset
Debugger: Run
Command Window
Set the cursor on first line
Run
Check for FAIL
Application Note
Step 7:
Half the line
); -Debugger: Reset
Debugger: Run
Command Window
Set cursor on first line
Run
Check for FAIL
Step 8:
Debugger
Command Window
Repeat steps, check, at which
DH/DL no longer FAIL occurs
Here the U1:PB02_15/C is the
causer
Step 9:
Check the circuitry why U1:PB02_15/C can disturb the Testbus.
Application Note
Troubleshooting at dynamic Failures by means of Scope
This proves, if the TDO changes on falling TCK as expected.
Definition: The rising TCK edge loads the parallel inputs of the cells (Capture), falling one changes outputs
(Update).
Note: red = TCK; blue = TDO
Correct operation;
TDO changes on falling edge.
Faulty operation; sometimes is Update with falling
edge, sometimes with rising and falling one.
The reason can be a reflection or spikes on TCK.
Also signal rise times can be critical.
Observe the datasheet for that.
Special Cases in Practice
Those cases are not representative, however they show, that difficult cases can happen. Often the behavior has
not been compliant to the Standard.
Chip, Vendor, Failure image
<type name protected by NDA>
Instead of 1 there are 3 BScan cores inside one
package
Only one of them is usable for JTAG mode
Reason, Work-Around
Faulty BSDL File;
Create 3 individual library models
Detect IR and BScan register lengths
Create 2 Dummy models, later those Ics will be held in
mode:
Global Extended Generator Settings (*.EGS),
(DEVICES
(DEV ... (INSTRUCTION BYPASS))
2
<type name protected by NDA>
The length of the BScan register in mode
SAMPLE / PRELOAD is shorter than in
EXTEST; the function however is correct
3
Infineon MPC8548E-1333_CFCBGA_PGEQ1
At the TAP transition from Update-DR => RunTest/Idle => Select-DR-Scan => there is no
UPDATE if the mode EXTEST has been loaded.
Design failure on chip;
Disable the Testbyte in SAMPLE mode, afterwards
activate it again
Global Extended Generator Settings (*.EGS,
(CASLAN
(PRESHIFT_0 SET TEST_BYTE, OFF;)
(PREEXTEST SET TEST_BYTE, 052H;))
Design failure on chip;
Generate Options / Time between Update and Capture
= Fast (2.5 TCK)
4
Texas Instruments TMS320C6713
Sporadic Testbus failure, often PASS after reset.
Sporadic FAIL, then the length of the BScan
register does not match the BSDL file.
1
Application error; Compliance Pattern has not been
fulfilled:
TMS320C6713:Reset_Z did not get a LOW, because
of the prevention of Flash access by that.
Application Note
The IC vendor guarantees the function only when the
compliance patterns are met.
5
<type name protected by NDA>
The operation hangs up in TAP state PAUSE-DR;
continue of operation with Test Logic Reset only
6
Difficult to explain Testbus failures; when
checking by scope, on TDO sometimes proper and
sometimes midrange levels can be seen.
7
Xilinx Spartan 3E causes Testbus failure
everytime the Instruktion SAMPLE is loaded.
Change the board design: make a separation between
TMS320C6713:Reset_Z and Flash:Reset
To avoid the TAP state „PAUS-DR“ there are two
restrictions:
♦ the UUT must have only one TAP
♦ in TestProgram Generator (Intercon, RAMIntercon), Time between Update and Capture
= Normal
disadvantage: Missing Pull resistors
sometimes cannot be detected
Failure on board design. There were planned resistors
for different assembly scenarios, however the actually
mounted one was different. Due to this, two TDOs
have been connected in parallel.
Failure on board design. The /TRST pin was connected
just to an IO of the Spartan 3E, in addition there was
an Pull-Up of 4k7. No connection to the BScan
controller’s /TRST output.
Xilinx Support:
It is expected to see I/Os pulled up/down with
unconfigured device when SAMPLE instruction is
loaded and the TAP controller switch to UpdateIR state. If HSWAP is high, you will see all I/O
pulled down but if HSWAP is low you will see all
I/Os pulled up. The workaround we give to
customer is then to use BSDLAnno and set the
I/O as needed if the pull-up/down effect is
problematic.
Application Note
8
One BScan IC shows Testbus failure, the others in
the same chain are error-free.
The faulty IC (IC1) is connected through a serial
resistor in the TCK line, moreover from there is
connection to a fixture line. The opposite end of
that line is open (= stub). The period time of
ringing shown in the clock diagram (blue signal)
after edges is directly depending on the length of
the stub.
Explanation:
The open line causes reflection. Also, this line has
a capacitive load due to wiring in the fixture.
Blue: TCK signal of the faulty IC. Essential spikes
on the edges, therefore there is no chance for
synchronization. The voltage range of the spikes
is critical; they appear to IC1 as extra clocks.
Red: Also here spikes are visible. However due to
the serial resistor they are transferred to a noncritical voltage range. However, it is an indicator
fort he trouble described above.
9
Solution: Cut the connection to the fixture.
Here we have a BScan combination with a MDA
Tester. The Testbus is instable – we see sporadic
Testbus failures.
The TCK check by Scope on the UUT proves:
The Testbus signals are heterodyned a clock of 12
MHz. The clock generator is on the UUT.
Explanation:
A bi-level fixture on Testpoint X) is assembled
with a wrong size of probe. As a result, the clock
signal is transferred down to the fixture and
interferes there the TAP signals.
Solution:
Avoid connection of those signals during BScan
test by choosing short sizes of fixture probes.
Application Note
Question Catalog, Index, Hyperlinks
Question Catalog
1
Failure Images & Questions
Testbus failure ist stable
2
Testbus failure occurs in certain
tests only
3
There is TCK frequency
dependency
4
ADYCS™ settings do not improve
the situation
Testbus failure in EXTEST mode
only
Testbus failure im Intercon; the
causing DRSHIFT seems to be
unstable – in Debugger DRSHIFT
step mode the failure appears earlier
What happens if BScan pins
(drivers) are connected to TAP
lines?
Testbus failure in INFRA test only
5
6
7
8
Failure Reasons; Hints
Testbus cable
System-Reset active
/TRST not connected
Compliance Pattern not satisfied
Check over-current; check the data base of the board against faulty /
wrong models for BScan ICs or non-BScan ICs
There is a Ground Bounce effect – match settings of test generator
Faulty board; current peaks at short circuits
ADYCS™ setting not optimized
Testbus not terminated properly
GND on TAP cable or termination not optimal
The line termination is not well; probably line reflections
see 2
BScan hangs up itself by switching off the board-internal power
supply; the power does not break down immediately
Check power consumption
Those pins are normally detected and kept in stable inactive state
automatically. They will not get a Drive function.
Possibly a BScan IC with IDCODE register is not compliant to the
Standard and the ID Code register is not selected by default.
Solution: Load the IDCode instruction.
Application Note
FAQs
Is it possible to utilize the full PASS TCK range
Not really. In that test program only an IRSHIFT is
detected in TCK Check-up test for other test programs? executed. In Extest mode and in DRSHIFT differences
can happen. For experience: Reduce down by 3 MHz
the found maximum TCK frequency.
Which TCK frequency for which executable type
Infra, Intercon, RAM Intercon, Cluster, SVF: 1 … 3
makes sense?
MHz or higher.
High TCK frequencies in Intercon can cause pseudo
errors for Pull-resistors.
RAM with many DRSHIFTs (e.g. DDR2 SDRAM) and
Flash actions: As high as possible, however ~3 MHz
below the maximum TCK.
When is it advisable to apply a controller „Speed Grade If you want to program more than just a few kbyte of
B“ or „Speed Grade C“?
data down to a (parallel) FLASH in short time
(seconds) then use „Speed Grade B or C“ controller.
Why appears in the Testbus failure report often
IRSHIFT is the only possibility, get back constant
„Diagnosis with IRSHIFT“?
vectors from BScan ICs. More precise: The Capture
value of the IR is constant and has to be “..01b” for
LSB according to the Std. So opens on TDI and TDO
can be detected.
Even when a test program executes just a DRSHIFT, in This is an automatic element in CASCON™. The
the case of a Testbus failure an IRSHIFT is issued, too. IRSHIFT can help to locate the possible failure
location, see above.
How does the SFX controller of „Speed Grade A“ act
ADYCS™ is active for all speed grades, including
regarding ADYCS™?
„Speedgrade A”.
Why is the measure result one step (DRSHIFT) after
Capture occurs before Shift and Update after. That’s
the DRSHIFT updating the driver?
why the controller gets the measure result with the next
DRSHIFT.
Is there a way to check a TDO pin for tristate or active?
♦ High-omig voltage devider e.g. 2x 10 kOhm
nagainst GND and VCC: ~0V / ½ VCC /
~VCC; observe by DMM or scope
♦ BScan Probe: LEDs show the state directly
Why do all ICs simultaneously issue on their TDO
Since all ICs are supplied with the same TCK and
..01b when executing IRSHIFT?
TMS, the must be always in the same TAP state.
Therefore at TAP state Shift-IR all ICs clock out their
Capture value of the Instructions register starting with
LSB. And this is according to the Std. ..01b.
How can we fix / solve Ground Bounce problems?
CASCON offers in the Generate options the feature to
reduce the number of output pins that change their
level simultaneously and split the instead to several
DrShifts.
Topic: TAP Connections on Backplane
The ideal scenario is when all signals coming from the
controller have the same delay. The delay itself is not
Scenario:
important. Important is, that the BScan ICs can
8 similar boards on which there are 3 Boundary Scan
synchronise among each other. And this is guaranteed
FPGAs to test the back panel connectors.
as long as there is no essential delay between two ICs
Some cables connect the boards with each other; this
in terms of TCK arrives too early.
creates a long boundary scan chain.
The controller's TDI can be also considered as a BScan
Question:
IC's TDI and normally it would have a delay problem
What is the best way to route the TCK line?
as discussed above because the controller would use
the controller's TCK that is connected to the UUT. But
ADYCS compensates exactly this. You can see, only
the delay between the last IC and controller's TDI will
be compensated.
Conclusion:
Application Note
Buffers on the backplane are good for signal quality.
There is no effect / difference between different buffer
types with different delay for the TAP buffers on the
backplane because all boards will see the same delay.
The only time-"critical" detail is the delay along the
line between the last IC of a board routed to the TDI of
the next one. Do not use buffer there. This delay could
be compensated if you would delay TCK and TMS for
the next board by buffer. Here is the real limit, but this
can be measured / calculated.
Application Note
Typical Mistakes and Misunderstandings
♦
♦
♦
♦
♦
♦
♦
♦
♦
♦
♦
♦
♦
♦
♦
♦
♦
♦
♦
♦
♦
♦
The Testbus failure report is not red by the operator carefully. However it points very often to a
particular failure location and moreover it generates hints for Troubleshooting.
Testbus cable‘s GND line is connected only on one side; it is not a matter of shielding, but GND must
carry back the driver current.
Cable design: TDI mismatched with TDO.
Testbus cable no „twisted Pair“ nor flat cable with GND-Signal-GND-Signal scheme.
GND connection on the UUT side is not close to the TCK connection; if the distance is too large, the
current back is overlaid by current of other sources.
Testbus signals are not terminated on UUT side; this results in line reflections, that causes over and
under shoots
More than 5 BScan ICs in parallel on the same TCK and TMS lines; this can result in spikes / dips in
the
Ground-Bounce problem not handled; source of Testbus failures during test execution
TCK frequency is close to the maximum usable one (sporadic Testbus failures, pseudo data failures)
Testbyte de-activated (possible Testbus failures are not detected and will lead to a wrong diagnosis with
a number of nets being reported faulty in Intercon, RAM Intercon and Cluster test)
Testbyte de-activated in order to get a partly result of the INFRA test; the result has no value at all
BScan activates the System reset on the board
BScan switches off board-internal power supply
BScan controls buffers for the Testbus
Drivers drive against each other; defect or poor data set preparation (Library model, assembly versions,
CAD data, Extended Generator Settings)
BScan driver pins drive actively on Testbus lines
Not enough wait time after activating the power supply (extern or on board)
Assumption a low TCK frequency can compensate a poor Testbus cable design; ringing and over /
under shoots are not depending on the frequency
The program „TCK Check-up“ is applied on a not connected (in CON not described) TAP; here the
result is always PASS
CON has been created manually but the order is wrong. Possibly INFRA has PASS, in particular in
cases when no IDCode registers exist or identical device types are assembled in the chain. High number
of faulty nets in Intercon; even BS pins that are connected to GND or VCC show the opposite level;
often Testbus failure due to driver conflicts
wrong Testbus voltage settings on TAP Transceiver can cause High/Low failures on the Testbus
ignoring Testbus faults as the user is interested in the measure results from the UUT only
Application Note
Terms and Abbreviations
TAP
TAP Controller
TAP State
Ground-Bounce
TCK
TMS
TDI
TDO
TRST
ADYCS™
CASLAN
SVF
JAM/STAPL
Termination
Testbyte
Fan-out
Compliance Pattern
Scan Router
BSDL
IR
CON
LSB
UUT
Test Access Port, the interface for the testbus
TAP control unit inside a BScan IC
state of the TAP controller
Rise of the GND level internally in the chip on silicon due to simultaneous change of
a high number of outputs; the TAP controller can lose the synchronization
Testbus signal: Test Clock
Testbus signal: Test Mode Select
Testbus signal: Test Data In
Testbus signal: Test Data Out
Testbus signal: Test Reset
Active Delay Compensation; CASCON™ property, to compensate signal delay along
Testbus lines + buffers
CASCON‘s programming language, source code of tests
Serial Vector Format, simple vector description format for TAP activities, de-facto
Standard
Vector description format, more flexible than SVF, standardized
here: Line termination of correct impedance
A byte to verify the chain length; a CASCON™ feature
Driver parameter; defines the maximum number of inputs that can be safely driven
Side conditions to get access to BScan in the case the JTAG port is used for both
purposes, Debug /Emulating and JTAG test
ICs for splitting of Scan paths
Boundary Scan Description Language (File)
Instructions register
Scan Path Configuration File; CASCON™ file; the IC mentioned on top is connected
with it’s TDO to the controller’s TDI
Least Significant Bit
Unit-Under-Test
More Help needed?
If all work steps described in this application note you need the support by Goepel electronic. Our application
team will assist you.
For this, please use [email protected].
Excluded from this support is the supply of BSDL files. For this, please contact in any case the chip vendor.
Application Note
Appendix
Test Program “TCK Check Up_1TAP”
Note: Starting from CASCON 4.6.0, you need CON depending versions of the test program. The
version below reflects version for TAP1 only.
-- --------------------------------------------------------------------- Caslan File
--- Name
: TCK Check Up.CAS
-- Date
: 15.04.2005
-- Author
: vieweg
--- -------------------------------------------------------------------- Version
Date
Change
-- 1.0
15.04.2005 Creation
-- 1.1
13.12.2006 Update compressed output format
-- 1.2
21.12.2006 Update TAP selection
-- 1.4
01.03.2013 Update TAP selection according to CON file
--- ------------------------------------------------------------------PROGRAM 'TCK Check UP';
VAR
v_TCK
v_2
v_3
vSel
failflag
vLoopCnt
:
:
:
:
:
:
INT;
INT;
16;
16;
1;
INT;
LABEL
NewSelect;
PROC pTAP3;
BEGIN
-- procedure keyword 'PROC' and name 'ProcName'
-- place procedure code between 'begin' and 'end;'
WRITE ('
');
FOR v_TCK := 1 TO 79 DO
--20 MHz
-FOR v_TCK := 1 TO 39 DO
--10 MHz
TCK v_TCK;
IRSHIFT;
IF failflag ==1 THEN
WRITE ('F');
LD failflag, 0;
ELSE
WRITE ('.');
END;
TAPRESET;
END;
WRITELN ('');
END;
PROC p_TAP_TEST; BEGIN;
WRITELN ('');
WRITELN ('
1
2
3
4
5
6
7
8
9
10 11 12 13 14 15 16 17 18
20');
WRITELN ('
..|...|...|...|...|...|...|...|...|...|...|...|...|...|...|...|...|...|...|...|');
WRITE ('
');
FOR v_2 := 1 TO 79 DO
--20 MHz
TCK v_2;
IRSHIFT;
IF failflag ==1 THEN
WRITE ('F');
LD failflag, 0;
ELSE
WRITE ('.');
19
Application Note
END;
END;
WRITELN ('');
WRITELN ('');
WRITELN ('
21 22 23 24 25 26 27 28 29 30 31 32 33 34 35 36 37 38
40');
WRITELN ('
...|...|...|...|...|...|...|...|...|...|...|...|...|...|...|...|...|...|...|...|');
WRITE (' ');
FOR v_2 := 80 TO 159 DO
--40 MHz
TCK v_2;
IRSHIFT;
IF failflag ==1 THEN
WRITE ('F');
LD failflag, 0;
ELSE
WRITE ('.');
END;
END;
WRITELN ('');
WRITELN ('');
WRITELN ('
41 42 43 44 45 46 47 48 49 50 51 52 53 54 55 56 57 58
60');
WRITELN ('
...|...|...|...|...|...|...|...|...|...|...|...|...|...|...|...|...|...|...|...|');
WRITE (' ');
FOR v_2 := 160 TO 239 DO
--60 MHz
TCK v_2;
IRSHIFT;
IF failflag ==1 THEN
WRITE ('F');
LD failflag, 0;
ELSE
WRITE ('.');
END;
END;
WRITELN ('');
WRITELN ('');
WRITELN ('
61 62 63 64 65 66 67 68 69 70 71 72 73 74 75 76 77 78
80');
WRITELN ('
...|...|...|...|...|...|...|...|...|...|...|...|...|...|...|...|...|...|...|...|');
WRITE (' ');
FOR v_2 := 240 TO 319 DO
--80 MHz
TCK v_2;
IRSHIFT;
IF failflag ==1 THEN
WRITE ('F');
LD failflag, 0;
ELSE
WRITE ('.');
END;
END;
END;
PROC pLoop20MHz; BEGIN;
WRITELN ('
1
2
3
4
5
6
7
8
9
10 11 12 13 14 15 16 17
20');
WRITELN ('
..|...|...|...|...|...|...|...|...|...|...|...|...|...|...|...|...|...|...|...|');
LOOP vLoopCnt DO
CALL pTAP3;
END;
WRITELN ('
..|...|...|...|...|...|...|...|...|...|...|...|...|...|...|...|...|...|...|...|');
WRITELN ('
1
2
3
4
5
6
7
8
9
10 11 12 13 14 15 16 17
20');
WRITELN ('');
END;
39
59
79
18
19
18
19
PROC pActionSelect; BEGIN;
READSELECTION ('Action select', vSel, '1 x 80 MHz', '100 x 20 MHz', '1000 x 20 MHz', 'Exit');
Application Note
SWITCH
vSel
CASE 0:
CALL p_TAP_TEST;
CASE 1:
vLoopCnt := 100;
CALL pLoop20MHz;
CASE 2:
vLoopCnt := 1000;
CALL pLoop20MHz;
CASE 3:
STOP 200;
END;
END;
PROC p_FAIL; BEGIN;
-WRITE (' FAIL');
LD failflag, 1;
END;
/************************************ MAIN ***********************************/
BEGIN
ON_ERROR p_FAIL;
NewSelect:
LD vSel, 0;
WRITELN ('TAP select');
READSELECTION ('TAP selec', vSel, 'TAP1', 'TAP2', 'TAP3', 'TAP4', 'TAP5', 'TAP6', 'TAP7',
'TAP8', 'Exit');
SWITCH vSel
CASE 0:
SCANPATH (1 SHIFT);--, 2 PARK, 3 PARK, 4 PARK, 5 PARK, 6 PARK, 7 PARK, 8 PARK);
WRITELN (' ================================= TESTING TAP1
================================');
CALL pActionSelect;
CASE 1:
WRITELN (' chosen TAP does not exist');
JMP NewSelect;
--SCANPATH (1 PARK, 2 SHIFT, 3 PARK, 4 PARK, 5 PARK, 6 PARK, 7 PARK, 8 PARK);
--WRITELN (' ================================= TESTING TAP2
=================================');
CALL pActionSelect;
CASE 2:
WRITELN (' chosen TAP does not exist');
JMP NewSelect;
--SCANPATH (1 PARK, 2 PARK, 3 SHIFT, 4 PARK, 5 PARK, 6 PARK, 7 PARK, 8 PARK);
--WRITELN (' ================================= TESTING TAP3
=================================');
CALL pActionSelect;
CASE 3:
WRITELN (' chosen TAP does not exist');
JMP NewSelect;
--SCANPATH (1 PARK, 2 PARK, 3 PARK, 4 SHIFT, 5 PARK, 6 PARK, 7 PARK, 8 PARK);
--WRITELN (' ================================= TESTING TAP4
=================================');
CALL pActionSelect;
CASE 4:
WRITELN (' chosen TAP does not exist');
JMP NewSelect;
--SCANPATH (1 PARK, 2 PARK, 3 PARK, 4 PARK, 5 SHIFT, 6 PARK, 7 PARK, 8 PARK);
--WRITELN (' ================================= TESTING TAP5
=================================');
CALL pActionSelect;
CASE 5:
WRITELN (' chosen TAP does not exist');
JMP NewSelect;
--SCANPATH (1 PARK, 2 PARK, 3 PARK, 4 PARK, 5 PARK, 6 SHIFT, 7 PARK, 8 PARK);
Application Note
--WRITELN (' ================================= TESTING TAP6
=================================');
CALL pActionSelect;
CASE 6:
WRITELN (' chosen TAP does not exist');
JMP NewSelect;
--SCANPATH (1 PARK, 2 PARK, 3 PARK, 4 PARK, 5 PARK, 6 PARK, 7 SHIFT, 8 PARK);
--WRITELN (' ================================= TESTING TAP7
=================================');
CALL pActionSelect;
CASE 7:
WRITELN (' chosen TAP does not exist');
JMP NewSelect;
--SCANPATH (1 PARK, 2 PARK, 3 PARK, 4 PARK, 5 PARK, 6 PARK, 7 PARK, 8 SHIFT);
--WRITELN (' ================================= TESTING TAP8
=================================');
CALL pActionSelect;
CASE 8:
STOP 100;
WRITELN ('');
END;
WRITELN ('');
JMP NewSelect;
END.
Application Note
Literature
[1] Software description SYSTEM CASCON™, „User Manual“, „User Interface“, „Selected Topics“, Version
4.6.2c, GOEPEL electronic GmbH – 2013
www.goepel.com
[2] Boundary Scan Probe, „Technical Description” Version 1.0, GOEPEL electronic GmbH - 2008
www.goepel.com
[3] Application Note „Usage of Boundary Scan Probe“, Version 1.7, GOEPEL electronic GmbH - 2007
www.goepel.com
[5] Application Note „Implementation of Boundary Scan during ASIC and PCB Design“, Version 1.0, GOEPEL
electronic GmbH - 1999
www.goepel.com
[6] Application Note „DFT Rules for Boundary Scan (Samples)“, Version 1.0, GOEPEL electronic GmbH 1999
www.goepel.com