1
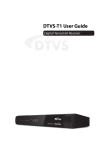
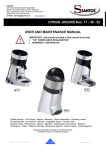
Gwenview User Manual
Aurélien Gâteau
Christopher Martin
Henry de Valence
Gwenview User Manual
2
Contents
1
Introduction
1.1 What is Gwenview . . . . . . . . . . . . . . . . . . . . . . . . . . . . . . . . . . . . .
5
5
2
The Interface
2.1 Start Page . . . . . . . . . . . . . . . . . . . . . . . . . . . . . . . . . . . . . . . . . .
6
6
2.2
Image Operations . . . . . . . . . . . . . . . . . . . . . . . . . . . . . . . . . . . . . .
6
2.3
2.4
2.5
Browse Mode . . . . . . . . . . .
View Mode . . . . . . . . . . . . .
Full Screen Modes . . . . . . . . .
2.5.1 Browse Mode Full Screen
2.5.2 View Mode Full Screen . .
Sidebar . . . . . . . . . . . . . . .
2.6
3
4
.
.
.
.
.
.
.
.
.
.
.
.
.
.
.
.
.
.
.
.
.
.
.
.
.
.
.
.
.
.
.
.
.
.
.
.
.
.
.
.
.
.
.
.
.
.
.
.
.
.
.
.
.
.
.
.
.
.
.
.
.
.
.
.
.
.
.
.
.
.
.
.
.
.
.
.
.
.
.
.
.
.
.
.
.
.
.
.
.
.
.
.
.
.
.
.
.
.
.
.
.
.
.
.
.
.
.
.
.
.
.
.
.
.
.
.
.
.
.
.
.
.
.
.
.
.
.
.
.
.
.
.
.
.
.
.
.
.
.
.
.
.
.
.
.
.
.
.
.
.
.
.
.
.
.
.
.
.
.
.
.
.
.
.
.
.
.
.
7
8
9
9
9
10
Gwenview Importer
12
3.1
Introduction . . . . . . . . . . . . . . . . . . . . . . . . . . . . . . . . . . . . . . . . .
3.1.1 Importing Images . . . . . . . . . . . . . . . . . . . . . . . . . . . . . . . . . .
12
13
3.1.2
13
Automatic Renaming . . . . . . . . . . . . . . . . . . . . . . . . . . . . . . . .
Tips
4.1
5
.
.
.
.
.
.
14
Using the mouse . . . . . . . . . . . . . . . . . . . . . . . . . . . . . . . . . . . . . .
14
4.1.1
Panning with the mouse . . . . . . . . . . . . . . . . . . . . . . . . . . . . . .
14
4.1.2
Zooming with the mouse . . . . . . . . . . . . . . . . . . . . . . . . . . . . .
14
4.1.3
Browsing with the mouse . . . . . . . . . . . . . . . . . . . . . . . . . . . . .
14
4.2
Key bindings . . . . . . . . . . . . . . . . . . . . . . . . . . . . . . . . . . . . . . . . .
14
4.3
Advanced Configuration Options . . . . . . . . . . . . . . . . . . . . . . . . . . . . .
15
Credits and Copyright
16
Abstract
Gwenview is an image viewer for KDE.
Gwenview User Manual
Chapter 1
Introduction
1.1
What is Gwenview
Gwenview is a fast and easy to use image and video viewer for KDE.
Gwenview features two main modes: Browse and View. Both modes can be used in a normal
application window and Full Screen. Browse Mode lets you navigate through your computer
showing thumbnails of your images, View Mode lets you view images one at a time, and Full
Screen lets you make quick slideshows. There is also a start screen that displays a list of recently
opened folders and URLs as well as your places and tags.
Image loading is handled by the Qt library, so Gwenview supports all image formats your Qt
installation supports. Gwenview correctly displays images with an alpha channel (transparency)
as well as animations.
Gwenview supports the displaying and editing of EXIF comments in JPEG images. Lossless JPEG
transforms such as rotations and mirroring are also supported.
Gwenview can read embedded color profiles from PNG and JPEG files. It can use the image color
profile together with the display color profile to output correct colors on the screen.
5
Gwenview User Manual
Chapter 2
The Interface
2.1
Start Page
The start page lists recently opened folders and URLs on the left side, and your places and tags
on the right side.
2.2
Image Operations
Gwenview has a few features which are available in both Browse, View, and Full Screen view.
Gwenview has the capability to do basic alteration of your images.
• Rotate: A rotate operation will rotate the image either to the left or to the right, depending on
whether you do Edit → Rotate Right (Ctrl+R) or Edit → Rotate Left (Ctrl+L)
• Edit → Mirror: This operation will reflect the image along the vertical axis, as if you were
seeing it in a mirror.
• Edit → Flip: This operation will reflect the image upside-down (a reflection along the horizontal axis)
6
Gwenview User Manual
• Edit → Resize (Shift+R): This operation will allow you to shrink or expand the image. Note
that if you increase the size of an image, it may appear blurry and/or pixelated.
These actions are also available on the Operations tab of the sidebar.
T IP
If you have installed the Kipi Plugins, a Plugins menu will be available that will allow you to perform
many additional operations on your images. For more information, see the Kipi Plugins documentation.
2.3
Browse Mode
When in Browse Mode, you can easily navigate through your files and folders. The preview
window shows thumbnails of the images in the current folder, as well as subfolders.
Moving the mouse over an image shows buttons to select or rotate the image as well as a button
to enter Fullscreen Mode. Modified images are indicated by an icon down right, click it to save
the changed image. Clicking on an image takes you into View Mode. You may select multiple
images and switch to View Mode to view them side-by-side.
The slider at the bottom right allows you to change the size of the images. You can also filter the
images by filename, date, tag or rating using the box on the lower left. The toolbar appears in
both Browse mode as well as View mode and contains the most commonly used actions.
• Start Page: Open the start page.
•
•
•
•
Browse: Switches to Browse Mode.
View: Switches to View Mode.
Full Screen: Switches to Full Screen Mode.
Previous: Clicking this icon will go to the previous image in the folder.
• Next: Clicking this button will go to the next image in the folder.
• Rotate Left/Right: Same as discussed in Image Operations
7
Gwenview User Manual
2.4
View Mode
View Mode displays full-size images. The same sidebar available in Browse Mode is displayed on
the left. At the bottom, there is the Thumbnail Bar, which allows you to scroll through the images
in the current folder. The Thumbnail Bar can be minimized by clicking on the Thumbnail Bar
button. Clicking again will restore it. To change the size of the thumbnails move the splitter with
the left mouse button.
View Mode supports viewing multiple images side-by-side. You may select multiple images in
Browse Mode before switching to View Mode, or you may click the + button that appears when
hovering over images in the Thumbnail Bar to add a pane displaying that image. A - will then
appear that will permit you to remove its pane.
When multiple images are displayed, a small toolbar appears below each image that permits
you to delete the image or remove its pane. You may perform zoom operations independently
for each image, or synchronize them. Toggle this by checking the Synchronize to the left of the
zoom slider or by pressing Ctrl+Y. You can switch images by clicking on their pane, or using
your keyboard. To switch to the image on the right, press Tab. To switch to the image on the left,
press Shift+Tab.
The slider at the bottom right controls the zoom of the image. The Fit button and the 100%
button are next to the zoom slider and are two preset zoom levels. The Fit button zooms the
current image to fit the size of the window, and the 100% button zooms the image to the actual
pixel size. The shortcut F toggles between both view modes.
When an image is in zoom-to-fit mode, you can go to the previous and next image with the
arrow keys. When you zoom in, arrow keys are used to scroll the image. This is very similar to
the behavior provided by phones or digital cameras.
When an image is zoomed in, a bird-eye view appears and lets you scroll the image using the
mouse and the arrow keys. The bird-eye view automatically hides itself after a short delay, showing back only while zooming or scrolling.
T IP
You can start directly in View mode by starting Gwenview from a context menu like Open With in
another program or by launching it from the command line with an image as an argument.
8
Gwenview User Manual
The following additional image operations are available only in View Mode:
• Edit → Crop (Shift+C): This operation lets you discard parts of the image you don’t want.
• Edit → Red Eye Reduction: This operation reduces the ´´red eye´´ effect commonly found in
photographs taken with a flash camera.
2.5
Full Screen Modes
Access Full Screen by pressing the Full Screen button on the taskbar, or by View → Full Screen
Mode (Ctrl+Shift+F).
To leave this mode press the Esc key.
2.5.1
Browse Mode Full Screen
In Browse Mode you can switch to fillscreen also by clicking on the button that appears when
you move the mouse over the thumbnails.
Going fullscreen while browsing gives you a more immersive experience while you go through
your pictures. It is quite nice on your regular computer, but makes even more sense when you
connect your laptop to the big TV in the living room to show pictures to your guests.
2.5.2
View Mode Full Screen
The full screen View Mode shows a slideshow of your images. Access Full Screen Mode by
clicking on the button that appears when you move the mouse over the thumbnails in Browse
Mode, by pressing the Full Screen button on the taskbar.
9
Gwenview User Manual
The top bar will hide itself automatically; to show it simply move the mouse to the top of the
screen. If the mouse cursor is over the top bar, it will not autohide. Most of the buttons on the bar
are the same as the ones on the toolbar in Browse or View Modes, except for the Exit Full Screen
Mode button which returns you to the Gwenview window, the Start/Stop Slideshow button,
and the Configure Full Screen Mode button which shows a small settings dialog that allows you
to easily and quickly configure the slideshow. The slideshow controls there are:
• The Interval slider controls how long Gwenview will show an image before it move to the next
one.
• If the Loop checkbox is checked, when the end of the slideshow is reached, it will continue
from the beginning instead of stopping.
• If the Random checkbox is checked, instead of progressing through the folder alphabetically,
images will be shown in random order.
• Select Image Information to Display allows you to define what metadata is displayed under
the buttons on the toolbar.
• If the Show thumbnails checkbox is checked, thumbnails for all images in the current folder
will be displayed to the right of the toolbar.
• The Height slider changes the size of the thumbnails displayed.
If enabled, an area that shows you the other images in the current folder will be shown on the
top bar. Clicking on one will display it.
2.6
Sidebar
The sidebar on the left is available in the Browse and View modes, but does not appear by default
in Browse Mode. Its appearance can be toggled using View → Sidebar (F11) or using the ← /
→ button at the left side of the statusbar. When clicked it collapses or expands the sidebar. The
sidebar contains several tabs:
10
Gwenview User Manual
Folders
Displays a list of all folders on your system permitting you to switch between them. In
Browse Mode thumbnails from the folder will be displayed, while in View Mode the first
image in the folder will appear, from which you can browse through the folder using the
Previous and Next buttons or shortcuts.
Information
Displays Meta Information like the filename and size. The More... link permits you to
view all available metadata and select which data appear in the sidebar.
Operations
This permits you to perform the previously described global image operations as well as
those specific to View Mode. It also permits common file operations like copying, renaming,
deleting, and creating new folders.
11
Gwenview User Manual
Chapter 3
Gwenview Importer
3.1
Introduction
The Gwenview Importer allows you to import images from a digital camera or removable media. To launch it, select Download Photos with Gwenview in the KDE Device Notifier after
connecting a supported device.
When you plug in a device the Gwenview importer recursively lists all images and videos.
This is not always what you expect, e.g. plugging a smartphone you do not want to list all medias
of the device; but only the pictures you took, which are usually in a special subfolder.
It is possible to select the root folder to list, and Gwenview Importer will remember the last root
folder for each device. This way, next time you plug a device in, only the relevant pictures and
videos should be listed.
12
Gwenview User Manual
3.1.1
Importing Images
If you wish, you may select the images you want to import under Select the documents to import
by pressing the + button that appears when hovering over an image. You may also select the
folder that images are imported to in the text box at the bottom of the window. When you are
done, click the Import Selected button to import only the images you have selected, or click
Import All to import all images found on the device.
3.1.2
Automatic Renaming
Gwenview Importer can rename your files according to a specified pattern. To configure this,
select the Settings in the lower left corner. You may turn this feature on or off using the checkbox
at the top. The Rename Format supports several special parameters, which will be replaced by
metadata such as the date the image was created or its filename. They are listed below the text
box. You may either click on the parameter name to enter it into the text box or type one manually.
13
Gwenview User Manual
Chapter 4
Tips
4.1
4.1.1
Using the mouse
Panning with the mouse
• Holding down the left mouse button on an image allows you to scroll the image.
• The mouse wheel will scroll the image up and down.
4.1.2
Zooming with the mouse
• Clicking the middle mouse button will toggle the auto zoom on/off.
• Hold down the Ctrl key, then either use the mouse wheel to zoom in and out or left click to
zoom in and right click to zoom out.
• The mouse wheel, used while holding down the Alt key, will scroll the image horizontally.
4.1.3
Browsing with the mouse
• When in Browse mode, clicking an image switches into View mode and shows that image.
• When in Browse mode, scrolling the mouse wheel will scroll up or down the thumbail view
area.
• If the Mouse Behavior option in Settings → Configure Gwenview is set to Browse, scrolling
the mouse wheel while in View Mode will move you through the images in the folder.
4.2
Key bindings
Gwenview comes with a range of keyboard shortcuts, all of which can be viewed and remapped
by selecting Settings → Configure Shortcuts.... Note that in the Files and Folders windows, all
the normal KDE shortcuts are functional, unless otherwise remapped.
A few of the most useful default bindings are:
• Space: Displays the next image in the directory.
14
Gwenview User Manual
• Backspace: Displays the previous image in the directory.
• Alt+Up: Moves to the parent folder of the current folder.
•
•
•
•
•
•
Ctrl+Shift+F: Switches into Full Screen Mode.
Esc: Switches back to Browse Mode.
Ctrl+M: Show or hide the menubar.
Ctrl+B: Show or hide the Thumbnail bar.
F11: Show or hide the Sidebar.
F6: Make the Location bar editable so that you can directly type in a file path. You can return
to the standard Location Bar by pressing the arrow at the right.
• Ctrl+R: Rotate the current image to the right.
• Ctrl+L: Rotate the current image to the left.
• Shift+R: Resize the current image.
• Shift+C: Crop the current image.
• Ctrl+Y: When multiple images are displayed in View Mode, this synchronizes their views.
• Tab: When multiple images are displayed in View Mode, this switched to the image to the
right of the currently selected image.
• Shift+Tab: When multiple images are displayed in View Mode, this switched to the image to
the left of the currently selected image.
• Ctrl+S: Save any changes made to the image.
• Del: Move the current image to the trash.
• Shift+Del: Permanently delete the image from the disk. Note that this operation is irreversible
and cannot be undone.
• Ctrl+P: Print the current image.
• Ctrl+O: Open an image using the standard file selection dialog.
• F: Pressing this shortcut toggles zoom-to-fit on and off.
• P: Viewing a video this shortcut toggles playback on and off.
• Ctrl+T: Edit tags.
• Ctrl+F2: Rename an image inline.
• Del: Move an image to the trash.
• Shift+Del: Delete an image.
• Ctrl+F7: Copy an image.
• Ctrl+F8: Move an image.
• Ctrl+F9: Link an image.
4.3
Advanced Configuration Options
Some notes on hidden Gwenview options can be found on this page.
I MPORTANT
The options described on the above-mentioned page may help you tune Gwenview for specific needs,
but please keep in mind there is no warranty they will continue working from one version to another.
15
Gwenview User Manual
Chapter 5
Credits and Copyright
Gwenview is currently maintained by Aurélien Gâteau
This document was written by Christopher Martin
This document was updated for KDE 4 by Henry de Valence
This documentation is licensed under the terms of the GNU Free Documentation License.
This program is licensed under the terms of the GNU General Public License.
16