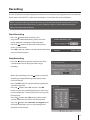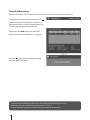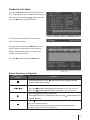
1
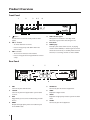
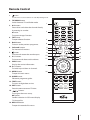
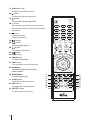
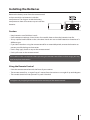
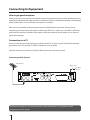
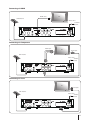
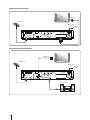
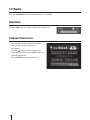
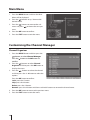
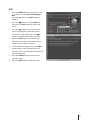
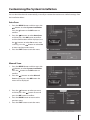
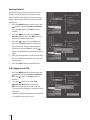
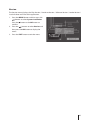
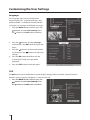
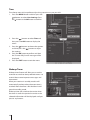
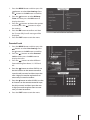
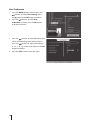
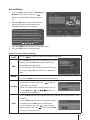
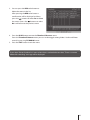
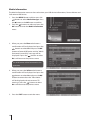
DTVS-T1 User Guide
Digital Terrestrial Receiver
Contents
Safety Instructions.....................................................................................................................4
Warning.................................................................................................................................................................. 4
Copyright Statement......................................................................................................................................... 4
Disclaimer.............................................................................................................................................................. 4
About the Set Top Box................................................................................................................5
Main Features....................................................................................................................................................... 5
Package Contents............................................................................................................................................... 5
Product Overview.......................................................................................................................6
Front Panel............................................................................................................................................................. 6
Rear Panel.............................................................................................................................................................. 6
Remote Control...........................................................................................................................7
Installing the Batteries...............................................................................................................9
Caution.................................................................................................................................................................... 9
Using the Remote Control............................................................................................................................... 9
Connecting to Equipment........................................................................................................10
How to get good reception...........................................................................................................................10
Connections to a TV.........................................................................................................................................10
First Time Installation...............................................................................................................13
Switch Program........................................................................................................................13
Volume Control.........................................................................................................................13
Text............................................................................................................................................13
Info ............................................................................................................................................14
Information Banner..................................................................................................................14
Sleep..........................................................................................................................................15
Quick Select..............................................................................................................................15
Audio Selection........................................................................................................................15
TV/Radio....................................................................................................................................16
Subtitles....................................................................................................................................16
Teletext Selection.....................................................................................................................16
Recording..................................................................................................................................17
Start Recording..................................................................................................................................................17
Stop Recording..................................................................................................................................................17
Time shift Recording........................................................................................................................................18
PlayBack & Trick Mode.....................................................................................................................................19
Button Functions in Playback.......................................................................................................................19
Main Menu................................................................................................................................20
Customising the Channel Manager.........................................................................................20
Channel Organizer............................................................................................................................................20
ESG..........................................................................................................................................................................21
Favourite List.......................................................................................................................................................22
Customising the System Installation......................................................................................23
Auto Scan.............................................................................................................................................................23
Manual Scan........................................................................................................................................................23
Factory Default...................................................................................................................................................24
S/W Upgrade via OTA.......................................................................................................................................24
Version...................................................................................................................................................................25
Customising the User Settings................................................................................................26
Language ............................................................................................................................................................26
OSD.........................................................................................................................................................................26
TV............................................................................................................................................................................27
Time........................................................................................................................................................................28
Wakeup Timer.....................................................................................................................................................28
Parental Lock.......................................................................................................................................................29
User Preference..................................................................................................................................................30
Customising the Media Manager............................................................................................31
Thumbnail Browser..........................................................................................................................................31
–– Bookmark ...............................................................................................................................................32
–– Record Editing.......................................................................................................................................33
–– Rename....................................................................................................................................................34
–– Lock...........................................................................................................................................................34
Recording Booked List ...................................................................................................................................34
Media Information............................................................................................................................................36
Troubleshooting.......................................................................................................................37
Specifications............................................................................................................................38
Warranty ...................................................................................................................................39
Safety Instructions
•
•
•
•
•
•
Always read the safety instructions carefully.
Keep this User's Manual for future reference.
Keep this equipment away from humidity.
Lay this equipment on a reliable flat surface before setting it up.
Do not stand it on soft furnishings.
If any of the following situation arises, get the equipment checked by a service Technician:
-- The equipment has been exposed to moisture.
-- The equipment has been dropped and damaged.
-- The equipment has obvious sign of breakage.
-- The equipment has not been working well or you cannot get it work according to User's
Manual.
Warning
• To prevent the risk of electric shock, do not open the cover or the back of the receiver.
• Do not block the ventilation holes of the device. Leave an appropriate gap above and around it to
allow for adequate ventilation.
• Do not place the device in an unventilated cabinet or on top of a unit which emits heat.
Copyright Statement
No part of this publication may be reproduced in any form by any means without the prior written
permission. Other trademarks or brand names mentioned herein are trademarks or registered
trademarks of their respective companies.
Disclaimer
Information in this document is subject to change without notice. The manufacturer does not make
any representations or warranties (implied or otherwise) regarding the accuracy and completeness
of this document and shall in no event be liable for any loss of profit or any commercial damage,
including but not limited to special, incidental, consequential or other damage.
This symbol indicates that this product incorporates double insulation between hazardous
mains voltage and user accessible parts. When servicing use only identical replacement
parts.
To reduce the risk of fire or electric shock, do not expose this apparatus to water or colds.
4
About the Set Top Box
This DVB-T Terrestrial Receiver is a Free-To-Air digital terrestrial receiver, allowing you to access freeto-air digital terrestrial TV channels and radio broadcasts on your TV set. Compared with analog TV
programs, digital TV programs eliminate the noise and interference by offering high quality video
and audio. An on-screen initial installation guide is provided so that you can easily start to enjoy
watching the programs. In addition, a fully featured remote control is included that offers you access
to every feature with a simple press of a button.
Main Features
•
•
•
•
•
•
•
•
•
•
•
Fully compliant with New Zealand DVB-T standards
Full MPEG2 ISO/IEC 13818 and MPEG-4 H.264 transport stream compliant audio/video decoding
COFDM demodulator
Automatic channel search
Channel edit and deletion
Parental lock control
Teletext function (where available)
HDMI / YPbPr / Scart / Digital Audio via coaxial
Digital Audio and Video via HDMI output
Recording via USB, Time shift recording
Full function remote control
Package Contents
Before installation, please check the items of the package. The package should contain the following
items:
1. DVB-T Terrestrial Receiver x 1
2. Remote Control x 1
3. AAA size Battery x 2
4. Instruction Manual x 1
5. Warranty Card x 1
6. Quick Start Guide x 1
7. SCART to AV Adapter x 1
8. AV Cable x 1
9. HDMI Cable x1
5
Product Overview
Front Panel
2
1
1.
3
45
6
4.
button
To switch the receiver to Stanby mode and On
mode.
2. CH +/- button
3.
LED indicator light 1
Will appear in red when in standby mode.
Will show in green while watching Live TV.
IR receiver
LED Display
To display the status of the receiver, in playing
menu it shows "MENU"; in watching TV channel it
shows the channel No.; in standby mode it shows
the time; in searching channels it shows "TUNE".
5.
6.
-- To switch between channels.
-- Press to navigate up and down within the
menu setup.
VOL +/- button
-- To increase and decrease the volume.
-- Press to navigate left and right within the menu
setup.
Rear Panel
3
1
1.
2.
3.
4.
6
2
7
4
ANT
Connect to your UHF Antenna.
TV/VCR
Connect to your TV if supported or your another
receiver.
USB
Upgrade for your recevier and Recording via USB
Device.
HDMI
Output the high quality video and audio to your
TV via HDMI cable.
8
5
6
5.
6.
7.
8.
AUDIO L/R
Connect to your TV or other equipment.
SPDIF
Output the digital audio.
YPbPr
Output the high quality video to your TV via RCA
cable.
SCART
Connect to your TV if supported.
Remote Control
1.
button
To switch the receiver between on and off(standby) mode.
2. TV/RADIO button
Switch between TV and Radio mode.
3. 0-9 buttons
Enter values and select the channel directly
by entering its number.
0 button
To capture images function.
4. TXT button
To open teletext function.
5. Back button
To return to the previous progamme.
6. Coloured buttons
For interactive functions.
7.
button
To mute and restore the sound output.
8. V+/- buttons
To increase and decrease the volume.
9. INFO button
Display the service information.
10. P+/- buttons
To switch up and down in channels.
11. MENU button
To open the main menu.
12. GUIDE button
Electronic progamme guide.
13. TEXT button
To access to digitaltext service.
14. EXIT button
Enter the menu to normal TV view.
15.
buttons
To navigate the menu setup.
OK button
Confirm selection in OSD menu/display
TV channel list.
16. REC LIST button
To open the recorded list menu.
TV/RADIO
2
1
3
4
TXT
BACK
5
6
10
8
7
V
P
INFO
8
12
11
9
10
U
N
ME
GUIDE
TEXT
13
EX
IT
14
15
REC LIST
PLAY LIST
16
17
JUMP
AUDIO
SUB
AD
WIDE
SLEEP
FAV
CH.LIST
7
17. PLAY LIST button
To open the playback list menu.
18.
19.
button
To stop the playback or recording.
button
TV/RADIO
To record the current programme.
20.
button
Press once to start playback in the Thumbail
Browse menu when you selected the recorded
progamme.
21. button
To pause playback,
To start timeshifting.
22.
23.
TXT
BACK
button
button
To fast rewind playback.
24.
button
V
P
INFO
To fast forward playback.
25.
button
26. JUMP button
27. AUDIO button
NU
GUIDE
TEXT
EX
IT
ME
To select Audio model.
28. SUBT button
Change subtitle for current broadast.
29.AD Button
REC LIST
PLAY LIST
To switch On/Off audio description
when available.
30.WIDE Button
To switch aspect ratio.
31. SLEEP button
To sleep timer of your receiver.
32.FAV button
To display the favourite menu.
33.CH.LIST button
To display the TV channel list.
8
18
19
22
23
26
27
30
31
JUMP
AUDIO
SUB
AD
WIDE
SLEEP
FAV
CH.LIST
21
20
25
24
29
28
33
32
Installing the Batteries
Remove the battery cover from the remote control
and put two AAA size batteries inside the
compartment. The diagram inside the battery
compartment shows the correct way to install the
batteries.
Caution
• Keep batteries out of childrens’ reach.
• Don’t attempt to recharge, short-circuit, disassemble, heat or throw the batteries into fire.
• Always replace both batteries at the same time. Never mix new and old batteries or batteries of a
different type.
• If you don’t intend on using the remote control for an extended period, remove the batteries to
prevent possible leakage and corrosion.
• Don’t drop, apply shock or step on the remote control.
• Don’t spill water on the remote control.
If the receiver does not operate when operating the remote control from a close range, you may
need to replace the batteries.
Using the Remote Control
• Point the remote control towards the front of your receiver.
• The remote control has a range of up to 7 metres from the receiver at an angle of up to 60 degrees.
• The remote control will not operate if its path is blocked.
Sunlight or very bright light will decrease the sensitivity of the remote control.
9
Connecting to Equipment
How to get good reception
There are many ways to connect the receiver to your home entertainment system, depending on the
equipment and connection types you have. However, for the best video/audio quality, use the higher
quality HDMI, YPbPr, Scart and S/PDIF connections if available.
Please always remember to disconnect the terrestrial decoder from the power source prior to
connecting or disconnecting the antenna cable to the ANT. This is necessary as the ANT installed on
your Terrestrial may be powered via the antenna cable that connects to the antenna in on the rear
panel of the receiver.
Connections to a TV
There are several ways of connecting you receiver to the TV and Hi-Fi System. Connection between
the receiver and TV is possible via YPbPr component, Scart or HDMI.
Connect the receiver via Video L/R, YPbPr, HDMI, SPDIF, Scart and Audio system.
Connecting to UHF Antenna
UHF Antenna
Mains cable
SS
Connect mains plug last, ensure your receiver is connected to the TV and Antenna before
plugging in to mains power.
10
To Mains
socket
Connecting via HDMI
HDMI cable
TV
UHF Antenna
Mains cable
To Mains
socket
SS
Connecting via Component
YPbPr input
TV
Audio input
UHF Antenna
Mains cable
SS
To Mains
socket
Connecting via Scart
TV
Scart input
UHF Antenna
Mains cable
SS
To Mains
socket
11
Component to Composite
TV
AV input
UHF Antenna
Mains cable
SS
To Mains
socket
Connecting to Audio Amplifier
HDMI cable
TV
UHF Antenna
Mains cable
SS
Audio System
12
To Mains
socket
First Time Installation
After all the connections have been made
properly, switch on your TV, make sure the
receiver is connected to the mains.
If you are using the receiver for the first time
or restored to factory default, the Welcome
Screen will be displayed.
The Welcome Page will allow you to enter the
Aspect ratio, Antenna Power and LPM standby
values as described below:
Aspect Ratio: Set the ratio of the picture. 16:9 is normally used for wide screen televisions and 4:3 for
square televisions.
Antenna Power: When set to on, the set top box will send 5V DC to the antenna.
LPM in stand-by: When set to on, the receiver will operate in low power mode when placed in
standby.
Press the OK button to begin the scanning of channels.
Switch Program
1. Press the numeric buttons (0~9) on the remote control to select the channel you want.
2. Press the P+/- buttons on the remote control or the front panel to change the available channels
up and down.
3. Press the BACK button to view the previous channel selected.
Volume Control
• Press the V+/- button on the remote control
or front panel to adjust the volume and the
volume bar will be displayed.
• Press the button to switch the sound off. If you want to cancel this function, you can press the
button again or press the V+/–.
Text
• Press the TEXT button to enter MHEG if MHEG is transmitted.
• Press the TEXT button again or press the EXIT button to exit the MHEG (TV mode).
13
Info
• Press the INFO button and then the
progamme banner will be displayed.
• Press the INFO button again the Service
Information will be displayed.
• Press the EXIT button to exit the menu.
Information Banner
When you selected the channel the Information Banner will be displayed.
2 3
7
4
1
6
8
9
10
1.
2.
3.
4.
5.
14
Navigate buttons
Current Channel No.
Current Channel Name
Audio Mode
TV / RADIO
5
10
6.
7.
8.
9.
10.
Current Date and Time
Parental Rating
Programme progress bar
Current event
Next event
Sleep
• Press the Sleep button and then the menu
will be displayed.
• Press the
buttons to select Off / 10 / 20
/ 30 / 40 / 50 / 60 /70 / 80 / 90 / 100 / 110 /
120 min(s) and then press the OK button to
confirm.
• Press the EXIT button to exit the menu.
Quick Select
• Press the OK or CH. LIST button the Service
list menu will be displayed.
• Press the
buttons to select the channel
and press OK to confirm.
• Press the OK button again or EXIT button to
exit the menu.
Audio Selection
• Press the AUDIO button the Audio Selection menu will be
displayed and then press the
buttons to select audio
languge.
• Press the
buttons to select the audio mode L (Left) / S
(Stereo) / R (Right), Stereo is default in the menu.
• When displayed the selection menu, the stereo audio type
icon is not displayed then it is of AC3 audio type (Dolby
digital). When toggling the audio, corresponding "Audio Type"
will be displayed.
• Press the OK button to confirm and then the "Successfully
saved" message will be displayed.
15
TV/Radio
Press the TV/RADIO button to switch between TV and Radio.
Subtitles
Press the SUB button to switch subtitles ON(English)/OFF.
Teletext Selection
• Press the TXT button and then the teletext
menu will be dispalyed if Teletext is
transmitted.
• Press the
buttons to up and down the
pages and you can press the Color buttons to
select the progamme.
• Press the EXIT button to exit the menu.
16
Recording
Use this function to record the programme when you are watching the progamme and save them for
future viewing. The DTVS-T1 allows two recordings at a time from the same multiplexer.
When use the hard disk drive for the first time, you will be required to format the drive. This unit
only records on to a hard disk drive in its own proprietary format. (refer to Media information
menu instructions how to format)
Start Recording
• Press the button while watching a live
programme a default Recording name with time
stamp & Record until option will be displayed.
buttons to select the record time or
• Press the
enter 1 to 480 minutes.
• Press OK button to confirm and the record information
banner will be displayed.
Stop Recording
• Press the button to stop the recording and then
a confirmation will be displayed when single
recording.
When dual recording, press the button to stop the
recording the Stop Recording and Playback menu
will be displayed
Press the OK button to stop the recording when you
selected progamme.
• Press the button select Yes and press the OK
button to save the recorded progamme in your Hard
Drive and then the "Successfully Saved" message will
be displayed.
Press the button select No to discard the record
and the "Recording Discarded" will be displayed.
Press the button select Rename, the Keypad menu
will be displayed then you can use the keypad to
modify the record name.
17
Time shift Recording
This function allows the receiver to virtually record the live viewing broadcast programme.
During normal TV Viewing, you may press the
button to pause the live broadcast. The Pause
information banner will be displayed which will
show the last stopped and current time.
When press the INFO button the menu will
display the event as TimeShifting is in progress.
Press the button the "Recording Discarded"
message will be displayed.
• Time shift and recording functions may not work if the signal strength is weak.
• Recording will stop automatically when the disk is full.
• During timeshift, changing channels will cause timeshift to terminate.
18
PlayBack & Trick Mode
Press the PLAY LIST button to enter the Playback
List - Video Records menu. Select the recording you
buttons and then
want to play back using the
press the OK button to begin playback.
The info banner will display the current play
time and the total time.
During playback, pressing the INFO button will
display detailed information on the recording.
Details shown include, Name, Duration, Date
and Time Created and Size.
Press the OK button to exit the INFO menu.
Button Functions in Playback
Remote Control
Button
Function
• During playback, press the
button to pause the progame and the
banner will be always display.
When playing
or
• Press the
• Press the
buttons repeatedly to fast forward 1x / 2x / 3x / 4x / 5x.
button repeatedly to fast rewind 1x / 2x / 3x / 4x / 5x.
• Press the button to resume playback.
• During fast forward / fast backward state, press the
normal playback.
button to return to
Press the button to exit the time shift and return to the Recording List
menu when timed recording.
If have not time recording the progamme the "No event booked for
recording" confirmation will be displayed.
19
Main Menu
1. Press the MENU button and then the Main
Menu will be displayed.
2. Press the
buttons to up / down to the
desired menu.
3. Press the
buttons to move to the sub
menu and press
to choose the one you
want.
4. Press the OK button to confirm.
5. Press the EXIT button to exit the menu.
Customising the Channel Manager
Channel Organizer
1. Press the MENU button and then press the
buttons to select Channel Manager.
Press the button or the OK button to
confirm.
2. Press the
buttons to select Channel
Organizer and then press the OK button to
display the menu.
3. Press the
buttons to select the channel
and then press the 1 - 4 button to select the
options.
Press the OK button to confirm.
Lock: press the 1 button.
Skip: press the 2 button.
Delete: press the 3 button.
Rename: press the 4 button and then use the 0-9 buttons to rename the channel name.
4. Press the OK button to return to the previous menu.
5. Press the EXIT button to exit the menu.
20
ESG
1. Press the MENU button and then press the
buttons to select Channel Manager.
Press the button or the OK button to
confirm.
2. Press the
buttons to select ESG and
then press the OK button to display the
menu.
3. Press the
buttons you can view the
current day progam guide information
if available in the stream; Press the
buttons to toggle within the service list.
When the OK button is pressed for the
selected service then the corresponding
current events will be refreshed.
4. In the schedule dialog, pressing the INFO
button twice on the selected event will
show the short and extended description of
the selected event.
5. Press the BACK button to return to the
previous menu.
6. Press the EXIT button to exit the menu.
21
Favourite List
1. Press the MENU button and then press the
buttons to select Channel Manager.
Press the button or the OK button to
confirm.
2. Press the
buttons to select Favourite
List and then press the OK button to
display the menu.
3. Press the
buttons to select the channels
and then press the Number buttons on the
remote control to group the channels. Press
OK to confirm and the "Successfully saved"
information will be displayed.
4. Press the EXIT button to exit the menu.
5. Press the FAV button to display the
Favourite List menu when watch normal TV
viewing.
22
Customising the System Installation
You can load the channels automatically, manually or restore the receiver to its default settings from
the Installation Menu.
Auto Scan
1. Press the MENU button and then press the
buttons to select System Installation.
Press the button or the OK button to
confirm.
2. Press the
buttons to select Auto Scan
and then press the OK button to confirm
and the confirmation will be displayed, use
the
buttons to select Yes to start auto
scanning, use the
buttons to select No
to return to the previous menu.
3. Press the EXIT button to exit the menu.
Manual Scan
1. Press the MENU button and then press the
buttons to select System Installation.
Press the button or the OK button to
confirm.
2. Press the
buttons to select Manual
Scan and then press the OK button the
menu will be displayed.
3. Press the
buttons to select you want,
and then press the
butons to set and
press the OK button to confirm.
4. Press the BACK button to return to the
previous menu.
5. Press the EXIT button to exit the menu.
23
Factory Default
Be careful when using this function, because
it will erase all the data and parameters that
are set earlier in the receiver. Once you made a
factory default they will have to re-install their
preferences.
1. Press the MENU button and then press the
buttons to select System Installation.
Press the button or the OK button to
confirm.
2. Press the
buttons to select Factory
Default and then press the OK button to
display the confirmation menu.
3. Press the
buttons to select Yes and
then press the OK button to confirm the
password entry dialog will be displayed.
(Default password is 0000) If use the
buttons select No will return to the previous
menu.
4. After you entered the password in the menu
the "Successfully Completed" message will
be displayed.
5. Press the EXIT button to exit the menu.
S/W Upgrade via OTA
1. Press the MENU button and then press the
buttons to select System Installation.
Press the button or the OK button to
confirm.
2. Press the
buttons to select S/W
Upgrade via OTA and then press the
OK button to display the menu and the
"S/W searching inprogress" message will be
displayed.
3. Software upgrade will begin if new software
is available in the transmission.
24
Version
The Version menu displays the Chip Version / Hardware Version / Software Version / Loader Version /
Last built date and Time of the application.
1. Press the MENU button and then press the
buttons to select System Installation.
Press the button or the OK button to
confirm.
2. Press the
buttons to select Version and
then press the OK button to display the
menu.
3. Press the EXIT button to exit the menu.
25
Customising the User Settings
Language
The Language menu aids to modify the on
Screen Display OSD: 1st Preferred Audio / 2nd
Preferred Audio / 1st Preferred Subtitle / MHEG
Lanauage / AD Lanauge and Teletext Lanauage.
1. Press the MENU button and then press the
buttons to select User Settings. Press
the button or the OK button to confirm.
2. Press the
buttons to select Lanauge
and then press the OK button to display the
menu.
3. Press the
buttons to choose the options
and then press the
buttons to adjust the
settings.
4. Press the OK button to confirm and the
"Successfully Saved" message will be
displayed.
5. Press the EXIT button to exit the menu.
OSD
The OSD menu aids to modify the on screen display settings Info bar Timeout / Banner Position /
Subtitle / Lpm in stand-by / Brightness / Contrast and LCN.
1. Press the MENU button and then press the
buttons to select User Settings. Press
the button or the OK button to confirm.
26
2. Press the
buttons to select OSD and
then press the OK button to display the
menu.
3. Press the
buttons to choose the options
and then press the
buttons to adjust
the settings.
4. Press the OK button to confirm and then
the "Successfully Saved" message will be
displayed.
5. Press the EXIT button to exit the menu.
TV
TV setup menu aids to set the parameters of the HD Resolution / Aspect Ratio / Digital Video / HDMI
output mode / HDCP / Antenna Power and Auto OTA Search.
1. Press the MENU button and then press the
buttons to select User Settings. Press
the button or the OK button to confirm.
2. Press the
buttons to select TV and then
press the OK button to display the menu.
3. Press the
buttons to choose the options
and then press the
buttons to adjust
the settings.
4. Press the OK button to confirm and then
the "Successfully Saved" message will be
displayed.
5. Press the EXIT button to exit the menu.
27
Time
Time Setup menu aids to perform adjust the system time as per you wish.
1. Press the MENU button and then press the
buttons to select User Settings. Press
the button or the OK button to confirm.
2. Press the
buttons to select Time and
then press the OK button to display the
menu.
3. Press the
buttons to choose the options
and then press the
buttons to adjust
the settings.
4. Press the OK button to confirm and then
the "Successfully Saved" message will be
displayed.
5. Press the EXIT button to exit the menu.
Wakeup Timer
Wakeup timer feature will allow you to set the
reminder to switch to their preferred events / to
remind about some important messages and
time record.
When your receiver in standby mode it will
automatically wakeup when the event time is
reached. After the event is finished then it will
go to the standby mode.
Wake up timer will switch to the service when
the timer is set for the particular service or the
selected information will be displayed until you
presses any buttons.
28
1. Press the MENU button and then press the
buttons to select User Settings. Press
the button or the OK button to confirm.
2. Press the
buttons to select Wakeup
Timer and then press the OK button to
display the menu.
3. Press the
buttons to choose the options
and then press the
buttons to adjust
the settings.
4. Press the OK button to confirm and then
the "Successfully Saved" message will be
displayed.
5. Press the EXIT button to exit the menu.
Parental Lock
1. Press the MENU button and then press the
buttons to select User Settings. Press
the button or the OK button to confirm.
2. Press the
buttons to select Parental
Lock and then press the OK button to
display the menu.
3. Press the
buttons to select different
Parental Rating from None / G / PGR and
AO.
4. Press the
button to select Old PIN, use
the 0-9 buttons on the remote control to
input the old password and then input the
new 4-digit password to replace then reenter new password to confirm.
5. Press the button to select Old PIN, use the
0-9 buttons on the remote control to input
the old password and then input the new
4-digit password to replace then re-enter
new password to confirm.
6. Press the EXIT button to exit the menu.
29
User Preference
1. Press the MENU button and then press the
buttons to select User Settings. Press
the button or the OK button to confirm.
2. Press the
buttons to select User
Preference and then press the OK button
to display the menu.
3. Press the
buttons to select Recording Start
Offset and Recording Start Offset and then
press the
buttons to adjust the settings 1,
2, 3, 5, 7, 10, 12, 15 Mins and Off, press the OK
button to confirm.
4. Press the EXIT button to exit the menu.
30
Customising the Media Manager
In Media Manager menu you can perform the
Record related operations.
Thumbnail Browser
1. Press the MENU button and then press the
buttons to select Media Manager. Press
the button or the OK button to confirm.
2. Press the
buttons to select Thumbnail
Browser and then press the OK button to
display the menu.
3. Press the BACK button to return the
previous menu.
4. Press the EXIT button to exit the menu.
Button Functions in Thumbnail browser
Press the
RED
GREEN
buttons to select the recorded progamme.
• Press the Red color button to display the menu and then press the OK button to
confirm.
• After pressing the OK button the "Do you want to delete record(s)" message will be
dispalyed.
• Press the
buttons to select Yes to delete your selected progamme. Press the
buttons to select No to return the previous menu.
Press the Green color button the Options Menu (Bookmark / Record Editing / Rename
and Lock )will be displayed.
BLUE
Press the Blue color button the SortByNmae and SortByDate.
TV/R
Press the TV/R button to switch between VIDEO / AUDIO / PHOTO.
31
Bookmark
1. Press the Green color button in Thumbnail
Browser menu and then press the
buttons to select Bookmark in option list.
2. After pressed the OK button the Bookmark
menu will be displayed and playback get
started for that record.
This function is only available for
recordings over 20 seconds.
3. During playback, you can press the OK
button to confirm and then press the
Green color button mark their preferred
point. Each marked point in the record will
show the time of the bookmark location.
You can press the
button to select the
bookmarked and then record playback will
be started from the particular bookmarked
location.
4. When you press the Red color button it will
remove the bookmark point.
5. This Recorder supports maximum 8
bookmarks for one record. After setting the
maximum bookmark points the information
will be displayed.
In this menu all the ,
buttons are supported.
32
,
,
Record Editing
1. Press the Green color button in Thumbnail
Browser menu and then press the
buttons to select Record Editing in option
list.
2. After the OK button is pressed, the Record
Editing menu will be displayed and the
selected recording will start playing.
Record editing option allows you to
remove the unwanted portion of the
record. The selected record should be of
minimum 20 second duration. You can
locate the particular point in the recording
by using the
,
,
,
buttons.
3. Press the BACK button to return the previous menu.
4. Press the EXIT button to exit the menu.
Button Functions in Record Editing
Press the
RED
GREEN
YELLOW
buttons to select the recorded progamme.
Press the Red color button to Cut in(Marked A) during
playback, press the Red color button again to Cut
out(Marked B) during playback.
You have to select a pair of points with minimum gap
of 5 seconds. Eight different pairs can be selected at
a time.
Press the Green color button the jump to time window will be displayed, and then you
can use the numbers button enter the time you wants.
• Press the Yellow color button the confirmation will
be displayed, and then press the
buttons to
select Mark A or Mark B.
• When you slected Mark A or Mark B then you can
use the Red color,
and
edit the event progamme.
BLUE
/
buttons to
• Press the Blue color button to delete when you selected the cut progammes in the
event list.
• Press the Blue color button to select the cut event
and then press the OK button a confirmation
will be displayed, press the
buttons to select
Yes to confirm, press the
buttons to select No
to return the previous menu.
33
Rename
1. Press the Green color button in Thumbnail
Browser menu and then press the
buttons to select Rename in option list.
2. After pressing the OK button the Keypad
menu will be displayed.
3. The new name can be given by selecting
the letters in the keypad. First position
the cursor in the service name. To select a
particular button in the keypad and press
the corresponding numeric buttons. To
change the character, do the repeated press
to toggle b/w the options. You can use the
color buttons to change the numeric /
alphabetic keypads.
Lock
1. Press the Green color button in Thumbnail
Browser menu and then press the
buttons to select Lock in option list, press
the OK button to confirm.
2. After pressing the OK button the "Recorded
Locked" confirmation will display, and then
the recorded progamme will be locked.
Press the Green color button again and use
the
buttons to select Release to release
the recorded progamme.
Recording Booked List
You can view all event timers booked in the Booked List. All recordings booked through Wakeup
Timer dialog can be viewed in this menu.
1. Press the MENU button and then press the
buttons to select Media Manager. Press
the button or the OK button to confirm.
2. Press the
buttons to select and press
the OK button to enter the Recording
Booked List menu.
34
3. You can press the RED color button to
delete the event in the list.
After pressing the RED color button a
confirmation will be displayed and then
buttons to select Yes to delete
press the
the event. If press the
buttons to select
No it will return to the previous menu
4. Press the BLUE button to enter the Thumbnail Browser menu.
From the Thumbnail Browser menu you can invoke toggle among Video / Audio and Photo
records by pressing TV/RADIO button.
5. Press the EXIT button to exit the menu.
If you select "Record booked list" menu when there is no booked event then "There is no event
booked for recording" message will be displayed.
35
Media Information
The Media Information menu can be used to view your USB device informations, Format Volume and
Safe remove USB Device.
1. Press the MENU button and then press the
buttons to select Media Manager. Press
the button or the OK button to confirm.
2. Press the
buttons to select and press the
OK button to enter the Media information
menu.
3. When you press the Blue color button a
confirmation will be displayed and press the
buttons to select Yes and press the OK
button to Fomat USB Device and the "Media
formatted Successfully" message will be
displayed. If press the
buttons to select
No it will return to the previous menu.
This USB Device will be formatted in this
operation.
4. When you press the Yellow color button a
confirmation will be displayed and press the
buttons to select Yes and press the OK
button to remove then the "Please Wait..."
will be displayed and exit to normal TV
viewing. If press the
buttons to select
No it will return to the previous menu.
5. Press the EXIT button to exit the menu.
36
Troubleshooting
If you experience problems with this receiver or its installation, in the first instance please read
carefully the relevant sections of this User Manual and this Troubleshooting section.
Problem
Display on front panel not lit
Tuning failed or Database
empty or No signal found
Possible cause
What to do
Main lead unplugged
Check mains lead
Main fuse blown
Check fuse
• Terr may be disconnected.
• Antenna may be damaged
or misaligned.
• Check cable from receiver to
Antenna.
• Get a qualified technician to
check Antenna alignment.
Out of digital signal area
Check with dealer
No picture or sound
• Return to another channel
• Program not broadcasting now
• Check cable from receiver to
• Antenna cable may be short
Antenna troubleshooting and
circuit
power on/off again.
Mosaic blocks in picture or
picture freezes
Aerial may not be compatible
Check aerial
Scrambled channel message
Channel is scrambled
Select an alternative channel
Forgotten channel lock code
No response to remote control
After moving the receiver
to another room, find can't
receive the digital reception
Use the override code(0000)
Receiver off
Plug in and turn on receiver
Handset not aimed correctly
Aim handset at front panel
Front panel obstructed
Check for obstructions
Remote control batteries are
inserted incorrectly
Check batteries direction
Handset batteries exhausted
Replace remote control batteries
The signal feed may come through
a distribution system which may Try a direct feed from the
reduce the digital signal now
Antenna
received by the receiver
If this doesn’t work, contact a qualified repair technician, never attempt to repair the receiver
yourself.
37
Specifications
Item
Connectors
Power supply
Display
Others
Specification
ANT
Connects to your UHF Antenna
TV/VCR
Connects to your TV or a second Set Top Box
USB
USB port for software upgrade and record
HDMI
For video and audio output
S/PDIF
RCA, for SPDIF digital audio output
YPbPr
RCA, for component video output
L/R
RCA, Analog audio output
Scart
Connects to your TV
Input
110-240V ~ 50/60Hz
Consumption
12W max.
Resolution
720 x 576i (CVBS ), 720 x 576i / 720 x 576p ( YPbPr)
1080i /1080p (HDMI)
Aspect Ratio
4:3(Letterbox/Panscan), 16:9(Fullscreen/Pillar Box), Auto
Sound Mode
Right, Left, Stereo, Dolby
Specifications are subject to change without prior notice.
This marking shown on the product or its literature, indicates that it should not be disposed
with other household wastes at the end of its working life. To prevent possible harm to the
environment or human health from uncontrolled waste disposal, please separate this from
other types of wastes and recycle it responsibly to promote the sustainable reuse of
material resources.
38
Warranty
Please keep your receipt as proof of purchase. This product is warranted for any defect in materials
or workmanship for one year after the original date of purchase. This product is for normal domestic
and office use only. This warranty does not cover damage from misuse or neglect, accidental
damage, vermin in festation, excessive voltages such us lightning or power surges or any alternation
that affects the performance or reliability of product.
In the unlikely event that your product fails to work normally, please contact the supplier the and
have your receipt of purchase on hand.
This guarantee is subject to the following provisions
• It is only valid within boundaries of the country of purchase.
• The product must be correctly assembled and operated in accordance with the Instructions
contained in the manual.
• This product must be used solely for domestic purposes.
• The guarantee does not cover accidental damage.
• The guarantee will be rendered invalid if the product is resold or has been damaged by inexpert
repair.
• The manufacturer disclaims any liability for incidental or consequential damaged.
• This guarantee is in addition to, and does not diminish, your statutory or legal rights.
Rev2.0_31-10-11
39