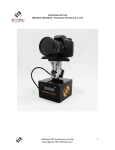
1
Setup Instruction for eMotimo PT - Firmware Version 1_4
More information can be found online at our user forum:
emotimo.com/forum
Setup Instructions
1. Setup your tripod (not included). Your tripod should be able to support 10lbs minimum and
have a standard 1/4-20 mounting screw. Set the base of your tripod wide! The center of
gravity of the assembly will change throughout the pan and tilt program. A quick release plate is
optional but desirable. Note - On recent builds of the PT, there is also a 3/8"-16 threaded hold
in the bottom for additional mounting options.
WARNING - eMotimo PT is NOT meant to be a table top device! Do not use eMotimo PT without
a tripod or securely locking down the unit. The unit may become unbalanced and tip over,
damaging your camera and eMotimo PT!
2. Mount eMotimo PT to your tripod. The mounting hole in the base of eMotimo PT is a standard
1/4-20 thread. You may use a quick release foot screwed into the base of eMotimo PT.
3. Mount camera to eMotimo PT's horizontal mounting plate (what tilts)
using the included brass thumb screw.
a. Mount the camera so that its remote shutter release plug is
closest to the pan axis (closets to the visible gear).
b. Pick a position that helps to balance the camera as close as
possible front to back. If you have a long or front-heavy lens,
mount the camera further back on the horizontal mounting
plate. If you are using a lightweight lens, mount more forward.
c. Ensure that the camera is secured fully to eMotimo PT and is
well balanced before stepping away from the setup.
Tip - If you are shooting in a windy setting, consider wrapping up
the neck strap in a rubber band. The strap can act as a sail and
shake the camera during shots
Tip - You may remove the brass screw for travel by lining it up
with the thread cut in the acrylic and backing it out. If your tilt
plate has multiple slots, this is how you remove and move the
thumb screw.
4. Connect the camera remote cable the camera port on the side of eMotimo PT. Connect the
other end of the cable to your camera - Canon cable is shown, but the camera side of the cable
will vary. If you are using a video camera, a cable is not required.
eMotimo PT Instructions Firmware1_4 Rev1
Copyright © 2011 eMotimo LLC
Page 1
WARNING - AT EXTREME TILT ANGLES THE SHUTTER PLUG COULD HAVE INTERFERENCE WITH
EMOTIMO PT. DURING PAN AND TILT MOVES ENSURE THERE IS NO INTERFERENCE BETWEEN
THE PLUG AND EMOTIMO PT. THIS COULD DAMAGE THE EMOTIMO PT AND YOUR CAMERA!
5. Connect the tilt motor cable to the side of eMotimo PT. This
connection is keyed and only goes one way - do not force it.
Depending on the shot, you may want to "wind up" the tilt
cable to prevent binding during a long pan.
WARNING - Have the unit powered down when you plug
in, or remove the tilt motor cable. The stepper drivers can
be damaged if the unit is powered up when you plug it in.
Tip - If you are not using the tilt for the shot, you may power
up, jog to your tilt position, power down, and remove the
plug. As mentioned before, it may damage the stepper
drivers if you unplug, or plug in while the unit is powered.
WARNING - There are no limits on how far you can pan.
You can cause motor and eMotimo damage if the tilt motor
wire gets pulled.
6. Connect the 12 volt DC source to the 2.1 mm power port on
the side of eMotimo PT. You may supply eMotimo PT a voltage of 10-13 volts DC.
a. If using the optional 12 volt battery, make sure the blade connectors connected
correctly. The wire lead with the writing on the wire and the red blade connector is
connected to the positive (red) terminal of the battery. The clear / silver blade
connector is connected to the ground (black). The
center lead of the barrel connector is positive and
the outside is negative. Reversing the polarity will
not harm the unit if connected for less than a
minute, but the unit will not power up.
b. If using a wall adapter, ensure the voltage is in range
and the supply is rated for a current of 1.0 Amp or
greater.
eMotimo PT Instructions Firmware1_4 Rev1
Copyright © 2011 eMotimo LLC
Page 2
7.
The LCD screen on eMotimo will light up and show its first prompt.
WARNING - eMotimo PT does not have limits for the Pan and Tilt Axis. During moves on
setup and during the program, watch for interference with:
a. The Camera Lens / Body and eMotimo PT or other objects.
b. The Shutter Release Cable attached to the Camera body and eMotimo PT (especially
watch out for high degree tilts).
c. The tilt cable wrapping and pulling from eMotimo PT or getting caught between the
Vertical Pan Arm and Base Plate.
d. The shifting camera weight causing an imbalance and tipping over the rig.
8. Follow the prompts.
a. C-Use Stored and Z-Reset -will be displayed on the LCD. Press the Z-button on the
remote to reset any stored parameters.
b. Move to Start Pt- use the remote joystick to pan and tilt until you have framed the start
of the shot correctly. Press C - the small top round button under your index finger to
advance. Start Pt. Set will flash momentarily
Information - The unit does make some noise while moving - this is normal. When
panning and tilting - it makes more noise and may even sound like grinding - nothing is
grinding, it is how the program pulses the motors concurrently .
c. Move to End Pt. - use the remote joystick to pan and tilt until you have framed the start
of the shot correctly. Press C - the small top round button under your index finger to
advance. End Point Set will flash momentarily.
d. Set Sht Interval will flash momentarily and then show Intval: XX.X sec will show with
XX.X being seconds with a 1/10 of a second resolution. Interval is your frame rate. If
you select a 2 second interval this is a frame every 2 seconds (with the effect of
speeding up time 48 to 60 times depending on your final movie frame rate).
i. For Move-Shoot -Move - Move the joystick up and down to select the interval
between 0.4 and 99.9 seconds. Press the C button to confirm. Interval Set will
flash.
ii. For Video - Move the joystick down until "Video" is displayed. Press the C
button to confirm. Interval Set will flash.
e. Set Static Time will flash momentarily and then show Stat_T: XX.X sec will show with
XX.X being seconds with a 1/10 of a second resolution. The exposure for all your
shots is always camera controlled. eMotimo PT stays still for this set length of time for
each shot. Set a Static time signal at least as long as the shutter speed to avoid the PT
moving while the camera is still exposing. If you are shooting HDR, you can use this to
send a longer than normal shutter signal (like holding down the shutter button) to allow
a bracketed exposure to complete.
i. For Move-Shoot -Move - Move the joystick up and down to select the static
time. This time must be less than the interval that was just set. For the
duration of the static time, a shutter signal is sent from eMotimo PT to your
camera to trigger the shot. eMotimo PT will not move during this signal.
Select the static time for what your longest exposure is expected to be plus .1
seconds, but no more. Selecting a longer static time will reduce the amount of
time available to move to the next position. This will make the motors move
faster, stop faster, and take longer to settle. Press the C button to confirm.
Static Time Set will flash.
ii. For Video -If you selected Video on the Interval selection screen, there is no
option. "Video" will be displayed and no shutter signal will be sent during this
eMotimo PT Instructions Firmware1_4 Rev1
Copyright © 2011 eMotimo LLC
Page 3
program. No shutter signal will be sent to the camera - and the PT will move
continuously.
f. Set Ramp will flash momentarily and then show Ramp: XXX Frames with XXX being the
number of frames that the unit is accelerating / decelerating during the shot. The
higher the value, the smoother the starts and stops. A good starting point for ramp is
45-60. This allows for 1-2 seconds of acceleration in the final footage for most shots.
Tip - If you are shooting a short shot sequence, ensure that you will have at least 4 times
ramp value in total shots or otherwise the ramp might not engage. Example - if
shooting 2 second intervals for 2 minutes, you have 120 total shots while moving. Your
ramp should not be any more than 30.
g. Set Move Duration - Select the total duration of the moving portion of the shot. Move
the joystick up and down to select the total minutes that you want to shoot while
eMotimo PT is moving. Tip - Time will be added to complete the Lead In and Lead out
Frames. Total shots are calculated by dividing duration by your shot interval.
Duration Set will flash.
h. Set Static Lead In/Out Frames - this is the number of stationary shots at the beginning
and end of the shot. XXX In - XXX Out will show. A flashing cursor will highlight
which setting you are changing. Move the joystick up and down to select number of
frames. Move the joystick left or right to select either the Lead in or Lead Out frames.
Press the C button to confirm. Lead Frames Set will flash. Going to Start will flash and
the motors will return to the start position.
i. Review and Confirm Setting will flash. Total Shots and Time are calculated and
displayed on the LCD along with feedback for Pan and Tilt Steps.
Tip - Keep track of these setting to fine tune your future shots.
If you want to change a setting, press the Z button to move back sequentially to the
setting you want to change. Ensure your camera is ready to shoot, then press the C
button to immediately start the program.
9. In program, the LCD will give you feedback on where it is in the program for Shoot-Move-Shoot
(SMS) programs. It will update once every shot with:
Upper Left - Current Shot/Total Shots
Upper Right - Program Stage (LeadIn, RampUp, Linear, RampDn, LeadOT)
Lower Left - Time Remaining in HH:MM:SS
Lower Right - Source Voltage
For Video it will just display "Program Running". When complete it will show "Program
Complete" and give you options to repeat the shot.
Tip - Don't touch the camera while it is moving -the footage will show it - the counter will give
you feedback on when the program will complete.
WARNING - STEPPER MOTORS CAN GET HOT - ESPECIALLY ON WARM DAYS! AVOID
TOUCHING THE TILT MOTOR DURING THE PROGRAM. ALWAYS MONITOR EMOTIMO PT
WHILE RUNNING TO ENSURE THAT OTHERS DON'T TOUCH THE UNIT!
eMotimo PT Instructions Firmware1_4 Rev1
Copyright © 2011 eMotimo LLC
Page 4
Example Parameters
1. 90 to 135 degree on a pan - 25 degrees on tilt from start to finish.
2. Interval - 1 second interval for fast moving subject like people, waves - for shots less than 20
3.
4.
5.
6.
minutes. 2 second interval for shots longer than 20 minutes or for slower moving subject like
meandering clouds. 3 seconds for long shots - 35-50 minutes. Much longer for night shots - see
special section below.
Static Time - if daylight, leave at the default of .1 seconds, the minimum. This will trigger the
camera appropriately and allow for the maximum move time.
Ramp 40-70 frames - allows for smooth starts and finishes. Lower values are mean faster
acceleration and deceleration. Higher values are very smooth starts and stops.
Duration - clouds - 20 minutes plus for slow subjects (clouds, stars)- 5 to 15 minutes for faster
moving subjects (people, cars).
Lead In - 30. Lead Out - 60 - about 1 second of static footage before the move and 2 seconds of
static footage after the move.
Camera Setup - Recommendations
1. Turn on camera. Is the battery level full? Always start with a charged battery! On the
recommended setting we have captured thousands of frames of daylight scenes.
2. Set the camera to M (Manual) mode with dial
3. Set the white balance to correct manual setting (sky, cloud, indoor) - Note - do not leave on
AWB as you will get flicker.
4. Set camera ISO setting to a manual setting - the lowest possible.
5. Set the exposure to be evaluative, but be careful if you want to expose the sky correctly - it still
might overexpose.
6. Set the aperture as desired. Low if you want a purposeful shallow depth of field. 7 or higher to
allow most to be in focus - in bright light 18 is great.
7. Set the shutter to expose correctly, most likely underexposing by 1/3 stop. Note - since the
camera is moving, the exposure will change slightly - this is expected, but and dark and lighter
pictures make an interesting shot. The goal is keep most pictures exposed within about 1 stop
of correct exposure. If you change this setting, it will be noticeable in the final film by camera
shake and/or jumps in lighting that are almost impossible to correct in post.
8. Put camera in manual focus mode! I usually do this by taking a picture on auto, then turning off
the focus. If you just select infinity for the focus, it might not be right. Do this as one of the
last steps, as the aperture setting can affect the focus point. I also have had good luck using
"live view" to focus manually using 10x magnification.
9. Set the Quality to be - Small - Fine - bigger is not better here - we don't need 18 or 21 MP shot
to make time lapse high def movies - it will eat memory and take a lot longer to edit! SMALLFINE!! or whatever setting will get you as close to high definition footage as possible without
going under 1920x1080. This equates to about a 2MP picture.
10. Take a couple sample pictures and review the histogram - adjust shutter speed as required consider taking pictures at several angles for you scene to ensure you don't start in the dark
area, exposed correctly and wash out the last half of you composition. I don't suggest it, but
you can change SHUTTER speed a click or two during the shot, but this will be noticeable.
11. Set Review time to be off - saves the camera battery.
12. Turn off the camera for now
eMotimo PT Instructions Firmware1_4 Rev1
Copyright © 2011 eMotimo LLC
Page 5
Charging eMotimo PT's battery/ charger (optional)
1. Lead Acid Batteries should not cycle below 11.9 volts. Depending on shooting parameters, this
is typically 4-6 hours of use. Ensure the blade terminals are connected correctly to the battery
(red blade is positive, clear/silver is neg). Connect the female barrel plug from the charger to
the male plug attached to the battery.
2. The Red LED will light to indicate the battery is charging. If no LED lights, then disconnect
immediately and check polarity.
3. When fully charged a green LED light on the charger will light up. This will typically take 2-6
hours. When charged, disconnect the battery from the charger.
WARNING - DO NOT CHARGE THE BATTERY UNATTENDED.
AS WITH ANY BATTERY TAKE CARE TO ENSURE THAT THE TERMINALS ARE NOT SHORTED
(CONNECTED BY A CONDUCTOR). A SHORTED BATTERY CAN CATCH FIRE, EXPLODE, AND
POTENTIALLY CAUSE INJURY OR DEATH.
Transporting optional SLA battery
BE ESPECIALLY CAREFUL WHEN TRANSPORTING THE BATTERY TO PREVENT SHORTS. EITHER
REMOVE BOTH WIRES FROM THE BATTERY AND BLOCK OR TAPE THE TERMINALS, OR LEAVE
BOTH WIRES ATTACHED AND ENSURE THE BARREL CONNECTOR CANNOT COME INTO
CONTACT WITH THE BATTERY TERMINALS. NEVER REMOVE JUST ONE LEAD OF THE BATTERY
FOR TRANSPORT AS THIS LEAVES AN OPEN TERMINAL THAT CAN BE SHORTED.
90 Day No Questions Asked Warranty: We'll fix or replace anything that suffers from a
defect in manufacturing or assembly. We do not warranty damage incurred in handling or
shipping.
eMotimo PT is a tool that is meant to be hacked, but if you do disassemble or modify eMotimo
PT, the warranty will not apply. Reach out to us to help us understand what you are trying to
do so that we can offer advice.
UNDER NO CONDITIONS WILL WE ACCEPT LIABILITY FOR ANY AMOUNT HIGHER THAN
THE ORIGINAL PURCHASE PRICE OF THE PRODUCT IN QUESTION.
If you do have to return something rest we will do everything possible to make it right for you.
Please reach out to us at [email protected] before you ship anything back for service.
Best regards,
Brian Burling - eMotimo Founder
eMotimo PT Instructions Firmware1_4 Rev1
Copyright © 2011 eMotimo LLC
Page 6