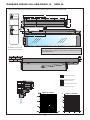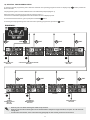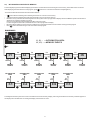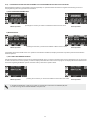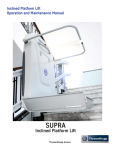
1
INSTALLATION MANUAL 2014 PREMIS Technical Help Line Tel 01275 871787 Sales : 01275 871787 Fax : 01275 870692 Email: [email protected] Website: www.adsf.co.uk : Premis 120 (120 Kg) Motorized opening - spring closing Premis 250 (250Kg) Motorized opening - spring closing a Design with Quality in mind NAVARRA Puertas Automatic Doors INDEX: GENERAL SAFETY WARNINGS GENERAL SAFETY OBLIGATIONS 4 5 1) MODEL DESCRIPTION 2) TECHNICAL SPECIFICATIONS page 4 5 MECHANICAL SECTION 3) COMPONENTS OF THE Premis OPERATOR 4) PRELIMINARY CHECKS 6 5) 8 7 ARMS ASSEMBLY OF THE OPERATOR ON THE LINTEL FROM THE SIDE OPPOSITE OF THE HINGE Premis L6 ASSEMBLY OF THE OPERATOR ON THE DOOR LEAF FROM THE HINGE SIDE Premis L6 6) PUSH ARM PUSH ARM 9 10 ASSEMBLY OF THE OPERATOR ON THE LINTEL FROM THE HINGE SIDE PREMIS SLIDE PULL ARM 11 ASSEMBLY OF THE OPERATOR ON THE LINTEL FROM THE HINGE SIDE PREMIS ELBOW ARM DEEP RECESS 12 MOVEMENT TRANSMISSION ARMS 13 6.1) PREMIS SLIDE PULL ARM 13 6.2) PREMIS ELBOW SLIDING ARM 13 6.4) SLIDING GUIDE FOR PULL ARM 14 6.5) ARTICULATED PUSH ARM 14 6.6) EXTENSION FOR PREMIS 5 15 15 7) PREPARING AND ASSEMBLING THE OPERATOR 7.1) REQUIRED TOOLS 16 16 7.2) OPERATOR CONTROL 16 7.3) OPERATOR ASSEMBLY 17 7.4) SELECTING THE SPRING LOAD (only for operators Premis 120 - 250) 17 7.5) INSERTING THE ARM'S TAPERED PIN 17 7.6) RELEASING THE SPRING (only operators Premis 120 - 250) 17 8) REMOVING THE ARM 18 9) HOW TO RESET THE SPRING PRELOAD (only operators Premis 120 - 250) 19 2 ELECTRONIC SECTION 11) 12) 13) 14) 15) 16) ELECTRIC ARRANGEMENTS ELECTRIC CONNECTIONS PWN-T POWER SUPPLY MODULE AND ELECTRIC WIRING PREMIS LOGIC BOARD 20 PREMIS DIGITAL PROGRAMMER – SCOPE AND CONNECTIONS COMMISSIONING OF AUTOMATED DEVICE (INITIAL SET-UP) 26 16.1) FIRST START OF PREMIS DIGITAL PROGRAMMER 16.2) USE OF PREMIS DIGIT AL PROGRAMMER 16.3) SERIAL COMMUNICATION SET-UP 16.4) INITIAL SET-UP SINGLE DOOR 16.5) FUNCTIONAL TESTING 16.6) INPUTS DIAGNOSTICS 17) PROGRAM SELECTORS 21 24 26 27 27 27 27 28 30 30 31 17.1) MANUAL PROGRAM SELECTOR 17.2) PREMIS MECHANICAL KEY SELECT OR 17.3) PREMIS DIGIT AL PROGRAMMER USED LIKE PROGRAM SELECTOR 18) GENERAL PROGRAMMING MENU 19) FUNCTIONS AND REGULATIONS 31 31 32 34 35 19.1) FUNCTIONS SETTING 19.2) PARAMETERS SETTING 35 39 20) LANGUAGE 21) PASSWORD MANAGEMENT 43 43 21.1) HOW TO CHANGE THE TECHNICAL PASSWORD 21.2) HOW TO CHANGE THE PRIMARY PASSWORD 21.3) HOW TO CHANGE THE SERVICE PASSWORD 21.4) ENABLING USER (primary and service) PASSWORD USAGE 21.5) DEACTIVAING THE USER PASSWORD USAGE 22) INFORMATION AND EVENTS MEMORY 23) MAINTENANCE 24) ELECTRIC LOCK APPLICATION 44 44 45 46 46 47 50 50 24.1) ELECTRIC LOCK / ELECTRIC STRIKE 24.2) MAGNETIC LOCK 50 51 25) SAFETY SENSOR DEVICES 51 25.1) SENSOR OA-EDGE T 25.2) SENSOR 4SAFE ON SW 25.3) SENSOR TOPSCAN-S 51 51 51 26) PREMIS BATTERY MODULE 27) DISABLED PEOPLE COURTESY FUNCTION 28) ADSF LARCO RADIO RECEIVER 29) DOUBLE LEAF DOOR SETUP 53 53 54 55 29.1) ELECTRICAL WIRING FOR A DOUBLE LEAF DOOR SET 29.2) DOOR SET-UP 29.3) FUNCTIONAL TESTING 29.4) PEDESTRIAN OPENING 29.5) CONSIDERATION ON THE USE OF THE PREMIS S12 PROGRAMMER IN A DOUBLE DOOR SYSTEM 30) INTERLOCK SYSTEM 55 55 58 58 59 60 30.1) INTERLOCK ELECTRIC CONNECTION 30.2) INTERLOCK APPLICATION WITH INDEPENDENT INTERNAL RADAR 30.3) INTERLOCK APPLICATION WITH ONLY ONE INTERNAL RADAR 30.4) INTERLOCK APPLICATION WITH ELECTRIC-STRIKE DISABLED ON CLOSED DOORS 31) MEANING OF THE ACOUSTIC SIGNAL 32) MAINTENANCE PROGRAM 60 60 61 61 62 62 3 GENERAL SAFETY WARNINGS Carefully read this instruction manual for the safe installation and operation of the automatic door. Improper installation and incorrect use of the product could cause serious injury. Keep the instruction manual for future reference. The installer must provide all the information about operation and provide the system user with the user manual delivered with the product. MEANING OF THE SYMBOLS USED IN THESE INSTRUCTIONS DANGER: Indication of dangerous situations that could cause material damage and personal injury. WARNING: Identifies the procedures that must be understood and followed to prevent product damage or malfunctions. NOTE: To point out and place attention on important information. GENERAL SAFETY OBLIGATIONS The mechanical and electric installation must be performed by specialised personnel in accordance with current directives and regulations. The installer must make sure that the structure to be automated is stable and robust and if necessary, make it this way by making structural modifications. Keep product and packaging materials out of children's reach, as they might be a source of danger. Do not let the children stay or play within the range of the door. This product was designed and built exclusively for the purpose described in this documentation. Any other use that is not specifically indicated could adversely impact the condition of the product and the safety of people. ADSF accepts no responsibility for incorrect product installation and usage, as well as for any damages caused by changes made without its prior consent. ADSF is not responsible for the construction of the fixtures to be motorised. The IP31 degree of protection requires that the operator is installed only on the inner side of buildings. This product cannot be installed in explosive environments or atmospheres, or in the presence of flammable gases or fumes. Make sure that the characteristics of the electric distribution network are compatible with the technical data indicated in this manual and that upstream of the system there is an omnipolar switch with an opening distance of the contacts of at least 3mm and a residual current device. Connect the ground conduit of the electric system. The automatic door must be checked, started up and tested by skilled and well-prepared personnel. A technical dossier must be prepared for every automation as required by the Machine Directive. Disconnect the power supply before working on the automation and before opening the cover. Maintenance is of fundamental importance for the proper operation and safety of the automation. Check the efficiency of all parts every six months. Use only original spare parts for maintenance and when replacing product components. Cleaning operations must be performed with the power supply disconnected, using a damp cloth. Do not deposit or let water or other liquids penetrate into the operator or the accessories that are part of the system. It is recommended to take out a maintenance contract. Risk assessment The automatic swinging doors must be designed and installed in a way to protect users against the risk and danger of crushing, impact and shearing between the door and adjacent parts near the door. The person responsible for starting-up the automation must perform a risk assessment based on the place of installation and the type of users that could use the automatic door. The operator can be adjusted in order to satisfy the Low energy requirements (movement force and speed control), as indicated by standard EN16005; however, if the door will be used by the elderly, children or disabled individuals, protective devices (sensors) that comply with standard EN12978 must be installed. A = Main closing edge B = Secondary closing edge C = Opposite closing edge The dangers of crushing and shearing related to the secondary closing edge must be prevented either structurally or by supplementary protective measures (rubber covers, for example). Any residual risks must be properly signalled. 4 1) MODEL DESCRIPTION The operators have an electro-mechanical motor for opening the pedestrian swing doors. Depending on the type of operator, reclosure is performed with a spring or a motor. The electronic control equipment is located inside the operator. A list of the operator models for swinging doors produced by ADSF is provided below: • PREMIS - 120 with reclosing spring, for maximum leaf weight of 120 Kg. • PREMIS - 250 with reclosing spring, for maximum leaf weight of 250 Kg. All operator models can be used with a slide pull arm or with an articulated push arm. The model is to be selected based on the weight and length of the door leaf, the type of reclosure (spring or motor-only) and if an emergency battery is required. The operator must be installed in indoor environments. All models are reversible, therefore in the case of a power failure the door can be opened manually. Before starting with assembly check the technical drawings in paragraph 5. A drawing of the application is provided for every type of arm, with the installation dimensions and a chart that provides the weight limits based on the length of the door leaf, depending on the operator model. The technical data provided in the charts refers to a typical installation, but the data can be influenced by variables present in every system, such as friction, environmental conditions, alignment of the leaf hinge, etc.... 2) TECHNICAL SPECIFICATIONS POWER SUPPLY POWER POWER SUPPLY OF EXTERNAL ACCESSORIES ELECTRIC MOTOR OPERATOR DIMENSIONS (LxHxD) WEIGHT models Premis 120 - 250 PROTECTION DEGREE AMBIENT TEMPERATURE FREQUENCY OF USE LIMIT SWITCH AND ANTICRUSHING SAFETY REACTION TO OBSTACLES OPENING TIME for 95° CLOSING TIME for 95° PAUSE TIME 115/230Vac +/-10%, 50-60Hz 120W 24Vdc, 1A 24Vdc 550 x 110 x 120 mm 9.5 Kg. IP31 -15°C +50°C continuous encoder controlled reversal of direction 4 - 12 seconds adjustable 5 - 15 seconds adjustable 0 - 20 seconds adjustable REFERENCE VALUES FORCE PREMIS 250 PREMIS 120 ARTICULATED ARM SLIDING ARM ARTICULATED ARM SLIDING ARM Min Max Min Max Min Max Min Max MANUAL CLOSING TORQUE (Nm) 14 26 14 24 14 26 14 24 AUTOMATIC CLOSING TORQUE (Nm) 14 65 14 65 14 140 14 140 MANUAL TORQUE TO OPEN (Nm) 22 32 20 30 22 32 20 30 AUTOMATIC OPENING TORQUE (Nm) 22 65 22 65 22 140 22 140 5 MECHANICAL SECTION 3) COMPONENTS OF THE OPERATOR 1 2 3 4 5 6 7 8 9 10 LOGIC CARD PWN-T ELECTRICAL WIRING AND POWER SUPPLY CARD RECLOSURE SPRING (models Premis 120 - 250 SPRING PRELOAD REFERENCE LINE GEARMOTOR WITH ENCODER MOTION TRANSMISSION SHAFT OUTPUT INNER WIRING BETWEEN THE L-NEP and PWN-T CARDS SPRING PRELOAD LOCKING SCREW PLASTIC PLATE TRANSFORMER 6 4 GENERAL SAFETY RECOMMENDATIONS Only begin to install the actuator after you have carefully read this instruction manual. Both the mechanical part and the electrical part must be installed in a perfectly workmanlike manner, in compliance with the current laws in force. Failure to comply with these latter may result in danger hazards for persons or property. The installer must be a competent person who has been adequately trained. He must check to make sure that the structure on which the actuator is installed is strong and stable. If necessary, structural modifications must be made to strengthen it. The installer must also check that all zones where there is a risk of crushing, dragging, shearing or other dangers, are protected by means of electronic safety devices, safety freeboards or barriers. These devices must be installed in compliance with the current laws and in a perfectly workmanlike way, also in relation to the place of use, the type of use and the operating logic of the product. The forces developed by the complete system as it operates must comply with the current standards and, where this is not possible, the zones affected by these forces must be protected with electronic safety devices. Moreover, dangerous zones must be indicated, as established by the current laws in force. Before the actuator is connected, make sure that the electricity main possesses characteristics that are compatible with those described in the technical specifications of this manual, and that there is a differential circuit-breaker and adequate protection against overcurrents on the supply side of the system. Remember to turn off the power supply before installing or servicing the actuator and whenever the cover must be opened. Electrostatic charges can damage the electronic components on the boards. Wear a grounded antistatic bracelet if you must work on the electronic boards. Never place the hands or other parts of the body in moving parts, such as belts, pulleys, gears, etc. Servicing the actuator is of fundamental importance if the system is to operate correctly and safely. The periodical check of the efficiency of all parts should be carried out every 6 months. ADSF UK LTD declines all liability for improper installation or use of the product, or for damage deriving from unauthorized modifications to the system. Only use genuine spare parts if replacements or repairs are required. The manufacturer cannot be held liable for the way the doors or gates to be automated are constructed, or for damages caused by failure to build the doors and gates in compliance with good workmanlike techniques. Protection degree IP32 requires that the actuator only be installed inside buildings. ADSF UK LTD declines all liability for damage caused by assembly on the outside, without adequate protections. Always make sure that the product is in a good condition before it is installed. This product cannot be installed in places with an explosive atmosphere or in the presence of inflammable fumes or gases. This product must be disposed of according to the current laws in force at the end of its useful life. Do not leave parts of the product or its packaging within children’s reach, as they could become a danger hazard. Do not stay within the range of the door and do not impede the door movement voluntarily. Do not let the children stay or play within the range of the door. (ADSF UK LTD) is the trading name of Auto Doors & Shopfronts UK LTD 7 6.0 ARMS ARTICULATED PUSH ARM L6 STANDARD SLIDING PULL ARM L5 DEEP RECESS 250mm PULL SLIDING ARM S7 8 ARTICULATE PUSH ARM PREMIS L6 Make use of the articulated arm for automations that open toward the outside as seen from the operator side FOR DOORS OPENING OUT (standard) A 546 X=12.5 mm 261 23 123 115 115 123 69 106 With Ext Pivot 18.5 X A+C X=60.5 mm 37 12 6 261 220 50 A= Standard Pivot connection For this application consider that the PWN cabling board must be on the door hinge side, in order to ensure the correct direction of the opening movement. C= 50mm Extension (optional) 261 220 Utilizable Length and weight Utilizable Length and weight with different fixing sizes 1) NOT Utilizable Length and weight 0 ....250 mm 1) Fixing drawings available on request PREMIS 250 DIAGRAM Kg PREMIS 120 DIAGRAM 150 120 100 50 Arm will extend up to 250mm for deep recess 0 9 mm 500 1000 1500 ARTICULATE PUSH ARM PREMIS L6 OPERATOR FITTED ON THE LEAF (HINGE SIDE) For doors that open inwards (seen from the operator side) (standard) LEAF OPENING IN CABLE PASSAGE SLOT Standard operator Operator with battery module A = STANDARD TAPERED PIN If it is necessary to increase the distance between the operator and the arm (dimension X), replace the standard tapered pin with the following optional extensions: B = PREMIS S 5 EXTENSION (optional) FOR TAPERED PIN for mm.48 shaft extension For this application, please consider that the PWN-T wiring card board must be on the hinged side of the door for a correct movement direction when opening. Usable leaf length and weight OPENING DIRECTION UNUSABLE leaf length and weight PREMIS 250 DIAGRAM 10 PREMIS 120 DIAGRAM STANDARD SLIDING PULL ARM PREMIS L5 OPEN IN Make use of the sliding arm for automations that open toward the inside as seen from the operator side 546 (standard) A 261 X=51.5 mm 23 123 115 115 123 69 106 18.5 A+C X=99.5 mm 12 X 0..200 9 mm 20.5 261 A= Standard Pivot connection C= 50mm Extension (optional) For this application consider that the ratiomotor must be on the door hinge side, in order to ensure the correct direction of the opening movement. Utilizable Length and weight Utilizable Length and weight with different fixing sizes 1) NOT Utilizable Length and weight 1) Fixing drawings available on request PREMIS 250 DIAGRAM Kg PREMIS 120 DIAGRAM 150 120 100 50 0 11 mm 500 1000 1500 S6 DEEP RECESS 150mm - 250mm PULL SLIDING ARM OPEN IN Make use of the bent arm for automations that open toward the inside as seen from the operator side (standard) A X=51.5 mm A+C X=99.5 mm A= Standard Pivot connection C= 50mm Extension (optional) For this application consider that the ratiomotor must be on the door hinge side, in order to ensure the correct direction of the opening movement. Utilizable Length and weight Utilizable Length and weight with different fixing sizes 1) NOT Utilizable Length and weight 1) Fixing drawings available on request PREMIS 250 DIAGRAM Kg PREMIS 120 DIAGRAM 150 120 100 50 0 12 mm 500 1000 1500 6) MOVEMENT TRANSMISSION ARMS 6.1) PREMIS S5 SLIDE PULL ARM a) b) c) d) e) f) 6.2) Insert the M8 x 70 screw (2) in the tapered pin (1) Insert the sliding arm (3) in the closed shell (4) Insert the tapered pin (1) above the sliding arm (3), through the closed shell (4) Strongly tighten the M6 x 30 screws (5) to block the sliding arm (3) on the tapered pin (1) For the assembly of the sliding guide, see paragraph 6.4 The pin (6) must be inserted in the sliding guide runner PREMIS S7 DEEP RECESS SLIDING ARM a) b) c) d) e) f) g) Insert the M8 x 70 screw (2) in the tapered pin (1) Insert the long rod of the arm (4) in the closed shell (3) Insert the tapered pin (1) above the long rod of the arm (4), through the closed shell (3) Strongly tighten the screws M6 x 30 (5) to block the long rod of the arm (4) on the tapered pin (1) Insert the rods, long (4) and short (6) in the bush (7) and fasten them with the M10 x 6 screws (8) For the assembly of the sliding guide, see paragraph 6.4 The pin (9) must be inserted in the sliding guide runner SEE PAGE 14 FOR SLIDE CHANNEL 13 6.4) SLIDING GUIDE FOR PULL ARM a) Fix the sliding guide (1) on the leaf through the holes (6-7), following the dimensions indicated in the technical drawings in paragraphs 5.1, 5.2, 5.3. b) Insert the runner (3) for the pull arm tapered pin inside the sliding guide. c) Insert the striker (5) inside the sliding guide and fix it in the end of stroke opening position using the dowel. d) Position the cover casing (2) on the sliding guide (1). e) Insert the two side panels (4) on the ends of the sliding guide. 6.5)PREMIS L6 ARTICULATED PUSH ARM a) Insert the M8 x 70 screw (2) in the tapered pin (1) b) Insert the lever arm (3) in the closed shell (4) c) Insert the tapered pin (1) above the lever arm (3) through the closed shell (4) d) Strongly tighten the M6 x 30 screws (5) to block the lever arm (3) on the tapered pin (1) e) Fix the arm plate (9) on the leaf or on the lintel using two screws according to the dimensions indicated in the technical drawings in paragraphs 5.4 or 5.5 f) Adjust the length of the telescopic arm (7-8) and tighten the screws (6) 14 6.6) PREMIS S5 PIVOT EXTENSIONS 50mm Use the PREMIS S5 extension if a larger distance is required between the operator and the arm in comparison to what can be obtained using the standard and premis tapered pins. Couple the extension to the standard or PREMIS S5 tapered pin (depending on the distance to be reached, see the technical drawings in par. 5). For the assembly, follow the steps shown in the following figures: couple the PREMIS extension with the tapered pin and insert the central screw (E), tighten the two M6 X 65 side screws (F), insert the extension in the arm and tighten the two M6 X 20 screws (G). E F G 15 7) PREPARING AND ASSEMBLING THE OPERATOR 7.1) Required tools: Tape measure, drill, level, thin flat-head screwdriver, medium-sized flat-head screwdriver, large cross-head screwdriver, Allen wrenches with handle (sizes 2.5 – 4 - 5 – 6), flat-head wrench 10. 7.2) Operator control Remove the operator from its packaging and remove the screws retaining the cover. Remove the aluminium cover from its seat, pulling it firmly upwards and without applying pressure on the sides, if possible. The operator foresees the possibility of connecting the arm on both sides of the mechanical body and therefore makes it possible to select the opening movement direction. The ARROW located on the mechanical body at the shaft outlet indicates the opening direction. Identify the correct side for connecting the pin, based on the type of arm used and the type of operator assembly. Carefully review the technical drawings in paragraph 5. Do not remove the spring preload locking screw! Operators with a built-in spring have a spring preload locking screw that keeps the pulley locked, making it possible for the screw to remain in its preloaded position (factory setting). Removing the spring preload locking screw would make the pulley and gears move inside the operator, representing a hazard to fingers or other body pars near the moving components. The spring preload locking screw must not be removed before completing installation and connecting the arm to the leaf and the operator shaft output to prevent the spring from being released. Follow the instructions to be certain to correctly perform all the assembly phases. 16 7.3) Operator assembly Based on the arm to be used and the operator fixing position, refer to the relative assembly table (par. 5.1 to 5.5), which indicates where the holes must be made for the assembly of the operator and the drive arm. For arm assembly refer to paragraph 6. To fix the devices use the screws and anchors suitable for the type of support. After fixing the operator and arm, follow the next steps for connecting the arm pin to the shaft output of the operator . 7.4) Selecting the spring load for operators PREMIS 120 AND 250 The closing spring is preloaded in the factory to a standard value, which is indicated by the alignment of the red line on the belt with the red mark on the pulley. Select the spring reclosing force according to the following rule: • Connect the arm to the operator output shaft with the leaf completely open to obtain a low reclosing force (minimum spring load). • Connect the arm to the operator output shaft with the leaf in an intermediate position to obtain a medium reclosing force (medium spring load). • Connect the arm to the operator output shaft with the leaf completely closed to obtain a high reclosing force (maximum spring load). 7.5) Inserting the arm's tapered pin Make sure that the plastic plate is inserted in the operator's mechanical body where the output shaft is located, before inserting the arm's tapered pin. There are wedges in the arm's tapered pin that must be perfectly matched with those in the operator output shaft. These serve the purpose of making sure that the arm's tapered pin always moves together with the operator's motion transmission shaft. Insert the arm's tapered pin in the operator output shaft making sure that the wedges in the two parts are correctly matched and then firmly tighten the screw fixing the arm's tapered pin. 7.6) Releasing the spring for operators PREMIS 120 AND 250 During this operation, the operator and arm pulleys can move. Keep fingers and body parts away from the moving components during this operation and keep the leaf blocked manually. 17 Move the spring locking screw from the locked position to the free position. The door leaf is free to close due to the force of the spring. Make sure that the door closes completely even when open only a few degrees. If leaf movement is regular along the entire stroke, both when opening as well as when closing, continue with the electrical connections as described in the electronic part section of the paragraph “Electric connections”. If the spring load must be increased or reduced, remove the arm from the operator. This operation is described in the following paragraph. 8) REMOVING THE ARM PREMIS 120 AND 250 Carefully follow the steps described below to remove the arm. In particular, unscrew the screw fixing the tapered pin only after the spring has been locked. The removal of the tapered pin's fastening screw can cause the movement of pulleys and gears present in the automation if the closing spring has not been locked in advance. Keep your fingers and other parts of your body clear from the moving components during this operation. REPOSITIONING TO STANDARD PRELOAD Before removing the arm, re-establish the standard spring load value (factory setting). To do this, manually move the leaf until the red line on the belt is aligned with the red mark on the pulley. Spring locking Move the spring preload locking screw from the free position to the locked position, making sure that the screw is inserted in the pulley. REMOVING THE TAPERED PIN Insert the Allen wrench (6mm.) inside the hole of the tapered pin without removing the arm rod. Unscrew the arm's fastening screw, applying greater force in the final phase in order to remove the tapered pin. Repeat the steps described in par. 7.4, 7.5 and 7.6 to select the spring reclosure force and to connect the arm. 18 10) HOW TO RESET THE SPRING PRELOAD (only for models PREMIS 120 AND 250 ) Read this paragraph only if the reclosing spring must be unloaded due to the failure to comply with the correct installation procedures. The automatism is supplied with the reclosing spring preloaded to a standard value, which is indicated by the alignment of the red mark on the belt with the red mark on the pulley (see figure to the side). If during installation the arm is accidentally disconnected without first returning and blocking the spring in the standard position with the locking screw, the spring will be loaded below its standard value. To return it to the correct position, carry out the following steps carefully: a) Completely disconnect the arm from the outlet pin, if it is still inserted. b) Make sure that the manual program selector on the side of the operator is located in the central “0” position. c) Connect the power supply (see the ELECTRIC CONNECTIONS paragraph) d) Delete the set-up if it was already stored in the operator control unit (see paragraph 23: “MAINTENANCE”) e) Press and hold down the PS1 button (START) on the PWN-T card, the control unit will beep 5 times and start the spring loading manoeuvre. Return the spring load to the standard value indicated by the alignment of the red mark on the belt with the red mark on the pulley (see figure to the side). Once the position is reached, release the PS1 button. If the spring goes beyond the level indicated by the red line during the operation, it can be slowly unloaded by moving the manual program selector to position I . In position II , the spring is quickly rewound! Keep fingers and body parts away from moving components. f) g) Move the locking screw from the free position to the locked position, paying attention that the screw is inserted in the pulley. After this operation, the initial set-up must be repeated (see the INITIAL SET-UP paragraph). 19 ELECTRONIC SECTION 11) ELECTRIC ARRANGEMENTS 2 NOTE: The grey part indicates the survey zone of radar and sensors. The number of cables and the relevant section in mm is indicated for every device. 7 1 6 5 4 8 9 1 2 3 4 5 6 7 8 9 3 EXTERNAL RADAR (4x0,5mm) INTERNAL RADAR (4x0,5mm) OPENING CONTROL (2x0,5mm) PROGRAM SELECTOR (4x0,5mm) SAFETY SENSOR FOR CLOSING (6x0,5mm) SAFETY SENSOR FOR OPENING(6x0,5mm) PREMIS OPERATOR (mains power supply 3x1,5mm) ELECTRIC LOCK (2x1mm) FLOOR STOP The power supply line must be protected against short circuit and dispersion to ground. On the power supply mains, provide for an omni-polar switch/selector with contact opening distance of at least of 3 mm. Use self-extinguishing cables for electric connections. Separate the mains power supply line from the very-low voltage line relative to control and safety accessories. On the plastic side panels of the PREMIS operator there are the holes that must be broken open, through which the electric cables must be inserted. The installer must make the power supply cable stable inside the operator and, particularly, limit the peeling of cable primary sheath so that the air and surface distances are not reduced if a connector detaches from the terminal. If operator is installed on a door leaf, perform electric connection by a branching box with suitable flexible unions and pipes, available on the market. 20 273 12.1) EXAMPLE WIRING FULLY AUTOMATIC SYSTEM 40/ 4044! 76<=$ 2 4 7 2 7 6 @ 7: 7@ 7E 7B= 7F ,, 2@ > 2D 2E 7< F 2< Emergency Open Device 72 26 2B 2: 2F E 27 E 22 6 / @ D 7D 6 D B : B START/STOP FUNCTION H 7B= PROGRAMMER PREMIS S12 273 12.2) EXAMPLE WIRING WITH HARD WIRE PUSH PADS 40/ 4044! BEA 4 SAFE EXTERNAL 76<=$ BEA 4 SAFE EXTERNAL 2 4 7 2 7 6 @ 7: 7@ 7E 7B= 7F ,, 2@ > 2D 2E 7< F 2< Emergency Open Device 72 26 2B 2: 2F E 27 E 22 6 / @ D 7D 6 D B : B START/STOP FUNCTION H 7B= PROGRAMMER PREMIS S12 22 273 12.2) EXAMPLE WIRING WITH LARCO WIRELESS RECIVER 40/ 4044! BEA 4 SAFE EXTERNAL 76<=$ BEA 4 SAFE EXTERNAL 2 4 7 2 7 6 @ 7: 7@ 7E 7B= 7F ,, 2@ > 2D 2E 7< F 2< Emergency Open Device 72 26 2B 2: 2F E 27 E 22 6 / @ D 7D 6 D B : B START/STOP FUNCTION H 7B= PROGRAMMER PREMIS S12 23 13) PWN-T POWER SUPPLY MODULE AND ELECTRIC WIRING VOLTAGE CHANGE 115V 230V GROUND 115/230V OPEN S12 In case of 230Vac mains voltage, put the 4-pole connector of the transformer primary in the J3 connector (230V) of PWN-T board (factory setting). In case of 115Vac mains power supply, put the 4-pole connector of the transformer primary in the J2 (115V) connector of PWN-T board. TERMINAL BOARD M1 230 Vac power supply: phase to terminal F, neutral to terminal N, ground connection with terminal ground symbol. Ground the operator by connecting the ground cable from the line to the Faston connector on the plate the PWN-T board is fastened to. A cable, connected with ground terminal of PWN-T board, is connected with the second faston. The electric line is protected by 2A fuse F1. TERMINAL BOARD M2 Terminals 1-3-4 MANUAL PROGRAM SELECTOR, located on operator side panel (factory wiring): closed contact on position I to terminal 1 (AUX1); central contact to terminal 3 (common); closed contact on position II to terminal 4 (AUX2); For more information on the operating modes of manual program selector, refer to "Program selectors" paragraph. Terminals 2-3 Input of SAFETY SENSOR FOR CLOSING, N.C. contact. The operation of safety sensor for closing must be enabled by PREMIS S12 digital programmer (function F18 ON). The activation during closing provokes the door reopening. Terminals 5-7 Input of SAFETY SENSOR FOR OPENING, N.C. contact. The operation of safety sensor for opening must be enabled by PREMIS S12 digital programmer (function F18 ON). The activation during opening stops the door leaf movement; when the sensor deactivates, the opening restarts at low speed. Terminals 6-7 OPEN input. Input contact logic state can be selected as N.O. (default condition) or N.C. by PREMIS S12 digital programmer (function 30). The activation allows opening the door of all operating programs. Ideal for emergency input signal. 24 TERMINAL BOARD M3 Terminals 8-11 EXTERNAL RADAR input, N.O. contact. It controls the door opening. It is not active when the program selector is on “Exit only” and “Night lock”. Terminals 9-11 INTERNAL RADAR input, N.O. contact. It controls the door opening. It is not active when the program selector is on “Entrance only” and “Night lock”. Terminals 10-11 START input, N.O. contact. It controls the door opening , for stop /start function It is not active when the program selector is on “Night lock”. TERMINAL BOARD M4 Connection of PREMIS S12 digital programmer . Terminal 12 = - GND (power supply negative); Terminal 13 = signal line A; Terminal 14 = signal line B; Terminal 15 = + 13V (power supply positive). TERMINAL BOARD M6 Terminal 25 TEST output for safety sensors set for monitoring. For more information, refer to "Safety sensors" paragraph. Terminals 26-27 AUX 3 input, N.O. contact. It is enabled in applications with interlock (function F26 = ON and F29 = ON). It controls the door opening in all operating programs. For more information, refer to "Interlock system" paragraph. Terminals 28-29 Open Collector output of door status, it activates with open door and deactivates with closed door. Connect a max. 100mA charge between 29 (O.C.) and 28 (positive + 24V) terminals. In Interlock function (F26=ON), terminal 29 is used for connection of interlock operation; for more information, refer to “Interlock system” paragraph. TERMINAL BOARD M7 Terminals 16 (negative) - 17 (positive) 24Vdc output, max. 20W, for the power supply of control and safety sensors. Led 2 ON indicates the proper operation of output. TERMINAL BOARD M8 Terminals 18-19-20 Free contact of relay RL1 for electric lock connection; (18 = Common, 19 = N.O., 20 = N.C.). Terminals 16 (negative) - 21 (positive) 24Vdc output for electric magnet or electric lock power supply. For more information, refer to "Applications with electric lock" paragraph. CONNECTORS Connector J1 Connector J2 Connector J3 Connector J4 Connector J5 Connector J6 = transformer secondary (factory wiring). = transformer primary (for 115V mains voltages). = transformer primary (for 230V mains voltages, factory wiring). = wiring of electric signals to connector J10 of L-NEP logic board. = wiring of motor power supply to connector J11 of L-NEP logic board. Led 1 ON indicates the presence of output voltage. = connection with PREMIS battery module (see PREMIS S3 battery module”) 25 14) LOGIC BOARD PART DESCRIPTION Connector J7 Connector J8 Connector J10 Connector J11 Connector J12 Jumper J13 Connector J14 Jumper J15 Led 3 – Led 4 Led 5 Buzzer MP1 Mp2 SW1 = PREMIS wiring for Master Slave communication in two-leaf swing door. For more information, refer to "DOUBLE LEAF DOOR SET" paragraph. = encoder wiring insertion. = wiring of electric signals from connector J4 of PWN-T module. = wiring of motor power supply from connector J5 of PWN-T module. = insertion for EN/RF1 radio receiver. For more information, refer to "EN/RF1 radio receiver" paragraph. = it selects the logic status of safety sensor monitoring signal. For more information, refer to "Safety sensors" paragraph. = motor wiring insertion. = it selects two speed levels for door closing without power supply. For models PREMIS 120 and 250 with closing spring only. Jumper J15 activated = low speed. Jumper J15 deactivated = high speed. = display of encoder signals. = display of MP1 microcontroller operation (micro A): led on = correct operation; led off or slowly flashing = fault on logic board. = warning buzzer. = microcontroller “A” = microcontroller “B” = dip-switch for operator type selection: 1 OFF / 2 OFF = single leaf operator or Master operator in double leaf 1 ON / 2 OFF = Slave operator in double leaf 15) PREMIS S12 DIGITAL PROGRAMMER – SCOPE AND CONNECTIONS The S12 digital programmer is a tool necessary to the installer to configure the operation of the automatic door and perform the set-up of operations, functions and parameters, to perform system diagnostics and have access to events memory containing information on automated device and its operation. Access to the programming menu is protected by safety technical password so that specialized and authorized personnel only can operate on the automated device. The S12 digital programmer can also be used by the final user, but only for choosing the operating mode of automatic door; the user can also select the preferred language and set up a user password to prevent the use of digital programmer by unauthorized persons. Connect The S12 digital programmer to PWN-T module of the PREMIS operator by 0.5mm 4-conductor cable. Terminal +13V Terminal Terminal A Terminal B = connect to terminal 15 of PWN-T board (+13V); = connect to terminal 12 of PWN-T board (- GND); = connect to terminal 13 of PWN-T board (A); = connect to terminal 14 of PWN-T board (B); B A For each subject-matter described in the following paragraphs the use of digital programmer (hereinafter PREMIS S12) is explained in the specific case. 26 CN2 +13 - 16) COMMISSIONING OF AUTOMATED DOORS (INITIAL SET-UP) FOR SINGLE DOOR'S SEE PAGE 28 FOR DOUBLE DOOR SET'S SEE PAGE 55 After completing the mechanical installation and performing electric connections, manually shift the door leaf for its entire stroke, to ensure that no friction appears on the movement. SET-UP operation is compulsory to allow the operator electronic control unit to acquire stroke points. When the set-up begins, the door must be closed and during the stroke learning cycle, no obstacle shall appear in the leaf movement area. The PREMIS operator is equipped with a function allowing it to learn the position of the side wall during the initial set-up. This function is useful as it allows to store the wall position at the end of the opening stroke, and as a consequence to precisely set the point at which the tripping of the opening safety sensor causes the leaf to decelerate in the last few degrees of the opening stage. It is important that you adjust the safety sensor detection field before starting the operator set-up cycle. If the PREMIS operator controls a single-leaf automatic door, dip 1 and 2 on SW1 dip-switch of L-NEP logic board must be set on OFF. If two PREMIS operators are to control a double-leaf automatic door, refer to the“Double-leaf door set” paragraph.. Follow chapter 16.1 only if the digital programmer is new and powered for the first time. Follow chapter 16.2 if digital programmer has already been used before. 16.1) FIRST START UP OF PREMIS S12 DIGITAL PROGRAMMER Power the PREMIS operator by mains voltage, the control unit buzzer emits some quick, short beeps. Language selection is shown on the display of the digital programmer; * use F2 and Press EXIT button to exit “Language” section and enter “Serial communication set-up” section, see paragraph16.3. 16.2) buttons to move the arrow in correspondence with the language desired. USE OF PREMIS S12 DIGITAL PROGRAMMER Power the PREMIS operator by mains voltage, the control unit buzzer emits some quick, short beeps. The display signals the lack of communication between the S12 and operator control units since the serial code of logic board is not stored on S12. Press button for about 5 seconds to enter the general programming menu. F1 button allows moving forward among menu symbols. Select RS485 symbol. Give a quick pulse to ENTER button to enter the “Serial communication setup” section, see paragraph16.3. 16.3) SERIAL COMMUNICATION SET-UP The PREMIS S12 programmer automatically detects the presence of operator electronic control unit (fig. A) and stores the serial code of the logic board (fig. B). When acquisition of serial code is completed, the display must show the closed padlock symbol on letter M and open padlock on letter S, for a single leaf door (fig. C). fig.A fig.B fig.C For a double-leaf swing door, refer to “Double-leaf door set” paragraph. Press EXIT button to exit “Serial communication set-up” section and enter the general programming menu. 27 16.4) INITIAL SET-UP FOR SINGLE DOOR OPERATION From general programming menu, F1 button allows moving forward among menu symbols. Select INITIAL SET-UP symbol. Give a quick pulse to ENTER button to enter the “Initial setup” section. Type the 10-character technical password for access to set-up configuration. The default technical password supplied by ADSF UK to the S12 digital programmer is “A-A-A-A-A-A-A-A-A-A” Press the button in correspondence with letter A, asterisk appears on the first letter case on the display; repeat this operation for all the other characters required. If the password typed is correct, you enter the section dedicated to set-up configuration; if the password typed is wrong, you return to general programming menu. It is recommended to change the default technical password. Refer to “Password management” paragraph. In this section, F1 / F3 buttons allows selecting the function ON / OFF status, while button allows moving to the following function. Press F2 button to return to previous function. Select the door type: single leaf or double leaf OFF ( ,In this case it should be set to off for a single door) ON For Premis 120 - 250 models only. Select if the closing cycle must only be performed by spring effort only or If motor must also be enabled to ensure a higher closing force. Select ON if an electric lock is present only. Only if S03 function has been set to ON If an electronic lock exists, select type: pulse or OFF (electronic lock or electric strike) permanent ON (electric magnet). Select ON only if a safety sensor has been installed on closing. 28 (OFF) (ON) Select ON only if a safety sensor has been installed on opening. We recommend that you adjust the safety sensor detection field before starting the set-up, to allow the operator to precisely store the position of any side wall. Only if S05 function has been set to ON Select ON if a safety sensor has been installed on closing and monitored (as required by standard EN 16005) to activate sensor test at the beginning of each cycle, select OFF only if the safety sensor on closing has not been set up to be monitored. For more information, refer to "Safety sensors" paragraph. Only if S06 function has been set to ON Select ON if a safety sensor has been installed on opening and monitored (as required by standard EN 16005) to activate sensor test at the beginning of each cycle, select OFF only if the safety sensor on closing has not been set up to be monitored. For more information, refer to "Safety sensors" paragraph. If S07 and/or S08 functions are set to ON only Select test logic status, used by operator control unit to monitor safety sensors. The set-up depends on the characteristics of sensor installed. Select OFF when using “4SAFE ON SW” or "OA-EDGET" type sensors; select ON when using “TOP SCAN-S” type sensors. For more information, refer to "Safety sensors" paragraph. Contact configuration on OPEN input between terminals 6-7 of PWN-T board. Select ON with normally open contact or when the OPEN input is not used. Select OFF when using a device with normally closed contact. The operator is ready for the set-up cycle. Exit the detection field of the opening safety sensor during the set-up, to allow the sensor to only detect the presence of any side wall at the end of the opening. Press the (OK) button The control unit buzzer emits 4 beeps and starts the opening cycle at slow speed. When the opening stroke is completed, a long beep indicates that the set-up has been successful. The door automatically closes again. 29 16.5) FUNCTIONAL TESTING Select door automatic operation by program selector. Put program manual selector on status l, if used. Refer to “Program selectors” paragraph describing the selector types provided to select the automatic door operating mode. To start an opening manoeuvre, give a pulse to PS1 button (Start) of PWN-T module or engage door opening devices. Ensure that door opening and closing cycle is properly performed and that pulse organs and safety sensors operate; to adjust sensor detection field, refer to the instructions delivered with the sensor. The opening safety sensor detects the presence of any side wall at the end of the opening stroke thanks to the automatic learning function during the initial set-up. Should you need to change the optical adjustment of the safety sensor after performing the initial set-up of the operator, you can manually change the opening safety sensor inhibition distance by editing the P03 parameter (see paragraph "Parameter setting"). During door movement, intermittent signals could be heard as emitted by the buzzer to indicate that the limit power delivered by operator has been reached, especially if leaf dimensions and weight are close to the limits allowed. A short noise signal by the buzzer during start in opening is to be considered as normal, as the pick-up phase is the moment requiring maximum force. Adjust the thrust power by P04 parameter of the S12 programmer (see . “Parameters setting” paragraph). To deactivate the buzzer noise signal when the power limit is reached, set up F34 function to ON (see “Functions setting”). The buzzer noise signal for almost the entire stroke means that the leaf exceeds the limits allowed or installation levels shown on technical installation drawings are not met or frictions exist on the fixture; in this case, the movements of automatic door are difficult and the opening/closing cycle could not be completed. Impact safety: ensure that stop and reverse of moving direction are performed if the leaf movement is hindered. To set up the available functions, refer to “Functions setting” paragraph. To adjust the variable parameters, refer to “Parameters setting” section. Set-up operation must be repeated if one of the following conditions varies: door weight, leaf opening angle, spring loading, replacement of L-NEP logic board or of mechanical unit inside PREMIS operator. . To repeat set-up, follow the steps described in the previous paragraph, “Initial set-up”. 16.6) INPUTS DIAGNOSTICS The S12 programmer allows checking the inputs status to ensure proper operation of all devices connected with the PREMIS operator. To enter "Inputs diagnostics" while the automatic door operating program is shown on display, keep F2 button pressed for about 3 seconds. F3 button is exclusively used with a double-leaf swing door; if an M appears on top right, MASTER input ports are displaying, in case of an S, input ports concern SLAVE operator. A single touch on the F3 button switches from M to S. In case of single-leaf automation, an M appears on top right. The display shows the symbols of all operator inputs, with the relevant terminal number. If an input is used, the corresponding symbol lights up with an arrow on a side. External radar Internal radar Start OPEN Closing safety sensor Opening safety sensor AUX 1 (it activates if the manual program selector is in position I) AUX 2 (it activates if the manual program selector is in position II) AUX 3 EN/RF1 receiver when activated by S11 radio control unused 30 17) PROGRAM SELECTORS The program selector allows the door user to select the operating mode. The following can be used, according to the choice: manual selector integrated in the PREMIS, or thePREMIS S14 mechanical selector or the S12 digital programmer . Each program selector is described in details below. 17.1) MANUAL PROGRAM SELECTOR The 3-position manual program selector is the basic solution provided for onboard operator. The operation of this selector is enabled by F01 function OFF (default preset). Position I = Bi-directional automatic program The door automatically opens when each opening control activates. = Free manual door The automatic operation is disabled and door can be manually open. Position 0 Position II = Night lock program if F07 function is set to OFF The door can only be open by OPEN input or radio control if EN/RF1 radio receiver is installed. (default) = Open door program Position II The door stops in complete opening position. if F07 function is set to ON 17.2) PREMIS S14 MECHANICAL KEY SELECTOR 5-position key mechanical selector can be used as an alternative to the manual selector and its operation is enabled by F01 function OFF (default preset). Disconnect manual selector wires from terminal board of PWN-T module if the S14 mechanical selector is installed. ELECTRIC CONNECTIONS Terminal 1 of S14= to terminal 9 (Internal radar) of the PREMIS operator PWN-T Terminal 2 of S14= to terminal 3 (Common) of the PREMIS operator PWN-T Terminal 3 of S14= to terminal 1 (AUX 1) of the PREMIS operator PWN-T Terminal 4 of S14= to terminal 4 (AUX 2) of the PREMIS operator PWN-T . . . . For any check on proper connection and operation of key mechanical selector, enter inputs diagnostics (see par. 16.5) to ensure that different key positions correspond to activation of the following symbols: and = no active symbol and OPERATING MODE Insert and rotate the key in the S14 selector to select the program desired. Open door program The door stops in complete opening position. Free manual door The automatic operation is disabled and door can be manually open. Bi-directional automatic program The door automatically opens when each opening control activates. Single-direction automatic program output only To exclude the incoming detection on external radar input Night lock program The door can only be open by OPEN input or radio control if EN/RF1 radio receiver is installed. The key can be taken out of the selector when in any position in order to prevent the work program from undesired changes. 31 17.3) PREMIS S12 DIGITAL PROGRAMMER – USED LIKE PROGRAM SELECTOR The S12 digital programmer can be installed in the system and used by the user like a program selector, as an alternative to manual and mechanical selector if you need a more complete tools in terms of functions and graphs. To enable the S12 operation like a program selector, set up F01 function ON (see “Functions setup” paragraph). Select the automatic door operating mode by pressing once the button. Each time a button is pressed, it switches from a work program to the next one. The operating programs to be selected by button are described below Bi-directional automatic program The door automatically opens when each opening control activates. Single-direction automatic program output only To exclude the incoming detection on external radar input Single-direction automatic program input only To exclude the outgoing detection on internal radar input. Open door program The door stops in complete opening position. Night lock program The door can only be open by OPEN input or radio control if EN/RF1 radio receiver is installed. Free manual door The automatic operation is disabled and door can be manually open. Power warning light display The symbol indicates the presence of mains power voltage and the battery, if any, is operating. The symbol indicates the absence of mains power voltage and operator activity is ensured by emergency battery, if any, which is in working order. The symbol with mains power voltage indicates that the battery is damaged. In this case, the control unit buzzer emits a beep before each door opening for 10 cycles (if F09 function OFF), or the door opens and remains open (if F09 function ON). The symbol without mains power voltage indicates that the emergency battery is about to run out. 32 Operation of other buttons located on PREMIS S12 program selector panel Pedestrian opening, used in double-leaf door automated device only To activate pedestrian opening, press the button. the symbol on the display indicates that the function is on. * * In a double leaf door, the first leaf (Master) only opens if the opening command is given by internal or external radar inputs. The pedestrian opening only operates in bi-directional, single-direction and open door automatic programs. To deactivate pedestrian opening, press again the button. For more information, refer to "Pedestrian opening" paragraph. * F2 Deactivation of step-by-step operation Give a pulse to F2 button to deactivate the step-by-step operation previously activated by F13 function ON (see para. “Functions setting”) and enable the door automatic closing. Press F2 button again to activate step-by-step operation. Symbol F2 on display goes off. F1 Door opening command Press F1 button to open the door, but only in bi-directional and single-direction programs (if F33 function OFF). Press F1 button to open the door in all operating programs, both automatic and night lock (if F33 function ON). F3 It is only used in one MASTER / SLAVE double-leaf door automated device F3 button has no function on the main work program selection screen, it is only used to switch from MASTER to SLAVE and to check that communication between operators and the S12 programmer is working properly. Letter M is displayed on top right side when Master operator is selected, letter S appears when Slave operator is selected. If the system is working properly, door working program is displayed both with M and S, in case of fail communication the message "NO COMUNICATION" is displayed for the nonworking-properly operator. SCHEDULED MAINTENANCE If the display shows the message "SCHEDULED MAINTENANCE", contact the authorized service center to request maintenance on the system. 33 18) GENERAL PROGRAMMING MENU To enter the general programming menu while the automatic door operating program is shown on display, keep about 5 seconds. button pressed for The programming menu consists of different sub-menus divided by subject (Diagram 1). Select the section you want to have access to by using F1 button >> . The menu icon selected is highlighted and the section title is shown on display top side. To enter the selected sub-menu, give a quick pulse on ENTER * button. To exit the general programming menu and return to the operating program view, press EXIT button. DIAGRAM 1 EXIT 5” EXIT F1 F1 “INITIAL SET-UP” SECTION EXIT F1 » ENTER EXIT F1 EXIT F1 » » UNUSED ENTER “SERIAL COMMUNICATION SET-UP” SECTION F1 » “LANGUAGE” SECTION “FUNCTIONS AND REGULATIONS” SECTION EXIT ENTER F1 UNUSED ENTER EXIT » » » ENTER EXIT ENTER “MAINTENANCE ” SECTION “PASSWORD MANAGEMENT” SECTION Refer to par. 16.4 when entering the initial set-up section. Refer to par.16.3 when entering the serial communication setups for single-leaf door; see para. 29.2 for two-leaf swing door. For the other sub-menus, refer to the following paragraph on the section you have had access to 34 19) FUNCTIONS AND REGULATIONS To enter please digit the 10-digits technical password (for detailed information please check paragraph “Password management” In this submenu the push buttons have the following scope: Push Button F2 Push Button Push Button F1 Push Button F3 Push Button 19.1) = entering the setting for functions F (see paragraph “Functions Setting”); = entering the setting for Parameters P (see paragraph “Parameters Setting”); = to run door opening; = it is used only in case of double leaf door application to set up the parameters on Master or Slave operator; letter M or S displayed bottom right indicates which operator has been selected. Letter M will appear on display on top right position if the automation is single leaf = to return to the general setting menu. FUNCTIONS SETTING In this section the display describes the scope of the selected function; push button F1 is setting the function in OFF; push button F3 is setting the function in ON; push button F2 allows proceeding to the following function; push button allows returning to the previous function; Here the explanation of each single function: FUNCTION STATUS OFF DESCRIPTION *' SLAVE Choosing the program selector: manual built-in selector or mechanical key switch PREMIS S14 F01 ON OFF Choosing the program selector: digital selector PREMIS S12 Singe leaf door (just on display; repeat initial set-up in order to change it) F02 ON Double leaf door (just on display; repeat initial set-up in order to change it) OFF Master operator in double leaf door application (just on display; repeat initial set-up in order to change it) ON Slave operator in double leaf door application (just on display; repeat initial set-up in order to change it) F03 OFF Electric lock deactivated S F04 ON Electric lock activated OFF Active function if F04 = ON. Impulsive functioning for electric lock (see paragraph "Electric lock Application") ON Active function if F04 = ON. Permanent functioning for electric lock (see paragraph "Electric lock Application") OFF Electric lock release excluded in free manual door program S F05 F06 S ON Electric lock activated for each door closing in free manual door program (see paragraph "Electric lock Application") 35 FUNCTION STATUS DESCRIPTION OFF Active function if F01 = OFF. Operation mode for the manual built-in selector in position II II= Night Lock program ON Active function if F01 = OFF. Operation mode for the manual built-in selector in position II II= Open Door program *' SLAVE F07 OFF For operators with battery = in case of power failure the door keep on working normally with battery power supply ON For operators with battery = in case of power failure the door opens and remains open in Automatic Door program F08 OFF Battery monitoring = in case of empty or damaged battery the control unit buzzer beeps prior to ten following opening cycles F09 ON OFF Battery monitoring = in case of empty or damaged battery the door opens and remains open in Automatic Door program For operators with battery = in case of power failure or with almost empty battery the door keep on working normally F10 ON OFF For operators with battery = in case of power failure or with almost empty battery the door opens and remains open Selecting the program "Night Lock" the door remains closed and can be opened just with the OPEN input F11 ON OFF Selecting the program "Night Lock" the door opens and remains open for 10" before closing in order to grant escape from building Function for disabled persons deactivated F12 ON OFF F13 ON OFF F14 ON OFF F15 ON Function for disabled persons activated; see paragraph "Courtesy function for disabled persons" for detailed information on this function mode Function mode with automatic closure Step by step function: one Start or one OPEN input activates door opening while a second input is needed for door closure Standard function mode on inputs internal and external radar Step by step function mode with separate commands. The external radar input activates door opening, whereas the internal radar input activates door closure. The command input (Start, OPEN and LARCO remote control) operate in standard mode For double leaf door application: partial opening deactivated if key switch selector S14 is connected For double leaf door application: partial opening activated on Master leaf if key switch selector S14 is connected (active function if F01=OFF). For further details please check paragraph "Pedestrian opening" OFF Active function if F15=ON. Partial opening on Master leaf active with key switch selector S14 in program "Free manual door" ON Active function if F15=ON. Partial opening on Master leaf active with key switch selector S14 in program "Night Lock" F16 OFF F17 ON OFF For operators with spring closure: door closure is obtained just through spring power For operators with spring closure: motor is assisting the spring in door closure. This function is useful in all those cases where the only spring power is not enough to grant full door closure (i.e. in presence of strong air flows or in case of other unfavourable conditions) S Closure safety sensor input deactivated; if a closure safety sensor is not installed F18 S ON Closure safety sensor input activated; if a closure safety sensor is installed 36 FUNCTION STATUS OFF DESCRIPTION *' SLAVE Opening safety sensor input deactivated; if a opening safety sensor is not installed F19 S ON Opening safety sensor input activated; if a opening safety sensor is installed OFF Test on closure safety sensor deactivated. For sensors without monitoring function carried out by the automation control unit ON Active function if F18=ON. Test on closure safety sensor activated. For sensors with monitoring function carried out by the automation control unit (cat. 2 / pl. c). For detailed information please check paragraph "Safety Sensors Device" OFF Test on opening safety sensor deactivated. For sensors without monitoring function carried out by the automation control unit ON Active function if F19=ON.Test on opening safety sensor activated. For sensors with monitoring function carried out by the automation control unit (cat. 2 / pl. c). For detailed information please check paragraph "Safety Sensors Device" OFF Active function if F20 or F21=ON. Safety sensor test with LOW logic level. For detailed information please check paragraph "Safety Sensors Device" ON Active function if F20 or F21=ON. Safety sensor test with HIGH logic level. For detailed information please check paragraph "Safety Sensors Device" F20 F21 F22 S S S F23 Function disabled F24 Function disabled OFF Constant pause time F25 ON OFF Automatic pause time increases if door is not closing properly due to the high flow of persons walking through it Interlock function deactivated F26 ON OFF Interlock function activated. Please check paragraph "Interlock System" Active function if F26=ON. Delayed door opening for 0,5" after opening command. Please check paragraph "Interlock System" F27 ON OFF Active function if F26=ON. Prompt door opening at opening command. Please check paragraph "Interlock System" Active function if F26=ON. Opening command is not being saved. Please check paragraph "Interlock System" F28 ON OFF Active function if F26=ON. Opening command is being saved. Please check paragraph "Interlock System" Active function if F26=ON. Standard function mode for the electric lock in interlock system F29 ON OFF Active function if F26=ON. Electric lock deactivated if both doors are closed in automatic program modes. Please check paragraph "Interlock System" OPEN input configuration; normally closed contact. When a device with N.C. contact is installed F30 ON OFF OPEN input configuration; normally open contact. When a device with N.O. contact is installed For double leaf application: in case of power failure the two leaves starts simultaneously in the first opening phase F31 ON For double leaf application: in case of power failure the two leaves starts respecting the offset in the first opening phase 37 FUNCTION STATUS OFF DESCRIPTION *' SLAVE Internal and external radars are deactivated during closing phase in "Night Lock" program F32 ON OFF Internal and external radars are activated during closing phase in "Night Lock" program, causing the door reopening Push button F1 of digital selector the S12 enables door opening only during automatic program modes F33 ON OFF Push button F1 of digital selector the S12 enables door opening both during automatic program modes and during "Night Lock" program Activates buzzer warning relative to the reached motor power limit (please check paragraph "Functional Testing") S F34 ON Deactivates buzzer warning relative to the reached motor power limit F35 Function disabled F36 Function disabled F37 Function disabled F38 Function disabled F39 Function disabled OFF Cyclic function disabled F40 ON Cyclic function. Activates the continuous door opening and closing cycle; this function is meant to be used for function testing or laboratory purposes *' For double leaf swing door application. In the column Slave of the present spreadsheet, the functions marked with letter S, have to be separately configured on Slave operator. All other functions not marked with letter S, have to be set on Master operator and are common for both units. 38 19.2) PARAMETERS SETTING In this section the display describes the type of selected parameter; push button F1 decreases the setting value in percentage; push button F3 increases the setting value in percentage; push button allows proceeding to the following parameter; push button F2 allows returning to the previous parameter; * Here the explanation of each single parameter. PARAMETER Ref. Drawing DESCRIPTION *'SLAVE P01 Fig.1 Opening speed. Increase this value for a faster door opening speed. S P02 Fig.2 Closing speed. Increase this value for a faster door closing speed. S Fig.4 Safety sensor, slow motion area in opening. When the door leaf at the end of the opening is close to the wall, the safety sensor in opening can detect it and stop the door. To prevent an uncomplete opening cycle the door can move at low speed when the sensor detect the wall. The area from where the door reacts with a low speed instead of stop depend from this potentiometer. If P03=0 the door stop ever, increasing the value the door use low speed to approach the end of the opening. At maximum value the area start from about 45° from the end of opening. S P04 Thrust power during opening. Increase this value for higher motor thrust power during opening (and closing if set closing by motor) cycle. S P05 Pause time, can be regulated between 0 and 60 seconds. It is the time in which the door remains open before closing. P06 Closing voltage at door closed. Increase this value to keep the motor thrust active with door close. S P03 P07 Fig.5 Wind stop function at door closed. At 0% (default value) the function is disabled. Increasing this value the motor is applying an opposite force to wind strength in order to keep the door leaf closed. S P08 Fig.3 Push & go. At 0% (default value) the function is disabled. Distance from where a door pushed by hand start to open automatically. Setting range between 2° and 15°. S Final thrust for electric lock coupling (active if F04=ON). Increase this value for a higher leaf speed in the last closing phase so that an easier coupling to electric lock is enabled. S P09 39 PARAMETER Ref. Drawing DESCRIPTION *'SLAVE P10 Closing stroke to release electric lock (active if F04=ON). At 0% (default value) the function is disabled. Increase this value to adjust the closing stroke power of 0,5 second closing before opening cycle. Used to easily release the electric lock. S P11 Opening delay at electric lock activation (active if F04=ON). By 0% (default value) the function is disabled. Increase this value to increase the delay leaf opening in respect of the electric lock activation (4 seconds at 100%). S P12 Fig.1 Slowing down distance in opening. Slowing down distance in opening. Distance from where the leaf start the low speed in opening. Increase this value to adjust door leaf slowing distance. S P13 Fig.2 Slowing down distance in closing. Slowing down distance in closing. Distance from where the leaf start the low speed in closing. Increase this value to adjust door leaf slowing distance. S Fig.6 Motor thrust distance during end closing (active if F17=OFF for spring closing units). At 0% (default value) the function is disabled. Increase this value to adjust the range in which motor is activated to support door closing, especially in unfavorable conditions like strong air flows. By value 100% the motor is active for the whole closing phase. The motor thrust power can be adjusted by parameter P15. S Fig.6 Motor thrust power in closing. (active if F17=OFF for spring closing units). At 0% (default value) the function is disabled. Increase this value for higher motor thrust power during closing phase. In swing closing units, this parameter is active only when door closure is achieved with motor thrust. S P16 Motor thrust time during end closing. Increase this value to adjust time during which the motor thrust is active in the last closing phase, thus overcoming any friction and achieving complete door closure. At value 100% time would be 1,5''. S P17 Motor thrust during end opening. The defaul value (12%) is low in order to reduce leaf juddering during end opening phase. This parameter value has to be increased in case of any difficulty in the last door opening phase and thus increasing motor thrust power. S P18 Distance between leaf physical end stop and opening end-running. Increase this value to increase the gap between the physical end stop on the floor and the position of the leaf with the door full open. This setting can be adjusted for about 5°. S P19 Leaf opening delay. For double leaf application. Increase this value to adjust opening delay between Slave and Master unit. This setting is necessary in case of overlapping leaves. At minimum value 0% both leaves start opening at the same time. P20 Leaf closing delay. For double leaf application. Increase this value to adjust closing delay between Master and Slave unit. This setting is necessary in case of overlapping leaves. At minimum value 0% both leaves start closing at the same time. P21 Assisted spring closure (active just if F17=OFF for spring closing units). Increase this value for higher thrust power, to granting the initial closing phase, in all those situations where the spring power is not enough to start closing process. S Push & close. If the door is manually pushed to close direction, an automatic closure is activated. Increase this value to adjust closing corner needed for door leaf to start automatic closing. Setting range between 2° and 15°. S P14 P15 P22 Fig.3 40 PARAMETER Ref. Drawing DESCRIPTION *'SLAVE Opening acceleration ramp: Increase this value for higher acceleration during opening cycle. S Wind stop at door open. Increase this value to achieve a higher opposite force to wind direction in order to keep door open. S P25 Closing friction adjustment (for spring closing units). This parameter regulates the opposite force applied by motor toward a complementary pushing force toward closing direction. Increase this value to achieve a higher leaf resistance. S P26 Safety sensor test time (adjustment enabled if F20 and/or F21=ON). This parameter can be used only if safety sensors with test monitoring option checked by the control unit are installed and in case the default value 0% causes safety test failure. For further information please check paragraph "Safety Sensors". S P27 Deactivation time for Interlock system in case that one of the door cannot close properly (adjustment enabled if F26=ON). By 0% (default value) the function is disabled. Increase this value to achieve a higher time after which the interlock function is disabled if one of the two doors cannot close due to high flow of person walking through it. At value 100% time is 2 minute. Please check paragraph "Interlock system". P28 Assisted manual opening (just with spring closing units). Increasing this value to obtain a lighter manual opening. At minimum value 0% the assisted manual opening is not active. S P29 Leaf braking intensity when the opening safety sensor trips. Increasing the value reduces the braking distance. S P30 Parameter disabled P31 Parameter disabled P32 Parameter disabled P33 This parameter allows you to select the number of cycles of opening/closing after which the display of the program selector S12 show the message "SCHEDULED MAINTENANCE ". OFF (default), the message is not displayed. Select the number of cycles in dependence on the operations of the door and the conditions of use: 8K (8000 cycles), 16K (16.000 cycles), 32K (32.000 cycles), 64K (64.000 cycles), 128K (128.000 cycles), 256K (256.000 cycles), 512K (512.000 cycles). P34 Parameter disabled P35 Parameter disabled P23 P24 Fig.5 *' For double leaf swing door application. In the column Slave of the present table, the functions marked with letter S, have to be separately configured on Slave operator. All other functions not marked with letter S, have to be set on Master operator and are common for both units. 41 The following drawings show the regulation areas of some parameters described in the spreadsheet in order to better understand its purpose. In the spreadsheet the column “Ref. Drawing” is indicating the drawing number to be checked for any parameter for which a relative drawing has been added. FIG.2 FIG.1 0% B B FIG.3 100% A C 100% B A 0% A C A=Adjusting area of opening speed controlled by P01 parameter B= Adjusting area of slowing down distance controlled by P12 parameter C= Adjusting area of approach speed A+C = Opening time FIG.4 A=Adjusting area of closing speed controlled by P02 parameter B=Adjusting area of slowing down distance controlled by P13 parameter C= Adjusting area of approach speed A+C = Closing time A FIG.5 A= Adjusting area of Push&Go controlled by P08 parameter, before automatic opening B= Adjusting area of Push&Close controlled by P22 parameter, before automatic closing. 100% 75% FIG.6 50% A B 10% 1% A = Area from where, if safety sensor in opening detect an obstacle, the door opens at low speed instead of stop moving depending of potentiometer P03 value. A= Intervention area of Wind Stop with opened door. The opposing force is controlled by P24 parameter. B= Intervention area of Wind Stop with closed door. The opposing force is controlled by P07 parameter. 42 Rate (in %) of intervention area, controlled by P14 parameter, in which the motor operated during closing stroke. Motor power can be adjusted by P15 parameter. 20) LANGUAGE * Use F2 and buttons to move arrow to the language desired. Press EXIT (SET) button to return to general programming menu. 21) PASSWORD MANAGEMENT This section shows three types of password. a) TECHNICAL PASSWORD (for technical personnel in charge of installation and maintenance) It is a 10-character password of installer who starts the system. Using a technical password is compulsory to prevent unauthorized persons from having access to general programming menu sections concerning parameters and functions setting, initial set-up and maintenance area. Default preset technical password is “A-A-A-A-A-A-A-A-A-A”. WARNING! It is recommended to change the default technical password and be very careful not to forget it. b) PRIMARY PASSWORD (for the system's owner-user) It is a 5-character password used by the user to prevent unauthorized persons from having access to the S12 programmer and change the work program. Using a primary password is optional and must be enabled by system's owner. Default preset primary password is “A-A-A-A-A”. WARNING! When enabling the password, be very careful not to forget the access combination. c) SERVICE PASSWORD (for user) It is a 5-character password that the system's owner may divulge to persons to be authorized to use the S12 programmer. The service password only allows changing the automatic door work program. Default preset service password is “A-A-A-A-A”. To change the service password, it is necessary to have access by primary password. Use * button to move the selection arrow downward, F2 button to move the arrow upward. 43 21.1) HOW TO CHANGE THE TECHNICAL PASSWORD Select “TECHNICAL PASSWORD” Press OK (F1) button. Type the default preset technical password “A-A-A-A-A-A-A-A-A-A” by pressing 10 times on A button. Type the new technical password, selecting a combination of 10 characters from the letters A-B-C-D. • It is required to repeat the new password, so type the previous combination again. • If the password typed is correct, “PASSWORD OK” is shown on display for one second and the general programming menu is restored. From this moment on, when having access to general programming to enter initial set-up, functions and adjustments, settings of serial communication and maintenance section, the new password stored needs to be typed. The password is not required afterwards, when toggling among sections without exiting the general programming menu. If the password typed is not correct, “PASSWORD ERROR” is shown on display and the general programming menu is restored. 21.2) HOW TO CHANGE THE PRIMARY PASSWORD Select “PRIMARY PASSWORD” Press OK (F1) button. Type the default preset primary password “A-A-A-A-A” by pressing 5 times on A button. (IF the primary password is not the default password as it had already been changed before, type the currently-used primary password). Type the new primary password, selecting a combination of 5 characters from the letters A-B-C-D. 44 It is required to repeat the new password, so type the previous combination again. If the password typed is correct, “PASSWORD OK” is shown on display for one second, thus reverting to the PASSWORD MANAGEMENT section; through the EXIT button the general programming menu is restored. On the contrary, if the password typed does not match the previous one, PASSWORD ERROR is displayed, thus reverting to PASSWORD MANAGEMENT section. The procedure needs to be carried out again. 21.3) HOW TO CHANGE THE SERVICE PASSWORD Select "SERVICE PASSWORD" Press OK (F1) button. Type the primary password Type the new service password, selecting a combination of 5 characters from the letters A-B-C-D. It is required to repeat the new password, so type the previous combination again. If the password typed is correct, “PASSWORD OK” is shown on display for one second, thus reverting to PASSWORD MANAGEMENT section. Pressing the EXIT button the general programming menu is available again. If the password typed does not match the previous one, PASSWORD ERROR is displayed, thus reverting to PASSWORD MANAGEMENT section. The procedure needs to be carried out again. 45 21.4) ENABLING USER (primary and service) PASSWORD USAGE Select “PASSWORD ON / OFF” Press OK (F1) button. Type the primary password * Press ON button to enable the user password usage and return to PASSWORD MANAGEMENT menu. To return to work program view, press EXIT button twice. From this moment on, whenever the user wants to access theS12 digital programmer to change the automatic door work program, the primary or service password must be typed. When the user decides to enable the password usage, it is recommended to change the combination of both primary and service password. 21.5) DEACTIVATING THE USER PASSWORD USAGE From PASSWORD MANAGEMENT section, type “PASSWORD ON / OFF” Press OK (F1) button Type the primary password Press OFF (F1) button to disable user password usage. To return to general programming menu press the EXIT From this moment on, the access to the S12 digital programmer as program selector is free. 46 button twice. 22) INFORMATION AND EVENTS MEMORY The S12 digital programmer allows displaying information on automation and accessing to events memory, where fault errors are stored. * After displaying the automatic door work program, press button for 5” to enter the information area (Diagram 2). The buttons inside the information area are used as follows: * ν button allows forwarding to the following information or event in events memory. ^ F2 button allows forwarding to the following information or event in events memory. F3 button is only used with two-leaf swing door and the symbol on the top right side of display shows M if Master operator information is displayed, or S if Slave operator is involved. Every touch on F3 button allows shifting from M to S and vice versa. In case of single-leaf automation, letter M is shown on the top right side of display. F1 button allows shifting to events memory to display error messages and return to information area by pressing it again EXIT button allows returning to main view of door work program. DIAGRAM 2 I1, I2, ... = INFORMATION AREA E1, E2, ... = MEMORY EVENTS 5” F2 F2 I1 F2 I2 F2 I3 F2 I4 I5 I6 F1 F1 F1 F1 F1 F1 ERROR ERROR ERROR ERROR ERROR ERROR MEMORY EVENTS MEMORY EVENTS MEMORY EVENTS MEMORY EVENTS MEMORY EVENTS INFORMATION AREA INFORMATION AREA INFORMATION AREA INFORMATION AREA INFORMATION AREA F1 F1 F1 F1 F1 INFO INFO INFO INFO INFO F2 E1 F2 E2 F2 E3 MEMORY EVENTS F2 E4 E5 The diagram shows the path for access to information and events memory display; texts in figures relate to the memory cells that appear on the display in the left side when accessing the display of information or errors. 47 Refer to the following tables for a list of information and error messages. INFORMATION AREA NUMBER INFORMATION MEANING I1 Serial number Display serial code of logic board L-NEP I2 Partial cycles Display opening/closing door cycles since last maintenance. This counter must be reset every maintenance by authorized personnel (See "Maintenance" chapter) I3 Total cycles Display total opening/closing door cycles since first time operation. I4 Release Micro "A" Display Micro "A" software release of logic board L-NEP. I5 Release Micro "B" Display Micro "B" software release of logic board L-NEP. I6 Identificative number Identification number containing useful data for manufacturer. The events memory stores the last 5 error messages in chronological order. When all the 5 memory cells are full of messages, the following event stored shall be located in E1 cell, the other memory events are shifted by one position and the event in E5 cell shall be deleted. The events memory stores messages, divided into warnings and errors. The errors stored are shown by symbol directly from main screen of work program; enter the events memory to show the relevant message. The warnings stored are not shown in the main screen of work program, but only stored in events memory. 48 MEMORY EVENTS Message of warnings or errors that can be read by the digital programmer PREMIS S12 ( E1-E2-E3-E4-E5) WARNINGS SIMBOL SOLUTION SCREEN MESSAGE MEANING RESET SOFTWARE Generic malfunction that caused a reset of the microcontroller. There is an automatic recovery system in case of temporary malfunction. OBSTACLE IN OPENING The door detect an obstacle during the opening cycle that caused the reversal direction of the leaf. If the problem persists, check if there is any obstacle that stop the door and remove it, or control the smoothness of the leaf. OBSTACLE IN CLOSING The door detect an obstacle during the closing cycle that caused the reversal direction of the leaf. If the problem persists, check if there is any obstacle that stop the door and remove it, or control the smoothness of the leaf. RESET 4 OBSTACLE IN CLOSING If, during closing, the door detect an obstacle at the same point for 4 consecutive times, a Remove the obstacle that prevents the complete closure of the door. reset occurs with subsequent opening at slow speed. BATTERY LOW LEVEL Low battery level in absence of mains power, As soon as the mains supply returns the battery will be with battery operation (only for operators recharged. with battery module). ERRORS SIMBOL SCREEN MESSAGE MEANING SOLUTION FAULT CURRENT The cyclical testing of the detection circuit current has failed. The system automatically resets and, after a few seconds, repeat again the test. If the problem persists it is a defect on the logic board . FAULT POWER The control of the driving signal of the motor The system automatically resets and, after a few seconds, repeat again the test. If the problem persists it is a defect has detected a fault. on the logic board ERROR INITIAL SET UP ERROR ENCODER OR MOTOR FAULT ENCODER . The operator is not able to finish the initial set-up. Control the smoothness of the door and that there are no obstacles along the way, that motor and encoder are connected and try again to set-up the door. Encoder signals are not detected or the motor does not turn. Check that the cables and connector of the motor and encoder are well inserted and not damaged. Fault detected during the test operation of the encoder. The system automatically resets, and repeat again the test at the first cycle. If the problem persists it is a defect on the logic board . ERROR SAFETY SENSOR IN OPENING Verify that the settings and parameters related to the safety sensor test are correct, on the operator and on The test on the safety opening sensor is failed. the sensor.Also check that the electrical connection between the sensor and controller are correct. ERROR SAFETY SENSOR IN CLOSING Verify that the settings and parameters related to the safety sensor test are correct, on the operator and on The test on the safety closing sensor is failed. the sensor.Also check that the electrical connection between the sensor and controller are correct. FAULT BATTERY The battery is damaged (only for operators with battery module). FAULT BRAKING The control of the braking during closing cycle The system automatically resets and repeat again the test in every cycle. If the problem persists it is a defect on the has detected a fault. logic board . FAULT EEPROM REGISTER The system automatically resets and, after a few seconds, The test of the internal memory cells related to repeat again the test. If the problem persists it is a defect the safety parameter has failed. on the logic board . ERROR COMMUNICATION MASTER-SLAVE The communication line between master and slave is missing. (with double door only) Check that the L7 cable is connected between master and slave and that the configuration setting for double swing unit is correct. GENERAL ERROR SLAVE A fault is present on the slave operator. (with double door only) Access memory events on the slave operator and check what type of problem is displayed. 49 Verify the efficiency of the battery and the control module 23) MAINTENANCE To enter, type 10-character technical password (for more information, refer to “Password management” paragraph). Access to this section only for setting to zero the errors in the events memory, for setting to zero the partial counter of opening/closing cycles performed by the door and for deleting the initial set-up performed when operation starts. The reset of events memory and partial counter must be performed by specialized personnel only during routine maintenance, after performing all checks on system operation. Never delete set-up. Only in case of leaf stroke change, reuse of operator or logic board in a new system or if the spring needs to be reloaded (unloaded during arm extraction because spring preload lock procedures have not been properly performed), it is necessary to delete set-up and proceed to a new set-up following operations described in par. 16.4 (for single-leaf door) or par. 29.2 (for doubleleaf door). The buttons in this section are used as follows: ν button allows forwarding in reset type selection. ^ F2 button allows returning to previous reset. F1 (OK) button allows confirming data zero-set operation for the reset type selected. F3 button is only used with two-leaf swing door and the symbol on the top right side of display shows M if reset operations are relevant to Master operator, or S if Slave operator is involved. Every touch on F3 button allows shifting from M to S and vice versa. In case of single-leaf automation, letter M is shown on the top right side of display. * 24) ELECTRIC LOCK APPLICATION To block the door in closing position, PREMIS operator is ready to drive an electric strike, an electric lock or an magnetic lock. 24.1) ELECTRIC LOCK / ELECTRIC STRIKE Functions settings to activate electric lock: 24V F04 = ON to activate electric lock output. F05 = OFF to enable impulsive driving. F06 = ON If automatic release of electric lock is required when door is closed, with the work program mode set to “Manual”, so to predispose door to be opened manually. If digital programmer S12 is used it's possible activate the automatic release of electric lock at the end of closing stroke, also in the automatic work programs. Push F2 button on S12 programmer to activate the function (F2 symbol appear on display). Push again F2 button on S12 programmer to disactivate the function (F2 symbol disappear on display). M7 Electric lock Electric strike P09 Adjust the speed of the door in the last degrees of the closing stroke to facilitate electric lock coupling. P10 Power during the 0,5 seconds of stroke on closing before opening to release electric lock. At 0% value the function is disabled, between 01 to 100% the power increase proportionally. P11 Delay between electric lock and motor activation in opening. At 0% value the function is disabled, between 01 to 100% the power increase proportionally until 4 seconds. 50 M8 24dc 24.2) MAGNETIC LOCK Functions settings to activate magnetic lock: F04 = ON to activate electric lock output. F05 = ON to enable permanent driving, that keep magnetic lock powered with closed door. In the working program “Manual” the magnetic lock isn't powered with door closed, so to move door manually. Activating “Push & Go” function (P08 parameter), the magnetic lock isn't powered with door closed in the automatics working program to allow manually opening. It work only in the “Night lock” program. 25) SAFETY SENSOR DEVICES This section describes how to connect and configure properly some of the safety sensors in compliance with the standard EN12987 available on the market, to ensure a level of safety corresponding to PL = c, Category 2 as required by the standard EN16005. 25.1) SENSOR OA-EDGE T WIRING CONNECTION SENSOR OA-EDGE T WIRING CONNECTION Wiring between the sensor and the terminal block of the PWN-T board on PREMIS operator 1. WHITE (+) Supply power TERMINAL 17 (+) 2. BROWN (-) Supply power TERMINAL 16 (-) 3. GREEN COM (Closing side) TERMINAL 3 COM 4. YELLOW N.C. (Closing side) TERMINAL 2 Safety sensor in closing 5. GREY N.O. (Closing side) do not connect 6. PINK COM (Opening side) TERMINAL 7 COM 7. BLUE N.C. (Opening side) TERMINAL 5 Safety sensor in opening 8. RED N.O. (Opening side) do not connect 9. BLACK (+) Test input TERMINAL 25 TEST (+) 10. VIOLET (-) Test input TERMINAL 26 GND (-) DIP SWITCH SETTING ON OA-EDGE T PARAMETERS ON DIGITAL PROGRAMMER A7 = ON Low level test input. F20 (S07) = ON For safety sensor in closing For safety sensor in opening A8 = OFF Input test delay 10msec.. F21 (S08) = ON For other option and settings available on the safety sensor, see the instructions supplied with the sensor OA-EDGE-T. F22 (S09) = OFF Test level LOW SETTING ON THE BOARD Jumper J13 = position P 51 25.2) SENSOR 4SAFE ON SW WIRING CONNECTION SENSOR 4SAFE ON SW WIRING CONNECTION PREMIS 120/250 Wiring between the sensor and the terminal block of the PWN-T board on PREMIS operator 1. GREEN (+) Supply power TERMINAL 17 (+) 2. BROWN (-) Supply power TERMINAL 16 (-) 3. YELLOW COM (Opening side) TERMINAL 7 COM 4. WHITE N.C. (Opening side) TERMINAL 5 Safety sensor in opening 5. BLACK N.O. (Opening side) do not connect 6. PINK COM (Closing side) TERMINAL 3 COM 7. VIOLET N.C. (Closing side) TERMINAL 2 Safety sensor in closing 8. GREY N.O. (Closing side) do not connect 9. RED (+) Test input TERMINAL 25 TEST (+) 10. BLUE (-) Test input TERMINAL 26 GND (-) DIP SWITCH SETTING ON 4SAFE ON SW PARAMETERS ON DIGITAL PROGRAMMER S12 DIP 1 = ON F21 (S08) = ON For safety sensor in opening For safety sensor in closing Sensor installed opening side DIP 1 = OFF Sensor installed closing side F20 (S07) = ON For other option and settings available on the safety sensor, see the instructions supplied with the sensor 4SAFE ON SW. F22 (S09) = OFF Test level LOW SETTING ON THE BOARD Jumper J13 = position P 25.3) SENSOR TOPSCAN-S WIRING CONNECTION SENSOR TOPSCAN-S WIRING CONNECTION PREMIS 120/250 Wiring between the sensor and the terminal block of the PWN-T board on PREMIS operator 1. (-) Supply power TERMINAL 16 (-) 2. (+) Supply power TERMINAL 17 (+) 3. COM 4. N.O. 5. 5. 6. TERMINAL 7 COM N.C. See Sensor Installation Manual N.C. See Sensor Installation Manual TERMINAL TERMINAL 5 Safety sensor in opening 2 Safety sensor in closing TEST TERMINAL 25 TEST (+) do not connect test input SETTING ON TOPSCAN-S For other option and settings available on the safety sensor, see the instructions supplied with the sensor TOPSCA-S, In particular make sure to cut configuration jumper J on the sensor according to the instructions of the TOPSCAN-S. PARAMETERS ON DIGITAL PROGRAMMER S12 F21 (S08) = ON For safety sensor in opening F20 (S07) = ON For safety sensor in closing F22 (S09) = ON Test level HIGH SETTING ON THE BOARD Jumper J13 = position P The parameter 26 on digital programmer S12 adjusts the timing of testing of the safety sensor . In case of failure of safety test on the sensor TOPSCAN-S may need to increase the value of this parameter. The test of the safety sensors occurs at the beginning of each cycle of opening and closing of the door. If the sensor does not respond properly to the test the buzzer on the operator control unit will beep, and the speed of the leaf will be slow (at safety speed) for the entire cycle. 52 26) PREMIS S3 BATTERY MODULE Electric connection Connect the J1 connector of the the S3 module to the J6 connector of the PWN-T power supply unit through the special cables. The battery cable must be connected to the J2 connector of the S3. PWN-T PREMIS S3 J6 J1 Connect the cable from connector J1 to connector J6 of the operator Operation The PREMIS S3 module trips in case of mains power failure, allowing the PREMIS operator to keep running. The battery operating time depends on various factors, like the number of operations performed, the leaf weight, the connected external devices , etc.... As a rough guide, the charged battery can supply power for about 30 consecutive door opening/closing cycles, or for about two hours with the door stopped. IMPORTANT! BATTERY TYPE: 3x6V (18V) - 1.3Ah ! LED SIGNALLING SIGNALLED EVENTS WARNING! GREEN LED RED LED ON ON Periodically check battery efficiency To allow recharging batteries must always be connected to the BLINKING OFF The equipment must be disconnected from the mains when removing BATTERY CHARGED WITH MAINS VOLTAGE ON OFF BATTERY DISCHARGED OFF BLINKING BATTERY CHARGED WITHOUT MAINS VOLTAGE OFF ON BATTERY DISCONNECTED BATTERY CHARGING 27) electronic control unit the batteries In case of replacement, always use genuine batteries. Replacement must be performed by qualified personnel Remove batteries from the equipment before its disposal Batteries contain polluting substances; therefore they must be disposed of in accordance with the provisions of local regulations DISABLED PEOPLE COURTESY FUNCTION Enable this function by setting function F12=ON on the digital programmer S12. The inputs suitable for use by disabled people must be connected to the START or OPEN input terminals. Even the remote control combined with the LARCO radio receiver can be used as disable people input. Adjust the pause time (parameter P05 on the digital programmer S12 ) to hold the door open for a sufficient time to allow the disabled person to be able to pass through the door before the automatic closing. If at the end of the opening cycle or during the pause time, the safety sensor in closing detects the presence of the disabled people, the pause time is reduced to 3 seconds (even if is set at higher value) after which the door closes . The door closes immediately without taking into account the pause time if the opening is activated by external radar input , internal radar input or with a manual push if push & go function is enable. 53 27) ADSF LARCO RADIO RECEIVER Programming Procedures NOTE: Prior to programming, make sure the receiver’s LED blinks red when power is applied. If the receiver’s LED is not blinking red, disconnect then reconnect the power. Programming transmitter(s) into the receiver’s memory: The receiver can learn up to 12 transmitters. Follow the steps below to program your receiver. Repeat steps 1-3 for each transmitter. 1. Press the receiver’s programming button for less than 2 seconds and release. The LED should change from blinking red to solid green, indicating the receiver has entered its programming mode. 2. Activate and release the transmitter once and confirm that the receiver’s LED changes to solid red. This indicates the receiver is learning the transmitter’s code. 3. Wait a few seconds and then activate the transmitter a second time. The receiver’s LED should now blink green several times indicating that it is ending its learning procedure. When the procedure has ended, the LED should be blinking red. Programming the receiver’s output activation time: When the receiver is activated, its outputs will stay in the minimum activation state for approximately 1.5 seconds (default). This time can be adjusted to stay in the activation state for up to 4 hours. Follow the steps below to adjust the receiver’s output activation time. 1. Press the receiver’s programming button for 4 seconds and release. The LED should be solid red. This indicates the receiver is in the activation time programming mode. 2. Activate and release the transmitter. 3. When the desired time has elapsed (up to 4 hours) activate the transmitter again. The receiver’s LED should blink green several times indicating it is ending the procedure. When the procedure has ended, the LED should be blinking red. Deleting all transmitters from the receiver’s memory: You can clear the receiver’s memory of all previously learned transmitters by following the steps below. NOTE: Deleting previously learned transmitters does not change the receiver’s output activation time. 1. Press the receiver’s programming button for more than 8 seconds until the receiver’s LED starts blinking green. Release the programming button. The LED should now be blinking red. 2. The receiver’s memory is now cleared. To learn new transmitters, follow the steps for programming transmitters into the receiver’s memory. Specifications Transmitter Frequency: 433.92 MHz Dimensions: 1.25” x 0.875” x 0.25” Security Code Method: Code Hopping Battery Life: 60,000 cycles Certifications: FCC, Industry Canada, CE Operating Temperature Range: -4oF to 122oF (-20oC to 55oC) Receiver Frequency: 433.92 MHz Dimensions: 2.25” x 1.25” x 0.75” Security Code Method Code Hopping Can learn up to 12 different transmitters Operating Temperature Range: -4oF to 122oF (-20oC to 55oC) Electrical Rating: 100,000 cycles at 2 Amps at either 24 VDC or 120 VAC Input Power: 24 VAC, 24VDC or 12 VDC Output: Two Relay Outputs: 1 NO 1 NC Certifications: FCC, Industry Canada, CE The receiver and transmitter comply with FCC part 15/15.231-2001, Industry Canada RSS-210-2003, EN55022A-2000, EN55024-2001, EN300-220-3 V1.1.1-2000, and EN301-489-1 V1.2.1-2000. Operation is subject to the following two conditions: (1) This device may not cause harmful interference, and (2) this device must accept any inerference received, including interference that may cause undesired operation. This product may be susceptible to local transmissions being generated near the transmitter’s fundamental frequency. Testing has shown some susceptibility in a frequency range of 416-440 MHz. NOTE: This equipment has been tested and found to comply with the limits for a Class B digital device, pursuant to part 15 of the FCC rules. These limits are designed to provide reasonable protection against harmful interference in a residential installation. This equipment generates, uses and can radiate radio frequency energy and, if not installed and used in accordance with the instructions, may cause harmful interference to radio communications. However, there is no guarantee that interference will not occur in a particular installation. If this equipment does cause harmful interference to radio or television reception, which can be determined by turning the equipment off and on, the user is encouraged to try to correct interference by one or more of the following measures: (a) Reorient or relocate the receiving antenna. (b) Increase the separation between the equipment and receiver. (c) Connect the equipment into an outlet on a circuit different from that to which the receiver is connected (d) Consult the dealer or an experienced radio/TV technician for help. The user is cautioned that any internal modifications, either replacement of or modification of any component, of the transmitter or receiver could violate the rules of compliance and authority to operate the equipment. 54 29) DOUBLE LEAF DOOR SET To manage the operation of a swing door with two leaf two operators is needed, one must be configured as Master and the other must be configured as a Slave. In the case of overlapping leaf, the operator applied to the door leaf that overlap the other (the one that opens first) must be configured as Master. When double swing door with overlapped leaf is used as escape route too, the installer must check that force required to open the door manually with the slave operator 's leaf ( with Master operator's leaf overlapped) not exceed 150 N , measured at the leading edge at right angles to the door leaf and at a height of 1000 +/- 10 mm. In case of force over 150 N only the leaf of the Master operator must be use as escape route and consequently the identification symbol must be put just on this leaf." 29.1) ELECTRICAL WIRING FOR A DOUBLE LEAF DOOR SET Make the electrical connections at the operators (see Section 12 "Electrical connections"), taking in to account that all the devices used to open the door, the program switch and the electric lock must be connected to the Master operator. Safety sensors installed on the master leaf must be connected to the operator Master, safety sensors installed on the slave leaf must be connected to the Slave operator. If the door has a double electric lock to lock each door individually, connect the electric lock that blocking the slave door at the slave operator. Master and Slave operators must be connected together with the L7 Sync cable. Connect the two terminals of the cable to connector J7 on the L-NEP logic card. The digital programmer S12 must be connected to the Master operator. WIRING CABLE L7 OPERATOR MASTER SAFETY SENSORS POWER SUPPLY LINE PROGRAM SELECTOR OPENING RADAR OPEN COMMAND OPERATOR SLAVE SAFETY SENSORS START COMMAND ELECTRO-LOCK MASTER SLAVE WING 1 (MASTER) WING 2 (SLAVE) 29.2) DOUBLE DOOR SET UP After completing the mechanical installation and after that electrical connections are made, manually check that the movement of both leaves is friction-free for all the stroke. Before power up the operator set the switch SW1 on the logic board L-NEP as indicated on the following table. PREMIS MASTER OPERATOR PREMIS SLAVE OPERATOR SW1 DIP 1 SW1 DIP 2 OFF OFF ON OFF 55 Follow now the next steps to complete the operator set up. 1. Turn on main power supply on both operators. 2. If the digital programmer S12 has been used before, the display will show "No Communication” because the new serial numbers of the operator's board L-NEP are not stored in the programmer. Press and hold for about 5 seconds the SET push button to enter the general programming menu, and from there select the submenu "Serial communication setting" (as indicated in par. 18). If the digital programmer S12 is new and is powered for the first time, you will be required to choose your preferred language as specified in paragraph 16.1, then you will automatically enter the "Serial communication setting". 3. SERIAL COMMUNICATION SETTING The programmer S12 recognizes the presence of the two operators in the system (Fig. A) and acquires automatically the serial number of the logic boards (fig. B). At the end of the acquisition of the logic boards serial numbers, the display will show the symbol closed padlock on the icons with letters M and S (fig. C) and the programmer will be able to manageboth master and slave operators. fig. A fig. B fig. C Press EXIT (SET) push button to exit from “Serial communication setting” and come back to the general programming menu . 4. INITIAL SET-UP From the general programming menu , enter in the “INITIAL SET UP” section (as indicated in par. 18) Enter the 10 digits of the technique password to access the configuration set-up. (for more information on using technique password, see the par. “Password management” 21 and 21.1). In this section the push-button F1 / F3 set the OFF / ON state of the function. With the push-button you go to the next function, with the F2 you return to the previous function. 5. SETTING OF THE DOUBLE LEAF FUNCTIONS. Set function S01 ON = double leaf door. For PREMIS 150 AND 250 models only . Select if the closing cycle must only be performed by spring effort only or If motor must also be enabled to ensure a higher closing force. The S03 function must be set ON if an electro-lock is fitted to the door Only on the Master operator the electro-lock output will be activated. The function S04 is displayed only if function S03=ON. Select the electro-lock type installed: OFF: electric strike; ON: maglock. 56 (OFF) (ON) The function S05 must be selected ON if a safety sensor in closing is installed. Selecting this functionis valid for both Master and Slave operators. The function S06 must be selected ON if a safety sensor in opening is installed. Selecting this functionis valid for both Master and Slave operators. The function S07 is displayed only if the function S05 = ON Select ON if you have installed a safety sensor in closingmonitored (as required by standard EN16005) to activate the testsensor at the beginning of each closing cycle. For more information, refer to par. "Safety sensors devices". Select OFF if the safety sensor in closing is notarranged to be monitored. The function S08 is displayed only if the function S06 = ON Select ON if you have installed a safety sensor in openingmonitored (as required by standard EN16005) to activate the testsensor at the beginning of each opening cycle. For more information, refer to par. "Safety sensor devices". Select OFF if the safety sensor in opening is notarranged to be monitored. The function S09 is displayed only if the function S07and/or S08 = ON. Select the logical state of the test used to monitor the safety sensors. The setting depends on the characteristics of the sensor. Select OFF for sensors "4SAFE SW ON" or "OA-EDGE T. Select ON for the sensor "TOP SCAN-S". For more information, refer to par. "Safety sensor devices". Configuration of the contact on the OPEN input between terminals 6-7 of the PWN-T board. Select ON with normally open contact, or if you do not useOPEN INPUT. Select OFF if you are using a device with a normally closed contact. The operators are now ready to start the set-up cycle. Press the button (OK) to start the set-up cycle. 6. INITIAL SET-UP CYCLE The Master operator starts opening at slow speed after 4 beeps of start signal. At the end of the opening cycle, a prolonged 3 seconds beep, will signal the end of the Master operator set-up. The Master operator leaf remains opened to permit the set-up of the slave operator. The Slave operator starts opening at slow speed after 4 beeps of start signal. At the end of the opening cycle, a prolonged 3 seconds beep, will signal the end of the Slave operator set-up. The set-up is now completed, the closing cycle start automatically providing to close as first the slave operator and then after a delay time the master operator. 57 29.3) FUNCTIONAL TESTING Select the automatic operation of the door using the program selector.If you use the manual switch, set the program at state l. Refer to par. "Program Selectors " that describe the types of selectors available to set the operating mode of the automatic doors. To start an opening cycle give an impulse by the push-button PS1 (Start) on the module PWN-T of the Master operator, or operate the other opening control devices ( as radar, mat, etc.). Verify that opening and closing cycle takes place correctly.During the opening cycle the Slave leaf start with a predetermined delay with respect to Master leaf, as well as in the closing cycle is that the Master leaf that start with a predetermined delay with respect to Slave leaf. The delay between the leaves at the start is crucial to avoid that it can come across each other. To change the preset delay door go to "Switch and potentiometer" and set: On the parameter P19 the desired value of delay in opening ; on the parameter P20 the desired value of delay in closing (see par. 19.2 "Parameters setting"). Verify that the input device and safety sensors are functioning; to adjust the detection range of the sensors, refer to the instructions supplied with the sensor.The detection of the opening safety sensor due to the arrest of the movement only of the leaf on which it is installed. The detection of the closing safety sensor causes the inversion of the movement in opening of both doors. During the movement of the door an intermittent buzzer sound may be hear. It's an indication that the limit power use by the operator it's near the maximum available, Occur especially if the size and the weight of the leaf are approaching the limits permitted. A short beep of the buzzer when leaf starting is to be considered normal because the inrush phase is the time in which it is required more strength. Adjust the power stroke with parameter P04 by the programmer (par.19.2 see "Parameters setting"). Power stroke P04 must be set on both master and slave operators separately (see par. 19 "Functions and regulation"). To turn off the audible buzzer that signal the power limit, set the F34 ON (see par. "Functions setting"), in this case independently on the two operators. The sound of the buzzer for almost the entire cycle means that the leaf exceeds the permissible limits, or that the installation dimensions given in the drawings of installation have not been met, or that are present to much friction on the frame, in which case the automatic door has difficulty moving and may fail to complete the cycle of opening and Safety in case of impact: verify that opposing an obstacle to the movement of a door, the operator stop and reverse the direction of travel of both doors Every time, after powering the system, the first cycle of opening occurs at slow speed and can be selected with the function F31 if the leafs starts together, or starts respecting the leaf delay. F31 = OFF in the first cycle of opening the doors start together. F31 = ON in the first cycle of opening the doors start, respecting the leaf delay. It is recommended to keep the default setting (F31 OFF) if the door is not provided with coordinator mechanical closure, which guarantees the correct position of the doors during the manual closure in the absence of power. To set functions available see par. “Functions Setting”. To adjust parameters see par. “Functions Setting”. The operation of set-up must be repeated in the case of variation of one of the following conditions:weight of the door, opening angle of the leaf, spring loading, replacement of the logic board or the mechanical unit inside the operator To repeat the set-up, follow the steps described in the previous section. 29.2 (points 4, 5, 6). 29.4) PEDESTRIAN OPENING With a double door it's possible to select the pedestrian opening, in which only Master operator open. If is installed the program selector S12 (F01 = ON), press the * push-button to activate the pedestrian opening. If is installed the manual selector switch or the mechanical key S14 (F01 = OFF), in order to activate the pedestrian opening is necessary to set the F15 = ON. Then you have to choose what position on the selector must be enabled pedestrian opening: F16 = OFF: pedestrian opening in position 0 on the manual selector program. pedestrian opening in position on the mechanical selector S14. F16 = ON : pedestrian opening in position II on the manual selector program. pedestrian opening in position on the mechanical selector S14. PEDESTRIAN OPENING WORKING MODE Any opening activation via internal and external radars inputs and with the push push & go actuate partial opening of the door, then only the leaf Master operate.Any opening activation via Start, OPEN input cause the complete opening of both doors. 58 29.5) CONSIDERATION ON THE USE OF PREMIS S12 PROGRAMMER IN A DOUBLE DOOR SYSTEM. With the digital programmer it is possible to operate separately on operators Master and Slave as regards the following sections of the programming menu and general area information. a) FUNCTIONS AND PARAMETERS pressing the F3 button you switch from Master to Slave and vice versa Master operator Slave operator b) MAINTENANCE pressing the F3 button you switch from Master to Slave and vice versa Master operator Slave operator If the display shows the letter M on the S12 operations it's related to the Master, if display show letter S operation performed it's related to the slave operator. c) INFO AREA AND MEMORY EVENTS Also the informations and the events can be accessed individually.Once you enter in the information menu as described in par. 22, press the F3 button to selected on which operator you want to display information and events.At the top right of the display will show the letter M if the information regarding the Master operator, the letter S if they relate to the operator Slave. pressing the F3 button you switch from Master to Slave and vice versa Master operator Slave operator In double leaf application, reset error log first on SLAVE (S) unit and then on MASTER (M) unit. To reset error log, select “ERROR RESET” and press OK. 59 30) INTERLOCK SYSTEM The interlock system is used when two automatic doors must open one at a time, so they must not open together. 30.1) INTERLOCK ELECTRIC CONNECTION AUX1 COMUNE AUX2 X X X X= D i s c o n n e c t manual selector from the terminals AUX1, COMMON, AUX2. Module PWN-T Door 1 Module PWN-T Door 2 M1 F M2 M1 N F SWITCH ON/OFF M2 AUX1 SEN./CL COMMON AUX2 COMMON AUX2 SEN./OP SEN./OP COMMON GND RAD.EX GND RAD.EX AUX3 RAD.IN AUX3 RAD.IN 24V START 24V START O.C. COMMON O.C. COMMON M3 M7 - GND B M4 TEST M6 A M8 LOCK OPEN TEST M7 OUT 24V AUX1 SEN./CL OPEN M6 N M3 COMMON - GND A S12 M8 +13V B M4 OUT 24V LOCK LOCK S12 +13V LOCK The figure show electrical connection between two independent operators in Interlock configuration. Terminal 29 (O.C.) on PWN-T of door 1 must be connected at terminal 4 (AUX2) of door 2. Terminal 29 (O.C.) on PWN-T of door 2 must be connected at terminal 4 (AUX2) of door 1. Terminals 3 (Common) on both PWN-T must be connected to each other. By connecting a switch (SWITCH ON/OFF) between the terminals 3 (COMMON) and 1 (AUX1) on both PWN-T, it is possible to disable the Interlock function ( with the contact closed) and to re-enable the function ( with the contact open). The use of this switch is optional, it is used only to disable temporarily the interlock detection and to allow the free passage between the two doors. To use Interlock functioning it's necessary to install digital programmer S12 as a program selector on each door. It is not possible use the manual selector or mechanical selector with key S14. In case of double leaf door connect only Master operator. 30.2) INTERLOCK APPLICATION WITH INDEPENDENT INTERNAL RADAR DOOR 1 DOOR 2 INTERNAL RADAR EXTERNAL RADAR EXTERNAL RADAR INTERNAL RADAR Independent internal radar for each door is used when the distance between two doors is enough to not allow interference in detection from both radar. Set the function F26 = ON in both operators. Select which of two doors firstly opening in case of simultaneous command on both: F27 = OFF: Opening with 0,5 seconds of delay after command. F27 = ON : Opening immediately after command. Set function F27 =ON on the door which opens first, F27 = OFF on the other door. 60 Choose whether you want to store, or not, the opening control on the radar in a door when the other door still in movement. F28 = OFF: disable storage opening command. To open a door is necessary to activate again the radar when the other door is closed. F28 = ON: enable storage opening command. To open one of the two doors can activate the radar even when the other door still moving; the opening will be automatically executed as soon as the door in moving stop in closed position. It's possible to override the interlock function (one of the door open even if the other door has not yet closed) in case one door have it's sensors activated for a time set by parameter P27. The interlock function come back to normal when the door arrived to fully close. P27 = 0% : function is disabled and second door opening only after first closed. P27 = 01% : second door opening after 10 seconds from first door open, if its radar is continuously detect. P27 = 100%: second door opening after 2 minutes from first door open, if its radar continuously detect. Steps of interlock operation are the following: a.) b.) c.) d.) e.) f.) person comes from outside activates the radar of the door 1 and the door 1 is opened; person enter inside area between two doors; door 1 closes after pause time; person must activate internal radar of second door to obtain second door opening; door 2 opening after door 1 closed; person enter from door 2, and this closes at the end of pause time. The operation is the same coming from the opposite direction. To open the door even when the other is open, it is necessary to operate the command of OPEN input. 30.3) INTERLOCK APPLICATION WITH ONLY ONE INTERNAL RADAR DOOR 1 DOOR 2 EXTERNAL RADAR INTERNAL RADAR START COMMON DETECTOR It's possible to use a single sensor that cover the common inside area to open the door. Connected the sensor in parallel at Start input in both modules PWN-T of each operator, may be necessary when distance between two doors does not allow use of two independent radar. Set the function F26 =ON on both operators. Select which of the two ports must be opened first in the event of simultaneous control of both: F27 = OFF: opening with 0,5 seconds of delay after command. F27 = ON : opening immediately after command. Determine which of the two ports to be preferred to open immediately and set the function F27 = ON, on the other set F27 = OFF. Steps of interlock operation are the following: a.) person comes from outside activates the radar of the door 1 and the door 1 is opened; b.) person enter inside area between two doors and detected by common sensor; c.) door 1 closes after pause time (detection is disabled on Start input of door 1 during pause time, during closing cycle and during 5 seconds after end closing). d.) door 2 opening after door 1 closed if internal common radar is active on Start input; e.) person enter from door 2, and this closes at the end of pause time. The operation is the same coming from the opposite direction. To open the door even when the other is open, it is necessary to operate the command of OPEN input. 30.4) INTERLOCK APPLICATION WITH ELECTRIC-STRIKE DISABLED ON CLOSED DOORS This application is only used when the two interlocked doors have electric-strike installed on the electro-lock output and want to keep off when both doors are closed (fail safe condition). In two-way and one-way automatic work programs, when the door 1 receives an opening command electric-strike is activated (door locked) on door 2; at the end of door 1 closing cycle electric-strike it's deactivated on door2. The operation is the same coming from the opposite direction. In the “Night lock” work program electric-strike is activated with closed door and to open the door it's necessary give a command on AUX3 input. To open the door even when the other is open, it is necessary to operate the command of OPEN input. 61 31) MEANING OF THE ACOUSTIC SIGNAL On the logic board is present a buzzer which emits acoustic signals, which corresponds to a meaning depending on the number of beeps emitted and the duration of the sound. ACOUSTIC SIGNAL (BEEP) MEANING 8 BIP short and fast Operator without set-up at power up. 5 BIP short Pressing the push button PS1 on the PWN-T board with the operator without initial set-up and manual program selector in position 0 (manual). BIP extended For as long as you hold down the push button PS1 on the PWN-T board, with operator without initial set-up and manual program selector in position I or II. 4 BIP short Warning signal that door start to move slowly in the initial phase of the cycle set-up. Long sound (3 seconds) Initial set-up completed correctly. Extended or blinking sound (during movement) The limit of power that the operator is able to supply to the motor is exceeding during the movement of the leaf. This warning is activated if the function F34 = OFF. To disable this acoustic signal set F34 = ON 1 BIP After power up with an operator previously set. 5 BIP Encoder is disconnected or malfunctioning or motor is disconnected or malfunctioning. 1 BIP (before opening) Test of the safety sensor in opening failed. 1 BIP medium (before opening) Battery faulty or low level 1 BIP (before closing) Test of the safety sensor in closing failed. 1 BIP long (1 second) Internal fault detection. 32) MAINTENANCE PROGRAM To guarantee and to keep a secure functioning in door's lifetime it recommended make maintenance every 6 months. The installer can set the number of cycles of opening/closing after which on the programmer S12 shows the message "SCHEDULED MAINTENANCE" (parameter 33). Warning! Before work on the operator cut main power line. - Check that all fixing screws are well tightened. - Clean and lubricate moving and sliding components. - Lubricate closing spring if present. - Check wiring connections. - Check that arm connection screw are well tightened. - Check that the door wing is stable and that the movement is fluent and with no friction from ”door open” position up to “door closed” position. - Check the condition of the hinges and lubricate it. - Check that speeds, timing, and safety functions are well adjust. - Check that safety and activation sensors are properly functioning. - Verify if door with spring closes at damping speed without power supply. At the end of the maintenance reset the counter of partial cycles and reset the memory events (see paragraph 23 "MAINTENANCE") Warning! Any part that appear damaged or worn must be changed. Make use only of original spare parts; for this purpose check price list. 62 WC System: Installation Instructions Auto Door system: Overview: Swing Door: the system is designed to leave the Door unlocked enabling Manual or Assisted entry, when entering the facility the Door should be shut before the “Touch to Lock” sensor will work therefore inhibiting pranksters. This is achieved by a Normally closed Door status Micro-switch. When incorporating a Sliding Door the additional Activate timer PCB can be adjusted to keep the door open on entry until the “Touch to Lock” sensor is activated to ensure the user engages the Lock. NB: A link on the PCB enables Flashing or Solid status LEDs. An Access control system may fitted to give a Secure Door scenario. Touch Sensor installation: Architrave & Round units. (AWC - RWC) Ascertain fixing height. (Centre 900 to 1000 F. F. L) Use back Plate to mark cable hole & Screw fixing points. Round unit may be angled towards approaching users. Fix top retaining screw (No 8 or 10) leave 4 mm of screw shaft protruding. Fit Back seal to rear of plate. Place cable through Back-plate & seal. Make connections. (see “Circuit”) Fit Back-plate to unit. Hook unit onto top Screw & fit bottom retaining screw. Single Gang units: (SGWC) “Internal Quality” Fits any UK Metal or Plastic back-box. Surface or Flush (If using a metal back box the vertical lugs may require removal) App 5 mm Circuit: Auto Swing Door / Sliding Door NB: 12v or 24v DC Power supply, Lock voltage as PSU. Door Switch Contact Closed Circuit when Door is shut ! If not FIT LINK or Internal switch will not function Optional. “Advised” Sounder to denote operation. Mag / Fail Safe Lock Contact Lock C Nc Ov +V Door Switch Lock C No Ov +V C Nc Door Operator “Activate” Nc B Nc Sounder Nc B Break No C CC Glass Lock Fuse Activate Relay +V Ov Link Timer Lock LED Jumper Flashing / Solid Door J1 No External +V Ov DC. PSU 12 - 24v Regulator Turn Clockwise C = 0v. Removed when Locked Optional To Open Door on operation C A A No B-Glass K-Switch No C + Ov A B C Key Switch Nc C C +V Ov L+ R BL Power C No Internal Fit Link Re Ov C Nc No +V Re Ov C Nc No +V Lock / Open Touch Assisted Entry Touch Sensor RD + B R G R + B R G Emergency Entry Key Switch Note: LED’s - Pre 2012 configuration. + G B R LED Status: Blue: Vacant Red: Engaged / Locked Doc No: CPWCINSM12-001CC 1 The sensor is disturbed by lamps or another sensor. Select a different frequecy for each module (DIP 2). Launch a new calibration. Check mounting height. Change position of calibration screw. Launch a new calibration. Launch a new calibration. Launch a new calibration. Step out of the detection field. Change angle of spots. Switch off background (DIP 3: OFF). Check wiring between modules. Launch a module count: long push on push button of MASTER. Check power supply (tension, capacity). Reduce the cable length or change cable. Only for EC countries: According to the European Guideline 2002/96/EC for Waste Electrical and Electronic Equipment (WEEE) BEA hereby declares that the 4SAFE ON SW is in conformity with the basic requirements and the other relevant provisions of the directives 2004/108/EC and 2006/42/EC. Notified Body for EC inspection: 0044 - TÜV NORD CERT GmbH, Langemarckstr. 20, D-45141 Essen Angleur, December 2010 Jean-Pierre Valkenberg, Authorized representative The complete declaration of conformity is available on our website: www.bea.be SAFETY INSTRUCTIONS The manufacturer of the door system is responsible for carrying out a risk assessment and installing the sensor and the door system in compliance with applicable national and international regulations and standards on door safety and if applicable, the machinery directive 2006/42/EC. Only trained and qualified personnel may install and setup the sensor. The warranty is void if unauthorized repairs are made or attempted by unauthorized personnel. Avoid touching any electronic and optical components. The ORANGE LED flickers. every 3 seconds. 1 2 3 1 The sensor receives too much IR-energy. 5 flashes 5 x The ORANGE LED every 3 seconds. Calibration error 1 2 3 4 The sensor receives not enough IR-energy. 1 2 Power supply is out of limit. The ORANGE LED flashes 2 x every 3 seconds. The ORANGE LED 1 Cut and restore power supply. 2 If orange LED flashes again, replace sensor. The sensor signals an internal fault. The ORANGE LED flashes 1 x every 3 seconds. 1 2 1 Corfirm the DIP-switch setting: long push on the push button. DIP-switch setting awaiting confirmation. The ORANGE LED flashes quickly. Communication error between modules. 1 Send the sensor back for a technical check-up. The sensor encounters a memory problem. The ORANGE LED is on permanently. The ORANGE LED flashes 3 x every 3 seconds. 1 Check wiring. - Door control with test: Connect RED and BLUE wires to test output. - Door control without test: Connect RED to 0 V and BLUE to +12 V - 30 V DC. The monitoring is activated, but the test input is not powered. The sensor does not react, but a calibration can be launched. 4 flashes 4 x 3 2 1 1 2 Bad adjustment of the uncovered zone. The RED or GREEN LED is ON permanently. Check if the DIP-switch 4 is ON (uncovered zone). Launch a calibration. 1 Check if the DIP-switch 4 is ON (uncovered zone). 2 Launch a calibration. Bad adjustment The RED or GREEN LED is ON sporadicly. E R L AU BT Z R I E R UN G F IZ T I E N A B L E S DESCRIPTION A O A C C R D A Output: Max. contact voltage Max. contact current Max. switching power Input: Max. contact voltage: Voltage threshold: Max. number of modules: Reflectivity: Degree of protection: Temperature range: Expected lifetime: Norm conformity: Max current consumption: Technology: Detection field: Mounting height: Reaction time: Max. presence time: Supply voltage: profile supporting clip main connector DIP-switch calibration screw receiver 7. 8. 9. 10. 11. Specifications are subject to changes without prior notice. All values measured in optimal conditions. (under the condition that the door control system monitors the sensor at least once per door cycle) 110 mA @ 24 V AC/ 70 mA @ 24 V DC; 190 mA @ 12 V AC/ 145 mA @ 12 V DC (MASTER) 85 mA @ 24 V AC/ 60 mA @ 24 V DC; 180 mA @ 12 V AC/ 113 mA @ 12 V DC (other modules) 2 relays (free of potential contact) 42 V AC/DC 1 A (resistive) 30 W (DC) / 60 VA (AC) 1 optocoupler (free of potential contact) 30 V high: >10 V DC; low: <1 V DC 4 (up to 6 if 24 V DC) min. 5% at IR-wavelength of 850 nm IP53 -25 °C to +55 °C; 0-95% relative humidity, non condensing 5 years EMC 2004/108/EC; MD 2006/42/EC; EN 12978 EN ISO 13849-1:2008 Performance Level «c» CAT. 2 (to be operated from SELV compatible power supplies only) 11 10 7 8 9 end cap clip with angle adjustment screw transmitter (TX) push button front face Safety sensor for automatic swing doors 4SAFE ON SW active infrared with background suppression 400 mm (W) x 70 mm (D) (at 2 m mounting height; 4 spots active) 1.1 m to 3 m (according to floor reflectivity) 64 ms (typ) infinite 12 V - 24 V AC +/-10% ; 12 V - 30 V DC -5%/+10% 1. 2. 3. 4. 5. 6. Other use of the device is outside the permitted purpose and can not be guaranteed by the manufacturer. The manufacturer cannot be held responsible for incorrect installations or inappropriate adjustments of the sensor. TECHNICAL SPECIFICATIONS 6 5 4 2 3 1 N 50 186 DIN E W I T H E C N ENGLISH For product version 0100 and more LED-SIGNALS H ©BEA | Original instructions | 42.0793 / V5 - 02.11 C * * BLUE** RED** VIOLET GREY PINK BLACK WHITE YELLOW BROWN TEST OUPTUT*** REVERSE IMPULSE CLOSING SIDE STOP IMPULSE OPENING SIDE POWER SUPPLY 4SAFE ON SW * Output status when sensor is operational ** For compliance with DIN 18650, connection to door controller test output is required. *** If door controller is not tested: conncect BLUE to 0 V and RED to +12 V - 30 V DC. NC NO COM NO NC COM 12-24 V AC-DC WIRING 3 GREEN POSITIONING THE MODULES 2 cm MOUNTING THE PROFILE 2 1 NO POWER Plug the SLAVE CABLE between the modules in one of the two placements. DETECTION NO DETECTION NO The module connected to the door controller becomes the MASTER. 1. detach the clips 2. turn them by 180° 3. reattach NC When a module needs to be turned: Turn the module if necessary. The angle adjustment clip should be next to the transmitter. The transmitter (TX) should be placed next to the door edges that need to be protected. Take the position of the white clips into account before drilling and fastening the screws. Mount the profiles as close as possible to the closing edge. Leave 2 cm for the black end caps. 6 5 4 X GREEN OFF RELAY 2 CLOSING SIDE OFF 4 5 ORANGE RED GREEN OFF Mounting height > 2.7 m: switch to ON to allow for DIN 18650-conformity Not enough background reflectivity: switch to OFF OFF ON BACKGROUND * Recommended for most applications Approximate values at 1.8 m. Do not stand in the detection field! A SHORT push on the button of the MASTER launches a calibration on ALL MODULES. Afterwards, a number of green flashes (x) indicates the number of connected modules. A LONG push on the push button of the MASTER confirms the settings of ALL MODULES. Launch a new calibration. If necessary, position spots closer to or away from the door and relaunch a calibration. 4SAFE ON SW The flashing speed of the LED increases when approaching the optimal position. Step out of the detection field. If necessary, change angle or switch off background (DIP 3 = OFF). The detection zone is too long: turn the screw anticlockwise. The detection zone is too short: turn the screw clockwise. IMPORTANT: Test the good functioning of the installation before leaving the premises. 15 cm 35 cm* UNCOVERED ZONE After changing a DIP-switch, the orange LED flashes. Set different frequencies on modules close to each other. FREQ B FREQ A FREQUENCY When the LED is off on all modules, the detection zone is OK. DOOR SAFETY CHECK RED-GREEN LED during detection: R1 > RED R2 > GREEN RELAY 1 OPENING SIDE MOUNTING SIDE ON CALIBRATION ORANGE FACTORY VALUE SETTINGS OPERATORS SPARE PARTS SWING Nº Picture Item Motor PREMIS 120/250 1 Logic Task Board PREMIS 250 2 Logic Task Board PREMIS 120 Power Supply PREMIS 250 3 Power Supply PREMIS 120 4 Stainless Steel Spring PREMIS 120/250 5 Long Belt 6 Short Belt 7 Plastic closing 8 Sliding arm nylon block Code OPERATORS SPARE PARTS SWING Nº 9 Picture Item Kit sliding arm side cover stoppers PREMIS LS Conical connection: Enlongation type B (EXTB-Z ) 10 Conical connection: Enlongation type C (EXTB-Z) * Special sliding arm (Y:250, Z for max: 220) * Double leaves cable (Master – Slave) * Interface Digital Selector PREMIS 120/250 Code NBS Specification ADSF PREMIS 120 swing door operator ADSF PREMIS 120 Standard swing door operators are suitable for a wide variety of applications (particularly for external facing entrance doors) including: high volume, retail, trade, hotels, offices, airports, stations, hospitals, schools, colleges, garden centres and leisure facilities. Low energy or fully automatic operation. All equipment is designed to meet the rigorous safety requirements of BS 7036:1996 and is installed by Automatic Door Suppliers Association (ADSA) accredited engineers. EN16005 Compliant 2014 Standard details for ADSF PREMIS 120 swing door operator • • • • • • • Supplier Product reference: Door configuration: Door leaf widths: Door height: Door panel weight: Control: ADSF UK LTD ADSF PREMIS 120 Swing door operator Single unit or double door leaf set 650 - 1400mm single leaf Up to 3000mm Up to 120 Kg 4 position key switch (open/close two way & exit only) Standard details for ADSF PREMIS 120 swing door operator As standard Drive System • Motor open Spring close • Housed in 110mm high x 120mm deep x 550mm wide Operation • Over head face mounted • Push arm to open out / Pull slide arm to open in • Extended pivot available for operators mounted on lintel • Push and go facility Options Safety & Security • • • • Interfacing with fire alarm via a relay Interfacing with BMS, audio/video /intercom entry systems via a relay Integration of electric locking facility (possible with optional locking module) Interlocking with other door types TECHNICAL SPECIFICATIONS POWER SUPPLY POWER POWER SUPPLY OF EXTERNAL ACCESSORIES MAXIMUM WEIGHT OF DOOR WING WORK TYPOLOGY OPERATOR DIMENSIONS WORKING TEMPERATURE ELECTRIC MOTOR PROTECTION DEGREE 115/230Vac +/- 10%, 50-60 Hz 50W 24Volt dc 120Kg Intensive use 550x120x110mm -20°C / +50°C 24Volt dc With Encoder IP32 NBS Specification ADSF PREMIS 250 Heavy duty swing door operator ADSF PREMIS 250 Heavy duty swing door operators are suitable for a wide variety of applications (particularly for external facing entrance doors) including: high volume, retail, trade, hotels, offices, airports, stations, hospitals, schools, colleges, garden centres and leisure facilities. Low energy or fully automatic operation. All equipment is designed to meet the rigorous safety requirements of BS 7036:1996 and is installed by Automatic Door Suppliers Association (ADSA) accredited engineers. EN16005 Compliant 2014 Standard details for ADSF PREMIS 250 swing door operator • • • • • • • Supplier Product reference: Door configuration: Door leaf widths: Door height: Door panel weight: Control: ADSF UK LTD ADSF PREMIS 250 Swing door operator Single unit or double door leaf set 650 - 1400mm single leaf Up to 3000mm Up to 250 Kg 4 position key switch (open/close two way & exit only) Standard details for ADSF PREMIS 250 swing door operator As standard Drive System • Motor open Spring close • Housed in 110mm high x 120mm deep x 550mm wide Operation • Over head face mounted • Push arm to open out / Pull slide arm to open in • Extended pivot available for operators mounted on lintel • Push and go facility Options Safety & Security • • • • Interfacing with fire alarm via a relay Interfacing with BMS, audio/video /intercom entry systems via a relay Integration of electric locking facility (possible with optional locking module) Interlocking with other door types TECHNICAL SPECIFICATIONS POWER SUPPLY POWER POWER SUPPLY OF EXTERNAL ACCESSORIES MAXIMUM WEIGHT OF DOOR WING WORK TYPOLOGY OPERATOR DIMENSIONS WORKING TEMPERATURE ELECTRIC MOTOR PROTECTION DEGREE 115/230Vac +/- 10%, 50-60 Hz 75W 24Volt dc 250Kg Intensive use 550x120x110mm -20°C / +50°C 24Volt dc With Encoder IP32 RETURNS NOTE Please include this form with any items returned CUSTOMER DETAILS YOUR REFERENCE: DATE: ACCOUNT NUMBER: COMPANY NAME: CONTACT NAME: ADDRESS: POSTCODE: TEL: FAX: Goods E-MAIL: QUANTITY INVOICE No. Replacement Ordered ACTION NEEDED Credit Fault Description Date Purchased Repair TERMS AND CONDITIONS 1. Goods will not be accepted back without a valid Returns number. 2. Please ensure the relevant invoice is placed inside the component box with a detailed fault report. 3. Please give as much detail as possible regarding your fault report .Reports like DEAD or FAULTY will not be accepted. 4. All items including swing operators must be sent back complete, we will not accept individual internal components for repair or replacement. 5. Goods found not to be faulty may incur a testing fee handling charge of £10.00 plus vat. 6. Physically damaged items will be rejected. 7. Items may be replaced with equivalents if originals are not available. 8. These items may be repaired or replaced. 9. Refunds and credit notes are issues at Auto Doors & Shopfronts discretion as point 10 below. 10. Re-stocking: * The goods have not been installed. * The goods are returned as complete items. * All packaging, fixing kits and instructions are as new. * A re-stocking charge of 15% will be imposed. Send to ADSF UK LTD Unit 3 Millers Court, Windmill Road, Kenn, Clevedon BS21 6UL PLEASE SIGN BELOW TO ACCEPT OUR TERMS AND CONDITIONS Registered Office: 20 –22 Bedford Row, London WC1R 4JS. Registration No. 5287944 VAT No. 811346 362 MAINTENANCE PROGRAM Maintenance program for swing door ADSF Each 6 month: Warning! Before work on the operator cut main power line. - Check that all securing screws are well tightened. - Clean and lubricate moving and sliding components. - Lubricate closing spring if present. - Check wiring connections. - Check that arm connection screw are well tightened. - Check that the door wing is stable and that the movement is fluent and with no friction from ”door open” position up to “door closed” position. - Check the condition of the hinges and lubricate it. - Check that speeds, timing, and safety functions are well adjust. - Check that safety and activation sensor are properly functioning. Warning! Any part that appear damaged or worn must be changed. Make use only of original spare parts; for this purpose check price list. Check that the doors are compliant to BS EN16005 BS7036 Part 2 1996 - Authorized Technician Checklist Company Name & Address Installer Name Site Address Date Job No Door Location Door Type General Times (s) Opening Time Activation Distances (mm) Closing Time Hold Open Time Closing Energies Check Speed (J) Straight Approach Straight Approach Drawing-In Protection Max Speed (J) Entrapment (N) Safety Barrier Y/N Finger Guards Y/N Safety Devices Photocells Y/N Photocell Height (mm) Presence Sensor On Door Safety Sensors Break Out Force (N) Battery Back-Up Battery Settings (F-O / CONT) Escape System Break Out Doors Y/N Engineers Notes Signage Affixed / Left on Site Technician Name Technician Signature Date & Time www.adsf.co.uk LOG BOOK Company Name & Address Installer Name Site Address Install Date Unit ID No Door Location Operators Installed Activation Devices Sensor Push Pad Keyfob Access Control Side Screen Sensor On Door Sensor Barriers Break Out Force (N) Battery Back-Up Battery Settings (F-O / CONT) Safety Devices Threshold Sensor Escape System Break Out Doors Y/N Repair / Maintenance History Date Works Carried Out Manufacturer: ADSF Unit 3 Millers Court Windmill Road Bristol BS21 6UL Name Signature LOG BOOK Repair / Maintenance History Date Works Carried Out Name Signature