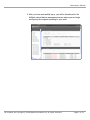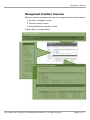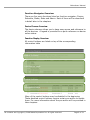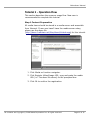
1
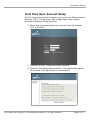
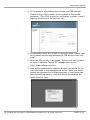
IAdea Users' Manual
Adfotain Central MZ Users' Manual
Version 2.0
March 2008
Table of Contents
Revision.................................................................................................................3
Introduction...........................................................................................................3
First Time User: Account Setup.................................................................................4
Logging In.............................................................................................................6
Management Interface Overview.............................................................................10
Function Navigator Overview...............................................................................11
Device Chooser Overview....................................................................................11
Function Display Overview...................................................................................11
Tutorial 1 - Operation Flow.....................................................................................12
Step 1 Content Preparation .................................................................................12
Step 2 Playback Scheduling.................................................................................14
Step 3 Schedule Synchronization..........................................................................15
Device Management..............................................................................................16
Device Group Management..................................................................................16
Control Buttons – Device Groups.......................................................................17
Control Buttons – Ungrouped Devices................................................................19
Device Management...........................................................................................20
Control buttons...............................................................................................20
Schedule Management...........................................................................................21
Month Schedule View..........................................................................................21
Device Group Information...................................................................................22
Device Information.............................................................................................22
Schedule Management........................................................................................23
Calendar........................................................................................................23
Timetable......................................................................................................24
Control Buttons..............................................................................................24
Play List Editor...................................................................................................30
Control Buttons..............................................................................................32
Media Management................................................................................................33
Media Library.....................................................................................................33
Control Buttons..............................................................................................33
Media Library Playlist..........................................................................................36
Control Buttons..............................................................................................36
Stats...................................................................................................................37
Overview..........................................................................................................37
All contents are Copyright © 2008 IAdea Corporation Inc. All rights reserved.
Page 1 of 31
IAdea Users' Manual
Device stats......................................................................................................38
Administration......................................................................................................39
Modify Alarm Email.............................................................................................39
Format Storage..................................................................................................39
Force Reboot.....................................................................................................39
Change Password...............................................................................................39
All contents are Copyright © 2008 IAdea Corporation Inc. All rights reserved.
Page 2 of 31
IAdea Users' Manual
Revision
Revision #
Change logs
1.0
First user manual
1.1
1. New function update:
- repeat function
- support 4 zone layouts for HMP-500S
1.2
1. Add section “operation flow”
2. Add layout dimension table
2.0
1. Reformat manual
2. Add sections that explain how Adfotain Central
MZ management server works with IPN (IAdea
Passport Network)
3. New function update:
- Register device
- Unregister device
Introduction
Adfotain central management server is a powerful application which
helps users to control their digital signage network. With friendly
user interfaces, users only need very little training to start to
manage their digital signage devices. This document introduces the
functionality of the management server to provide basic
understanding of the application.
All contents are Copyright © 2008 IAdea Corporation Inc. All rights reserved.
Page 3 of 31
IAdea Users' Manual
First Time User: Account Setup
All first time users require to setup an account from IAdea Passport
Network (IPN). If the account has already been setup, please
proceed to Register Media Processor.
1. Open http://passport.iadea.net using an Internet browser
(I.E. or Firefox).
2. Click on the link "Create and Active Account".
3. Read the user agreements carefully. The registration cannot
be proceed if the agreement is not accepted.
All contents are Copyright © 2008 IAdea Corporation Inc. All rights reserved.
Page 4 of 31
IAdea Users' Manual
4. Fill up account information and provide one COA number.
Please find the COA number from the back of the media
processor. (This COA is used for verification process, it won't
register the device to the account yet)
5. An activation email will be sent to account email. Please login
to the email account and activate the IPN account from the
email.
6. Once the IPN account is activated. The account can be used
to login to Adfotain Central MZ management server:
http://www.adfotain.net/mz.
7. User will be requested to register at least one device for the
first time login to the management server. Note, the device
cannot be registered to multiple accounts, if the device has
been already registered, using this device information will
result failed to login.
All contents are Copyright © 2008 IAdea Corporation Inc. All rights reserved.
Page 5 of 31
IAdea Users' Manual
Logging In
1. Open your web browser and type the following address into the
address bar: http://www.adfotain.net/mz
2. Adfotain Central welcome screen will show in the browser. The
Adfotain Central MZ management sever will redirect you to the
Log-in page in 5 seconds.
3. Enter the account information. Note, copy and paste user ID or
password may result extra space appended at the end of string, thus
may result authentication failure.
All contents are Copyright © 2008 IAdea Corporation Inc. All rights reserved.
Page 6 of 31
IAdea Users' Manual
4. After you have successfully log-in, you will be transferred to the
Adfotain central device management screen where you can begin
configuring the program according to your need.
All contents are Copyright © 2008 IAdea Corporation Inc. All rights reserved.
Page 7 of 31
IAdea Users' Manual
Management Interface Overview
Adfotain central management server is organized into three frames:
1. Function navigator frame.
2. Device chooser frame.
3. Selected function display frame.
Please refer to image below.
Function navigator
Device chooser
Selected function display
All contents are Copyright © 2008 IAdea Corporation Inc. All rights reserved.
Page 8 of 31
IAdea Users' Manual
Function Navigator Overview
There are five main functions listed on function navigator: Device,
Schedule, Media, Stats and Admin. Each of them will be described
in detail later in the chapters.
Device Chooser Overview
The device chooser allows you to have easy access and reference to
all the devices. A legend is provided for a quick reference on device
online status.
Function Display Overview
All control buttons are listed on top of the corresponding
information table
Control buttons
Information table
Control buttons
Information table
Many of the control buttons may be disabled in the beginning.
These disabled control buttons require certain pre-action to enable
them. For more information about the pre-action will be provided in
later chapters.
All contents are Copyright © 2008 IAdea Corporation Inc. All rights reserved.
Page 9 of 31
IAdea Users' Manual
Tutorial 1 - Operation Flow
This section describes the common usage flow. New user is
recommended to complete this tutorial.
Step 1 Content Preparation
All media items should be stored in a media server and accessible
from Internet. If new user hasn't have the media server setup,
please use the demo file
(http://demo1.adfotain.net/files/demo/United.mpg) for this tutorial.
1. Click Media on function navigator.
2. Click Register Video/Image URL, copy and paste the media
URL (i.e. The demo file above) to the prompted box.
3. Click Ok to confirm the registration.
All contents are Copyright © 2008 IAdea Corporation Inc. All rights reserved.
Page 10 of 31
IAdea Users' Manual
Step 2 Playback Scheduling
In this step, play back time and screen zone layout will be
determined. There are several zone layout combinations, for
simplicity, this tutorial will use single zone as demo.
1. Click the device on device chooser.
2. Function display area will show the schedule time table for
the device. Click Create a Play Slot, type in the desired
playback time, then click Ok. Note if the playback time is
some time in the future, the device will be idle till the
playback time is reached.
3. On the schedule time table, there is a new play slot at the
playback time, click the time link will bring the page to Play
List Editor.
All contents are Copyright © 2008 IAdea Corporation Inc. All rights reserved.
Page 11 of 31
IAdea Users' Manual
4. In the Play List Editor page, expand the media library, click to
check the media item that we have registered in Step 1, then
click Assign Clip to Play List.
5. Click Confirm Editing on top of media library to go back to
schedule time table.
Step 3 Schedule Synchronization
Now a play back is scheduled to the device, but the device won't
start to download and play the media right away. Usually user will
create multiple play slots and visualize the whole scheduling then
select a time for the device and server to perform synchronization.
The synchronized time can be some times in the future, for
example, a retail store may want to perform synchronization during
off hours to optimize their network usage. In this tutorial, since we
want to see the action, we will force synchronization to happen
right away.
1. Click Sync Now on schedule management page.
All contents are Copyright © 2008 IAdea Corporation Inc. All rights reserved.
Page 12 of 31
IAdea Users' Manual
Device Management
The device management provides basic information on all registered devices and
allows to organizing devices into groups.
Device Group Management
Organize devices into groups make easy the device management.
All devices under the device group will inherit the schedule of the
group. In Adfotain central MZ, we introduce a multi-level grouping
mechanism. Each group can be assigned under another group to
create a tree like grouping structure. Child groups will inherit the
schedule of its parent groups.
Control Buttons – Device Groups
Create New Group
1. Click [Create New Group], a pop-up icon appears.
2. Type the group name in the New name field. Since this should
be the first group, there is no choice available on Create group
under.
3. Click OK. The system responds with a confirmation indicating
the change has been accepted or failed.
All contents are Copyright © 2008 IAdea Corporation Inc. All rights reserved.
Page 13 of 31
IAdea Users' Manual
4. Upon successfully creating the new group, an easy reference for the
grouping would also be indicated in the device chooser frame.
Create Sub-Group
1. Click [Create New Group], a pop-up icon appears.
2. Type the sub-group name in the New name field.
3. Select the parent group you want the sub-group to be part of from the list
provided under [Create group under].
4. Click OK. The system responds with a confirmation indicating the change
has been accepted.
Free Group
1. Select groups by clicking on the check box beside the group
you wish to disable.
2. Click on [Free Group].
3. A warning message will prompt up. Click OK to confirm the
action.
Note that all sub-groups and devices that were assigned to the
group will be deleted as well.
Rename Group
1. Click on the check box beside the group you wish to rename.
2. Click on [Rename Group].
3. Type in the new group name then click OK to confirm the
changes
Change Parent Group
1. Click on the check box beside the groups you wish to make the
change.
2. Click on [Change Parent Group].
3. Select a desired parent group. Click OK to confirm the action.
Note: To avoid circular grouping, only the possible parent
groups will be display for selection.
Ungroup Device
1. Click on the check box beside the devices you wish to ungroup.
2. Click on [Ungroup Devices].
3. A warning message will prompt up. Click OK to confirm the
All contents are Copyright © 2008 IAdea Corporation Inc. All rights reserved.
Page 14 of 31
IAdea Users' Manual
action.
Note: When a device is ungrouped it will automatically get
transfer to the Device management table
Rename Device
1. Click on the check box beside the device you wish to rename.
2. Click on [Rename Device].
3. Type in the new device name in the pop up box. Click OK to
confirm the changes.
Set Device Time Zone
1. Click the check box beside the devices you wish to set the time
zone.
2. Click on [Set Device Time Zone].
3. Choose the time zone you desire then click OK to confirm the
action.
Control Buttons – Ungrouped Devices
Assign to Group
1. Click on the check box beside the devices you wish to assign to
a certain group.
2. Click on [Assign to Group].
3. Select the desire group from the pull down menu. Click OK to
confirm the action.
Rename Device
1. Click on the check box beside the device you wish to rename.
2. Click on [Rename Device].
3. Type in the new device name in the pop up box. Click OK to
confirm the changes.
Set Device Time Zone
1. Click the check box beside the devices you wish to set the time
zone.
2. Click on [Set Device Time Zone].Choose the time zone you
desire then click OK to confirm the action.
All contents are Copyright © 2008 IAdea Corporation Inc. All rights reserved.
Page 15 of 31
IAdea Users' Manual
Device Management
User is capable to register/unregister devices in this area.
Control buttons
Register Devices
1. Click Register Devices button.
2. Enter COA and Mac address of device.
3. Click OK to register device.
Unregister Device
1. Checks on the box besides devices that will be unregistered.
2. Click on Unregister Device.
3. Confirm to unregister device.
All contents are Copyright © 2008 IAdea Corporation Inc. All rights reserved.
Page 16 of 31
IAdea Users' Manual
Schedule Management
The schedule management provides functions that allow users to
design their play back contents on the device.
Month Schedule View
Clicks Schedule option on function navigator bar, a monthly
schedule will be shown up in function display frame.
Month schedule is based on Greenwich Mean Time (GMT+0). For passed days,
numbers are strike through and background color is grayed out. All devices or
device groups that have play slot scheduled will be shown up here. Click on the
device/device group name will link to the corresponding schedule.
All contents are Copyright © 2008 IAdea Corporation Inc. All rights reserved.
Page 17 of 31
IAdea Users' Manual
Device Group Information
Device group information displays the number of devices assigned
to this group. The pie chart shows the online status of all devices in
this group.
Device Information
The device information displays the owner, firmware, time zone,
local time and last heartbeat of the device. The Detail Stats button
provides a fast link to device's statistic page.
All contents are Copyright © 2008 IAdea Corporation Inc. All rights reserved.
Page 18 of 31
IAdea Users' Manual
Schedule Management
Calendar
Timetable
Calendar
–
–
Days already passed are displayed with a strike-through.
Selected date is highlighted in orange. User can change display
date by simply click on the desired date on calendar.
All contents are Copyright © 2008 IAdea Corporation Inc. All rights reserved.
Page 19 of 31
IAdea Users' Manual
Timetable
Display the schedule of the selected date.
Sync Column
User can request an update to device by checking the check box of
the sync column. Device will perform necessary download and
change its playlist at the checked sync point.
Control Buttons
Sync Now
By choosing this function, the device is forced to perform an update
right away. In other words, a sync point of current time will be
inserted to the device’s schedule.
Create a Play Slot
Play slot is a reserved time to play certain media. On the zone
selection there are eleven types of zone configurations. After a slot
is created, click on the slot will bring you to playlist editor where
you can schedule your registered media item to play at this play
slot.
Confirm Editing
To avoid device sync currently editing play slot, all play slots need
to be committed before it can be read by device.
All contents are Copyright © 2008 IAdea Corporation Inc. All rights reserved.
Page 20 of 31
IAdea Users' Manual
Remove Play Slot
1. Select removing play slot by checking on the check box beside
play slots; a select all check box is provide on the header
where displays the selected date.
2. Click on Remove Play Slot.
3. A warning message will be prompt, click OK to confirm the
action.
Schedule Commands
1. Click on [Schedule Commands] button.
2. On the prompt up menu, select the command and enter the
time.
3. Click OK to confirm schedule.
Repeat Play Slot
There are two repeat methods. One is to keep the relationship with
original slot, the other will make a copy to repeaters. When the
relationship with original slot is maintained, modifications on the
original play slot will apply to all repeaters. In the other hand, make
a copy of original slot provides flexibility to customize schedule
contents to each individual repeater.
1. Select the play slots by clicking on the check boxes beside
play slots.
2. Click on [Repeat Play] Slot button.
3. On the prompt up menu, choose type of repeat and enter
number of cycles to repeat.
4. Check on Save repeated slot as a copy if you want to make a
copy to all repeater. Leave it unchecked will maintain the
relationship between original slot and its repeaters.
5. Click on OK to confirm the action.
Cancel Repeat
[Cancel Repeat] will remove the repeating effect from those
repeated slots that still maintain relationship with its original slots.
Clear All Schedule
This function will delete all play slots of this group or device. Note
that inherited play slots won't get affected.
All contents are Copyright © 2008 IAdea Corporation Inc. All rights reserved.
Page 21 of 31
IAdea Users' Manual
Play List Editor
Click on any valid play slot will brought you to play list editor page.
In this page, user can assign media item to corresponding screen
zone and decide the play back orders.
Move the mouse over the screen zone image, the dimensions of the
pointed zone will be shown as image below.
All contents are Copyright © 2008 IAdea Corporation Inc. All rights reserved.
Page 22 of 31
IAdea Users' Manual
The table below lists all screen zone dimensions.
Zone type
Full Screen
Video Upper
Video Upper
Video Lower
Video Lower
Video Upper
Video Upper
Video Upper
Video Upper
Video Upper
Video Upper
Video Lower
Video Lower
Video Lower
Video Lower
Video Lower
Video Lower
Video Right
Video Right
Video Left
Video Left
Video Upper
Video Upper
Video Upper
Video Upper
Video Upper
Video Upper
Video Upper
Video Upper
Right
Right
Right
Left
Left
Left
Right
Right
Right
Left
Left
Left
Right
Right
Right
Right
Left
Left
Left
Left
Zone
Video
Video
Text
Video
Text
Video
Picture
Text
Video
Picture
Text
Video
Picture
Text
Video
Picture
Text
Video
Picture
Video
Picture
Video
Picture Upper
Picture Lower
Text
Video
Picture Upper
Picture Lower
Text
X
0
0
0
0
0
416
0
0
0
864
0
416
0
0
0
864
0
640
0
0
640
416
Left
0
Left
0
0
0
Right 864
Right 864
0
All contents are Copyright © 2008 IAdea Corporation Inc. All rights reserved.
Y
0
0
648
72
0
0
0
648
0
0
648
72
72
0
72
72
0
0
0
0
0
0
0
324
648
0
0
324
648
Width Height
1280
720
1280
648
1280
72
1280
648
1280
72
864
648
416
648
1280
72
864
648
416
648
1280
72
864
648
416
648
1280
72
864
648
416
648
1280
72
640
720
640
720
640
720
640
720
864
648
416
324
416
324
1280
72
864
648
416
324
416
324
1280
72
Page 23 of 31
IAdea Users' Manual
Control Buttons
Assign Clip to Play List
1. Click on desired screen zone on zone image. The selected
zone will be highlighted by yellow color.
2. Click on [+ Click to Expand Media Library] to expand the
media library. [Assign Clip to Play List] button will be shown
at the bottom of the media library.
3. Click on the check boxes beside media items or predefine
playlists which you want to assign to desired screen zone for
play back.
4. Click on [Assign Clip to Play List] to assign media items to
selected screen zone.
Modify Play Duration
1. Click on desired screen zone on zone image, corresponding
assigned media will be shown in playlist table.
2. Click on the check boxes beside the media item which you
want to change its play duration.
3. Click on [Modify Play Duration].
4. Input desired play length in seconds.
5. Click OK to confirm modifications.
Modify Effects
1. Click on text zone on zone image. Note: effects can only
apply to text media files only.
2. Click on the check boxes beside the text media items which
you want to change its effects.
3. Click on [Modify Effects].
4. Configure desired effects on prompt up Modify Effects Menu.
5. Click on OK to confirm the changes.
Remove Media
1. Click on the check boxes beside the media items which you
no long want to play in the zone.
2. Click on [Remove Media].
All contents are Copyright © 2008 IAdea Corporation Inc. All rights reserved.
Page 24 of 31
IAdea Users' Manual
Media Management
Media management provides the functions for user to organize their
media URLs. Once media is registered into the library, it can be
scheduled to play on device. Commonly used media clips can also
organized into predefined playlists which make scheduling process
even easier.
Media Library
Control Buttons
Register Video/Image URL
1. Click on [Register Video/Image URL].
2. Type in the URL in the text area of the prompt out dialog box.
Note: multiple URLs can be registered at once. Hit an enter
after each URL to separate URLs to different lines.
3. If the URLs is protected by http basic authentication, User and
Password fields are required.
4. Click OK to register. A report will be generated to inform if the
URLs are registered successfully.
All contents are Copyright © 2008 IAdea Corporation Inc. All rights reserved.
Page 25 of 31
IAdea Users' Manual
Register Text URL
1. Click on [Register Text URL].
2. Type in the URL in the text area of the prompt out dialog box.
Note: multiple URLs can be registered at once. Hit an enter
after each URL to separate URLs to different lines.
3. Click OK to register. A report will be generated to inform if the
URLs are registered successfully.
Unregister
1. Click on the check box beside the media items which you want
to unregister.
2. Click [Unregister], a confirmation message will prompt up.
3. Confirm unregister will remove the selected media items from
the library.
Add/Modify Authentication
The function provide user to be able to add or modify according to
the new authentication settings of the URL.
1. Click on the check box beside the media items.
2. Click [Add/Modify Authentication] then key in the new user
name and password.
3. Confirm the settings by clicking on OK button.
Assign Clip to Predefine Play List
1. Click on the check box beside the media item which you want
to group into predefine play list.
2. Click on [Assign Clip to Predefine Play List].
3. Select the desired play list then click OK.
Modify Play Duration
1. Click on the check box beside the media item which you want
to change its play duration.
2. Click on [Modify Play Duration].
3. Input desired play duration in seconds.
4. Click OK to confirm the changes.
All contents are Copyright © 2008 IAdea Corporation Inc. All rights reserved.
Page 26 of 31
IAdea Users' Manual
Update
A registered URL can be missing or removed. The media library will
block the unavailable media URLs after the devices attempt to
download it three times. Once the URL is blocked, all devices will
skip this URL if it presents in the device's schedule. To unblock the
URL, user will have to update the file to media server then use
“Update” function in Adfotain media library to release the URL.
1. Click on the check boxes beside the media items which you
want to update its information from media server.
2. Click on [Update].
All contents are Copyright © 2008 IAdea Corporation Inc. All rights reserved.
Page 27 of 31
IAdea Users' Manual
Media Library Playlist
Control Buttons
Add Play List
1. Click on [Add Play List].
2. Input a name for predefine play list.
3. Click OK to confirm the action.
Free Play List
1. Click on the check boxes beside the play lists which you want
to dismiss.
2. Click on [Free Play List].
Free URL
1. Click on the check boxes beside the grouped media item which
you want to remove from its predefine play list.
2. Click on [Free URL].
All contents are Copyright © 2008 IAdea Corporation Inc. All rights reserved.
Page 28 of 31
IAdea Users' Manual
Stats
Stats management function allows user to easily monitor their
digital signage network.
Overview
Click the Stats function on the function navigator bar, this action
will brought you to stats overview page. In this page, you will find a
summary table of most recent events of all devices.
All contents are Copyright © 2008 IAdea Corporation Inc. All rights reserved.
Page 29 of 31
IAdea Users' Manual
Device stats
Click on View Individual Device Stats or Detail Stats (page 10) to
get to the detail statistic page of the device. This page contains
basic device information, device contents, device events and device
play record.
All contents are Copyright © 2008 IAdea Corporation Inc. All rights reserved.
Page 30 of 31
IAdea Users' Manual
Administration
Modify Alarm Email
Each device can have one or multiple alarm email address. Central
server will send out an alarm notification to the assigned email
address when there are critical situations concerning the device.
User can modify or re-assigned the Alarm email under
Administration Management screen.
1. Click on the check boxes besides the devices.
2. Click on [Modify Alarm Email].
3. On the prompt up menu, all selected device will be listed with
a text box to enter email. Separate emails by comma (,) or
semi-column(;) if there are multiple recipients.
4. Click OK to confirm the settings.
Format Storage
User will be able to format storage remotely. Note that all contents
will be erased. If the devices have schedule content, all media will
be re-downloaded after format.
Force Reboot
Force reboot will soft reboot the device remotely.
Change Password
User can change the original password, as giving at the time of
registering for the Adfotain Central MZ system, from the
administration management screen.
To change your password:
1. Click on Admin function
2. Scroll down until you see [change password]
3. You will have to enter the old password in the assigned box.
Then entered the desired new password.
4. Re-enter the new password again for confirmation
5. Click on the [change password] button to make the change.
6. A message will show up to confirm the change
All contents are Copyright © 2008 IAdea Corporation Inc. All rights reserved.
Page 31 of 31