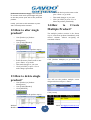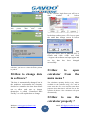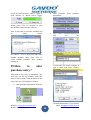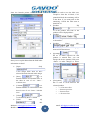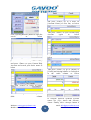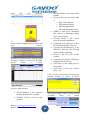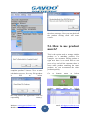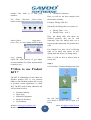
1
2012 Gayoo Software Author: Raja S Periyasamy CEO [GAYOO SOFTWARE’S FINANCIAL ACCOUNTING SOLUTION (FAS) 5.00 USER MANUAL] This book is written mainly for users of gayoo software to understand the software solution fully with their self guidance at any time, so we used here the simple language of english. A child can learn Website: www.gayoosoftware.com Mobile:+91 9965599324 1 email: [email protected] Mobile:+91 98429 83493 Gayoo software’s financial accounting solution (fas) 5.00 user manual English This book is written mainly for users of gayoo software to understand the software solution fully with their self guidance at any time, so we used here the simple language of english. Raja S Periyasamy CEO Website: www.gayoosoftware.com Mobile:+91 9965599324 2 email: [email protected] Mobile:+91 98429 83493 Gayoo Software FAS 5.00 User Manual Website: www.gayoosoftware.com Mobile:+91 9965599324 worldwide English version 3 email: [email protected] Mobile:+91 98429 83493 SNo Chapter 1. How to Open the Software? How to select data path ? How to login to the software? How to Logout from the software? How to select company? How to switch between menu(s)? How to use function keys? How to use Alternate Keys? How to switch between two languages like English/Tamil? How to type in Tamil ? How to create single product ? How to alter single product? How to delete single product? How to Create Multiple Product? How to create a customer? How to create a supplier? How to create a Account or Group Account? How to create a User ? 2. 3. 4. 5. 6. 7. 8. 9. 10. 11. 12. 13. 14. 15. 16. 17. 18. Website: www.gayoosoftware.com Mobile:+91 9965599324 Page No 6 19. How to use Product Enquiry ? 20. How to change date in software? 21. How to open calculator from the main menu ? 22. How to use the calculator properly ? 23. How to open Phone Book in the software ? 24. How to create purchase entry? 25. How to alter purchase entry? 26. How to delete purchase entry? 27. How to print barcode label? 28. How to print barcode label for single product? 29. How to create sale entry? 30. How to alter sale entry? 31. How to delete sale entry? 32. How to print sale entry? 33. How to do credit sale entry? 34. How to do cash sales with customer name ? 35. How to use Custom Help Account? 36. How to create Bank Payment? 37. How to create Bank Receipt? 6 6 7 7 8 9 9 9 10 10 16 16 16 17 19 21 23 4 25 30 30 30 31 31 34 35 36 39 41 44 45 46 46 47 48 53 55 email: [email protected] Mobile:+91 98429 83493 38. How to create Cash Payment? 39. How to create Cash Receipt? 40. How to create credit note? 41. How to create debit note? 42. How to create journal? 43. How to feed opening balance for single account? 44. How to feed opening balance for multiple account? 45. How to feed opening stock for product? 46. How to create, alter and delete multiple barcode for one product? 47. How to create bill to bill settlement receipt (cash or bank) ? 48. How to create bill to bill settlement payment (cash or bank) ? 49. How to do simple year creation process? 50. How to do detailed year creation process? 51 How to do year end closing stock process? 52 How to recalculate balance for account? 53 How to recalculate stock for product? 54 How to use product match? Website: www.gayoosoftware.com Mobile:+91 9965599324 57 55 59 56 61 57 63 58 65 68 59 69 60 61 71 62 74 63 76 64 65 79 66 How to See Ledger Account Summary for Account Name ? How to use product kit? How to use product to kit? How to use kit to product? How to interface and use Electronic Weighing Scale ? How to use multiple MRP ? How to use Batch Number & Expiry Date? How to use raw material consumption? How to use simple multiple product unit ? How to use multiple product unit ? How to use Production Sermi Finished ? How to use Production? 93 95 97 82 84 86 90 91 92 5 email: [email protected] Mobile:+91 98429 83493 Gayoo Software’s Retail Management Solution Gayoo FAS 5_07 is the customized ERP for all kind of retail point of sale business including click Hyper Market Super Market Department Stores Grocery Store Provisional Store Fruits & Vegetables Store Medical Shop Vehicle Spare Store Sweet & Bakery Restaurant Textile Shop 2.How to select data path ? We here by explain step by step how to use software easily and correctly 1. How to Open the Software? After open the icon you will prompt for the data path selection Select the desire data path use Up/Down arrow keys and press <Enter> to go inside 3.How to login to the software? Switch on the computer/laptop wait until your operating system Windows XP/Windows 7 fully loaded to the memory Take the mouse and click on the desktop or use keyboard [Windows Key]+D to focus directly to the Desktop There you will find the short cut of software icon located in any location of the screen and mouse click or enter or mouse right Website: www.gayoosoftware.com Mobile:+91 9965599324 6 Once go inside the data path you will see the login screen as You have enter your UserID and Password given by your owner or email: [email protected] Mobile:+91 98429 83493 supervisor as looks like below exit from the software that we called as Logout from the software In textbox opposite to label UserID type your <userid> and press <ENTER> to go next textbox In textbox opposite to label Password type your <Password> and press <ENTER> to go to Date Textbox In Date textbox check the date is correct format as DD-MM-YYYY and today then press <ENTER> Now you will focus on Language scroll bar you can select your desire human language default will be <English> and press <ENTER> Now you will focus on the [LOGIN] button, then click or press <ENTER> to go inside the software Go to top menu Select [EXIT] option from the top menu as below Press <Enter> or mouse <Click> and focus will come to the login screen as below Press <Enter> or mouse <Click> on [Logout] button to close the software successfully. 5.How to select company? Once you login, you will see the classic interface of the Gayoo software in your favorite color as 4.How to Logout from the software? Once you logged into the software and finish all the work and now want to Website: www.gayoosoftware.com Mobile:+91 9965599324 But the all option of disabled and company also not shown 7 email: [email protected] Mobile:+91 98429 83493 Now your focus will be in [SELECT] so press <ENTER> or mouse <CLICK> to open Custom Help Company Then press <ENTER> or mouse <DOUBLE CLICK> to select the company software, because, which designed for the user easy and remember are called Press <ENTER> to go to the company Top Menu Left Menu Bottom Menu Right Menu Now you have successfully selected the company as you wish 6.How to switch between menu(s)? Gayoo software menu’s quiet different from the menus you are known from other Website: www.gayoosoftware.com Mobile:+91 9965599324 8 email: [email protected] Mobile:+91 98429 83493 <F6> to know the Cost Price or Profit Information <F7> to how Stock From Multiple Location <F8> to auto load product selected using (+/-) from product enquiry <F9> to Accept the any Action <F10> to open form menu <F11> to auto load from one voucher to another These are most frequently used, but in some places we uses the same key for other function that we will explain in that particular place or module 8.How to use Alternate Keys? Here, you have to use <ESCAPE> key to scroll between the menus use Up/Down arrow keys to navigate and press <ENTER> to forward and press <ESCAPE> to backward. Also you can use mouse to go to any option directly without keyboard. As like any software use will use alternate denoted underscore in command button as here the key <L> is Alternate key, you have to press <ALT>+L same time using two fingers to change the language easily wherever you are seeing the same you have do the same work to get the correct resut. 7.How to use function keys? Gayoo software will use frequently some function keys, which are more easy and quick access to the software <F1> for calculator <F2> for select Customer or Supplier <F3> for Cash Customer or Supplier <F4> for refresh the information you typed <F5> for open Account Department from Voucher Website: www.gayoosoftware.com Mobile:+91 9965599324 9.How to switch between two languages like English/Tamil? Normally, the software will open in the user desired language in case the user would like view the information in the other language also he has to use <ALT>+L to switch between language from any screen of the software to change 9 email: [email protected] Mobile:+91 98429 83493 back to previous language again use <ALT>+L You have to choose [FINISHED PRODUCT] and press <ENTER> or [MOUSE CLICK] then you will see the [FINISHED PRODUCT] screen as below Click [CREATE] button in the left side of form it will let you in the product creation process 10.How to type in Tamil ? We used Unicode font named Tscu_Paranar from E-Kalappai of Keyman software, which is user friendly, for switching between English and tamil you have to use <ALT>+3 For example for you will type ammaa in tamil «õÁ¡ will come automatically for detailed information you will ask for Gayoo Tamil keyboard layout. The [Information] tab is the basic information will be needed for the product 11.How to create single product ? In [LEFT MENU] of gayoo software you find the [PRODUCT] or [PRODUCT MANAGEMENT] icon Go there and press <ENTER> or use mouse [CLICK] to open then you will see the product menu as Website: www.gayoosoftware.com Mobile:+91 9965599324 10 [ProductID] is the automated number, but [Product Code] is the user defined code, but by default the product id is put in the product code. Press <Enter> to goto [ProductName] [ProductName] you will enter the name of the product in English example: Turmeric Powder 100g and press <ENTER> email: [email protected] Mobile:+91 98429 83493 [ProductNameMotherLanguage] it will automatically replaced by the product name in English here you have to type the product name in Mother Language [ML] for type in language keyboard use <F1> [BarCode] It is the automated id column of the software To print barcode, also you can scan/type company barcode on the product in any digit, suppose if you deleted the default barcode use <F1> automatically update from every purchase transaction [PurchasePriceAverage] is the value based average price and this also automatically updated from the after purchase voucher entry. [PurchasePriceMaximum] is purchase price control factor used to control the purchase price below the the price mentioned, if its zero the control is not work. The [Sale] tab is to type all the sale price information to load it again The [Purchase] tab is asking all detail related to to purchase [PurchasePrice] is the cost price of the goods excluding tax , purchase expenses, purchase commission [PurchasePriceCurrent] is the current cost price excluding tax, purchase expenses, purchase commission and will Website: www.gayoosoftware.com Mobile:+91 9965599324 [SalePrice] the most commonly used price is this only as a retail price [SalePriceWholeSale] the most commonly used whole sale price is this only as whole sale price and by default whole sale price is replaced by the retail price 11 [SalePriceAverage] is the automated price calculated from the Sale Voucher [SalePriceMinimum] is user cannot sale blow this price [SalePriceMaximum] is user cannot sale above the price mostly known as MRP email: [email protected] Mobile:+91 98429 83493 [SpecialPrice] is used to define more sale prices for selling the product so, the customers have to be classified into those price category [OpeningStock] is the automated field sum of opening stock from the voucher entry on different date or frequest opening stock feeding [ClosingStock] is the automated field to hold the calculated closing stock [Setting] tab is to set the desire setting The [Sock] tab is to put stock level as we want [MinimumStock] this is minimum level of stock we should keep in place to meet the sale, its having automatic calculation also to fix it [MaximumStock] User can also specify the maximum stock level to stop unwanted stock to be hold in place [ReOrderLevel] is the quantity to place purchase order to the supplier [DeadStockLevel] is the quantity to maintain the dead stock in place Website: www.gayoosoftware.com Mobile:+91 9965599324 12 [Status] use <SpaceBar> to select 0Enable / 1-Disable, if the product is once disabled the product cannot be used in any voucher [CalculateStockUsing] use <SpaceBar> to select o 0-PurchasePrice o 1-PurchasePriceAverage o 2-PurchasePriceCurrent o 3-BasicPrice o 4-NettPrice [IsPurchasePriceMaximumFound] When making purchase entry user try enter above PurchasePrice Maximum the setting can be as using <SpaceBar> o 0-ALLOW It allow user normally o 1-ALLOW WITH WARNING It ask user to want to allow this or not email: [email protected] Mobile:+91 98429 83493 2-ALLOW NEVER It never allow user to go beyond this level [IsSalePriceMinimumFound] is setting is used to set what to do if sale price minimum found can be selected using <SpaceBar> as o 0-ALLOW It allow user normally o 1-ALLOW WITH WARNING It ask user to want to allow this or not o 2-ALLOW NEVER It never allow user to go beyond this level [IsSaleNegativeStockFound] is negative stock found in sale voucher the user what to do can be selected using <SpaceBar> as o 0-ALLOW It allow user normally o 1-ALLOW WITH WARNING It ask user to want to allow this or not o 2-ALLOW NEVER It never allow user to go beyond this level [StockCalculationMethod] We use several stock calculation method user can select this anyone of the suitable process to each and every product using <SpaceBar> as o 0-SetClosingStock o 1-SetClosingStockTransfer Goods o 2-SetClosingStockExpiry Product o 3-SetClosingStockOnMRP o 4-SetClosingStockOn BatchNumber o 5-SetClosingStockKIT o Website: www.gayoosoftware.com Mobile:+91 9965599324 o 6-SetClosingStockMultiple ProductUnit [Classification] tab is used to define different grouping analysis for product as o o o o [Group] this can be company / main / first category of product [SubGroup] this can be brand / sub / second category of product [Section] this can Content / third category of product [SubSection] this can flavor / fourth category of product User can use <SpaceBar> to call Custom Help to select previous information entered in the field for saving time with typing it again and again. [Location] tab is used to type exact location of the product in the ware house / branch / shop 13 email: [email protected] Mobile:+91 98429 83493 [ProductPurchasePriceUnit] This field can be used select default unit of measure during purchase voucher entry, use <Spacebar> to select Unit / Pack / Bundle [ProductSalePriceUnit] This field can be used select default unit of measure during sale voucher entry, use <Spacebar> to select Unit / Pack / Bundle [Place] This field only can used to locate product simly as A101 The [Unit] tab is used to mention unit related information about the product [Purchase (Price Or Percentage)] Different purchase price can be entered for unit / pack / bundle. [ProductUnit] User can type select default unit using <SpaceBar> or existing unit by <Blank> and <Enter> or type the desire unit kgs / dozen / set etc., [Sale (Price Or Percentage)] Different sale price can be entered for unit / pack / bundle. [ProductPerUnit] This field can be used by default how much the product contained will be entered here as 1, if [ProductSemiFinished] setting i s enabled suppose the product is [Addition1] tab is used to mention different kind of parameters can be entered by the users. Turmeric Powder 100g here we should enter 0.100 [ProductPerPack] This field is used to mention how much product per unit in a pack of product [ProductPerBundle] This field is used to mention how much pack of product per unit contained in a bundle of product Website: www.gayoosoftware.com Mobile:+91 9965599324 14 email: [email protected] Mobile:+91 98429 83493 [Special] this field is used to mention type of product as o o o o FP – Finished Product RM – Raw Material SF – Semi Finished Product PM-Packing Material [Distribution] This tab is used to mention some extra factor as [Warranty] is the field is used mention warranty in days or expiry in days [BasicPrice] is the purchase price excluding tax Later can used for warranty days calculation and expiry date calculation [NettPrice] is the purchase price including tax can be used for exact profit calculation [Addition2] tab is having some important fields as below [PurchaseProfit] is the field to know how much profit from the purchase process. [SaleProfit] is the field to know how much profit from the sale process. [SelfPacking] is the field to mention this can be self packed by the company locally use <SpaceBar> Yes /No [ProfitPerProduct] is the field used to automate the Sale Price calculation in purchase voucher. [VAT] is Value Added Tax option to fix input , output tax and cst tax Website: www.gayoosoftware.com Mobile:+91 9965599324 15 email: [email protected] Mobile:+91 98429 83493 [SaleCommissionPercentage] is the field used to mention how much percentage will given to the sale person upon sale of this particular product. o o o Finally, you have to click <ACCEPT> or press <F9> to finish product creation. 14.How to Create Multiple Product? 12.How to alter single product? o o Goto [Product] or [Product Management] Goto [FinishedProduct] Click [ALTER] o Then you will see the product enquiry o Select the desire product want to alter press <Enter> to go inside Then make changes as you want Click [ACCEPT] or press <F9> to make changes permanent. o o o The multiple product creation is the fastest way to create more products immediately with desired columns without navigating all unwanted columns Click [Product Multiple] to go inside this option 13.How to delete single product? o o o Select the desire product want to alter press <Enter> to go inside Then make changes as you want Click [ACCEPT] or press <F9> to delete the product permanently. You will see the product multiple screen design and select and press <Enter> Goto [Product] or [Product Management] Goto [FinishedProduct] Click [DELETE] Click [Create] o Then you will see the product enquiry Website: www.gayoosoftware.com Mobile:+91 9965599324 16 email: [email protected] Mobile:+91 98429 83493 [ProductCode] this will come automatically from the MaximumProductID Like this way you create all the product one by one maximum 499 product you can create per voucher, [ProductName] you have to type the product name in English Finally, click [ACCEPT] or press <F9> to create the product multiple. 15.How to customer? [ProductNameML] type the product name in Mother Language create a The customer is the person or company who buying products from us in the terms of cash or credit [Barcode] here automatic barcode will come here, if you want scan your desire branded or company barcode. [ProductUnit] this is the field to mention unit as pce / set / dozen Goto Left Menu Find the icon named [Customer] Click this icon to invoke [Customer] information Click [CREATE] for new customer it will focus on [UnderGroupAccountName] Press enter to show [CustomHelpAccount] as below the [SalePriceMaximum] this is field also known as MRP [BasicPrice] is the field to type excluding tax purchase price if don’t know the Basic Price If you type the Input Tax and Nett Price the Basic Price will calculated automatically. [InputTax] is the field to enter the purchase tax percentage [NettPrice] is the field to mention the purchase price including the tax. Website: www.gayoosoftware.com Mobile:+91 9965599324 17 the email: [email protected] Mobile:+91 98429 83493 Now select the group account name Customer and press <Enter> to proceed to next [AccountID] automatically created from the group account id + maximum account id [AccountCode] the accounted will be placed automatically in this field also user can enter the desire value on this field [Marketing] tab is used to provide complete marketing information for this customer [AccountName] is name of the customer in English with city name [Account Name (Alias)] is alias name of the customer in english [AccountNameML] is name of customer in Mother Language [AccountNameMLAlias] is alias name of the customer in Mother Language This information can be used later for obtaining analysis report about sales, purchase, stock, customer & supplier closing balances etc., [Opening] tab is used to provide Closing Debit as Opening Debit and Closing Credit as Opening Credit This tab is used give full address details of the customer with landmark also [Setting1] tab is used to provide many information as below Website: www.gayoosoftware.com Mobile:+91 9965599324 18 email: [email protected] Mobile:+91 98429 83493 [CreditLimitDays] This field is used to maintain the credit limit days from the invoice date for example if we put 15 days, the invoice date is 01-3-2000, the bill should be settled on or before 15-03-2000 [CreditLimitAmount] This field is used to maintain the maximum credit limit for each and every customer One customer have both of the above two limits, which one validating first that will take to effect, the credit limit violation can be set as PurchasePriceMaximum BasicPrice NettPrice When we select the particular customer the default price will come in all related Sale Vouchers. All license numbers will be entered for multiple reporting purposes. This setting will help us to set for each and every customer as 0-ALLOW 1-ALLOW WITH WARNING 2-ALLOW NEVER [DefaultID] In sale voucher the customer may ask some fixed features for their accounting purpose that also can be easily updated and maintained using these default ids [Setting 2] has some important information for the customers as below [DefaultPrice] Suppose, we classified the product prices for the customer based on grade the default price for each and every customer can be set using <SpaceBar> as below 16.How to supplier? SalePrice SalePriceWholeSale SalePriceAverage SalePriceMinimum SalePriceMaximum SalePriceSpecial1 SalePriceSpecial2 SalePriceSpecial3 SalePriceSpecial4 SalePriceSpecial5 PurchasePrice PurchasePriceCurrent PurchasePriceAverage Website: www.gayoosoftware.com Mobile:+91 9965599324 create a The supplier is the person or company who selling products to us in the terms of cash or credit 19 Goto Left Menu Find the icon named [Supplier] Click this icon to [Supplier] information invoke the email: [email protected] Mobile:+91 98429 83493 [AccountNameML] is name of supplier in Mother Language [AccountNameMLAlias] is alias name of the supplier in Mother Language Click [CREATE] for new supplier it will focus on [UnderGroupAccountName] Press enter to show [CustomHelpAccount] as below Now select the group account name Supplier and press <Enter> to proceed to next [AccountID] automatically created from the group account id + maximum account id [AccountCode] the accounted will be placed automatically in this field also user can enter the desire value on this field This tab is used give full address details of the supplier with landmark also the [AccountName] is name of the supplier in English with city name [Account Name (Alias)] is alias name of the supplier in english Website: www.gayoosoftware.com Mobile:+91 9965599324 20 email: [email protected] Mobile:+91 98429 83493 [Marketing] tab is used to provide complete marketing information for this Supplier 0-ALLOW 1-ALLOW WITH WARNING 2-ALLOW NEVER 17.How to create a Account or Group Account? This information can be used later for obtaining analysis report about sales, purchase, stock, customer & supplier closing balances etc., The Group Account is the personal or nominal information of the company Goto Left Menu Find the icon named [Account] Click this icon to [Account] information Click [CREATE] for new group account it will focus on [UnderGroupAccountName] Press enter to show [CustomHelpAccount] as below [Opening] tab is used to provide Closing Debit as Opening Debit and Closing Credit as Opening Credit invoke the [Setting1] tab is used to provide many information as below [CreditLimitDays] This field is used to maintain the credit limit days from the invoice date for example if we put 15 days, the invoice date is 01-3-2000, the bill should be settled on or before 15-03-2000 [CreditLimitAmount] This field is used to maintain the maximum credit limit for each and every supplier One customer have both of the above two limits, which one validating first that will take to effect, the credit limit violation can be set as This setting will help us to set for each and every supplier as Website: www.gayoosoftware.com Mobile:+91 9965599324 21 the email: [email protected] Mobile:+91 98429 83493 [AccountName] is name of the Acount in English with city name [Account Name (Alias)] is alias name of the group account or account in english [AccountNameML] is name of group account or account in Mother Language [AccountNameMLAlias] is alias name of the group account or account in Mother Language This tab is used give full address details of the group account or account with landmark also Now select the group account name and press <Enter> to proceed to next Now it ask Want to create Group Account ? if you pur [Yes] this leads us to create Group otherwise this leads to create Account [AccountID] automatically created from the group account id + maximum account id [AccountCode] the accounted will be placed automatically in this field also user can enter the desire value on this field [Marketing] tab is used to provide complete marketing information for this group account Website: www.gayoosoftware.com Mobile:+91 9965599324 22 email: [email protected] Mobile:+91 98429 83493 or account This information can be used later for obtaining analysis report about account closing balances etc., Click [CREATE] to new user creation [Opening] tab is used to provide Closing Debit as Opening Debit and Closing Credit as Opening Credit Type your full name as [User Name] and short name as [User ID] Type your desire password in 10 digit and also retype the same in next textbox. And press <Enter>, now you will see the user rights screen as below 18.How to create a User ? User creation is very simple and powerful option to control all user in a strict manner. Goto bottom menu <F1> is used to select Select [User Admin] and press <Enter> or <MOUSECLICK> to open it Website: www.gayoosoftware.com Mobile:+91 9965599324 <SpaceBar> is used to select / deselect permission for one module 23 email: [email protected] Mobile:+91 98429 83493 You can use more special key functionality to select or deselect rights for Create / Alter / Delete / Print Click <Delete> to select all module rights Click <Delete> to deselect all module rights <C> to select / deselect <Create> rights <A> to select / deselect <Alter> rights <D> to select / deselect <Delete> rights <P> to select / deselect <Print> rights Click <Alter> to select all module rights Now press <F1> to select all the rights in software as below Click <Alter> rights to deselect all module And press <Enter> you will focus on the [ACCEPT] button, then press enter the user will created and prompted a success Website: www.gayoosoftware.com Mobile:+91 9965599324 24 email: [email protected] Mobile:+91 98429 83493 message. Below will show close up screen shot of product enquiry By this way you can create many number of user as you required. 19.How to use Product Enquiry ? Gayoo software product enquiry is custom help customized enable you to design yourself, required fields, width, back color Goto bottom menu You can search in any single column and multiple column There are more function key operations in this mode <F1> from the text boxes enable us to do start of field search and middle search as a multiple column <F2> from the text boxes to switch between English and Mother Language <F3> from the text boxes to filter if closing stock exist only or not. <F4> from the text boxes Click [Product Enquiry] to open it, now you will see the full view of enquiry to select one supplier all the products which can be Website: www.gayoosoftware.com Mobile:+91 9965599324 25 email: [email protected] Mobile:+91 98429 83493 useful for placing purchase order to the supplier. o Press <F4> key from any text boxes, you see a Custom Help Account for supplier as below Another set of function keys which will used on the selected product in the list box control <F1> EDIT is used to edit the information on the selected list box control as below o o Select the desire supplier name and pres <Enter> Now it ask us , Want to update from Supplier to Product from Purchase and PurchaseReturn Now, we would like to change the Purchase Price, goto there using Up/Down arrow and press <F1> to show the text box as below o o If you press <Yes > it take some to do process, <No> proceed with the existing information. Then press <Enter> you will see only the product those supplied by a selected supplier as below and type the actual purchase price and press <Enter> to place it in the corresponding position as below By this way you can change all information finally, click the [Update] button to save the changes in to the product or you want to cancel the operation click <Close>. <F2> Supplier is used to see one supplier or all the supplier who supply this product in bill wise detailed information, now press <F2> after focus on desire product in list Website: www.gayoosoftware.com Mobile:+91 9965599324 26 email: [email protected] Mobile:+91 98429 83493 box control. You will see the Custom Help Account below with the list of customers to select You will see the Custom Help Account as below with the list of supplier to select if you want select any one supplier use Up/Down arrow to navigate and press <Enter> to show the Supplier Price History as below if you want select any one supplier use Up/Down arrow to navigate and press <Enter> to show the Customer Price History as below now you will see only one supplier purchase history of one product now you will see only one customer sale history of one product Suppose from the Custom Help Account instead of selecting any supplier if you press <Escape> you will see the Supplier Price History of the suppliers of this product as below Suppose from the Custom Help Account instead of selecting any customer if you press <Escape> you will see the Customer Price History of the customers of this product as below <F3> Customer is used to see one customer or all the customer who bought this product in bill wise detailed information, now press <F3> after focus on desire product in list box control <F4> Match is very useful facility, if suppose customer asking one product but the stock is not available for that at the same time we have another product with the similar use with same functionality we recommend that product to the customer as this will same like that one which you asked Website: www.gayoosoftware.com Mobile:+91 9965599324 27 email: [email protected] Mobile:+91 98429 83493 and try to convenience them easily, but if the sales man is new he does not which product is match with which once, in this situation our software is very use ful to identify easily those product Suppose your customer asking for Chair you will search as below But we don’t have stock on that product, now press <F4> you will list of product matching with the similar product as below <F5> Kit is used to maintain stock calculation for group of product joined as one product called as Kit, now we would like to see what are the product contained in the kit as below here, if you would like hide the purchase prices you can do it with help of the settings available for users/counters also Here, the Dining Table is the kit contains 1 Table and 4 Chair <F7> Stock is used to display stock available in different warehouse(s) or branches of the company, focus one desire product as blow <F6> Price this is used to know all the prices of this product selected in the list box control press <F7> to display stock as below Website: www.gayoosoftware.com Mobile:+91 9965599324 28 email: [email protected] Mobile:+91 98429 83493 each and every location have how many stock with the total available also. <Enter> <F8> Reserved is to display reserved product for how many customer and how much quantity now it ask Want to print all? If you select <No> it will print only current page selected. If you select <Yes> it will ask message as below And press <F8> to show reserved product as below and also show the remain stock by subtracting reserved stock from the available stock this used to select direction of printing 0Portrait 1-Landscape, type your desire number to click <OK> <F9> Print is used to print product list with customized manner. Click <F9> you will receive message as below then it ask print column as percentage width between 50-100? The default will be 85 percentage, then click <OK> If you select <Yes> it will let you to the next message as below, then it ask top margin for printing default will be 500 pixels, then click <OK> use Up/Down arrow to navigate and <SpaceBar> to select / deselect and then press Website: www.gayoosoftware.com Mobile:+91 9965599324 29 email: [email protected] Mobile:+91 98429 83493 In the software login form you will see a date textbox as below then it ask left margin for printing default is 100 pixels, then click <OK> In the date textbox press <F2> key to open the small date change screen as below then it ask for font size default will be 10 size. then type your desire date in MM-DD-YYYY format and click <OK> and click <Logout> the software and open again and see the date has been changed successfully. then it show the available printers for selection, you have to select the desire printer to print it. 21.How to open calculator from the main menu ? 20.How to change date in software? The date is automatically changed, but in the multiuser environment the company decided to centralize the date that means not to allow each user to change themselves is called “Centralised Date Facility” we will explain how to change. The calculator opening facility every where available in the software using <F1> and in some areas the <F1> was used for some other purposes also, that time it will ask Yes or No question if choose <No> calculator will open automatically. 22.How to use the calculator properly ? Website: www.gayoosoftware.com Mobile:+91 9965599324 30 email: [email protected] Mobile:+91 98429 83493 Press <F1> from any of the screen to open calculator as shown below 24.How to create purchase entry? In every business the purchase transaction is very important, to know the exact cost of the goods and to know the profit from the sold product the purchase transaction is needed. Here you can do any calculation + for addition - for substration / for division * for multiplication Goto Purchase Department from the main menu Press <Enter> or mouse <Click> to open it, then you will see the purchase menu as below Select <Purchase> and press <Enter> to Open Purchase entry screen as below Example: 25+15-5*10+20/1 After press <Enter> to display the value in the same text box. If you would like to transfer the result automatically to called textbox just press <SpaceBar> also, it will not store any value inside if you close the form the calculated date will be lost. 23.How to open Phone Book in the software ? The phone book in the Gayoo software is very simple and useful, to open the phone book from main menu top, left , bottom, right you have to press <F2> key you see the form as below Then click <Create> and press <Enter> to choose the phone book grouping and then fill all the desired information, after that any time you can view it via <Alter> button from the phone book entry. Website: www.gayoosoftware.com Mobile:+91 9965599324 31 email: [email protected] Mobile:+91 98429 83493 the basic accounting rule for purchase transaction is [Debit] The Receiver and [Credit] the giver), to get help from account use <SpaceBar> To add a new purchase Click <Create> from the purchase screen If you are creating a very first entry it ask you to give the starting voucher id as below but, there you did not find your desire supplier name, because right now you are creating the account information one by one, so just press <Escape> to go back to the previous screen. if you need to give any continuation of existing serial you can give here, otherwise just press <OK> to continue to create new supplier from the purchase screen itself, press * (asterisk) from the [Credit] textbox it let you to the Supplier Information as below now it ask you to give the voucher date or goods received date (some customers they use this as invoice date also) and press <Enter> ( to know more about this please read article 16.How to create a supplier?) After supplier creation is over, user <SpaceBar> and select supplier name as below now it let you another screen <Purchase Bill> you should feed the Invoice Number and the Invoice Date and press <Enter> after it focus on the [Credit] Cash in Hand ( Website: www.gayoosoftware.com Mobile:+91 9965599324 32 email: [email protected] Mobile:+91 98429 83493 now press <Enter> to select the supplier and go back to the purchase screen And press <Enter> to proceed to the product entry screen. from this select your desire product and press <Enter> to go back to purchase screen with selected product code as below press <Etner> to get information about the product as below, by seeing the purchase bill you have feed the all the product one by one, if the product is newly come use * <asterisk> from the [ProductCode] to open Product Information (to know about this read article 11.How to create single product ?) by default it focus on the [SerialNumber] shortly known as SNo press <Enter> to proceed to next column [ProductCode] [ProductCode] is the most used column of the application in inventory mode, what are the work can be done here? Will explain one by one. You can type the code of product to get information of product directly You can scan barcode here to interpret the product code using barcode. After If you don’t know the both above information, you have to press <Enter> (make sure the [ProductCode] is blank) then it will help you open the Product Enquiry or Product Enquiry Custom Help Customised as below feed any discount as below Any amount to add or amount less use the following textbox Check the tax information as shown in the tax break up screen as below (to know more about this read article 19.How to use Product Enquiry ? ) Website: www.gayoosoftware.com Mobile:+91 9965599324 33 email: [email protected] Mobile:+91 98429 83493 check the total purchase value is equal to total amount as shown below bigger open purchase department from purchase click <Alter> command button you will see the finally, press <F9> or <Accept> to save the purchase entry into the software. Now it ask want to print the purchase bill as show below if you choose <Yes> it will print and create another purchase entry, click <No> to create another purchase entry without printing it. Voucher ID Text box, as below 25.How to purchase entry? if you know the which voucher id type it there and press <Enter> alter Alteration in any entry is mandatory, any well user can do any mistake some that time he has to made some alteration in the entry, here we will explain to do this? open purchase department from top menu it ask is this voucher with its essential information, if you choose Website: www.gayoosoftware.com Mobile:+91 9965599324 34 email: [email protected] Mobile:+91 98429 83493 <Yes> it will show all the information belong to that particular voucher id as below open purchase department from purchase click <Delete> command button you will you can make alteration as you wish and press <F9> to Accept changes see the Voucher 26.How to delete purchase entry? Text box, as below if you know the which voucher id type it there and press <Enter> This is very rarely used when some purchase entry has too many errors or no need, in this case we have to delete this purchase information permanently, once you commit the delete you cannot roll back it. ID open purchase department from top menu it Website: www.gayoosoftware.com Mobile:+91 9965599324 35 email: [email protected] Mobile:+91 98429 83493 barcode printer is expensive and labels are also expensive, but using inkjet and laser printers are very cheapest solution to printing barcode label using our software in easy manner. ask is this voucher with its essential information, if you choose <Yes> it will show all the information belong to that particular voucher id as below The barcode labels can be printed from many modules of the software are listed below Purchase Sale Return Opening Stock Production Production Semi Finished Here, we explain you how to print barcode from purchase entry screen. First create the purchase bill as required and then go to alter as below if you want to confirm the remove press <F9> to Delete Click <Alter> to open the desire purchase voucher will ask you as below it ask are you sure to delete, if you press <Yes> it permanently delete purchase voucher entry <No> release voucher id from the delete mode. 27.How to barcode label? print type your desire [voucher id] and press <Enter> Nowadays, id automation is a very important one for handling more products in a retail shop for identity purpose, there are many ways to print barcode sticker. Barcode sticker can be printed using special printer made up for printing barcode or using any inkjet or laser printer, but the special Website: www.gayoosoftware.com Mobile:+91 9965599324 36 email: [email protected] Mobile:+91 98429 83493 voucher to the barcode printing you have to select <Yes>, if you select <No> it will start with the barcode printer with the already selected information. now it reconfirm the voucher information select <Yes> to display the information If previous barcode information found it ask us want to add with existing one, if you choose <Yes> it will add this bill with existing information already selected using the same option. If you choose <No> it will start with the existing information already selected now you see at the bottom of the purchase screen you will find the command button <Barcode> as below now it ask you select preloaded barcode design of different barcode labels, you have to select the desired design and press <Enter> it will click <Barcode> to open the barcode printer screen, but before that it ask us to load the voucher to the barcode printer as below if you want to add all the product in this Website: www.gayoosoftware.com Mobile:+91 9965599324 37 email: [email protected] Mobile:+91 98429 83493 show the barcode printer screen as below option is used to save the label cost, example a sheet has 65 labels, if we printed 60 labels the remaining will be in the sheet. if you want print on the remaining 5 labels the label start at should be 61 [Product ID] id of the product and code of the product will be displayed here [Product Name] the selected product name in English is shown here [Product Name ML] the selected product mother language name will be shown here Here just we explain little about the field in the information in detail [Paper [Quantity] the no of product is change the <Enter> to labels required for this entered here, you can desire quantity and press make changes as below Size] is the design name what we have selected from the barcode label design [Row] is to mention number of horizontal lines in the sheet in case of A4 / letter / 210x310 sizes [Column] is to mention number of vertical lines in the sheet in case of A4 / letter / 210x310 sizes. [Labels] is calculated by Row x Column [Label Start [Navigation] this is used to scroll between the selected product o << is for move first o < for move previous o > for move next o >> for move last this At] this Website: www.gayoosoftware.com Mobile:+91 9965599324 38 email: [email protected] Mobile:+91 98429 83493 [Select] is used to select the group of barcode to printed ALL – print all products SELECTED – what you have see in the screen only that product is printed o SELF – this option is to print only print the self packing products o INTERNATIONAL – this option is only print the international barcode products. [Label] is the option for showing the total quantity of labels as below o o there you have to select the desire printer and press <Enter> [Page] is the option for showing total number of pages Now click <Print> to start printing barcode label you can scan print and fix in the products and scan the barcode labels during sale process. By this way you can print barcode labels using any printer. now it shows you the printer selection dialog box as below 28.How to print barcode label for single product? Website: www.gayoosoftware.com Mobile:+91 9965599324 39 email: [email protected] Mobile:+91 98429 83493 now it reconfirm the voucher information select <Yes> to display the information Many times we have printed all the labels of a purchase voucher but we have to make change only one product barcode label we would like take label for only one product instead of printing all the product labels, here we will explain how to achieve this easily, Go to [Purchase Department] in the top menu Open [Purchase] screen from the purchase department menu below Now scroll to the desire product and press <F5> to selection process Click <Alter> to open the desire purchase voucher will ask you as below it ask “Want to Add <ProductCode> to Barcode Printing ?” if you press <Yes> it will ask next question as type your desire [voucher id] and press <Enter> “Previous Barcode Information Found Want to Add with existing One?” if you choose <Yes> it add to the previous barcode information already selected or if choose <No> the previously selected barcode information will be deleted and Website: www.gayoosoftware.com Mobile:+91 9965599324 40 email: [email protected] Mobile:+91 98429 83493 like to give more concentration to this process. So we start over here how to create sale step by step. only this product is available for barcode printing and display the message below by this way you can add many products from the different voucher even purchase, opening stock, production semi finished or production. Go to [Sale Department] from the [Top Menu] and press <Enter> to proceed next Now it will show [Sale Department Menu] as below Finally, click the <Barcode> button from the voucher screen it Go to [Sale] and pess <Enter> Then it ask you the following question In this case, you have to click <No> to start with the barcode printing. 29.How to create sale entry? For all the business in the world the sale is very important transaction of a business, because which leads cash come in to the company, so all the business owners would Website: www.gayoosoftware.com Mobile:+91 9965599324 41 now it ask above question “Want to show only today sale ?” this question is only ask from the Counter 1 (SERVER) only, if the Sale Today Facility is enabled, otherwise it will not ask this question. If you want to see sale information of today you have to select <Yes> or else you want to see previous days except today you have to choose <No>. Then it will ask you another question below in case of electronic weighing email: [email protected] Mobile:+91 98429 83493 scale interface is enabled it ask for enter port number, is the numeric number between 1 to N of serial port (COM) of the computer to interface with the electronic scale through rs232 interface. The default port will be 1 press <Enter> to continue next screen. Press <Enter> or click <Create> to start the sale creation process. now it ask for starting voucher id of sale voucher, you can give the continues of existing voucher, otherwise click <Ok> or press <Enter> to continue to next Now it ask for “Enter starting invoice number?” in case of the setting every day invoice number starting from 1 facility is enabled otherwise it will not ask you this question, just click <Ok> to continue to next screen Now it focus directly on the [Serial Number] column, to go to next column just press <Enter> Now it focus on the [Product Code] column, if you know the code of the product, type the code and press <Enter> or if you have barcode scanner connected with the computer just scan the barcode to select the product code automatically, if you don’t know the code just press <Enter> (the code column should be blank) to display the [Product Enquiry] (To know more about the product enquiry just read 19.How to use Product Enquiry ?) Website: www.gayoosoftware.com Mobile:+91 9965599324 42 Just select all product one by one enter the required [Quantity] in the specific email: [email protected] Mobile:+91 98429 83493 column of the sale screen, and now the sale screen will look like this After done all the entry just press <F9> accept the sale voucher and go to the printing process, if the cash balance screen is enabled it ask for how much the cash the customer given as above, then it automatically calculate the balance amount you have given back to the customer and just press <Enter> to proceed next. Then it successfully saved the sale voucher and ask you to print this voucher or not as below If you really don’t want to print his sale voucher choose <No>, otherwise click <Yes> to start print, if multiple print design for Sale Voucher facility is enabled the software will ask to select the print design for printing this voucher Website: www.gayoosoftware.com Mobile:+91 9965599324 Now you have to select the desire print design and press <Enter> Then it ask for printer selection screen, because there are many printer devices are connected with the computer, the help will show like below then you have select the desire printer and press <Enter> to start print immediately Or if you click close button of this window, it will cancel the printing and give us message as 43 email: [email protected] Mobile:+91 98429 83493 <Alter> in [Sale ] voucher it will work, otherwise it disable the command button immediately on click of the button. then it focus on the [Serial Number] and voucher id will be incremented automatic to next available serial, by this way you can create easily and continuously Now it ask for enter voucher id as below If you know the voucher id of you want to alter is exist, you have to give it there and press <Enter>, if you don’t know the voucher id just press 30.How to alter sale entry? The alteration of the sale voucher is some time mandatory to some company because the owner often ask the user to change some information in the sale voucher frequently in this case you to use the way to solve this. Goto [Sale Department] from the top menu Click [ Sale ] from the sale department menu <Enter> the voucher id should blank to display the Show Help immediately Now it show month wise view of the sale voucher, you have to select the desire month and press <Enter> to see Show Help Date Click <Alter> to start the alteration process, if you have permission of the Website: www.gayoosoftware.com Mobile:+91 9965599324 44 email: [email protected] Mobile:+91 98429 83493 Open <Sale Department> Click <Delete> button to start the delete process, Select on the desire date and press to see the Show Help Voucher as below <Sale> from Now you can select the voucher from the help and press <Enter>, not it shows the sale voucher to be altered as below it ask the same question as enter voucherid, and you can do any changes and finally press <F9> accept the all the transaction just now you altered. 31.How to delete sale entry? This option is rarely used in sale voucher, some time you have to delete or remove the unwanted sale transaction and wrongly entered You have to select the unwanted sale voucher and press <F9> and it will ask as below Open <Sale Department> from top menu if you really don’t want the voucher <Yes> to delete it otherwise click Website: www.gayoosoftware.com Mobile:+91 9965599324 45 email: [email protected] Mobile:+91 98429 83493 <No> to terminate the delete process of this voucher. voucherid, 32.How to print sale entry? During the sale creation and alteration process you can print the voucher, in case that time you really don’t want the print out later you need to print it again and again this will very useful Open <Sale Department> from top menu Open <Sale> You have to select the sale voucher and press <F9> and it will ask as below click <Yes> print the voucher and press <No> cancel print operation try another. from 33.How to do credit sale entry? Normally by default the sale will be created in the cash sales, but the customer does not pay the money for this sale transaction it is called credit sale, here we see how to do the credit sale for a customer <Sale Department> Click <Print> button to start the print process, Open <Sale Department> from top menu it ask the same question as enter Website: www.gayoosoftware.com Mobile:+91 9965599324 46 email: [email protected] Mobile:+91 98429 83493 Open <Sale> from <Sale Department> Click <Create> button from the sale screen and the focus will on [product code] now press <F2> the control will go to [Debit] column of the sale voucher as below But still it shows [Cash Sales] on the <Credit> side, if you press <Enter> the credit value automatically changed to credit sales as looks like below Now add all the desire products and press <F9> to finish the credit sale successfully. 34.How to do cash sales with customer name ? Many cash customers asked to print their names in the cash sale voucher, because they have to produce those voucher for accounting purpose and to prove this purchase is happed for so and so company, here we will see how to do this easily, Now press <Space Bar> on cash in hand to open the Custom Help Account to select customer list as below Open <Sale Department> from top menu Open <Sale> from select the desire customer to do credit sale and press <Enter> <Sale Department> Website: www.gayoosoftware.com Mobile:+91 9965599324 47 Click <Create> button from the sale screen and the focus will on [product code] now press <F3> the control will go to the multiple tab email: [email protected] Mobile:+91 98429 83493 information screen as below and press <Enter> Now again press <F3> to close multiple tab information screen and back to sale voucher now you will the cash customer name will be displayed next to [Debit] Cash in Hand Now as usual select the desire products and press <F9> for accept the sale voucher. the focus will be in [Account Name], if you want type new name that’s not our existing customer do it here manually or if you want to do cash sales for your existing customer just press <Space Bar> and continuously press <Enter> to open Custom Help Account of customer as below 35.How to use Custom Help Account? Custom help account is a useful help on account / customer / supplier wherever we need help on account name it will be available there. scroll down and select your desire customer Website: www.gayoosoftware.com Mobile:+91 9965599324 48 Press <F3> from the [Top Menu] or [Left Menu] or [Bottom Menu] or [Right Menu] it will open the Custom Help Account The Custom Help Account look like this email: [email protected] Mobile:+91 98429 83493 [Closing Debit] in this list box only the debit balance of the account will be displayed in red color [Closing Credit] only credit balance and it has many hidden features [Code / Account Name] in the text box you can enter either account code or account name or account name mother language it will search and filter as we wish of the account will be displayed here in green color. Website: www.gayoosoftware.com Mobile:+91 9965599324 49 email: [email protected] Mobile:+91 98429 83493 [Credit Limit] in this list display the contact information typed in the account to the user as below box account name has credit / debit limitation which will be displayed in blue color. This will display the count of account and each page has 25 account name at one time and total how many pages and currently you are which page and which account serial everything you can monitor here. [F1 Quick Search] this facility is used to find the unknown account name, some time if we don’t know the starting letter of a account name, we just click <F1> and enable Quick Search and try to find any middle name of account easily as below [F4 Ledger Account] is short key for Ledger Account Summary in Reports, enable the user to easily access the ledger from here from the selected account name in the list box control now press <F4> it will go inside the [F2 Language] is the facility to switch between English and Mother Language. This can set using windows hot key settings [F3 Contact Information] this facility is used Website: www.gayoosoftware.com Mobile:+91 9965599324 to 50 email: [email protected] Mobile:+91 98429 83493 Reports automatically as below type desire name click <OK> or press <Enter> to accept, by this way do it for all return accounts, finally go to text box and press <F6> to show the available favorite account information as below [F5Order Name/Code] is the option to order of account name either code or name so user easily select which one they want [F6 Favorite] is facility to group certain account name as one group of information to monitor frequently otherwise we have to search each and every information separately which is time consuming, for example scroll down and select as you wish now we want to group all the return account in one group as “Return” use quick search as below, then press <F6> on that account name as below Website: www.gayoosoftware.com Mobile:+91 9965599324 51 email: [email protected] Mobile:+91 98429 83493 popup and press <Enter> to show only the favorite named “Return”, by this way you can create many favorite but one account will be in one favorite only. [F7 Dead Stock] This facility especially used as shortcut for stock [F8 Purchase Return] this option is used to display the return product to supplier will be displayed from the reports, just select any one supplier account as below supplier dead report, after selecting a supplier account name, just press <F7> to go to the reports of dead stock directly with accounted selected for the account name as below if you want to open it just press <Enter> or click <OK> to show the reports, if you don’t want reports click <Cancel> and press <Eascape> to exit from the report Website: www.gayoosoftware.com Mobile:+91 9965599324 menu and click <F8> to display the reports 52 email: [email protected] Mobile:+91 98429 83493 from here below then click <Create> to start the payment process, it ask for starting voucher id in case of very first entry as below 36.How to create Bank Payment? The company is going to pay to expenses or supplier through cheque / demand draft / tele transfer / swift it’s called bank payment, the short code of this is BPAY click <OK> or press <Enter> to proceed next, now its focused in the <Serial Number> press <Enter> go to <Account Name> the default account name will displayed as below Go to [Account Department] in the top menu Now press <Enter> to open Account Department Menu as below If you want choose different account name just press <Del> or <Delete> key and press <Enter> to open the Custom Help Account to display only Bank Accounts as below From this menu just select [Bank Payment] and press <Enter> to open it show the day book entry screen as Website: www.gayoosoftware.com Mobile:+91 9965599324 Select the desired account name and press <Enter> to go to next column 53 email: [email protected] Mobile:+91 98429 83493 [Narration], here the string “Cheque No.” automatically displayed on focus as below if you want insert any information related to this transaction as a narration and press <Enter> to focus on the [Cheque] column is used to type one the Cheque Number now press <Yes> or <Enter> go to the next line’s [Serial Number] column press <Enter> to go to [Account Name] and press <Enter> to open the Custom Help Account as below as well as [Cheque Date] on the date column and press <Enter>, now the control automatically go to the [Credit] column as accounting intelligence as below now, select the desired expense or supplier name and press <Enter> if you press three <Enter> continuously then first line information automatically copied to the corresponding column of second line with out retype again as below you can feed the transaction amount on the credit side and press <Enter> and it shows the balance of selected account as below as a message box you have click it or press <Enter> and it ask again as below Website: www.gayoosoftware.com Mobile:+91 9965599324 by this way you create all bank payments easily, finally press <F9> or click Accept to finish the transaction 54 email: [email protected] Mobile:+91 98429 83493 if you want print click <Yes> otherwise click <No> to proceed to next voucher. From this menu just select [Bank Receipt] and press <Enter> to open it show the day book entry screen as below This is the simple way to create bank payment voucher for expenses, supplier payment and other payments through banking. 37.How to create Bank Receipt? The company is going to receive money from income or customer through cheque / demand draft / tele transfer / swift it’s called bank receipt, the short code of this is BRCP then click <Create> to start the receipt process, it ask for starting voucher id in case of very first entry as below Go to [Account Department] in the top menu click <OK> or press <Enter> to proceed next, now its focused in the <Serial Number> press <Enter> go to <Account Name> the default account name will displayed as below Now press <Enter> to open Account Department Menu as below Website: www.gayoosoftware.com Mobile:+91 9965599324 55 email: [email protected] Mobile:+91 98429 83493 If you want choose different account name just press <Del> or <Delete> key and press <Enter> to open the Custom Help Account to display only Bank Accounts as below as a message box you have click it or press <Enter> and it ask again as below Select the desired account name and press <Enter> to go to next column [Narration], here the string “Cheque No.” automatically displayed on focus as below if you want insert any information related to this transaction as a narration and press <Enter> to focus on the [Cheque] column is used to type one the Cheque Number now press <Yes> or <Enter> go to the next line’s [Serial Number] column press <Enter> to go to [Account Name] and press <Enter> to open the Custom Help Account as below as well as [Cheque Date] on the date column and press <Enter>, now the control automatically go to the [Debit] column as accounting intelligence as below you can feed the transaction amount on the debit side and press <Enter> and it shows the balance of selected account as below Website: www.gayoosoftware.com Mobile:+91 9965599324 now, select the desired income or customer name and press <Enter> 56 email: [email protected] Mobile:+91 98429 83493 Go to [Account Department] in the top menu if you press three <Enter> continuously then first line information automatically copied to the corresponding column of second line with out retype again as below Now press <Enter> to open Account Department Menu as below by this way you create all bank receipt easily, finally press <F9> or click Accept to finish the transaction From this menu just select [Cash Payment] and press <Enter> to open it show the day book entry screen as below if you want print click <Yes> otherwise click <No> to proceed to next voucher. This is the simple way to create bank receipt voucher for income, customer receipt and other receipt through banking. then click <Create> to start the payment process, it ask for starting voucher id in case of very first entry as below 38.How to create Cash Payment? The company is going to pay to expenses or supplier through cash it’s called cash payment, the short code of this is CPAY Website: www.gayoosoftware.com Mobile:+91 9965599324 57 email: [email protected] Mobile:+91 98429 83493 click <OK> or press <Enter> to proceed next, now its focused in the <Serial Number> press <Enter> go to <Account Name> the default account name will displayed as below column and press <Enter>, now the control automatically go to the [Debit] column as accounting intelligence as below you can feed the transaction amount on the debit side and press <Enter> and it shows the balance of selected account If you want choose different account name just press <Del> or <Delete> key and press <Enter> to open the Custom Help Account to display only supplier and expenses accounts as below as below as a message box you have click it or press <Enter> and it ask again as below Select the desired account name and press <Enter> to go to next column [Narration], here the string “Payment No.” automatically displayed on focus as below now press <Yes> or <Enter> go to the next line’s [Serial Number] column press <Enter> to go to [Account Name] and press <Enter> to open the Custom Help Account as below if you want insert any information related to this transaction as a narration and press <Enter> to focus on the [Invoice Number] column is used to type one the Invoice Number as well as [Invoice Date] on the date Website: www.gayoosoftware.com Mobile:+91 9965599324 58 email: [email protected] Mobile:+91 98429 83493 39.How to create Cash Receipt? The company is going to receive money from income or customer through cash it’s called cash receipt, the short code of this is CRCP Go to [Account Department] in the top menu now, select the desired cash account and press <Enter> if you press three <Enter> continuously then first line information automatically copied to the corresponding column of second line with out retype again as below Now press <Enter> to open Account Department Menu as below by this way you create all bank payments easily, finally press <F9> or click Accept to finish the transaction From this menu just select [Cash Receipt] and press <Enter> to open it show the day book entry screen as below if you want print click <Yes> otherwise click <No> to proceed to next voucher. This is the simple way to create cash payment voucher for expenses, supplier payment and other payments through cash. Website: www.gayoosoftware.com Mobile:+91 9965599324 then click <Create> to start the receipt process, it ask for starting voucher id in 59 email: [email protected] Mobile:+91 98429 83493 case of very first entry as below transaction as a narration and press <Enter> to focus on the [Invoice] column is used to type one the Invoice Number as well as [Invoice Date] on the date column and press <Enter>, now the control automatically go to the [Debit] column as accounting intelligence as below click <OK> or press <Enter> to proceed next, now its focused in the <Serial Number> press <Enter> go to <Account Name> the default account name will displayed blank as below you can feed the transaction amount on the debit side and press <Enter> and it shows the balance of selected account as below If you want choose different account name just press <Del> or <Delete> key and press <Enter> to open the Custom Help Account to display only Customer Accounts as below as a message box you have click it or press <Enter> and it ask again as below Select the desired account name and press <Enter> to go to next column [Narration], here the string “Being cash received for Inv No: .” automatically displayed on focus as below now press <Yes> or <Enter> go to the next line’s [Serial Number] column press <Enter> to go to [Account Name] and press <Enter> to open the Custom Help if you want insert any information related to this Website: www.gayoosoftware.com Mobile:+91 9965599324 60 email: [email protected] Mobile:+91 98429 83493 Account as This is the simple way to create cash receipt voucher for income, customer receipt and other receipt through cash. below 40.How to create credit note? This is a kind of accounting note created for discount given to customers in multiple circumstances or unpaid credit from customers will be adjusted using the credit note. now, select the desired cash account name and press <Enter> So, now we will see how to do the credit note in a easy manner. Go to top menu and choose [Account Department] if you press three <Enter> continuously then first line information automatically copied to the corresponding column of second line with out retype again as below and press <Enter> to open it as below by this way you create all bank receipt easily, finally press <F9> or click Accept to finish the transaction and press <Enter> to open [Credit Note] as below if you want print click <Yes> otherwise click <No> to proceed to next voucher. and click <Create> to start the credit note Website: www.gayoosoftware.com Mobile:+91 9965599324 61 email: [email protected] Mobile:+91 98429 83493 process, and type the amount in the [Debit] column and and it ask for starting voucher id you can give your desire starting number of press <Enter> to start with default starting and now it will focus on [Serial Number] column and press <Enter> to continue to [Account Name] column as below press <Enter> it will show the current balance as above and click <OK> press <Enter> to open Custom Help Account to as below it ask for Want to Add More? It choose <Yes> to go to next line and select your desire account name, here we choose “Cash Discount Given” as below and press <Enter> to go to [Narration] column here you can type your desire details belongs to the transaction as below <Enter> to focus and press <Enter> to open the Custom Help Account and choose the desire Customer and press next column Website: www.gayoosoftware.com Mobile:+91 9965599324 62 email: [email protected] Mobile:+91 98429 83493 and press <F9> click <Accept> to save changes to credit note and it will show as below and press <Enter> to focus on [Narration] column to the first line narration will automatically placed on the second line narration as below if you really want to print the credit note press <Yes> or click <No> to without printing, by this way can create all the credit notes one by one. and press <Enter> to go to [Credit] column the debit amount will placed automatically to credit column as below 41.How to create debit note? and press <Enter> it show you the closing balance for the current account name as This is a kind of accounting note created for discount received from suppliers in multiple circumstances or unpaid debit to suppliers will be adjusted using the debit note. below <Enter> it ask So, now we will see how to do the debit note in a easy manner. Go to top menu and choose [Account Department] and press below and press <Enter> to open it as below press <Enter> or <Yes> to go to next line Website: www.gayoosoftware.com Mobile:+91 9965599324 63 email: [email protected] Mobile:+91 98429 83493 and select your desire account name, here we choose “Cash Discount Received” as below and press <Enter> to open [Debit Note] as below and press <Enter> to go to [Narration] column here you can type your desire details belongs to the transaction as below and click <Create> to start the debit note process, <Enter> to focus and press next column and type the amount in the [Credit] column and press <Enter> and it ask for starting voucher id you can give your desire starting number of press <Enter> to start with default starting and now it will focus on [Serial Number] column and press <Enter> to continue to [Account Name] column as below it will show the current balance as above and click <OK> press <Enter> to open Custom Help Account to as below Website: www.gayoosoftware.com Mobile:+91 9965599324 64 email: [email protected] Mobile:+91 98429 83493 press <Enter> it show you the closing balance for the current account name as it ask for Want to Add More? It choose <Yes> to go to next line below <Enter> and press <Enter> to open the Custom Help Account and choose the desire supplier it ask and press below press <Enter> or <Yes> to go to next line and press <F9> click <Accept> to save changes to credit note and it will show as below and press <Enter> to focus on [Narration] column to the first line narration will automatically placed on the second line narration as below if you really want to print the debit note press <Yes> or click <No> to without printing, by this way can create all the debit notes one by one. and press <Enter> to go to [Debit] column the credit amount will placed automatically to credit column as below 42. How journal? to create and Website: www.gayoosoftware.com Mobile:+91 9965599324 65 email: [email protected] Mobile:+91 98429 83493 The journal is a kind of accounting voucher, if the user would like to do all the transaction as their wish without any bounded rules the journal is right choice. Simply, except cash and bank transaction will be entered using journal voucher. here, type your desire starting voucher id or click <OK> to conitnue with the default serial and press <Enter> to focus in the [Serail Number] and press <Enter> to focus on [Account Name] and press <Enter> to open Custom Help Account as below Here, we see how to create journal voucher, go to [Top Menu] and select [Account Department] as below and press <Enter> to open [Account Department] menu as below and choose [Journal] and press <Enter> to open journal voucher as below to start the process choose your desire account name and press <Enter> select it to transaction. As below and press <Enter> and focus to the [Narration] column as below and press <Enter> and you have to choose [Debit] or [Credit] column and type your desire amount in correct column as below and click <Create> to start it will ask you enter starting voucher id in case you are doing very first journal voucher the inputbox will look like this Website: www.gayoosoftware.com Mobile:+91 9965599324 66 email: [email protected] Mobile:+91 98429 83493 press <Enter> to ask and below press <Enter> to select the name as below and press <Enter> the control will go to [Narration] column, the previous line narration value automatically pasted here without retyping it again as below shows the current balance of the current account name selected, click <OK> or press <Enter> and press <Enter> to go to next column and choose your desire [Debit] or [Credit] column here we choose credit column as below and the amount will automatically pasted from the previous line without retyping it again and press <Enter> now press <Enter> or click <Yes> to proceed with the next [Serial Number] as below and press <Enter> to go to [Account Name] serial number 2 and press <Enter> to open Custom Help Account as below, from the help select your desire account name by typing the account name in the textbox shown below, it filtered the desire account name Website: www.gayoosoftware.com Mobile:+91 9965599324 and it shows the current balance of the selected account name and press <Enter> 67 email: [email protected] Mobile:+91 98429 83493 it ask Want to Add Mote? Click <Yes> or press <Enter> it focus on next line of [Serial Number] column information as below and press <Enter> to open it as below now press <F9> or click <Accept> to save the transaction and the message will display as below and click <Alter> from the command button it will open the Custom Help Account as below if you want to save the transaction press <Yes> or click <No> to without printing. 43. How to feed opening balance for single account? If the business is already running we suddenly implementing the software application we have many closing balances some are in debit or credit depend the nature of account, so we will see here how to feed opening balance as below go to [Left Menu] and select [Account] Website: www.gayoosoftware.com Mobile:+91 9965599324 and type your desire name as below and press <Enter> to select it to a alteration mode 68 email: [email protected] Mobile:+91 98429 83493 Suppose, we are going to start software from the middle of business (not new business) we have transaction closing balances for all the accounts, we have to feed the closing debit of last balance to opening debit and closing credit of last balance to opening credit and click on [Opening] tab button to show as below Here, we will show how to do this as below, go to [Left Menu] and select [Account] Information you can feed the it in [Debit] or [Credit] column, if you lost your focus from the any amount typed column either [Debit] or [Credit] it will be locked automatically its called safety lock, if you want open the safety lock you have press <F1> from the particular column it will show message as below and click to open the account information as below now, click <OK> or press <Enter> to change the value again. After finish everything, you have to press <F9> or click <Accept> to save changes, by this way one by one you have to feed the opening balance. there you will find a command button [Opening Balance] next to [Show] button 44. How to feed opening balance for multiple account? Website: www.gayoosoftware.com Mobile:+91 9965599324 69 email: [email protected] Mobile:+91 98429 83493 and press <Enter> up to it focus on [Account Name] of next line, as below and press <Enter> to open Custom Help Account again as below click [Opening Balance] button to open the screen as below and press <Enter> to select account name below press <Enter> to focus on [Account Name] and press <Enter> to open Custom Help Account and search your desire name as below and press <Enter> to go to [Debit] or [Credit] and closing balance is credit put it in the credit column as below and click <Enter> to select as below and the total of debit and credit column will be show as below and if the closing balance is debit put it in debit column to navigate between up/down account names use <Up> Arrow and <Down> Arrow. Finally, click <Accept> button if Website: www.gayoosoftware.com Mobile:+91 9965599324 70 email: [email protected] Mobile:+91 98429 83493 you want to save all the changes you made, otherwise click <Close> button to exit without saving the changes. 45. How to feed opening stock for product? In every business, if we start the software in the middle, there will a initial stock in hand, this will be feed in the [Opening Stock] as described below. the default column will be available there is SNo (Serial Number) Product Name MRP (Sale Price Maximum) Qty (Quantity) Price Amount Sale Price Nett Price Here, the product will be classified as Raw Material Semi Finished Finished Product All the product have to be feed in [Opening Stock] in same way. Go to [Right Menu] and select [Stock Management] We have feed the desired information one by one as below, In the left top position <Create> button will be there, select it, and press <Enter> or mouse <Click> to start it and press <Enter> to open it as below for very first voucher as usual it ask for starting voucher id, and press <Enter> it will focus on the Voucher Date and select [Opening Stock] and press <Enter> to open the opening stock screen as below Website: www.gayoosoftware.com Mobile:+91 9965599324 you have to feed all the opening stock in same 71 email: [email protected] Mobile:+91 98429 83493 date, if you feed it in the next date, if you previously created any opening stock for same product in the previous it will be omitted and the next date opening stock will taken as a new opening stock for this product, for example o Quantity 1750 Pce Now, the current stock will 1750 in any method you use it will correct. From [Voucher Date] press <Enter> to go to [Debit] text box as below If you feed as below Voucher Date : o 01-01-2000 Product Name : o Turmeric Powder 100g Quantity o 1500 Pce the default will be “Branch 1”, press <Enter> it ask as below “Want To Auto Load Opening Stock?” the default answer is <No> The current opening stock is 1500 Nos. Suppose, after 5 days if you find there is a quantity counting mistake in the stock taken that day, the actual quantity is 1750 Pce that is 250 more, so, what you have to do now press <Enter> it will focus to <Credit> column as below Method-1 Create new voucher for the same product on the same date i.e. o Voucher Date 01-01-2000 o Product Name Turmeric Powder 100g o Quantity 250 Pce Method-2 Create new voucher for the same product on the current date i.e. o Voucher Date 05-01-2000 o Product Name Turmeric Powder 100g Website: www.gayoosoftware.com Mobile:+91 9965599324 and press <Enter> to go to product details <Serial Number> column as below, press <Enter> to focus on <Product Code> column if you know the code of the product name type it, otherwise press <Enter> to open the Product Enquiry as below 72 email: [email protected] Mobile:+91 98429 83493 from this, select your desire product and press <Enter> the product code will be placed automatically as below, it manually later on, but the default will answer will be <No>, select your option and press <Enter> and press <Enter> to show the product name, MRP, Purchase Price, Sale Price, Nett Price details as below, now the above message says your entry was saved successfully in this duration. and type the desire quantity as below By this way, you have to create all the opening stock product one by one. and press <Enter> continuously up to next line, 46.How to create, alter, delete multiple barcode for one product? This facility is used to create more than one barcode identity for a product, which is used for many products which are classified by flavors which leads us to stop create same product name for one product, which saves time and increase the speed. and try to feed next product maximum 499 products you can create for a voucher. Finally, press <F9> or click <Accept> to save changes and display the message below, suppose you have made any changes in main product information like [Sale Price], [Nett Price], you have choose <Yes> for this question, then only the newly changed information will be updated in the product information, if you choose <No> the product information will be remain unchanged, you have to change Website: www.gayoosoftware.com Mobile:+91 9965599324 To activiate this facility, you should ask our support engineer to activate the setting id 241 Enable Multiple Barcode Facility For One Product ? to Yes. Let us see how is this working as below, go to <Bottom Menu> 73 email: [email protected] Mobile:+91 98429 83493 and press <Move First> button from the navigation control, now it shows the existing product barcode as below, and open <Product Enquiry> by pressing <Enter> or mouse <Click> as below now select on the desire product and press asteric (*) to open the product multple barcode screen as below use <Move Next> navigation control to move to the next barcode, you want scan correct barcode, once do it and click <Accept> to made alteration successfully. If you want to remote and multiple barcode information, just click <Delete> from screen and use navigation to search the unwanted product and click Accept to remote the barcode permanently. if you want create a new barcode just click <Create> button, it will focus on the [Barcode] textbox as below now type the barcode manually or just scan the barcode using barcode scanner as below it ask this question when you try to remove, if you press <Yes>, the transaction will be deleted permanently and click <Accept> to save changes. If you want alter a existing barcode just click <Alter> Website: www.gayoosoftware.com Mobile:+91 9965599324 74 email: [email protected] Mobile:+91 98429 83493 and it shows the message box, by this way we have create, alter and delete it. and you will see the [Finance Department Menu] as below 47. How to create bill to bill settlement receipt (cash or bank)? now, choose [Receipt] from the menu and press <Enter> or mouse click to open it and display the receipt screen as below This facility is used to create Cash Receipt (CRCP) or Bank Receipt (BRCP) in bill to bill settlement method and also the receipt detail will automatically available in the Ledger Account Summary of the customers. What are the key benefits of using this method are as below Pending bills will know separately as report Cheque or cash details of settled bill as report Return bills will know separately as report Date wise collection reports now click [Create] to start the receipt creation process as below Here we see how to do this easily as below Go to [Right Menu] and select [Finance Department] as below Website: www.gayoosoftware.com Mobile:+91 9965599324 it show you a Text Box and asking [Voucher ID] of sale invoice already created for the customer who is going to pay the money now as below 75 email: [email protected] Mobile:+91 98429 83493 information. Here we discuss little bit about the columns, just type [Voucher ID] as below and press <Enter> then it shows the customer details automatically as below [Serial Number] is the sequence number for how many invoices will be created [Account ID] is the sale credit account id used in the application press <Enter> to display the Custom Help Account of sale [Account Name] is the sale credit account name retrieved using the account id [Invoice Number] type invoice number manually or press [Enter] to display the Custom Help Voucher as below and the invoice details automatically retrieved as below it and it automatically focus in the [Invoice number] and press <Enter>, if the bill is already settled it will display the as below display the information if you want to continue anyway click <Yes> otherwise click <No> it will focus again in the [Invoice Number] give another invoice number to display the Website: www.gayoosoftware.com Mobile:+91 9965599324 76 email: [email protected] Mobile:+91 98429 83493 o [Year] is the current year of selection o [Debit] is to display the credit sale account name o [Select] is to select the collection status as Pending All Vouchers Settled Vouchers All Voucher o Use +/- to display the Next/Previous year information in single key press [Customer Invoice Number] is the invoice number of customer even entered in the day book also [Invoice Date] is the invoice date entered in the day book also [Invoice Amount] is the actual invoice amount [Invoice Return Amount] is the invoice return amount against the invoice number [Settled Amount] is the already settled sum of amount [Amount] is the receipt amount collected from the customer Website: www.gayoosoftware.com Mobile:+91 9965599324 [Remarks] is the additional information column for the corresponding invoice number [Bank Account ID] in case of customer paying through the cheque you must select the bank account id [Bank Account Name] is the account name retrieved using bank account id [Cheque Number] is the column for cheque number received from the customer [Cheque Date] is the column for cheque date received from the customer [Cheque Date Received Status] is the column to display the sum of cheque amount received on that date Instead of typing [Voucher ID] if you press blank <Enter> it focus on the [Voucher Date] type your desire date and press <Enter> to focus on [Debit] as below is this Cash Receipt just leave the default account name Cash In Hand as it is and just press <Enter> otherwise use <Space Bar> to select another cash account or bank account name using Custom Help Account as below 77 email: [email protected] Mobile:+91 98429 83493 then you can type or select [Invoice Number] as said above and add more invoices one by one and finally you will get the total cheque value. By this way you can create bill to bill cash receipt or bank receipt the corresponding ledger account will be auto loaded instantly without fail. 48. How to create bill to bill settlement payment (cash or bank)? select your desire account name and press <Enter> to focus on the Credit column, here also use <Space Bar> to select desire customer account name as below This facility is used to create Cash Payment (CPAY) or Bank Payment (BPAY) in bill to bill settlement method and also the payment detail will automatically available in the Ledger Account Summary of the suppliers. What are the key benefits of using this method are as below select the correct customer and press <Enter> to proceed to next it will focus on the <Serial Number> and press <Enter> then it go to the <Account ID> the default credit sale account id 3210000002 will be displayed automatically as below Pending bills will know separately as report Cheque or cash details of settled bill as report Return bills will know separately as report Date wise payment reports Here we see how to do this easily as below Go to [Right Menu] and select [Finance Department] as below and press <Enter> to select retrieve the credit sale account name as below Website: www.gayoosoftware.com Mobile:+91 9965599324 78 email: [email protected] Mobile:+91 98429 83493 and you will see the [Finance Department Menu] as below [Serial Number] is the sequence number for how many invoices will be created [Account ID] is the sale credit account id used in the application press <Enter> to display the Custom Help Account of sale [Account Name] is the sale credit account name retrieved using the account id [Supplier Invoice Number] type invoice number manually or press [Enter] to display the Custom Help Voucher as below now, choose [Payment] from the menu and press <Enter> or mouse click to open it and display the payment screen as below it display the information now click [Create] to start the payment creation process as below Here we discuss little bit about the columns, Website: www.gayoosoftware.com Mobile:+91 9965599324 79 email: [email protected] Mobile:+91 98429 83493 o [Year] is the current year of selection o [Debit] is to display the credit sale account name o [Select] is to select the collection status as Pending All Vouchers Settled Vouchers All Voucher o Use +/- to display the Next/Previous year information in single key press [Supplier Invoice Number] is the invoice number of supplier even entered in the day book also [Invoice Date] is the invoice date entered in the day book also [Invoice Amount] is the actual invoice amount [Invoice Return Amount] is the invoice return amount against the invoice number [Settled Amount] is the already settled sum of amount [Amount] is the payment amount paid to supplier Website: www.gayoosoftware.com Mobile:+91 9965599324 [Remarks] is the additional information column for the corresponding invoice number [Bank Account ID] in case of supplier payment through the cheque you must select the bank account id [Bank Account Name] is the account name retrieved using bank account id [Cheque Number] is the column for cheque number paid to the supplier [Cheque Date] is the column for cheque date paid to the supplier [Cheque Date Paid Status] is the column to display the sum of cheque amount paid on that date If you click <Create> it will focus on the [Voucher Date] it focus on the [Voucher Date] type your desire date and press <Enter> to focus on [Debit] as below is this Cash Payment use <Space Bar> to select supplier account name using Custom Help Account as below 80 email: [email protected] Mobile:+91 98429 83493 then you can type or select [Invoice Number] as said above and add more invoices one by one and finally you will get the total cheque value. By this way you can create bill to bill cash payment or bank payment the corresponding ledger account will be auto loaded instantly without fail. 49.How to do simple year creation process? select your desire account name and press <Enter> to focus on the Credit column, here also use <Space Bar> to select desire cash account name or bank account name as below The year creation is the process at the end of financial year of each company essential information will be placed in a new file and the closing balances of stock and debit / credit balances of ledger accounts transferred and the remaining all the transactions will be initiated to zero, what is the real advantages of year creation press <Enter> to proceed to next it will focus on the <Serial Number> and press <Enter> then it go to the <Account ID> the default credit purchase account id 3120000002 will be displayed automatically as below Size of the data files will be reduced Speed of the application will be increased Each year financial statements will be taken easily The financial period of the company will be vary from country to country, normally the financial period of india is 1st April 2000 to 31st March 2001 and the financial year of Malaysia is 1st January 2000 to 31st December 2000, during the selection of company and the particular period the voucher date should be between these dates specified as financial period and press <Enter> to select retrieve the credit sale account name as below For example, here we see the current financial year is 01-04-2011 to 31-03-2012 Website: www.gayoosoftware.com Mobile:+91 9965599324 81 email: [email protected] Mobile:+91 98429 83493 but now the date is 01-04-2012 so it will not allow you go inside. just open the software and type the starting date of current financial year as below and press <Enter> it shows a message box saying that the date should be between the financial year and press <Enter> or mouse <Click> it ask you as Want to do year creation process? and press <Enter> up to [Company] in the [Top Menu] then press <Yes> to start the process press <Enter> to focus on the [Select] option as below it ask want to do simple year creation process if you press <Yes> it automatically increase 365 to the [To] date of current company year and display a message below then it shows the company name and financial year as below Website: www.gayoosoftware.com Mobile:+91 9965599324 82 email: [email protected] Mobile:+91 98429 83493 For example, here we see the current financial year is 01-04-2011 to 31-03-2012 but now the date is 01-04-2012 so it will not allow you go inside. that saying the application will close automatically and the simple year creation process is over. just open the software and type the starting date of current financial year as below Then try to open the software and start working the application will work correctly. 50. How to do detailed year creation process? The year creation is the process at the end of financial year of each company essential information will be placed in a new file and the closing balances of stock and debit / credit balances of ledger accounts transferred and the remaining all the transactions will be initiated to zero, what is the real advantages of year creation and press <Enter> up to [Company] in the [Top Menu] Size of the data files will be reduced Speed of the application will be increased Each year financial statements will be taken easily press <Enter> to focus on the [Select] option as below The financial period of the company will be vary from country to country, normally the financial period of india is 1st April 2000 to 31st March 2001 and the financial year of Malaysia is 1st January 2000 to 31st December 2000, during the selection of company and the particular period the voucher date should be between these dates specified as financial period Website: www.gayoosoftware.com Mobile:+91 9965599324 then it shows the company name and financial year as below 83 email: [email protected] Mobile:+91 98429 83493 and press <Enter> it shows a message box this will recalculate all the account balance once again in case it has any error or missing entry will be replaced automatically. After finish stock calculation it ask the next question as below saying that the date should be between the financial year and press <Enter> or mouse <Click> it ask you as Want to do year creation process? now it ask you to recalculate closing stock for all products which take some more time according to the product you have, please be patient until it finishes all the recalculation work then press <Yes> to start the process it ask you for the simple year creation process you have to choose <No> then it ask you as below Website: www.gayoosoftware.com Mobile:+91 9965599324 now it ask you want to create new year for this company, you have to choose <Yes> 84 email: [email protected] Mobile:+91 98429 83493 This Company?” you have to choose <Yes> otherwise choose <No>. now it ask you as “Want To Initiate (i.e.zero) Manufacturing, Trading, P & L Account Opening Debit/Credit to Zero for this company?” choose <Yes> to do this. to do it then it says the company creation is successful Finally, it says the year creation process over, just close application and open it again as below now it ask you, “Want To Create Data Files For This Company ?” you have to choose <Yes> to create new data files, 51. How to do year end closing stock process? In all around the world, the closing stock check process is same, but duration of stocking is depends the nature of the company, some companies are doing yearly or half yearly or quarter yearly or monthly now it ask you “Want To Initiate Date For This Company? You have to press <Yes> to do initiation except Product, Customer, Supplier and General Account Heads Here, we see how to do yearly closing stocking procedure, then it ask as “Want to Transfer Closing Debit/Credit to Opening Debit/Credit For Website: www.gayoosoftware.com Mobile:+91 9965599324 85 email: [email protected] Mobile:+91 98429 83493 Open last year company and go to [Right Menu] as below and choose [Stock Management] as above and press <Enter> and choose [Closing Stock] from the menu and press <Enter> to show the [Closing Stock] screen as below [Product Name] is the name of the product [Type] is the type of product athat is o RM – Raw Mateiral o FP-Finished Product o PM-Packing Matrial o SF-Semi Finished Product [MRP] is Sale Price Maximum also known as Maximum Retail Price of the product [Closing Stock] is the current stock in software application [Quantity] is the physical stock to be entered manually by the user [Closing Stock Difference] is the difference between the [Closing Stock] and the [Quantity] [Price] is the cost price of the product [Amount] the physical [Quantity] multiplied by the [Price] [Sale Price] is the selling price of the product [Nett Price] is the sum of basic price + tax Click <Create> the as usual it displays the starting voucher id screen as below it has several column in the product details let us see what are they, [Serial Number] is the sequence number generated for counting [Product Code] is code of each product Website: www.gayoosoftware.com Mobile:+91 9965599324 just press <Enter> then it focus on the [Voucher Date] as below 86 email: [email protected] Mobile:+91 98429 83493 and press <Enter> to go to [Debit] column as below just press it ask you question as below repeat this process for all the products auto load correctly, finally, it display a message as below “Want To Auto Load Closing Stock?” choose <Yes> to auto load now, all the closing stock will be created successfully. Now, open the new company year as below then it ask you “Want To Load With Negative Stock?” for this you have to choose <Yes> then only you will see what will be the problem and go to [Right Menu] as below and select [Opening Stock] now it loads 100 products per voucher in product name alphabetic order with all the information filled, now you to type the actual physical quantity one by one and press <F9> to accept the changes then it display message as below Website: www.gayoosoftware.com Mobile:+91 9965599324 and press <Enter> to open it as below 87 email: [email protected] Mobile:+91 98429 83493 just press <Enter> then it focus on the [Voucher Date] as below it has several column in the product details let us see what are they, [Serial Number] is the sequence number generated for counting [Product Code] is code of each product [Product Name] is the name of the product [Type] is the type of product athat is o RM – Raw Mateiral o FP-Finished Product o PM-Packing Matrial o SF-Semi Finished Product [MRP] is Sale Price Maximum also known as Maximum Retail Price of the product [Quantity] is the physical stock to be entered manually by the user [Price] is the cost price of the product [Amount] the physical [Quantity] multiplied by the [Price] [Sale Price] is the selling price of the product [Nett Price] is the sum of basic price + tax press <Enter> then it go to [Debit] column as below Click <Create> the as usual it displays the starting voucher id screen as below now it ask as “Want to update this changes in product?” if you have made any changes Website: www.gayoosoftware.com Mobile:+91 9965599324 and press <Enter> then it ask ”Want to auto load opening stock ?” you have to select <Yes> to auto load opening stock from last year closing stock entry as opening stock and click <F9> or <Accept> to save changes, 88 email: [email protected] Mobile:+91 98429 83493 in Sale Price or product click <Yes> otherwise click <No> then it show as below and press <Enter> to open it and go to [Service And Maintenance] as below repeat this process until all the products finished successfully and you will get the information as below now, you can check the closing stock of all the product it will be correctly loaded from the previous years closing. and press <Enter> and choose [Trouble In Balance] and press <Enter> and choose [Trouble In Balance] as below This is easy way stocking all the products in a company to know the actual closing stock value. 52. How to recalculate balance for account? The recalculate balance is facility to calculate missing sale or purchase / receipt / payment during auto load process or during power failure, for best performance result or accuracy, you must run this end of every day without fail, and press <Enter> and ask as below here we will explain how to do this, go to [Reports] in the [Top Menu] Website: www.gayoosoftware.com Mobile:+91 9965599324 89 email: [email protected] Mobile:+91 98429 83493 here you type any starting of account id for Customers example type as 1113 then it calculate only for customers or click <OK> to calculate for all the account then it starts calculating and show the progress bar as below and press <Enter> to open it and go to [Service And Maintenance] as below please wait while until it finish all the account one by one and display the message below and press <Enter> and choose <Trouble In Stock> as below and you can check the balance everything will come correct. 53. How to recalculate stock for product? The recalculate stock facility is used to calculate the stock correctly in case of any abnormal termination of application or power failure or system crash, the calculation process will not finish properly press <Enter> to and select Here, we see how to do this easily step by step. Go to [Top Menu] and select [Reports] as below Website: www.gayoosoftware.com Mobile:+91 9965599324 90 email: [email protected] Mobile:+91 98429 83493 after finish all the product it will display the above message. Now you can check all the product closing stock will come correct. [Recalculate 54. How to use product match? Stock] This is the option used to arrange similar product as a matching product. For example, our customer asking product a right now there is no stock and we can press a key and tell the customer there is some other product matching the same product; we can recommend the other products quickly and it ask as “Want to recalculate for complete product?” choose <Yes> to start calculation process, for every 500 products it will as below Go to bottom menu as below click <Product Match> it will open the product match option as below this will protect the application from not responding error(s). Website: www.gayoosoftware.com Mobile:+91 9965599324 91 email: [email protected] Mobile:+91 98429 83493 Here, we explain step by step how to create product match, click <Create> to start the process select desire finished product and press [Enter] and show below the product information this will open the Custom Help Customized alias Product Enquiry as below by this add all the product one by one as below first select the raw material Sugar and press <Enter> and finally press <F9> or click <Accept> to save to changes. and it automatically focus on the [SeialNumber] and press [Enter] to focus on [ProductCode] Now, we see how to check the product match, goto <Product Enquiry> from the bottom menu as below and press [Enter] to open [Product Enquiry] as below click to open it as below now click <F4> to open product match as Website: www.gayoosoftware.com Mobile:+91 9965599324 92 email: [email protected] Mobile:+91 98429 83493 below and then Summary] we can recommend the desire product to customer with all information as showed. select [Ledger Account 56.How to See Ledger Account Summary for Account Name ? The ledger account summary is also known as statement of accounts, to see the report you have to follow the steps one by one as below Goto [Reports] from the top menu as below From the [Reports] Department] select and it will show the filter screen as below [Account and here will explain the selection tags one by one By Account is the column to select desire account name customer/supplier/expense or any account using <Space Bar> and then select [Account] Website: www.gayoosoftware.com Mobile:+91 9965599324 93 email: [email protected] Mobile:+91 98429 83493 As below Date is the exact date of the transaction executed Type is the nature of transaction as code select your desire account name and press <Enter> then the account code will be automatically placed in the textbox corresponding to account name as below press <Enter> continuously until it reaches the From/To Date textbox as below and press <Enter> to focus on <OK> button BPAY is Bank PAYment BRCP is Bank ReCeiPt CPAY is Cash PAYment CRCP is Cash ReCeiPt PURC is PURChase PRTN is Purchase ReTurN SALE is SALE SRTN is Sale ReTurN JRNL is JouRNaL DNTE Debit NoTE CNTE Credit NoTE Account Name is consist of account name followed by Project Name in case you have selected project in the daybook transaction. Debit is the value entered in the debit column Credit is the value entered in the credit column then you will see the report result as below The very first line of the report will show automatically the opening debit/credit balance available in the account according to the date selected by you. you must watch the right top of the screen to know how many pages are generated the number before slash (/) is current page number and It has five columns as below Website: www.gayoosoftware.com Mobile:+91 9965599324 94 email: [email protected] Mobile:+91 98429 83493 number after slash (/) is total page numbers. Chemical Laboratory Here, we will see the best example from the furniture industry, Use <First> <Previous> <Next><Last> button to navigate between report pages as Example: Dining Table Set Normally, the dining table set consists of Dining Table – 1 no Dining Chairs – 4 no’s Here, the dining table and chairs are finished products, this can be sold separately. But the dining table set is logical product physically the product does exist. shown below press <F9> or Click [Print] button to hard For example if we have 10 no’s of dining table set in hand, that means 10 no’s dining table and 40 no’s of dining chairs. Here, we will see how to achieve this in one by one. copy printing repeat the same process to get ledger account summary for all the account heads created by you. Step-1 Go to Product / Product Management from 57.How to use Product KIT ? The KIT is combination of more than one finished product (FP) or raw material (RM) or semi finished product (SF) is used to perform certain application is called KIT. The KIT used in many industries and will be listed as below Furniture Industry Spare Parts Industrial Equipment Medical Laboratory Food Industry Website: www.gayoosoftware.com Mobile:+91 9965599324 the left menu and press Enter or mouse Click to open it as below 95 email: [email protected] Mobile:+91 98429 83493 select <Finished Product> and press Enter or Mouse Click to open it as below you will see the finished product screen below press Enter or mouse click to open the Product KIT Management Menu as below Create the following product one by one with your required details select Product Kit from the menu and press Enter or mouse click to open it as below 1. Dining Table Set 2. Dining Table 3. Dining Chair For further details please refer chapter 11 How to create single product? now, click [Create] it will shows the Product Enquiry screen as below Step 2 After creating all the products go to the product enquiry type Dining in the product name column you will find the product listed as below Scroll down the cursor and select Dining Table Set and press Enter to get product details as below Step 3 Go to bottom menu and select Product KIT or Product KIT Management as below and the control will automatically focus on the [Serial Number] text box Website: www.gayoosoftware.com Mobile:+91 9965599324 96 email: [email protected] Mobile:+91 98429 83493 now press Enter to focus to the Code and type the product code or blank enter to open the Product Enquiry Screen as below then press <F9> or click <Accept> to save changes and repeat the same process for all the product KIT one by one. 58.How to use Product to KIT ? and select product name Dining Table from the list and press <Enter> to get it to the entry screen and again press <Enter> to retrieve the full information of the product as below This option is used to convert the group of product in to one single product as kit, after that the stock of the product will be decreased according to the quantity in product kit and quantity in product to kit also the product kit quantity will be increased type 1 in the quantity column as below for the Dining Table and press <Enter> In this case, if the Dining Table set is ready for 10 no’s you have to do the Product to Kit transaction entry for 10 no’s then the stock of Dining Table Set will be increased by 10 and the stock of the Dining Table and Dining Chair will be decreased each 10 automatically, if the product kit was not done for Dining Table Set it will not happen. now press <Enter> continuously until it reaches next line as below Let us explain step by step procedure how to do this simply, by this way add Dining Chair and put quantity as 4 and press <Enter> continuously until it reaches next line as below Website: www.gayoosoftware.com Mobile:+91 9965599324 Go to Bottom Menu and select Product KIT Management as below 97 email: [email protected] Mobile:+91 98429 83493 information just press <Enter> to proceed show the Product then it will Kit as below to next. Then you have to type the correct date in voucher date and press <Enter> now click on <Product To Kit> and press <Enter> to open it show the screen as below you have to select the name of product kit as below now click <Create> to start the creation as below now it ask for new voucher id as below if you have no any previous serial of Website: www.gayoosoftware.com Mobile:+91 9965599324 98 email: [email protected] Mobile:+91 98429 83493