Download CPS User Guide - Gainesville ISD

Transcript
CPS 4.0 for PC
Users Guide
Changing the face of Education
Table of Contents
Table of Contents
Chapter 1: Getting Started
1
Installing CPS ......................................................................................................................... 2
Install Free Databases of Questions ................................................................................... 2
Install CPS Student Content Databases.............................................................................. 3
Mouse/Keyboard Shortcuts..................................................................................................... 4
Software Support Information................................................................................................. 5
Hours.................................................................................................................................. 5
Contact Information ........................................................................................................... 5
Training Information.......................................................................................................... 5
New Features in CPS 4.0 ........................................................................................................ 5
Chapter 2: CPS Overview
7
Creation Functions ................................................................................................................. 7
Engage Functions ................................................................................................................... 8
Reporting Functions................................................................................................................ 8
Gradebook and Attendance Functions.................................................................................... 8
Chapter 3: Creation Functions
9
Databases ............................................................................................................................... 9
Create a New Database ...................................................................................................... 9
Password-Protect a Database ............................................................................................. 10
Open an Existing Database ................................................................................................ 11
Import/Export XML Databases.......................................................................................... 12
Export a Database ......................................................................................................... 12
Import a Database ......................................................................................................... 12
Login to CPSOnline ........................................................................................................... 13
K-12 CPSOnline Login ................................................................................................. 13
Higher Ed CPSOnline Login......................................................................................... 15
Lessons.................................................................................................................................... 16
Create Lessons ................................................................................................................... 17
Create FastGrade Lessons .................................................................................................. 18
Create Lesson Questions .................................................................................................... 19
Create Subjective Questions.......................................................................................... 21
Select a Question Template........................................................................................... 21
Add Audio/Video Notes to Lesson Questions............................................................... 26
Add Notes to Lesson Questions .................................................................................... 27
Create Questions with Graphics .................................................................................... 27
Display Graphics within Questions............................................................................... 28
Assign Question Difficulty Levels ................................................................................ 31
Associate Categories to a Question ............................................................................... 31
Associate Standards to a Question ................................................................................ 32
Create Lessons with the Lesson Builder ............................................................................ 32
Edit Lessons ....................................................................................................................... 34
Edit Lesson Attributes................................................................................................... 35
Add Questions to an Existing Lesson............................................................................ 35
Edit Lesson Questions................................................................................................... 36
Rearrange Questions within a Lesson ........................................................................... 37
CPS 4.0 Users Guide
ii
Table of Contents
Copy Questions ............................................................................................................. 37
Delete a Lesson ............................................................................................................. 37
Delete Lesson Questions ............................................................................................... 38
Delete Graphics from Questions ................................................................................... 38
Adjust the Question Font............................................................................................... 39
Search for Questions ..................................................................................................... 40
Spell-check Questions ................................................................................................... 41
Print CPS Lessons ......................................................................................................... 43
Create Rubrics.................................................................................................................... 44
Create a Rubric.............................................................................................................. 44
Associate a Rubric to a Subjective Question................................................................. 45
Edit a Rubric ................................................................................................................. 46
Copy a Rubric ............................................................................................................... 46
Delete a Rubric.............................................................................................................. 47
Import Lessons................................................................................................................... 47
Import CPS Lessons ...................................................................................................... 47
Import Scanner Results ................................................................................................. 48
Import Lessons from Microsoft Word........................................................................... 50
Import ExamView Lessons ........................................................................................... 53
Import PowerPoint Presentations .................................................................................. 54
eI SEARCH ............................................................................................................................. 55
Search for Content ............................................................................................................. 55
Create an eI SEARCH Account .................................................................................... 55
Enter User Information ................................................................................................. 57
Login to an eI SEARCH Account ................................................................................. 58
Find SEARCH Content ................................................................................................. 59
Import Content ................................................................................................................... 60
Import Content Lessons ................................................................................................ 60
Import Specific Content Questions ............................................................................... 61
Import PowerPoint Presentations .................................................................................. 62
Upload Content .................................................................................................................. 63
Create Publisher/Coordinator eI SEARCH Account..................................................... 63
Enter User Information ................................................................................................. 64
Upload Textbook Content ............................................................................................. 65
Standards ................................................................................................................................ 66
Create Standards ................................................................................................................ 67
Create Standard Questions ............................................................................................ 68
Download State Standards from eInstruction................................................................ 68
Create Standards Using the Standards Builder.............................................................. 69
Edit Standards .................................................................................................................... 71
Edit Standard Attributes ................................................................................................ 71
Edit Standard Questions ................................................................................................ 71
Associate Dynamic Standards to Questions .................................................................. 72
Add Questions to a Standard ......................................................................................... 73
Copy Questions to a Standard ....................................................................................... 74
Delete a Standard .......................................................................................................... 75
Delete Questions from a Standard................................................................................. 75
Print CPS Standards ...................................................................................................... 76
Import Standards ................................................................................................................ 77
Import Standards from CPS Databases ......................................................................... 77
Import Downloaded Standards...................................................................................... 78
Classes .................................................................................................................................... 79
Create Classes .................................................................................................................... 80
Create a K-12 Class....................................................................................................... 80
Create a K-12 CPSOnline Class.................................................................................... 81
CPS 4.0 Users Guide
iii
Table of Contents
Create a Higher Ed Class .............................................................................................. 81
Create a Quick K-12 Class ............................................................................................ 82
Create a WebCT Class .................................................................................................. 83
Create a Blackboard Class............................................................................................. 85
Add Students to a Class ..................................................................................................... 86
Add Students to K-12 Class .......................................................................................... 86
Add Students to a Class using CBIT ............................................................................. 87
Add students to a Higher Ed Class................................................................................ 89
Edit Classes........................................................................................................................ 89
Edit a Class.................................................................................................................... 89
Edit Student Information............................................................................................... 91
Copy Students to a Class............................................................................................... 92
Show All Students......................................................................................................... 93
Recycle a K-12 CPSOnline Class ................................................................................. 93
Recycle a Higher Ed Class ............................................................................................ 94
Delete a Class................................................................................................................ 95
Delete a Student ............................................................................................................ 95
Import Classes.................................................................................................................... 95
Import Classes from a CPS Database............................................................................ 96
Import Classes from CPSOnline ................................................................................... 96
Import Classes from Pentamation Files......................................................................... 97
Import Classes from Osiris Files ................................................................................... 98
Import Classes from SASI XP Files.............................................................................. 99
Import Classes from OnTrack Files .............................................................................. 100
Import Classes from DuPont Files ................................................................................ 101
Import Classes from WebCT......................................................................................... 101
Import Classes from Blackboard................................................................................... 102
Export Classes.................................................................................................................... 103
Export Class to tbt Deliver ............................................................................................ 103
Export Class as a CSV file ............................................................................................ 104
Print/Export a Class....................................................................................................... 104
Team Activities........................................................................................................................ 105
There It Is!.......................................................................................................................... 106
CPS Challenge Board......................................................................................................... 106
Create CPS Challenge Boards....................................................................................... 107
Edit CPS Challenge Boards........................................................................................... 109
Delete CPS Challenge Boards....................................................................................... 110
Top Score........................................................................................................................... 111
Chapter 4: Engage Functions
112
The CPS Response System ...................................................................................................... 112
Components of the Response System ................................................................................ 112
CPS IR System.............................................................................................................. 113
CPS RF System ............................................................................................................. 113
Setup the Response System................................................................................................ 114
Plug in the Receiver unit ............................................................................................... 114
Setup IR Pads ................................................................................................................ 114
Setup RF Pads ............................................................................................................... 115
CPS Session Setup .................................................................................................................. 115
Choose Delivery Modes..................................................................................................... 115
Teacher Managed Assessment Mode ............................................................................ 116
Student Managed Assessment Mode............................................................................. 116
Student Managed Practice Mode................................................................................... 122
Teacher-Led Student Managed Assessment Mode ....................................................... 126
CPS 4.0 Users Guide
iv
Table of Contents
Anonymous Mode......................................................................................................... 127
Setup Delivery Options ...................................................................................................... 127
Teacher Managed tab .................................................................................................... 128
Student Managed tab..................................................................................................... 140
Receiver tab................................................................................................................... 141
Feedback Grid tab ......................................................................................................... 143
Team Activities tab ....................................................................................................... 145
Engage in the Classroom ........................................................................................................ 147
Engage in QuickStart Mode ............................................................................................... 147
Engage Lessons.................................................................................................................. 148
Use the CPS Engage Toolbar ........................................................................................ 149
Engage Multiple Lessons .............................................................................................. 149
Engage FastGrade Lessons............................................................................................ 151
Engage ExamView Lessons .......................................................................................... 151
Preview Lessons............................................................................................................ 152
Engage Verbal Questions................................................................................................... 152
Engage Verbal Questions from the Lessons tab............................................................ 152
Engage Verbal Questions from the Engage Toolbar ..................................................... 153
Engage Team Activities ..................................................................................................... 154
Play There It Is!............................................................................................................. 154
Play the CPS Challenge Board...................................................................................... 156
Play Top Score .............................................................................................................. 157
Engage PowerPoint Presentations...................................................................................... 158
Engage a PowerPoint Presentation................................................................................ 158
Engage Lessons with a PowerPoint Presentation .......................................................... 159
Chapter 5: Reporting Functions
161
Merge Sessions ....................................................................................................................... 161
Re-grade Assessments............................................................................................................. 163
Re-grade Questions ............................................................................................................ 163
Re-assign Categories to Questions..................................................................................... 164
Re-grade Numeric Questions ............................................................................................. 165
Re-grade Students .............................................................................................................. 167
Edit Assessments ..................................................................................................................... 168
Edit Assessment Attributes ................................................................................................ 168
Create Attendance from an Assessment............................................................................. 169
Import an Assessment ........................................................................................................ 169
Delete an Assessment......................................................................................................... 170
Download Assessments ........................................................................................................... 170
Generate Reports .................................................................................................................... 171
Choose Reports ....................................................................................................................... 172
Class Reports ..................................................................................................................... 172
Instructor Summary Report........................................................................................... 172
Question Report ............................................................................................................ 173
Response Report............................................................................................................ 173
Item Analysis Report..................................................................................................... 174
Item Analysis with Standards Report............................................................................ 174
Standards Analysis Report ............................................................................................ 174
Opinion Survey Report ................................................................................................. 175
Data Slicing Report ....................................................................................................... 175
Individual Reports.............................................................................................................. 175
Star Chart Report........................................................................................................... 176
Study Guide Report....................................................................................................... 176
CPS 4.0 Users Guide
v
Table of Contents
Study Guide – Incorrect Answers Report...................................................................... 177
Study Guide – Class Summary Report.......................................................................... 177
Export Reports ................................................................................................................... 178
Question Grid Export Report ........................................................................................ 178
Session Data Export Report .......................................................................................... 178
Classroom Manager Export Report............................................................................... 179
AEIS-IT Export Report ................................................................................................. 179
OnTrack Export Report................................................................................................. 179
Response Data Export Report ....................................................................................... 180
All Data Export Report ................................................................................................. 180
Post Report.................................................................................................................... 180
LMS Export Report....................................................................................................... 180
InteGrade Pro Export Report......................................................................................... 181
WebCT Export Report .................................................................................................. 181
Print Reports........................................................................................................................... 181
View Results and use Data Slicing.......................................................................................... 182
Access the CPS Charting window...................................................................................... 182
Access during Session Delivery .................................................................................... 182
Access from the Reports tab.......................................................................................... 183
View Performance Data by Question................................................................................. 183
View Performance Data by Answer................................................................................... 183
View Performance Data by Category................................................................................. 184
Change Chart Options ........................................................................................................ 184
Show Response Time .................................................................................................... 185
Chart Type..................................................................................................................... 186
Show Correct................................................................................................................. 186
Show Questions and Categories .................................................................................... 187
Raw Response Data Export........................................................................................... 188
Save Chart as Graphic ................................................................................................... 188
Print Chart ..................................................................................................................... 188
Show Multiple Charts ................................................................................................... 189
Answer Options............................................................................................................. 190
Show Answer Legend ................................................................................................... 190
Slice Performance Data...................................................................................................... 191
Slice by Demographics ................................................................................................. 191
Slice by Comparison Sessions....................................................................................... 192
Chapter 6: Gradebook and Attendance Functions
193
Use the CPS Gradebook ......................................................................................................... 194
Create a Gradebook............................................................................................................ 194
Create Gradebook from Session Setup.......................................................................... 194
Quick Setup and Grade Export...................................................................................... 195
Advanced Gradebook Setup.......................................................................................... 196
Using Grading Periods .................................................................................................. 201
Manage Assessments ......................................................................................................... 203
View Specific Assessment Types.................................................................................. 203
Include Assessment in Gradebook ................................................................................ 204
Create Assessments ....................................................................................................... 205
Edit Assessments........................................................................................................... 205
Delete Assessments ....................................................................................................... 206
Export Assessments ...................................................................................................... 207
Manage Class Info ............................................................................................................. 207
Review Student Information ......................................................................................... 207
Change Attendance Options.......................................................................................... 208
CPS 4.0 Users Guide
vi
Table of Contents
Use Gradebook Reports ..................................................................................................... 209
Access Gradebook Reports ........................................................................................... 209
View Gradebook Reports .............................................................................................. 210
Manage Attendance ................................................................................................................ 213
Set Attendance Options...................................................................................................... 213
Take Attendance as Absent/Present ................................................................................... 214
Take Attendance from a Session ................................................................................... 214
Take Attendance During a Session ............................................................................... 215
Take Attendance from the Classes tab .......................................................................... 216
Take Attendance as an Assessment.................................................................................... 216
Create an Attendance Assessment from a Session ........................................................ 217
Create an Attendance Assessment from an Existing Session........................................ 217
Take a Graded Attendance Average................................................................................... 218
Take an Attendance Average from a Session................................................................ 218
Take an Attendance Average from the Classes tab ....................................................... 219
Upload Attendance............................................................................................................. 220
Automatically Upload Attendance from Session Setup ................................................ 220
Automatically Upload Attendance from the Attendance window................................. 221
Upload Attendance after Class ...................................................................................... 222
Appendix A: REAP
223
Curriculum Coordinator Walkthrough ................................................................................... 224
Create Lessons with Standards........................................................................................... 224
Create a Database.......................................................................................................... 224
Download REAP Standards from eInstruction.............................................................. 225
Import CPS REAP Standards........................................................................................ 225
Create a Lesson Structure.............................................................................................. 226
Create Lesson Questions ............................................................................................... 227
Associate Standards to Questions ................................................................................. 229
Create and Send Assessments ............................................................................................ 229
Log in to CPSOnline ..................................................................................................... 229
Create an Assessment.................................................................................................... 230
Setup an Assessment ..................................................................................................... 231
Send an Assessment ...................................................................................................... 233
Non-CBIT Teacher Walkthrough ............................................................................................ 234
Create Classes .................................................................................................................... 234
Create a Database.......................................................................................................... 234
Create a CPSOnline Class ............................................................................................. 235
Enter Contact and Class Information ............................................................................ 236
Connect your Class to CPSOnline................................................................................. 237
Populate Student Rosters ................................................................................................... 240
Add a Student to your Class.......................................................................................... 240
Sync Class with CPSOnline ............................................................................................... 241
Download Assessments................................................................................................. 243
Appendix B: CPSOnline Higher Ed
245
CPSOnline Instructor’s Guide ................................................................................................ 246
Have your School Bookstore Order Response Pads .......................................................... 247
Install the Classroom Performance System desktop software............................................ 247
Create a CPS Database....................................................................................................... 248
Create a CPSOnline Class.................................................................................................. 249
Purchase a Response Pad at the Bookstore ........................................................................ 251
Register Response Pads ..................................................................................................... 251
Import and Deliver PowerPoint Presentations ................................................................... 252
CPS 4.0 Users Guide
vii
Table of Contents
Import PowerPoint Presentations .................................................................................. 252
Engage PowerPoint Presentations ................................................................................. 252
Use your CPSOnline class for following semesters ........................................................... 254
Troubleshooting ................................................................................................................. 254
CPSOnline Higher Ed FAQ .................................................................................................... 255
Appendix C: Third Party Add-ins
261
CPS-WebCT Proxy Tool for WebCT Vista.............................................................................. 262
Link a WebCT class to CPS............................................................................................... 262
Import your Class to CPS................................................................................................... 263
Export CPS Grades to WebCT........................................................................................... 264
Export immediately after lesson.................................................................................... 264
Export later.................................................................................................................... 264
Sync CPS with WebCT...................................................................................................... 265
CPS-WebCT Proxy Tool for WebCT CE................................................................................. 266
Link a WebCT CE class to CPS......................................................................................... 266
Import your Class to CPS................................................................................................... 267
Export CPS Grades to WebCT........................................................................................... 268
Export immediately after lesson.................................................................................... 268
Export later.................................................................................................................... 268
Sync CPS with WebCT...................................................................................................... 269
CPS Connection Building Block for Blackboard .................................................................... 270
Link a Blackboard class to CPS ......................................................................................... 270
Import your Class to CPS................................................................................................... 272
Sync CPS with Blackboard ................................................................................................ 272
Glossary
273
Index
276
CPS 4.0 Users Guide
viii
Chapter 1: Getting Started
The Classroom Performance System (CPS) is a package of software and hardware developed by
eInstruction Corporation. The hardware consists of a radio frequency or infra red receiver unit
and response pads. The hardware and software work together to help you create and deliver
course-relevant questions and standards. Then, CPS compiles and reports student performance
results.
With CPS you can
Construct, organize, and deliver your own interactive set of questions.
Create review materials to deliver in a competitive, fun, and fast-paced learning
environment.
Run CPS and another software application, like PowerPoint, simultaneously; access the
on-screen CPS bar for a verbal question; or select predefined questions.
Input standards based on your school’s, district’s, or state’s requirements and create
questions that measure those standards.
Print questions in traditional paper format.
Instantly receive and grade homework, reviews, tests, and standards measurements.
Generate detailed reports about how each student performs in class.
Record all CPS and non-CPS-generated grades and automatically calculate averages.
Take and record attendance in a quick, fun way.
This chapter provides you with information on
Installing CPS
Mouse/Keyboard Shortcuts
Software Support Information
New Features in CPS 4.0 Beta
To access the most up-to-date Users Guide for CPS, please visit our Downloads Center at
www.einstruction.com/downloads.
CPS 4.0 Users Guide
1
Chapter 1: Getting Started
Installing CPS
To run the CPS package, depending on your operating system, you will need the following
components:
Windows Operating System
Intel Pentium II or higher processor
One USB port
A minimum of 256 MB RAM (512 recommended)
At least 120 MB of hard drive space for CPS software; databases may require more hard
drive space
Microsoft Windows 98 and 98SE, Microsoft Windows 2000 with Service Pack 2,
Windows XP Professional or Home Edition, or Windows XP Tablet PC Edition
Screen resolution of 800x600 or higher
Mac Operating System
Mac OS X, including 10.3 "Panther" or greater
PowerPC G3 300 MHz or better processor, including G4
256 MB of physical RAM (512 MB recommended)
120 MB of free hard disk space
One open USB port
800 x 600 display, thousands of colors or better
We recommend using a projection system, such as a projector, LCD, or TV, but a projection
system is not required to use CPS.
Install Free Databases of Questions
eInstruction provides you a free database full of questions that you can use immediately. The free
database is on the same CD you used to install the CPS software:
1. Click the Start button from your Windows taskbar.
2. Click the Run command. In the pop-up window, type your CD-ROM drive letter, then
“:\bin\
3. Click OK.
When the Select CPS Databases dialog box opens, choose Trivia.
1. Click Install. In the next dialog box, choose the drive on which you installed CPS. Use
the drop-down list to see your available options.
2. Click Next. When the installation is complete, the database
is in a new folder on your hard drive named CPS.
3. Click on the folder to open it, and open the
CPS_Databases folder. The directory path to your
databases should look like Figure 1:
Figure 1: Viewing the Directory
Path to your database
NOTE: You may install the other available databases at any time you like
using these same steps.
CPS 4.0 Users Guide
2
Chapter 1: Getting Started
Install CPS Student Content Databases
1. Insert the Content CD into your CD-ROM drive.
2. Wait while the CD-ROM installs the content automatically. If the installation process has
not started in two minutes:
a. Click the Start button from your Windows taskbar.
b. Click the Run command. In the pop-up window, type the CD-ROM drive letter and
then “:\customdatabasename.exe” For example: d:\ImageLibrary.exe
c. Click OK.
In the License Agreement dialog box, click I Agree and Continue. If you do not agree, the
installation process stops.
3. Choose the drive to which you want to install the database(s).
4. Click Continue.
5. Type your User Code in the next dialog box.
6. Click OK.
The next dialog box lists the components purchased. Select which components you want to
install now. You do not have to do multiple components at one time; you can return and do this
process again to finish installing all of your purchased components.
7. Click Finish at the end of the installation process. You have now installed the CPS
Content database(s) to your system.
CPS 4.0 Users Guide
3
Chapter 1: Getting Started
Mouse/Keyboard Shortcuts
The CPS Guide and software use normal Window’s conventions. They include the following
Click: press and immediately release the left mouse button.
Double-click: perform rapid, back-to-back clicks with the left mouse button.
Drag: press the left mouse button and move the cursor with the left mouse button
remaining depressed. When the function associated with the dragging of the mouse is
accomplished, release the left mouse button.
Pop-up hints: Roll your mouse over any button on any CPS tab to see a brief description
of what function that button performs.
Select or Highlight: indicates an operation of choosing a command, typically from a list
of options. Accomplish this by clicking the left mouse button on a menu or list box,
dragging to the command, and then releasing the left mouse button. Clicking a menu or
list box and then clicking the desired command can accomplish this.
Right-click: click and release the right mouse button.
Alt + Tab: move to your windows desktop or any other open program or system, without
quitting CPS. Hold the Alt key and press the Tab key.
Shortcuts: key combinations and sequences are often used to shorten the command
functions of software. For example, Ctrl+W means to hold the Ctrl key while pressing
W.
Ctrl+C: Simultaneously press the Ctrl key and the C key to copy selected text.
Ctrl+V: Simultaneously press the Ctrl key and the V key to paste selected text into
another location, file or software application.
Ctrl + highlighted items: select non-consecutive items from a list by highlighting an
item, pressing the Ctrl key, and highlighting other items.
Shift+ highlighted items: select consecutive items from a list by highlighting an item,
pressing the Shift key, and highlighting other items.
Move: to move lessons, standards, questions and other items within CPS, simply
highlight the item and drag it to another available location within CPS. On-screen
messages will inform you if the location is or is not available. The item will no longer be
available from its source location.
Copy: to copy lessons, standards, questions, and other items within CPS, simply
highlight the item, press the Ctrl button and drag it to another available location within
CPS. On-screen messages will inform you if the location is available. The item will be
available from its source location as well is its target location.
Link: to link lessons, standards, questions, and other items to one another within CPS,
simply highlight the item, press the Ctrl+Shift buttons simultaneously and drag it to
another available location within CPS. On-screen messages will inform you if the
location is or is not available. The item will be available from its source location and
linked to its target location, so that any changes made to the item at either location will
directly affect the other location.
For more keyboard shortcuts, please visit http://support.microsoft.com/default.aspx?scid=kb;ENUS;q126449
CPS 4.0 Users Guide
4
Chapter 1: Getting Started
Software Support Information
eInstruction Corporation supports your instructional activities with CPS. CPS aids your
instructional delivery process and enhances your flexibility and creativity. If you have any
questions about CPS, please call eInstruction Corporation and ask for Technical Support.
Hours
Monday - Thursday 7 A.M. - 6 P.M. CST
Friday 7 A.M. - 5 P.M. CST
Extended hours available at the beginning of each long semester. Please check our website,
http://www.einstruction.com/support, for extended hours.
Contact Information
Email: [email protected]
Phone: 888.333.4988
Training Information
Professional Development Seminars: http://www.einstruction.com/pds
Online Training: http://www.einstruction.com/training
New Features in CPS 4.0
CPS 4.0 includes many new features that enable you to create a more fun and flexible learning
environment.
Gen 2 Response System: The Gen 2 response system works with radio frequency (RF)
technology to create an new and improved system. The Gen 2 response pads include
“Auto Join” capabilities, as well as a new multi-function “sym” button for creating
equations.
Random Student Selector: The Random Student Selector allows you to set your options
when randomly choosing students during an assessment. You can choose how frequently
a student is available to answer questions, as well as the pool of students from your class
that you choose.
There It Is! SMA Mode: The There It Is! SMA mode allows you to engage students in a
There It Is! Activity using SMA mode. In SMA mode, students move through a set of
questions at their own pace. There It Is! SMA mode also allows you to include one
picture file (jpg, bitmap, or gif file) at the bottom of the SMA screen. For example, you
could include a picture of an algebraic equation, and ask the students to find the answer if
'X' equals their question number.
eI SEARCH: eI SEARCH allows you to search eInstruction’s repository of CPS lessons
and PowerPoint presentations to integrate into your lesson plans. Select publishers can
also include lessons from specific textbooks. However, to access textbook lessons you
must have an Adoption Code from your publisher.
CPS 4.0 Users Guide
5
Chapter 1: Getting Started
Spell-Checker: The Spell Checker allows you to spell-check your questions in the CPS
Question Author window. You can change your Checker options to check spelling
automatically or to check spelling only when you request it.
Import Class Rosters from Blackboard (Higher Ed): CPS now supports Blackboard
online classes with CPS. The CPS-Blackboard Connection Building Block connects CPS
to your Blackboard class so that you can sync student data and upload CPS performance
results to Blackboard.
Access WebCT/Blackboard Classes from CPS (Higher Ed): When you upload a file
from CPS, CPS will prompt you for your Blackboard or WebCT username and password.
This direct connection saves you time and provides an extra layer of protection for your
students' data.
Create Attendance Sessions: Both Higher Ed and K-12 instructors can manage
attendance by creating attendance sessions or viewing attendance as an attendance sheet
in the Gradebook.
Data Slicing and Charting: When you engage lessons, you can view the performance
results graphically through the Charting window so that you can quickly assess your
students’ performance. The Charting window is available after each question during a
session, and is now also available from the Reports tab in CPS. The new CPS Charting
window not only provides you with a graphical representation of your students’
performance, it now also allows you to slice the performance data to view specific
subsets of student performance.
K-12 RF Support: Now you can engage up to 300 students using the K-12 RF response
pads.
ExamView 5 Support: CPS supports ExamView 5 files. Now, you can engage your
ExamView files, from ExamView version 5 or earlier, in CPS.
CPS 4.0 Users Guide
6
Chapter 2: CPS Overview
By understanding a few important concepts within CPS, you will be able to quickly integrate
CPS into your lessons. The CPS program is divided into four basic categories: creation, engage,
reporting, and grading/attendance functions.
Creation Functions (Chapter 3)
Create databases
Create and edit lessons, standards, and questions
Create classes of students
Create team activities
Engage Functions (Chapter 4)
Understand the Response System
Assessment delivery modes
Engaging students in the classroom
Reporting Functions (Chapter 5)
Reporting System
Types of Reports
Gradebook and Attendance Functions (Chapter 6)
Add non-CPS-generated grades
Setup your gradebook
Keep attendance records
Creation Functions
CPS creation functions build databases. Any one database contains classes, reports, a gradebook,
team activities, and assessments in lessons and standards.
Classes are saved in the databases you create. They are like class rosters with additional
information (gender, ethnicity, student ID, and pad ID) that the CPS response system uses to
collect performance feedback. The Classes tab also has a function that allows you take
attendance quickly using the response pads.
Lessons of questions or coordinating answer keys are stored in databases that you create. The
lessons are delivered in a classroom environment using the Engage Lesson(s) icon. This allows
students to respond with their pads while their performance data is recorded for your future use.
Team Activities are game boards that award point values for correctly answered questions that
you have delivered from a lesson or standard.
CPS 4.0 Users Guide
7
Chapter 2: CPS Overview
Standards are state, district, school or instructor established goals for entire lessons or
individual questions. Associate standards with questions, deliver those questions to students
using the Engage Lesson(s) icon, and then generate performance reports sorted by standards, so
you can see student performance in relation to these goals.
Engage Functions
A CPS delivery session presents questions to the students in various formats such as verbal
questions, FastGrade answer keys, questions from a lesson or standard, teacher or student
managed modes, or from the team activities.
The CPS response system is the hardware system (a receiver unit and set of pads) that uses
infrared or radio frequency signals to capture students’ responses to CPS questions, and record
those responses for later evaluation. CPS uses the CPS response system to create an interactive
classroom and to record performance results.
From the Lessons tab and the Standards tab, you can choose the Teacher Managed Assessment
mode, Student Managed Assessment mode, Student Managed Practice mode, or Teacher-Led
Student Managed Assessment mode. These modes record student performance. This data is
available for evaluation via the Reports tab, and if you so specify, CPS records grades in the
Gradebook. You can also deliver questions using the Preview command on the Lessons tab or
the Standards tab; however, Preview does not record performance data.
From the Team Activities tab, deliver questions taken from Lessons or Standards in a gameboard setting. Your students may not even realize they are learning!
Reporting Functions
Reports are compiled from the data collected from each student’s response pad. CPS takes
information submitted by the response pads during a delivery session and organizes the
information by class, attributes the data to the appropriate student/team, and makes the data
available to view via the Reports tab. You can also choose to include recorded data in the
Reports tab in the Gradebook.
The performance data captured by the CPS response system during a session is saved in the
database and accessible via the Reports tab. A session report contains data including the student
name, pad ID, ratio of attempted to correct responses, and percentage correct. Multiple report
types offer variety and flexibility in reviewing student data, as well as the ability to export to
word processing or spreadsheet applications.
Gradebook and Attendance Functions
The Gradebook is an organizational tool that keeps students’ grades over your specified time
periods using your own point system of letter grades and weights. The Gradebook records both
CPS and non-CPS-generated grades for each student. It also calculates averages according to
your instructions and keeps track of attendance.
CPS 4.0 Users Guide
8
Chapter 3: Creation Functions
CPS allows you to construct course-relevant questions. CPS also gives you the ability to track
each student's performance data generated during lesson or team activities delivery sessions. This
tracking produces student and class grades and performance reports with respect to your course
lesson. This chapter shows you how to
Create databases
Create lessons
Use eI SEARCH
Create standards
Create classes
Create team activities
Databases
A CPS database is a file with a file extension of .cps. This file is where you save all your
questions, and where CPS stores all the reports of student performance. A CPS database contains
lessons, standards, classes, team activities, student performance data (reports), the student
gradebook, and attendance records. This section will show you how to
Create new databases
Password-protect databases
Open existing databases
Convert databases to CPS 4.0 Beta
Import/Export databases in XML
Login to CPSOnline
Create a New Database
Although you can create many CPS databases, we suggest you create only one. Organizing the
data collected by CPS is easy when you save multiple classes and lessons to a single database.
Whether you’re a first-time CPS user or a seasoned
pro, follow the steps below to create a new CPS
database.
First-time CPS Users
If you have never used CPS before, you will need to
create a new *.cps database file.
1. Open CPS from the desktop icon. The CPS
Open or Create New CPS Database window
appears.
2. Choose Create a new CPS File.
3. Click OK. The New CPS File dialog box
opens.
4. Go to Step 4 in the next section for further
instructions.
Figure 2: Creating a new database as a firsttime user
CPS 4.0 Users Guide
9
Chapter 3: Creation Functions
Subsequent CPS Users
If you have used CPS before and want to create a new database file, simply
follow these steps:
1. Open CPS from your desktop icon.
2. Click File from the menu bar.
3. Click New Database.... A New CPS Database window appears.
4. In the File Name text box, type the database name that you are
creating. The file extension *.cps is automatically added to your file
name.
NOTE: Make certain that you save this database in the
CPS folder and inside that, the CPS_Databases folder—
not in the My Documents folder or any other folder that
displays in the Save in drop-down list. The install
program created the eInstruction and CPS_Databases
folders on your hard drive when you installed the databases
from CD. For instructions about the existing databases,
refer to Install Free Database of Questions.
Figure 3: Creating
a new database
from within CPS
5. Click Save and wait while CPS processes your request. The Lessons tab opens with your
database name in the title bar and left window of that tab.
The database you created automatically opens. If you were to exit the CPS software now, the
next time you start the software this same database opens.
Password-Protect a Database
You can prevent your database from being opened, and possibly altered, by anyone who does not
have your permission by using the Passwords option. Because the password protection applies to
the database (not just Lessons, Classes, or Standards), the option is available from the Settings
menu item.
Before you enable the Passwords function, keep in mind
An option box from the Edit Password window enables/disables the password security for
the database. You must check this “on” in order to establish a database password.
Any time you access a database that is password protected, you are required to input the
password before it will open.
To edit a password or disable the password protection from a database, you must provide
the password in the Edit Password window.
When importing or building lessons or standards from a password protected database,
you do not have to provide the password.
When importing classes from a password-protected database, you must provide the
password.
CPS 4.0 Users Guide
10
Chapter 3: Creation Functions
To enable the Passwords function
1. Click the Settings menu item from the main
CPS window.
2. Select the Passwords… command. The Edit
Password window appears.
3. Choose to Enable Password Protection for
this CPS database in order to activate the
password fields.
4. Type in your personal password in the first two
fields, Enter Password and Confirm
Password.
5. Create your own hint or reminder question to
help you remember your password.
6. Click OK to save your password protection
information.
Figure 4: Password-protecting a CPS database
To disable the Passwords function
1. Click the Settings menu item from the main CPS window.
2. Select the Passwords… command. The Edit Password window appears.
3. Click the box next to the Enable Password Protection for this CPS database option so
that the checkmark disappears.
4. Click OK to save your settings and return to CPS.
Open an Existing Database
If the .cps database file that was open the last time you used CPS is available, that database file
opens automatically.
If the last .cps file is no longer available because you renamed, deleted, or moved the file, you
need to create a new .cps file or find a pre-existing .cps file from the Open or Create New CPS
File dialog box. To open an existing database
1. Open CPS from your desktop icon.
2. Click File from the menu bar.
3. Click Open Database..., or look in the
File menu drop-down list to see the most
recently opened databases.
4. If you selected the Open Database...
command, an Open CPS File dialog box
appears.
5. Search for and select the database you
want to activate. Use the Look in dropdown list if you need to navigate around
your hard drive to find the correct
folder.
Figure 5: Opening a recently used database from the File
menu
6. Click Open. Any lessons in this
database display on the Lessons tab.
CPS 4.0 Users Guide
11
Chapter 3: Creation Functions
Import/Export XML Databases
You can import or export an entire CPS database (including lessons, standards, and team
activities) into a new database.
Export a Database
You can export an entire database, with lessons, standards, team activities,
classes, and the Gradebook, using an XML format. Follow the steps below
to export a database.
1. Open CPS from your desktop icon.
2. Open the database you would like to export.
3. Click the File menu and choose Export Database.... The Package
and Export Database window appears.
4. Browse through your computer to find the location to which you
would like to save your exported database.
5. Type in a database name in the File name text box.
6. Click Save to save your database, as an XML file, to your computer.
Figure 6: Exporting a
database from the
File menu
Import a Database
You can import a database in an XML format into a new or existing database. Follow the steps
below to import a database.
1. Open CPS from your desktop icon.
2. Open the database into which you
would like to import an existing
database. Alternatively, create a new
database. For more information on
creating a new database, please see the
Create a New Database section.
3. Click the File menu and choose
Import Database.... The Import
Packaged Database window appears.
4. Browse through your computer until
Figure 7: Importing a database from the Import
you find the database you would like
Packaged Database window
to import.
NOTE: Only databases with a *.cxm file extension (exported XML files) will
be available for import.
5. Click Open. CPS will begin to import your database. This process may take up to several
minutes, depending on the amount of information in your database.
All of your data will be stored in the proper tab (i.e., lessons will be in the Lessons tab, team
activities in the Team Activities tab, and so on). You will be able to edit your imported data just
like any other lesson, standard, class, team activity, or gradebook entry in your database.
CPS 4.0 Users Guide
12
Chapter 3: Creation Functions
Login to CPSOnline
CPSOnline is the online component of CPS. CPS connects to CPSOnline to send data to
administrators or to manage higher education classes. This section will show you how to
Login to CPSOnline for K-12 Instructors
Login to CPSOnline for Higher Ed Instructors
K-12 CPSOnline Login
As a K-12 instructor, you will use
CPSOnline when your school or district
adopts REAP. For more information on
REAP, please see Appendix A: REAP. To
login to CPSOnline
1. Open CPS from your desktop icon.
2. From the Settings menu, choose
CPSOnline Login. The
CPSOnline Login Wizard appears.
First Timer Users – If this is
your first time to login to
CPSOnline in this database,
choose K-12 as your institution
type and click Next.
Figure 8: Logging in for the first time as a K-12 CPSOnline user
Current Users – If you have
logged on to CPSOnline before from the CPSOnline Login Wizard
in this database, skip to step 7.
3. Choose your user type and click Next.
Exiting User – Choose this option if you already have a CPSOnline username and
password. If you are a current CPSOnline user, skip to step 7.
New User – Choose this option
if you have never used
CPSOnline before.
4. Enter the required account
information in the spaces provided
and click Next.
Title – not required
First Name – required
Last Name – required
Email Address – required
Phone – not required
Teacher Code – not required
NOTE: The Teacher
Code is the unique
code, given to you by
Figure 9: Entering account information to login to CPSOnline
from the CPSOnline Login Wizard
eInstruction or your
campus administrator, which identifies you and your classes in CPSOnline.
CPS 4.0 Users Guide
13
Chapter 3: Creation Functions
For more information on the Teacher Code for REAP instructors using CBIT, please see the
CBIT Teacher Walkthrough.
5. Enter the class information to create
your first CPSOnline class and click
Next.
NOTE: Make sure the
option Make this a
CPSOnline class is
checked.
6. Enter your Instructor Setup Code
and click Next.
NOTE: The Instructor
Setup Code is the unique
code, given to you by
Figure 10: Creating a CPSOnline class from the CPSOnline
Login Wizard
eInstruction or your
campus administrator, which identifies you and your classes in CPSOnline.
For more information on the Teacher Code for REAP instructors using CBIT,
please see the CBIT Teacher Walkthrough.
7. Enter your CPSOnline Username and Password and click Next. CPS connects you to
CPSOnline.
8. Choose Yes to sync your class with CPSOnline now, or choose No to wait. Click Next to
continue.
9. Click Yes to check for any new downloadable assessments, or click No to skip this step.
Click Next to continue.
10. Click Done to exit the CPSOnline Login Wizard and return to CPS.
CPS 4.0 Users Guide
14
Chapter 3: Creation Functions
Higher Ed CPSOnline Login
As a Higher Ed instructor, you can use CPSOnline in several ways: You can use CPSOnline
Higher Ed to manage your class rosters or link CPS to your existing Blackboard or WebCT class.
For more information on CPSOnline Higher Ed, please see Appendix B: CPSOnline. For more
information on linking your classes to Blackboard or WebCT, please see Appendix C: Third
Party Add-ins. To login to CPSOnline
1. From the Settings menu, choose
CPSOnline Login. The
CPSOnline Login Wizard appears.
First time Users – If this is
your first time to login to
CPSOnline in this database,
choose Higher Ed and click
Next.
Current Users – If you have
logged in to CPSOnline before
in this database, please skip to
step 4.
Figure 11: Logging in to CPSOnline for the first time using the
CPSOnline Login Wizard
2. Enter your CPSOnline Instructor
Setup Code. If you do not have a
code, please contact eInstruction at
888.707.6819 and ask for the
Administrator for Web-Based
Initiatives. Click Next.
3. Select your university from the list
and click Next.
4. Enter your CPSOnline Username
and Password.
First time Users – If you are
creating a Username and
Password for the first time, you
will also need to confirm your
password.
Blackboard and WebCT
Figure 12: Entering your Instructor Setup Code in the
CPSOnline Login Wizard
Users – Your Username and
Password is your CPS-Blackboard or CPS-WebCT Username and Password.
5. If you are a first time user, create your class. For more information on creating a
CPSOnline class, please see Create a Higher Ed Class. If you are a current CPSOnline
user, choose a current CPSOnline class roster that you would like to import (optional)
and click Next.
6. Click Done to exit the CPSOnline Login Wizard and return to CPS.
CPS 4.0 Users Guide
15
Chapter 3: Creation Functions
Lessons
CPS provides you with several ways to create a lesson. You can create a traditional lesson with
class participation questions, or you can create lessons using PowerPoint. CPS also offers a third
type of lesson, the FastGrade lesson, where you do not even need to create questions. You can
create lessons using the CPS Question Author window and toolbar, import entire lessons from
other CPS databases, or create quick CPS answer keys to accompany existing hard copy material
using the FastGrade option.
The Lessons tab splits into two windows. These windows can either be vertical or horizontal,
depending on your preference. The default is vertical view. To switch views, simply click the
View button located at the far end of the Lessons tab.
The left window (top in horizontal view) gives a view of all lessons in this open database. We
refer to this as the lesson side. The name of the open database is the first item listed in the left
window. Beneath that are parent-level lesson names. If a parent-level lesson name has child-level
lessons, then a plus (+) symbol appears next to the parent lesson name. Click that plus (+)
symbol to see all child-level lessons.
Figure 13: Viewing the Lessons tab
The right window (bottom in horizontal view) lists all of the questions from any highlighted
lesson name. We refer to this as the question side. When you highlight the database name, all
lessons (and the number of questions in the lessons) display in the question side.
When you highlight a lesson name from the left window, all questions for that lesson and any
child-level lessons display on the question side. The question side also displays the number of
questions, the type of question, and each question’s difficulty level.
Lessons can be in outline or hierarchical form. For example, you could create a level of lessons
titled Chapter 1, Chapter 2, and so on. Beneath each chapter level, you can create levels of
lessons that relate to sections within the chapter.
CPS 4.0 Users Guide
16
Chapter 3: Creation Functions
This section will show you how to
Create lessons
Create FastGrade lessons
Create lesson questions
Edit lessons
Create rubrics
Import and Export lessons
Chapter 4: Engage Functions will provide you with additional information on engaging lessons,
PowerPoint presentations, and ExamView lessons within CPS.
Create Lessons
To create a new lesson, follow the steps below:
1. Open the database in which you
want to create a lesson and click
the Lessons tab. To create a
parent-level lesson, highlight the
database name. To create a childlevel lesson, highlight a lesson
name. The new lesson will be
created beneath the lesson you
highlighted.
. A pop-up menu
2. Click
appears.
3. Choose New then Lesson. The
CPS Lesson Attributes window
appears.
4. Type in the title of your lesson.
Optionally, you can add a
Figure 14: Creating a CPS lesson with the CPS Lesson
Attributes window
description, unique identifier, or
associate a picture file that you can view in There It Is! SMA mode.
5. Click OK.
6. Use the keyboard commands Ctrl and Ctrl+Shift, along with mouse selections and
movement to move, copy, or link lessons. For more shortcut hints, please see
Mouse/Keyboard Shortcuts.
CPS 4.0 Users Guide
17
Chapter 3: Creation Functions
Create FastGrade Lessons
Use the FastGrade feature as a supplement to worksheets and other hardcopies. You can create a
FastGrade answer key, distribute hardcopies to the students, and have them respond for a quick
grade.
When you create a FastGrade lesson, please have a hard copy of the course material with you,
preferably one that has the correct answers indicated. You should make this FastGrade lesson
before you present it to your students. Follow the steps below to create a FastGrade lesson.
1. Open CPS from your desktop icon.
2. Click the Lessons tab.
3. Select the database or a lesson under
which you want to create a
FastGrade lesson.
. A pop-up menu
4. Click
appears.
5. Choose FastGrade. The CPS
Lesson Attributes window opens for
you to name your FastGrade lesson.
6. Type a name for your FastGrade
lesson in the Title box and
optionally, a description or unique
identifier. You can also add a picture
file (jpeg, bitmap, or gif) that will
appear when you engage the lesson
Figure 15: Creating a title for a FastGrade lesson in the
CPS Lesson Attributes window
in There It Is! SMA mode.
7. Click OK. The CPS FastGrade window opens showing the following features:
Title: The name you typed in the CPS Lesson Attributes window.
Number of questions in this Lesson: The number of questions you have successfully
added to the FastGrade answer key.
Properties: Opens the CPS Lesson Attributes window.
Question type columns: Question types in individual columns enable you to add
various question types to the FastGrade answer key.
Standards associated with the current question: Standards in the open database
appear so that you can associate them with each question if you like.
Current Question #: The question number you are currently working on. This
number is always one more than the Number of questions in this Lesson.
Previous: Moves to the previous question in your FastGrade answer key. This action
highlights the previous question’s type and correct answer as well as displaying the
number position of this question as the Current Question #.
Next: Moves to the next question in your FastGrade answer key. This action
highlights the next question’s type and correct answer as well as displaying the
number position of this question as the Current Question #.
Rubric…: Allows you to associate a rubric with a question.
Add: Allows you to add a numeric question.
Other: Allows you to create “placeholder” questions for essays, short answer, etc.).
CPS 4.0 Users Guide
18
Chapter 3: Creation Functions
Figure 16: Using the CPS FastGrade window
8. Click the answer button that corresponds with the question type and correct answer for
each question.
9. Repeat step 8 until you’ve entered every question into the CPS FastGrade window.
10. Click OK. The Lessons tab appears with the FastGrade lesson name in the left window
Create Lesson Questions
After you create a lesson, you can populate the lesson by adding lesson questions. You can create
questions by using the CPS Question Author window and toolbar to
Create Subjective Questions
Select a Question Template
Add Audio/Video Notes
Add Notes
Create Questions with Graphics
Display Graphics within the Questions
Assign Question Difficulty Levels
Associate Standards to a Question
Associate Categories to Questions
CPS 4.0 Users Guide
19
Chapter 3: Creation Functions
To create questions in a parent-level or child-level lesson
1. Highlight a lesson name from
the lesson side of the Lessons
tab. The question side will be
empty if you have not
Question box
previously added or imported
any questions.
Answer box
2. Click
. A pop-up menu
appears.
3. Choose New then Question.
The CPS Question Author
window appears.
4. Click the drop-down arrow in
the Template box to see more
5.
6.
7.
8.
than 50 question templates
Figure 17: Creating a question from the CPS Question Author
window
available with and without
graphic placement options. Refer to Select a Question Template for detailed information
about available question templates.
Type the question in the question box of the template you selected.
Type multiple answers in the answer boxes of the template you selected.
Select a correct answer by clicking in the checkbox beside that answer, so that a
checkmark appears.
Use the Question Author toolbar to save the question. Roll your mouse over each button
from left to right on the toolbar to see each function:
Figure 18: Using the Question Author toolbar to create a question
Click
Click
to save the question and remain on the CPS Question Author window.
to move to the previous or next question in the lesson.
Click
to negate any text or graphics you may have just added and to “redo” this
question number.
Click
to display standards in this database that you can associate with questions;
see Associate Standards to Questions for instructions.
Click
to preview the question.
Click
to save any change you have made and move to the previous or
next question in the lesson. If the question you are saving is last in the list, clicking
Save and Move to Next Question opens a new question template.
9. Repeat for as many questions as you want to add to the lesson.
10. When you finish adding questions, click Question in the menu above the toolbar, and
then Save and Close. All questions appear in the question side of the Lessons tab.
CPS 4.0 Users Guide
20
Chapter 3: Creation Functions
For help editing existing questions, please see the Edit Lesson Questions section.
Create Subjective Questions
You can create subjective questions, with no “correct”
answer, within a CPS lesson. These subjective questions
use the Performance Question template in the CPS
Question Author window. To create a subjective question
1. Open CPS to the Lessons tab.
2. Create a question within a lesson. The CPS
Question Author window appears.
3. Choose Performance Question from the
Template pull-down menu in the Question
Author toolbar.
4. Type your question in the Question Box.
to save your question.
5. Click
6. Close the CPS Question Author window to return
to the Lessons tab.
Figure 19: Create a subjective question
Alternatively, you can create subjective multiple-choice, with the Performance Question template
true/false, or yes/no question by following the steps below:
1. Create a question within a lesson. The CPS Question Author window appears.
2. Remove any checkmarks next to an answer by clicking the box next to the answer.
3. Click
to save your question.
4. Close the CPS Question Author window to return to the Lessons tab.
NOTE: If you use REAP, you will not be able to upload subjective questions.
Select a Question Template
Because you are creating the questions your students will see in the lesson, you can determine
the type of question and many other question attributes. Below are more than 50 question
templates and graphic placement options that are available.
Chalkboard: The chalkboard
MC2, Answer Graphics II: This is
template gives you the opportunity to
a multiple-choice question with 2
draw or load images into the area
answer choices (A-B) and no
provided while verbally asking
graphics included with the question
questions for students to engage in
text but with only graphics included
during delivery. See Chalkboard for
for each of the answer choices. You
more information on how this
may not include text with any
template functions.
question choice.
MC2, Answer Graphics: This is a
MC2, Big Question Graphic: This
multiple-choice question with 2
is a multiple-choice question with 2
answer choices (A-B) and no
answer choices (A-B) where you can
graphics included with the question
include a large graphic with the
text, but with a graphic included for
question text but not in the answer
each of the answer choices.
choices.
CPS 4.0 Users Guide
21
Chapter 3: Creation Functions
MC2, No Graphics: This is a
multiple-choice question with 2
answer choices (A-B) and no
graphics included in the question text
or in the answer choices.
MC2, Question Graphic: This is a
multiple-choice question with 2
answer choices (A-B) and a graphic
included with the question text, but
not in the answer choices.
MC2, Question Graphic Right:
This is a multiple-choice question
with 2 answer choices (A-B) and a
graphic included with the question
text, but not in the answer choices.
The graphic goes to the right of the
question text.
MC2, Question Graphic, Answer
Graphic: This is a multiple-choice
question with 2 answer choices (AB) and a graphic included with the
question text and with each of the
answer choices.
MC3, Answer Graphics: This is a
multiple-choice question with 3
answer choices (A-C) and no
graphics included with the question
text, but with a graphic included for
each of the answer choices.
MC3, Answer Graphics II: This is
a multiple-choice question with 3
answer choices (A-C) and no
graphics included with the question
text but with only graphics included
for each of the answer choices. You
may not include text with any of the
answer choices.
MC3, Answer Graphics III: This is
a multiple-choice question with 3
answer choices (A-C) and no
graphics included with the question
text but with graphics included for
each of the answer choices.
MC3, No Graphics: This is a
multiple-choice question with 3
answer choices (A-C) and no
graphics included in the question text
or the answer choices.
MC3, Question Graphic: This is a
multiple-choice question with 3
answer choices (A-C) and a graphic
included with the question text but
not in the answer choices.
MC3, Question Graphic Bottom:
This is a multiple-choice question
with 3 answer choices (A-C) and a
graphic included with the question
text but not in the answer choices.
The graphic goes directly beneath
the question text.
MC3, Question Graphic Right:
This is a multiple-choice question
with 3 answer choices (A-C) and a
graphic included with the question
text but not in the answer choices.
The graphic goes to the right of the
question text.
MC3, Question Graphic, Answer
Graphic: This is a multiple-choice
question with 3 answer choices (AC) and a graphic included with the
question text, and with each of the
answer choices.
MC4, Answer Graphics: This is a
multiple-choice question with 4
answer choices (A-D) and no
graphics included with the question
text but with a graphic included for
each of the answer choices.
MC4, Big Question Graphic: This
is a multiple-choice question with 4
answer choices (A-D) where you can
include a large graphic with the
question text but not in the answer
choices.
CPS 4.0 Users Guide
22
Chapter 3: Creation Functions
MC4, No Graphics: This is a
multiple-choice question with 4
answer choices (A-D) and no
graphics included in the question text
or the answer choices.
MC4, No Graphics, Big Question:
This is a multiple-choice question
with 4 answer choices (A-D) and no
graphics included in the question text
or the answer choices. This template
is ideal for essay questions or other
question types with extensive text.
MC4, Question Graphic: This is a
multiple-choice question with 4
answer choices (A-D) and a graphic
included with the question text but
not in the answer choices.
MC4, Question Graphic Bottom:
This is a multiple-choice question
with 4 answer choices (A-D) and a
graphic included with the question
text but not in the answer choices.
The graphic goes directly beneath
the question text.
MC4, Question Graphic Mid: This
is a multiple-choice question with 4
answer choices (A-D) and a graphic
included with the question text but
not in the answer choices. The
graphic goes between the question
and the answer choices.
MC4, Question Graphic Right:
This is a multiple-choice question
with 4 answer choices (A-D) and a
graphic included with the question
text but not in the answer choices.
The graphic goes to the right of the
question text.
MC4, Question Graphic, Answer
Graphics: This is a multiple-choice
question with 4 answer choices (AD) and a graphic included with the
question text and with each of the
answer choices.
MC4, Question Graphic, Right
Big: This is a multiple-choice
question with 4 answer choices (AD) and a graphic included with the
question text but not in the answer
choices. The graphic goes to the
right of the question text and can be
unusually large if needed.
MC4, Question Graphic, Right Big
II: This is a multiple-choice question
with 4 answer choices (A-D) and a
graphic included with the question
text but not in the answer choices.
The graphic goes to the right of the
question text and can be unusually
large if you need it to be. The image
area is not quite as large as the Right
Big question template.
MC4, Question Graphic, Right
Small: This is a multiple-choice
question with 4 answer choices (AD) and a graphic included with the
question text but not in the answer
choices.
MC5, Answer Graphics: This is a
multiple-choice question with 5
answer choices (A-E) and no
graphics included with the question
text but with a graphic included for
each of the answer choices.
MC5, Answer Graphics II: This is
a multiple-choice question with 5
answer choices (A-E) and no
graphics included with the question
text but with only graphics included
for each of the answer choices. There
is no text allowed for any answer
choice.
MC5, No Graphics: This is a
multiple-choice question with 5
answer choices (A-E) and no
graphics included with the question
text or the answer choices.
CPS 4.0 Users Guide
23
Chapter 3: Creation Functions
MC5, No Graphics, Big Question:
This is a multiple-choice question
with 5 answer choices (A-E) and no
graphics included in the question text
or the answer choices. It is ideal for
essay questions or other question
types with extensive text.
MC5, Question Graphic Mid: This
is a multiple-choice question with 5
answer choices (A-E) and a graphic
included with the question text but
not in the answer choices. The
graphic goes between the question
and the answer choices.
MC5, Question Graphic Right:
This is a multiple-choice question
with 5 answer choices (A-E) and a
graphic included with the question
text but not in the answer choices.
The graphic goes to the right of the
question text, and can be a largescale graphic.
MC5, Question Graphic Right Big:
This is a multiple choice question
with 5 answer choices (A-E), and a
graphic included with the question
text but not in the answer choices.
The graphic goes to the right of the
question text and can be unusually
large if needed.
MC5, Question Graphic Right
Small: This is a multiple choice
question with 5 answer choices (AE) and a graphic included with the
question text but not in the answer
choices. The graphic goes to the
right of the question text.
MC6, No Graphic: This is a
multiple-choice question with 6
answer choices (A-F) and no
graphics included with the question
text or the answer choices. This
template works best with RF
response pads.
MC6, Question Graphic: This is a
multiple-choice question with 6
answer choices (A-F) and a graphic
associated with the question text, but
no graphics with the answer choices.
This template works best with RF
response pads.
MC7, No Graphics: This is a
multiple-choice question with 7
answer choices (A-G) and no
graphics included with the question
text or the answer choices. This
template works best with RF
response pads.
MC7, Question Graphic: This is a
multiple-choice question with 7
answer choices (A-G) and a graphic
associated with the question text, but
no graphics with the answer choices.
This template works best with RF
response pads.
MC8, No Graphics: This is a
multiple-choice question with 8
answer choices (A-H) and no
graphics included with the question
text or the answer choices. This
template works best with RF
response pads.
MC8, Question Graphic: This is a
multiple-choice question with 8
answer choices (A-H) and a graphic
associated with the question text, but
no graphics with the answer choices.
This template works best with RF
response pads.
Performance Question: This is a
subjective question with no correct
answer. You can grade a
performance question using a rubric,
which you can create using the
Rubric Wizard.
Numeric, No Graphics: This is a
template, for use with CPS RF that
allows you to pose a question with a
numeric answer as opposed to
multiple choices.
CPS 4.0 Users Guide
24
Chapter 3: Creation Functions
Numeric, Question Graphic: This
is a template for use with CPS RF
that allows you to pose a question
with a numeric answer (as opposed
to multiple choices) and also lets you
include a graphic.
T/F, No Graphics: This is a
true/false question with no graphics
included in the question text or the
answer choices.
T/F, No Graphics, Big Question:
This is a true/false question without
any graphics included in the question
text or the answer choices. It is ideal
for essay questions or other question
types with extensive text.
T/F, Question Graphic: This is a
true/false question with a graphic
included with the question text but
not in the answer choices.
T/F, Question Graphic Bottom:
This is a true/false question with a
graphic included with the question
text but not in the answer choices.
The graphic goes directly beneath
the question text.
T/F, Question Graphic II: This is a
true/false question with a graphic
included with the question text but
not in the answer choices. The
graphic goes beside the question text
and above the answer choices.
T/F, Question Graphic Right: This
is a true/false question and a graphic
included with the question text but
not in the answer choices. The
graphic goes beside the question and
can be large.
Y/N, No Graphics: This is a yes/no
question with no graphics included
in the question text or the answer
choices.
Y/N, No Graphics, Big Question:
This is a yes/no question with no
graphics included in the question text
or the answer choices. It is ideal for
essay questions or other question
types with extensive text.
Y/N, Question Graphic: This is a
yes/no question with a graphic
included with the question text but
not in the answer choices.
Y/N, Question Graphic Bottom:
This is a yes/no question with a
graphic included with the question
text but not in the answer choices.
The graphic appears beneath the
question text.
Y/N, Question Graphic II: This is a
yes/no question and a graphic
included with the question text but
not in the answer choices. The
graphic goes beside the question text
and above the answer choices.
Y/N, Question Graphic Right: This
is a yes/no question with a graphic
included with the question text but
not in the answer choices. The
graphic goes beside the question and
can be large.
NOTE: You will not be able to use MC6 - MC8 question types with IR pads
in SMA or SMP modes because the F, G, and H buttons are directional
buttons.
CPS 4.0 Users Guide
25
Chapter 3: Creation Functions
Question templates with graphics include the pixel size of the graphic area. You can size your
graphic accordingly so it is not skewed upon display. Older versions of CPS do not have as many
template options. If you have an older version of CPS, please download the newer version from
our website, http://www.einstruction.com/downloads.
Add Audio/Video Notes to Lesson Questions
Attach videos, audio clips, and more to your CPS questions. See the Add Notes section for
information on including Notes in your lesson questions.
NOTE: The following instructions assume you are adding a note to an
existing question in one of your lessons. However, you can also add a note to
a new question in an existing lesson or to a question in a new lesson. Once the
CPS Question Author window is displayed, the process is the same.
1. Open the Lessons tab of CPS.
2. Click on one of your lessons. The
questions in that lesson will display to
the right (or on the bottom if your
view is split horizontally.)
3. Right-click on the question to which
you want to add a note.
4. Click Edit. The CPS Question Author
window appears.
5. Click Question.
6. Click Notes and Media…. The
Question Note window appears.
7. Click on the Audio/Video tab.
8. Click Browse. Locate the file you
wish to attach and click Open. The
Figure 20: Adding an Audio/Video Note to a question from
the Audio/Video tab of the Question Note window
CPS File Details window appears.
9. If the information is correct, click OK. The file will be listed in the Audio/Video tab.
NOTE: There is a checkbox in the bottom right corner that says, “Make all
file(s) available after response.” If you check this box, your note will not be
available until question delivery is complete. This means that the Notes button
shown below will not appear on your question until you click End. If you are
using the Auto Move to Next Question feature, this box must be left
unchecked for your note to be available.
10. Click Close. The note will be added to your selected question.
11. Close the CPS Question Author window.
CPS 4.0 Users Guide
26
Chapter 3: Creation Functions
Add Notes to Lesson Questions
Often, questions have an answer but also need an explanation or some background information.
CPS allows you to create notes to accompany your questions. For example, while authoring a
question about Indefinite Pronouns, you can add a note that defines Indefinite Pronouns and
compares that to the definition of Personal Pronouns.
1. Click the Question menu item from
the CPS Question Author window.
2. Click the Notes and Media …
command. The Question Note
window opens.
3. Type in your note, then use the
buttons at the top of the window to
adjust the format:
Font: Notes automatically use
the default font. Set the default
font from the Settings menu item
found on the main CPS window.
You can adjust the size and style
of the text in your note using the
Format button.
Color: make all of the text in
Figure 21: Adding a Note to a question from the Note tab of
your note, or only selected words the Question Note window
in your note, colored to draw attention to it.
4. Click the Close button when you have finished typing and formatting your note. This
automatically saves any changes.
Back on the CPS Question Author window, be sure to click the Question menu and the Save
command in order to associate this note with this question.
Any note you associate with a question is available during the delivery session after you click the
End button. You can edit this note at any time by going back to the Notes and Media …
command from the Question menu item.
Create Questions with Graphics
You can add .jpg, .gif, or .bmp graphics files to questions. The smaller files are usually better,
and range from .jpg as the smallest to .bmp as the largest. All question templates with graphics
include the pixel size of the graphic area.
The following page shows two methods to adding graphics:
CPS 4.0 Users Guide
27
Chapter 3: Creation Functions
Method 1
After you have selected a question template
with graphics, left-click inside the graphic
area and the Set Image Files window opens.
1. Use the Look in drop-down list at
the top of the dialog box to browse
to the directory where you saved
your graphic files.
2. Highlight a graphic file that you
want to display in this graphic area.
3. Click the Open button. The graphic
Figure 22: Adding graphics to a question with the Set
appears in the graphic area of the
Image File window
question or answer option you
selected.
4. Click the File menu and the Save command, or click the Save and Move to Next
Question icon from the Question Author toolbar.
Method 2
After you have selected a question template with graphics, right-click inside the graphic area. A
shortcut menu will appear on-screen.
1. Click the Browse command. The Set Image File window opens.
2. Use the Look in drop-down list at the top of the dialog box to browse to the directory
where you saved your graphic files.
3. Highlight a graphic file that you want to display in this graphic area.
4. Click the Open button. The graphic appears in the graphic area of the question or answer
option you selected.
5. Click the File menu and the Save command, or click the Save and Move to Next
Question icon from the Question Author toolbar.
Display Graphics within Questions
Show Graphic After Response
The Show Graphic After Response option is available
only with question templates that include a question
graphic. To use this option
1. Open a question from the Lessons tab. The CPS
Question Author window appears.
2. From the CPS Question Author window, click
Options.
Figure 23: Displaying a graphic after the
3. Choose Show Graphic After Response. A
response with the Show Graphic After
checkmark appears next to the option.
Response option
4. Click
in the Question Author toolbar to save
your question.
5. Close the CPS Question Author window to return to the Lessons tab.
CPS 4.0 Users Guide
28
Chapter 3: Creation Functions
NOTE: If you have the option turned on for one question so that the graphic
displays after you have ended the response cycle, the option stays on until you
turn it off.
To turn off this option
1. Open a question from the Lessons tab. The CPS Question Author window appears.
2. From the CPS Question Author window, click Options.
3. Click Show Graphic After Response so that the checkmark disappears.
4. Click
in the Question Author toolbar to save your question.
5. Close the CPS Question Author window to return to the Lessons tab.
Show Graphic Full Screen
The Show Graphic Full Screen option is available only
with question templates that include a question graphic.
To use this option
1. Open a question from the Lessons tab. The CPS
Question Author window appears.
2. From the CPS Question Author window, click
Options.
3. Choose Show Graphic Full Screen. A
Figure 24: Displaying a graphic full screen
with the Show Graphic Full Screen option
checkmark appears next to the option.
in the Question Author toolbar to save your question.
4. Click
5. Close the CPS Question Author window to return to the Lessons tab.
NOTE: If you have the option turned on for one questions so that the graphic
is displayed full screen, the options stays on until you turn it off.
If you would prefer the graphic to appear the size in which it was formatted when you added it to
the question (see the pixel count for each graphic area in a question template), then make certain
that this option is off. To turn off this option
1. Open a question from the Lessons tab. The CPS Question Author window appears.
2. From the CPS Question Author window, click Options.
3. Click Show Graphic Full Screen so that the checkmark disappears.
4. Click
in the Question Author toolbar to save your question.
5. Close the CPS Question Author window to return to the Lessons tab.
Exclude Question from SMA
The Exclude Question from SMA option is a valuable tool when grading paper-based exams or
assignments that contain question types that need to be answered in written form. If you select
this option for a given question, the question will be skipped when delivered in SMA mode.
For example, you have a five question paper-based test that you want to deliver and grade in
SMA mode.
CPS 4.0 Users Guide
29
Chapter 3: Creation Functions
Questions 1, 2, 4 and 5 are all multiple-choice, but
question 3 is to be answered in essay form. Because
CPS cannot collect and grade an answer in written
form, when the student completes question 2 and clicks
the arrow to move to the next question, CPS will
advance the student to question 4.
Students have the convenience of being automatically
Figure 25: Excluding a question from SMA
mode with the Exclude Question from SMA
transferred to the next available multiple-choice
option
question instead of having to skip over questions that
cannot be answered using their pad. To use this option
1. Open a question from the Lessons tab. The CPS Question Author window appears.
2. From the CPS Question Author window, click Options.
3. Choose Exclude Question from SMA. A checkmark appears next to the option.
4. Click
in the Question Author toolbar to save your question.
5. Close the CPS Question Author window to return to the Lessons tab.
To turn off this option
1. Open a question from the Lessons tab. The CPS Question Author window appears.
2. From the CPS Question Author window, click Options.
3. Click Exclude Question from SMA so that the checkmark disappears.
4. Click
in the Question Author toolbar to save your question.
5. Close the CPS Question Author window to return to the Lessons tab.
Engage as Freeform
Choose Engage as Freeform to deliver freeform
questions with your lessons. Choosing this option will
not change the information in the Question Author
window; however, your questions will be delivered in a
freeform control rather than in the template. This option
allows you to display questions with a large amount of
text, without needing to scroll through the information.
NOTE: You will not be able to
display graphics in this mode.
Figure 26: Engaging a question in Freeform
mode with the Engage as Freeform option
To use this option
1. Open a question from the Lessons tab. The CPS Question Author window appears.
2. From the CPS Question Author window, click Options.
3. Choose Engage as Freeform. A checkmark appears next to the option.
4. Click
in the Question Author toolbar to save your question.
5. Close the CPS Question Author window to return to the Lessons tab.
CPS 4.0 Users Guide
30
Chapter 3: Creation Functions
To turn off this option
1. Open a question from the Lessons tab. The CPS Question Author window appears.
2. From the CPS Question Author window, click Options.
3. Click Engage as Freeform so that the checkmark disappears.
4. Click
in the Question Author toolbar to save your question.
5. Close the CPS Question Author window to return to the Lessons tab.
Assign Question Difficulty Levels
Questions can range in difficulty from 1 (easiest) to 5 (hardest). To assign a difficulty level to a
question
1. Open a question from the Lessons tab. The CPS Question Author
window appears.
2. From the Question Author toolbar, click the Difficulty pull-down
menu.
3. Select a difficulty level (1-5).
to save your question.
4. Click
5. Close the CPS Question Author window to return to the Lessons
tab.
Associate Categories to a Question
Figure 27:
Choosing a
question difficulty
level from the
Question Author
toolbar
You can create and assign categories to your questions. After you deliver your lesson, you can
use the categories with the Charting window to slice performance data. To associate categories to
a question
1. Create a new question or open an existing
question in the Lessons tab. The CPS Question
Author window appears.
2. From the Question menu in the CPS Question
Author window, choose Categories.... The
Categories window appears.
3. Type in a category name in the Question(s)
belong to these categories: box. You can add
multiple categories by separating them with a
comma.
4. Click Add to List. The category name will appear
in the category list box. CPS will automatically
associate the current question with the categories
you create. Alternatively, you can add a new
category by clicking New and typing in the
category name.
5. Click OK to save your changes and return to the
CPS Question Author window.
Figure 28: Associating categories to
questions using the Categories window
CPS 4.0 Users Guide
31
Chapter 3: Creation Functions
Associate Standards to a Question
After you have typed in a question and answer options, you can associate specific standards to a
question using these steps:
1. Open a question from the Lessons tab. The CPS Question Author window appears.
2. In the CPS Question Author window, click the Question menu item and choose
Associate Standards. Alternatively, click
CPS Question Standards window appears.
from the Question Author toolbar. The
Figure 29: Associating standards to a question with the CPS Question
Standards window
3. Click inside the boxes beside as many standards as you want to associate with this
question. Use to see any child-level standards and select them if you like.
4. Click the OK or Cancel button.
To review which standards are associated with any question, open a question in the CPS
Question Author window and repeat steps 1 and 2.
Create Lessons with the Lesson Builder
When you use the Lessons Builder function, you can build one lesson of questions from several
pre-existing lessons. For example, if a Language Arts database has 32 lessons in it, each lesson
representing a chapter from a text, you can create a mid-term exam from the first six lessons
(chapters) without re-typing all the questions. You can also create a lesson from multiple
databases. To create a lesson from the Lesson Builder
1. Open CPS from your desktop icon.
2. Click the Lessons tab.
3. Click
. A pop-up window appears.
CPS 4.0 Users Guide
32
Chapter 3: Creation Functions
4. Choose Builder. The Builder window opens showing the features listed below:
Figure 30: Creating lessons using the Lesson Builder
The top pane is the target lesson, the lesson to which you are adding questions.
The top Browse button allows you to alter the target lesson.
The bottom Browse button allows you to select a source database (.cps file) from
which to copy or link questions.
The bottom left pane lists the lessons available in the database shown directly above
it. You can also build from the standards in this open database.
The bottom right pane is a list of questions available in the source lesson or standard
selected in the bottom left pane.
The Dragged Questions section allows you to choose whether the questions you select
for the target lesson are copied from the lesson source or linked to the lesson source.
NOTE: Check whether the database open in the bottom left pane is the source
from which you want to take questions. If this is not the correct database, use
the Browse button to find and open the database from which you want to
select questions. Also, make certain the target lesson named at the top of the
Builder window is the destination into which you want to build questions. If
not, use the top Browse button to select a different lesson name from the open
database.
CPS 4.0 Users Guide
33
Chapter 3: Creation Functions
5. Select a lesson from the database open in the bottom left pane. Alternately, you can
choose to build from Standards questions; simply click the Standards tab in the bottom
left window. Questions for the selected
lesson or standard display in the bottom
right pane.
6. Select questions to copy or link into the
target lesson.
7. Use the Ctrl key or the Shift key and
your mouse to select specific questions
to be included in the target lesson. While
pressing your mouse button, drag those
selected questions into the top pane.
8. Use the Link or Copy option buttons to
choose how you want the questions
moved.
9. Click the Select Random Questions
button to choose the number of specific
question types you want to include in the
target lesson. Click the OK button to
complete this random selection.
Figure 31: Selecting random questions from the
10. Close the Lesson Builder to return to the Random Question Selector in the Builder window
Lessons tab. Your lesson will appear in the left (or top in horizontal view) window.
Edit Lessons
After you create lessons, you can edit them to fit your lesson plans. This section will show you
how to
Edit lesson attributes
Add or edit questions in a lesson
Rearrange questions within a lesson
Copy questions
Delete lessons and lesson questions
Delete graphics from questions
Adjust the question font
Search for questions
Spell-check questions
Print lessons and questions
CPS 4.0 Users Guide
34
Chapter 3: Creation Functions
Edit Lesson Attributes
1. Open CPS from your desktop icon.
2. Click the Lessons tab.
3. Select the lesson from the lesson side of
the window.
and select the Edit
4. Click
command. Alternatively, right-click and
choose the Edit… command from the
shortcut menu or double-click the lesson
name. The CPS Lesson Attributes
window appears.
5. Edit the lesson name, the lesson
description, or the unique identifier.
Optionally, you may also add or change
the file associated with the lesson.
6. Click OK to save your changes or click
Cancel to negate your changes.
Figure 32: Editing a lesson with the CPS Lesson Attributes
window
Add Questions to an Existing Lesson
1. Highlight a lesson name from the lesson side of the Lessons tab. The question side should
be empty if you have not previously added or imported any questions.
. A pop-up
2. Click
window appears.
3. Select New then Question.
The CPS Question Author
window appears.
4. Click the drop-down arrow in
the Template box to see more
than 50 question templates
available with and without
graphic placement options.
Refer to Select a Question
Template for detailed
information about the available
question templates.
Figure 33: Adding additional questions to a lesson with the CPS
Question Author window
5. Type the question in the
question text box of the template you selected.
6. Type multiple answers in the answer boxes of the template you selected.
7. Select a correct answer by clicking in the check box beside that answer.
8. Use the toolbar in the upper left corner of the CPS Question Author window to save the
question.
CPS 4.0 Users Guide
35
Chapter 3: Creation Functions
Figure 34: Using the Question Author toolbar
Click Save to save the question and remain on the CPS Question Author window.
Click Move to Previous Question to move to the previous question in the lesson.
Click Move to Next Question to move to the next question in the lesson.
Click New Question to negate any text or graphics you may have just added and to
“redo” this question number.
Click Standards to display standards in this database that you can associate with
questions; see Associate Standards to Questions for instructions.
Click Preview Question to preview the question.
Click Save and Move to Previous Question to save any change you have made and
move to the previous question in the lesson.
Click Save and Move to Next Question to save any change you have made and
move to the next question in the lesson. If the question you are saving is last in the
list, clicking Save and Move to Next Question opens a new question template.
9. Repeat for as many questions as you want to add to the lesson.
Remember to save your question before exiting the CPS Question Author window.
Edit Lesson Questions
1. Open CPS from your desktop icon.
2. Click the Lessons tab.
3. Select the lesson from the lesson side of the window. To edit an existing question, select
that question from the question side of the window.
. A pop-up window appears.
4. Click
5. Choose Edit. Alternatively, right-click the selected question and choose the Edit …
command from the shortcut menu or double-click the selected question. This opens the
CPS Question Author window.
6. Make any changes to the question, answer choices, question template, subjective status,
difficulty level, format, note, and standards from this window.
NOTE: Display the file path of a graphic included in a question by rolling
your mouse cursor over the graphic itself or right-clicking on the graphic.
7. When you have added as many questions as you like, click Close or Save and Close in
the Question menu.
CPS 4.0 Users Guide
36
Chapter 3: Creation Functions
Rearrange Questions within a Lesson
You can rearrange the order of questions within a lesson. To move a lesson question
1. Open CPS from your desktop icon.
2. Click on the Lessons tab.
3. Select the lesson that contains the question you would like to move. The questions appear
in the question side (right or bottom window of the Lessons tab.)
4. From the question side, select the question that you would like to move.
or
to move the question. The question number changes when you click
5. Use
the lesson title in the left window.
Copy Questions
You can create a question and then duplicate it within the same lesson, or copy it to other lessons
and edit portions of the question to make it different from the original.
Copy
1.
2.
3.
questions to other lessons
Open CPS from your desktop icon.
Click the Lessons tab.
Select a lesson from which you want to copy questions to another lesson. Questions in the
selected lesson appear in the question side of the window.
4. Select a question or a group of questions while pressing the mouse button and pressing
the Ctrl button from the keyboard simultaneously.
5. Drag the selected questions to a target lesson on the lesson side of the window. The
selected questions display at the end of the target lesson.
Copy
1.
2.
3.
questions within the same lesson
Open CPS from your desktop icon.
Click the Lessons tab.
Select a lesson from the lesson side of the window. Any questions in the lesson appear in
the question side of the window.
4. Select a question or a group of questions.
5. Right-click your mouse somewhere on the selected questions. A shortcut menu appears.
6. Choose the Copy Questions command from the shortcut menu. The copied questions
display at the end of the lesson.
Delete a Lesson
You can delete an entire lesson of questions by following these steps:
1. Open CPS from your desktop icon.
2. Click the Lessons tab.
3. Select the lesson that you want to delete.
4. Click
. A pop-up menu appears.
5. Choose Delete. Alternatively, right-click on the lesson name and choose the Delete
command from the shortcut menu. A confirmation message appears.
CPS 4.0 Users Guide
37
Chapter 3: Creation Functions
NOTE: If you select a lesson that has child-level lessons beneath it, those
lesson(s) delete as well. Use caution when deleting lessons from the lesson
side of the window.
6. Click the OK or Cancel button.
7. Repeat steps 3-6 for as many lessons as you want to delete.
Delete Lesson Questions
1. Click the Lessons tab.
2. Select the lesson from the lesson side of the window.
3. From the question side of the window, select the question(s) you want to delete.
4. Click
. A pop-up menu appears.
5. Choose Delete. Alternatively, right-click on the selected questions and choose the Delete
command from the shortcut menu. A confirmation appears.
6. Click OK to continue or Cancel to stop.
7. Repeat steps 3-6 for as many questions as you want to delete from this lesson.
8. Click the lesson name in the lesson side (left or top window) to see question numbers
update. Question numbers update automatically when you exit the lesson.
Delete Graphics from Questions
1.
2.
3.
4.
Open CPS from your desktop icon.
Click the Lessons tab.
Select the lesson that contains the question with the graphic you would like to delete.
From the question side (right or bottom window), select the question with the graphic you
want to delete.
5. Click
. A pop-up menu appears.
6. Choose Edit. The CPS Question Author window appears.
NOTE: Display the file path of a
graphic included in a question by
rolling your mouse cursor over the
graphic itself or by right-clicking on
the graphic.
7. Right-click on the graphic area. A shortcut
menu appears.
8. Click the Remove command. The graphic is
deleted, but the question template that allows a
graphic is still active.
Figure 35: Removing a graphic from a
question in the CPS Question Author window
CPS 4.0 Users Guide
38
Chapter 3: Creation Functions
To add a new graphic to this question, follow the instructions in Create Questions
with Graphics.
To eliminate the possibility of using a graphic with this question, use the Template
drop-down list to select a different question template.
9. Click the File menu and the Save command to exit the CPS Question Author window and
return to the Lessons tab.
Adjust the Question Font
You can adjust the font displayed for all CPS questions (default font), or for a particular question
or answer.
Change the Default Font
When you type in your first question, you see
the font style that comes with CPS. You can
alter the default font so that every new
question you type appears with that style. To
change your default font
1. Click the Settings menu item. A popup menu appears.
2. Choose Default Font. The Font
window appears.
3. Adjust the style, size, or color in this
dialog box.
4. Click OK to save your new default
font.
Figure 36: Setting the default font from the Font
window
Change the Font of a Single Question or Answer
You can also alter the font you use to create questions in the CPS Question Author window. To
change the font of a single question or answer
1. Highlight the question and/or answer text in the CPS Question Author window.
Alternatively, you can click the Format menu item and choose the Select All command.
2. Click the Format menu.
3. Click Font, Color, Subscript, or Superscript. A dialog box appears.
4. Adjust to your preference. Changes to the font style apply only to highlighted text.
NOTE: If you use the Superscript or Subscript option, and then decide to
undo that special format, select that text again and choose the opposing option
from the Format menu. For example, if you have subscripted text that you
want to restore to the default font style, highlight that text, click Format, and
select the Superscript command.
CPS 4.0 Users Guide
39
Chapter 3: Creation Functions
Add a Special Character
Also included in the CPS Question Author window is the ability to add special characters to your
questions or answers. If you are a math or science teacher, this function is especially helpful in
creating questions with symbols to accurately express equations and other course-relevant data.
However, anyone can use the character map to incorporate a more specialized question into any
lesson. To add a special character to a question or answer
1. Place your cursor in the question or answer text box where you want to place the special
character.
2. Click the Tools menu item. A pop-up menu appears.
3. Choose Character Map. The Character Map window appears.
Notice the font currently selected in the Font drop-down list.
4. Adjust this font style if you like by using the arrow in that dropFigure 37: Accessing
the Character Map
down list to see other character map options.
window from the Tools
5. Find the character in the large portion of the window you want to
menu
incorporate into your questions or
answers.
6. Click the Select button. That character
appears in the Characters to Copy text
box.
7. Repeat steps 5 and 6 for as many
characters as you want to add.
8. Click Copy.
9. Click Close to return to the CPS Question
Author window. Make sure your mouse
cursor is where you want the characters to
go.
10. Use the keyboard command CTRL+V to
Paste the characters into this area. For
more information on keyboard commands,
please refer to Mouse/Keyboard Shortcuts. Figure 38: Choosing a special character from the
Character Map window
Your special characters display during a delivery session just like any other text.
Search for Questions
You can use the Question Finder feature to search find all occurrences of a question in CPS. For
example, if you would like to know whether a particular lesson question exists in any of your
Challenge Boards, you can search the question. To search for questions
1. Open CPS to the Lessons or Standards tab.
2. Select the lesson or standard that has a question you would like to search for.
CPS 4.0 Users Guide
40
Chapter 3: Creation Functions
3. Click
. A pop-up menu appears.
Alternatively, right-click on the question to
access the pop-up menu.
4. Choose Question Finder.... The CPS Question
Finder window appears.
5. Use the CPS Question Finder window to view
all of the locations of your selected question.
Read below for more information on the
window:
Question: The question you selected
appears in bold print at the top of the CPS
Question Finder window.
Lessons: The Lessons section of the
window shows you every lesson that
contains the question, as well as how many
total questions are in each of the lessons.
Standards: The Standards section lists
every standard associated with your
question.
Challenge Boards: The Challenge Board
section lists every Challenge Board that
contains your question.
Figure 39: Searching for a question using the
CPS Question Finder window
6. Select the location of your question that you
would like to edit.
7. Click the Go to Selected Question button to move to the lesson, standard, or Challenge
Board that contains your question.
8. Click Close to return to the Lessons or Standards tab.
Spell-check Questions
CPS can spell-check your questions with the CPS Spell Checker. You can choose to
automatically spell-check each question before moving to the next question, or you can use the
Spell Checker icon to check a specific question.
To use the CPS Spell Checker
1. Open CPS from your desktop icon.
2. Click the Lessons tab.
3. Create a new question or edit an existing
question. For more information on
creating or editing a question, please see
Create Lesson Questions or Edit Lesson
Questions. The CPS Question Author
window appears.
4. Click
. The CPS Spell Checker
automatically spell-checks your
question.
Figure 40: Spell-checking a questions with the Spell
Check window
CPS 4.0 Users Guide
41
Chapter 3: Creation Functions
5. If the Spell Checker finds any misspelled words, the Spell Check window appears.
6. Use the Spell Check window to change the spelling, ignore the word, or access the Spell
Checker Options window. For more information on changing the Spell Checker options,
please see Set Spell Checker Options.
Set Spell Checker Options
You can set your Spell Checker to ignore capitalized words, ignore alphanumeric words, or even
to recognize special words from your custom dictionary. To setup the Spell Checker options
1. Open CPS from your desktop icon.
2. Click the Lessons tab.
3. Select a question you would like to
spell-check or create a new question.
The CPS Question Author window
appears. For more information on
creating or editing a lesson question,
please see Create Lesson Questions or
Edit Lesson Questions.
4. From the Tools menu, choose Spelling
then Spell Checker Options. The
Spell Checker Options window
appears.
Ignore uppercase words - To
have Spell Checker ignore
Figure 41: Setting up Spell Check options from the Spell
Checker Options window
capitalized letters, click the box
next to this option so that a checkmark appears.
Ignore words with letters and numbers - To have Spell Checker ignore
alphanumeric "words," click the box next to this option so that a checkmark appears.
Custom Dictionary - To add words to or create a custom dictionary for Spell
Checker, click the Edit button.
5. Click OK to save your changes and return to the CPS Question Author window.
Add Words to the Spell Checker Dictionary
You can create a custom dictionary for the Spell Checker. Using the custom dictionary, the Spell
Checker can identify special words or acronyms that you frequently use. To create a custom
dictionary
1. Open CPS from your desktop icon.
2. Click the Lessons tab.
3. Select a question you would like to
spell-check or create a new question.
The CPS Question Author window
appears. For more information on
creating or editing a lesson question,
please see Create Lesson Questions or
Edit Lesson Questions.
4. From the Tools menu, choose Spelling
then Spell Checker Options. The Spell
Checker Options window appears.
Figure 42: Creating a custom dictionary with the
Dictionary Notepad window
CPS 4.0 Users Guide
42
Chapter 3: Creation Functions
5. Click Edit.... The Dictionary Notepad window appears.
NOTE: Put each word on a separate line.
6. When you've added all your words, click File then Save. Close the Dictionary Notepad
window to return to the Spell Checker Options window.
Print CPS Lessons
You can print your CPS lesson (be it an
exam, homework or review), hand it out to
students, and then grade the material with
the CPS response system.
1. Open CPS from your desktop icon.
2. Click the Lessons tab.
3. Select the lesson you want to print.
. A pop-up menu
4. Click
appears. Alternatively, right-click
on the lesson name to access the
pop-up menu.
5. Choose Print. The CPS Print
Questions window appears.
Figure 43: Printing questions from the CPS Print Questions
window
6. Click beside the questions you want to print, or click Select All in the lower left corner to
include every question on the printout.
If you want an answer key, an area for inputting a name, an area for inputting a date,
or a combination any of the available options included in your printout, check the box
or boxes that coincide with your preference.
7. Click the Preview button. The Reporting Preview window opens showing the selected
questions just as they will print—except for graphics.
NOTE: The directory path of any graphic associated with a question displays
in the Preview window. Graphics will print, but do not display in the Preview
window.
8. Click the Export/Print button at the bottom of the Reporting Preview window if you are
satisfied with the data. The printout contents automatically open in a word processing
application and automatically save to the CPS folder on your hard drive. Look at the
word processing application’s title bar to see the file name of the printout.
NOTE: If Microsoft Word is set to automatically view text and graphic files,
then graphics associated with questions display as well as the text. Other word
processing programs may not be capable of displaying images.
9. Review the file and make any layout adjustments.
CPS 4.0 Users Guide
43
Chapter 3: Creation Functions
10. Click the File menu and the Print command.
11. Make sure you are connected to a printer, and then click the OK button to print this
lesson. You can close the word processing application and the lesson you printed at any
time.
12. Return to the Reporting Preview window and click Close.
13. In the CPS Print Questions window, click the Close button to return to the Lessons tab.
Create Rubrics
You can create custom rubrics for subjective questions. When you engage subjective questions in
CPS, you can associate them to a rubric, and award the students points based on your rubric. You
can include this grade information in the Gradebook tab. This section will show you how to
Create a rubric
Associate a rubric to a subjective question
Edit a rubric
Copy a rubric
Delete a rubric
Create a Rubric
1. Open CPS from your desktop icon.
2. Click the Lessons tab.
3. Click the Settings menu item and choose Rubric Wizard…. The Rubric Wizard appears.
Your next few steps will depend on whether or not you have created a rubric in CPS
before. Follow the steps below to create a new rubric.
If You Have Never Created a Rubric…
The CPS Performance Question Wizard
appears.
a. Fill in the Rubric Name box.
b. Choose the number of
categories from the Total
Number of Categories pulldown menu.
c. Click Next to continue.
d. Type in the names of your
categories, or leave the
default names and click
Next.
e. Verify that the information
you entered previously is
correct. Click Back to edit
the information and Next to
Figure 44: Creating a rubric for the first time using the CPS
save it.
Performance Question Wizard
f. Click Done to save your
rubric and return to the Lessons tab.
CPS 4.0 Users Guide
44
Chapter 3: Creation Functions
If You Have Previously Created a Rubric…
The CPS Performance Question
Wizard appears. Any rubrics you have
already created will be in the Existing
Rubrics list.
g. In the New Rubric section,
check the box labeled
Create New Rubric.
h. Select a name for your
rubric and how many
categories (1- 8) you want
for your rubric and click
Next.
i. Choose names for your
categories, or leave the
default names and click
Next.
j. Verify that the information Figure 45: Creating a rubric with the CPS Performance Question
Wizard
is correct. Click Back to
change it and Next to continue.
k. Click Done; your rubric information is now available to associate with questions.
Associate a Rubric to a Subjective Question
1. Open CPS from your desktop
icon.
2. Click on the Lessons tab.
3. Double-click on a subjective
question. The CPS Question
Author window appears.
4. Choose the rubric you
created in the Associated
Rubric drop-down box.
5. Save your question and close
the CPS Question Author
window to return to the
Lessons tab.
Figure 46: Choosing a rubric to associate with a subjective question
NOTE: If you use the Performance Question template and you use
CPSOnline, on the CPS Session Setup window make sure to uncheck the
Automatically Upload box.
CPS 4.0 Users Guide
45
Chapter 3: Creation Functions
Edit a Rubric
You can edit existing rubrics in CPS. To edit a rubric
1. Click the Settings menu and
choose Rubric Wizard....
The CPS Performance
Question Wizard appears.
2. Click the circle next to the
Edit option so that a dot
appears. Click Next.
3. Edit the Rubric Name or
Total Number of
Categories. Click Next.
4. Edit any of the category
names. Click Next.
5. Verify that your rubric
information is correct: click
Back to change the
information and Next to
Figure 47: Editing a rubric from the CPS Performance Question
Wizard
continue.
6. Click Done to save your rubric and return to CPS.
Copy a Rubric
You can copy a rubric in CPS. To copy a rubric
1. Click the Settings menu and
choose Rubric Wizard....
The CPS Performance
Question Wizard appears.
2. Click the circle next to the
Copy option so that a dot
appears within the circle.
Click Next.
3. Edit the Rubric Name and
Total Number of
Categories. Click Next.
4. Edit the category names.
Click Next.
5. Verify that your information
is correct: click Back to
change the information and
Figure 48: Copying a rubric in the CPS Performance Question
Next to continue.
Wizard
6. Click Done to save your
changes and return to CPS.
CPS 4.0 Users Guide
46
Chapter 3: Creation Functions
Delete a Rubric
You can delete existing CPS rubrics. However, keep in mind that when you delete a rubric, any
performance questions associated with the rubric are no longer associated to a rubric. To delete a
rubric
1. Click the Settings menu and
choose Rubric Wizard....
The CPS Performance
Question Wizard appears.
2. From the Existing Rubrics
list, select the rubric you
would like to delete.
3. Click the Delete button on
the rubric. A delete
confirmation window
appears.
4. Choose OK to delete the
rubric or choose Cancel to
cancel. You will return to the
CPS Performance Question
Wizard.
Figure 49: Deleting a rubric from the CPS Performance Question
5. Click Cancel to exit the CPS Wizard
Performance Question Wizard and return to CPS.
Import Lessons
You can import lessons both from CPS and from non-CPS applications to engage in CPS. This
section will show you how to
Import CPS lessons
Import Scanner Results
Import lessons from Word
Import ExamView lessons
Import PowerPoint Presentations
Import CPS Lessons
CPS lets you import pre-existing lessons from other CPS databases. This import function is a real
time-saver for busy instructors. For example, if you have a lesson in a database for a marketing
class that would be beneficial for your management class to review, you can import the
marketing lesson to the management database.
1. Open CPS from your desktop icon.
CPS 4.0 Users Guide
47
Chapter 3: Creation Functions
2. Open the database into which you want to import the lesson, and click the Lessons tab.
3. Select the target lesson into which
you want to import another lesson.
4. Click
. A pop-up menu
appears.
5. Choose Import. Alternatively,
right-click the selected lesson
name and choose the Import
command from the shortcut menu.
The CPS Import Lessons window
appears.
6. Click the Browse button. An Open
dialog box appears.
7. Select the path and file name of the
lesson you want to import, and
click the Open button. The path
and file name appear at the top of
the CPS Import Lessons window.
Any lessons in the database appear
in the larger text area of the dialog.
8. Select individual lessons from this Figure 50: Importing a CPS lesson to another database
database by clicking in the box beside each lesson name.
NOTE: When you select a lesson that has child-level lessons, the child-level
lessons are automatically selected as well.
9. Click OK when you have selected all desired lessons. Depending on the lesson sizes and
the speed of your processor, this import may take some time. The imported lessons
appear on the lesson side of the Lessons tab. You can edit questions and deliver imported
lessons the same as you would any you authored with CPS.
NOTE: When you import a lesson from one database to another, any
standards or classes in the database from which you are importing are not
imported into the target database.
Import Scanner Results
Scanner testing is a frequently used form of answer collection during exam delivery at both the
K-12 and Higher Education levels. With CPS, these scanner results can be imported into your
CPS database and compiled to generate comprehensive reports. After scanning student’s results,
follow the directions below to import the data into your CPS database. To import scanner results
1. Open CPS from your desktop icon.
2. Open the database into which you want to import the scanner performance results.
CPS 4.0 Users Guide
48
Chapter 3: Creation Functions
3. Create a FastGrade lesson with the correct number of questions and answers to
correspond with the scanner file’s answer key.
NOTE: Be sure to include a unique identifier in the CPS Lesson Attributes
window when creating the FastGrade lesson. This unique ID should match the
Test ID input into ScanTools II when recording scanner results. Doing so will
ensure consistency between the CPS lesson and imported scanner file.
4. Click
. A pop-up menu appears.
5. Choose Create Scanner Session. The Feature Activation dialog box appears, prompting
you to enter the activation key for the
scanner feature.
6. Use the key provided with your CPS
system from NCS Pearson, or call
eInstruction at 888.333.4988 for an
activation key. Once activated, the import
form will be displayed now and on future
executions.
7. Click the Show icon to view a list of the
lessons in your database.
8. Select the lesson that corresponds with the Figure 51: Activating a scanner session from the
scanner file you are importing and drag it Feature Activation dialog box
into the Lesson box on the upper right side of the Create Scanner Session window. The
Lesson title, ID, and number of questions will appear in the Lesson box.
9. Click Browse and search for the scanner file you are importing.
10. Select a class that contains students corresponding with the scanner file you chose. The
student IDs in your CPS roster must match with the student IDs in the scanner file.
11. Continue inputting your setup preferences.
Click Create once you have input all required data. The Session Summary window
may appear showing any issues experienced during the session import.
Click Yes if you desire to store the session in your database and No if you do not.
If you select Yes, your scanner session will be imported and available for generating extensive
data reports via the Reports tab.
If you select No, the Create Scanner Session window will appear allowing you to either make
any preference changes before importing again, or cancel the session all together.
CPS 4.0 Users Guide
49
Chapter 3: Creation Functions
Import Lessons from Microsoft Word
The Import from Word feature will allow you to quickly import RTF-formatted questions into
CPS. At this time you will not be able to import tables from Word into CPS. To import your files
1. Open your file in Microsoft Word. You will need to format your document before
importing it. Please see CPS Import
from Word Format for more
information.
2. Click the Save as option from the File
menu. The Save as window will open.
3. From the Save as type pull-down menu,
save the file as a Rich Text Format
(*rtf) document.
NOTE: Make sure you save
your file in a folder that you
can find later. To save a file
to a particular location, use
the Save in pull-down menu.
Figure 52: Saving a file as an RTF document in
Microsoft Word
NOTE: You will not be able to import tables from your RTF document into
CPS.
4. Open CPS from your desktop icon.
5. Click on the Lessons tab.
. A pop-up menu appears.
6. Click
7. Choose Import....
8. Click on the Browse button. The Open
dialog box will appear. Use the Look in:
pull-down menu to view the folder your
file is in. Use the Files of Type pulldown menu to view RTF files.
9. Click Open and CPS will begin
importing your files from Word.
Figure 53: Importing an RTF lesson into CPS
NOTE: You can import files from other word processors, such as MS Works,
WordPerfect, or Word Pad as long as you can save the files as RTF.
CPS 4.0 Users Guide
50
Chapter 3: Creation Functions
CPS Import from Word Format
Before using the Import from Word feature, your question and answer stems must be formatted
so they can be imported into CPS. Use the following table and the example below the table to
properly label your questions. Please remember that a Question Type label is required for each
different type of question.
Table 1: Import from Word format
Label
TITLE:
True/False
Multiple Choice
Yes/No
Numeric
ANS:
STO: and OBJ:
MOE:
NOT:
Description
Lesson title (required)
True or False question type
Multiple-choice question type; up to 8
multiple-choice answers (MC8)
Yes or No question type
Numerical answers question type (RF only)
Answer to the question (required)
State Standards or Objectives (not required)
Margin of Error (not required): CPS can accept
a range of answers for a numeric question (RF
only)
Notes (not required)
Example:
TITLE: this label signals the title to your lesson. (Required)
Addition1 the title of your lesson
True/False this label identifies the question type (Required)
1. Four plus seven equals twelve.
ANS: F the“ANS” label identifies the correct answer. You must include the colon “:” (Required)
Multiple Choice this label signals the start of a different question type. (Required)
4. The sum of 11 and 5 is
a. 15
b. 16 Use a., b., c., and so on to mark answer choices (Required)
c. 12
d. 7
ANS: B
STO: Understanding Numbers
OBJ: 3-4.2 You can include the
standards and objectives on the
same line as the answer stem.
NOT: CPS supports up to eight multiple-choice answers (MC8) an optional Note.
Numeric this label signals the start of a different question type (Required)
6. What is 12 plus 13?
ANS: 25
MOE: 1 the Margin of Error means that CPS will count the answer correct
for any response ranging 1 more or less than the actual answer (24 – 26)
CPS 4.0 Users Guide
51
Chapter 3: Creation Functions
TITLE: Addition1
True/False
1. Four plus seven equals twelve.
ANS: F
Multiple Choice
4. The sum of 11 and 5 is
a. 15
b. 16
c. 12
d. 7
ANS: B
STO: Understanding Numbers
NOT: CPS supports up to eight multiple-choice answers (MC8).
OBJ: 3-4.2
Numeric
6. What is 12 plus 13?
ANS: 25
MOE: 1
Figure 54: Creating a correctly imported RTF lesson
Additional Rules for Formatting and Importing
Below are some additional rules for importing your RTF document into CPS.
Title your lesson - Remember to include the Title stem so that CPS can find the title to
your lesson.
Question Type (required) - Make sure you use a new Question Type label each time
you change question types. Put the label above your question. Press the Enter or Return
key and move to the next line.
Question Stem (required) - Number your questions, put a period after the number, then
put at least one white space (Spacebar or Tab key). After the white space, type the text
for your question. If you are making an essay question, you may use multiple paragraphs.
Press the Enter or Return key to start a new question or enter the answer stem.
Answer Stem (required) - Always put your answer stem (ANS: ) on a new line. If you
do not put any information after ANS:, your question will be imported as a performance
question. However, you must have an answer after the ANS: if you are using multiplechoice, true/false, yes/no, or numeric questions.
Standards and/or Objectives (not required) - Including Standards and/or Objectives in
your RTF document is optional. You may put them on the same line as your answer stem.
After STO:, OBJ:, or NOT:, type your information. Whatever you type after STO: or
OBJ: will be the Standard or Objective name when the file is imported to CPS.
Margin of Error (not required) - When you use MOE:, you can set CPS to accept a
range of answers for a numeric question. This feature only works with the RF systems.
CPS 4.0 Users Guide
52
Chapter 3: Creation Functions
Use only supported features for import
Superscript
Subscript
Pictures (.bmp, .gif, .jpg)
Charts
Symbols
Strikeout
Font (size, type, and color)
Import ExamView Lessons
You can import ExamView 5 or earlier tests and quizzes into CPS. You can then engage these
tests or quizzes just like any other CPS lesson. However, you will not be able to edit the
questions of an imported ExamView lesson in CPS. To import an ExamView lesson
1. Open CPS from your desktop icon.
2. Click the Lessons tab.
3. Right-click on the ExamView folder in the lesson side. A pop-up menu appears.
4. Choose Add file. The Add Files window appears.
5. Browse through your computer until you find the ExamView file you would like to
import.
6. Click Open.
NOTE: If you're importing an ExamView file for the first time, a pop-up
window will appear, and ask you to choose your state. After you select your
state from the pull-down menu, you can engage your ExamView lesson.
The ExamView file imports to the ExamView folder in the Lessons tab. You can engage this
lesson like any other CPS lesson.
Set ExamView Options
When you import ExamView lessons into CPS, you can alter the ExamView options to filter out
certain question types, change your state standards, and change the magnification on ExamView
questions. To set your ExamView options
1. Open CPS from your desktop icon.
2. From the Settings menu, choose ExamView Settings. The ExamView Options window
appears.
Question Types – Select the question types you would like to display in CPS. Any
question types with checkmarks will be available in CPS; CPS will filter out
unchecked question types.
True/False (default)
Modified True/False (default)
Multiple Choice (default)
CPS 4.0 Users Guide
53
Chapter 3: Creation Functions
BiModal (default)
Yes/No (default)
Numeric Response
Completion
Matching
Short Answer
Problem
Essay
Case
Other
Restore Default – Click this button to
restore the default question types.
Standards – Choose your state from
the State pull-down menu to set the
standards to which CPS associates
your questions.
Zoom – Set the magnification level of
the question in the CPS Content
Delivery window.
3. Click OK to save your changes and return
to CPS.
Figure 55: Setting ExamView options from the
ExamView Options window
NOTE: If you import a numeric question with more than 12 characters into
CPS, CPS automatically changes the question type to subjective.
For more information on engaging ExamView lessons, please see Engage ExamView Lessons.
Import PowerPoint Presentations
You can import PowerPoint presentations into CPS to engage as a lesson. To import a
PowerPoint presentation
1. Open CPS from your desktop icon.
2. Click the Lessons tab.
3. Right-click on the PowerPoint folder. A
pop-up menu appears.
4. Choose Add File. The Add File window
appears.
5. Browse through your computer until you
find the PowerPoint presentation you
would like to import.
6. Click Open.
Figure 56: Importing a PowerPoint presentation to
CPS
The PowerPoint presentation appears in the PowerPoint folder in the Lessons tab. For
information on engaging a PowerPoint presentation in CPS, please see Engage PowerPoint
Presentations.
CPS 4.0 Users Guide
54
Chapter 3: Creation Functions
eI SEARCH
eI SEARCH is an online search engine within CPS that allows you to search for CPS content to
integrate into your lesson plans. You can browse through eInstruction content or, if you have an
Adoption Code, through content for specific textbooks. This section will show you how to
Search for content
Import content
Upload content (curriculum coordinators and publishers only)
Search for Content
Before you can search for content in eI SEARCH, you will need to login to your eI SEARCH
account. This section will show you how to
Create an eI SEARCH account
Login to an eI SEARCH account
Find content
NOTE: If you have an existing CPSOnline Username and Password, you can
login to eI SEARCH using that account. For more information, please see
Login to an eI SEARCH Account.
Create an eI SEARCH Account
eI SEARCH allows you to search through eInstruction’s repository of content. To create a
SEARCH account
1. Open CPS from your desktop icon.
2. Click the Lessons tab.
3. Click
. The eI SEARCH main page appears in the question side of the Lessons tab.
Figure 57: Viewing the eI SEARCH main page in the Lessons tab
CPS 4.0 Users Guide
55
Chapter 3: Creation Functions
4. Click Create a SEARCH Account.
The CPS SEARCH Account Wizard
appears.
5. Choose your institution type.
6. Click Next to continue.
Figure 58: Creating a SEARCH account from the CPS
SEARCH Account Wizard
7. Enter your Instructor Setup Code.
eInstruction will provide you with this
code before you create your account.
If you do not have an Instructor Setup
Code, please contact eInstruction at
888.333.4988.
8. Click Next to continue.
Figure 59: Entering the Instructor Setup Code in the CPS
SEARCH Account Wizard
9. Confirm your school by clicking Next.
Figure 60: Confirming your school in the CPS SEARCH
Account Wizard
CPS 4.0 Users Guide
56
Chapter 3: Creation Functions
Enter User Information
1. Create a Username and Password.
2. Click Next to continue.
Figure 61: Creating a SEARCH Username and Password
in the CPS SEARCH Account Wizard
3. Enter your First Name, Last Name,
and Email address. Optionally, you
can include your phone number or
Teacher Code.
4. Click Next to continue.
Figure 62: Entering user information in the CPS SEARCH
Account Wizard
5. Click Next to create your account, or
click Back to make changes to
previous pages.
6. Click Done to exit the CPS SEARCH
Account Wizard and return to the
SEARCH main page. The SEARCH
main page now shows any available
content for you to add to your CPS
lessons.
Figure 63: Completing the CPS SEARCH Account Wizard
CPS 4.0 Users Guide
57
Chapter 3: Creation Functions
Login to an eI SEARCH Account
If you have an existing CPSOnline Username and Password, you can use your login information
to login to eI SEARCH. Additionally, if you did not have an existing login and created an eI
SEARCH account, you can use your login information to access eI SEARCH from CPS. To
login to an existing eI SEARCH account
1. Make sure to connect your computer to the Internet.
2. Open CPS from your desktop icon.
3. Click the Lessons tab.
. The eI SEARCH main page
4. Click
appears in the question side of the
Lessons tab.
5. Click Login to SEARCH. The CPS
SEARCH Login Wizard appears.
6. Choose your institution type and click
Next to continue.
Figure 64: Logging in to eI SEARCH from the CPS
SEARCH Login Wizard
7. Choose Existing User (I have a
Username and Password) and click
Next to continue.
Figure 65: Logging in as an existing user in the CPS
SEARCH Login Wizard
CPS 4.0 Users Guide
58
Chapter 3: Creation Functions
8. Enter your eI SEARCH account username
and password (or your CPSOnline
username and password). Click Next to
continue.
CPS logs you in to your eI SEARCH account,
where you can find and import content for your
lessons.
Figure 66: Entering your username and password in the
CPS SEARCH Login Wizard
Find SEARCH Content
You can access eInstruction sample content directly from the eI SEARCH main page, without
logging in; or you can login to eI SEARCH to access content specifically for you or your school
district. To search for content
1. Open CPS from your desktop icon.
2. Login to your eI SEARCH account. For more information on creating an eI SEARCH
account or logging in, please see Create an eI SEARCH Account or Login to an eI
SEARCH Account. Your SEARCH home page appears with any content already
available to you.
Figure 67: Viewing the SEARCH home page with content
CPS 4.0 Users Guide
59
Chapter 3: Creation Functions
3. Browse through your content to find the textbook or content information you would like
to import.
4. If you do not have any content or do not see the content you would like, enter a textbook
Adoption Code into the Adoption Code box and click Go. eI SEARCH will retrieve the
textbook data available from your Adoption Code. If you do not have an Adoption Code,
please contact your textbook publisher or eInstruction Technical Support at
888.333.4988.
Import Content
Once you find the content you would like to import, you can “drag and drop” the content directly
into the Lessons tab. You can import entire lessons, PowerPoint presentations, or individual
questions from a lesson. This section will show you how to
Import entire content lessons
Import specific content questions
Import PowerPoint presentations
Import Content Lessons
You can import entire content lessons from your content in eI SEARCH. To import content
lessons
1. Make sure to connect your computer to the Internet.
2. Open CPS from your desktop icon.
3. Click the Lessons tab.
4. Login to eI SEARCH. For more information on logging in to eI SEARCH or creating an
account, please see Login to an eI SEARCH Account or Create an eI SEARCH Account.
Your SEARCH home page appears with any available content.
5. Browse through SEARCH to find the content you would like to import.
6. Click on the textbook image or
book title to view all the lessons.
7. Click and hold down the left
mouse button on the chapter you
would like to import.
8. Holding down the left mouse
button, drag your mouse to the
lesson side (left-hand window of
the Lessons tab) to the lesson to
which you would like to import
the content. CPS imports the
lesson content into the existing
CPS lesson.
Figure 68: Importing a lesson from eI SEARCH to the Lessons tab
If you drag the SEARCH content lesson to your main database name, CPS will ask you if you
would like to create a new lesson for the content.
CPS 4.0 Users Guide
60
Chapter 3: Creation Functions
Import Specific Content Questions
In addition to importing entire lessons of content, you can import specific questions from a
lesson. To import specific questions
1. Make sure to connect your computer to the Internet.
2. Open CPS from your desktop icon.
3. Click the Lessons tab.
4. Login to eI SEARCH. For more information on logging in to eI SEARCH or creating an
account, please see Login to an eI SEARCH Account or Create an eI SEARCH Account.
Your SEARCH home page appears with any available content.
5. Browse through SEARCH to find the content you would like to import.
6. Click on the textbook image or book title to view all the lessons.
7. Click on the lesson to view lesson questions.
8. Click and hold down the left mouse button on the question you would like to import.
9. Holding down the left mouse button, drag your mouse to the lesson side (left-hand side of
the Lessons tab) to the lesson to which you would like to import the question. CPS
imports the question into the existing CPS lesson.
Figure 69: Viewing specific content questions from a lesson in eI SEARCH
You will be able to see the content question from the question side (right-hand side of the
Lessons tab) when you select the lesson which contains it.
CPS 4.0 Users Guide
61
Chapter 3: Creation Functions
Import PowerPoint Presentations
You can import specific PowerPoint presentations, associated with textbook content, from eI
SEARCH. To import a PowerPoint presentation
1. Make sure to connect your computer to the Internet.
2. Open CPS from your desktop icon.
3. Click the Lessons tab.
4. Login to eI SEARCH. For more information on logging in to eI SEARCH or creating an
account, please see Login to an eI SEARCH Account or Create an eI SEARCH Account.
Your SEARCH home page appears with any available content.
5. Browse for the textbook which contains PowerPoint presentations you would like to
import.
6. Click on the PowerPoint Presentations link next to the textbook with content you would
like to import.
7. Click and hold the left mouse button on the presentation you would like to import.
8. Holding the left mouse button, drag your mouse to the PowerPoint folder on the lesson
side (left-hand side of the Lessons tab).
Figure 70: Importing a PowerPoint presentation from eI SEARCH
The presentation appears in the PowerPoint folder, where you can engage the presentation. For
more information on engaging a PowerPoint presentation, please see Engage a PowerPoint
Presentation.
CPS 4.0 Users Guide
62
Chapter 3: Creation Functions
Upload Content
Only publishers and curriculum coordinators can upload content to eI SEARCH. eI SEARCH
then makes this content available to specific teachers or groups of teachers through Adoption
Codes and Instructor Setup Codes. For more information on uploading content to eI SEARCH,
please contact eInstruction at 888.333.4988. This section will show you how to
Create a publisher or curriculum coordinator eI SEARCH account
Upload textbook content
Create Publisher/Coordinator eI SEARCH Account
Before you can upload content to eI SEARCH, you will need to create an eI SEARCH Account.
To create an eI SEARCH account
1. Open CPS from your desktop icon.
.
2. From the Lessons tab, click
The eI SEARCH homepage appears
in the question (right-hand) side of
the Lessons tab.
3. Click Create a SEARCH Account.
The CPS SEARCH Account Wizard
appears.
4. Choose Other or K-12 and click
Next to continue.
5. Enter your Instructor Setup Code.
eInstruction will provide you with
this code before you create your
account. If you do not have an
Instructor Setup Code, please contact
eInstruction at 888.333.4988. Click
Next to continue.
Figure 71: Creating a SEARCH account from the CPS
SEARCH Account Wizard
Figure 72: Entering the Instructor Setup Code in the CPS
SEARCH Account Wizard
CPS 4.0 Users Guide
63
Chapter 3: Creation Functions
6. Confirm your publisher company or
school district by clicking Next.
Figure 73: Confirming your publisher information in the CPS
SEARCH Account Wizard
Enter User Information
1. Create a Username and Password to
use in eI SEARCH.
2. Click Next to continue.
Figure 74: Creating an eI SEARCH Username and
Password in the CPS SEARCH Account Wizard
3. Enter your First Name, Last Name,
and Email Address. Click Next to
continue.
Figure 75: Entering account information in the CPS
SEARCH Account Wizard
CPS 4.0 Users Guide
64
Chapter 3: Creation Functions
4. Create your account by clicking Next. A
icon appears in the Lessons tab.
Now when you login to eI SEARCH using your publisher or curriculum coordinator account,
you can upload content to eI SEARCH.
Upload Textbook Content
Once you create a publisher or curriculum coordinator eI SEARCH account, you can upload
textbook content to eI SEARCH. To upload
content
1. Make sure to connect your computer
to the Internet.
2. Open CPS from your desktop icon.
3. Click the Lessons tab.
. The CPS Upload
4. Click
Content Wizard appears.
5. Enter the textbook content
information in the fields provided.
ISBN – enter the book’s ISBN
number.
Publisher – choose a publisher
Figure 76: Entering content information in the CPS Upload
from the drop-down list.
Content Wizard
Title – enter the book title.
Author – enter the book author’s name.
Discipline – select the discipline from the drop-down list.
Subject – choose the specific
subject from the drop-down list.
Grade – Choose HE for a
Higher Ed book, and K-12 for a
K-12 book. If you choose K-12,
click each box corresponding to
the grade for which the book was
written. A checkmark will appear
in each book you check.
Book Image – optionally,
include a picture of the book’s
cover as a bitmap (bmp) image.
6. Click Next to continue.
7. Browse through the Lessons area to
find the content you would like to
Figure 77: Moving textbook content as CPS lessons into the
upload.
CPS Upload Content Wizard
8. Click Add to add content to the
Lessons to Upload area. Click Next to continue.
CPS 4.0 Users Guide
65
Chapter 3: Creation Functions
9. Click Browse to find any PowerPoint presentation files you would like to upload with the
textbook content. Click Next after you include your files, or if you do not wish to include
any PowerPoint files.
10. Verify the content information in the Verify Information area, and click Next to upload
your content. CPS provides you with the Adoption Code for your textbook content.
11. Click Done to exit the CPS Upload Content Wizard. Teachers can now access your
textbook content by using the Adoption Code.
Standards
The Standards tab allows you to enter your own list or outline of teaching standards. However,
the organizational functions of Standards reach beyond merely setting learning goals for
students.
CPS Standards enable you to create an outline of the state’s, district’s, or school’s standards for a
certain grade level or course of study. You can identify these standards by different types,
according your state’s, district’s, or school’s requirements. CPS has a list of terms to help you
identify the type of standard with which you are working.
Curriculum directors and state or district administrators can use CPS to establish an extensive
outline of the state’s, district’s or school’s goals, then pass that CPS database of standards onto
individual schools/teachers who use CPS in the classroom. This ensures that the standards that a
state, district, or school wants to focus on are known and integrated into teaching plans.
Teachers then take this database and start adding lesson questions, standard questions, classes,
and team activities for their class(es). Question delivery is the same from the Lessons tab and the
Standards tab, while the Reports tab helps summarize and express student data in usable forms.
Figure 78: Viewing the Standards tab
CPS 4.0 Users Guide
66
Chapter 3: Creation Functions
The Standards tab is split into two windows. These windows can either be vertical or horizontal,
depending on your preference. The default is vertical view. To switch views, simply click the
View button located at the far end of the Standards tab.
The left window (top in horizontal view) gives a view of all standards in this open database. We
refer to this as the standard side. The name of the open database is the first item listed in the left
window. Beneath that are parent-level standard names.
If a parent-level standard name has child-level standards, a plus (+) symbol appears next to the
parent standard name. Click that plus symbol to see all child-level standards.
The right window (bottom in horizontal view) lists all of the questions from any highlighted
standard name. We refer to this as the question side. When you highlight the database name, all
standards and the number of questions in the standards, display in the question side. When you
highlight a standard name from the left window, all questions for that standard and any childlevel standards, display on the question side. The question side also displays the number of
questions, the type of question, and its difficulty level.
This section will show you how to
Create standards and standard questions
Download standards from eInstruction
Edit Standards
Import Standards
Associate Dynamic Standards with questions
Create Standards
You can create your own standards to associate with your lessons. To create a standard
1. Open CPS from your desktop icon.
2. Click the Standards tab.
. A pop-up menu appears.
3. Click
4. Choose New then Standard. The CPS
Standard Attributes window appears.
The window displays the database or
standard name under which the new
standard will be created.
5. Type in or select the following
standard attributes:
The standard title
Details about the standard
A code, number, or identifier for
this standard
Figure 79: Creating a standard with the CPS Standard
Attributes window
CPS 4.0 Users Guide
67
Chapter 3: Creation Functions
The type of standard. The type helps identify why the standard is in place. The dropdown list has more than 20 different types from which to select. Your school, district,
or state may have a type they use or reference often. If that is the case, use that type
of standard. If you choose a grade level type, also specify to which grade the standard
applies.
6. Select the state in which the standard originated or is most closely associated.
7. Click the Save and Create New button, or the Save and Close button. The standard you
created appears in the left or upper window of the Standards tab.
Create Standard Questions
When using the Standards tab on an administrative level, you may have an outline of standard
types to emphasize state, district, or school teaching goals. Within this outline it may be
appropriate to have questions associated with only the lowest level of standard types. To create
questions for a standard
1. Highlight a standard name from the standard side of the Standards tab. The question side
should be empty if you have not previously added or imported any standards.
. A pop-up menu appears.
2. Click
3. Choose New and then Question. The CPS Question Author window appears.
4. Type in the question and make any template, format, or image changes that you desire.
Refer to Create Questions for detailed instructions. When you close the CPS Question
Author window, questions will appear on the question side of the Standards tab.
5. Use
or
to rearrange questions within a selected standard.
Download State Standards from eInstruction
You can download state and national standards from eInstruction. Many of these standards are
also available for REAP reporting. To download standards
1. Go to http://www.einstruction.com/downloads.
2. From the pull-down menu, choose State
Standards.
3. Click OK.
4. Select a state from the pull-down menu.
5. Click Go.
6. Choose the Standards from the links
provided. A File Download window
appears.
7. Click Save. A Save As window appears.
8. Browse through your computer to choose
the location to which you would like to
save the standards.
9. Click Save.
Figure 80: Downloading state standards from
eInstruction
To import these standards to your database, please see Import Downloaded Standards.
CPS 4.0 Users Guide
68
Chapter 3: Creation Functions
Create Standards Using the Standards Builder
Using the Standards Builder function, you can build one standard of questions from several preexisting standards. For example, if a Language Arts database has 32 standards in it, each
standard representing a chapter from a text, you can create a mid-term exam from the first six
standards (chapters) without re-typing all the questions. You can also create a standard from
multiple databases.
To create standards from the Standards Builder
1. Open CPS from your desktop icon.
2. Click the Standards tab.
3. Click
. A pop-up menu appears.
4. Choose Builder. The Builder window opens showing the features listed below:
T
h
Figure 81: Creating standard questions using the Standards Builder
The top pane is the target standard (the standard to which you are adding questions).
The top Browse button allows you to alter the target standard.
The bottom Browse button allows you to select a source database (.cps file) from
which to copy or link questions.
The bottom left pane lists the standards available in the database shown directly
above it. You can also build from the Standards in this open database.
The bottom right pane is a list of questions available in the source standard or
standard selected in the bottom left pane.
CPS 4.0 Users Guide
69
Chapter 3: Creation Functions
The Dragged Questions section allows you to choose whether the questions you select
for the target standard are copied from the standard source or linked to the standard
source.
The Close button at the bottom of the screen closes the builder window.
NOTE: Check whether the database open in the bottom left pane is the source
from which you want to take questions. If this is not the correct database, use
the Browse button to find and open the database from which you want to
select questions. Also, make certain the target standard named at the top of the
Builder window is the destination into which you want to build questions. If
not, use the top Browse button to select a different standard name from the
open database.
5. Select a standard from the database open in the bottom left pane. Alternately, you can
choose to build from Standards questions; simply click the Standards tab in the bottom
left window. Questions for the selected
standard display in the bottom right pane.
6. Select questions to copy or link into the
target standard.
7. Use the Ctrl key, or the Shift key, and
your mouse to select specific questions to
be included in the target standard. While
pressing your mouse button, drag those
selected questions into the top pane.
8. Use the Link or Copy option buttons to
choose how you want the questions
moved.
9. Click the Select Random Question
button to choose the number of specific
question types you want to include in the
target standard. Click the OK button to
complete this random selection.
Figure 82: Selecting a random question with the
Random Question Selector from the Standards
Builder
When you have completed building a new standard from an existing database(s), click the Close
button. The Standards tab appears. Select the standard you built on the left in order to review the
questions on the right.
CPS 4.0 Users Guide
70
Chapter 3: Creation Functions
Edit Standards
Once you create standards, you can edit them in CPS. This section will show you how to
Edit Standard Attributes
Edit Standard Questions
Associate Dynamic Standards to Questions
Add Questions to a Standard
Copy Questions to Standards
Delete a Standard
Delete Standard Questions
Print Standards
Edit Standard Attributes
1. Open CPS from your desktop icon.
2. Click the Standards tab.
3. Select the standard from the standard
side (right or bottom window).
4. Click
. A pop-up menu
appears.
5. Choose Edit. Alternatively, rightclick and choose the Edit…
command from the shortcut menu, or
double-click the standard name. The
CPS Standard Attributes window
appears.
6. Edit the standard name or the
standard description.
7. Click Save and Close to save your
changes or click Cancel to negate
your changes.
Figure 83: Editing standard attributes from the CPS
Standard Attributes window
Edit Standard Questions
You can edit questions associated with your standards. To edit standard questions
1. Open CPS from your desktop icon.
2. Click the Standards tab.
3. Select the standard that is associated with the question you would like to edit.
4. From the standard side (right or bottom window), select the question you would like to
edit.
5. Click
. A pop-up menu appears.
6. Choose Edit. Alternatively, right-click the selected question and choose the Edit…
command from the shortcut menu. The CPS Question Author window appears.
CPS 4.0 Users Guide
71
Chapter 3: Creation Functions
7. Make any changes to the question, answer choices, question template, subjective status,
difficulty level, format, note, and standards from this window.
NOTE: Display the file path of a graphic included in a question by rolling
your mouse cursor over the graphic itself or right-clicking on the graphic.
8. After adding all your questions, click Close or Save and Close in the Question menu.
Associate Dynamic Standards to Questions
The Dynamic Standards feature allows you to easily align state standards to your questions
during a delivery session. This feature lets you choose a subset or a list of standards applicable to
the lesson you are engaging.
You can choose to be prompted with this subset before you ask each question, or you can
automatically apply all the standards in your subset to all of the questions in the lesson you are
engaging. To associate Dynamic Standards to your questions
1. Open CPS from your desktop icon.
2. Open the Lessons tab.
or highlight the lesson you want to engage, and click
. You can
3. Click
also access the Verbal Question Setup window from the Settings menu. If you engage a
prepared lesson, the CPS Session Setup window will appear. If you engage a verbal
question session, then the Verbal Question Setup window will appear. Dynamic
Standards can be set up from either of these windows.
NOTE: In the CPS Session Setup window, you will be able to click the
Dynamic Standards icon only if the Teacher Managed Assessment mode is
selected. This feature is not available with Student Managed, Student Practice,
or Teacher-Led Student Managed Assessment modes.
4. Click
to bring up the Dynamic
Standards Setup window. In this
window you will see all of the
standards you have downloaded.
5. Click on the empty boxes next to the
standards to include them in your
subset.
6. Notice that there are two options that
can be checked at the bottom of this
window: Prompt for Dynamic
Standards and Automatically Align
Selected Dynamic Standards. Either
of these can be selected, or they can
both be de-selected.
Figure 84: Associating Dynamic Standards with lesson
questions
CPS 4.0 Users Guide
72
Chapter 3: Creation Functions
Prompt for Dynamic Standards is the default setting. If you leave this option
selected, then the Dynamic Standards Setup window will pop-up with each question
you ask. This allows you to decide upon question delivery which standards to align
with each question. This option is especially useful with the Verbal Question feature.
If you choose Automatically Align Selected Dynamic Standards, the standards you
define in your subset will be automatically aligned with each question in your session,
and you will not be prompted with the Dynamic Standards Setup window.
You may also leave both boxes unchecked. If unchecked, you will not be prompted
with the Dynamic Standards Setup window, and no standards will be automatically
aligned to your questions. If you de-select both boxes, you can still select a subset of
standards and align those standards to your questions by clicking the dynamic
standards button at any time.
NOTE: If you currently have state standards aligned with your questions, you
do not need to re-select them in the Dynamic Standards Setup window. The
standards you choose in the Dynamic Standards Setup window will be aligned
in addition to those you have predefined.
7. Click OK. This will bring back the CPS Session Setup window or the Verbal Question
Setup window, depending on which type of session you chose.
NOTE: Dynamic standards can be set up at any time during a verbal question
session or a prepared lesson by simply clicking
.
8. Click OK in the Dynamic Standards Setup window and engage your lesson as you
normally would. If you chose to be prompted with dynamic standards, then the Dynamic
Standards Alignment window will appear when you start your session.
Add Questions to a Standard
You can add additional questions to a standard from the Standards tab. To create questions in a
parent-level or child-level standard
1. Highlight a standard name from
the Standards tab and the
standard side. The question side
should be empty if you have not
previously added or imported
any questions.
2. Click the Tools icon then the
New Question command. The
CPS Question Author window
appears.
Figure 85: Adding a question to a standard from the CPS
Question Author window
CPS 4.0 Users Guide
73
Chapter 3: Creation Functions
3. Click the drop-down arrow in the Template box to see more than 50 question templates
available with and without graphic placement options.
4. Type the question in the question text box of the template you selected.
5. Type multiple answers in the answer boxes of the template you selected.
6. Select a correct answer by clicking in the check box beside that answer.
7. Use the toolbar in the upper left corner of the CPS Question Author window to save the
question.
Figure 86: Using Question Author toolbar
Click Save to save the question and remain on the CPS Question Author window.
Click Move to Previous Question to move to the previous question in the standard.
Click Move to Next Question to move to the next question in the standard.
Click New Question to negate any text or graphics you may have just added and to
"redo" this question number.
Click Standards to display standards in this database that you can associate with
questions; see Associate Standards to a Question for instructions.
Preview your question. This option will be available after your question has been
saved.
Click Save and Move to Previous Question to save any change you have made and
to move to the previous question in the standard.
Click Save and Move to Next Question to save any change you have made and
move to the next question in the standard. If the question you are saving is last in the
list, click Save and Move to Next Question to open a new question template.
8. Repeat for as many questions as you want to add to the standard.
9. When you have finished adding questions, click Question in the menu above the toolbar,
and then Save and Close. All questions appear in the question side of the Standards tab.
Copy Questions to a Standard
You can create a question and then duplicate it within the same standard or copy it to other
standards, editing portions of the question to make it different from the original.
Copy
1.
2.
3.
questions to other standards
Open CPS from your desktop icon.
Click the Standards tab.
Select a standard from which you want to copy questions to another standard. Questions
in the selected standard appear in the question side (right or bottom window).
4. Select a question or a group of questions, while pressing your mouse button, and press
the Ctrl button from the keyboard simultaneously.
5. Drag the selected questions to a target standard on the standard side of the window. The
selected questions display at the end of the target standard.
6. When you have added as many questions as you like, click Close or Save and Close in
the Question menu.
CPS 4.0 Users Guide
74
Chapter 3: Creation Functions
Copy
1.
2.
3.
4.
5.
6.
7.
questions within the same standard
Open CPS from your desktop icon.
Click the Standards tab.
Select a standard from the standard side of the window. Any questions in the standard
appear in the question side (right or bottom window).
Select a question or a group of questions.
Right-click your mouse somewhere on the selected questions. A pop-up menu appears.
Choose Copy Questions. The copied questions display at the end of the standard.
When you have added as many questions as you like, click Close or Save and Close in
the Question menu.
Delete a Standard
You can delete an entire standard of questions by following these steps:
1. Open CPS from your desktop icon.
2. Open the database that has the standard you want to delete.
3. Click the Standards tab.
4. Select the standard that you want to delete.
5. Click
. A pop-up menu appears.
6. Choose Delete. Alternatively, right-click on the standard name and choose the Delete
command from the pop-up menu. A confirmation message appears.
NOTE: If you select a standard that has child-level standards beneath it, those
standard(s) will be deleted as well. Use caution when deleting standards from
the standard side of the window.
7. Click OK to delete the standard or click Cancel to return to the Standards tab.
Delete Questions from a Standard
1.
2.
3.
4.
Open CPS from your desktop icon.
Click the Standards tab.
Select the standard from the standard side (left or top window).
Select the question(s) you want to delete from the question side (right or bottom
window).
5. Click
. A pop-up menu appears.
6. Choose Delete. Alternatively, right-click on the selected questions and choose the Delete
command from the pop-up menu. A confirmation appears.
7. Click OK delete the standard or click Cancel to return to the Standards tab.
8. Click the standard name in the left window to see question numbers update. Question
numbers update automatically when you exit the standard.
CPS 4.0 Users Guide
75
Chapter 3: Creation Functions
Print CPS Standards
Sometimes you can teach more effectively by delivering course material, such as homework and
exams, to your students in a hardcopy format. You can print your CPS standards, hand it out to
students, and then grade the material with the CPS response system. To print CPS Standards
1. Open CPS from your desktop icon.
2. Click the Standards tab.
3. Select the standard you want to print.
4. Click
. A pop-up
menu appears.
5. Choose Print Questions or
Print Standards.
Alternatively, right-click
the standard name and
choose one of these print
commands from the
shortcut menu. The CPS
Print Questions window
appears.
Questions from the
selected standard
display in the new
window. Click beside
Figure 87: Printing standards or questions from the CPS Print
the questions you want Questions window
to print, or click Select All in the lower left corner to include every question on the
printout.
If you want an answer key with your printout, click Include Answer Key.
6. Click Preview. The Reporting Preview window opens showing the selected questions
just as they will print, but without graphics. The directory path of any graphic associated
with a question displays in the Preview window. Graphics print, but do not display in the
Preview window.
7. Click the Export/Print button at the bottom of the Reporting Preview window if you are
satisfied with the data. The printout contents automatically open in a word processing
application and automatically save to the CPS folder on your hard drive. Look at the
word processing application’s title bar to see the file name of the printout. If you get a
message indicating that a default viewer cannot see the questions, please refer to
Troubleshooting for more instructions.
NOTE: If Microsoft Word is set to automatically view text and graphic files,
graphics associated with questions display as well as the text. Other word
processing programs may not be capable of displaying images.
8. Review the file and make any layout adjustments.
9. Click the File menu and the Print command.
CPS 4.0 Users Guide
76
Chapter 3: Creation Functions
10. Make sure you are connected to a printer, and then click the OK button to print this
standard. You can close the word processing application and the standard you printed at
any time.
11. Return to the Reporting Preview window and click Close.
12. In the CPS Print Questions window, click the Close button to return to the Standards tab.
Import Standards
You can import standards to the Standards tab of your CPS database. This section will show you
how to
Import standards from CPS databases
Import downloaded standards
Import Standards from CPS Databases
CPS lets you import pre-existing standards from other CPS databases. The import feature will
save you valuable time. For example, if you have a standard in a database for a marketing class
that would be beneficial for your management class to review, then you can import the marketing
standard to the management database.
1. Open CPS from your desktop icon.
2. Open the database into which you want to import the standard, and click the Standards
tab.
3. Select the target standard into which you want to import another standard.
4. Click
. A pop-up menu
appears.
5. Choose Import.
Alternatively, right-click the
selected standard name and
choose the Import command
from the pop-up menu. The
CPS Import Standards
window appears.
6. Click the Browse button. An
Open dialog box appears.
7. Select the path and file name
of the standard you want to
import, and click the Open
button. The path and file
name appear at the top of the Figure 88: Importing standards from existing CPS databases
CPS Import Standards
window. Any standards in the database appear in the larger text area of the dialog.
8. Select individual standards from this database by clicking in the box beside each standard
name. When you select a standard that has child-level standards, those child-level
standards are selected automatically.
CPS 4.0 Users Guide
77
Chapter 3: Creation Functions
9. Click the OK button when all desired standards are selected. Depending on the standard
sizes and the speed of your processor, this import may take some time. The imported
standards appear on the standard side of the Standards tab. You can edit questions and
deliver imported standards the same as any you authored with CPS.
NOTE: When you import a standard from one database to another, any
lessons and/or classes in the database from which you are importing are not
imported into the target database.
Import Downloaded Standards
Most states with CPS-enabled schools have their standards on the web for easy access. If
eInstruction has posted your state’s educational standards, then you can download them to your
computer and import them into your CPS database. To import downloaded standards
1. Open CPS from your desktop icon.
2. Click the Standards tab.
. A pop-up menu appears.
3. Click
4. Choose Import. Alternatively, right-click in the Standards tab and choose Import from
the pop-up menu. The CPS Import Standards window appears.
5. Click Browse to look through your computer to find the standards you would like to
import. An Open dialog box appears.
6. Click Open.
7. Select the standards you would like to import by clicking the box next to the standard so
that a checkmark appears.
8. Click OK.
Depending on the amount of standards you are importing, this may take CPS a few minutes.
Your standards will be in the standard side (left or top window) of the Standards tab.
CPS 4.0 Users Guide
78
Chapter 3: Creation Functions
Classes
To create course/class distinctive classes that contain student and response system information,
continue with the instructions in this section. This function is ideal for sharing student lists
within a school or even an entire district. The import and export commands make it easy to use
student data from other applications too.
The Classes tab is split into two panes. The left pane gives a view of all classes in this open
database. We refer to this as the class side.
The right pane displays all of the students from any highlighted class name. We refer to this as
the student side. When you highlight a class name from the left pane, all of the students’ names
in that class display on the student side.
Figure 89: Viewing the Classes tab
This section will show you how to
Create classes
Add students to a class
Edit class and student information
Import classes
Export classes
CPS 4.0 Users Guide
79
Chapter 3: Creation Functions
Create Classes
A class is a roster of students, student information, and class information that you use within
CPS to engage students in the classroom. You can create several types of classes in several
different ways. This section will show you how to
Create a K-12 class
Create a K-12 CPSOnline class
Create a Higher Ed class
Create a WebCT or Blackboard class
Create a Quick K-12 Class
Create a K-12 Class
A K-12 class is a roster of students using a numbered system of pads. K-12 classes can be linked
to CPSOnline or stand-alone classes within CPS. If you are a Higher Ed instructor who does not
want to use CPSOnline, you will create a K-12 class. To create a K-12 class
1. Open CPS from your desktop icon.
2. Click the Classes tab.
3. Click
. The CPS New Class
Wizard appears.
4. Choose your Institution Type and
click Next.
NOTE: If you are a
Higher Ed instructor
but you do not want to
create a CPSOnline
class, please choose K12 as your institution
type.
Figure 90: Creating a K-12 class with the CPS New Class
Wizard
5. Enter your Contact Information if this is your first CPS class. If you have already created
CPS classes, your contact information is stored within CPS and you will automatically be
moved to the Class Information page.
6. Enter your Class Information. Please note that Class Name is the only information
required.
7. Choose your Attendance Options. You can view class attendance as a grade in the
Assessments area of the Gradebook tab or as Absent/Present in the Class Info area of the
Gradebook tab. Click Next to continue.
8. Click Next to create your class or click Back to review your information.
9. Click Done to close the CPS Class Wizard and return to the Classes tab.
CPS 4.0 Users Guide
80
Chapter 3: Creation Functions
Create a K-12 CPSOnline Class
A K-12 CPSOnline class is a roster of students using a numbered system of pads. When your
district or campus uses REAP, you will create CPSOnline classes so that administrators can
gather student performance data. To create a K-12 CPSOnline class
1. Open CPS from your desktop icon.
2. Click the Classes tab.
. The CPS New Class Wizard appears.
3. Click
4. Choose K-12 as your institution type and click Next.
5. If this is your first CPS class, enter your Contact Information. If you have created classes
in CPS before, you will skip this step
and move directly to the Class
Information page.
6. Fill in your Class Information.
Click the box next to the Make
this a CPSOnline class option
so that a checkmark appears.
Choose your Attendance
Options. You can view class
attendance as a grade in the
Assessments area of the
Gradebook tab, or as
Absent/Present in the Class Info
area of the Gradebook tab.
Skip to step 8 if you have an
Figure 91: Entering the class information for a K-12
CPSOnline class in the CPS New Class Wizard
existing CPSOnline account, or
continue to step 7 if you do not.
7. Enter your Instructor Setup Code. If you do not have one, please contact eInstruction at
888.333.4988. Click Next.
8. Create or enter your Username and Password. Click Next.
9. Click Next to create your class or click Back to edit your class information.
10. Click Done to close the CPS New Class Wizard and return to the Classes tab.
CPS will sync your class with CPSOnline and create your class. You will have access to your
CPSOnline class through CPS. For information on recycling your CPSOnline class for
subsequent terms, please refer to Recycle a K-12 CPSOnline Class.
Create a Higher Ed Class
A Higher Ed class is a roster of students using serial response pads. Students typically purchase
their response pads from their school bookstore and enroll their response pads into the class
through eInstruction’s CPSOnline. CPSOnline then sends student information to your CPS class
when you sync, and CPS creates your class roster. To create a Higher Ed class
1. Open CPS from your desktop icon.
2. Click the Classes tab.
CPS 4.0 Users Guide
81
Chapter 3: Creation Functions
3. Click
. The CPS New Class Wizard appears.
4. Choose Higher Ed as your
institution type and click Next.
5. If you have an existing CPSOnline
Username and Password, click Yes
and skip to step 7. If this will be
your first CPSOnline class,
continue to step 6.
6. Enter your Instructor Setup
Code. If you do not have one,
please contact eInstruction at
888.333.4988. Click Next to
continue.
7. Create or enter your Username
and Password.
8. Select your institution from the
pull-down menu. Click Next to
Figure 92: Entering or creating your CPSOnline Username
or Password for a Higher Ed class
continue.
9. Click Next to create your class or click Back to edit your class information.
10. Click Done to close the CPS New Class Wizard and return to the Classes tab.
CPS will sync your class with CPSOnline and create your class. You will have access to your
CPSOnline class through CPS. For information on recycling your CPSOnline class for
subsequent terms, please refer to Recycle a Higher Ed Class.
Create a Quick K-12 Class
The Class Wizard lets you create a class as you are delivering a session. This on-the-fly class
contains the pad ID values specific to the number of students
participating in the session so you can quickly generate a
class with only 6 pad IDs, 32 pad IDs, or up to 2000 pad IDs.
The Class Wizard also saves any class generated during a
delivery session into the database you have open, so the class
is available from the Classes tab any time you want to use it
again.
1. Open CPS from your desktop icon.
2. Click the Lessons or Standards tab.
3. Select a lesson or standard name.
or
. The CPS Session
4. Click
Setup window appears. Select the session options
from this window.
5. Click Create… (Class) on the CPS Session Setup
window. The CPS Create Class window appears.
Figure 93: Accessing the CPS Create
Class window from the CPS Session
Setup window
CPS 4.0 Users Guide
82
Chapter 3: Creation Functions
6. Type in a Class Title.
7. Use the Lower Range and Upper
Range boxes to indicate the number of
pads you are using in this delivery
session, as well as designating the pad
ID values in use. For example, if you are
using 5 pads with a pad ID value range
from 11 to 15, then type 11 in the
Lower Range box and 15 in the Upper Figure 94: Creating a K-12 Quick Class from the CPS
Create Class window
Range box. When the lesson is
delivered, only those pad IDs would be represented on-screen.
8. Click OK. The CPS Session Setup window reappears.
9. Click Start. The CPS Engage toolbar appears.
Create a WebCT Class
Now you can use your WebCT Vista classes in CPS. Before you follow the steps below, make
sure your IT Administrator has installed the CPSOnline Registration Proxy Tool onto your
institution’s server. To link your WebCT class to CPS
1. Log on to your WebCT Vista Instructor’s account.
Figure 95: Logging on to your WebCT Instructor's account
2. Select the link for your WebCT Vista Course Section that you would like to create in
CPS.
3. Click the Build tab and click the Basic View tab.
CPS 4.0 Users Guide
83
Chapter 3: Creation Functions
4. Click the More Tools link on the left-hand menu. A link for you to create your class in
CPS will appear below.
5. Click on the link.
6. Click the appropriate button to create a new class or edit an
existing class. Skip step 7 if you are editing an existing class.
7. Create a class Title.
Figure 97: Titling your class as it appears for students
when they register for CPSOnline
Figure 96: Creating
the link between
your class and CPS
8. Click the Register Class button to create your class.
9. Complete the required fields in the next screen.
NOTE: If you change your WebCT Instructor Username and Password, your
CPS-WebCT Connection Username and Password will not change. You can
change your CPS-WebCT Connection Username and Password from the
Contact Information tab if you Edit your class.
10. Click the Submit button to return to the WebCT Build tab and Basic View. Now your
class is ready to import to CPS.
You will be able to access your class from the Build tab under the Basic View tab.
CPS 4.0 Users Guide
84
Chapter 3: Creation Functions
Create a Blackboard Class
You can link your Blackboard classes to CPS to create a more interactive classroom experience
for your students. Before you follow the steps below, make sure your IT Administrator has
installed the CPS Connection Building Block onto your institution’s server. To link your
Blackboard class to CPS
1. Log on to your Blackboard Instructor’s account.
Figure 98: Logging on to your Blackboard Instructor's account
2. Select the link for your Blackboard course that you would like to
create in CPS.
3. Click Tools from the left-hand menu.
4. Choose CPS Connection from the list of online tools. If the CPS
Connection option is unavailable from your Tools menu, please
contact your IT Administrator and ask them to install the CPS
Connection.
5. Click the Register Class button.
6. Choose your campus from the pull-down menu.
7. Type in a Class End Date.
NOTE: Make sure your class end date is in
mm/dd/yy format.
8. Enter your Instructor Setup Code. If your institution uses one
setup code, the code will automatically appear in the Instructor
Figure 99: Accessing the
tool to link Blackboard to
Setup Code field.
9. Create a CPS – Blackboard Connection Username and Password. CPS
Alternatively, enter your existing CPSOnline Username and Password in the fields
provided.
NOTE: If you change your Blackboard Instructor Username and Password,
your CPS – Blackboard Connection Username and Password will not
change.
CPS 4.0 Users Guide
85
Chapter 3: Creation Functions
Figure 100: Registering your class in Blackboard
10. Click Register Class to register your class.
Add Students to a Class
You can generate a class roster by adding students to a class. The type of class you create
(Higher Ed, K-12, K-12 CPSOnline with REAP) determines how you populate the class roster.
This section will show you how to
Add students to a K-12 class
Add students to a K-12 class using CBIT
Add students to a Higher Ed class
Add Students to K-12 Class
Once you have created a class in the database, you can add students to that class. You can create
a class of default students or personalize the default student data to specifically fit your class
requirements. To add students to a K-12 class
1. Open CPS from your desktop icon.
2. Click the Classes tab.
3. Select a class name from the class side (left or top window).
4. Click
. The default student information displays at the bottom of the Classes tab. To
start a class of default students, click the Save button at the bottom of the Classes tab.
CPS 4.0 Users Guide
86
Chapter 3: Creation Functions
5. Personalize the student information by changing or adding any of the available data
options:
First name (required)
Last name (required)
Gender (required for REAP)
Ethnicity (required for REAP)
Student ID (required for REAP)
Pad ID (required)
NOTE: If you are using REAP, each student must have a unique student ID.
If you know your students’ district IDs, please use them. The IDs may be
alpha-numeric, but must have at least 5 total characters and/or numbers.
6. Click Save when you have added all the elements of one student. That student’s
information automatically displays in the student side (right or bottom window).
7. Repeat steps 3-5 to add more students to the class.
You can use any class you create in this database in conjunction with any session delivery. Click
the column headers, First Name, Last Name, or Pad ID, from the student side (right or bottom
window) to sort the view of the students in a class.
Add Students to a Class using CBIT
To make organizing your district's campuses, teachers, and students, your district can use REAP
with CBIT. CBIT is a component software program from eInstruction that provides your teachers
with updated class rosters and provides your district Curriculum Coordinator with an updated
teacher distribution list. Your Curriculum Coordinator can use the distribution list to send
assessments to all teachers within the district or to specific groups of teachers. CBIT uses your
district SMS (Student Management System) to create the rosters and the distribution lists, which
allows your teachers and curriculum coordinators to concentrate on education your students.
You will not need to create your class in CPS if
your district uses CBIT. To add the class and the
students
1. Create your database. For more
information on creating a database,
please see Create a New Database.
2. From the Settings menu, choose
CPSOnline Login. The CPSOnline
Login Wizard appears.
3. Enter your CPSOnline Username and
Password. The first time you create a
class using CPSOnline, you will need to
use a pre-generated username and
password to log on.
Figure 101: Logging on to CPSOnline from the CPSOnline
Login Wizard
CPS 4.0 Users Guide
87
Chapter 3: Creation Functions
4. Once you have created your class and logged on for the first time, CPS will ask you to
change your username and password. To determine your pre-generated username and
password:
a. Gather the following information:
School ID (you can get this information from your school)
First letter of your first name
First four letters of your last name
Two-digit birth month**
Two-digit birth year**
Site ID (this is the campus ID)
b. Add all of the above information together, into one long string of information. This is
both your username and password.
c. Enter the information for your username and password when you create your first
CPSOnline class.
For example, if your school’s ID is 001, your name is Joe Smith and you were born on
05/16/1972, and your campus’s ID is 456, your username and password would be:
001JSMIT0572456.
** Ask your IT Administrator if your school uses your birth date to generate your password. If
they do not, you will need the following information to determine your pre-generated username
and password:
School ID (you can get this information from your school)
First letter of your first name
First four letters of your last
name
Teacher ID (you can get this
information from your school)
District ID (you can get this
information from your school)
5. Click Next to continue.
6. Click the circle next to Yes to indicate
that you would like to sync CPS with
CPSOnline now. Click Next.
7. Select the class or classes you would
like to sync by clicking the box next to
their name so that a checkmark
appears. Alternatively, click Select All Figure 102: Syncing CPS with CPSOnline to retrieve your
class data
to sync all CPSOnline classes. Click
Next.
8. Choose whether or not you would like to download any assessments. For more
information on downloading assessments, please see Appendix A: REAP. Click Next.
CPS downloads class information from CPSOnline as well as any downloaded
assessments (if applicable).
9. Click Done to exit the CPSOnline Login Wizard and return to CPS.
Your class or classes and the student rosters will appear in the Classes tab.
CPS 4.0 Users Guide
88
Chapter 3: Creation Functions
Add students to a Higher Ed Class
If you are a Higher Ed instructor, CPS will update your class roster when your students enroll in
your class online.
1. Create a CPSOnline class.
2. Distribute the Class Key and Student Enrollment Instructions to your students. You can
print off this information at the end of the CPS New Class Wizard.
3. Ask your students to register for your class from www.einstruction.com. As students
enroll in your class, their information will become available on your CPS class roster. If a
student does not want their information displayed on CPSOnline, you will receive an
email from eInstruction with steps to comply with his or her request.
NOTE: Now you can link CPS with Blackboard or WebCT. For information
on creating a CPS link with your institution's web learning tool, please contact
eInstruction at 888.333.4988 and ask for a Technical Sales Associate.
Edit Classes
You can manage your class information, CPSOnline classes, and class rosters by editing classes
in the Classes tab. This section will show you how to
Edit a class
Edit student information
Copy students to a class
Show all students
Recycle a K-12 CPSOnline class
Recycle a Higher Ed class
Delete a class
Delete a student
Edit a Class
You can edit your class information including your contact information, the general class
information, and if you have a CPSOnline class, you can manage your CPSOnline options.
Edit Class Information
You can edit the general class information of
any class within CPS. To edit class
information
1. Open CPS from your desktop icon.
2. Click the Classes tab.
3. Select the class name that you want to
edit.
4. Click
. Alternatively, right-click
the class name and choose the Edit…
command from the shortcut menu, or
double-click the class name. The CPS
Class Information window appears.
Figure 103: Editing class information in the CPS Class
Information window
CPS 4.0 Users Guide
89
Chapter 3: Creation Functions
5. Edit any of the on-screen options.
Class Name: This is the only required information for a class.
Course Number: This is an optional course number assigned by your school.
Section: This is the optional section number for your class.
Period: This is the optional period in which you hold your class.
Semester: This is the optional semester during which you teach your class.
Campus: This is the optional building or campus name where you teach your class.
Classroom Number: This is the optional room number for your class.
Attendance Options: This is the location where you store your attendance records in
CPS. You can choose to view the attendance as a grade in the Assessments area of the
Gradebook tab or choose to view the attendance as Absent/Present in the Class Info
area of the Gradebook tab.
6. Click Save to save any changes.
7. Click Done to exit the CPS Class Information window and return to the Classes tab.
Edit Contact Information
You can edit your contact information
as a teacher of any of your CPS
classes. To edit contact information
1. Open CPS from your desktop
icon.
2. Click the Classes tab.
3. Select a class.
. Alternatively,
4. Click
right-click the class name and
choose Edit from the pop-up
menu, or double-click the class
name. The CPS Class
Information window appears.
5. Click on the Contact
Information tab.
6. Edit any contact information.
Figure 104: Editing teacher contact information from the CPS Class
Title: This is your optional Information window
title by which people address you.
First Name: This is your required first name.
Last Name: This is your required last name.
Email Address: This is your required email address.
Phone: This is your optional work phone number.
Teacher Code: This is an optional code used by your school’s management system.
Username: This is your CPSOnline Username. This field is available only if you
have a CPSOnline class.
Password: This is your CPSOnline Password. This field is available only if you have
a CPSOnline class.
Confirm Password: This field is available only if you have a CPSOnline class, and
allows you to change your CPSOnline password.
7. Click Save to save any changes.
CPS 4.0 Users Guide
90
Chapter 3: Creation Functions
8. Click Done to exit the CPS Class Information window and return to the Classes tab.
Edit CPSOnline Options
You can edit general CPSOnline class options only if you have a CPSOnline class. To edit
CPSOnline options
1. Open CPS from your desktop
icon.
2. Click the Classes tab.
3. Select the CPSOnline class
whose options you would like
to edit.
4. Click
. Alternatively,
right-click the class name and
choose Edit from the pop-up
menu, or double-click the class
name. The CPS Class
Information window appears.
5. Click on the Online Class
Options tab.
6. Edit any CPSOnline class
Figure 105: Editing CPSOnline class options from the CPS Class
Information window
options.
Online Study Guide: This option allows you to change the Online Study Guide
options. You can choose to automatically show a study guide online for each
assessment you upload, or you can have CPS prompt you to show the study guide
after you upload each assessment.
Sync Options: This option allows you to choose whether or not you automatically
sync your class information with CPSOnline each time you open your database.
7. Click Save to save any changes.
8. Click Done to exit the CPS Class Information window and return to the Classes tab.
Edit Student Information
You can edit student information for K-12 and K-12 CPSOnline classes (unless your school uses
CBIT). To edit student information
1. Open CPS from your desktop icon.
2. Click the Classes tab.
3. Select a class from the class side (left or top window). Any students in this class display
on the student side (right or bottom window).
4. From the student side, select a student name. The selected student’s information activates
in the Student Information area at the bottom of the Classes tab (Continues on next page).
CPS 4.0 Users Guide
91
Chapter 3: Creation Functions
Figure 106: Editing a student's information in the Classes tab
5. Edit any of the student’s information.
6. Click Save when you finish editing that entry. The entry displays as edited.
7. Repeat the above steps for as many entries as you want to edit in the class.
Copy Students to a Class
You can copy students from one class to another class in your database. To copy students
1. Open CPS from your desktop icon.
2. Click the Classes tab.
3. Select the class which has a student or students
you would like to copy.
4. From the student side (right or bottom window),
select the student or students you would like to
copy.
Figure 107: Copying students to a class
5. Right-click on a selected student's name. A pop- from the Classes tab
up menu appears.
6. Choose Copy to Class. The menu expands to provide you with a list of available classes.
7. Select a class from the list. The student appears in both class rosters.
NOTE: CPS assigns the student to the next consecutive pad ID number in the
new class roster. Any changes you make to the student's information (except
pad ID number) changes the information in both class rosters.
CPS 4.0 Users Guide
92
Chapter 3: Creation Functions
Show All Students
The Show All icon allows you to view student information for every student in every class
within one database. To use the Show All view
1. Open CPS from your desktop icon.
2. Click the Classes tab.
. The student side (right or bottom window) displays each student by his or
3. Click
her first and last name. The pad ID values do not display because multiple classes use the
same pad ID values.
NOTE: You cannot edit or delete student information from this view.
4. To get out of the Show All view, click
again.
Recycle a K-12 CPSOnline Class
You can recycle classes to use for subsequent terms only if you create CPSOnline classes. To
learn more about creating CPSOnline classes, please see Create a K-12 CPSOnline Class. To
recycle your K-12 CPSOnline
class
1. Open CPS from your
desktop icon.
2. Click the Classes tab.
3. From the class side (left or
top window), select the
class you wish to recycle.
. The CPS Class
4. Click
Information window
appears.
5. Click the Recycle
CPSOnline Class tab.
6. Select your recycle options.
7. Click Recycle to recycle
your CPSOnline class.
Figure 108: Recycling a K-12 CPSOnline class from the CPS Class
Information window
NOTE: Recycling your class has no effect on your instructor account.
8. Click Done to close the CPS Class Information window and return to the Classes tab.
CPS 4.0 Users Guide
93
Chapter 3: Creation Functions
Recycle a Higher Ed Class
You can reuse your existing CPSOnline classes in subsequent semesters. This feature is
especially helpful when you teach the same class in multiple semesters. To recycle a Higher Ed
class
1. Open CPS from your desktop icon.
2. Click the Classes tab.
3. From the class side (left or top window), select the class you wish to recycle.
. The CPS Class Information window appears.
4. Click
5. Click the Recycle CPSOnline Class tab.
6. Select your recycle options.
Class Key: Click the
box next to the Class
Key option so that a
checkmark appears.
When a checkmark
appears next to the
Class Key option,
your Class Key from
the previous semester
will be retained for
the next semester.
Uploaded CPS
Sessions: Click the
box next to the
Uploaded CPS
Sessions option so
Figure 109: Recycling a Higher Ed class from the CPS Class Information
window
that a checkmark
appears. When a checkmark appears next to the Uploaded CPS Sessions option, your
recycled CPSOnline class will still contain your uploaded CPS sessions from the
previous semester.
New Start Date: Use the pull-down menu to view a pop-up calendar. Select a new
class start date. Remember: Students cannot register for your class until the start date.
New End Date: Use the pull-down menu to view a pop-up calendar. Select a new end
date for the class.
Enable Notification Date: Click the box next to the Enable Notification Date option
to remove the checkmark. If the checkmark is there, you will receive an email from
eInstruction regarding every student who registers for your class after the notification
date. For example, some instructors use this function to notify them when students
enroll after regular enrollment dates.
New Notification Date: Use the pull-down menu to view a pop-up calendar. Set your
new notification date.
7. Click Recycle to recycle your CPSOnline class.
8. Click Done to close the CPS Class Information window and return to the Classes tab.
CPS 4.0 Users Guide
94
Chapter 3: Creation Functions
Delete a Class
You can delete an entire class in CPS. However, when you delete a class, you also delete any
students within that class’s roster. To delete a class
1. Open CPS from your desktop icon.
2. Click the Classes tab.
3. Select the class you want to delete.
. Alternatively, right-click and choose the Delete command from the pop-up
4. Click
menu. A confirmation message appears.
5. Click OK to permanently eliminate the class or click Cancel to quit this delete function.
6. Repeat steps 3-5 for as many classes as you want to delete.
Delete a Student
You can delete an individual student from a class roster. Deleting a student who is copied into
another class roster will not delete that student from the other class roster. To delete a student
1. Open CPS from your desktop icon.
2. Click the Classes tab.
3. Select the class from which you want to delete students. The students in this class display
in the student side (right or bottom window).
4. From the student side (left or top window), select the student(s) that you want to delete.
5. Click
. Alternatively, right-click and choose the Delete command from the pop-up
menu. A confirmation message appears on-screen.
6. Click OK to remove that entry.
7. Repeats steps 4-6 for as many entries as you want to delete from the class.
Import Classes
You can import class rosters from many different applications into CPS. When you import the
roster, CPS creates a new K-12 class with this roster information. To learn how to change the
class type, please see Edit Class Information. This section will show you how to
Import classes from a CPS database
Import classes from CPSOnline
Import classes from Pentamation files
Import classes from Osiris files
Import classes from SASI XP files
Import classes from OnTrack files
Import classes from DuPont files
Import classes from WebCT
Import classes from Blackboard
CPS 4.0 Users Guide
95
Chapter 3: Creation Functions
Import Classes from a CPS Database
You can import classes from another CPS databases. When you import classes from another
database, the student grades associated with the class roster do not import with the class. To
import a class from another CPS database
1. Open CPS from your desktop icon.
2. Click the Classes tab.
. Alternatively, right3. Click
click in a blank space on the class
side and choose the Import
command from the pop-up menu.
The CPS Import Class Wizard
appears.
4. Choose CPS Database and click
Next.
5. Click Browse and look for the
database containing the class you
want to import. An Open dialog box
appears.
6. Select the database file and click
Figure 110:Importing a CPS class from another database
Open.
7. Select individual classes from this database by clicking in the box beside each name. You
can also choose to import all of the available classes from this database by clicking inside
the Select All option.
8. Click OK. Depending on the class size and the speed of your processor, this import may
take some time. The imported classes appear in the Classes tab when the import finishes.
You can edit this imported class just as you did when you created other classes in this database.
For more information on editing classes, please see Edit Class Information.
Import Classes from CPSOnline
You can import your CPSOnline classes. To import a CPSOnline class, you must first connect
your computer to the Internet. To import a
CPSOnline class
1. Open CPS from your desktop icon.
2. Click the Classes tab.
3. Click
. Alternatively, right-click in
a blank space on the class side and
choose the Import command from the
pop-up menu. The CPS Import Class
Wizard appears.
4. Choose CPSOnline and click Next.
5. Choose your Institution Type and click
Next.
Figure 111: Importing a CPSOnline class
CPS 4.0 Users Guide
96
Chapter 3: Creation Functions
6. Enter your CPSOnline Username and Password. CPS will connect to CPSOnline and
display all of your available CPSOnline classes.
7. Select individual classes from this database by clicking in the box beside each name. You
can also choose to import all of the available classes from this database by clicking inside
the Select All option.
8. Click OK. Depending on the class size and the speed of your processor, this import may
take some time. The imported classes appear in the Classes tab when the import is
complete.
You can edit recycle this class for subsequent terms. For information on recycling a class, please
see Recycle a Higher Ed Class or Recycle a K-12 CPSOnline Class.
Import Classes from Pentamation Files
You can import classes saved from Pentamation files. To import a Pentamation file
1. Open CPS from your desktop icon.
2. Click the Classes tab.
. Alternatively, right-click
3. Click
in the class side of the Classes tab and
choose Import. The CPS Import Class
Wizard appears.
4. Choose Pentamation File (*.txt) from
the list. Click Next.
5. Click Browse. An Open dialog box
appears.
6. Select the Pentamation file from which
you want to import information. Click
Open. If there are no teachers defined,
you will automatically be presented
with the Teacher Login dialog box. If
there are teachers defined, you can use
an existing teacher, or create a new
teacher.
Figure 112: Importing a Pentamation file
NOTE: The information on the left side of the CPS - Add/Edit Teachers
dialog box applies to data that is in CPS—not data that is in the Pentamation
file.
7. Select the teacher you want to import classes for and click OK. You will see a list of
classes associated with that teacher, from which you can choose which classes to import.
8. Select the classes to import and click OK. When a class is imported into CPS, review the
student information from the Classes tab.
Response pad numbers are automatically assigned to the student information imported from the
Pentamation file. To learn more about editing a class, please see Edit Class Information.
CPS 4.0 Users Guide
97
Chapter 3: Creation Functions
Update Pentamation Data
We know that things don’t stay the same. Students move into or out of your class, or information
about students in your class changes. That is why you can easily update the CPS class from the
updated Pentamation data without starting from scratch. When you update a Pentamation file,
instead of importing it, you can add new student information to an existing CPS class without
altering existing CPS information such as pad ID numbers.
1. Open CPS from your desktop icon.
2. Click the Classes tab.
3. Select the class name that was imported from a Pentamation file.
4. Right-click on the class name.
5. Select the Update command from the pop-up menu. As CPS reads the updated
Pentamation file, please wait for it to prompt you. Depending on what Pentamation data
has been altered and how, CPS will give you appropriate responses. Just follow any onscreen instructions to make your update complete. The updated student information is
represented on the Classes tab.
6. Review the student data, including pad ID numbers, to make certain all data is valid.
Import Classes from Osiris Files
You can import files form Osiris. To import Osiris files
1. Open CPS from your desktop icon.
2. Click the Classes tab.
3. Click
. Alternatively, right-click on the class side of the Classes tab and choose
Import. The CPS Import Class Wizard appears.
4. Choose Osiris File (*.txt) from the
list. Click Next.
5. Click Browse. An Open dialog box
appears.
6. Select the Osiris file from which you
want to import information. Click
Open. If no teachers are defined,
you will automatically be presented
with the Teacher Login dialog box.
You must add a teacher name and ID
that has class data associated with an
Osiris file. If there are teachers
defined, you can select an existing
teacher. The teacher you select must
have data in the Osiris file in order to Figure 113: Importing an Osiris file
import any data.
NOTE: In the CPS Add/Edit Teachers dialog box, the class names that appear
on the left side apply to data that is in CPS, not data that is in the Osiris file.
7. Select the teacher for whom you want to import classes.
CPS 4.0 Users Guide
98
Chapter 3: Creation Functions
8. Click OK. A list of classes associated with the teacher you selected in step 6 is displayed.
9. Select which classes you want to import and click OK.
When a class is imported into CPS, review the student information from the Classes tab.
Response pad numbers are automatically assigned to the student information imported from the
Osiris file. To learn more about editing a class, please see Edit Class Information.
Update Osiris Data
You can easily update the CPS class from the updated Osiris data without starting from scratch.
When you update an Osiris file rather than import it, you can add new student information to the
existing CPS class without altering existing CPS information such as pad ID numbers.
1. Open CPS from your desktop icon.
2. Click the Classes tab.
3. Select the class name that was imported from an Osiris file.
4. Right-click on the class name.
5. Select the Update command from the pop-up menu. As CPS reads the updated Osiris
file, please wait for it to prompt you. Depending on what Osiris data has been altered and
how, CPS will give you appropriate responses. Just follow any on-screen instructions to
make your update complete. The updated student information is represented on the
Classes tab.
6. Review the student data, including pad ID numbers, to make certain all data is valid.
Import Classes from SASI XP Files
You can import files from SASI XP. To import SASI XP files
1. Open CPS from your desktop icon.
2. Click the Classes tab.
3. Click
. Alternatively, right-click the class side of the Classes tab and choose
Import. The CPS Import Class
Wizard appears.
4. Choose SASI File (*.txt) from the
list. Click Next.
5. Click Browse. An Open dialog
box appears.
6. Select the SASI file from which
you want to import information.
Click Open. If no teachers are
defined, you will automatically be
presented with the Teacher Login
dialog box. If there are teachers
defined, you can use an existing
teacher or you can create a new
teacher.
Figure 114: Importing a SASI XP file
NOTE: The information on the left side of the CPS Add/Edit Teachers dialog
box applies to data that is in CPS—not data that is in the SASI file.
CPS 4.0 Users Guide
99
Chapter 3: Creation Functions
7. Select the teacher you want to import classes and click OK. You will see a list of classes
associated with that teacher, from which you will be able to choose which classes to
import.
8. Select the classes to import and click OK. When a class is imported into CPS, review the
student information in the Classes tab.
Response pad numbers are automatically assigned to the student information imported from the
SASI file. To learn more about editing classes, please see Edit Class Information.
Import Classes from OnTrack Files
You can import classes from OnTrack files. To import an OnTrack file
1. Open CPS from your desktop icon.
2. Click the Classes tab.
. Alternatively, right-click on the class side of the Classes tab and choose
3. Click
Import. The CPS Import Class
Wizard appears.
4. Choose OnTrack (*.csv) from the
list. Click Next.
5. Click Browse. An Open dialog box
appears.
6. Select the OnTrack file from which
you want to import information.
Click Open. If no
instructors/teachers are defined, you
will automatically be presented with
the Teacher Login dialog box. If
there are instructors/teachers
defined, you can use an existing
teacher or create a new teacher.
Figure 115: Importing an OnTrack file
NOTE: The information on the left side of the CPS Add/Edit Teachers dialog
box applies to data that is in CPS—not data that is in the OnTrack file.
7. Select the instructor/teacher you want to import classes for and click OK. You will see a
list of classes associated with that teacher, from which you can choose which classes to
import.
8. Select the classes to import and click OK. When a class is imported into CPS, review the
student information from the Classes tab.
Response pad numbers are automatically assigned to the student information imported from the
OnTrack file. To learn more about editing a class, please see Edit Class Information.
CPS 4.0 Users Guide
100
Chapter 3: Creation Functions
Import Classes from DuPont Files
You can import files from DuPont. To import a DuPont file
1. Open CPS from your desktop icon.
2. Click the Classes tab.
. Alternatively, right-click on the class side of the Classes tab and choose
3. Click
Import. The CPS Import Class
Wizard appears.
4. Choose LMS File (*.txt) from the
list. Click Next.
5. Click Browse. An Open dialog box
appears.
6. Select the DuPont file from which
you want to import information.
Click Open. If no
instructors/teachers are defined, you
will automatically be presented with
the Teacher Login dialog box. If
there are instructors/teachers
defined, you can use an existing
teacher or create a new teacher.
Figure 116: Importing a DuPont file
NOTE: The information on the left side of the CPS Add/Edit Teachers dialog
box applies to data that is in CPS - not data that is in the DuPont file.
7. Select the instructor/teacher you want to import classes for and click OK. You should be
presented with a list of classes associated with that instructor/teacher and be able to select
which classes to import.
8. Select the classes to import and click OK. When a class is imported into CPS, review the
student information from the Classes tab.
Response pad numbers are automatically assigned to the student information imported from the
DuPont file. To learn more about editing a class, please see Edit Class Information.
Import Classes from WebCT
You can import your WebCT class into CPS by using the CPS-WebCT Proxy Tool. For more
information on the CPS-WebCT Proxy Tool, please refer to CPS-WebCT Proxy Tool or contact
eInstruction at 888.333.4988 to speak with a Technical Sales Support Associate. To import a
WebCT class
1. Open CPS from your desktop icon.
2. Click the Classes tab.
3. Click
. Alternatively, right-click on the class side of the Classes tab and choose
Import. The CPS Import Class Wizard appears.
CPS 4.0 Users Guide
101
Chapter 3: Creation Functions
4. Choose WebCT and click Next.
5. Enter your CPS-WebCT Username
and Password and choose your
institution from the pull-down list.
Click Next.
6. Select the WebCT class or classes
you would like to import.
Alternatively, import all of your
available WebCT classes by
clicking the Select All option.
Click Next.
7. Enter your WebCT username and
password. Click OK.
Figure 117: Importing a WebCT class
Response pad numbers are automatically assigned to the student information imported from the
WebCT class. You can recycle this CPS-WebCT class for subsequent terms. To learn more about
recycling a class, please see Recycle a Higher Ed Class.
Import Classes from Blackboard
You can import your Blackboard class to CPS, using the CPS Connection Building Block from
eInstruction. For more information on the CPS Connection Building Block, please see CPS
Connection Building Block or contact an eInstruction Technical Sales Associate at
888.333.4988. To import a Blackboard class
1. Open CPS from your desktop icon.
2. Click the Classes tab.
3. Click
. Alternatively, right-click on the class side of the Classes tab and choose
Import. The CPS Import Class
wizard appears.
4. Select Blackboard from the list of
import sources. Click Next.
5. Enter your CPS Connection
username and password and
choose your institution from the
pull-down menu. Click Next.
6. Select your Blackboard classes or
classes that you would like to
import. Alternatively, click the box
next to the Select All option so
that a checkmark appears. Click
Next.
Figure 118: Importing a Blackboard class
CPS 4.0 Users Guide
102
Chapter 3: Creation Functions
Response pad numbers are automatically assigned to the student information imported from the
Blackboard class. You can recycle this CPS-Blackboard class for subsequent terms. To learn
more about recycling a class, please see Recycle a Higher Ed Class.
Export Classes
You can export classes to non-CPS applications. This section will show you how to
Export class to tbt Deliver
Export class as a CSV files
Print/Export a class
Export Class to tbt Deliver
You export a CPS class to a tbt Deliver file. Tbt Deliver is a product by eInstruction Corporation.
To export a CPS class to tbt Deliver
1. Open CPS from your desktop icon.
2. Click the Classes tab.
3. Select a class name you want to
export to tbt Deliver.
. Alternatively, right-click
4. Click
and choose the Export command
from the pop-up menu. The Export
Class window opens with your class
name in the File name text box.
5. Click the drop-down arrow in the
Save as type box, and select Deliver
Rosters (*.ros), the .ros file
extension needed to operate in tbt
Deliver.
6. Click Save.
Figure 119: Exporting a class roster to tbt Deliver
NOTE: If the CPS class you are exporting has alpha characters in the Student
ID field, a warning statement appears saying the tbt Deliver software cannot
use the class file. Edit the CPS class if that is the case. When you have
successfully exported a CPS class to a .ros file, you can operate the tbt Deliver
software with the class.
CPS 4.0 Users Guide
103
Chapter 3: Creation Functions
Export Class as a CSV file
You can export a CPS class as a CSV file. The CSV file opens in most spreadsheet applications,
such as Microsoft Excel. To export a CSV file
1. Open CPS from your desktop icon.
2. Click the Classes tab.
3. From the class side (right or top
window), select the class roster you
would like to export to a CSV file.
. The Export Class window
4. Click
appears.
5. Browse through your computer to find
the location to which you would like to
save your class roster.
6. Click Save to save your roster and return
to CPS.
Figure 120: Exporting a class roster to a CSV file
Print/Export a Class
You can export classes to .csv files for importing to other software applications and print from
word- processing applications. To print or export a class
1. Open CPS from your desktop icon.
2. Click the Classes tab.
3. Select the class name that you
want to print.
4. Click
. Alternatively,
right-click and choose the
Print command from the popup menu. The CPS Class Print
window opens displaying the
class entries in order with last
name, first name and pad ID
information.
Click Export to CSV to
take this class into a
spreadsheet format, and
Figure 121: Viewing a class roster in the CPS Class Print window
save it as a .csv file.
Click Export/Print to take the class information to a word-processing application.
CPS 4.0 Users Guide
104
Chapter 3: Creation Functions
Team Activities
CPS team activities are a fun and effective way for you to teach your students and for them to
learn. In fact, the CPS response system is ideal to use with teams of students. Teams compete for
points in a fun environment where knowledge is cool. CPS offers a variety of team activities to
give you flexibility in engaging your students.
The Team Activities tab provides you with two different types of interactive games for your
students. You can use the Challenge board, which creates a Jeopardy-like quiz game that you can
engage just like any other lesson.
The Team Activities tab also includes the There It Is! game. There It Is! combines knowledge
and quick critical thinking skills in a fastest-finger format.
Figure 122: Viewing the Team Activities tab
This section will give you information on the various CPS team activities. The team activities
include
There It Is!
CPS Challenge Board
Top Score
CPS 4.0 Users Guide
105
Chapter 3: Creation Functions
There It Is!
CPS makes it easier than ever to get your students to learn without realizing it! Using the timehonored method of healthy competition, get your students to learn the course material while
having a fun time in your class. You can organize your class into teams of students, or let
individual students compete.
There it is! employs the Student Managed Assessment mode in a fastest-finger format. Each
team or student answers a different question at a time, so students do not need to shout out
answers.
The first team/student to correctly respond to their own question receives bonus points.
Teams/Students who answer correctly, but did not answer first, receive the standard point
value that is set.
Teams/Students who did not answer correctly or did not answer at all get 0 points.
The points accumulate over the There it is! session to determine a winner.
To set the standard and bonus point value distributed to teams/students
1. Open CPS from your desktop icon.
2. Click the Team Activities tab.
. The There it is!
3. Click
Properties window appears.
4. Select your standard/bonus point
values, whether or not you would like
to show if students answered correctly
on each question, and/or if you want to
use bonus points.
5. Select your preferences and click OK.
Figure 123: Changing the settings for a There It Is!
activity
NOTE: The settings you
put will apply to all lessons in the Team Activities tab until otherwise
changed.
CPS Challenge Board
CPS also offers Challenge Boards as a team activity. If you and your students are familiar with
the game show Jeopardy! ™, then you already have a good idea how the CPS Challenge Board
works. Challenge Boards use questions that you have already created in a lesson and assigns
them point values.
During a Challenge Board delivery session, select point values under a category, or have a team
call them out. Then click on that point value to display a question. As soon as you start the
response cycle, teams can discuss, point, and click their answers. You can review students'
grades in the Gradebook or view reports from the Challenge Board in the Reports tab.
CPS 4.0 Users Guide
106
Chapter 3: Creation Functions
Create CPS Challenge Boards
You can create CPS Challenge Boards before class, so that you can simply engage the activity
when your students arrive. To create a CPS Challenge Board
1. Open CPS from your desktop icon.
2. Click the Team Activities tab.
3. Click
.
4. Click
. The CPS Challenge
Board Info window appears.
5. Type in a title for your challenge
board, and then name the
categories. You can come back and
edit these later if you would like.
6. Click OK. The CPS Challenge
Board window opens containing
the panes listed below.
The Top left pane displays all
of the lessons or standards in
Figure 124: Creating a CPS Challenge Board with the CPS
Challenge Board Info window
the open database.
Use the tabs above this pane to choose Lessons or Standards.
The Top right pane displays the point values under each category. Each point value
button also displays how many questions it contains.
The Bottom half displays the questions in the lesson you select from the top left
window.
Figure 125: Populating a CPS Challenge Board with the CPS Challenge Board
window
CPS 4.0 Users Guide
107
Chapter 3: Creation Functions
7. Select a lesson or standard from the top left pane. The questions appear in the bottom half
of the window.
8. Use one or both of the following methods to populate the category and point values with
questions:
Method 1: Populate a Challenge Board with Specific Questions from Lessons or Standards
a. Highlight a question or multiple questions (use the Ctrl key to select multiple, nonconsecutive questions) in the bottom half of the window that you want to drag 0to a
point value in a particular category.
b. Drag the question(s) to a point value until the pointer is over the point value.
c. Release your mouse button to drop the question(s) into that point value. The point
value button display changes to represent the number of questions you just dropped
into the point value.
d. Repeat for as many questions as you want to add to the challenge board.
Method 2: Populate a Challenge Board with an Entire Lesson or Standard of Questions
e. Click and highlight the name of the lesson or standard in the top left window that you
want to drop into one of the categories.
f. Drag that lesson or standard to a category until the pointer is over the category name.
The category name depresses slightly.
g. Release your mouse button to drop the entire contents of the lesson or standard into
the category. The questions equally and randomly distribute in the point values. Point
value buttons change to display the number of questions that button just received.
h. Repeat for as many lessons or standards as you want to add to the challenge board.
NOTE: You can use a combination of the above two methods to drag and
drop some questions to point values, or drop an entire lesson or standard of
questions in one category. Alternatively, you have the option to right click a
question and distribute it to a category or specific point value by using the
context menu that appears. The option to preview the question is also
available in the context menu.
9. Click the File menu item and the Close command to close the Challenge Board and
return to the Team Activities tab.
The Team Activities tab displays your new challenge board title. CPS has saved this board to
your opened database.
CPS 4.0 Users Guide
108
Chapter 3: Creation Functions
Edit CPS Challenge Boards
Once you create a CPS Challenge Board, you can edit a CPS Challenge Board by editing the
attributes of the Challenge Board or by adding or removing questions from the activity.
Edit CPS Challenge Board Attributes
You can edit certain attributes of the CPS Challenge Board. These attributes include the
Challenge Board title and the categories. To edit the attributes of a CPS Challenge Board
1. Open CPS from your desktop icon.
2. Click the Team Activities tab.
3. Select the challenge board with
attributes you want to edit.
. The CPS Challenge
4. Click
Board window appears.
5. Click the File menu item and
select the Edit Challenge Board
attributes command. The CPS
Challenge Board Info window
appears.
6. Edit the Board Title or the
Category Titles.
7. Click OK when finished.
Figure 126: Editing the CPS Challenge Board attributes
Add Questions to a CPS Challenge Board
You can add questions to an existing CPS Challenge Board. To add questions
1. Open CPS from your desktop icon.
2. Click the Team Activities tab.
3. Select the challenge board to which you want to add questions.
4. Click
. The CPS Challenge
Board window appears.
5. Select a lesson or standard from
which to take questions, which
appears in the bottom half of the
screen.
6. Highlight a question, or multiple
questions (use the Ctrl key to
select multiple, nonconsecutive
questions), that you want to drag
to a point value in a particular
category.
7. Drag the question(s) to a point
value until the pointer is over the
point value.
Figure 127: Adding questions to a CPS Challenge Board from
the CPS Challenge Board window
CPS 4.0 Users Guide
109
Chapter 3: Creation Functions
8. Release your mouse button to drop the questions into that point value. The point value
button changes to display the number of questions that button just received.
9. Repeat steps 5-8 for as many questions as you want to add to the challenge board.
10. Click the File menu item and the Close command to return to the Team Activities tab
when you finish.
Remove Questions from a CPS Challenge Board
You can remove questions from a current CPS Challenge Board. To remove questions
1. Open CPS from your desktop
icon.
2. Click the Team Activities
tab.
3. Select the CPS Challenge
Board you would like to edit.
4. Click
. The CPS
Challenge Board window
appears.
5. Click on any of the colored
boxes that contain questions.
The Challenge Board
Question Edit window
Figure 128: Removing questions from a CPS Challenge Board
appears.
6. Select the question you would like to remove.
7. Click Delete to remove the question, or click Delete All to remove all the questions. A
Confirmation dialog box appears.
8. Click OK. The Challenge Board Level Questions window refreshes and shows only the
questions you have not deleted.
9. Click the Close button to return to the full Challenge Board.
10. Repeat steps 4-8 for each point value from which you want to delete questions.
11. Click the File menu and Close when you are ready to return to the Team Activities tab.
Delete CPS Challenge Boards
You can delete a challenge board from the Team Activities tab. To delete a CPS Challenge
Board
1. Open CPS from your desktop icon.
2. Click the Team Activities tab.
3. Select the challenge board you want to delete.
. A confirmation window appears.
4. Click
5. Click OK in the confirmation window.
6. Repeats steps 2-4 for every challenge board you want to delete.
CPS 4.0 Users Guide
110
Chapter 3: Creation Functions
Top Score
Top Score is a quick game you can use with an existing lesson. You can engage any set of
questions associated with a lesson or standard, and use Top Score in the Teacher Managed
Assessment mode to create a quick challenge for your students.
The Rules:
Students answer questions from a CPS lesson, using their response pads.
If you select the Use Bonus Points option, the first student to answer correctly receives
bonus points.
You can use the Score window to view students with the top scores in the class.
CPS 4.0 Users Guide
111
Chapter 4: Engage Functions
A CPS response system enables students to provide electronic feedback to questions in the
classroom. CPS collects this feedback, also called performance data, in a CPS database. The
performance results represent students’ answers to questions from the lesson and Verbal
Questions asked while the response system is in use.
To deliver a lesson, you will need
The CPS IR or CPS RF response system that accompanied the software. The CPS
response system is available in 16, 24, or 32 pad sets; or you can expand your CPS
system by adding pads in increments of 8, up to 256 numbered pads.
One available USB port
A projection device such as a projector, LCD, or TV monitor which can display
information to students (optional)
In Chapter 3, you learned how to set up CPS to deliver lessons, standards, and team activities. In
this chapter, you will learn how to
Use the CPS response system
Choose delivery options for your sessions
Engage lessons, standards, presentations, and team activities in CPS
The CPS Response System
The CPS response system consists of response pads and a coordinating receiver unit. Each
uniquely numbered pad transmits responses that the receiver unit records, and the CPS software
automatically attributes to the corresponding response pad number listed in the class. The CPS
response system uses either infra red or radio frequency technology. For more information on the
technologies available, please see CPS IR System or CPS RF System.
This section will show you the
Required components
Response system setup
Components of the Response System
The CPS response system consists of an infra red or radio frequency receiver unit and
corresponding response pads. Students use the response pads to electronically transmit their
responses to CPS questions. The receiver unit receives student responses and communicates with
CPS to generate session data in the form of reports and grades. This section will tell you about
the
CPS IR System
CPS RF System
CPS 4.0 Users Guide
112
Chapter 4: Engage Functions
CPS IR System
The CPS IR System consists of an infra red receiver unit and infra red response pads. The system
works together to collect student responses for CPS.
IR Receiver Unit
One receiver unit supports a set of 60 student response pads (16, 24, or 32
pad sets are available, with the ability to expand a system by adding pads
in increments of 8, up to 256 numbered pads and an unlimited amount of
serial pads).
The receivers can accept signals from IR response pads from up to 60 feet
away. Although students must have a direct line-of-sight to transmit
signals to the IR receiver unit, students can also send signals at angles
such as 90°, 120°, 180°, and 270°.
Figure 129: Using the
IR Receiver Unit
IR Response Pad
The IR response pads can transmit up to 60 feet.
When you ask a question, students respond using the CPS response pads. Notice
the CPS response pad alpha characters A-H.
Use the A and B buttons to answer True/False or Yes/No questions.
The F button is a question scrolling function. Students can use this during
the Student Managed Assessment or Practice mode deliveries. Just press
the F button to advance through each question at an interval of less than a
second. This is a great function if students want to answer questions 1-5,
skip question 6-11, and go onto questions 12-20. They can also go back to
the skipped questions. Press any button to stop the scrolling.
Under the G and H buttons are directional arrows. Students use this
function during Student Managed Assessment and Practice mode
deliveries. It allows students to move backwards or forwards to questions,
check their answers, or answer any skipped questions.
Figure 130: Using
the IR Response
Pad
CPS RF System
The CPS RF System works with eInstruction’s award-winning CPS software and radio frequency
hardware. The hardware, including response pads and a receiver unit, provides instructors with
more flexibility in the classroom.
First Generation RF System
The original CPS RF system provides instructors with all the functionality of
the IR system and includes additional features. With CPS RF, instructors can
Engage up to 300 K-12 students on one receiver
Engage up to 1000 Higher Ed students on one receiver
Engage students in numeric answer questions
The CPS RF response pads have a range of 200 feet and allow students to
respond to questions without a “line of sight” to the receiver unit.
CPS 4.0 Users Guide
Figure 131: Using
the RF Higher Ed
Response Pad
113
Chapter 4: Engage Functions
The K-12 RF System works with K-12 RF response pads and a receiver unit. One
receiver unit can handle up to 300 response pads. The response pads also have an
LCD screen, which allows students to view their answers before sending them to
CPS.
Second Generation RF System
The next generation of eInstruction radio frequency technology will be available
in the Fall of 2006. The Gen 2 RF System includes all the features of the
first generation RF system, as well as new capabilities. With the Gen 2
System, instructors can
Auto Join Higher Ed classes
See the response pad serial number (Higher Ed)
Indicate the correct answer on the response pad
Hide answers on the response pad
Create equations using symbols [+, -, ( ), (decimal), (space), *, /,
X, Y]
Engage students in self-paced testing, eliminating the need for a
projector and bubble sheets
Engage students for Higher Ed or K-12
Setup the Response System
Figure 132: Using
the K-12 RF
Response Pad
Figure 133: Using the Gen
2 RF Response Pad
CPS requires very little setup to begin engaging students. This section will show you how to use
the receiver unit and make sure the connection between the receiver and CPS works.
Plug in the Receiver unit
Setting up the response system is very easy. Simply plug your response pad USB cable into an
available USB port on your computer. When you open CPS, CPS will automatically detect your
receiver settings.
Setup IR Pads
CPS automatically detects your receiver settings, so all you need to do is plug in your receiver
and start CPS. eInstruction has provided you a manual override if necessary, but you should
always check with CPS Technical Support before making any changes. You can call Technical
Support at 888.333.4988 or email them at [email protected]. To manually override the
automatic COM detection
1. Open CPS from your desktop icon.
2. Click the Settings file menu.
3. Click Delivery Options. The CPS Delivery Options window appears.
4. Click the Receiver tab.
5. Select the Manual Override option to manually choose your COM port. Before you use
the Manual Override option, please consult Technical Support. You can reach them by
calling 888.333.4988 or by emailing Technical Support at [email protected].
6. Choose K-12 IR Pads as your type. Select your COM port from the pull-down menu.
CPS 4.0 Users Guide
114
Chapter 4: Engage Functions
7. Click OK.
Setup RF Pads
Although CPS automatically detects your
receiver settings, you will need to tell CPS
which channel your receiver uses. To setup
your RF settings
1. Open CPS from your desktop icon.
2. Click the Settings file menu.
3. Click Delivery Options. The CPS
Delivery Options window appears.
4. Click the Receiver tab.
5. Enter the receiver Base Channel in
the Base Channel box. Your Base
Channel is the blinking number on
your receiver unit.
Figure 134: Setting up the RF system from the CPS Delivery
Options window
NOTE: You can use Gen 2 response pads with a first generation Higher Ed
RF receiver. To use Gen 2 pads with a first generation Higher Ed receiver,
select Higher Ed RF from the list under the Com Port.
6. Click OK to save your settings and return to CPS.
CPS Session Setup
CPS offers many ways for you to engage your students. This section will show you how to
Choose a delivery mode
Setup delivery options from the CPS Delivery Options window
Choose Delivery Modes
Delivery modes are the major ways in which you can affect the way students interact with CPS.
Depending on which mode you choose, you can control the students’ pace through questions, the
students can control their own pace, or you can even choose to give anonymous assessments.
This section will show you when and how to use
Teacher Managed Assessment Mode (TMA)
Student Managed Assessment Mode (SMA)
Student Managed Practice Mode (SMP)
Teacher-Led Student Managed Assessment Mode (TLSMA)
Anonymous Mode
CPS 4.0 Users Guide
115
Chapter 4: Engage Functions
Teacher Managed Assessment Mode
Teacher Managed Assessment (TMA) mode lets you control the pace and progress of students
through the questions. A delivery session in the Teacher Managed Assessment mode uses the
Engage toolbar to regulate settings and question flow. The Engage toolbar also displays in the
title bar the lesson or standard title you have engaged.
When you engage a lesson in the Teacher Managed Assessment mode, you can use the Top
Score icon on the Feedback Grid to create a quick team activity. For more information on the
Top Score feature, please see Top Score.
To deliver a lesson in Teacher Managed Assessment
mode
1. Open CPS from your desktop icon.
2. Click the Lessons tab.
3. Select the lesson you would like to engage.
4. Click
. The CPS Session Setup
window appears.
5. Choose Teacher Managed Assessment
mode.
NOTE: You can associate
Dynamic Standards to questions in
Teacher Managed Assessment
mode. For more information on
Dynamic Standards, please see
Associate Dynamic Standards to
Questions.
Figure 135: Choosing Teacher Managed
Assessment mode from the CPS Session
Setup window
6. Click Start. The CPS Engage toolbar appears.
Use the CPS Engage toolbar to navigate through the session and engage students in the lesson.
For more information on using the CPS Engage toolbar, please see Engage Lessons.
Student Managed Assessment Mode
The Student Managed Assessment (SMA) mode lets you incorporate CPS lessons, existing hard
copy material, or FastGrade lessons into one seamless activity that allows students to pace
themselves. For more information on creating and using FastGrade lessons, please see Create
FastGrade Lessons and Engage FastGrade Lessons. To deliver a lesson in Student Managed
Assessment mode
1. Open CPS from your desktop icon.
2. Click the Lessons tab.
3. Select the lesson that represents the hand out (either a lesson of questions or a FastGrade
lesson).
CPS 4.0 Users Guide
116
Chapter 4: Engage Functions
4. Click
. The CPS Session Setup
window appears.
5. Select Student Managed Assessment
mode.
NOTE: If you select
multiple lessons or standards
to engage in Student
Managed Assessment mode,
you can assign certain pad
numbers to respond to
selected lessons or standards.
6. Click Start to begin the Student
Managed Assessment. Depending on the
type of response system you are using,
CPS will display either the Student
Feedback window or the Instructor
Feedback window for SMA mode.
Figure 136: Choosing Student Managed
Assessment mode from the CPS Session
Setup window
IR and 1st Generation Higher Ed RF Systems
If you use an IR or first generation Higher Ed RF system, when you engage students in a Student
Managed Assessment the Student Feedback window appears.
1. Click Options to change any of the session delivery options. For more information on
session delivery options, please see Student Managed tab.
2. Click Start to initiate the session. Upon doing this, students can begin submitting
answers.
3. Click Close to end the session at any time.
Figure 137: Viewing an SMA session from the Student Feedback window
CPS 4.0 Users Guide
117
Chapter 4: Engage Functions
The class name appears in the title bar of the window.
The top row of each bank of numbers, preceded by a response pad symbol,
corresponds to the pad ID numbers assigned in the class. These pad ID numbers are
black on gray numbers before you start the assessment.
The Student Managed Assessment mode is capable of supporting up to 2000 pad IDs.
The bottom row of each bank of numbers, preceded by a question mark, represents
question numbers. These numbers increment as each student proceeds through the
list.
NOTE: Remember, if your students use IR pads, they can use the F button on
their response pad to scroll through the questions, using any button to stop
when they get to a question number they want to answer. They can also use
the G button to move backward in the list of questions or the H button to
forward.
Using Student Managed Assessment Mode with an IR or 1st Generation
Higher Ed RF System
When you engage lessons in Student Managed Assessment mode, you see a specialized screen
that tracks each student’s progress throughout the lesson. Every student begins on question one.
When a student selects an in-range answer, that student’s pad number blinks blue to indicate
acceptance. Then that student’s question number moves to the next unanswered question.
The following graphics illustrate the feedback grid during a response activity. Follow student
usage on the top box, and question progression on the bottom box. Please note that the student
ID pads are the top number and the Question number is on the bottom.
Snapshot 1:
Figure 138: Snapshot 1 of Student Managed Assessment mode
CPS 4.0 Users Guide
118
Chapter 4: Engage Functions
Student 6 has answered Question 1 and is answering Question 2 at this moment. The pad
ID blinks blue indicating acceptance of an in-range answer, then the question number
progresses.
Student 5 has answered the first 2 questions and moved to Question 3.
Student 7 has answered Question 1 moved on to Question 2.
Snapshot 2:
Figure 139: Snapshot 2 of Student Managed Assessment mode
Student 7 has used the G button (on an IR response pad) to move back to Question 1. Pad
ID 3 remains blue indicating that the question has been previously answered.
Snapshot 3:
Figure 140: Snapshot 3 of Student Managed Assessment mode
Student 7 changed the answer to Question 4. The pad ID color changes to yellow. Student
7 then moves to Question 5. Notice that Students 5 and 9 are on Question 4, Student 6 is
on Question 2, and Student 8 is on Question 3.
CPS 4.0 Users Guide
119
Chapter 4: Engage Functions
As you can see, the students have progressed through the paper test at their own pace
with options to move back and change answers, or skip questions and move forward.
Snapshot 4:
Figure 141: Snapshot 4 of Student Managed Assessment mode
Student 6 has answered all of the questions from the printout and is now back at the first
question. When a student has answered all of the questions, his/her current question
number and pad ID stay blue. This indicates a question has already been answered.
Snapshot 5:
Figure 142: Snapshot 5 of Student Managed Assessment mode
Students 6 and 9 are finished with the questions.
Student 8 has moved to Question 4, and his or her pad ID screen is flashing green, which
means that he or she has completed the questions and is changing the answer to Question
4.
CPS 4.0 Users Guide
120
Chapter 4: Engage Functions
If you selected to Export to Question Grid from the CPS Session Setup window, a
separate window opens with the performance data for this session in grid format. You can
also access reports of student performance from the Reports tab for Student Managed
Assessment sessions.
1st Generation K-12 RF or 2nd Generation RF Systems
If you are using a first generation K-12 RF system or a second generation RF system, when you
engage students in a lesson in SMA mode, the Instructor Feedback window appears.
1. If you are using a projector, please turn off the projector before beginning the session.
2. Click Start to begin the SMA session.
3. Ask students to begin responding to questions. As students respond to questions, the
boxes corresponding with the student name and question number light up.
4. Click Close to end the session.
Figure 143: Viewing an SMA session from the Instructor Feedback window
CPS 4.0 Users Guide
121
Chapter 4: Engage Functions
Student Managed Practice Mode
The Student Managed Practice (SMP) mode operates in much the same way as the Student
Managed Assessment mode. SMP allows you to use printout material and student-paced
responses.
Like the other Assessment modes, it too records student performance information in the Reports
tab. Unlike the Student Managed Assessment mode, the intent of the Practice mode is for
students to review and get familiar with course material in a challenging way. To deliver lessons
in Student Managed Practice mode
1. Open CPS from your desktop icon.
2. Click the Lessons tab.
3. Select the lesson you would like to engage.
. The CPS Session Setup
4. Click
window appears.
5. Choose Student Managed Practice mode.
NOTE: The Student Managed
Practice mode is available only
for use with IR or 1st Generation
Higher Ed RF systems.
6. Click Start to begin the Student Managed
Practice. The Student Feedback window
opens.
The class name appears in the title bar of
the window.
Figure 144: Choosing Student Managed
Practice mode from the CPS Session Setup
The top row of each bank of numbers,
window
preceded by a response pad symbol,
corresponds to the pad ID numbers assigned in the class. These pad ID numbers are
black on gray numbers before you start the assessment.
The Student Managed Assessment mode is capable of supporting up to 2000 pad IDs.
The bottom row of each bank of numbers, preceded by a question mark, represents
question numbers. These numbers increment as each student proceeds through the
list.
7. Click Options to change any of the session delivery options.
8. Click Start to initiate the session. Upon doing this, students can begin submitting
answers.
9. Click Close to end the session at any time.
CPS 4.0 Users Guide
122
Chapter 4: Engage Functions
Figure 145: Viewing a lesson in SMP mode from the Student Feedback window
Using Student Managed Practice Mode
In the Student Managed Practice mode, only a correctly answered question moves the student
onto the next unanswered question. If a student answers a question incorrectly, their
corresponding on-screen number flashes blue until he or she answers that question correctly.
When he or she does select the correct answer, his or her corresponding on-screen pad number
changes to blue. The student is then allowed to move to the next unanswered question.
The following graphics illustrate the feedback grid during a response activity. Follow student
usage on the top box, and question progression on the bottom box. Please note that the student
ID pads are the top number and the Question number is on the bottom.
Snapshot 1:
Figure 146: Snapshot 1 of Student Managed Practice mode
CPS 4.0 Users Guide
123
Chapter 4: Engage Functions
Student 5 has correctly answered Question 1 and moved to Question 2.
Student 6 is currently answering Question 1 incorrectly and remains on Question 1. The
pad ID flashes blue indicating acceptance of an answer, but the question number remains
1 because the answer is incorrect.
Snapshot 2:
Figure 147: Snapshot 2 of Student Managed Practice mode
Student 5 has correctly answered two questions and moved to Question 3.
Students 7, 8, and 9 have correctly answered Question 2 and moved to Question 3.
Student 6 is incorrectly answering Question 1. The pad ID flashes red with a black X
indicating that the response is out of range.
Snapshot 3:
Figure 148: Snapshot 3 of Student Managed Practice mode
Students 5 and 6 are on Question 3.
Student 7 has progressed to Question 5.
CPS 4.0 Users Guide
124
Chapter 4: Engage Functions
Students 8 and 9 are on Questions 6 and 4, respectively. Because students cannot move to
the next question until a question has been answered correctly, the G and H buttons are
disabled on the IR pad.
Snapshot 4:
Figure 149: Snapshot 4 of Student Managed Practice mode
All of the participating students have finished all of the questions. They cannot move to
any other questions, and they remain on Question 20. Their pad IDs stay blue to indicate
that they have finished the assessment.
If you selected Export to Question Grid from the CPS Session Setup window, a separate
window opens with the performance data for this session in grid format. You can access reports
of student performance from the Reports tab for Student Managed Practice sessions as well.
CPS clearly labels the reports with Practice mode. The performance feedback accurately depicts
that only questions answered correctly on the first attempt display as correct in the
correct/attempted ratio.
CPS 4.0 Users Guide
125
Chapter 4: Engage Functions
Teacher-Led Student Managed Assessment Mode
The Teacher-Led Student Managed Assessment (TLSMA) combines the TMA and SMA modes
for one teacher-led session conducted at the students' pace. This new mode is ideal for K-12
teachers who use multiple versions of a test. For example, you can create three versions of the
same test: A, B, and C, make a FastGrade answer key, then distribute the tests to the class. The
students then write their answers on the handouts. After a set time, you can pass out the response
pads and have the students put in their answers, one question at a time. You can even create tests
with different question totals. In the time it takes to have the students enter all of their answers
on the CPS pad, you can have multiple test versions
graded and ready to review. To engage a lesson in
Teacher-Led Student Managed Assessment mode
1. Open CPS from your desktop icon.
2. Click the Lessons tab.
. The CPS Session Setup
3. Click
window appears.
4. Choose Teacher-Led Student Managed
Assessment mode.
5. Click Start to deliver your lesson. The
TLSMA mode Session Delivery window
appears.
NOTE: When you engage
TLSMA mode, you will not be
able to change the Options while
you deliver your session.
6. Click Start and ask your students to press his
or her answer for Question 1 on his or her pad.
Figure 150: Choosing Teacher-Led Student
Managed Assessment mode from the CPS
Session Setup window
Figure 151: Tracking student progress from the Teacher-Led Student Managed Assessment mode Session Delivery
window
CPS 4.0 Users Guide
126
Chapter 4: Engage Functions
7. Click the > button to move to the next question and the < button to move to the previous
question. Remember that students cannot move on to the next question until you choose
to move questions.
8. Click End when the students have answered all of the questions. You will be returned to
the main CPS screen.
Anonymous Mode
The Anonymous mode allows you to, in Teacher Managed Assessment (TMA), Teacher-Led
Student Managed Assessment (TLSMA), or Student Managed Assessment (SMA) mode, to
record a class assessment without associating students’ individual responses with their student
information. To engage a lesson in Anonymous
mode
1. Open CPS from your desktop icon.
2. Click the Lessons tab.
3. Choose the lesson you would like to deliver.
. The CPS Session Setup
4. Click
window appears.
5. Click the box next to Anonymous Mode so
that a checkmark appears. Notice that you
no longer have the option to include the
session in the Gradebook.
6. Click Start.
You will engage the students in the same format as
the mode you chose. For more information on using
the different delivery modes, please see Teacher
Managed Assessment Mode, Student Managed
Assessment Mode, or Teacher-Led Student
Managed Assessment Mode.
Figure 152: Choosing Anonymous mode from
the CPS Session Setup window
Setup Delivery Options
Each delivery mode has specific features that you can change within CPS. You can make these
changes through the CPS Delivery Options window. In addition to delivery mode features, you
can change bonus settings on team activities and manage your receiver options. The CPS
Delivery Options window consists of five tabs:
Teacher Managed tab
Student Managed tab
Receiver tab
Feedback Grid tab
Team Activities tab
This section will show you how to manage settings in the above tabs. To access the CPS
Delivery Options window from CPS
1. Open CPS from your desktop icon.
CPS 4.0 Users Guide
127
Chapter 4: Engage Functions
2. Click the Settings menu option. A pop-up menu appears.
3. Choose Delivery Options.... The CPS Delivery Options window appears.
You can also access the CPS Delivery Options window from the Feedback Grid
1. Engage a lesson in CPS.
2. End a response cycle. The Feedback Grid appears on the CPS Content Delivery window.
3. Click
. The CPS Delivery Options window appears.
Teacher Managed tab
The Teacher Managed tab allows you to change the options available when you engage a lesson
in Teacher Managed Assessment mode. For more information on Teacher Managed Assessment
mode, please see Teacher Managed Assessment Mode.
Figure 153: Setting Teacher Managed Assessment and Verbal options in the Teacher Managed tab of the CPS
Delivery Options window
From the Teacher Managed tab, you can adjust settings for
Teacher Managed Assessment mode sessions
Verbal Questions
CPS 4.0 Users Guide
128
Chapter 4: Engage Functions
Show Pads that Have Responded
The Show Pads that Have Responded option alters the on-screen appearance of the response
pad numbers during the response cycle. When you look at the Feedback Grid during a response
cycle, the Feedback Grid shows the corresponding pad number for each student in the class.
When a student responds to an answer, his or her pad number lights up in the Feedback Grid.
Figure 154: Feedback Grid with the Show Pads that Have Responded option ON
To access the Show Pads that Have Responded option
1. Open the CPS Delivery Options window. The CPS Delivery Options window opens to
the Teacher Managed tab.
Show Pads - To display in the Feedback Grid pads that have responded, click the box
next to the Show Pads that Have Responded option so that a checkmark appears.
Hide Pads - To hide in the Feedback Grid pads that have responded, click the Show
Pads that Have Responded option so that the checkmark disappears.
2. Click OK to save your changes and return to CPS.
Show Cumulative Percent Correct
The Show Cumulative Percent Correct option displays the cumulative percent of correct answers
for the session in the Feedback Grid, after you end each response cycle.
Figure 155: Feedback Grid with the Show Cumulative Percent Correction option ON
To access to the Show Cumulative Percent Correct option
1. Open the CPS Delivery Options window. The CPS Delivery Options window opens to
the Teacher Managed tab.
Show Cumulative Percent Correct - To show the session's cumulative percent of
correct answers in the Feedback Grid after each question, click the box next to the
Show Cumulative Percent Correct option so that a checkmark appears.
Hide Cumulative Percent Correct - To hide a session's cumulative percent of
correct answers in the Feedback Grid, click the box next to the Show Cumulative
Percent Correct option so that the checkmark disappears.
2. Click OK to save your changes and return to CPS.
CPS 4.0 Users Guide
129
Chapter 4: Engage Functions
Show Answer Distribution
The Show Answer Distribution option displays the number of students who chose each answer
to a question. When you end a response cycle, the distribution information appears in the CPS
Content Delivery window.
Figure 156: CPS Content Delivery window with Show Answer Distribution window option ON
To access the Show Answer Distribution option
1. Open the CPS Delivery Options window. The CPS Delivery Options window opens to
the Teacher Managed tab.
Show Answer Distribution – To show the question’s distribution of answers in the
CPS Content Delivery window, click the box next to the Show Answer Distribution
option so that a checkmark appears.
Hide Answer Distribution – To hide the question’s distribution of answers in the
CPS Content Delivery window, click the box next to the Show Answer Distribution
option so that the checkmark disappears.
2. Click OK to save your changes and return to CPS.
NOTE: To view the Show Answer Distribution option, you must also choose
the Show Large Screen option. For more information on the Show Large
Screen option, please see Show Large Screen.
CPS 4.0 Users Guide
130
Chapter 4: Engage Functions
Detach Narrative (Imported Narratives)
The Detached Narrative option affects Narratives you import from ExamView. When you
import ExamView tests into CPS, any Narratives associated with a question import as well. The
Detached Narrative option creates a button on the Feedback Grid for that question, from which
you can choose whether or not to show the associated Narrative with the question in the CPS
Content Delivery window. Below the CPS Content Delivery window, in the Feedback Grid, a
Narrative button appears. When you click on this Narrative button, the associated Narrative
appears or disappears from the question.
Figure 157: CPS Content Delivery window with the Detached Narrative option ON
To access the Detached Narrative option
1. Open the CPS Delivery Options window. The CPS Delivery Options window opens to
the Teacher Managed tab.
Detached Narrative – To detach an ExamView Narrative from a question, click the
box next to the Detached Narrative option so that a checkmark appears.
Attached Narrative – To keep an ExamView Narrative attached to a question, click
the box next to the Detached Narrative option so that the checkmark disappears.
2. Click OK to save your changes and return to CPS.
NOTE: To view the Detached Narrative option, you must also choose the
Show Large Screen option. For more information on the Show Large Screen
option, please see Show Large Screen.
CPS 4.0 Users Guide
131
Chapter 4: Engage Functions
Auto Show Detached Feedback Grid
The Auto Show Detached Feedback Grid option allows you to detached the feedback grid
from the CPS Content Delivery window during a response cycle. When you being the response
cycle, the CPS Ballot Grid window automatically appears, and tracks student responses to the
question.
Figure 158: The CPS Ballot Grid appears when the Auto Show Detached Feedback Grid option is ON
To access the Auto Show Detached Feedback Grid option
1. Open the CPS Delivery Options window. The CPS Delivery Options window opens to
the Teacher Managed tab.
Auto Show Detached Feedback Grid – To show a detached feedback grid during a
response cycle, click the box next to the Auto Show Detached Feedback Grid
option so that a checkmark appears.
Auto Hide Detached Feedback Grid – To hide the detached feedback grid during a
response cycle, click the box next to the Auto Show Detached Feedback Grid
option so that the checkmark disappears.
2. Click OK to save your changes and return to CPS.
Auto Send Alphabetic Responses
The Auto Send Alphabetic Responses option allows you to set Gen 2 RF response pads so that
they automatically send student responses for alphabetic answer choices. For more information
on the Gen 2 RF, please see Gen 2 RF System.
To access the Auto Send Alphabetic Responses option
1. Open the CPS Delivery Options window. The CPS Delivery Options window opens to
the Teacher Managed tab.
2. Click the box next to the Auto Send Alphabetic Responses option so that a checkmark
appears.
3. Click OK to save your changes and return to CPS.
Indicate Correct Alphabetic Response on Pad
The Indicate Correct Alphabetic Response on Pad option allows you to set Gen 2 RF response
pads so that after a student responds to a question, the student’s LCD screen on his or her pad
indicates the correct answer. The correct answer appears only for multiple-choice questions.
To access the Indicate Correct Alphabetic Response on Pad option
1. Open the CPS Delivery Options window. The CPS Delivery Options window opens to
the Teacher Managed tab.
2. Click the box next to the Indicate Correct Alphabetic Response on Pad option so that
a checkmark appears.
3. Click OK to save your changes and return to CPS.
CPS 4.0 Users Guide
132
Chapter 4: Engage Functions
Auto Show Charting
The Auto Show Charting option automatically displays the CPS Charting window after you end
a response cycle. For more information on the CPS Charting window, please see View Results
and Use Data Slicing.
To access the Auto Show Charting option
1. Open the CPS Delivery Options window. The CPS Delivery Options window opens to
the Teacher Managed tab.
Auto Show Charting – To automatically view the CPS Charting window after you
end each question, click the box next to the Auto Show Charting option so that a
checkmark appears.
Auto Hide Charting – To hide the CPS Charting window after you end each
question, click the box next to the Auto Show Charting option so that the checkmark
disappears.
2. Click OK to save your changes and return to CPS.
Show Large Screen
The Show Large Screen option displays questions in the CPS Content Delivery window. The
CPS Content Delivery window contains the questions and answer choices for each question.
Figure 159: The CPS Content Delivery window appears when you deliver a question with the Show Large
Screen option ON
CPS 4.0 Users Guide
133
Chapter 4: Engage Functions
To access the Show Large Screen option
1. Open the CPS Delivery Options window. The CPS Delivery Options window opens to
the Teacher Managed tab.
Show Large Screen – To deliver your questions using the CPS Content Delivery
window, click the box next to the Show Large Screen option so that a checkmark
appears.
Hide Large Screen – To deliver your questions using just the Feedback Grid, click
the box next to the Show Large Screen option so that the checkmark disappears.
2. Click OK to save your changes and return to CPS.
Show Percent Correct
The Show Percent Correct option displays the percentage of students who correctly answered
the question, after you end the response cycle. When you end the response cycle, this
information appears in the Feedback Grid.
Figure 160: Feedback Grid with Show Percent Correct option ON
To access the Show Percent Correct option
1. Open the CPS Delivery Options window. The CPS Delivery Options window opens to
the Teacher Managed tab.
Show Percent Correct – To display the percentage of students who correctly
answered a question, click the box next to the Show Percent Correct option so that a
checkmark appears.
Hide Percent Correct – To hide the percentage of students who correctly answered a
question, click the box next to the Show Percent Correct option so that the
checkmark disappears.
2. Click OK to save your changes and return to CPS.
CPS 4.0 Users Guide
134
Chapter 4: Engage Functions
Show Correct Answer
The Show Correct Answer option displays the correct answer to the question in the CPS
Content Delivery window, after you end the response cycle.
Figure 161: CPS Content Delivery window with the Show Correct Answer option ON
To access the Show Correct Answer option
1. Open the CPS Delivery Options window. The CPS Delivery Options window opens to
the Teacher Managed tab.
Show Correct Answer – To display the correct answer to a question in the CPS
Content Delivery window, click the box next to the Show Correct Answer option so
that a checkmark appears.
Hide Correct Answer – To hide the correct answer to a question in the CPS Content
Delivery window, click the box next to the Show Correct Answer option so that the
checkmark disappears.
2. Click OK to save your changes and return to CPS.
NOTE: To view the Show Correct Answer option, you must also choose the
Show Large Screen option. For more information on the Show Large Screen
option, please see Show Large Screen.
CPS 4.0 Users Guide
135
Chapter 4: Engage Functions
Auto Start the Timer
The Auto Start the Timer option automatically begins the question timer when you start the
response cycle.
Figure 162: CPS Content Delivery window with the Auto Start the Timer option ON
To access the Auto Start the Timer option
1. Open the CPS Delivery Options window. The CPS Delivery Options window opens to
the Teacher Managed tab.
Auto Start the Timer – To automatically start the timer when you begin the response
cycle, click the box next to the Auto Start the Timer option so that a checkmark
appears.
Manually Start the Timer – To manually start the timer when you begin the
response cycle, click the box next to the Auto Start the Timer option so that the
checkmark disappears.
2. Click OK to save your changes and return to CPS.
CPS 4.0 Users Guide
136
Chapter 4: Engage Functions
Auto Start the Question
The Auto Start the Question option automatically starts the question, so that you do not need to
press the Start button to begin the response cycle.
Figure 163: Viewing the CPS Content Delivery window with the Auto Start the Question option ON
To access the Auto Start the Question option
1. Open the CPS Delivery Options window. The CPS Delivery Options window opens to
the Teacher Managed tab.
Auto Start the Question – To automatically start the response cycle for a question,
click the box next to the Auto Start the Question option so that a checkmark
appears.
Manually Start the Question – To manually start the response cycle for a question,
click the box next to the Auto Start the Question option so that the checkmark
disappears.
2. Click OK to save your changes and return to CPS.
CPS 4.0 Users Guide
137
Chapter 4: Engage Functions
Mask Response on Pad
The Mask Response on Pad option allows you to mask the response on Gen 2 response pads.
For more information on Gen 2 RF response pads, please see Gen 2 RF System.
To access the Mask Response on Pad option
1. Open the CPS Delivery Options window. The CPS Delivery Options window opens to
the Teacher Managed tab.
2. Click OK to save your changes and return to CPS.
Timer Length and Increment
The Timer Length and Timer Increment options allow you to change the length of time and
increment of change on the question timer.
Figure 164: Timer Length and Timer Increment options in the CPS Delivery Options window Teacher
Managed tab
To access the Timer Length and Timer Increment options
1. Open the CPS Delivery Options window. The CPS Delivery Options window opens to
the Teacher Managed tab.
Timer Length – To set the length of time that students have to respond to a question
during a response cycle, use the up and down arrows in the Timer Length option.
Timer Increment – To set the length of time increments by which you can adjust the
Timer on the Feedback Grid, use the up and down arrows in the Timer Increment
option.
2. Click OK to save your changes and return to CPS.
CPS 4.0 Users Guide
138
Chapter 4: Engage Functions
Show Large Screen Verbal
The Show Large Screen option in the Verbal Questions section displays the CPS Content
Delivery window when you engage a verbal question. For verbal questions using the CPS
Content Delivery window, you can use the CPS Content Delivery window to type in a question
and possible answers.
Figure 165: The CPS Content Delivery window for a verbal question with the Show Large Screen option ON
To access the Show Large Screen option in the Verbal Questions section
1. Open the CPS Delivery Options window. The CPS Delivery Options window opens to
the Teacher Managed tab.
Show Large Screen – To display the CPS Content Delivery window when you
engage a verbal question, click the box next to the Show Large Screen option in the
Verbal Questions section, so that a checkmark appears.
Hide Large Screen – To deliver a verbal question using only the Feedback Grid,
click the box next to the Show Large Screen option in the Verbal Questions section,
so that the checkmark disappears.
2. Click OK to save your changes and return to CPS.
CPS 4.0 Users Guide
139
Chapter 4: Engage Functions
Auto Move to Next Question
The Auto Move to Next Question option automatically advances to the next question after you
end a response cycle.
To access the Auto Move to Next Question option
1. Open the CPS Delivery Options window. The CPS Delivery Options window opens to
the Teacher Managed tab.
Auto Move to Next Question – To automatically advance to the next question after
you end a response cycle, click the box next to the Auto Move to Next Question
option so that a checkmark appears.
Manually Move to Next Question – To manually advance to the next question after
you end a response cycle, click the box next to the Auto Move to Next Question
option so that the checkmark disappears.
2. Click OK to save your changes and return to CPS.
Student Managed tab
The Student Managed tab allows you to edit options for when you engage a lesson in Student
Managed Assessment or Student Managed Practice mode. For more information on the student
managed modes, please see Student Managed Assessment Mode or Student Managed Practice
Mode.
Figure 166: Setting student managed mode options in the Student Managed tab of the CPS Delivery Options window
CPS 4.0 Users Guide
140
Chapter 4: Engage Functions
Manual Advance to Next Question
The Manual Advance to Next Question option allows students to manually move to the next
question, using the left and right arrows on their response pads.
To access the Manual Advance to Next Question option
1. Open the CPS Delivery Options window. The CPS Delivery Options window opens to
the Teacher Managed tab.
2. Click the Student Managed tab.
Manual Advance to Next Question – To allow students to manually advance to the
next question, using the left and right arrows on their response pads, click the box
next to the Manual Advance to Next Question option so that a checkmark appears.
Auto Advance to Next Question – To set CPS to automatically advance students to
the next question, click the box next to the Manual Advance to Next Question
option so that the checkmark disappears.
3. Click OK to save your changes and return to CPS.
Receiver tab
The Receiver tab allows you to set your CPS response system options for your receiver unit.
Figure 167: Setting receiver options from the Receiver tab in the CPS Delivery Options window
CPS 4.0 Users Guide
141
Chapter 4: Engage Functions
From the Receiver tab you can
Detect your CPS receiver settings
Manually override receiver settings
Turn off all response pads (RF only)
Change RF receiver settings
Detect CPS Receiver Settings
If you plug in your receiver unit before opening CPS, CPS will automatically detect your
receiver settings. However, if you need to check your receiver settings, you can detect the current
configuration and make changes from the Receiver tab in the CPS Delivery Options window. To
detect your CPS receiver settings
1. Open the CPS Delivery Options window. The CPS Delivery Options window opens to
the Teacher Managed tab.
2. Click the Receiver tab.
3. Click Detect CPS Receiver. CPS will detect your current receiver settings.
4. Click OK to save your changes and return to CPS.
Manually Override Receiver Settings
You can manually override your current CPS receiver settings from the Receiver tab. To
manually override your settings
1. Open the CPS Delivery Options window. The CPS Delivery Options window opens to
the Teacher Managed tab.
2. Click the Receiver tab.
3. Click the box next to the Manual Override option so that a checkmark appears. The
COM Port and receiver type options become available.
4. Choose your COM Port from the pull-down menu.
5. Select a receiver type. If you choose an RF receiver type, the RF Response Pad Options
and RF Receiver Options become available.
NOTE: Manually overriding your receiver settings can affect your ability to
engage lessons. If you have any questions about your receiver settings, please
contact eInstruction Technical Support at 888.333.4988 or email them at
[email protected].
6. Click OK to save your changes and return to CPS.
Turn Off Response Pads
If you use an RF system, you can automatically power off all your students’ response pads. To
turn off RF response pads
1. Open the CPS Delivery Options window. The CPS Delivery Options window opens to
the Teacher Managed tab.
2. Click the Receiver tab.
3. Click Power Off. The students’ response pads turn off.
4. Click OK to save your changes and return to CPS.
CPS 4.0 Users Guide
142
Chapter 4: Engage Functions
Change RF Receiver Settings
If you use an RF system, you can change the Base Channel and max power settings for your
receiver unit. To change RF receiver settings
1. Open the CPS Delivery Options window. The CPS Delivery Options window opens to
the Teacher Managed tab.
2. Click the Receiver tab.
3. Enter your Base Channel in the Base Channel box. Your Base Channel number ranges
between 1 and 75, and flashes on your receiver unit.
4. Increase or decrease your max power range by using the sliding scale.
5. Click Apply to apply your changes.
6. Click OK to save your changes and return to CPS.
Feedback Grid tab
The Feedback Grid tab allows you to set your Feedback Grid settings for when you engage a
lesson.
Figure 168: Setting Feedback Grid options in the Feedback Grid tab of the CPS Delivery Options window
CPS 4.0 Users Guide
143
Chapter 4: Engage Functions
Time Interval for Feedback Grid
The Time Interval for Feedback Grid option allows you to set the amount of time between
Feedback Grid cycles in large classes. When classes have rosters of more than 32 students, the
Feedback Grid displays pad IDs, in groups of 30, in cycles. You can set the frequency of cycles
by using the Time Interval for Feedback Grid option.
To access the Time Interval for Feedback Grid option
1. Open the CPS Delivery Options window. The CPS Delivery Options window opens to
the Teacher Managed tab.
2. Click the Feedback Grid tab.
3. Use the sliding scale to choose the number of seconds between each cycle of the
Feedback Grid.
4. Click OK to save your changes and return to CPS.
Number of Pads for Question Preview
The Number of Pads for Question Preview option allows you to determine the number of pads
you view at one time in the Feedback Grid, during a question Preview. To access the Number of
Pads for Question Preview option
1. Open the CPS Delivery Options window. The CPS Delivery Options window opens to
the Teacher Managed tab.
2. Click the Feedback Grid tab.
3. Use the sliding scale to select the number of students you would like to view in the
Feedback Grid during question Preview. If you have more students in your class than
students in the Feedback Grid, the Feedback Grid will cycle through the response pad
numbers.
4. Click OK to save your changes and return to CPS.
CPS 4.0 Users Guide
144
Chapter 4: Engage Functions
Team Activities tab
The Team Activities tab allows you to set your delivery and grading options when delivering a
There It Is! game. For more information on There It Is! please see There It Is!
Figure 169: Setting There It Is! activity settings from the Team Activities tab in the CPS Delivery Options
window
From the Team Activities tab you can
Show correctly answered responses
Use bonus points
Show Answered Correct
The Show Answered Correct option allows you, at the end of a There It Is! activity, to display
the questions students missed in the CPS Content Delivery window. You can engage the
question, and when you end the response cycle, CPS displays the correct answer in the CPS
Content Delivery window.
To access the Show Answered Correct option
1. Open the CPS Delivery Options window. The CPS Delivery Options window opens to
the Teacher Managed tab.
2. Click the Team Activities tab.
Show Answered Correct – To display the correct answer to a question in the CPS
Content Delivery window after a There It Is! activity, click the box next to the Show
Answered Correct option so that a checkmark appears.
CPS 4.0 Users Guide
145
Chapter 4: Engage Functions
Hide Answered Correct – To hide the correct answer to a question in the CPS
Content Delivery window after a There It Is! activity, click the box next to the Show
Answered Correct option so that the checkmark disappears.
3. Click OK to save your changes and return to CPS.
Use Bonus Points
The Use Bonus Points option allows you to assign bonus points to students who correctly
answer questions in a There It Is! activity.
To access the Use Bonus Points option
1. Open the CPS Delivery Options window. The CPS Delivery Options window opens to
the Teacher Managed tab.
2. Click the Team Activities tab.
Use Bonus Points – To assign bonus points to students who correct answer questions
in a There It Is! activity, click the box next to the Use Bonus Points option so that a
checkmark appears. Enabling this option allows you to set the value of the bonus
points assigned per question in the Bonus Point Value box.
Don’t use Bonus Points – To assign no bonus points to students for correctly
answering a question in a There It Is! activity, click the box next to the Use Bonus
Points option so that the checkmark disappears.
3. Click OK to save your changes and return to CPS.
Enable Student Led Mode
The Enable Student Led Mode option allows you to engage a There It Is! activity in Student
Managed Assessment mode. For more information on Student Managed Assessment, please see
Student Managed Assessment Mode.
To access the Enable Student Led Mode option
1. Open the CPS Delivery Options window. The CPS Delivery Options window opens to
the Teacher Managed tab.
2. Click the Team Activities tab.
Enable Student Led Mode – To engage a There It Is! activity in Student Managed
Assessment mode, click the box next to the Enable Student Led Mode option so that
a checkmark appears.
Disable Student Led Mode – To engage a There It Is! activity in Teacher Managed
Assessment mode (standard mode), click the box next to the Enable Student Led
Mode option so that the checkmark disappears.
3. Click OK to save your changes and return to CPS.
CPS 4.0 Users Guide
146
Chapter 4: Engage Functions
Engage in the Classroom
You can use CPS to engage lessons, standards, team activities, third-party lessons, and
presentations. This section will tell you how to
Engage lessons in QuickStart mode
Engage lessons
Engage Verbal Questions
Engage team activities
Engage PowerPoint presentations
Engage in QuickStart Mode
You can set CPS to skip the CPS Session Setup window each time you engage lessons. If you
have a particular way you prefer engaging lessons, such as engaging all lessons in Teacher
Managed Assessment mode, you can use the QuickStart feature to preset your options. Then,
when you engage a lesson, CPS automatically uses your pre-programmed settings for your
lesson. To set up QuickStart mode
1. Open CPS from your desktop icon.
2. Click on the Settings menu.
3. Select QuickStart Setup…. The QuickStart Setup window appears offering the
following options:
Enable QuickStart - Select this option to start CPS in QuickStart mode.
Include Session in Gradebook - Select this option if you want the session
automatically included in the Gradebook.
Export to Question Grid - Select this option if you want CPS to automatically create
and export the Question Grid report. CPS will create the file in the sub-directory that
contains the CPS database you are using.
Session Title - Create a title that identifies the session in the Reports tab.
Session Category - Choose a session category to define the type of session you are
delivering. It also defines the Gradebook
category for the session.
Class Options - Select this option to setup
QuickStart to prompt you for the class roster
each time you start CPS or to automatically use
the selected class roster.
Create Attendance from this Assessment –
Select this option to create attendance records in
the Gradebook. Make sure you also have your
class attendance options set to show attendance
as assessments. For more information on setting
the attendance options for a class, please see
Edit Class Information.
4. Click OK.
To use the QuickStart features, close CPS and open it again
from your desktop icon.
Figure 170: Setting up QuickStart
options in the CPS QuickStart Setup
window
CPS 4.0 Users Guide
147
Chapter 4: Engage Functions
To change your QuickStart features at any time, simply use the Settings menu to access the
QuickStart Setup window. For more information on engaging lessons, please see the Engage
Lessons section.
Engage Lessons
You can deliver lessons to students in a mode that requires their feedback via the CPS response
system. CPS saves this feedback, or performance data, in the open database so you can evaluate
it later.
You can engage a lesson by using the Engage
Lesson(s) icon in the Lessons tab. When you click
on the Engage Lesson(s) icon, the CPS Session
Setup window appears. From this window you can
change your engage settings and begin your lesson.
To engage a lesson
1. Open CPS from your desktop icon.
2. Click the Lessons tab.
3. Select a lesson from the lesson side and
click
. The CPS Session Setup
window appears.
4. Select in which mode you want to deliver
the lesson: Teacher Managed Assessment,
Student Managed Assessment, Teacher-Led
Student Managed Assessment, or Student
Managed Practice mode.
Include in Gradebook - Check Include
in Gradebook if you want grades
recorded in the Gradebook.
Figure 171: Engaging a lesson from the CPS
Session Setup window
Export to Question Grid - Check
Export to Question Grid to send performance results directly to the Question Grid
report type.
Session Category - Select the Session Category to deliver. The eleven Session
Categories in the drop-down list do not affect the way CPS delivers to students; it is
only a way to label the delivery session in the Reports tab.
Class - Select a Class from the drop-down list or click the Create… button to create
a Quick K-12 Class.
Max Points - Choose your Max Points. This field will default to 100.
Create Attendance - Click the box next to the Create Attendance from this
Assessment to generate an attendance assessment for your session. You can choose
to track the attendance in the Gradebook, and if you use CPSOnline, you can
automatically upload attendance after your session. Make sure you also have your
class attendance options set to show attendance as assessments. For more information
on setting the attendance options for a class, please see Edit Class Information.
5. Click Start.
CPS 4.0 Users Guide
148
Chapter 4: Engage Functions
If you selected Teacher Managed Assessment Mode, the CPS Engage toolbar appears
at the top of your screen.
If you selected Student Managed Assessment, Student Managed Practice, or TeacherLed Student Managed Assessment mode, the CPS Assessment window appears.
Use the CPS Engage Toolbar
When you engage lessons in Teacher Managed Assessment mode, you navigate through the
lesson using the CPS Engage toolbar.
Figure 172: Using the CPS Engage toolbar
Use the CPS Engage toolbar buttons, from left to right, to navigate through your lesson.
Questions: Allows you to choose any of the pre-written questions in your lesson.
Next? #: This constantly changing menu button indicates which question number is next
in chronological order. Click to put the question on-screen.
Verbal...: You can spontaneously ask questions in class and still record performance
data.
Chalk...: Much like the verbal question feature, this option allows you to upload and
draw images while delivering spontaneous questions.
Engage toolbar Handle: Click and drag on this icon to move the CPS Engage toolbar
anywhere on your screen.
Options: Response cycle options like feedback, auto start, hide/show, and show large
screen are here. The Options button is available only in Preview and in Teacher
Managed Assessment mode.
Class...: Click on the Class button to randomly select a response pad number from your
active class and call on that student to answer a question verbally in class. For more
information on this option, please see Choose Random Student. You can also take
attendance from this button. For more information on taking attendance, please see Take
Attendance from the CPS Engage Toolbar.
Charting window: View a Charting window reporting results of your session.
Exit CPS: Save your results up to this point and shut down CPS entirely.
Close: End the delivery session and return to the main CPS window.
Engage Multiple Lessons
If you engage a lesson in Student Managed Assessment or Student Managed Practice mode, you
can engage more than one lesson at a time. Engaging multiple lessons is especially helpful when
you would like to use multiple versions of a test. To engage multiple lessons
1. Open CPS from your desktop icon.
2. Click the Lessons tab.
3. Select a lesson you would like to engage and click
window appears.
. The CPS Session Setup
4. Click
to open a second panel of the CPS Session Setup window. The second panel
contains a list of all your lessons available in the Lessons tab of CPS.
CPS 4.0 Users Guide
149
Chapter 4: Engage Functions
5. Double-click on the name of any additional lesson, in the second panel, that you would
like to engage. The name of that lesson appears in the Engage List window of the CPS
Session Setup window. You can engage as many additional lessons as you would like.
6. Click Start to engage your lessons. If you chose Student Managed Assessment, Page 2 of
the CPS Session Setup window will appear so that students can indicate which lesson (or
test version) they will answer.
NOTE: If you are using a second generation RF system, you will not see Page
2 of the CPS Session Setup window—students will choose their test version
number on their response pads.
Figure 173: Allowing students to indicate their lesson in Page 2 of the CPS Session Setup window
7. If you are engaging more than 8 lessons, click Next to move to the next set of 8 lessons
so that students can indicate which lesson they are answering.
CPS 4.0 Users Guide
150
Chapter 4: Engage Functions
Engage FastGrade Lessons
You can engage FastGrade lessons in CPS. FastGrade lessons work best when engaged in
Student Managed Assessment or Student Managed Practice mode. Please refer to Student
Managed Assessment Mode or Student Managed Practice Mode for more information. To
engage a FastGrade lesson
1. Open CPS from your desktop icon.
2. Click the Lessons tab.
3. Select a FastGrade lesson from the lesson side.
4. Click
. The CPS Session Setup window appears.
5. Choose your session options. For more information on the CPS Session Setup window
options, please see Engage Lessons.
6. Click Start to begin the session.
Engage ExamView Lessons
You can engage ExamView lessons just like other CPS lessons. For information on importing
ExamView lessons into CPS or on settings your ExamView options, please see Import
ExamView Lessons or Set ExamView Options. To engage an ExamView lesson
1. Open CPS from your desktop icon.
2. Click the Lessons tab.
3. From the ExamView folder, select the lesson you would like to engage.
4. Click
. The CPS Session Setup window appears.
5. Choose your session options. For more information on the CPS Session Setup window
options, please see Engage Lessons.
6. Click Start to begin the session.
ExamView lessons in CPS have a few extra buttons on the Feedback Grid. For more information
on ExamView-specific buttons, please see ExamView Buttons.
ExamView Buttons
When you engage an ExamView lesson in CPS, you have access to three special ExamView
buttons in the Feedback Grid. Read below for more information:
NOTE: All buttons will not be available on all questions. The Narrative and
Recalculate buttons will appear only on questions in ExamView lessons
offering those options.
Zoom Button
The Zoom button allows you to change the magnification of your question in the CPS
Content Delivery window.
Narrative Button
The Narrative button allows you to hide or show an associated Narrative on the CPS
Content Delivery window.
CPS 4.0 Users Guide
151
Chapter 4: Engage Functions
Recalculate Button
The Recalculate button allows you to change the answer to a question and deliver
that one question multiple times. This button works with
Preview Lessons
You can engage a lesson in Preview mode to review students for a quiz. When you use Preview
mode, CPS will not record any performance data. To engage a lesson in Preview mode
1. Open CPS from your desktop icon.
2. Click the Lessons tab.
3. From the lesson side, select the lesson you would like to preview.
4. Click
. A pop-up menu appears.
5. Choose Preview. The CPS Content Delivery window appears with the first question of
the lesson.
You can ask students to respond to the questions; however, CPS will not record any of their
performance data in the Reports tab.
Engage Verbal Questions
Verbal questions are “on-the-fly” questions that you can use to spontaneously engage your
students in a lesson. You can engage verbal questions from the Lessons tab or from the CPS
Engage toolbar.
Engage Verbal Questions from the Lessons tab
You can engage verbal questions directly from the Lessons tab. To engage a verbal question
1. Open CPS from your desktop icon.
2. Click the Lessons tab.
3. Click
. The Verbal Engage toolbar appears.
Figure 174: Engaging a verbal question from the Verbal Engage toolbar
4. Click the Verbal… button. If you have the Show Large Screen Verbal option ON, the
CPS Content Delivery window will appear. If you have that option turned off, only the
Feedback Grid appears. For more information on the Show Large Screen Verbal option,
please see Show Large Screen Verbal. .
CPS 4.0 Users Guide
152
Chapter 4: Engage Functions
Figure 175: Engaging a verbal question using the Feedback Grid
5. Choose the question type from the buttons available on the Feedback Grid.
6. Ask your question.
If using the CPS Content Delivery window, you can also type your question in the
Question Box and type answer choices in the Answer Boxes.
If using the Feedback Grid, ask your question aloud.
7. Click Start to begin the response cycle.
Figure 176: Engaging a verbal question using the CPS Content Delivery window
Engage Verbal Questions from the Engage Toolbar
You can engage a verbal question during a CPS session using the Engage toolbar. You can
access the Engage toolbar only from Teacher Managed Assessment mode. For more information
on Teacher Managed Assessment mode, please see Teacher Managed Assessment Mode. To
engage a verbal question from the Engage toolbar
1. Open CPS from your desktop icon.
2. Click the Lessons tab.
CPS 4.0 Users Guide
153
Chapter 4: Engage Functions
3. Select a lesson you would like to engage and click
. The CPS Session Setup
window appears.
4. Select Teacher Managed Assessment mode and click Start. The CPS Engage toolbar
appears.
Figure 177: Engaging a lesson with the CPS Engage toolbar
5. Click the Verbal… button at any point during the lesson. If you have the Show Large
Screen Verbal option ON, the CPS Content Delivery window will appear. If you have
that option turned off, only the Feedback Grid appears. For more information on the
Show Large Screen Verbal option, please see Show Large Screen Verbal.
6. Close the CPS Engage toolbar whenever you would like to end your session. CPS records
the student performance data in the Reports tab.
Engage Team Activities
You can use CPS team activities in your classroom to engage your students in fun, creative ways.
CPS offers the following team activities:
There It Is!
Challenge Board
Top Score
Play There It Is!
There It Is! is a simple game for students to learn. The rules for There It Is! include
The first team/student to correctly respond to their question gets 25 points.
Teams/Students who answer correctly, but did not answer first, get 20 points.
Teams/Students who did not answer correctly or did not answer at all get 0 points.
The points accumulate over the There it is! session and before long you have a winner.
To play There It Is!
1. Open the CPS from your desktop icon.
2. Click the Team Activities tab.
3. Click
.
4. Select the Lessons or Standards tab from the window.
5. Find and highlight a lesson or standard that has questions in it you would like to present
to your class. Remember, this can be a FastGrade lesson.
6. Click
. The CPS Session Setup window for There It Is! appears.
7. Click Start. A Student Managed Assessment Board delivery window appears, consisting
of pad ID numbers (top row or each row) and question numbers (bottom row of each
row).
CPS 4.0 Users Guide
154
Chapter 4: Engage Functions
8. Click Start. A new delivery window opens and displays the pad ID numbers with
different questions: As students/teams answer their question, their pad ID turns blue.
They can change their response anytime before you end this question delivery.
Figure 178: Viewing the There It Is! initial delivery window
9. Click End when all teams/students have responded. The point values awarded to the
teams/students for their responses are displayed:
Figure 179: Viewing student responses for a There It Is! activity
Pad ID 6 received 25 points for answering correctly first.
Pad IDs 7 and 8 received 20 points each for answering correctly, but after pad ID
Pad IDs 9 and 10 did not respond correctly, so they received 0 points.
CPS 4.0 Users Guide
155
Chapter 4: Engage Functions
10. Click Score to see the name of each
person or team responding and their
points or click Start again to go on to
the next question. When you deliver
the next question, each pad ID gets a
different question than anyone in the
class has had before. When the last
question has been answered, the Start
button is deactivated and the only
option is to review the Score or Close
the game. The Score is tallied for each
participant:
11. Click Close from the Scoreboard
window and from the There it is!
Delivery window.
Figure 180: Viewing student scores from the Score
window
CPS asks if you would like to display the questions that were missed by the participants. Click
Yes or No.
If you click No, you can review the session data from the Reports tab.
If you click Yes, the questions missed are displayed in a teacher managed delivery
format. Students can respond but their answers are not saved or recorded as session data.
Play the CPS Challenge Board
You can engage students in a CPS Challenge Board activity. For more information on the CPS
Challenge Board, please see CPS Challenge Board.
1. Open CPS from your desktop icon.
2. Click the Team Activities tab.
3. Click
. Your available Challenge Boards appear. For more information on creating
a CPS Challenge Board,
please see Create CPS
Challenge Boards.
4. Select a Challenge Board and
click
. The CPS
Challenge Board Delivery
window appears.
5. Click on a point value. The
question and answer options
appear on-screen. Click
Options to change feedback
settings if you would like.
6. Click the Start button on the
question feedback grid.
Figure 181: Engaging a CPS Challenge Board with the CPS
Challenge Board Delivery window
CPS 4.0 Users Guide
156
Chapter 4: Engage Functions
NOTE: If you want to see question or answer graphics better, click once on
the graphic to enlarge it to full screen. Click again to return the graphic to
original size.
Teams press and release the button that represents their desired answer. The onscreen number that corresponds to their pad number turns blue. This indicates the
Hide/Show option is set to show the pad numbers that have answered. The
Hide/Show button on the feedback grid reads Hide Pads.
If the Hide/Show option is set to hide the pads and a student responds, the
corresponding on-screen pad number flashes blue, then becomes white again. The
Hide/Show button on the feedback grid reads Show Pads.
If a student or team wants to change their answer, they simply press a different button
for the same question and the corresponding on-screen response pad number flashes
yellow.
The number of responses received by the receiver unit displays in the counter box on
the feedback grid. When you have received enough responses, click End.
If there is a Note associated with this question, a Note button takes the place of the
End button. Click the Note button to view the note. Optionally, you can click the
Charting button and see various charts representing student answers. For more
information on the CPS Charting window, please see View Results and Use Data
Slicing.
To return to the challenge board and select a new point value, click the Close button.
The center of the challenge board displays each team name, their pad ID, and their
cumulative points earned.
7. Repeat steps 5-6 for each question you want teams to answer.
8. Click File and Close when you have completed the challenge board. Performance data
for each team is available on the Reports tab.
Play Top Score
You can engage students in a Top Score activity while delivering a session in Teacher Managed
Assessment mode. For more information on Teacher Managed Assessment mode, please see
Teacher Managed Assessment Mode.
1. Open CPS from your desktop icon.
2. Click the Lessons tab.
3. Select the lesson you would like to engage and click
. The CPS Session Setup
window appears.
4. Choose Teacher Managed Assessment.
5. Click Start to begin the session. The Engage toolbar appears.
6. Click the Next (#) button to engage a prepared question, or click the Verbal… or
Chalk… buttons to engage a verbal or chalkboard question respectively. The Question
Delivery window appears.
CPS 4.0 Users Guide
157
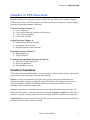
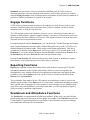
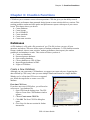
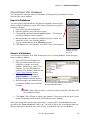
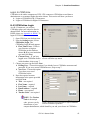
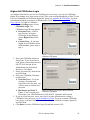
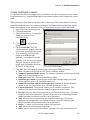
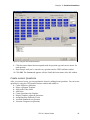
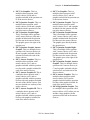
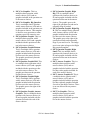
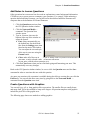
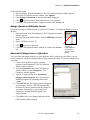
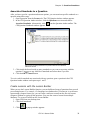
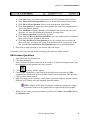
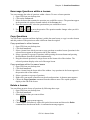
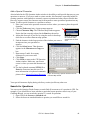
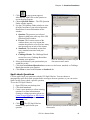
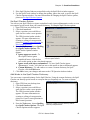
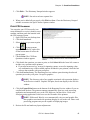
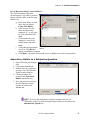
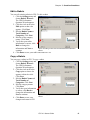
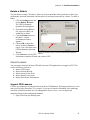
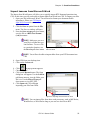
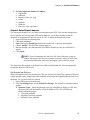
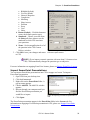
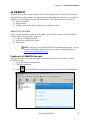
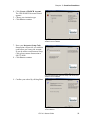
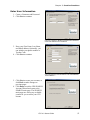
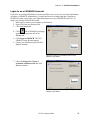
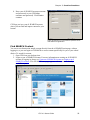
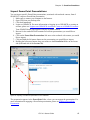
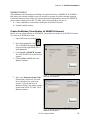
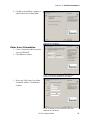
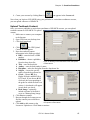
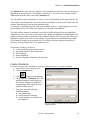
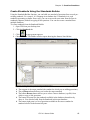
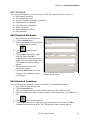
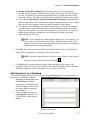
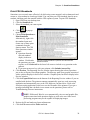
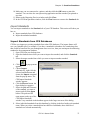
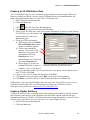
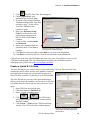
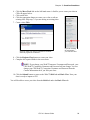
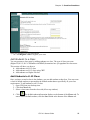
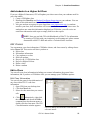
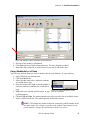
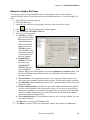
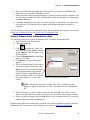
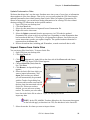
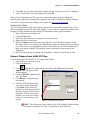
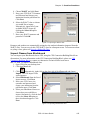
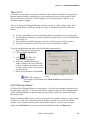
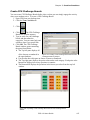
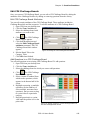
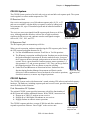
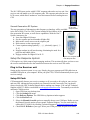
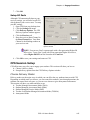
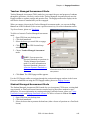
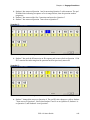
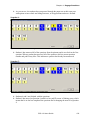
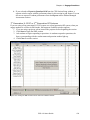
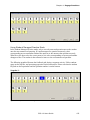
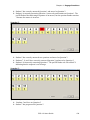
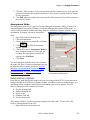
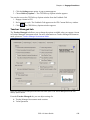
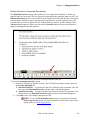
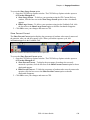
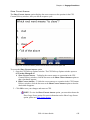
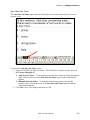
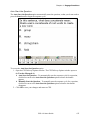
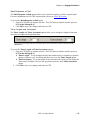
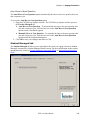
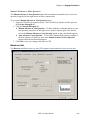
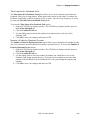
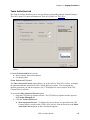
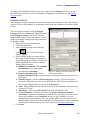
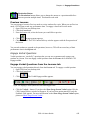
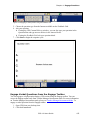
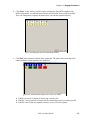
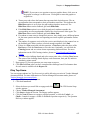
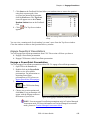
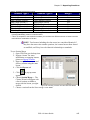
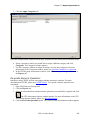
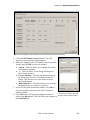
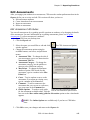
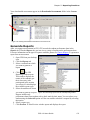
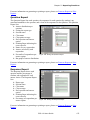
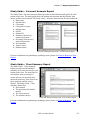
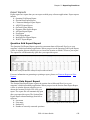
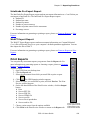
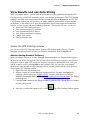
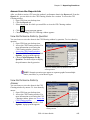
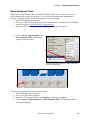
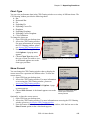
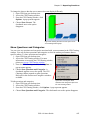
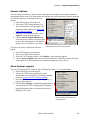
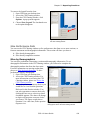
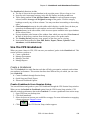
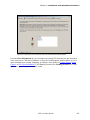
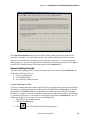
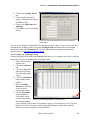
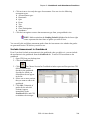
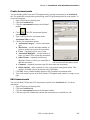
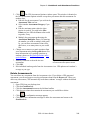
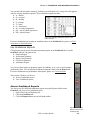
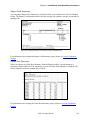
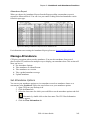
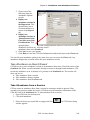
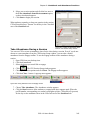
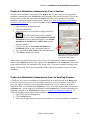
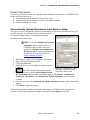
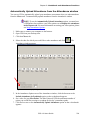
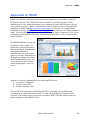
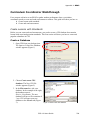
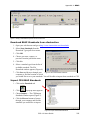
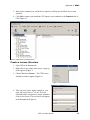
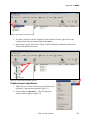
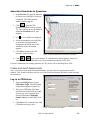
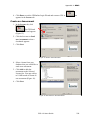
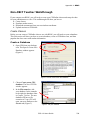
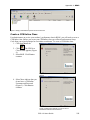
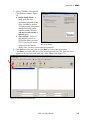
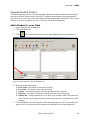
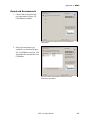
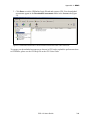
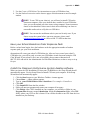
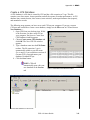
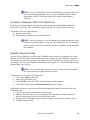
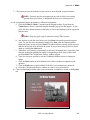
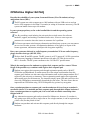
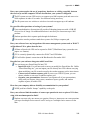
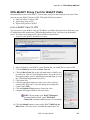
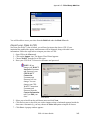
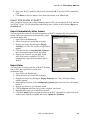
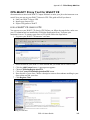
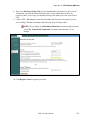
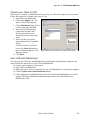
Chapter 4: Engage Functions
7. Click Start on the Feedback Grid and allow your students time to answer the question
using their response pads. Once
everyone has answered the question,
click the End button. The Top Score
icon will appear next to the Choose
Random Student icon on the Feedback
Grid.
8. Click
appears.
. The Top Score window
Figure 182: Viewing student scores for a Top Score
activity
You can view a running total of each student’s or team’s score from the Top Score window.
Close the window to return to the Question Delivery window.
Engage PowerPoint Presentations
You can engage PowerPoint presentations from CPS. This section will show you how to
Engage a PowerPoint presentation
Engage CPS lessons with a PowerPoint presentation
Engage a PowerPoint Presentation
You can engage a PowerPoint presentation within CPS. To engage a PowerPoint presentation
1. Open CPS to the Lessons tab.
2. Double-click on the PowerPoint
folder to view all available
presentations. For information on
importing PowerPoint
presentations to CPS, please see
Import PowerPoint Presentations.
3. Select the presentation and click
. The CPS Session Setup
window appears.
4. Choose your session options and
click Start. Your presentation will
appear with the Engage toolbar at
the bottom of your screen.
Figure 183: Engaging a PowerPoint presentation in CPS
NOTE: You can engage PowerPoint presentations only in Teacher Managed
Assessment mode. For more information on Teacher Managed Assessment
mode, please see Teacher Managed Assessment Mode.
CPS 4.0 Users Guide
158
Chapter 4: Engage Functions
5. Press any key on your keyboard to begin your presentation.
NOTE: If you would like to ask a Verbal Question, use the Chalkboard
feature, or select a random student, choose the appropriate button from the
Engage toolbar.
6. Click the Close button on the Engage toolbar after you have finished your presentation.
Engage Lessons with a PowerPoint Presentation
You can engage a PowerPoint presentation and additional CPS lessons, FastGrade lessons, or
ExamView lessons. To engage CPS lessons with a PowerPoint presentation
1. Open CPS from your desktop icon.
2. Click the Lessons tab.
3. Select the PowerPoint presentation from the PowerPoint folder that you wish to engage.
4. Click
. The CPS Session Setup window appears.
5. Click
to open up the Lessons section of the CPS Session Setup window. All of your
available lessons from
the Lessons tab will
appear.
6. Double-click on the
lesson or lessons you
would like to engage
with your presentation.
The lesson(s) will appear
in the Engage List
section of the setup
window.
Figure 184: Engaging CPS lessons with a PowerPoint presentation
NOTE: You can engage only one PowerPoint presentation at a time.
7. Click Start when you are ready to engage your lessons. Your PowerPoint presentation
will appear with the Engage toolbar centered at the bottom of your screen.
8. Click anywhere on your screen with your mouse to advance your presentation. If you
would like to as a question from your lesson, click the Next #... button from the Engage
toolbar.
CPS 4.0 Users Guide
159
Chapter 4: Engage Functions
You can continue using your PowerPoint presentation and your other lesson as you normally
would. When you are finished with the presentation and lesson, click the Close button to end the
session and return to the Lessons tab.
CPS 4.0 Users Guide
160
Chapter 5: Reporting Functions
The CPS Reporting System lets you access, view, and print performance data recorded during
instructional sessions. The Reporting System is a delivery tool because you can use it only after
you finish a session and CPS records the session information in the database.
CPS generates reports from delivery sessions, regardless of the delivery mode. However, if you
deliver questions to students in Preview mode, CPS records no performance data and you cannot
access the session data.
CPS records performance results in the same database where the delivered lesson, standard, or
team activity resides. When you access the Reports tab and select the type of report you want,
CPS organizes the recorded data around the class associated with the lesson when it was
delivered and in the report form you select.
This chapter will show you how to
Merge sessions
Re-grade assessments
Generate reports
Choose reports for specific data
Edit reports
Use the CPS Charting window to view performance data
Download assessments
Merge Sessions
From the Reports tab, you can merge two existing sessions together to create one new session.
Merging sessions is particularly helpful when you give make-up sessions and do not want to
have two separate sessions with the same data. For example, let’s say you give Test A on
Wednesday and two students in your class are absent. On Friday, the two students are back at
school and need to take the test. Engage Test A on Friday the same way you engaged Test A on
Wednesday, and have the two students enter their responses. You can then merge Wednesday's
session and Friday's session for Test A together to create one session with all of your students'
answers.
You can merge several types of sessions with the session merge feature. The table on the next
page shows you which sessions you can and cannot merge.
NOTE: You cannot merge sessions from SMP mode.
CPS 4.0 Users Guide
161
Chapter 5: Reporting Functions
Table 2: Available session types to merge
Session Type I
TMA (single session)
SMA (single session)
TMA (multiple session)*
TMA (single session)**
TLSMA (single session)
SMA (multiple session)
TMA (multiple session)
TMA (single session)
Session Type II
TMA (single session)
SMA (single session)
TMA (multiple session)
SMA (single session)
TLSMA (single session)
SMA (multiple session)
SMA (single session)
SMA (multiple session)
Merge?
Yes
Yes
Yes
Yes
Yes
No
No
No
* When you merge two multi-lesson sessions, you must use the same class roster and the
lesson(s)/standard(s) must be in identical order.
** This is an exception to the identical rule where you can have two different sources or lessons and the
result will be a combination of the two.
NOTE: Two lessons (including the class roster) are considered identical if
they have the same exact number questions, the content has not been altered
or modified, and if they have the identical relationships to standards.
To use Session Merge
1. Open CPS from your desktop icon.
2. Engage a lesson. For more
information on engaging lessons,
please see Engage Lessons.
3. Repeat step 2 to create a second
delivery session using the same
lesson.
4. Click the Reports tab.
. A pop-up menu
5. Click
appears.
6. Choose Session Merge…. The
Classes Wizard will appear with
a list of sessions available to
merge with the lesson you rightclicked.
Figure 185: Choosing a session from the CPS Class Wizard
7. Choose a session from the list to merge. Click Next.
CPS 4.0 Users Guide
162
Chapter 5: Reporting Functions
8. Rename the newly-merged
session if you would like, or use
the default name. You can also
change the grading options, add
comments, and include the
merged session in the
Gradebook. Click Next. Your
sessions have been merged.
9. Click Done to exit out of the
CPS Class Wizard and return to
CPS. You can view your newlymerged session from the Reports
tab.
Figure 186: Renaming a merged session in the CPS Class
Wizard
NOTE: When you view the merged session from the Reports tab Instructor
Summary, note that you can view the Class Average in two modes: all
students or only students who took the assessment.
Re-grade Assessments
When you deliver an assessment, the assessment results appear in the Reports tab. From the
Reports tab, you can re-grade assessment results, if necessary. This section will show you how to
Re-grade questions
Re-assign categories to questions
Re-grade numeric questions
Re-grade students
Re-grade Questions
You can re-grade any assessment you deliver in CPS. To re-grade an assessment
NOTE: If you are a K-12 instructor using REAP, your Curriculum
Coordinator may send assessments to you that you cannot re-grade. For more
information on using REAP, please see Appendix A: REAP.
1. Open CPS from your desktop icon.
2. Click the Reports tab.
3. Select the assessment you would like to regrade and click
. The CPS Assessment
Options window appears. For more information on the CPS Assessment Options window,
please see Edit Assessments.
CPS 4.0 Users Guide
163
Chapter 5: Reporting Functions
4. Click the Re-Grade Questions button. The CPS Re-Grade Assessments window appears.
The Correct Answers tab contains each question included in the session with a
distributed number and percentage representing which answer options the class selected.
The correct answers that were previously selected will be represented by a check in each
question’s answer option box.
Figure 187: Re-grading questions in the CPS Re-grade Assessments window
5. Click one of the other possible answer options to change the correct answer, or click the
omit box to exclude that particular question from being calculated in the grading process.
6. When you have completed all changes, click OK to save them and close the window, or
click Cancel to close the window without saving.
Re-assign Categories to Questions
You can associate categories to questions during question authoring. After you deliver the
lesson, you can re-assign the questions to different categories in the Reports tab. For more
information on associating categories to questions, please see Associate Categories to a
Question. To re-assign questions to different categories
1. Open CPS from your desktop icon.
2. Click the Reports tab.
3. Select the assessment you would like to regrade and click
. The CPS Assessment
Options window appears. For more information on the CPS Assessment Options window,
please see Edit Assessments.
4. Click the Re-Grade Questions button. The CPS Re-Grade Assessments window appears.
CPS 4.0 Users Guide
164
Chapter 5: Reporting Functions
5. Click the Apply Categories tab.
Figure 188: Changing question Categories from the Apply Categories tab in the CPS Re-grade Assessments window
6. Select a question to which you would like to assign a different category and click
Categories. The Categories window appears.
7. Use the Categories window to assign, un-assign, or create new categories. For more
information on the Categories window, please see Associate Categories to a Question.
8. In the CPS Re-grade Assessments window, click OK to save your changes and return to
the Reports tab.
Re-grade Numeric Questions
Instructors using CPS RF systems can engage students in numeric questions. For more
information on CPS RF, please see CPS RF System. To re-grade a numeric question in an
assessment
1. Open CPS from your desktop icon.
2. Click the Reports tab.
3. Select the assessment that contains numeric questions you would like to regrade and click
. The CPS Assessment Options window appears. For more information on the CPS
Assessment Options window, please see Edit Assessments.
4. Click the Re-Grade Questions button. The CPS Re-Grade Assessments window appears.
CPS 4.0 Users Guide
165
Chapter 5: Reporting Functions
Figure 189: Re-grading numeric questions in the CPS Re-grade Assessments window
5. Click the Edit Numeric Answers button. The CPS
Numeric Answer Options window appears.
6. Make your changes in the CPS Numeric Answer Options
window and click OK to save your changes.
Answer – This box allows you to change the answer
of the numeric question.
+/- - This box allows you to change the Margin of
Error for the question.
Correct Answers – This box lists all answers given
for the question. To have CPS count an answer as
correct, click the box next to the answer so that a
checkmark appears.
Make Subjective – This button allows you to change
the question type to a subjective question.
7. In the CPS Re-grade Assessment window, click OK to
save your changes and return to the CPS Assessment
Options window.
8. Click OK in the CPS Assessment Options window to
return to the Reports tab. CPS will reflect your changes in
the Gradebook tab.
CPS 4.0 Users Guide
Figure 190: Changing the options
for a numeric question in the CPS
Numeric Answer Options window
166
Chapter 5: Reporting Functions
Re-grade Students
You can alter a student’s grade on an assessment by re-grading the student’s correct answers in
the assessment. To re-grade a student
1. Open CPS from your desktop icon.
2. Click the Reports tab.
3. Select the assessment that contains numeric questions you would like to regrade and click
. The CPS Assessment Options window appears. For more information on the CPS
Assessment Options window, please see Edit Assessments.
4. Click the Re-grade Students button. The CPS Edit Session Students window appears.
Figure 191: Re-grading students from the CPS Edit Session Student window
5. Click the box that corresponds with the question number and student name you would
like to mark correct. When you click the box, a checkmark appears. To mark a student’s
answer incorrect, click a box with a checkmark so that the checkmark disappears.
6. Click OK to save your changes and return to the CPS Assessment Options window.
7. Click OK in the CPS Assessment Options window to return to the Reports tab. CPS will
reflect your changes in the Gradebook tab.
CPS 4.0 Users Guide
167
Chapter 5: Reporting Functions
Edit Assessments
After you engage your students in an assessment, CPS stores the student performance data in the
Reports tab for you to review and edit. This section will show you how to
Edit assessment attributes
Create Attendance from an assessment
Import an assessment
Delete an assessment
Edit Assessment Attributes
You can edit assessments by re-grading specific questions or students, or by changing the details
of the assessment. For more information on re-grading assessments, please see Re-grade
Assessments. To edit an assessment’s attributes
1. Open CPS from your desktop icon.
2. Click the Reports tab.
. The CPS Assessment Options
3. Select the report you would like to edit and click
window appears.
4. Change the assessment options using the
available buttons, text boxes, and pull-down
menus.
Assessment Title – To change the title of
your assessment, type a new name into the
Assessment Title box.
Assessment Category – To change the
assessment category, use the pull-down
menu to select a different category.
Max Points – To change the maximum
number of points CPS awards for this
assessment, type in a number in the Max
Points box.
Curve – To give students a curve on the
assessment, or to adjust an existing curve,
type in a number in the Curve box.
Comment – To add a comment to the
assessment that you can use as a reference,
type your notes in the Comment box.
Figure 192: Editing assessment attributes
Online Options – To make a study guide
for the assessment available online, click the from the CPS Assessment Options window
box next to the Show online study guide for this session option so that a checkmark
appears.
NOTE: The Online Options are available only if you have a CPSOnline
class.
5. Click OK to save your changes and return to the Reports tab.
CPS 4.0 Users Guide
168
Chapter 5: Reporting Functions
Create Attendance from an Assessment
You can use an existing assessment in the Reports tab to create attendance. CPS stores the
attendance records in the Gradebook tab as grades in the Assessments area or as an attendance
sheet in the Class Info area. You choose where CPS stores attendance records when you create
your class. For more information on choosing your attendance options, please see Edit Class
Information. To create attendance from an assessment
1. Open CPS from your desktop icon.
2. Click the Reports tab.
3. Select an assessment from which you would like to create attendance.
. A pop-up menu appears.
4. Click
5. Choose Create Attendance.
CPS creates an attendance report in the Reports tab and puts the attendance record in the
Gradebook tab.
Import an Assessment
You can import assessments from tbt Deliver into the Reports tab in CPS. To import an
assessment
1. Open CPS from your desktop icon.
2. Click the Reports tab.
3. Click
. The CPS Import Sessions
window appears.
4. Click Browse to search through your
computer to find the database which
contains the assessment you would
like to import. The Open dialog box
appears.
5. Click Open to open the database and
return to the CPS Import Sessions
window.
6. Select the assessment(s) you would
like to import by clicking the box next
to the assessment(s) so that a
Figure 193: Importing tbt Deliver assessments from the
CPS Import Sessions window
checkmark appears. Alternatively,
click Select All to import all assessments.
7. Click OK to import your assessments.
CPS imports the assessments to the Reports tab in CPS.
CPS 4.0 Users Guide
169
Chapter 5: Reporting Functions
Delete an Assessment
You can delete assessments from the Reports tab. However, when you delete an assessment, you
can no longer access the performance data from that session nor generate a report. To delete an
assessment
1. Open CPS from your desktop icon.
2. Click the Reports tab.
3. Select the assessment you would like to delete.
4. Click
. A confirmation message appears.
5. Click OK to delete the assessment or click Cancel to keep the assessment and return to
the Reports tab.
Download Assessments
You can download assessments sent by your Curriculum Coordinator. To download
assessments
NOTE: Only K-12 teachers participating in REAP may download
assessments.
1. Open CPS from your desktop icon.
2. Login to CPSOnline. The CPSOnline Login Wizard appears. For more information on
logging on to CPSOnline, please
see K-12 CPSOnline Login.
3. Choose whether or not you
would like to sync your class. If
you choose not to sync your
class, you will not receive any
new assessments. Click Next.
4. Select your class from the
available list. To select all
classes, click the box next to the
Select All option so that a
checkmark appears. Click Next.
5. Choose to download new or
existing assessments. Click Next.
6. Select the assessment(s) from the
list. Click Next. CPS downloads Figure 194: Downloading assessments from the CPSOnline
Login Wizard
your assessments.
7. Click Done to exit the CPSOnline Login Wizard and return to CPS.
CPS 4.0 Users Guide
170
Chapter 5: Reporting Functions
Your downloaded assessments appear in the Downloaded Assessments folder in the Lessons
tab.
Figure 195: Viewing downloaded assessments in the Lessons tab
Generate Reports
After you engage an assessment in CPS, CPS records the student performance data in the
Reports tab. From the Reports tab, you can view a variety of reports on the performance data.
For more information on the types of reports available, please see Choose Reports. To generate a
report from an assessment
1. Open CPS from your desktop
icon.
2. Click the Reports tab.
3. Select a session from which
you want to generate a
report.
4. Click
. The CPS
Reporting window opens.
This window displays the
names of the students (per
their class entry) who
participated in the session
you selected. It also displays
the available report types.
5. Select the students on whom
you want to generate a report. Figure 196: Generating reports from the CPS Reporting window
Reports include only
performance data from students with a check mark by their name. You can select every
student using the Select All option or Filter out students who didn’t respond by selecting
that option.
6. Select a report type.
7. Click Preview. A Print Preview window opens and displays the report.
CPS 4.0 Users Guide
171
Chapter 5: Reporting Functions
8. Click the Views button in the left column of the Print Preview window and use the four
icons there to see different views of the report. These icons also appear in the toolbar.
9. To exit the Print Preview window, click the Close button on the left end of the toolbar.
10. Click the Close button on the Reporting window to get back to the Reports tab.
Choose Reports
CPS uses student performance data to provide you with 24 different types of reports. You can
generate these reports from the Reports tab in CPS. For more information on generating a report,
please see Generate Reports. This section will provide you with information on each type of
report available in CPS. Reports fall into three major categories:
Class Reports
Individual Reports
Export Reports
Class Reports
Class reports give general information about the overall class performance. While these reports
may also give some information on each individual student, the overall focus of the report is on
the class. Class reports include
Instructor Summary Report
Question Report
Response Report
Item Analysis Report
Item Analysis with Standards Report
Standards Analysis Report
Opinion Survey Report
Data Slicing Report
Instructor Summary Report
The Instructor Summary Report provides a general review of how each student performed on an
assessment. The Instructor Summary
includes each student’s score, as
well as the class average. The
Instructor Summary lists
Report type
Session name
Class
Pad ID numbers
Student names
Student IDs
Number of correct to
attempted answers
Percentage of correct to
attempted answers for all
students selected in the report
Figure 197: Viewing an Instructor Summary Report
CPS 4.0 Users Guide
172
Chapter 5: Reporting Functions
For more information on generating or printing a report, please see Generate Reports or Print
Reports.
Question Report
The Question Report lists each question, the responses for each question (by student), any
associated standards to the question, and a chart of the responses for the question. The Question
Report lists
Answer distribution per
question
Listing the report type
Session name
Class name
Class points average
Each question and answer
option
Pointing finger indicating the
correct answer
Name of every respondent
Answer selected by each
respondent
Percentile of respondents per
Figure 198: Viewing the Question Report
answer option
Bar graph of answer distribution
For more information on generating or printing a report, please see Generate Reports or Print
Reports.
Response Report
The Response Report shows each
question and the percentage of
students who responded to each
answer choice. The Response Report
lists
Report type
Session name
Class name
Class average
Each question and answer
option
Pointing finger indicating the
correct answer
Percentage of respondents per
answer option
Figure 199: Viewing the Response Report
For more information on generating or printing a report, please see Generate Reports or Print
Reports.
CPS 4.0 Users Guide
173
Chapter 5: Reporting Functions
Item Analysis Report
The Item Analysis Report provides a
table with all assessment questions
and the percentage of students who
responded to each answer choice. An
asterisk indicates the correct answer
to each question.
For more information on generating
or printing a report, please see
Generate Reports or Print Reports.
Figure 200: Viewing the Item Analysis Report
Item Analysis with
Standards Report
The Item Analysis with Standards
Report provides a table with all
assessment questions and the
percentage of students who
responded to each answer choice.
The Item Analysis with Standards
Report also includes any standards
associated with each question. An
asterisk indicates the correct answer
to each question.
For more information on generating
or printing a report, please see
Generate Reports or Print Reports.
Figure 201: Viewing the Item Analysis with Standards Report
Standards Analysis
Report
The Standards Analysis Report
analyzes each standard associated
with a question in the assessment
and the percentage of students who
correctly answered all of the
questions associated with a standard.
For more information on generating
or printing a report, please see
Generate Reports or Print Reports.
Figure 202: Viewing the Standards Analysis Report
CPS 4.0 Users Guide
174
Chapter 5: Reporting Functions
Opinion Survey Report
The Opinion Survey Report provides
a table that shows each question
number and the percentage of
students who answered each
question, per answer choice.
For more information on generating
or printing a report, please see
Generate Reports or Print Reports.
Figure 203: Viewing the Opinion Survey Report
Data Slicing Report
The Data Slicing Report opens up
the Charting window with a chart of
the last question of the assessment.
To view more information in the
Charting window, please see View
Results and Use Data Slicing.
For more information on generating
or printing a report, please see
Generate Reports or Print Reports.
Figure 204: Viewing the Data Slicing Report
Individual Reports
Individual reports focus on the performance data for each student. Individual reports include
Star Chart Report
Study Guide Report
Study Guide – Incorrect Answers Report
Study Guide – Class Summary Report
CPS 4.0 Users Guide
175
Chapter 5: Reporting Functions
Star Chart Report
The state of Texas specifically uses
the Star Chart Report. The Star Chart
Report analyzes each student’s
performance on the assessment based
on the principles of Star Chart
reporting.
For more information on generating
or printing a report, please see
Generate Reports or Print Reports.
Figure 205: Viewing the Star Chart Report
Study Guide Report
The Study Guide Report provides an individualized study guide for each student in the class. The
study guide shows the student each question, their response, and the correct response for each
question. The Study Guide lists for each student the
Report type
Session name
Class name
Class points average
Student name
Pad ID
Student ID
Number of correctly
answered questions
Percentage of correctly
answered questions
Each question
Answer choice
Student answer
Figure 206: Viewing the Study Guide Report
For more information on generating or printing a report, please see Generate Reports or Print
Reports.
CPS 4.0 Users Guide
176
Chapter 5: Reporting Functions
Study Guide – Incorrect Answers Report
The Study Guide – Incorrect Answers Report provides an individualized study guide for each
student in the class. The study guide shows the student each question that they missed, their
answer, and the correct answer. The Study Guide – Incorrect Answers lists for each student the
Report type
Session name
Class name
Class points average
Student name
Pad ID
Student ID
Number of incorrectly
answered questions
Percentage of incorrectly
answered questions
Each question
Answer choice
Student answer
Figure 207: Viewing the Study Guide - Incorrect Answers Report
For more information on generating or printing a report, please see Generate Reports or Print
Reports.
Study Guide – Class Summary Report
The Study Guide – Class Summary
Report provides an individualized
summary of incorrect answers for each
student in the class. The study lists for
each student, their percentage of
correct answers, the questions they
answered incorrectly, their answers on
those questions, and the correct
answers. The Study Guide – Class
Summary Report lists
Each student
The question(s) the student
missed
The correct answer
The student's answer
Figure 208: Viewing the Study Guide - Class Summary Report
For more information on generating or printing a report, please see Generate Reports or Print
Reports.
CPS 4.0 Users Guide
177
Chapter 5: Reporting Functions
Export Reports
Export reports are reports that you can export to third-party software applications. Export reports
include
Question Grid Export Report
Session Data Export Report
Classroom Manager Export Report
AEIS-IT Export Report
OnTrack Export Report
Response Data Export Report
All Data Export Report
Post Report
LMS Export Report
InteGrade Pro Export Report
WebCT Export Report
Question Grid Export Report
The Question Grid Export Report exports the assessment data to Microsoft Excel or to your
computer’s default spreadsheet application. When you preview the Question Grid Export Report,
a Save As window appears, allowing you to choose the location to which CPS saves your report.
The export file will automatically open after you export this report.
Figure 209: Viewing the Question Grid Export Report in Microsoft Excel
For more information on generating or printing a report, please see Generate Reports or Print
Reports.
Session Data Export Report
The Session Data Export Report exports the session data to Microsoft Excel or to your
computer’s default spreadsheet application. When you preview the Session Data Export Report,
a Save As window appears, allowing you to
choose the location to which CPS saves your
report. The export file will automatically open
after you export this report. The Session Data
Export Report column headings (from left to
right) are
Last name
First name
Figure 210: Viewing the Session Data Export Report
Student ID
Number of correctly answered questions
CPS 4.0 Users Guide
178
Chapter 5: Reporting Functions
Total number of questions
Percentage of correctly answered questions
Total percentage available
For more information on generating or printing a report, please see Generate Reports or Print
Reports.
Classroom Manager Export Report
The Classroom Manager Export Report exports the assessment data as a Classroom Manager
file. When you preview the Classroom Manager Export Report, a Save As window appears,
allowing you to choose the location to which CPS saves your report.
For more information on generating or printing a report, please see Generate Reports or Print
Reports.
AEIS-IT Export Report
The AEIS-IT Export Report exports the assessment
data as an AEIS-IT file. When you preview the AEISIT Export Report, the AEIS-IT Data window appears.
In that window, enter your AEIS-IT data, then choose
where you would like to save your file.
For more information on generating or printing a
report, please see Generate Reports or Print Reports.
Figure 211: Entering AEIS-IT data in the
AEIS-IT Data window
OnTrack Export Report
The OnTrack Export Report exports the assessment data as a Comma Delimited (*.csv) file.
When you preview the OnTrack Export Report, a Save As window appears, allowing you to
choose the location to which CPS saves your report.
For more information on generating or printing a report, please see Generate Reports or Print
Reports.
CPS 4.0 Users Guide
179
Chapter 5: Reporting Functions
Response Data Export Report
The Response Data Export Report exports the assessment data as a Comma Delimited (*.csv)
file to Microsoft Excel or to your computer’s default spreadsheet application. When you preview
the Response Data Export Report, a Save As window appears, allowing you to choose the
location to which CPS saves your report.
For more information on generating or printing a report, please see Generate Reports or Print
Reports.
All Data Export Report
The All Data Export Report exports the session information to Microsoft Excel or to your
computer’s default spreadsheet application. The All Data Export Report exports
Question ID
Question
Correct answer
Each answer choice
Corresponding number of students who chose each answer choice
For more information on generating or printing a report, please see Generate Reports or Print
Reports.
Post Report
The Post Report exports the class grades to Microsoft Excel or to your computer’s default
spreadsheet application. The Post Report exports
Student last name
Student first name
Number of points student received for the assessment
Percentage correct
For more information on generating or printing a report, please see Generate Reports or Print
Reports.
LMS Export Report
The LMS Export Report exports student assessment information as a *.txt file that you can
import to DuPont. The LMS Export Report exports the student ID, student name, and percent
correct for each student in your class.
For more information on generating or printing a report, please see Generate Reports or Print
Reports.
CPS 4.0 Users Guide
180
Chapter 5: Reporting Functions
InteGrade Pro Export Report
The InteGrade Pro Export Report exports student assessment information as a *.txt file that you
can import to InteGrade Pro. The InteGrade Pro Export Report exports
Student ID
Student last name
Student first name
Number of correct answers
Number of points earned for the assessment
Percentage correct
For more information on generating or printing a report, please see Generate Reports or Print
Reports.
WebCT Export Report
The WebCT Export Report exports student assessment information as a Comma Delimited
(*.csv) file to Microsoft Excel or to your computer’s default spreadsheet application. You can
then import the file to WebCT.
For more information on generating or printing a report, please see Generate Reports or Print
Reports.
Print Reports
You can print any assessment reports you generate from the Reports tab. For
more information on generating reports or choosing a report, please see Generate
Reports or Choose Reports.
To print a report
1. Open CPS from your desktop icon.
2. Click the Reports tab.
3. Select the assessment from which you would like to print a report.
4. Click
. The CPS Reporting window appears.
5. Select the report you would like to print, and click Preview. The Print
Preview window appears.
6. On the left-hand toolbar of the Print Preview window, click the Output
button.
Print
Save as RTF file
Save as PDF file
Save as HTML file
Save as text file
Save as Excel spreadsheet
Save as archive file
7. Choose a print source from the options available
8. Click Close in the Print Preview window to return to the Reports tab.
CPS 4.0 Users Guide
Figure 212: Choosing
a print option from the
Output toolbar in the
Print Preview window
181
Chapter 5: Reporting Functions
View Results and use Data Slicing
When you engage lessons, you can view the performance results graphically through the CPS
Charting window so that you can quickly assess your students’ performance. The CPS Charting
window is available after each question during a session and from the Reports tab in CPS. The
CPS Charting window not only provides you with a graphical representation of your students’
performance, it also allows you to slice the performance data, in that session and comparison
sessions, to view specific subsets of student performance. This section will show you how to
Access the CPS Charting window
View performance data by question
View performance data by answer
View performance data by category
Change chart options
Slice performance data
Access the CPS Charting window
You can access the CPS Charting window from the CPS Engage toolbar, during a Teacher
Managed Assessment session, or after you finish the assessment, from the Reports tab.
Access during Session Delivery
When you engage a lesson in Teacher Managed Assessment mode, the Engage toolbar appears
on your screen. When you begin the first question allow the students to respond to the question
using their response pads, CPS records the students’ responses as performance data. After you
end the response cycle by clicking End on the Feedback Grid, you can view your students’
performance data, through the CPS Charting window, for that question and previous questions.
To access the CPS Charting window
1. Open CPS from your desktop icon.
2. Engage a lesson in Teacher Managed Assessment mode. For more information on
engaging a lesson, please see Engage Lessons. For more information on Teacher
Managed Assessment mode, please see Teacher Managed Assessment Mode. The Engage
toolbar appears.
3. Click the Next # button on the Engage toolbar to open the CPS Content Delivery window
and ask your question.
4. After you’ve ended the response cycle, click
. The CPS Charting window appears.
CPS 4.0 Users Guide
182
Chapter 5: Reporting Functions
Access from the Reports tab
After you finish a session, CPS saves the students’ performance data in the Reports tab. From the
Reports tab., you can also view the CPS Charting window for a session. To access the CPS
Charting window
1. Open CPS from your desktop icon.
2. Click the Reports tab.
3. Select the session for which you would like to view the CPS Charting window.
. A pop-up menu appears.
4. Click
5. Choose Charting. The CPS Charting window appears.
View Performance Data by Question
You can choose to view the charts in the CPS Charting window by question. To view charts by
question
1. Open CPS from your desktop icon.
2. Access the CPS Charting window. For
more information on accessing the
CPS Charting window, please see
Access the CPS Charting window.
3. From the CPS Charting window, click
Options. A pop-up menu appears.
4. Choose Chart Responses then By
Question. The charts adjust to display
the performance data by question.
Figure 213: Viewing charts by Question in the CPS
Charting window
NOTE: Numeric question types appear as separate graphs from multiplechoice, true/false, or yes/no answer types.
View Performance Data by
Answer
You can choose to view the charts in the CPS
Charting window by answer. To view charts by
answer
1. Open CPS from your desktop icon.
2. Access the CPS Charting window. For
more information on accessing the CPS
Charting window, please see Access the
CPS Charting window.
3. From the CPS Charting window, click
Options. A pop-up menu appears.
Figure 214: Viewing charts by Answer in the CPS
Charting window
CPS 4.0 Users Guide
183
Chapter 5: Reporting Functions
4. Choose Chart Responses then By Answer. The charts adjust to display the performance
data by answer.
NOTE: Numeric question types appear as separate graphs from multiplechoice, true/false, or yes/no answer types.
View Performance Data by Category
You can choose to view the charts in the CPS
Charting window by category. For more
information on associating categories to
questions in a lesson, please see Associate
Categories to a Question. To view charts by
category
1. Open CPS from your desktop icon.
2. Access the CPS Charting window. For
more information on accessing the CPS
Charting window, please see Access the
CPS Charting window.
3. From the CPS Charting window, click
Options. A pop-up menu appears.
Figure 215: Viewing charts by Category in the CPS
Charting window
4. Choose Chart Responses then By
Category. The charts adjust to display the performance data by category.
Change Chart Options
You can set the options by which you view the performance data in the CPS Charting window.
This section shows you how to
Show the response time
Change the chart type
Show the correct answer to a question
Access questions and categories
Export data
Save the chart as a graphic
Print the chart
Show multiple charts
Change the answer options
Show a Charting legend
CPS 4.0 Users Guide
184
Chapter 5: Reporting Functions
Show Response Time
When you view performance data in the CPS Charting window, you can also see the time in
which students took to answer a question. You can view the response time information, in
seconds, in the chart legend. To show the response time on the graph
1. Open CPS from your desktop icon.
2. Access the CPS Charting window. For more information on accessing the CPS Charting
window, please see Access the CPS Charting window.
3. From the CPS Charting window, click Options. A pop-up menu appears.
4. Choose Answer Legend Options then
Show Response Time. A checkmark
appears beside the option.
Figure 197: Choosing to show the response times in the
legend of the CPS Charting window
Figure 216: Showing the response times on the CPS
Charting window legend
Figure 217: Showing the response times in the legend of the CPS Charting window
To remove the response times from the chart legend
1. Open CPS from your desktop icon.
2. Access the CPS Charting window.
3. From the CPS Charting window, click Options. A pop-up menu appears.
4. Choose Answer Legend Options then Show Response Time. The checkmark next to
the option disappears.
CPS 4.0 Users Guide
185
Chapter 5: Reporting Functions
Chart Type
You can view performance data in the CPS Charting window as a variety of different charts. The
CPS Charting window provides the following charts:
Bar
Horizontal Bar
Pie
Exploding Pie
Exploding Correct Pie
Doughnut
Exploding Doughnut
Exploding Correct Doughnut
Cross Tabulation
To change the chart type
1. Open CPS from your desktop icon.
2. Access the CPS Charting window.
For more information on accessing
the CPS Charting window, please
see Access CPS Charting window.
3. From the CPS Charting window,
click Options. A pop-up menu
appears.
4. Choose Chart Type then select
the type of chart you wish to view. Figure 218: Changing the chart type on the CPS Charting
window
A checkmark appears next to the
chart type you chose.
Show Correct
You can change the CPS Charting window chart to display the
correct answer for a question in a different color. To show the
correct answer
1. Open CPS from your desktop icon.
2. Access the CPS Charting window. For more information
on accessing the CPS Charting window, please see
Access the CPS Charting window.
3. From the CPS Charting window, click Options. A popup menu appears.
4. Choose Show Correct. A checkmark appears next to the
option.
Figure 219: Changing the show
correct option on the CPS
Charting window
Optionally, to show the correct answer
1. Open CPS from your desktop icon.
2. Access the CPS Charting window. For more information on accessing the CPS Charting
window, please see Access the CPS Charting window.
3. From the bottom left-hand corner of the CPS Charting window, click the box next to the
Show Correct option so that a checkmark appears.
CPS 4.0 Users Guide
186
Chapter 5: Reporting Functions
To change the chart so that the correct answer does not display differently
1. Open CPS from your desktop icon.
2. Access the CPS Charting window.
3. From the CPS Charting window, click
Options. A pop-up menu appears.
4. Choose Show Correct. The
checkmark next to the option
disappears.
Figure 220: Viewing the Show Correct option on the
CPS Charting window graph
Show Questions and Categories
You can view any questions and categories associated with your assessment in the CPS Charting
window. You can use these questions and categories to slice the student performance data to
specific subsets. To show questions and categories
1. Open CPS from your desktop icon.
2. Access the CPS Charting window. For more
information on accessing the CPS Charting window,
please see Access CPS Charting window.
3. From the CPS Charting window, click Options. A
pop-up menu appears.
4. Choose Show Questions and Categories. A
checkmark appears next to the option. The CPS
Charting window expands to make Questions
Delivered in this Session and Categories windows
available.
Figure 202: Choosing the Show
To hide questions and categories
Questions and Categories option from
1. Open CPS from your desktop icon.
the CPS Charting window
2. Access the CPS Charting window.
3. From the CPS Charting window, click Options. A pop-up menu appears.
4. Choose Show Questions and Categories. The checkmark next to the option disappears.
CPS 4.0 Users Guide
187
Chapter 5: Reporting Functions
Raw Response Data Export
You can export the students’ performance data for a session from the CPS Charting window.
You can also export this data as a report in the Reports tab. For more information on exporting
the performance data from the Reports tab, please see Response
Data Export Report. To export students’ performance data from the
CPS Charting window
1. Open CPS from your desktop icon.
2. Access the CPS Charting window. For more information on
accessing the CPS Charting window, please see Access the
Figure 221: Exporting session
CPS Charting window.
data from the CPS Charting
3. From the CPS Charting window, click Reports. A pop-up
window
menu appears.
4. Choose Raw Response Data Export. CPS exports the session’s performance data as a
Comma Delimited (*.csv) file. A pop-up window will tell you the location to which CPS
saved your file.
Save Chart as Graphic
You can save the chart from the CPS Charting window as a bitmap picture file. To save the chart
as a picture file
1. Open CPS from your desktop icon.
2. Access the CPS Charting window. For more
information on accessing the CPS Charting window,
please see Access the CPS Charting window.
3. From the CPS Charting window, click Reports. A popup menu appears.
4. Choose Save Chart as Graphic. A Save As window
Figure 222: Saving a chart as a
picture
in the CPS Charting window
appears.
5. Browse through your computer to find the location to which you would like to save the
chart.
6. Title your chart.
7. Click Save to save the chart as a bitmap (*.bmp) file and return to the CPS Charting
window.
Print Chart
You can print the chart from the CPS Charting window. To print the chart
1. Open CPS from your desktop icon.
2. Access the CPS Charting window. For more
information on accessing the CPS Charting window,
please see Access the CPS Charting window.
3. From the CPS Charting window, click Reports. A popup menu appears.
4. Choose Print Chart. The Print window appears.
Figure 223: Printing a chart from the
5. Select the printer to which you would like to send the
CPS Charting window
file.
6. Click OK to print the chart and return to the CPS Charting window.
CPS 4.0 Users Guide
188
Chapter 5: Reporting Functions
Show Multiple Charts
You can view an individual chart for each question, answer, or category. You can set the view
for your charts from the Chart Responses option. For more information on charting responses,
please see View Performance Data by Question, View
Performance Data by Answer, or View Performance Data by
Category. To display multiple charts
1. Open CPS from your desktop icon.
2. Access the CPS Charting window. For more information
on accessing the CPS Charting window, please see
Access the CPS Charting window.
3. From the CPS Charting window, click Options. A popup menu appears.
4. Choose Show Multiple Charts. A checkmark appears by
the option. The CPS Charting window changes to reflect
your choice.
Figure 224: Choosing the Show
Multiple Charts option from the
CPS Charting window
To view a single chart
1. Open CPS from your desktop icon.
2. Access the CPS Charting window.
3. From the CPS Charting window, click
Options. A pop-up menu appears.
4. Choose Show Multiple Charts. The
checkmark beside the option disappears.
The CPS Charting window displays only
one chart.
Figure 225: Viewing multiple charts in the CPS
Charting window
CPS 4.0 Users Guide
189
Chapter 5: Reporting Functions
Answer Options
You can change your answer options on the chart legend to include the percentage of students
choosing an answer choice, the total number of students who chose that answer, and the question
stem for that question. To change the answer
options
1. Open CPS from your desktop icon.
2. Access the CPS Charting window. For
more information on accessing the CPS
Charting window, please see Access the
CPS Charting window.
3. From the CPS Charting window, click
Options. A pop-up menu appears.
4. Choose Answer Legend Options then
select the answer choices you would like
to use in the chart legend. A checkmark
appears next to each choice you select.
Figure 226: Choosing answer legend options for the
chart legend in the CPS Charting window
To remove an answer option from the chart
legend
1. Open CPS from your desktop icon.
2. Access the CPS Charting window.
3. From the CPS Charting window, click Options. A pop-up menu appears.
4. Choose Answer Options then select the choices that you would like to remove from the
chart legend. The checkmark beside each option disappears as you click it.
Show Answer Legend
You can view the legend for a chart in the CPS Charting window. To view the legend
1. Open CPS from your desktop icon.
2. Access the CPS Charting window. For more
information on accessing the CPS Charting window,
please see Access the CPS Charting window.
3. From the CPS Charting window, click Options. A
pop-up menu appears.
4. Choose Show Legend. A checkmark appears next to
the option and the CPS Charting window displays a
legend beneath the chart (or beneath each chart in
Multiple Chart view).
Figure 227: Choosing the Show
Answer Legend option in the CPS
Charting window
CPS 4.0 Users Guide
190
Chapter 5: Reporting Functions
To remove the legend from the chart
1. Open CPS from your desktop icon.
2. Access the CPS Charting window.
3. From the CPS Charting window, click
Options. A pop-up menu appears.
4. Choose Show Legend. The checkmark next
to the option disappears.
Figure 228: Viewing a chart with a legend in
the CPS Charting window
Slice Performance Data
You can use the CPS Charting window to slice performance data from two or more sessions, or
from an assessment and demographic information. This section will show you how to
Slice data by demographics
Slice data by comparison sessions
Slice by Demographics
You can slice performance data using a session and demographic information. To use
demographic information in the CPS Charting window, you will need to complete the
demographic student data from the class roster.
For more information on entering student data,
please see Edit Student Information. To slice
performance data by demographic
1. Open CPS from your desktop icon.
2. Access the CPS Charting window. For
more information on accessing the CPS
Charting window, please see Access the
CPS Charting window.
3. Select the questions or answer choices you
would like to view from the Questions
Delivered in this Session window. You
can select questions or answer choices by
clicking the box next to a choice so that a
checkmark appears. The chart will change
to depict each question or answer choice
you choose. The figure at right shows
Question 10 as a bar chart, in the question
Figure 229: Viewing a question chart sliced with
response view.
demographic data in the CPS Charting window
CPS 4.0 Users Guide
191
Chapter 5: Reporting Functions
4. Select the demographic data you would like to use by clicking the demographic
information in the Roster Demographics window. The figure on page 189 shows
Question 10 as a bar chart, in the question response view, with only male respondents.
Slice by Comparison Sessions
You can slice performance data using two or more sessions. You will need to have at least two
sessions in the Reports tab to slice with multiple sessions. To slice performance data with
multiple sessions
1. Open CPS from your desktop icon.
2. Access the CPS Charting window. For
more information on accessing the
CPS Charting window, please see
Access the CPS Charting window.
3. From the CPS Charting window, click
Options. A pop-up menu appears.
4. Choose Add Sessions. The CPS
Choose Sessions for Charting window
appears.
5. Select the sessions or specific
questions you would like to use to
slice performance data.
6. Click OK to return to the CPS
Charting window.
Figure 230: Choosing additional sessions for the CPS
Charting window
CPS 4.0 Users Guide
192
Chapter 6: Gradebook and Attendance Functions
Chapter 6: Gradebook and Attendance
Functions
CPS allows you to create and engage lessons, view student performance data, and track student
performance data as grades. CPS saves the grades in the Gradebook tab, where you can sort the
grades by assessment type. The Gradebook tab also allows you to review your class roster and
view Gradebook reports.
In the Gradebook tab, you can also review your class attendance records. You choose the
settings for these records from the CPS Class Information window in the Classes tab. You can
view attendance records as an attendance sheet in the Class Info section of the Gradebook tab,
or as a graded assessment in the Assessments section.
Chapters 3 and 4 showed you how to create and engage lessons and activities in CPS. In this
chapter, you will learn how to
Create a gradebook in CPS
Manage assessments
Manage class data
View Gradebook reports
Manage Attendance
The Gradebook tab contains all of your graded information from CPS. In addition to assessments
you engage in CPS, you can enter non-CPS assessments into your gradebook. The CPS
Gradebook can track student grades as a points-based or percentage-based gradebook.
Figure 231: Viewing the Gradebook tab
CPS 4.0 Users Guide
193
Chapter 6: Gradebook and Attendance Functions
The Gradebook tab functions include
The list of classes in the open database in the top right corner. Select a class to view.
Icons for each Assessment category in the left side toolbar, including an All icon.
Tables listing students’ First and Last Names, Grades for each assessment category
selected, and the Average and Weighted Average of the grades. Click the category
headings to sort by any of these columns. You may sort them in ascending or descending
order.
Class Information button in the side toolbar which displays, in table form, the data you
entered on the Classes tab for each student, and accesses Attendance data.
Reports button, in the side toolbar, which accesses reports available in the open database
for the selected class.
Pop-up calendars at the bottom of the window from which you can select View from and
to dates of the delivery sessions from which you want to view grade results.
The Grading Period (semester, term, quarter) of the class you are viewing.
Icons on the main toolbar for New, Edit, Delete, Export, Choose, Upload, Create
Attendance, and Gradebook Setup.
Use the CPS Gradebook
When you create classes in CPS, CPS can store your students’ grades in the Gradebook tab. This
section will show you how to
Create a gradebook
Manage Assessments
Manage Class Info
Manage Reports
Create a Gradebook
The CPS Gradebook is a multi-function tool that will help you organize, maintain, and evaluate
your students' performance. This section describes three different ways in which you can create
your Gradebook:
Create Gradebook through Session Setup
Quick Setup and Grade Export
Advanced Gradebook Options
Create Gradebook from Session Setup
You can add classes and grades to your CPS Gradebook through the CPS Session Setup window.
When you use the Include in Gradebook option from the CPS Session Setup window, CPS
adds the session's performance data to the Gradebook. To create a gradebook from session setup
1. Open CPS from your desktop icon.
2. Click the Lessons tab.
3. Select the lesson or lessons you would like to engage. For more information on engaging
a lesson, please see Engage Lessons.
4. Click
. The CPS Session Setup window appears.
CPS 4.0 Users Guide
194
Chapter 6: Gradebook and Attendance Functions
5. Choose your setup options on the CPS Session
Setup window.
6. Click the box next to the Include in Gradebook
option so that a checkmark appears. You can also
add an attendance record to the Gradebook by
clicking the box next to the Create Attendance
from this Assessment option.
For more information on including attendance records in
the Gradebook, please see Create Attendance from Session
Setup.
CPS will include your students' performance results in the
CPS Gradebook. You can access the grades through the
Gradebook tab.
Quick Setup and Grade Export
Figure 232: Including the session in the
Gradebook from the CPS Session Setup
window
You can quickly set up your Gradebook and export the students' grades to a spreadsheet
application, such as Microsoft Excel. To quickly setup your gradebook and export the grades to a
spreadsheet
1. Open CPS from your desktop icon.
2. Click the Gradebook tab. If this is your first time using the Gradebook in this database,
the CPS Gradebook Setup Wizard appears.
3. Follow the CPS Gradebook Setup Wizard if this is your first time using the Gradebook.
To set your Gradebook for an additional class, click
. For more information on
the Gradebook Setup Wizard, please see Advanced Gradebook Setup.
4. Select the class whose grades you would like to export.
5. Click
. CPS exports your gradebook to Microsoft Excel or to your computer’s
default spreadsheet application.
Your class roster and grades will appear in the spreadsheet. You can save this information and
import it to other applications or keep the spreadsheet for your records.
CPS 4.0 Users Guide
195
Chapter 6: Gradebook and Attendance Functions
Advanced Gradebook Setup
After you deliver CPS sessions to your class, CPS automatically saves the performance data in
the Reports tab. You can also choose to save the data to the Gradebook. For more information
on automatically adding sessions to the gradebook, please see Create Gradebook from Session
Setup. When you open the Gradebook tab, you can use the CPS Gradebook Setup Wizard to set
all your gradebook options. To use the CPS Gradebook Setup Wizard
1. Open CPS from your desktop icon.
2. Click the Gradebook tab.
3. If this is the first time you accessed the Gradebook tab in your database, the CPS
Gradebook Setup Wizard automatically appears. If you would like to set your gradebook
options for another class, click
.
The first tab is the Welcome tab. From here you can choose to have your database protected by a
password, which is required to open the database from this point forward. You can opt for a
points-based as opposed to percentage-based gradebook in this window. For more information
about password protection, please see Password-protect a Database.
Figure 233: Viewing the Welcome tab of the CPS Gradebook Setup Wizard
Click Next to proceed to the Class Information tab, or click OK to save your changes and end
the wizard.
CPS 4.0 Users Guide
196
Chapter 6: Gradebook and Attendance Functions
Figure 234: Viewing the Class Information tab of the CPS Gradebook Setup Wizard
From the Class Information tab you can import an existing CPS class that you are associated
with, create a new CPS class of students, or leave the list that appears in the window as is. For
more information on creating, importing, or editing a class, please see Create Classes, Import
Classes, or Edit Class Information. Click Next to proceed to the Grading Period tab, or click
OK to save your changes and end the wizard.
CPS 4.0 Users Guide
197
Chapter 6: Gradebook and Attendance Functions
Figure 235: Viewing the Grading Period tab of the CPS Gradebook Setup Wizard
The Grading Period tab allows you to customize and identify the time periods in which student
grades are organized. From this tab, type in the grading period name, then use the Begin Date
and End Date drop-down lists to select the coordinating dates. For more information on grading
periods, please see Grading Periods.
Click Next to proceed to the Weight Sets tab, or click OK to save your changes and end the
wizard.
CPS 4.0 Users Guide
198
Chapter 6: Gradebook and Attendance Functions
Figure 236: Viewing the Weight Sets tab from the CPS Gradebook Setup Wizard
Weight Sets allow you to differentiate the importance of varying assessments that go toward
students’ final grades. For a class during a specified grading period, click inside the empty cell
under each assessment type (Homework, Quiz, Exam, Test, Class Participation, and Other
(includes: classwork, review, lab, pre- and post-tests)) and enter the total point value you want
each category to have.
Each weight set must equal 100. You will not be able to view weighted averages until you have
at least one assessment from each category. Click Next to proceed to the Letter Grades tab, or
click OK to save your changes and end the wizard.
CPS 4.0 Users Guide
199
Chapter 6: Gradebook and Attendance Functions
Figure 237: Viewing the Letter Grades tab in the CPS Gradebook Setup Wizard
The Letter Grades tab allows you to establish the letter grade assigned to students’ points. For
example, if a student earns 83 points in your class after their assessments are weighed and tallied,
then that student would earn a letter grade of B. You can expand the letter grades to A+, A, A-,
and so on by clicking the Extended Letter Grades option. Click Next to proceed to the Class
Participation tab, or click OK to save your changes and end the wizard.
CPS 4.0 Users Guide
200
Chapter 6: Gradebook and Attendance Functions
Figure 238: Viewing the Class Participation tab in the CPS Gradebook Setup Wizard
The Class Participation tab allows you to add or deduct points for incorrect answers on a
particular assessment. You may choose to give your students additional credit for incorrect
answers as an incentive for attempting to answer all posed questions. You can also choose to
deduct points for every incorrect question as a disincentive for missing questions. Click OK to
exit the CPS Gradebook Setup Wizard and return to the Gradebook tab.
Using Grading Periods
You can create grading periods to help you organize your class records in the Gradebook tab.
This section will tell you how to
Create Grading Periods
Use Grading Periods
View data by calendar function
Create Grading Periods
CPS saves student performance data from the first day you begin using it, and you can organize
that data into certain grading periods. While the data available from the Reports tab is in order
sequentially, the Gradebook offers the opportunity to organize the data into specific grading
periods. For example, if you create and deliver questions to students from January 8 to February
21, and that is referred to as your fourth 6-week period, then from the Gradebook tab you can
define that period of time as such. To create a Grading Period
1. Open CPS from your desktop icon.
2. Click the Gradebook tab.
3. Click
. The CPS Gradebook Setup Wizard appears.
CPS 4.0 Users Guide
201
Chapter 6: Gradebook and Attendance Functions
4. Click on the Grading Period
tab.
5. Create Grading Periods by
typing a Grading Period title in
the Title text box.
6. Choose your Begin Date and
End Date.
7. Click OK to save your Grading
Period.
Figure 239: Creating Grading Periods in the CPS Gradebook
Setup Wizard
You can create multiple Grading Periods by repeating steps 5-6 above. You can view your class
assessments by grading period by using the Grading Period pull-down menu in the bottom
right-hand corner of the Gradebook tab. For more information on setting your gradebook
options, please see Advanced Gradebook Setup.
View Grades by Grading Period
Creating Grading Periods within the Gradebook tab allows you to organize your class records by
time frame. To view the gradebook by a Grading Period
1. Open CPS from your
desktop icon.
2. Click the Gradebook
tab.
3. Click the Class name
from the drop-down
list in the upper right
corner.
4. Click the Assessment
button from the side
toolbar.
5. Select a Grading
Period from the dropdown list in the
bottom right corner.
6. Use the Assessment
toolbar buttons to
view grades for the
selected class during Figure 240: Viewing the gradebook by Grading Period
the selected grading
period. Simply click whichever assessment category you would like to view. The class
grades for the selected category and Grading Period appear in table form, with the
selected assessment category as column headers.
CPS 4.0 Users Guide
202
Chapter 6: Gradebook and Attendance Functions
View Data by Calendar Function
You can view a small sub-section of the gradebook using the Calendar Function in the
Gradebook tab. To view specific dates in your
gradebook
1. Open CPS from your desktop icon.
2. Click the Gradebook tab.
3. Click the drop-down arrows next to
the View from: and to: pop-up
calendars to select a view start and end
date.
4. Click outside the calendar area to
make it disappear. The date you
selected appears in the drop-down list. Figure 241: wing specific dates in the Gradebook tab
Manage Assessments
The Gradebook tab offers three different views to help you sort through your class information:
the Assessments view, the Class Info view, and the Reports view.
In the Assessment view, you can manage your class assessments. You can find and edit CPS
assessments from the Reports tab, but from the Gradebook tab, you can also create new
assessments to include in the gradebook. This section will show you how to
View specific assessment types
Include an existing CPS assessment in the gradebook
Create assessments
Edit assessments
Delete assessments
Export assessments
View Specific Assessment Types
You can view specific CPS assessment types, which you can set from the CPS
Session Setup window or the Edit Assessments window. For more information on
setting the assessment type, please see Engage Lessons or Edit Assessments. You can
view specific assessment types using the Assessments toolbar. To view an assessment
type
1. Open CPS from your desktop icon.
2. Click the Gradebook tab.
3. On the left-hand side of the Gradebook tab, click Assessments. The
Assessments toolbar appears down the left-hand side of the tab.
Figure 242: Using the
Assessments toolbar
in the Gradebook tab
CPS 4.0 Users Guide
203
Chapter 6: Gradebook and Attendance Functions
4. Click an icon to view only that type of assessment. You can view the following
assessment types:
All assessment types
Homework
Quiz
Exam
Test
Other
Class Participation
Attendance
5. Click the icon again to remove that assessment type from your gradebook view.
NOTE: Make certain that the Grading Period highlighted in the lower right
corner represents the time frame of grades you want to view.
You can add, edit, and delete assessment grades from the Assessment view whether the grades
are generated from a CPS delivery session or not.
Include Assessment in Gradebook
Even if you don’t include an assessment in the gradebook when you deliver it, you can include
the assessment in the gradebook from the Gradebook tab. To add a CPS assessment to the
gradebook
1. Open CPS from your desktop icon.
2. Click the Gradebook tab.
3. Click
. The Choose Session for Gradebook window opens and lists previous CPS
delivery sessions not
already in the gradebook.
Sessions for which you
deleted data do not appear
in the list.
4. Select one or more sessions
that you want to add to the
gradebook.
5. Click OK. Column(s) of
grades for the selected
session(s) appear
immediately in the
Gradebook table, and CPS
recalculates the averages.
Figure 243: Adding an existing CPS session to the gradebook
CPS 4.0 Users Guide
204
Chapter 6: Gradebook and Attendance Functions
Create Assessments
You can include grades from non-CPS assignments by creating assessments in the Gradebook
tab. The gradebook averages these grades along with CPS-generated grades for each student. To
create an assessment
1. Open CPS from your desktop icon.
2. Click the Gradebook tab.
3. Click the Assessments button on the left-hand
toolbar.
. The CPS Assessment Options
4. Click
window appears.
5. Type a title for the new assessment in the
Assessment Title text box.
6. Choose your assessment options.
Assessment Category – sets the assessment
type.
Max Points – sets the maximum number of
points a student can earn on the assessment.
Curve – (optional) sets the curve value.
Assessment Multiplier – sets the number of
times you want CPS to count this assessment.
Other Classes – (optional) includes any
additional classes to which you would like to Figure 244: Creating a new assessment
from the CPS Assessment Options window
add this assessment.
Comment – (optional) associates specific notes about the assessment.
Online Options – allows students to view an assessment study guide online. This
option is available only for instructors using CPSOnline.
7. Click OK. A new column heading appears in the Gradebook Assessment table.
8. Type each student’s grade in the new column. CPS updates each student’s average as you
type.
Edit Assessments
You can edit both CPS and non-CPS assessments entered in the Gradebook tab. To edit an
assessment
1. Open CPS from your desktop icon.
2. Click the Gradebook tab.
3. Click the Assessments button on the left-hand toolbar.
4. Click the top of the column that contains the assessment you would like to edit.
CPS 4.0 Users Guide
205
Chapter 6: Gradebook and Attendance Functions
5. Click
. The CPS Assessment Options window opens. This window is identical to
the New Assessment Options window except that you cannot edit this assessment for
another class.
Edit title for the assessment if you wish in the
Assessment Title text box.
Select another Assessment Category if you
wish.
Edit the maximum point value the class
session is worth if you wish in the Max
Points text box. Edit the Curve value to add
to grades, if any.
Multiply the assessment grade using the
Assessment Multiplier feature. By entering
the number you wish to multiply each grade
by, you can have assessments count twice,
three times, or as many times as you would
like.
6. Change correct answers or omit questions from
your assessment using the Re-grade button. For
more information on re-grading questions or
students, please see Re-grade Questions or Regrade Students.
7. Add any comments to describe the new
Figure 245: Editing an assessment from
the CPS Assessment Options window
assessment.
8. Click OK.
9. Edit individual student grades from the Assessment view. CPS updates each student’s
average as you type.
Delete Assessments
You can delete any assessment from the Assessment view. If you delete a CPS-generated
assessment, you can no longer access the performance data from the Reports tab. When you
delete any assessment, CPS automatically recalculates students’ averages without the deleted
assessment.
1. Open CPS from your desktop icon.
2. Click the Gradebook tab.
3. Click the Assessments button on the left-hand toolbar
4. Click the top column that contains the assessment you would like to delete.
5. Click
. A confirmation message appears.
6. Click OK in the confirmation message to delete the assessment and return to the
Gradebook tab.
CPS 4.0 Users Guide
206
Chapter 6: Gradebook and Attendance Functions
Export Assessments
You can export assessments in a class gradebook as a Comma Delimited (*.csv) file. You can
open the Comma Delimited file in Microsoft Excel or your computer’s default spreadsheet
application. To export assessments from a class gradebook
1. Open CPS from your desktop icon.
2. Click the Gradebook tab.
3. Click the Assessments button on the left-hand toolbar.
4. Choose which assessment(s) you want to include in your export by selecting from the
assessment category icons on the left side of the screen. Only the assessments that are
showing in the assessment table at the time you click Export will be included in your
export. Make sure the grading period and date range that contain the assessments you
want to view are selected, so that all desired assessments are shown.
. CPS exports the assessments to Microsoft Excel or to your computer’s
5. Click
default spreadsheet application.
Manage Class Info
In the Class Info view, you can manage your CPS classes and their attendance records. This
section will show you how to
Review student information
Change attendance options
Review Student Information
You can view the details of each student in your class. To view student details
1. Open CPS from your desktop icon.
2. Click the Gradebook tab.
3. Click the Class Info button on the left-hand toolbar.
4. Select a class name from the class drop-down list, located in the upper right
corner of the Gradebook tab. You create and edit the classes from the
Classes tab. For more information on creating and editing classes, please
see Create Classes or Edit Classes.
5. Click the Students icon from the Class Info toolbar. The students in that
class, along with their class information, displays as a table in the
Gradebook tab. You can edit any information displayed in the table. CPS
saves any changes you make from the Gradebook tab in the Classes tab.
Student details from the Gradebook form include
Last name and first name
Student ID number
Economic status
Gender
Ethnicity
Pad ID number
Pad serial number
Figure 246: Using the
Class Info toolbar in the
Gradebook tab
CPS 4.0 Users Guide
207
Chapter 6: Gradebook and Attendance Functions
You may sort by any of the above categories by simply clicking the corresponding category title
in each column. You may choose to sort in ascending or descending order by clicking the
category title again.
Change the class you are viewing by simply clicking a different class name in the drop-down list
from the upper right corner.
Figure 247: Viewing class information in the Gradebook tab
Change Attendance Options
You can choose your attendance options from the CPS Class Information window. By selecting
Display Attendance as Absent/Present in the Class Info Area, you can view student
attendance as an Attendance sheet. For more information on taking attendance, please see
Manage Attendance.
1. Take attendance from the Classes tab.
2. Go to the Gradebook tab.
3. Select a class name from the Class drop-down list, located in the upper right corner of the
Gradebook tab. These classes are entered from the Classes tab and are only displayed
here.
4. Select the grading period that you want to view attendance data from under the Grading
Period drop-down list in the bottom right corner.
NOTE: While your entire attendance records are accessible, CPS will display
a maximum of seven weeks at a time.
5. Click the Class Info button from the side toolbar.
6. Click the Attendance icon in the Class Info toolbar. The class’s attendance data is
displayed in table form.
Beside each student’s name is the attendance status by date, as it was recorded for the Classes
tab. Upon collecting attendance data from the Classes tab, each student’s status is either P
(present) or A (absent).
CPS 4.0 Users Guide
208
Chapter 6: Gradebook and Attendance Functions
You can alter the attendance status by clicking on an individual cell. A drop-down list appears
with the varying attendance options. These attendance options include:
A = absent
E = excused
H = holiday
P = present
T = tardy
U = unexcused
IS = in school suspension
OS = out of school suspension
SR = school related
Figure 248: Changing attendance options in the
Class Info area
For more information on creating an attendance sheet in the Gradebook tab, please see Take
Attendance as Absent/Present.
Use Gradebook Reports
CPS generates grade reports from the assessment grades in the Gradebook tab. From the
Gradebook tab you can generate the
Progress Report
Assessment Summary
Report Card Summary
Grade Post Summary
Attendance Report
You can use these reports as progress reports for students, or as a way to track student
performance data. You can also track student performance data from the Reports tab.
For more information on performance data reports, please see Choose Reports.
This section will show you how to
Access Gradebook reports
View Gradebook reports
Access Gradebook Reports
You can access five different gradebook reports using the Reports toolbar in the
Gradebook tab. To access a gradebook report
1. Open CPS from your desktop icon.
2. Click the Gradebook tab.
3. Click the Reports button on the left-hand toolbar.
Figure 249: Using the
Reports toolbar in the
Gradebook tab
CPS 4.0 Users Guide
209
Chapter 6: Gradebook and Attendance Functions
4. Click the icon representing the report type you would like to view. The Gradebook
Reporting window appears. For more information on the different types of gradebook
reports, please see View
Gradebook Reports.
Classes – Choose the
class for which you
would like to view the
gradebook report.
Report Title – Create a
title for your report
Grading Period – Select
a Grading Period from
the pull-down menu (only
if available). For more
information on creating
Grading Periods, please
see Using Grading
Periods.
Report From – Use the
Figure 250: Creating a gradebook report from the CPS Gradebook
Reporting window
Report From: and To:
pull-down menus to choose a date range for which you would like to view the report.
If you choose a Grading Period, CPS automatically chooses the range of dates that
correspond with the Grading Period.
5. Click the Preview button. The Print Preview window appears with your report.
6. Review the report. For more information on the specific reports available, please see
View Gradebook Reports.
7. Click Close to exit out of the Print Preview window and return to the Gradebook tab.
View Gradebook Reports
The Reports section of the Gradebook tab provides you with five different report types,
generated from information in your class gradebook. From the Gradebook tab, you can view the
Progress Report
Assessment Summary Report
Report Card Summary Report
Grade Post Summary Report
Attendance Report
Progress Report
The Progress Report allows you to view each student's performance data for every assessment
within your Grading Period. You can print out Progress Reports to send home with your students
for a parent's signature. These reports include information regarding
Student performance on each assessment
Comparison of student performance versus class performance
Any missed assignments
Student's grade during the Grading Period
Student's weighted grade (if any) during the Grading Period
CPS 4.0 Users Guide
210
Chapter 6: Gradebook and Attendance Functions
Figure 251: Viewing a Progress Report from the Gradebook tab
For information on accessing the Progress Report, please see Access Gradebook Reports.
Assessment Summary
The Assessment Summary shows each student's progress in each type of assessment category.
For example, you look at the Assessment Summary for Nancy Drew and discover that she excels
in Class Participation, but does not do well on quizzes.
Figure 252: Viewing an Assessment Summary report from the Gradebook tab
For information on accessing the Assessment Summary report, please see Access Gradebook
Reports.
CPS 4.0 Users Guide
211
Chapter 6: Gradebook and Attendance Functions
Report Card Summary
You can print a Report Card Summary to send home with your students at the end of a Grading
Period. The Report Card Summary shows the class average, the student's average, and includes a
grading scale.
Figure 253: Viewing a Report Card Summary from the Gradebook tab
For information on accessing the Report Card Summary report, please see Access Gradebook
Reports.
Grade Post Summary
When you choose the Grade Post Summary from the Reports toolbar, a grade summary is
exported to Microsoft Excel. You can choose to view the Grade Post Summary by Student Full
Name, Student Last Name, Student ID, or Pad ID.
Figure 254: Viewing a Grade Post Summary from the Gradebook tab
For information on accessing the Grade Post Summary report, please see Access Gradebook
Reports.
CPS 4.0 Users Guide
212
Chapter 6: Gradebook and Attendance Functions
Attendance Report
When you choose the Attendance Report from the Reports toolbar, an attendance report is
exported to Microsoft Excel. You can view your entire Grading Period and attendance results
from this report type.
Figure 255: Viewing an Attendance Report from the Gradebook tab
For information on accessing the Attendance Report, please see Access Gradebook Reports.
Manage Attendance
CPS gives you options when you take attendance. You can take attendance from several
places within CPS, and there are multiple ways to display your attendance data. This section will
show you how to
Set Attendance Options
Take attendance as Absent/Present
Take attendance as a session
Take a graded attendance average
Upload attendance
Set Attendance Options
You can set your attendance options to view attendance records as attendance sheets or as
assessments in the Gradebook. Follow the steps below to set your attendance options.
1. Open CPS from your Desktop icon.
2. Click the Classes tab.
3. Select the class name for which you would like to set the attendance options and click
. Alternatively, double-click on the class name. The CPS Class Information
window appears.
4. Click the Class Information tab.
CPS 4.0 Users Guide
213
Chapter 6: Gradebook and Attendance Functions
5. Choose one of the
following from the
Attendance Options
section:
Display new
attendance sessions in
the Reports tab. This
option allows you to
record attendance as a
session in the Reports
tab.
Display new
attendance sessions as
Absent/Present in the
Class Info area of the
Gradebook tab. This
option displays
Figure 256: Changing attendance options for a class in the CPS Class
attendance records as an Information window
attendance sheet in the Gradebook.
6. Click Save to save your options.
7. Click Done to close the CPS Class Information window and return to the Classes tab.
You can edit your attendance options at any time when you can access the Classes tab. Any
attendance changes that you make affect only new attendance records.
Take Attendance as Absent/Present
CPS allows you to store attendance records as an attendance sheet in the Class Info section of the
Gradebook tab. When you take attendance through a session or through formal attendance, CPS
records the attendance as an A (absent) or P (present) in the Gradebook tab. This section will
show you how to
Take attendance from a session
Take attendance during a session
Take attendance from the Classes tab
Take Attendance from a Session
CPS can create an attendance sheet from a session by counting a student as present if they
respond to any question within the session. CPS then saves the attendance information in the
Class Info area of the Gradebook tab. To take attendance from a session
1. Open CPS from your desktop icon.
2. Click the Lessons tab.
3. Select the lesson you would like to engage and click
window appears.
CPS 4.0 Users Guide
. The CPS Session Setup
214
Chapter 6: Gradebook and Attendance Functions
4. Select your session options and click the box next to
the Take Attendance from this Assessment option,
so that a checkmark appears.
5. Click Start to begin your session.
When students respond to at least one question in the session,
CPS will mark them as "Present" for the day in the Class Info
area of the Gradebook tab.
Take Attendance During a Session
Figure 257: Creating an attendance sheet
from the CPS Session Setup window
You can use CPS to create an attendance sheet for the class during a session. Even if you do not
choose to create attendance from the CPS Session Setup window, you can take a formal
attendance from the Engage toolbar. To use the Engage toolbar to take attendance during a
session
1. Open CPS from your desktop icon.
2. Click the Lessons tab.
3. Select the lesson you would like to engage.
4. Click
. The CPS Session Setup window appears.
5. Choose your session options and click Start. The Engage toolbar appears.
6. Click the Class… button. A pop-up menu appears.
Figure 258: Taking attendance from the Engage toolbar
7. Choose Take Attendance. The Attendance window appears.
8. Click the Start button to allow students to respond with their response pads. When the
pad ID number corresponding to a student’s pad lights up blue, CPS marks a P (present)
for the day on the attendance sheet in the Class Info area of the Gradebook tab.
CPS 4.0 Users Guide
215
Chapter 6: Gradebook and Attendance Functions
Figure 259: Recording attendance from the Attendance window
Take Attendance from the Classes tab
Even if you do not engage a lesson during class, you can still take attendance. You can take
attendance from the Classes tab in CPS. To take attendance from the Classes tab
1. Open CPS from your desktop icon.
2. Click the Classes tab.
3. Select the class for which you would like to take attendance and click
. The
Attendance window appears.
4. Click the Start button to allow students to respond with their response pads. When the
pad ID number corresponding to a student’s pad lights up blue, CPS marks a P (present)
for the day on the attendance sheet in the Class Info area of the Gradebook tab.
Take Attendance as an Assessment
CPS allows you to store student attendance records as assessments in the Reports tab. Then, you
can import the assessment from the Reports tab into the Assessments area of the Gradebook tab.
This section will show you how to
Create an attendance assessment from a session
Create an attendance assessment from an existing assessment
CPS 4.0 Users Guide
216
Chapter 6: Gradebook and Attendance Functions
Create an Attendance Assessment from a Session
CPS can create attendance assessments in the Reports tab for your sessions. You can add the
attendance assessments to the Gradebook at the beginning of the session from the CPS Session
Setup window or after the session from the Reports tab. For more information on creating
attendance assessments from existing sessions, please see Create an Attendance Assessment
from an Existing Session. To create an attendance assessment
from a session
1. Open CPS from your desktop icon.
2. Click the Lessons tab.
3. Select the lesson you would like to engage and click
. The CPS Session Setup window appears.
4. Click the box next to the Create Attendance from this
Assessment so that a checkmark appears. The Include
Attendance in Gradebook and Max Points options
become available.
5. Click the box next to the Include Attendance in
Gradebook option so that a checkmark appears.
6. Set a value for the Max Points in the Attendance area.
7. Click Start to begin your session.
Figure 260: Creating an attendance
assessment for a session from the
CPS Session Setup window
When students respond to a question in the session, CPS automatically creates an attendance
session in the Reports tab and records a grade in the Gradebook. In the Gradebook, CPS awards
grade points based off your attendance Max Points value. If you take attendance multiple times
during a class period, CPS will divide the Max Points value by the number of times you took
attendance.
Create an Attendance Assessment from an Existing Session
CPS allows you to create an attendance assessment from an existing session in the Reports tab.
Even if you previously set your class attendance options to create an attendance sheet, and if
your class options currently create an attendance assessment, you can create an attendance
assessment from an assessment in the Reports tab. Once you create the attendance assessment in
the Reports tab, you can import the assessment to the Gradebook tab. For more information on
importing a session to the Gradebook tab, please see Include Assessment in Gradebook. To
create an attendance assessment from an existing session
1. Open CPS from your desktop icon.
2. Click the Reports tab.
3. Select the existing session for which you would like to create an attendance assessment.
CPS 4.0 Users Guide
217
Chapter 6: Gradebook and Attendance Functions
4. Click
. Alternatively, right-click on the session title. A
pop-up menu appears.
5. Choose Create Attendance.
CPS creates an attendance session, based on student responses from
the existing session, in the Reports tab.
Figure 261: Creating an
attendance session from the
Reports tab
Take a Graded Attendance Average
CPS allows you to create an incentive for students to stay for the entire class. If you take
attendance multiple times during a class period, CPS will take the Max Points for the attendance
session and divide it by the number of times you took attendance. For example, if you set the
max points for the attendance session at 15 and took attendance only at the beginning of class,
students responding to any question during the session would receive 15 points. If you took
attendance at the beginning of class, then in the middle and at the end of class using the Engage
toolbar, a student present only at the beginning of class would receive 5 points for the attendance
assessment; a student leaving after the second attendance would receive 10 points; a student
staying all the way through class would receive 15 points. This section will show you how to
Take an attendance average from a session
Take an attendance average from the Classes tab
Take an Attendance Average from a Session
CPS allows you to create an incentive for students to stay for the entire class. If you take
attendance multiple times during a class period, CPS will take the Max Points for the attendance
session and divide it by the number of times you took attendance. To take an average attendance
grade from a session
1. Open CPS from your desktop icon.
2. Click the Lessons tab.
3. Select a lesson you would like to engage and click
. The CPS Session Setup
window appears.
4. Click the box next to the Create Attendance from this Assessment option, so that a
checkmark appears. The Include Attendance in Gradebook and Max Points options
become available.
5. Click the box next to the Include Attendance in Gradebook option to include the
attendance in the gradebook. If you do not choose this option, CPS will still create an
attendance session in the Reports tab, where you can add the session to the Gradebook at
a later time.
6. Type in a value for your Max Points.
7. Click Start to begin the session.
8. Use the Engage toolbar to take attendance multiple times during the session. CPS will
divide the Max Points by the number of times you took attendance during class. For more
information on taking attendance from the Engage toolbar, please see Take Attendance
During a Session.
CPS 4.0 Users Guide
218
Chapter 6: Gradebook and Attendance Functions
Take an Attendance Average from the Classes tab
Even if you don’t engage a lesson during class, you can still create attendance grades using the
Classes tab. To take an attendance average from the Classes tab
1. Open CPS from your desktop icon.
2. Click the Classes tab.
3. Select the class for which you would like to take attendance and click
Attendance window appears.
. The
Figure 262: Taking an attendance average from the Classes tab with the Attendance window
4. In the Attendance Options area of the Attendance window, click the box next to the
Include Attendance in Gradebook option so that a checkmark appears.
5. Set a value for your Max Points. The Max Points tell CPS the maximum number of
points you would like to assign to a student for the day’s attendance grade.
6. Click Start to begin attendance. When students press an answer key (A/1 - J/0 on RF or
A - H on IR), their corresponding pad ID number lights up on the Attendance window
and CPS creates an attendance session (if one does not already exist for the day) in the
Reports tab and a grade in the Gradebook tab.
7. Repeat steps 1-6 for as many times as you would like to take attendance.
CPS records students’ attendance grades based on the Max Points value divided by the number
of times you took attendance.
CPS 4.0 Users Guide
219
Chapter 6: Gradebook and Attendance Functions
Upload Attendance
If you have a CPSOnline class, you can upload your attendance assessments to CPSOnline. This
section will show you how to
Automatically upload attendance from session setup
Automatically upload attendance from the Attendance window
Upload attendance after class
Automatically Upload Attendance from Session Setup
You can set CPS to automatically upload your attendance sessions after you end the session. To
set CPS to do this, you will need to set your options in the
CPS Session Setup window. To automatically upload
attendance from session setup
NOTE: To set the Automatically Upload
Attendance option, you must have a
CPSOnline class and have your class
options set to Display new attendance in
the Reports tab. For more information on
setting your class options, please see
Setup Attendance Options.
1.
2.
3.
4.
Make sure to connect your computer to the Internet.
Open CPS from your desktop icon.
Click the Lessons tab.
Select the lesson you would like to engage and click
Figure 263: Automatically uploading
attendance assessments from the
CPS Session Setup window
. The CPS Session Setup window appears.
5. Click the box next to the Create Attendance from
this Assessment option, so that a checkmark appears. The Include Attendance in
Gradebook, Max Points, and Automatically Upload Attendance options become
available.
6. Click the box next to the Automatically Upload Attendance option so that a checkmark
appears.
7. Click Start to begin the session.
CPS will automatically upload the attendance assessment to CPSOnline after you end your
session. CPS will also include the attendance assessment in the Reports tab of CPS.
CPS 4.0 Users Guide
220
Chapter 6: Gradebook and Attendance Functions
Automatically Upload Attendance from the Attendance window
You can set CPS to automatically upload your attendance assessments when you take attendance
from the Classes tab. To automatically upload attendance from the Attendance window
NOTE: To set the Automatically Upload Attendance option, you must have
a CPSOnline class and have your class options set to Display new attendance
in the Reports tab. For more information on setting your class options, please
see Setup Attendance Options.
1. Make sure to connect your computer to the Internet.
2. Open CPS from your desktop icon.
3. Click the Classes tab.
4. Select the class for which you would like to take attendance and click
Attendance window appears.
. The
Figure 264: Automatically uploading attendance from the Attendance window
5. In the Attendance Options area of the Attendance window, click the box next to the
Include Attendance in Gradebook option so that a checkmark appears.
6. Set a value for your Max Points. The Max Points tell CPS the maximum number of
points you would like to assign to a student for the day’s attendance grade.
7. Click the box next to the Automatically Upload Attendance option so that a checkmark
appears.
CPS 4.0 Users Guide
221
Chapter 6: Gradebook and Attendance Functions
8. Click Start to begin attendance. When students press an answer key (A/1 - J/0 on RF or
A - H on IR), their corresponding pad ID number lights up on the Attendance window
and CPS creates an attendance session (if one does not already exist for the day) in the
Reports tab and a grade in the Gradebook tab.
9. Repeat steps 1-8 for as many times as you would like to take attendance.
CPS automatically uploads your attendance assessment after you end the attendance. If you take
attendance multiple times during the class period, CPS will adjust your students’ attendance
grades to reflect an attendance average.
Upload Attendance after Class
CPS allows you to upload attendance assessments after class from the Reports tab. To upload
attendance after class
NOTE: To upload attendance, you must have a CPSOnline class and have
your class options set to Display new attendance in the Reports tab. For
more information on setting your class options, please see Setup Attendance
Options.
1.
2.
3.
4.
Make sure to connect your computer to the Internet.
Open CPS from your desktop icon.
Click the Reports tab.
Select the attendance assessment you would like to upload. If you would like to upload
attendance from a previous session without a current attendance assessment, you will first
need to create an attendance assessment from that session. For more information on
creating an attendance assessment from an existing session, please see Create an
Attendance Assessment from an Existing Session.
. The CPSOnline Login Wizard appears.
5. Click
6. Login to CPSOnline using the Wizard.
CPS uploads your attendance assessments to CPSOnline.
CPS 4.0 Users Guide
222
Appendix A: REAP
Appendix A: REAP
REAP is an evaluation tool produced by eInstruction Corporation to use with the Classroom
Performance System (CPS). REAP (Real-time Evaluation of Academic Progress) allows
administrators to view student performance data, organized into nine different report types, by
class, standards, school, or district. Administrators view the performance data using the REAP
Dashboard, available from http://cpsonline.einstruction.com. You can view a sample REAP
Dashboard by going to http://www.einstruction.com/REAP and clicking on the REAP Dashboard
image. You access the REAP Dashboard from CPSOnline, the online component of CPS. When
eInstruction creates your REAP account, administrators will be able to view performance data
from CPSOnline.
The REAP Dashboard presents the
performance data as graphs. The
graphs show student performance
based on Standards, demographics,
and campus information.
Administrators can click on each
graph to view more information on
the graph or to change the settings
on the Dashboard so that they can
view performance data sorted by
student demographics, school, or
district.
Appendix A contains walkthroughs for the following REAP users:
Curriculum Coordinators
Teachers using CBIT
Teachers not using CBIT
You can find more information on REAP and CBIT by contacting your local Education
Consultant or by calling eInstruction at 888.333.4988 and speaking with a Technical Sales
Associate. Your contact person can provide you with the REAP Tool Kit, which provides indepth explanations of the REAP process.
CPS 4.0 Users Guide
223
Appendix A: REAP
Curriculum Coordinator Walkthrough
For a campus or district to use REAP to gather student performance data, a curriculum
coordinator needs to create and send assessments to teachers. This guide will show you how to
Create lessons with standards
Create and send assessments
Create Lessons with Standards
Before you can create and send assessments, you need to create a CPS database that contains
lessons with associated premium standards. This first section will show you how to create and
populate a database in CPS.
Create a Database
1. Open CPS from your desktop icon.
The Open or Create New Database
window appears (Figure 1).
Figure 1: Choose Create a new CPS database
2. Choose Create a new CPS
database. The New CPS file
window appears (Figure 2).
3. In the File name box, title your
database. In the example to the right,
the database name is
District_Coordinator. The new
database will have a file extension of
*.cps. CPS will open your new
database to the Lessons tab (Figure
3).
Figure 2: Create a new CPS database
CPS 4.0 Users Guide
224
Appendix A: REAP
Figure 3: Empty CPS database opened to the Lessons tab
Download REAP Standards from eInstruction
1. Open your web browser and go to http://www.einstruction.com/downloads.
2. Select State Standards from the
Download Types pull-down menu.
3. Click OK.
4. Choose your state, country, or
province from the pull-down menu.
5. Click Go.
6. Select a standard type from the list of
available standards. The File
Download window appears (Figure 4).
7. Click Save and browse through your
Figure 4: Save downloaded standards
computer to find the location to which
you would like to save your standards. You will be able to import these standards to CPS.
Import CPS REAP Standards
1. Click on the Standards tab.
2. Click
. A pop-up menu appears.
3. Choose Import…. The CPS Import
Standards window opens (Figure 5).
4. Click the Browse button to browse
through your computer and find the
standards you would like to import.
Figure 5: Import downloaded standards
CPS 4.0 Users Guide
225
Appendix A: REAP
5. Indicate the standards you would like to import by clicking the checkbox next to each
standard.
6. Click OK to import your standards. CPS imports your standards to the Standards tab in
CPS (Figure 6).
Figure 6: Standards in the Standards tab
Create a Lesson Structure
1. Open CPS to the Lessons tab.
2. Right-click in any of the white space. A pop-up
menu appears (Figure 7).
3. Choose New then Lesson…. The CPS Lesson
Attributes window appears (Figure 8).
Figure 7: Create new lesson
4. Title your new lesson. In the example to your
right, the lesson title is 9th Grade. You can
optionally add a description or unique identifier
code to your lesson. The new lesson will appear
in the Lessons tab (Figure 9).
Figure 8: CPS Lesson Attributes window
CPS 4.0 Users Guide
226
Appendix A: REAP
Figure 265: Title your new lesson
Figure 9: One lesson in the Lessons tab
5. To create a child-level lesson (sublevel lesson) beneath a lesson, right-click on the
existing lesson name and choose New then Lesson….
6. Repeat step 3 to title your lesson. Figure 10 below illustrates a database with several
lessons and child-level lessons.
Figure 10: Lessons tab with multiple lessons
Create Lesson Questions
1. Right-click on a lesson to which you would like to ask
questions. A pop-up menu appears (Figure 11).
2. Choose New then Question…. The CPS Question
Author window appears (Figure 12).
CPS 4.0 Users Guide
227
Appendix A: REAP
Figure 11: Create a new question
Question Box
Answer Box
Figure 12: CPS Question Author window
3. Type in your question in the Question Box and use the Template pull-down menu to
choose a question template. You can type your possible answers in the Answer boxes.
4. Click the box next to the correct answer, so that a checkmark appears. To leave a
question subjective, clear all checkmarks from the checkboxes.
5. Click
to save your question and create an additional question.
6. Repeat steps 3-5 to create as many questions as you would like.
CPS 4.0 Users Guide
228
Appendix A: REAP
Associate Standards to Questions
1. In the Lessons tab, open the question
to which you would like to associate
a standard. The CPS Question
Author window appears.
to open the CPS
2. Click
Question Standards window (Figure
13). The window shows all standards
within the Standards tab of your
database.
3. Use
to view child-level standards.
4. Select the standards you would like
to associate with a question by
clicking the checkbox next to the
standard so that a checkmark
appears.
5. Click OK to return to the CPS
Question Author window.
Figure 13: Choose Standards to associate to a question
6. Click
or
to save your changes. A confirmation window appears, asking you
whether or not you would like to save your standard associations. Click Yes.
For more information on creating questions in CPS, please refer to the Help file in CPS.
Create and Send Assessments
Once you create lessons with associated standards, you can create an assessment to send to
teachers. This section will show you how to use the Send Assessments Wizard to create and send
an assessment.
Log in to CPSOnline
1. From the Settings menu, choose
CPSOnline Login. The CPSOnline
Login Wizard appears (Figure 14).
2. Enter your CPSOnline Username
and Password in the fields provided.
You can get your Username and
Password from the CPSOnline
Setup Codes tab in the REAP Tool
kit.
3. Click Next. CPS communicates with
CPSOnline and logs you in.
Figure 14: CPSOnline Login Wizard
CPS 4.0 Users Guide
229
Appendix A: REAP
4. Click Done to exit the CPSOnline Login Wizard and return to CPS. A
appears in the Lessons tab.
icon
Create an Assessment
1. In the Lessons tab, click
. The CPS Send
Assessment Wizard appears
(Figure 15).
2. Click the box next to Send
new Assessment so that a
checkmark appears.
3. Click Next.
Figure 15: Send a new assessment
4. Select a lesson from your
database that you would like to
send as an assessment.
5. Click Add to add that
assessment to the Selected
Lessons list. You may add up
to 10 MB worth of lessons to
one assessment (Figure 16).
6. Click Next.
Figure 16: Add lessons to the assessment
CPS 4.0 Users Guide
230
Appendix A: REAP
Setup an Assessment
1. Choose the assessment dates
(Figure 17).
Start Date: The first day
the assessment will be
available for teachers to
download.
Engage Date: The first day
teachers may engage the
assessment.
End Date: The last day
teachers may engage the
assessment.
2. Click Next.
Figure 17: Choose assessment dates
3. Choose the assessment access
options (Figure 18).
Allow teachers to edit
the lesson: Allows
teachers to add, change, or
delete questions and
lessons in the assessment.
Allow teachers to view
the lesson: Allows
teachers to view the
questions and lessons
before engaging the
assessment.
Allow teachers to change
the lesson order: Allows
Figure 18: Select assessment access options
teachers to reorder
questions or lessons in the assessment.
Allow teachers to print the lesson: Allows teachers to print the questions from a
lesson in the assessment.
4. Click Next.
CPS 4.0 Users Guide
231
Appendix A: REAP
5. Choose your session options
(Figure 19).
Allow the teacher to
print reports: Allows
the teacher to print any
reports generated from
the session.
Automatically upload
the assessment’s
sessions: Automatically
uploads the teachers’
sessions to CPSOnline.
Allow the teacher to
regrade sessions: Allows
teachers to change grades
Figure 19: Choose the session options
as well as which
questions are counted as correct.
Allow the teacher to
delete sessions: Allows
the teacher to delete
records of sessions
generated from this
assessment.
6. Click Next.
7. Choose the number of times
a teacher may engage a
lesson from this assessment
(Figure 20).
8. Click Next.
9. Title your assessment.
10. Click Next.
11. Optionally, include a note for
the assessment, such as any
special directions for teachers
on engaging this assessment.
Figure 20: Select the number of times a teacher can engage a lesson
from the assessment
12. Click Next.
CPS 4.0 Users Guide
232
Appendix A: REAP
Send an Assessment
1. Select teachers from the list of
available teachers. To send an
assessment to a teacher, the
teacher must have a CPSOnline
account and Username and
Password (Figure 21).
2. Click Next.
Figure 21: Select teachers
3. Optionally, attach any files,
such as PowerPoint
presentations, that you would
like to include with your
assessment (Figure 22).
4. Click Next.
5. Verify that all of the
assessment data is correct. To
change any assessment or
session options, click Back to
make your changes.
6. When you are sure the
assessment information is
correct, click Next. CPS will
connect to CPSOnline and send
your assessment.
Figure 22: Add additional files to the assessment
7. Click Done to return to CPS.
When you send an assessment, teachers can download the assessment, on the assessment start
date, by using CPS to log in to CPSOnline.
CPS 4.0 Users Guide
233
Appendix A: REAP
Non-CBIT Teacher Walkthrough
If your campus uses REAP, you will need to create your CPSOnline classes and setup the class
for your administrators to view. This walkthrough will show you how to
Create classes
Populate student rosters
Download assessments from your curriculum coordinator
Upload sessions to CPSOnline
Create Classes
Before you can create a CPSOnline class to use with REAP, you will need to create a database.
This first section will show you how to create a database, create a CPSOnline class, and then
populate the class roster with student information.
Create a Database
4. Open CPS from your desktop
icon. The Open or Create New
Database window appears
(Figure 1).
Figure 1: Choose Create a new CPS database
5. Choose Create a new CPS
database. The New CPS File
window appears.
6. In the File name box, title
your database. In the example
to the right, the database name
is Campus_Teacher. The new
database will have a file
extension of *.cps. CPS will
open your new database to the
Lessons tab (Figure 3).
Figure 2: Title your database
CPS 4.0 Users Guide
234
Appendix A: REAP
Figure 3: Empty CPS database opened to the Lessons tab
Create a CPSOnline Class
For administrators to review your students’ performance data in REAP, you will need to create a
CPSOnline class. Before you create your CPSOnline class you will need an Instructor Setup
Code from your school principal or curriculum coordinator. To create a CPSOnline class
1. Click the Classes tab.
. The CPS New
2. Click
Class Wizard appears (Figure
4).
3. Select K-12. Click Next to
continue.
Figure 4: Create a new class with the CPS New Class
Wizard
4. Select No to indicate that you
do not have a CPSOnline
Username and Password
(Figure 5). Click Next to
continue.
Figure 5: Select NO to indicate you do not have a
CPSOnline Username and Password
CPS 4.0 Users Guide
235
Appendix A: REAP
Enter Contact and Class Information
1. Enter your contact information.
Note that only your first name,
last name, and email address
are required (Figure 6). Click
Next to continue.
Figure 6: Enter your contact information in the CPS New
Class Wizard
2. Enter your class information (Figure 7).
Class Name – the title for
this class roster (required).
Course Number – the
school-assigned course
number for this class
(optional).
Section – the schoolassigned section number
for this class (optional).
Period – the school period
during which time you
teach this class (optional).
Semester – the semester in
which you teach this class
(optional).
Figure 7: Enter class information in the CPS New Class
Campus – the name of
Wizard
your school campus
(optional).
Classroom Number – the room number in which you teach the class (optional).
3. Choose your class options. Click Next to continue.
CPSOnline Class – click the box next to the Make this a CPSOnline class option.
Attendance Options – select whether you would like to view your students’
attendance as an attendance sheet in the Class Info area of the Gradebook tab, or as
an attendance grade in the Assessments area of the Gradebook tab.
CPS 4.0 Users Guide
236
Appendix A: REAP
Connect your Class to CPSOnline
1. Enter your Instructor Setup Code
(Figure 8). Click Next to
continue. CPS connects with
CPSOnline to retrieve your
school information.
Figure 8: Enter your Instructor Setup Code in the CPS New
Class Wizard
2. Click Next to confirm your
school information, or click
Back to use a different code
(Figure 9).
Figure 9: Confirm your school information in the CPS New
Class Wizard
CPS 4.0 Users Guide
237
Appendix A: REAP
3. Create a Username and Password
for CPSOnline (Figure 10). Click
Next to continue.
Figure 10: Create a CPSOnline Username and Password in
the CPS New Class Wizard
4. Choose your grade and subject
information from the pull-down
menus. Click Next to continue
(Figure 11).
Figure 11: Choose Grade and Subject information from the
CPS New Class Wizard
CPS 4.0 Users Guide
238
Appendix A: REAP
5. Select CPSOnline class options.
Click Next to continue (Figure
12).
Online Study Guide – a
study guide for each
assessment uploaded to this
class, available by default.
To choose which assessments
should have study guides
available online, click the
Ask me for each session I
upload option.
Sync Options – CPS can
automatically sync with
CPSOnline when you open
CPS. If you are not always
Figure 12: Select CPSOnline class options from the CPS
New Class Wizard
connected to the internet
during class, you may want to turn this option off.
6. Click Next to create your class or click Back to review your information.
7. Click Done to exit the CPS New Class Wizard and return to CPS. Your new class
appears in the class side (left-hand side) of the Classes tab (Figure 13).
Figure 13: A new class in the Classes tab
CPS 4.0 Users Guide
239
Appendix A: REAP
Populate Student Rosters
The REAP reporting tool uses class demographic information to help administrators accurately
assess how students perform in the classroom. To help the administrators assess performance,
you will need to create class rosters that provide accurate demographic information. This section
will show you how to populate your new CPS class with student information.
Add a Student to your Class
1. Open CPS from your desktop icon.
2. Click the Classes tab.
3. Click
. The Student Information section in the Classes tab activates (Figure 14).
Figure 14: Add a student to a class in the Classes tab
4. Enter the student information.
First Name – the student’s first name (required).
Last Name – the student’s last name (required).
Gender – the student’s gender, from the pull-down menu (required).
Ethnicity – the student’s ethnicity, from the pull-down menu (required).
Student ID – a unique student ID. If you know your students’ district ID, please use
them. The IDs may be alpha-numeric, but must have at least 5 total characters and/or
numbers.
5. Click the Enter key on the keyboard or click the Save button in CPS. Your student will
appear in the list of students on the student side (right-hand side) of the Classes tab.
CPS 4.0 Users Guide
240
Appendix A: REAP
If you hit the Enter key, the student information fields automatically become
available for you to add additional students.
If you clicked the Save Student button in CPS, you will need to click the New… icon
on the student side each time you would like to add an additional student.
6. Repeat steps 4 and 5 to add as many students to your class as you would like.
Next time you log on to CPSOnline, you will be able to sync your class roster and update the
student information in CPSOnline.
Sync Class with CPSOnline
1. Connect your computer to the Internet.
2. From the Settings menu, click CPSOnline
Login…(Figure 15). The CPSOnline Login Wizard
appears.
Figure 15: Login to
CPSOnline
3. Enter your CPSOnline Username
and Password (Figure 16). Click
Next to continue.
Figure 16: Enter your CPSOnline Username and Password
CPS 4.0 Users Guide
241
Appendix A: REAP
4. Select Yes to sync your class
(Figure 17). Click Next to
continue.
Figure 17: Sync your class with CPSOnline in the CPSOnline
Login Wizard
5. Select the class(es) you would
like to sync. To select all classes,
click the box next to the Select
All option, so that a checkmark
appears (Figure 18). Click Next
to continue. CPS connects with
CPSOnline and syncs your class
roster.
Figure 18: Select classes to sync in the CPSOnline Login
Wizard
CPS 4.0 Users Guide
242
Appendix A: REAP
Download Assessments
1. Choose Yes to download any
new assessments (Figure 19).
Click Next to continue.
Figure 19: Download assessments from the CPSOnline
Login Wizard
2. Select the assessments you
would like to download (Figure
20). Click Next to continue. CPS
downloads the assessments from
CPSOnline.
Figure 20: Select assessments to download from the
CPSOnline Login Wizard
CPS 4.0 Users Guide
243
Appendix A: REAP
3. Click Done to exit the CPSOnline Login Wizard and return to CPS. Your downloaded
assessments appear in the Downloaded Assessments folder in the Lessons tab (Figure
21).
Figure 21: Downloaded assessments in the Downloaded Assessments folder of the Lessons tab
To engage your downloaded assessments as lessons in CPS, and to upload the performance data
to CPSOnline, please see the CPS Help File or the CPS Users Guide.
CPS 4.0 Users Guide
244
Appendix A: REAP
Appendix B: CPSOnline Higher Ed
CPSOnline is the online companion to CPS. Using CPS and CPSOnline, you can engage students
in the classroom and allow them to view their grades and online study guides for class
assessments. CPSOnline works primarily for Higher Ed classrooms, but also works for K-12
classes using REAP. For more information on CPSOnline for K-12 and REAP, please see
Appendix A.
CPSOnline Higher Ed allows students to engage in the classroom and at home, via the Internet.
Students create CPSOnline accounts that connect the student’s response pad to the student. When
instructors sync their CPS class with CPSOnline, CPS downloads student information and
populates a roster of students for the class.
Appendix B includes
CPSOnline Instructor’s Guide
CPSOnline Higher Ed FAQ
Student Enrollment Instructions
You can also import classes from Blackboard or WebCT to use with CPS. If your institution uses
the CPS Connection Building Block for Blackboard or the CPS-WebCT Proxy Tool for WebCT,
students can use their online portal to register for your CPS class. For more information on
linking CPS to Blackboard or WebCT, please see Appendix C or contact eInstruction Technical
Support at 888.333.4988 and ask for a Technical Sales Associate.
CPS 4.0 Users Guide
245
Appendix A: REAP
CPSOnline Instructor’s Guide
Welcome to the Classroom Performance System (CPS) family. eInstruction is delighted to offer
you a creative and interactive method of class participation, test preparation, presentation, and
complete performance reporting.
There are some required processes that you and your students must complete before you can start
using CPS in your classroom(s). Some processes are instructor oriented and others are student
oriented. Please refer to the coordinating sections of each process:
1. Have your school bookstore order response pads (Instructor)
2. Install the Classroom Performance System desktop software (Instructor)
3. Create a CPS Database (Instructor)
4. Create a CPSOnline class using the Class Creation Wizard (Instructor)
5. Purchase a response pad at the bookstore (Student)
6. Register a response pad in a CPSOnline class (Student, Instructor)
7. Create and deliver CPS lessons in class (Instructor, Students)
8. Upload performance sessions to a CPSOnline class (Instructor)
9. Review student performance results online (Instructor, Students)
NOTE: Students will have to either purchase access or present an enrollment
code when registering their response pads online.
System Requirements
Intel Pentium II or higher microprocessor
At least one open serial port or USB port
A minimum of 256 MB RAM required
At least 120 MB of RAM for CPS software; databases may require more room
Windows 98 operating system or higher
Screen resolution of 800x600 or better
We recommend using a projection system, such as a projector, LCD, or TV, but a projection
system is not required to use CPS.
Test Kit
As part of your adoption of CPS, you should receive a test kit that contains 1 response pad, 1
enrollment code, and 1 CPS receiver unit. You can use the receiver unit, response pad, and
enrollment code to test the student enrollment process. We recommend setting up the test kit on
your office computer. This will allow you to get comfortable using the system, and if you
choose, provide a place where students can test their pads during your office hours.
To test the system, please do the following:
1. Connect the CPS receiver unit to your computer and install CPS. The installation CD is
packaged in a CPS for Higher Education booklet that contains your installation
instructions.
2. Use the Create a CPS Database instructions to create your CPS database.
CPS 4.0 Users Guide
246
Appendix A: REAP
3. Use the Create a CPSOnline Class instructions to create a CPSOnline class.
4. Use the Student Instructions on the last two pages of this document to enroll a sample
student.
NOTE: To use CPS in your class(es), you will need to install CPS on the
classroom computer. Once your students have enrolled in your CPSOnline
class, you can download your class roster to that computer. Some instructors
choose to download their class roster in their office and bring it to class on
removable media such as a Zip drive or USB drive.
NOTE: You can use the enrollment code in your test kit only once. If you
choose to test the system before your next semester, please email
[email protected] or call us at 888.333.4988 at that time.
Have your School Bookstore Order Response Pads
Before a school term begins, have the bookstore order the appropriate number of student
response pads, per your class enrollment.
eInstruction will create your school’s CPSOnline site. After we have created your school’s
CPSOnline site, you will be ready to create your CPSOnline virtual classroom using the CPS
Class Wizard. If your school’s site is not yet available, please contact eInstruction at
888.707.6819 and ask for the Administrator for Web-Based Initiatives so that we may set it up
for you.
Install the Classroom Performance System desktop software
When you insert the CPS Installation CD into your CD-ROM drive, the Setup Wizard should
automatically appear. Use the Setup Wizard to install CPS onto your computer. If the Setup
Wizard does not automatically appear
1. Click the Start button on your Windows Taskbar. A menu appears.
2. Choose Run…. A Run window appears.
3. Type in ‘your CD-ROM drive letter’:\install.exe. For example: d:\install.exe
4. Click OK.
5. Click Install CPS from the first window.
6. Follow all onscreen prompts and restart your computer if necessary.
7. Click Finish. After CPS is installed on your computer, you will have a folder in your
Program Files directory named eInstruction. Inside the eInstruction folder is the CPS
folder, where your CPS.exe file is located. You will also be able to run CPS from the icon
installed on your Desktop.
CPS 4.0 Users Guide
247
Appendix A: REAP
Create a CPS Database
A CPS database is a file that is created by CPS and has a file extension of *.cps. This file
contains your class rosters, lesson questions, and all the reports of student performance. A CPS
database may contain lessons, class rosters, team activities, student performance data (reports),
and attendance records.
The following steps assume you have never used CPS on your computer. If you are a current
CPS user and would like to create a new database, simply use the File menu in CPS and choose
New Database….
1. Open CPS from your desktop icon. If this
is the first time you have used CPS on
your computer, the Open or Create New
CPS Database window appears.
2. Choose Create a new CPS database and
click OK. The New CPS File window
appears.
3. Type a database name into the File Name
textbox. The file extension *.cps is
automatically added to your file name.
For example, if you teach three sections of
German 4250, you might name your
database German4250.cps.
4. Click the Save button.
NOTE: CPS will
automatically open with your
new database in the Lessons
tab.
Open or Create New CPS Database window
German 4250 database in Lessons tab
CPS 4.0 Users Guide
248
Appendix A: REAP
You can add lessons, questions, and team activities to your database once you have created it.
Create a CPSOnline Class
Once you’ve created your database, you will need to create a class. A CPS class consists of a
roster of the students’ names and pad ID numbers and may also contain student ID numbers.
When you engage a lesson, students answer the questions using the response pads, and CPS
saves performance data for each student.
When you sync your class with CPSOnline, you can make student grades, class lessons, and
class performance results available online. Follow the steps below to create and sync a
CPSOnline class.
NOTE: If you teach multiple sections of a class, you must create a separate
CPSOnline class for each section.
Follow the steps below to create a CPSOnline
class.
1. Open CPS from your desktop icon.
2. Open the Classes tab.
3. Click the New… icon from the classes
side (left side) of the tab. The CPS
New Class Wizard will appear.
4. Choose Higher Education and click
Next.
5. Choose Yes if you already have a
CPSOnline account with a Username
and Password. If you have never
created a CPSOnline account, choose
No. Click Next to move to the next
screen.
New Class Wizard
NOTE: Steps 6-9 assume you have never created a CPSOnline account. If
you have previously created an account, enter your Username and Password
and continue to step 10.
6. Enter your Instructor Setup Code. An Instructor Setup Code links you to your
CPSOnline class. You should receive your Instructor Setup Code in an email from
eInstruction. If you don't have a code, please contact eInstruction at 888.707.6819 and
ask for the Administrator for Web-Based Initiatives. Please save this code to receive
updates for the CPS software.
7. Select your school from the scroll-down list. Click Next.
8. Create a Username and Password.
9. Fill in your Instructor Information.
CPS 4.0 Users Guide
249
Appendix A: REAP
10. Fill in the Higher Education Class Information. For a brief description of each field,
please see below:
Instructor: This field is automatically filled in using the Instructor Information you
entered on the previous page.
Class Name: Fill in your class name. Make your class name descriptive of your class,
for example HIST 4210.002, so that you can quickly distinguish between your
classes.
Class Designation: You can add additional information, such as section number, to
this field. (not required)
Office Hours: Include your office hours for students to see. (not required)
Class Start Date: This date is the first day that students can register for the class.
Class End Date: This is the last day of class.
Notification date: A checkmark
automatically appears next to
this option. The date next to the
option indicates the first day on
which you will begin to receive
notification emails each time a
student registers for your class.
You may want to set this date the
same as the class start date.
Some instructors prefer to
receive the notification email so
that they can identify students
who enroll late (For example,
after open enrollment). If you do
not want to receive notification
emails, click the box next to the New Class Wizard: Higher Ed Class Information page
option so that the checkmark
disappears.
11. Click Next.
12. Verify your information by clicking the Go Back button, if necessary. If you are ready to
create your class, click Next. Your Class Key, CPSOnline Username and Password, and
class information will be sent to you in an email.
NOTE: You will only have to do this process one time. After you create a
class, you are considered an existing CPSOnline user and can use your
username and password to enter CPSOnline. If you need to create additional
classes you can do this from inside CPS so that you can access all your
CPSOnline classes using the same username and password.
After students register for your class through CPSOnline, their student information and response
pad IDs will appear in your CPS class roster when you sync your class with CPSOnline.
CPS 4.0 Users Guide
250
Appendix A: REAP
NOTE: If you are using WebCT Vista or Blackboard, you can link and access
your class information through CPS. For more information, please contact
eInstruction at 888.333.4988 and ask for the Technical Sales Support
Associate.
Purchase a Response Pad at the Bookstore
Each of your enrolled students must purchase a student response pad through the bookstore
(much like a text book). They will use the response pad for one or more classes each term.
The student will receive the following:
Student response pad
Directions for enrolling in your CPSOnline class
NOTE: After the semester is over, the students may sell their pads back to the
bookstore, to another student, or they may keep their pads. The next student to
use the response pad will be required to enroll in CPSOnline to use the pad the
next semester.
Register Response Pads
In order for your students to enroll in your CPSOnline class, provide your students with a copy
of pages 12-13 of this guide, titled Student Instructions, along with your CPSOnline class key.
These instructions are also provided to the student when they purchase the response pad. If you
are using the test kit, use the Student Instructions found on pages 12-13 and the Enrollment code
included with your Test Kit.
NOTE: If you teach multiple sections of a class, be sure to provide students
the correct class key for their individual section.
To find your class key, follow the steps below:
1. Click on the Classes tab of CPS.
2. Select your CPSOnline class.
3. Click the Edit… icon. The CPS Class Information window appears.
4. Locate the Class Key in the Class Information tab of the window.
Each student is required to provide the following information when they self-enroll into your
CPSOnline class:
Class key for the class (provided by the instructor)
Student enrollment code (if you are adopting CPS with a McGraw-Hill textbook) or
students can purchase access with a credit card or check.
Response pad serial number (printed on back of pad or under the pad’s battery cover)
Username and password
CPS 4.0 Users Guide
251
Appendix A: REAP
Import and Deliver PowerPoint Presentations
With CPS you can import PowerPoint presentations into CPS and engage them with your
lessons. In the Lessons tab you have a new PowerPoint folder that stores all PowerPoint
presentations. If you are using the Test Kit, register your pad and test CPS by importing and
presenting a presentation.
Import PowerPoint Presentations
1. Open CPS from your desktop
icon.
2. Open the Lessons tab and
select the PowerPoint folder.
3. Click the Tools… icon from
the lessons side (left side) and
choose Add File….
Alternatively, right-click on the
PowerPoint folder and choose
Add File…. The Add Files
window appears.
4. Browse through your files until
you find the PowerPoint
Add Files window
presentation you would like to
add.
5. Click the Open button. Your presentation will be accessible from the PowerPoint folder.
NOTE: You can create subfolders in the PowerPoint folder to help organize
your presentations.
Engage PowerPoint Presentations
After you add PowerPoint presentations to your CPS
database, you can engage them like a regular lesson. To
engage your presentation, follow the steps below:
1. Open CPS from your desktop icon.
2. Open the database from which you would like to
access the presentation and click the Lessons tab.
3. Click the PowerPoint folder in the lessons side
(left side) of the Lessons tab to display your
available presentations.
4. Select the presentation you would like to engage.
5. Click the Engage Lesson(s) icon. The CPS
Session Setup window appears.
6. Choose your class and delivery mode and click
Start. Your presentation will appear with the
Engage toolbar at the bottom of your screen.
CPS 4.0 Users Guide
252
Appendix A: REAP
7. Click on any key on the keyboard or the mouse to move through your presentation.
NOTE: You may stop the presentation at any time to deliver an existing
question from your lesson, a chalkboard question, or a verbal question.
To ask a question during the presentation, follow the steps below:
a. Click the Verbal or Chalk… button from the Engage toolbar. If you chose the
Verbal button, choose a question template from the pop-up list that appears. At this
point, the class channel number will display on screen and students will be required to
join the class.
NOTE: Steps b-g apply only to instructors using CPSRF systems.
b. Ask students to join the class before you click Start to begin the question response
cycle. To join the class, the students simply press Join, enter the channel number
displayed on the screen, and press Send. If a student who has already joined the class
turns his or her pad off or becomes un-joined for any reason, bring up the Join Form
again by clicking the Join button.
c. Administer your lesson as you normally would once all students have joined the class.
Students respond by pushing the button corresponding to their answer choice and
pressing Send. The CPS Question Deliver window appears.
d. Type in or ask your question or use the Chalkboard toolbar to draw or import an
image.
e. Click the Start button on the Feedback Grid to allow students to respond to your
question.
f. Click the End button on the Feedback Grid when your students have answered.
g. Close the CPS Question Deliver window to return to your presentation.
8. Close out the Engage toolbar when your presentation is complete to return to the Lessons
tab.
CPS 4.0 Users Guide
253
Appendix A: REAP
Use your CPSOnline class for following semesters
Once a class’s semester term has ended, you may want to reuse the class’s online site and stored
class information for a new semester with a new set of students. The Recycle button allows you
to select the class information you want to keep and then eliminate the class information you are
ready to discard, like excess User Messages, Bulletin Board Messages, and Assignments. Follow
the steps below to clean out your class.
1. Open CPS to the Classes tab.
2. Select the CPSOnline class you would like to clean out.
3. Click the Edit… icon. The Class Information window appears.
4. Click on the Recycle CPSOnline Class tab.
5. Determine your New Start Date and New End Date, and other information that you
want to edit.
6. Click Recycle. Your CPSOnline class is now ready for the next semester.
Recycle Class Information
7. Click the Done button to return to the Classes tab.
Troubleshooting
If you are having trouble syncing your class with CPSOnline Blackboard, or WebCT
Vista, be sure you are connected to the Internet. You can verify this by trying to connect
to other sites, such as www.eInstruction.com or www.yahoo.com
Print your username and password, and put them a safe place for reference. You can print
them from your Welcome Email by clicking File and then Print from your Internet
browser menu.
If you cannot find your school’s site from the list of available CPSOnline schools, please
contact eInstruction at 888.707.6819 so that we may create the site for you.
CPS 4.0 Users Guide
254
Appendix A: REAP
CPSOnline Higher Ed FAQ
Describe the scalability of your system, from small classes (20 or 30 students) to large
auditorium classes (500+).
The RF system can scale to support up to 1000 students with one USB receiver and can
receive 1000 responses in less than 10 seconds (no wiring of classrooms necessary). The IR
system can handle classes up to 60 students.
Is your system proprietary as far as the handheld device and the operating system
software?
Yes. By providing a total solution, the university has a single source for software,
hardware, support, and training. If technical issues arise, we never want to put our
customers in a scenario where the issues are someone else’s problem.
If a license agreement exists between eInstruction and third party systems, you can connect
our receivers to other systems. All eInstruction hardware is encrypted, so as part of the
license agreement, eInstruction would provide decryption capability.
Does your system use infrared or radio frequency transmission? If it uses radio frequency,
please describe what type (802.XX, FM,).
We have both IR and RF systems. The RF system is an FCC approved 2.4 GHz system that
uses frequency hopping to eliminate interference with other 2.4 GHz devices such as
802.11 networks. The RF system conforms to the 2.4 GHz FCC specifications.
What is the usual process for students to register their response pad for a course? Please
list all of the possible ways a student could register their response pad.
Students can register their response pads through registration portals such as WebCT,
CPSOnline and Blackboard. A student enters his or her unique serial number from the
response pad. Students can also enter other information such as their campus student ID, if
required by the university or instructor. These registration portals make class registration
duties much easier for the instructor. The instructor simply opens CPS and syncs his or her
class with CPSOnline to automatically download the class roster. The class roster data are
imported from CPSOnline using 128/1024-bit public key private key encryption.
Once a student purchases a response pad, can the student use it for as long as a student is
enrolled in classes? Can students purchase response pads through their campus bookstore?
Once a student purchases a response pad, is he or she able to transfer ownership when
finished with it?
Any eInstruction response pad can be activated for lifetime use; however, if a student is
only going to use their pad for a single class or for a single semester, it can be registered (at
a lower cost) for that period of time.
Students can purchase and activate their response pads directly through the campus
bookstore.
CPS 4.0 Users Guide
255
Appendix A: REAP
Students can transfer a response pad from one student to another at the end of a semester
without going through the bookstore.
NOTE: If a student can get money for their response pad by selling it to the bookstore at
the end of the semester, they can sell it back. The bookstore will then sell the used pad the
next semester. Therefore, reusing the pads creates an annuity revenue stream that allows
pads to be purchased and resold indefinitely. Who receives the annuity revenue stream –
the company who supports the product, trains the faculty, and grows the product; or the
college bookstore? Most systems provide the bookstore with the annual revenue stream, but
the bookstore does nothing to enhance or support the product. We do not feel that this is a
business model that will support this market in the long term.
Will your operating software integrate with other standard database formats? If so, please
list which ones.
CPS currently uses MS Access as its database. You can import data into CPS from
o Other CPS databases
o XML
o CSV
o ExamView
o MS Word documents or documents from other word processors.
However, we do not allow applications to access to our CPS files directly. As we continue
to develop CPS, the format and structure of the application changes. Because CPS changes,
we want to avoid burdening institutions and third parties by requiring constant upgrades.
Please describe the support levels you provide. If you offer maintenance agreements, please
describe what is covered.
eInstruction provides free technical support for students and instructors. We have a large
call center subdivided into two different groups: an instructor group and a student group.
Access to these groups is available from 7AM to 6PM CST via a toll-free number, email,
and text chat. Instructors and students can access Technical Support information and a
Knowledge Base through the Tech Support website: http://www.einstruction.com/support.
What is your company’s history in providing this type of technology? Please provide a
client list, especially higher education clients.
eInstruction leads the industry with over 1.4 million response pads in the marketplace for
K-12, Higher Ed, and corporate training. eInstruction also leads the market in Higher Ed
with over 700 universities using CPS at various levels and two dozen universities that have
standardized on eInstruction’s technology (August 2005).
eInstruction has been in business since 1981 and has worked with response technology
since 1989.
CPS 4.0 Users Guide
256
Appendix A: REAP
What measures does your company take to ensure student data privacy? Is your system in
compliance with FERPA?
CPS/CPSOnline does not require any student-specific information. Specific student
information can be collected if desired and made available in a number of different formats.
CPS/CPSOnline uses 128/1024-bit encryption and all-user access can be
username/password protected.
Please see the eInstruction Privacy Statement available from
http://www.einstruction.com/downloads. CPS also provides an Anonymous Mode feature
so that no student data is collected via the response pads. This feature can be turned on and
off at the instructor’s discretion.
CPS and CPSOnline comply with FERPA guidelines.
What personal data does your company collect on students and for what purpose? Is it
shared or sold to others? How is it protected?
eInstruction never provides or sells data to third parties.
Students have the option to input their name, SMS student ID, and email address.
If students are registering their pad via WebCT/Blackboard, student data is not required to
be housed in CPSOnline, but can be if desired by the institution.
eInstruction provides options for students to purchase access via credit card or personal
check, or with their response pad via the college bookstore. If students choose the credit
card/personal check option (less expensive because there is no bookstore markup),
eInstruction does not maintain any credit card or personal check data after the transaction.
All transactions are secured by 128/1024-bit bank level encryption.
You can download the eInstruction Privacy Statement from
http://www.einstruction.com/downloads.
Do any of your business partners collect personal information about students that use your
technology?
No eInstruction business partners collect any personal information about students.
With what formats can test/quiz questions be imported or exported?
You can import test/quiz questions into CPS from Microsoft PowerPoint, ExamView,
XML, and Microsoft Word (RTF format).
You can export test/quiz questions into Excel, Word, XML, PDF, HTML, and TXT.
Is your system both Windows and Macintosh compatible? If so, please list the operating
system versions with which it is compatible.
CPS is compatible with both Windows and Macintosh. We support Windows 98 and higher
and Mac OS X (10.2.8) and higher.
CPS 4.0 Users Guide
257
Appendix A: REAP
Does your system require the use of proprietary hardware or cabling, especially between
the receiver(s) and the computer? Please describe how your system is configured.
The RF system uses one USB receiver to support up to1000 response pads and can receive
1000 responses in under 10 seconds. No classroom wiring necessary.
The IR system uses one wireless or wired receiver and can support up to 60 students.
Do you offer either purchase or leasing of your systems?
Upon standardization, eInstruction will provide all adopting instructors with a USB RF
receiver free of charge. No additional hardware is necessary for classrooms up to 1000
students.
Students purchase their response pads through the bookstore.
Universities can also purchase stand-alone systems for $100 per response pad.
Does your software have any integration with course management systems such as WebCT
or Blackboard? If so, please describe how.
All data collected with CPS can be exported to WebCT, Blackboard (any system that can
import .csv formats).
CPS is currently dynamically connected to WebCT and CPSOnline.
CPS will add a dynamic connection with Blackboard in December 2005.
Describe how your software integrates with PowerPoint.
You can import any PowerPoint file into CPS.
o Import file as is: You will not need to convert or modify the PowerPoint file. Unlike
“PowerPoint Plug-ins,” you can import your file directly into CPS without worrying
about modifying your file to make room for the student response grid or insert timers.
o Choose to use a student response grid: If you use our CPS RF system, you can
choose whether or not to use a student response grid.
o Organize your presentations: Instructors can organize all of your presentations,
along with your lessons, class rosters, attendance reports, grades, and student
response reports, all within CPS.
How does your company address disability accommodation for your product?
All RF pads have Braille “bumps” capability on the pads.
Does your software limit the number of answers per question in tests or quizzes? If it does,
what is the maximum question limit?
Students can enter only one answer per question. However, instructors can create questions
with up to 8 multiple-choice answers on PC and up to 5 multiple-choice answers on the
Mac.
CPS 4.0 Users Guide
258
Appendix A: REAP
Does your software provide for integrating multimedia (video/audio) files? If so, please list
the file format types supported.
CPS can support any audio/video multimedia that is supported on the computer running
CPS.
What has been your historic schedule for software releases and what pricing mechanism do
you make available to your clients for upgrading?
We formally release CPS each June. All upgrades are free. We release multiple beta
versions of CPS during a development cycle so that all released software in classroom
tested.
Please describe your response pads.
We have an 8 button alpha IR pad.
We have an 18 button alpha-numeric RF pad.
We will have an 18 button alpha-numeric LCD RF pad for Higher Ed available in 2006.
What is the average life span of a battery in your response pad and what battery type does
it take?
Battery life span for both the IR and RF pads lasts at least one year with normal use.
IR pads use two AAA batteries.
RF pads use two AA batteries.
Does your system automatically save the class file upon shutdown?
CPS files are saved as changes/edits are made.
CPS saves the class data at the end of each question in TMA mode (instructional use).
CPS saves the class data at the end of a test in SMA mode (assessment use).
Please describe your pricing model for your systems.
IR pads cost $5 net to the bookstore.
RF pads cost $15 net to the bookstore.
Students have a variety of options to activate their pad from single class activation
(bundled with a McGraw-Hill Higher Ed textbook): single semester, multiple semester, 2
year, and lifetime. We can provide university wide pricing upon request.
Please see the standardization pricing document for more information.
CPS 4.0 Users Guide
259
Appendix A: REAP
Describe the hardware necessary for a system for 200 students and provide a cost for each
item.
The classroom would need one USB RF receiver unit – no charge when the instructor
adopts CPS.
Students would purchase their RF pads from the bookstore.
If your system is radio frequency based, what frequency spectrum does it operate in? If the
system operates in the 2.4 – 2.5 GHz spectrum, have you tested it to ensure that cell phones,
wireless PDAs, laptops, and 2.4 GHZ wireless phones do not affect your system? If so, what
are the results of those tests?
The RF system is an FCC approved system that meets all frequency hopping requirements
to avoid interfering with other 2.4 GHz devices. We have thoroughly tested it with cell
phones, wireless keyboards, PDAs, and multiple 802.11 wireless networks with no
interference. Again, the system is FCC approved, so it has to abide by the guidelines for
approval.
CPS 4.0 Users Guide
260
Appendix C: Third Party Add-ins
eInstruction works with several third party systems to create a more flexible and interactive CPS.
Your school administrators can install the CPS tools along with CPS, or at a separate time, so
that you can use third party products with CPS.
CPS supports two specific tools for Higher Education: WebCT and Blackboard. When IT
Administrators install the CPS tools on their networks, teachers can then setup their existing
WebCT or Blackboard classes with CPS. CPS can then download class rosters from WebCT or
Blackboard and then upload, via the CPS tool, information back into the WebCT or Blackboard
class.
CPS also supports a universal tool for both Higher Education and K-12: PowerPoint. When you
open PowerPoint on a computer with CPS installed, PowerPoint provides you with access to a
CPS toolbar. Using the CPS toolbar, you can create CPS-specific slides within your presentation.
Appendix C will provide you with information for
CPS-WebCT Proxy Tool for WebCT
CPS Connection building Block for Blackboard
For more information on these free tools, please see the information on the following pages or
contact eInstruction Technical Support at 888.333.4988 and ask for a Technical Sales Associate.
CPS 4.0 Users Guide
261
Appendix C: Third Party Add-ins
CPS-WebCT Proxy Tool for WebCT Vista
eInstruction has worked with WebCT Vista to make your job as the instructor even easier! Now
you can use your WebCT classes in CPS. This guide will tell you how to
Link your WebCT class to CPS
Import your class to CPS
Export CPS grades to WebCT
Link a WebCT class to CPS
You can now use your WebCT class in CPS! Before you follow the steps below, make sure your
IT Administrator has installed the CPSOnline Registration Proxy Tool onto your institution’s
server. To connect your class to CPS, please follow the steps below:
1. Log on to your WebCT Instructor’s account.
WebCT Instructor Login page
2. Select the link for your WebCT Course Section that you would like to create in CPS.
3. Click the Build tab and click the Basic View tab.
4. Click the More Tools link on the left-hand menu. A link for you
to create your class in CPS will appear below. If you do not see a
link, please contact your IT Administrator and ask them to set up
the “CPSOnline Registration Proxy Tool.”
5. Click on the link.
6. Click the appropriate button to create a new class or edit an
existing class. Skip step 7 if you are editing an existing class.
7. Create a class Title.
8. Click the Register Class button to create your class.
9. Complete the required fields in the next screen.
NOTE: If you change your WebCT Instructor
Username and Password, your CPS-WebCT
Connection Username and Password will not change.
10. Click the Submit button to return to the WebCT Build tab and
Basic View. Your class is now available for import into CPS.
CPS 4.0 Users Guide
262
Appendix C: Third Party Add-ins
You will be able to access your class from the Build tab under the Basic View tab.
Import your Class to CPS
Now that your WebCT class is linked, you will need to import the class to CPS. If your
institution has enabled the option, student names will be imported, along with other roster
information. Follow the steps below to import your class to CPS:
1. Open CPS to the Classes tab.
2. Click on the Import icon. The Import Class Wizard appears.
3. Choose WebCT from the list of file types.
4. Enter your CPS-WebCT Connection username and password.
NOTE: If you
change your WebCT
Instructor Username
and Password, your
CPS-WebCT
Connection
Username and
Password will not
change. You can
change your CPSWebCT Connection
Username and
Password from the
Contact Information
tab if you Edit your
class.
Select the WebCT class you would like to import from the CPS Import
Class Wizard.
5. Select your school from the pull-down menu and click Next.
6. Click the box next to the class you wish to import so that a checkmark appears beside the
class name. Alternatively, you may choose the Select All option to import all classes.
7. Click Next. A pop-up window appears.
CPS 4.0 Users Guide
263
Appendix C: Third Party Add-ins
8. Enter your WebCT username and password and click OK. Your class will be imported to
CPS.
9. Click Done to close the Import Class Wizard and return to the Classes tab.
Export CPS Grades to WebCT
After you deliver lessons and record performance data in CPS, you can upload all of the data into
your WebCT class. You can upload data immediately after a lesson or later, from the Reports or
Gradebook tab.
Export immediately after lesson
You can export the results of your performance data to WebCT automatically after you finish a
lesson. Follow the steps below to automatically export
your performance data.
1. Open CPS to the Lessons tab.
2. Select the lesson you would like to engage.
3. Engage your lesson by clicking the Engage
Lesson(s) icon. The CPS Session Setup window
appears.
4. Click the box next to Automatically Upload so
that a checkmark appears beside the option.
5. Engage your lesson as you normally would.
After your lesson is complete, CPS will
automatically export the performance data to
WebCT.
Export later
You can choose to export your data to WebCT at a later
time. Follow the steps below to export your
performance data.
CPS Session Setup window
1. Open CPS to the Lessons tab.
2. Select the lesson you would like to engage.
3. Engage your lesson by clicking the Engage Lesson(s) icon. The CPS Session Setup
window appears.
4. Make sure the box next to the Automatically Upload option does not have a checkmark
beside it.
5. Engage your lesson as you normally would.
6. Click the Reports tab when you are ready to upload your lesson.
7. Highlight the session you would like to upload.
8. Click the Upload button to upload the lesson to WebCT. Alternatively, right-click on the
session you would like to upload and choose Upload to CPSOnline.
CPS 4.0 Users Guide
264
Appendix C: Third Party Add-ins
Sync CPS with WebCT
You can sync your CPS class with WebCT to upload grades and maintain an updated class
roster. Follow the steps below to sync your CPS class roster with WebCT.
1. Connect your computer to the internet.
2. Open CPS to the Classes tab.
3. Right-click on the class you would like to sync with WebCT. A pop-up menu appears.
4. Choose Update roster from WebCT server.
5. CPS communicates with WebCT via the CPS-WebCT Proxy Tool to upload updated CPS
data to WebCT and download the latest roster information from WebCT to CPS.
CPS 4.0 Users Guide
265
Appendix C: Third Party Add-ins
CPS-WebCT Proxy Tool for WebCT CE
eInstruction has worked with WebCT Campus Edition 6 to make your job as the instructor even
easier! Now you can use your WebCT classes in CPS. This guide will tell you how to
Link your WebCT class to CPS
Import your class to CPS
Export CPS grades to WebCT
Link a WebCT CE class to CPS
You can now use your WebCT CE class in CPS! Before you follow the steps below, make sure
your IT Administrator has installed the CPSOnline Registration Proxy Tool onto your
institution’s server. To connect your class to CPS, please follow the steps below:
1. Log on to your WebCT CE Instructor’s account.
WebCT Instructor Login page
2.
3.
4.
5.
6.
Select the link for your WebCT Course Section that you would like to create in CPS.
Click the Add Content button. A pop-up menu appears.
Choose CPSOnlineRegistrationCE6.
Click the Create CPSOnlineRegistrationCE6 button.
Enter the title of your class. Choose a descriptive name so that students enrolling in your
class online can find your class.
7. Click Register Class.
Setup your CPS class
CPS 4.0 Users Guide
266
Appendix C: Third Party Add-ins
8. Setup your class information.
Campus Location – choose your institution from the pull-down menu.
Class End Date – enter the last day students will use their response pads in your
class.
Instructor Setup Code – enter your Instructor Setup Code from eInstruction. If your
institution has an exclusivity deal, you can get your Instructor Setup Code from your
eC. If your institution does not have an exclusivity deal, you can get your Instructor
Setup Code from CPS when you create your class.
CPS-WebCT Connection username and password – create a username and
password to use with the CPS-WebCT connection. Your CPS-WebCT username and
password will not change unless you change the information in the Contact
Information area of your class roster in CPS.
9. Click Register Class.
10. Click Finish Registration. eInstruction will send you an email with your class
information.
Import your Class to CPS
Now that your WebCT class is linked, you will need to import the class to CPS. If your
institution has enabled the option, student names will be imported, along with other roster
information. Follow the steps below to import your class to CPS:
1. Open CPS to the Classes tab.
2. Click on the Import icon. The Import Class Wizard appears.
3. Choose WebCT from the list of file types.
4. Enter your CPS-WebCT Connection username and password.
NOTE: If you change your WebCT Instructor Username and Password,
your CPS-WebCT Connection Username and Password will not change. You
can change your CPSWebCT Connection
Username and
Password from the
Contact Information
tab if you Edit your
class.
5. Select your school from the pulldown menu and click Next.
6. Click the box next to the class
you wish to import so that a
checkmark appears beside the
class name. Alternatively, you
may choose the Select All option
to import all classes.
7. Click Next. A pop-up window
appears.
Select the WebCT class you would like to import from the CPS Import
Class Wizard.
CPS 4.0 Users Guide
267
Appendix C: Third Party Add-ins
8. Enter your WebCT username and password and click OK. Your class will be imported to
CPS.
9. Click Done to close the Import Class Wizard and return to the Classes tab.
Export CPS Grades to WebCT
After you deliver lessons and record performance data in CPS, you can upload all of the data into
your WebCT class. You can upload data immediately after a lesson or later, from the Reports or
Gradebook tab.
NOTE: Instructors using CPS 3.6 or higher will be able to export CPS grades
to WebCT.
Export immediately after lesson
You can export the results of your performance data to
WebCT automatically after you finish a lesson. Follow
the steps below to automatically export your
performance data.
1. Open CPS to the Lessons tab.
2. Select the lesson you would like to engage.
3. Engage your lesson by clicking the Engage
Lesson(s) icon. The CPS Session Setup window
appears.
4. Click the box next to Automatically Upload so
that a checkmark appears beside the option.
5. Engage your lesson as you normally would.
After your lesson is complete, CPS will automatically export the performance data to
WebCT.
Export later
You can choose to export your data to WebCT at a later time. Follow the steps below to export
your performance data.
1. Open CPS to the Lessons tab.
2. Select the lesson you would like to engage.
3. Engage your lesson by clicking the Engage Lesson(s) icon. The CPS Session Setup
window appears.
4. Make sure the box next to the Automatically Upload option does not have a checkmark
beside it.
5. Engage your lesson as you normally would.
6. Click the Reports tab when you are ready to upload your lesson.
7. Highlight the session you would like to upload.
8. Click the Upload button to upload the lesson to WebCT. Alternatively, right-click on the
session you would like to upload and choose Update roster from WebCT server.
CPS 4.0 Users Guide
268
Appendix C: Third Party Add-ins
Sync CPS with WebCT
You can sync your CPS class with WebCT to upload grades and maintain an updated class
roster. Follow the steps below to sync your CPS class roster with WebCT.
6. Connect your computer to the internet.
7. Open CPS to the Classes tab.
8. Right-click on the class you would like to sync with WebCT. A pop-up menu appears.
9. Choose Update roster from WebCT server.
10. CPS communicates with WebCT via the CPS-WebCT Proxy Tool to upload updated CPS
data to WebCT and download the latest roster information from WebCT to CPS.
CPS 4.0 Users Guide
269
Appendix C: Third Party Add-ins
CPS Connection Building Block for Blackboard
Now you can use CPS with your Blackboard classes. The CPS Connection allows you to create a
complete interactive learning experience. You can use CPS in the classroom to engage your
students and receive instant feedback, and then connect your class with Blackboard so that
students can access information from home. This guide will tell you how to
Link your Blackboard class to CPS
Import your class to CPS
Sync your class with CPS
Link a Blackboard class to CPS
Before you follow the steps below, make sure your IT Administrator has installed the CPS
Connection building block onto your institution’s server. To connect your class to Blackboard,
please follow the steps below:
1. Log on to your Blackboard Instructor’s account.
Blackboard Instructor Login page
2. Select the link for your Blackboard course that you would like to
create in CPS.
3. Click Tools from the left-hand menu.
4. Choose CPS Connection from the list of online tools. If the CPS
Connection option is unavailable from your Tools menu, please
contact your IT Administrator and ask them to install the CPS
Connection.
5. Click the Register Class button.
6. Choose your campus from the pull-down menu.
7. Type in a Class End Date.
NOTE: Make sure your class end date is in
mm/dd/yy format.
CPS 4.0 Users Guide
270
Appendix C: Third Party Add-ins
8. Enter your Instructor Setup Code. If your institution has an exclusivity deal, your eC
will provide you with the Instructor Setup Code. If your school does not have an
exclusivity deal, you can get your Instructor Setup Code when you create your class in
CPS.
9. Create a CPS – Blackboard Connection Username and Password. Alternatively, enter
your existing CPSOnline Username and Password in the fields provided.
NOTE: If you change your Blackboard Instructor Username and Password,
your CPS – Blackboard Connection Username and Password will not
change.
Register your class in Blackboard
10. Click Register Class to register your class.
CPS 4.0 Users Guide
271
Appendix C: Third Party Add-ins
Import your Class to CPS
Now that you’ve linked your Blackboard class to CPS, you will need to import your class roster.
Follow the steps below to import your class to CPS:
1. Open CPS to the Classes tab.
2. Click on the Import icon. The
Import Class Wizard appears.
3. Choose Blackboard from the list
of class types and click Next.
4. Enter your CPS-Blackboard
Connection Username and
Password and choose your
institution from the drop-down
menu.
5. Select the class you wish to
import from the list of available
classes.
To select all classes, click box
next to the Select All option so
that a checkmark appears. Click Import Blackboard Class with the CPS Import Class Wizard
Next to continue.
6. Click Done.
Sync CPS with Blackboard
You can sync your CPS class with Blackboard to upload grades and maintain an updated class
roster. Follow the steps below to sync CPS with Blackboard.
11. Connect your computer to the internet.
12. Open CPS to the Classes tab.
13. Right-click on the class you would like to sync with Blackboard. A pop-up menu appears.
14. Choose Update roster from Blackboard server.
15. CPS communicates with Blackboard via the CPS Connection Building Block to upload
updated CPS data to Blackboard and download the latest roster information from
Blackboard to CPS.
CPS 4.0 Users Guide
272
Glossary
Glossary
A
Anonymous Mode – This mode allows you to, in TMA or SMA modes, record a class assessment without
recording individual students’ responses.
Assessment - An assessment is any sort of measure of the students' learning. Examples of assessments include tests,
quizzes, homework, and class work.
C
Challenge Board – A points-based game for your students that allows them to answer questions of varying
difficulty.
Child-level lesson - A child-level lesson is a sublevel lesson. Example: if you teach a lesson on Grammar, the
parent-level lesson could be Grammar, and you could have two child-level lessons called Punctuation and Spelling.
Child-level standard - A child standard is a standard associated with a parent (or main) standard. For example, your
parent standard might be 4th Grade Reading, and your child standard could be Word Comprehension list.
Class - A class is the list of your students, including information such as name, student ID, gender, ethnicity, and
pad ID number.
Classes tab - One of the main CPS tabs. From this tab, you can edit/create classes, import or export classes to or
from CPS, and take class attendance.
Class side - The left window of the Classes tab. This window lists all classes open for a particular database.
CPS Response System - The CPS response system enables students to provide electronic feedback to questions in
the classroom. This consists of IR or RF pads, a receiver unit, and the CPS software.
D
Database - A database is a collection of files (assessments, classes, grades, lessons) stored in CPS. You can have
more than one database in CPS.
Delivery Options - An option in CPS that you access from the Settings menu. Delivery Options allows you to
customize delivery modes, adjust your receiver settings, adjust the Feedback Grid, and make changes to the There It
Is! feature from the Team Activities section.
Delivery session - A delivery session includes your lesson, in any format and mode, and the students' responses.
CPS gathers the information from the student pads and compiles them into an assessment. You can view assessment
results from the Reports section.
Download - Think of download as loading files from the Internet (up there) down to your computer (down here).
E
Engage - The process of delivering a lesson from CPS.
Export - When you export a file, you send it from your computer to another program or computer.
F
FastGrade - Use the FastGrade feature as a supplement to worksheets and other hardcopies. You can create a
FastGrade answer key, distribute hardcopies to the students, and have them respond for a quick grade.
File - A file is one document, graphic, or presentation stored within a database. You can have thousands of files
within one database.
File extension - A file extension is the ending mark on a file name that tells the computer what type of file it is. This
is especially important when importing or exporting files from one database to another or from one program to
another.
Folder - A folder stores files. Folders are a great way to organize all of your files within a database.
G
Gradebook tab – One of the main CPS tabs. From this tab, you can view or edit gradebook data and generate
gradebook reports.
CPS 4.0 Users Guide
273
Glossary
I
Import - When you import a file, you take it from another program or computer and put it in your computer or
program.
L
Lesson - A lesson is your usual method of teaching. You can use CPS no matter your teaching style - from
PowerPoint to Chalkboard, CPS can give you immediate student feedback while you're teaching your lessons.
Lessons side - The left side of the Lessons tab. This window displays a list of all of the lessons you have in a
particular database.
Lessons tab - One of the main CPS tabs. From this tab you can create/edit lessons; organize lessons within your
database; and link PowerPoint presentations, ExamView lessons, and graphics to existing lessons.
Link - When you link two files such as a graphic and text together, they are merged into one file.
O
Objective question - Objective questions are multiple-choice, true/false, or yes/no questions that have definite
answers.
P
Parent-level lesson - A parent-level lesson is the main lesson level. You can also have sublevels called child-level
lessons. Example: if you teach a lesson on Grammar, the parent-level lesson could be Grammar, and you could have
a child-level lesson called Punctuation.
Parent-level standard - A parent-level standard is the main standard level. You can also have sublevels called
child-level standards. Example: You have a standard called 7th Grade Reading and two child-level standards called
Comprehension and Word Recognition.
Performance data - Performance data is student feedback collected from the CPS response system. This feedback
is compiled in the Reports section of CPS for you to view.
Performance question - An open-ended or subjective question that requires a specific response, usually in the form
of short answer or essay. You can create specialized performance questions through the CPS Performance Question
Wizard.
Preview - Use the Preview option to give your class an assessment without putting it in the Gradebook. Preview is a
great tool for exam or test review.
Q
Question side - The right window of the Lessons or Standards tab. This window lists all of the questions from any
highlighted lesson or standard name.
R
Receiver - The CPS IR receiver is a "UFO" object that accepts infra red (IR) waves from students' response pads
and transfers the information to CPS. The CPS RF receiver is a small, square object that accepts radio frequency
(RF) waves from response pads then transfers the information to CPS.
Reporting System - The CPS Reporting System lets you access, view, and print performance data recorded during
instructional sessions.
Reports - Reports are CPS-generated data from your sessions. You can view the data in many different forms from
the Reports section.
Reports tab - One of the main CPS tabs. From this tab you can generate reports, organize and maintain your
assessments, import new assessments, and re-grade student assessments.
Response cycle - The response cycle is the duration of time that students may respond with their pads. The cycle
begins when you click the Start button on the Feedback Grid and ends when you click the End button.
Response pad - The response pad is the device that looks like a remote control. When students press a button on the
response pad, the answer is sent by radio frequency (RF) or by infra red (IR) waves to the receiver. The receiver
then sends the information to CPS.
Rich Text Format - A type of file format that allows you to transfer data from one program to another. Rich Text
files end in *.rtf.
CPS 4.0 Users Guide
274
Glossary
S
Session - A session is any lesson that you engage, from which performance data is gathered.
Session Setup - The window that appears any time you choose to engage a lesson. From this window you can
change your delivery mode, select Anonymous mode, and choose the type of assessment you are giving.
Standards - Standards are state, district, or school-mandated minimum requirements of students.
Standards tab - One of the main CPS tabs. From this tab you can download state, district, or school standards and
link them to specific questions in your lessons, or to lessons themselves.
Standards side - The left window of the Standards tab. This side lists all of the standards available in a particular
database.
Students side - The right-hand window of the Classes tab. This window shows you all of the students from any
highlighted class name.
Subjective question - A subjective question is a performance question. Subjective questions do not have a specific
answer that can be defined by multiple-choice, true/false, or yes/no answers. See Performance Question.
Sync - Your computer and CPSOnline can sync together. This means that when you "sync," you form a connection
with CPSOnline so that you can download the most updated assessments or upload your most recent sessions.
T
Team Activities tab - One of the main CPS tab. From this tab you can create or edit new There it is! activities or
Challenge Boards for your classes. Whether you use the activities as class participation grades or as assessments,
students will always have fun.
U
Upload - Think of uploading as sending files from your machine (down here) to the Internet (up there).
USB - Your computer will have several USB ports. They are small, rectangular, and look similar to a toaster. You
will find them either at the front or back of your CPU (computer tower).
V
Verbal question - A verbal question is a question that you create while delivering a lesson. Use the Verbal
Question button on the Engage toolbar to type in or ask a verbal question.
CPS 4.0 Users Guide
275
Index
Index
Absent/Present Attendance
During a Session, 215
From a Session, 214
From the Classes tab, 216
AEIS-IT Export Report, 179
All Data Export Report, 180
Anonymous Mode, 127
Assesment
Re-grade Questions, 163
Assessment
Add to Gradebook, 204
Create, 205
Create Attendance, 169
Delete, 170, 206
Edit, 205
Edit Attributes, 168
Export, 207
Import, 169
Manage, 203
Re-assign Categories to
Questions, 164
Re-grade, 163
Re-grade Numeric Questions,
165
Re-grade Students, 167
View Types, 203
Assessment Summary, 211
Attendance, 213
Absent/Present, 214
As a Graded Average, 218
As an Assessment, 216
Create from Session Setup,
148
Set Options, 213
Upload, 220
Attendance Assessment
From a Session, 217
From an Existing Session,
217
Attendance Average
From a Session, 218
From the Classes tab, 219
Attendance Report, 213
Audio/Video Notes
Add, 26
Blackboard Class
Create, 85
Import, 102
Categories
Associate to Question, 31
Categories window, 31
CBIT, 86, 87, 91, 223
Chalkboard, 21
Change RF Receiver Settings,
143
Character Map window, 40
Charting window, 6, 31, 133,
149, 157, 161, 175, 182, 183,
184, 185, 186, 187, 188, 189,
190, 191, 192
Access from Reports tab, 183
Access in Session Delivery,
182
Answer Options, 190
Change options, 184
Chart Type, 185
Export Data, 188
Print, 188
Save Chart as Graphic, 188
Show Correct, 186
Show Legend, 190
Show Multiple Charts, 189
Show Questions and
Categories, 187
Show Response Time, 184
Slice Data by Comparison
Sessions, 192
Slice Data by Demographics,
191
View by Answer, 183
View by Category, 184
View by Question, 183
Class Information tab, 196
Class Information window, 89,
90, 91, 93, 94
Class Participation tab, 200
class side, 79
Classes, 7, 79
Add Students to Higher Ed
Class, 89
Add Students to K-12 Class,
86
Add Students using CBIT, 87
Copy Students, 92
Create Blackboard Class, 85
Create Higher Ed Class, 81
Create K-12 Class, 80
Create K-12 CPSOnline
Class, 81
Create Quick K-12 Class, 82
Create WebCT Class, 83
Delete, 95
CPS 4.0 Users Guide
Delete Student, 95
Edit, 89
Edit Class Information, 89
Edit Contact Information, 90
Edit CPSOnline Options, 91
Edit Student Information, 91
Export as CSV File, 104
Export to tbt Deliver, 103
Import from Blackboard, 102
Import from CPS Database,
96
Import from CPSOnline, 96
Import from DuPont Files,
101
Import from OnTrack Files,
100
Import from Osiris Files, 98
Import from Pentamation
Files, 97
Import from SASI XP Files,
99
Import from WebCT, 101
Print/Export, 104
Show All Students, 93
Classes tab
Take Absent/Present
Attendance, 216
Classroom Manager Export
Report, 179
CPS Challenge Board, 105, 106,
107, 109, 110
Add Questions, 109
Create, 107
Delete, 110
Edit, 109
Engage, 156
Remove Questions, 110
CPS Connection Building
Block, 85, 102, 270
CPS database, 9
CPS Database
Create new, 9
Export, 12
Open, 11
Password-protect, 10
CPS Delivery Options window,
114, 115, 127, 128, 129
Feedback Grid tab, 143
Receiver tab, 141
Student Managed tab, 140
Teacher Managed tab, 128
276
Index
Team Activities tab, 145
CPS Engage toolbar, 83, 116,
149
CPS FastGrade window, 18, 19
CPS IR System, 113
IR Receiver Unit, 113
IR Response Pad, 113
CPS Overview, 7
CPS Performance Question
Wizard, 44, 45, 46, 47
CPS Question Author window,
16, 19, 20, 21, 26, 27, 28, 29,
30, 31, 32, 35, 36, 38, 39, 40,
45, 68, 71, 73, 74, 227, 229
CPS Response System, 112
Components, 112
Session Setup, 115
Setup, 114
CPS RF System, 113
CPS Session Setup window, 45,
72, 73, 82, 83, 116, 117, 121,
122, 125, 126, 127, 147, 148,
149, 150
Class, 148
Create Attendance, 148
Export to Question Grid, 148
Include in Gradebook, 148
Max Points, 148
Session Category, 148
CPS_Databases folder, 10
CPSOnline Login, 13
Higher Ed Login, 15
K-12 Login, 13
CPSOnline Registration Proxy
Tool, 83
Create Class window, 82
Create Questions with Graphics,
27
Data Slicing, 182
By Comparison Sessions,
192
By Demographics, 191
Data Slicing Report, 175
Delivery modes, 115
Anonymous, 127
Student Managed
Assessment, 116
Student Managed Practice
mode, 122
Teacher Managed
Assessment, 116
Teacher-Led Student
Managed Assessment, 126
Detect CPS Receiver Settings,
142
Difficulty Levels, 31
Display Graphics, 28
Engage as Freeform, 30
Exclude Question from SMA,
29
Show Graphic After
Response, 28
Show Graphic Full Screen,
29
Download Assessments, 170
DuPont Files, 101
Dynamic Standards, 72
Edit
Add Lesson Questions, 35
Add Special Character, 40
Add Standards Questions, 73
Assessment Attributes, 168
Assessments, 205
Change Default Font, 39
Change Question or Answer
Font, 39
Class Information, 89
Contact Information, 90
Copy Questions to Other
Lessons, 37
Copy Questions within the
Same Lesson, 37
Copy Students to Class, 92
CPS Challenge Board, 109
CPSOnline Options, 91
Create Attendance from an
Assessment, 169
Delete Assessment, 170, 206
Delete Class, 95
Delete Graphics from
Questions, 38
Delete Lesson, 37
Delete Lesson Question, 38
Delete Standard, 75
Delete Standards Question,
75
Delete Student, 95
Export Assessment, 207
Lesson Attributes, 35
Lesson Questions, 36
Lessons, 34
Recycle Higher Ed Class, 94
Recycle K-12 CPSOnline
Class, 93
Spell-check Lessons, 41
Standards Attributes, 71
Standards Questions, 71
Student Information, 91
eI SEARCH, 55
Create Account, 55
Find Content, 59
Import Content, 60
CPS 4.0 Users Guide
Login to an Account, 58
Search for Content, 55
Upload Content, 63
Engage
CPS Challenge Board, 156
ExamView Lessons, 151
FastGrade Lessons, 151
Lesson with PowerPoint, 159
Lessons, 148
Multiple Lessons, 149
Preview Lessons, 152
There It Is! activity, 154
Top Score activity, 157
Verbal Questions, 152
Engage as Freeform, 30
Examview, 53
ExamView
Feedback Grid buttons, 151
Narrative Button, 151
Options, 53
Recalculate Button, 152
Zoom Button, 151
Exclude Question from SMA,
29
Export
Class as CSV File, 104
Class to tbt Deliver, 103
Export to Question Grid, 148
FastGrade answer key, 18
FastGrade Lesson
Create, 18
Feedback Grid tab, 143
Number of Pads for Question
Preview, 144
Time Interval for Feedback
Grid, 144
Font window, 39
Generate Reports, 171
Grade Post Summary, 212
Gradebook, 8
Add Assessment, 204
Advanced Setup, 196
Change Attendance Options,
208
Create, 194
Create Grading Periods, 201
Delete Assessment, 206
Edit Assessments, 205
Export Assessment, 207
From Session Setup, 194
Quick Setup and Export, 195
Review Student Information,
207
View Assessments, 203
View by Calendar Function,
203
277
Index
View Grading Periods, 202
Gradebook Reports
Access, 209
Assessment Summary, 211
Attendance Report, 213
Grade Post Summary, 212
Progress Report, 210
Report Card Summary, 212
Gradebook Reports, 209
Gradebook tab, 44, 80, 81, 90,
166, 167, 169, 193, 194, 195,
196, 201, 202, 203, 204, 205,
206, 207, 208, 209, 210, 264,
268
Grading Period tab, 197
Grading Periods
Create, 201
View, 202
Higher Ed Class
Add Students, 89
Create, 81
Recycle, 94
Import
Assessment, 169
Class from Blackboard, 102
Class from CPS Database, 96
Class from CPSOnline, 96
Class from DuPont Files, 101
Class from OnTrack Files,
100
Class from Osiris Files, 98
Class from Pentamation
Files, 97
Class from SASI XP Files,
99
Class from WebCT, 101
CPS Lessons, 47
Downloaded Standards, 78
ExamView Lessons, 53
Lessons from MS Word, 50
PowerPoint Presentations, 54
Scanner Results, 48
Standards from a CPS
Database, 77
Import, 47
Import Class Wizard, 96, 97, 98,
99, 100, 101
Import from MS Word
Format, 51
Formatting Rules, 52
Import from Word, 50
Import Lessons window, 48
Import Sessions window, 169
Import Standards window, 77,
78, 225
Include in Gradebook, 148
Infra Red System, 113
Install
CPS Student Content
Databases, 3
Free Databases of Questions,
2
Installing CPS, 2
Mac Operating System, 2
Windows Operating System,
2
Instructor Summary Report, 172
InteGrade Pro Export Report,
181
Item Analysis Report, 174
Item Analysis with Standards
Report, 174
K-12 Class
Add Students, 86
Add Students using CBIT, 87
Create, 80
K-12 CPSOnline Class
Create, 81
Recycle, 93
Lesson Questions
Create, 19
lesson side, 16
Lessons, 7, 16
Add Graphics to Questions,
27
Add Notes, 27
Add Questions, 35
Add Special Character, 40
Associate Categories, 31
Associate Standards, 32
Audio/Video Notes, 26
Change Question or Answer
Font, 39
Copy Questions, 37
Create, 17
Create FastGrade lesson, 18
Create Lesson Questions, 19
Create Subjective Questions,
21
Delete, 37
Delete Graphics from
Questions, 38
Delete Question, 38
Difficulty Levels, 31
Edit Attributes, 35
Edit Questions, 36
Engage, 148
Engage ExamView, 151
Engage FastGrade, 151
Engage multiple, 149
Engage with PowerPoint, 159
Import CPS Lessons, 47
CPS 4.0 Users Guide
Import ExamView, 53
Import from MS Word, 50
Import PowerPoint, 54
Import Scanner Results, 48
Lesson Builder, 32
Preview, 152
Print, 43
Rearrange Questions, 37
Search for Questions, 40
Spell-check, 41
Lessons Builder, 32
Letter Grades tab, 199
LMS Export Report, 180
Manually Override Receiver
Settings, 142
Margin of Error, 51
Max Points, 148
MC2, Answer Graphics, 21
MC2, Answer Graphics II, 21
MC2, Big Question Graphic, 21
MC2, No Graphics, 22
MC2, Question Graphic, 22
MC2, Question Graphic Right,
22
MC2, Question Graphic,
Answer Graphic, 22
MC3, Answer Graphics, 22
MC3, Answer Graphics II, 22
MC3, Answer Graphics III, 22
MC3, No Graphics, 22
MC3, Question Graphic, 22
MC3, Question Graphic Bottom,
22
MC3, Question Graphic Right,
22
MC3, Question Graphic,
Answer Graphic, 22
MC4, Answer Graphics, 22
MC4, Big Question Graphic, 22
MC4, No Graphics, 23
MC4, No Graphics, Big Questio,
23
MC4, Question Graphic, 23
MC4, Question Graphic Bottom,
23
MC4, Question Graphic Mid, 23
MC4, Question Graphic Right,
23
MC4, Question Graphic,
Answer Graphics, 23
MC4, Question Graphic, Right
Big, 23
MC4, Question Graphic, Right
Big II, 23
MC4, Question Graphic, Right
Small, 23
278
Index
MC5, Answer Graphics, 23
MC5, Answer Graphics II, 23
MC5, No Graphics, 23
MC5, No Graphics, Big
Question, 24
MC5, Question Graphic Mid, 24
MC5, Question Graphic Right,
24
MC5, Question Graphic Right
Big, 24
MC5, Question Graphic Right
Small, 24
MC6, No Graphic, 24
MC6, Question Graphic, 24
MC7, No Graphics, 24
MC7, Question Graphic, 24
MC8, No Graphics, 24
MC8, Question Graphic, 24
Merge Sessions, 161
Mouse/Keyboard Shortcuts, 4
New Class Wizard, 80, 81, 82,
89
New Features, 5
Access WebCT/Blackboard
from CPS, 6
Blackboard Connection, 6
Create Attendance Sessions,
6
Data Slicing and Charting, 6
ExamView 5 Support, 6
K-12 RF Support, 6
Random Student Selector, 5
There It Is! SMA Mode, 5
XML Import/Export, 12
Notes
Add, 27
Notification Date, 94
Numeric, No Graphics, 24
Numeric, Question Graphic, 25
OnTrack Export Report, 179
OnTrack Files, 100
Opinion Survey Report, 175
Osiris Files
Import, 98
Update, 99
Password-Protect your
Database, 10
Passwords Function
Disable, 11
Enable, 11
Pentamation Files
Import, 97
Update, 98
Performance Question, 24, See
Subjective Question
Post Report, 180
PowerPoint, 54
Engage presentation, 158
Engage with CPS lesson, 159
Practice mode, 8, 113, 122, 123,
124, 125, 148, 149
Print
Class, 104
Lessons, 43
Reports, 181
Standards, 76
Professional Development
Seminars, 5
Progress Report, 210
Question Author toolbar, 20, 21,
28, 29, 30, 31, 32
Question Finder, 40
Question Finder window, 41
Question Grid Export Report,
178
Question Note window, 26, 27
Question Report, 173
question side, 16, 67
Question Template, 21
QuickStart, 147
QuickStart Setup window, 147
Radio Frequency System, 113
REAP
Download Assessments, 170
Re-assign Categories to
Questions, 164
Receiver tab, 141
Change RF Receiver
Settings, 143
Detect CPS Receiver
Settings, 142
Manually Override Receiver
Settings, 142
Turn Off Response Pads, 142
Re-grade Assessments, 163
Re-grade Numeric Questions,
165
Re-grade Questions, 163
Re-grade Students, 167
Report Card Summary, 212
Reporting System, 161
Reports, 8
AEIS-IT Export Report, 179
All Data Export Report, 180
Classroom Manager Export
Report, 179
Data Slicing, 182
Data Slicing Report, 175
Generate, 171
Instructory Summary Report,
172
CPS 4.0 Users Guide
InteGrade Pro Export Report,
181
Item Analysis Report, 174
Item Analysis with Standards
Report, 174
LMS Export Report, 180
OnTrack Export Report, 179
Opinion Survey Report, 175
Post Report, 180
Print, 181
Question Grid Export Report,
178
Question Report, 173
Response Data Export
Report, 180
Response Report, 173
Session Data Export Report,
178
Standards Analysis Report,
174
Star Chart Report, 176
Study Guide - Class
Summary Report, 177
Study Guide - Incorrect
Answers Report, 177
Study Guide Report, 176
WebCT Export Report, 181
Response Data Export Report,
180
Response Report, 173
response system, 112
Rubrics, 44
Associate to Subjective
Question, 45
Copy, 46
Create, 44
Delete, 47
Edit, 46
SASI XP Files, 99
Scanner testing, 48
Session Category, 148
Session Data Export Report, 178
Session Merge, 161
Show Graphic After Response,
28
Show Graphic Full Screen, 29
Software Support Information, 5
Contact Information, 5
Hours, 5
Training Information, 5
Spell Checker, 6, 41, 42, 43
Customize Dictionary, 42
Options, 42
Standard Attributes window, 67,
71
standard side, 67
279
Index
Standards, 8, 66
Add Questions, 73
Associate Dynamic
Standards, 72
Associate to Lesson
Question, 32
Copy Questions to Other
Standards, 74
Copy Questions within the
Same Standard, 75
Create, 67
Create Questions, 68
Delete, 75
Delete Question, 75
Download, 68
Edit Attributes, 71
Edit Standards Questions, 71
Import Downloaded
Standards, 78
Import from CPS Database,
77
Print, 76
Standards Builder, 69
Standards Analysis Report, 174
Standards Builder, 69
Star Chart Report, 176
Student Managed Assessment
Mode, 116
Using a 1st Generation
Higher Ed RF System,
117
Using a 1st Generation K-12
RF System, 121
Using a 2nd Generation RF
System, 121
Using an IR System, 117
Walkthrough, 118
Student Managed Practice
Mode, 122
Student Managed tab, 140
Manual Advance to Next
Question, 141
student side, 79
Study Guide – Class Summary
Report, 177
Study Guide – Incorrect
Answers Report, 177
Study Guide Report, 176
Subjective Question
Create, 21
T/F, No Graphic, 25
T/F, No Graphics, Big Questio,
25
T/F, Question Graphic, 25
T/F, Question Graphic Bottom,
25
T/F, Question Graphic II, 25
T/F, Question Graphic Right, 25
tbt Deliver, 103
Teacher Managed Assessment
Mode, 116
Teacher Managed tab, 128
Auto Move to Next Question,
140
Auto Show Alphabetic
Responses, 132
Auto Show Charting, 133
Auto Show Detached
Feedback Grid, 132
Auto Start the Question, 137
Auto Start the Timer, 136
Detach Narrative, 131
Mask Response on Pad, 138
Show Answer Distribution,
130
Show Correct Answer, 135
Show Cumulative Percent
Correct, 129
Show Large Screen, 133
Show Large Screen Verbal,
139
Show Pads that Have
Responded, 129
Show Percent Correct, 134
Timer Length and Increment,
138
CPS 4.0 Users Guide
Teacher-Led Student Managed
Assessment Mode, 126
Team Activities, 7, 8, 12, 105,
106, 107, 108, 109, 110, 127,
154
Team Activities tab, 145
Enable Student Led Mode,
146
Show Answered Correct, 145
Use Bonus Points, 146
There It Is!, 5, 17, 18, 105, 106
Engage, 154
Top Score, 105, 111, 116
Engage, 157
Top Score icon, 158
Turn Off Response Pads, 142
Upload
Attendance after Class, 222
Attendance Assessments, 220
Attendance from Session
Setup, 220
Attendance from the
Attendance window, 221
Verbal Questions, 152
Engage from Engage toolbar,
153
Engage from Lessons tab,
152
WebCT Class
Create, 83
Import, 101
WebCT Export Report, 181
Weight Sets tab, 198
Welcome tab, 196
XML Import/Export, 12
Y/N, No Graphics, Big
Question, 25
Y/N, No Graphics:, 25
Y/N, Question Graphic, 25
Y/N, Question Graphic Bottom,
25
Y/N, Question Graphic II, 25
Y/N, Question Graphic Right,
25
280