1
Information System for Birkby
Videos
Mohammed Qasim
BSc Computer Science
2005/2006
The candidate confirms that the work submitted is their own and the appropriate credit has
been given where reference has been made to the work of others.
I understand that failure to attribute material which is obtained from another source may be
considered as plagiarism.
(Signature of student) _______________________________
Summary
This project had the aim of creating a system for a DVD rental business Birkby Videos. This
involved creating a database application for the day to day running of the business, and a
website for its existing members. The project was a success all the requirements were
achieved and surpassed.
The following was achieved in the project:
•
User requirements were gathered and analysed, and the system was designed
according to the user requirements. The system was then implemented, tested and
evaluated.
•
A database application for Birkby Videos was created. Which was able to carry out
the following operations:
1. Store details of all the members and DVD titles in stock.
2. For every member and for every DVD show when a DVD was rented, due
back and when returned.
3. Search for the details of a particular member or DVD.
4. Keep a record of how many times a DVD title has been rented and how
much money it has made.
5. Show the full DVD rental history of the DVD’s and members.
6. Show all the current DVD titles on loan.
7. Allow a member to have online access.
•
A website for existing members was created. Which was able to carry out the
following operations:
1. Members can check what DVD’s they have on loan and when they are due
back.
2. Members can change their login password online.
3. Members can view the current contact details the business holds and can
change their contact details online.
4. Members can view information about the business, how to contact it and its
opening times.
•
A non-technical user manual for the database application was also created.
i
Table of Contents
Chapter 1 – Introduction
1
1.1 Introduction
1
1.2 The Problem
1
1.3 Aim
1
1.4 Objectives
2
1.5 Minimum Requirements
2
1.6 Extensions
2
1.7 Deliverables
3
1.8 Project Schedule
3
1.9 Structure of the Report
3
Chapter 2 – Background Research
4
2.1 Previous Projects
4
2.2 System Development Methodology
4
2.2.1 The Waterfall Model
4
2.2.2 The Spiral Model
5
2.2.3 Prototyping
6
2.2.4 RAD
6
2.2.5 Choice of Methodology
7
2.3 Tools
7
2.3.1 Database
7
2.3.1.1 Microsoft SQL Server
7
2.3.1.2 Microsoft Access
7
2.3.1.3 MySQL
8
2.3.1.4 PostgreSQL
8
2.3.1.5 Choice of Database
8
2.3.2 Server Side Scripting Language
8
2.3.2.1 ASP
9
2.3.2.2 PHP
9
2.3.2.3 Perl
9
2.3.2.4 ColdFusion
9
2.3.2.5 JSP
9
2.3.2.6 Choice of Language
10
2.3.3 Mark-up Language and Cascading Style Sheets
ii
10
2.3.3.1 HyperText Markup Language
10
2.3.3.2 Extensible HyperText Markup Language
10
2.3.3.3 Cascading Style Sheets
10
2.3.4 Server
10
2.3.4.1 ISS
11
2.3.4.2 Apache
11
2.4 Usability
11
2.4.1 GOMS
11
Chapter 3 – Analysis
12
3.1 Project Objective
12
3.2 Business Needs
12
3.3 Requirements Capture
12
3.3.1 Interviews/Meetings
12
3.3.2 Requirements Specification
13
3.4 Initial Verses Additional Requirements
14
3.4.1 Database Application
14
3.4.2 Website
15
Chapter 4 – Design
16
4.1 Introduction
16
4.2 Database
16
4.2.1 Entity Relationship Diagram
16
4.2.1.1 Explanation of Entity Relationship Diagram
4.2.2 Normalisation
17
17
4.2.2.1 Data Definition Tables of Normalised Database
4.2.3 Graphical User Interface
18
20
4.3 Website
20
4.3.1 Website Framework
21
4.3.2 Page Layout
21
4.3.3 Look and Feel
22
Chapter 5 – Implementation
23
5.1 Introduction
23
5.2 The System
23
5.3 ODBC Connection
23
5.4 Database Implementation
23
iii
5.4.1 Database Queries
24
5.4.2 Graphical User Interface
27
5.5 Website Implementation
27
5.5.1 CSS and XHTML
27
5.5.2 Static Web Pages
28
5.5.3 PHP
28
5.5.3.1 Connection Script
29
5.5.3.2 PHP Scripts
29
5.6 Prototyping
30
5.6.1 Database Application
31
5.6.2 Website
31
5.7 Security
31
Chapter 6 – Testing
32
6.1 Introduction
32
6.2 Unit Testing
32
6.3 Functional Testing
32
6.3.1 Database Application
33
6.3.2 Website
35
6.4 Browser Compatibility
37
Chapter 7 – Evaluation
38
7.1 Goals and Requirements
38
7.2 Usability
38
7.2.1 Website
38
7.2.2 Database Application
40
7.3 Limitations
40
7.4 Methodology and Schedule
41
7.5 Further Development
41
7.6 Conclusion
42
Bibliography
43
Appendix A – Reflection
45
Appendix B – Project Schedule
46
Appendix C – Website
47
Appendix D – PHP Code
51
Appendix E – Non-technical User Manual
56
iv
Chapter 1
Introduction
1.1
Introduction
This section will briefly give an overview of the project, what it is about and the minimum
requirements.
1.2
The Problem
My uncle just recently opened a DVD rental business called Birkby Videos. He was working
in a paper based environment and his business was growing, the number of members he had
was growing along with his stock of movies, and it was clear to him that he needed some sort
of information system for the business.
At that time he recorded details of all his members and DVD’s on paper, along with what
DVD’s were on loan, by whom and when they were due back etc. So he wanted to
computerise this part of the business, to assist his business to run efficiently and effectively.
Along with this he wanted some sort of web presence to promote his business and for his
members to be able to check their records online.
There were off-the-shelf DVD rental software packages available, like Rapid Rental, Video
Vision and Winrental. But my client wanted something simple, tailor made for his needs only
and where users could access their details over the internet. These software packages did not
offer these requirements. There were also many business solution companies like Motion
Software and Solutions By Computer that did offer these services, they tailor make software
to suit your business needs, whatever the requirements. My client did consider this approach,
and he concluded that this was not appropriate for a small business like his, because the cost
was too high, it outweighed the benefits.
1.3
Aim
The aim of this project is to analyse the information needs and produce an appropriate
information system for a DVD rental business.
1
1.4
Objectives
The objectives of the project are to:
•
Analyse the information needs of the business.
•
According to the business needs produce an appropriate information system.
•
The system will consist of a database which will store details of all the
members/DVD titles and be able to carry out all the required operations carried out by
the business.
•
The information system will also consist of a website which will be linked to the
database and where members will be able to check their records online.
1.5
Minimum Requirements
The minimum requirements are:
•
A prototype database for a DVD rental business. Which will be able to carry out the
following operations:
1. Store details of all the members and DVD titles in stock.
2. For every member and for every DVD show when a DVD was rented, due
back and when returned.
3. Search for the details of a particular member or DVD.
•
A website for existing members where they can check what DVD’s they have on
loan and when they are due back.
1.6
Extensions
The extensions that were carried out are:
•
The prototype database is able to carry out the following additional operations:
1. Keep a record of how many times a DVD title has been rented and how
much money it has made.
2. Show the full DVD rental history of the members.
3. Show all the current DVD titles on loan.
•
The website is able to carry out the following additional operations:
1. Members can change their login password online.
2. Members can view the current contact details the business holds and can
change their contact details online.
3. It has an additional webpage for business opening times and a contact us
page.
•
A non-technical user manual for the database application.
2
1.7
1.8
Deliverables
•
The final project report.
•
A database, along with a website which connects to the database.
•
A non-technical user manual.
Project Schedule
The Gantt charts for the initial project schedule, along with the actual project schedule can be
seen in Appendix B.
1.9
Structure of the Report
The report will reflect the structure of the development process. The first section includes the
aim, minimum requirements and the objectives of the author. The following section covers
the examination of the technical aspects and system developments methodologies. This will
be followed by the analysis, design and implementation sections. The application will then be
tested and evaluated in the appropriate sections. Finally it finishes with a conclusion
concerning the overall success of the project.
3
Chapter 2
Background Research
2.1
Previous Projects
There have been many similar projects carried out in the past that involved building some sort
of system for a business. So it was in my interest to look into these projects to see what
aspects I could adapt that were successful and what advice the authors had for someone who
was going to do something similar.
All the projects I looked into were giving similar if not the same advice. [18] and [19] both
pointed out that when creating a system ensure functionality first, then worry about the
features later, as this would ensure that the system is produced on schedule and meeting the
user requirements. Both the authors underestimated the time required to write up the final
report, I will aim to leave ample time in my schedule for the write up and I will try to write
extracts for the report throughout the project process to minimise the workload at the end.
Another thing both authors, along with others also pointed out were the importance of always
keeping the user in mind. You could produce the most technically advanced system, but if the
system does not meet the user requirements or the user does not like the end system, the
project will essentially not be a success. So it was important I took note of this advice and
implemented it in my project.
2.2
System Development Methodology
Before design and implementation can begin on the system, it is important to decide which
system development methodology to employ. I only researched the methodologies that were
relevant to this project.
2.2.1
The Waterfall Model
“This is the classical model of system development” [1], it consists of a sequence of simple
stages working from top to bottom, as shown in figure 1 below. Each stage is represented by
boxes and each stage has to be completed before work on the following stage starts, and the
outputs of one stage are used as inputs to the next one. The waterfall model works best when
4
the level of reworking of the product is minimal and the products remain unchanged after the
completion of that stage [2]. There is no room for major changes to requirements/design etc.
as these changes may be necessary, when carrying out the further development or improving
the solution and it is clear the rigid structure of this model will not be suitable for this project.
Figure 1
The Waterfall Model [3]
2.2.2
The Spiral Model
The Spiral model differs from the waterfall model in that it introduces an iterative approach to
system development [2]. The spiral model (see figure 2) is a lot less rigid in its approach, it
allows for constant movement between levels of the development process and the life cycle of
the system. It allows you to change the requirements, re-design and re-implement with each
rotation of the spiral, this is because the models stages are cycled and reversible. However
one drawback of this model is when implemented it may lead to endless work as it is difficult
to get the system perfect and, as explained in [5], there is no clear cut stopping point when
using the spiral model.
5
Figure 2
The Spiral Model [4]
2.2.3
Prototyping
The principle of prototyping is to note the reaction of the user to the prototype of the system
and this enables the developer to gain an insight into the users thoughts about the system and
assess the extent to which it meets their needs. Prototypes can be classified as either throwaway or evolutionary [1]. Throw-away prototype is used only to test out some ideas and is
discarded after the required information is gathered. Evolutionary prototype is constantly
developed and modified until the user requirements are met [1]. Prototyping allows for the
user to have a more active involvement in the design decisions of the system, with their
timely involvement this allows the user to be able to test the system before it is completed and
appropriate changes can be made. This high level of involvement allows the user to get a feel
for how the system is likely to work in practice [1]. However, since the developer focuses
their attention on the prototype, this limits the time needed to create any documentation or test
the product [2].
2.2.4
RAD
RAD (Rapid Application Development) is a methodology for “compressing the analysis,
design, build and test phases into a series of short, iterative development cycles” [17]. It was
developed to respond to the need to deliver systems very quickly. Since the developer and
user agree on the design before implementation begins, the system can be developed quickly
6
with no interruptions. However, there is a tendency for RAD projects to contain errors, as
things can be over looked due to its ‘rapid’ nature.
2.2.5
Choice of Methodology
I chose to adopt the Prototyping methodology for this project, as I believed it suited this
project best. It allows my client to have an active involvement in the development of the
system and appropriate changes can be made during this process. The Waterfall model was
ruled out because of its rigid structure, there is little or no room for changes to the
requirements/design during the development process and it may be necessarily when carrying
out further development. The Spiral model was ruled out because it may have lead to endless
work, since there is no clear cut stopping point when implementing this model, and Rapid
Application Development projects have a tendency to contain error, because things can be
over looked due to its nature.
2.3
Tools
There are a verity of tools that I will need to use in order to complete this project.
•
Database management system to store all the required data.
•
Server side scripting language to retrieve information from the database.
•
Client side scripting for the web pages.
•
A server for the system.
2.3.1
Database
There are four main DBMS (Database Management Systems) that could have been used to
store the required data for this project.
2.3.1.1
Microsoft SQL Server
SQL server would be the ideal database to use for this project, because I am familiar with the
application, after using it extensively in my database modules, I had gained a good
understanding of it. Also it is accompanied by excellent documentation and support. SQL
server is a powerful database with a grate deal of functionality and can deal with a lot of web
traffic. But it costs too much for a software licence, $8,487 per server [6], which is not cost
effective for a small business.
2.3.1.2
Microsoft Access
Microsoft Access is the best selling database [7], it is included in the Microsoft Office
package and both my client and I are familiar with Access. It has the ability to edit, insert,
7
index and retrieve data through custom made forms and interfaces can also be developed to
manipulate the data. It is relatively simple to use with plenty of documentation available. The
downside of Access is that it is not ideal for use on a network because it can only cope with a
relatively small number of users at a time [7].
2.3.1.3
MySQL
MySQL was developed as an open source piece of software and therefore will cost nothing.
It is also a lot faster compared to any other database and the database design is relatively
simple [8]. Also it is designed to work well with web-based servers, it is simple to create a
web-driven web site and there is a lot of documentation and tutorials available online for help
and support. The downside of MySQL is that it not ideal if you want to create an application
that demands transactions and foreign key references [8].
2.3.1.4
PostgreSQL
PostgreSQL is another open source database and therefore it will cost nothing to acquire. It
supports a grate deal of features like complex rules, triggers, views and even geographical
information which some databases will lack [8]. The downside of PostgreSQL is that it is
relatively slower than MySQL and the database design is a lot more complex [8]. There is
also not as much documentation available compared to the other database applications, and
having no prior knowledge of the application, this makes it difficult to learn.
2.3.1.5
Choice of Database
Microsoft Access was chosen to be used for the production of the database for Birkby Videos.
I ruled out SQL server because it was not cost effective for a small business and there was
little documentation available for a complex DBMS like PostgreSQL. MySQL was ruled out
because my client was not familiar with the application and he wanted the ability to easily
move the database from one computer to another. Since the website will only be for existing
members and Access can concurrently network 255 users [7], the issue of Access only coping
with relatively few users compared to the other DBMS will not really be an issue.
2.3.2
Server Side Scripting Language
There are a number of server side scripting languages available for retreving/updating
information from the database. ASP, PHP, Perl, ColdFusion and JSP are all possible
languages that could have been used.
8
2.3.2.1
ASP
ASP (Active Server Pages) is a framework by Microsoft that lets you combine scripting
languages (VBScript and JavaScript) and software components resulting in very powerful
software development [10]. “ASP is a very well supported technology, with all the backing
of the Microsoft development community behind it” [10], and there is lots of technical articles
and reference material available. However it is not free and it only runs on a Windows server.
2.3.2.2
PHP
PHP is an open source, platform independent scripting language. It is a widely used, general
purpose scripting language that is especially suited for web development and can be
embedded into HTML [11]. It has an uncomplicated learning curve which results in a more
rapid product development [9], and can solve complex problem scenarios quicker and more
easily in comparison to other technologies.
2.3.2.3
Perl
Perl is the oldest of the scripting languages. It is a stable, multipurpose, cross platform
programming language [12]. It was designed to handle tasks that involve a lot of text
manipulation; it is “good at juggling pieces of text from various sources and combining them
to form complete documents, which is exactly what is involved in server-side web
development” [10]. However, Perl is a complex language and there are simpler languages out
there to learn that can do just as much in the web development area.
2.3.2.4
ColdFusion
ColdFusion is designed for web designers with no programming experience, Instead of a
scripting language, ColdFusion gives you a set of tags to learn, just like HTML tags, so it is
extremely easy to learn/implement [10]. There is plenty of professional support available
from its developers (Macromedia) and it has cross platform capabilities. However it costs
from $1,299 to $5,999 depending on which edition and subscription are chosen [13].
2.3.2.5
JSP
JSP (JavaServer Pages) is the most powerful platform for server side web development; it is a
complex language that provides much functionality and scalability [10]. Due to its
complexity it takes a lot of work to learn.
9
2.3.2.6
Choice of Language
PHP is the server side scripting language that was chosen. It was chosen because it is
powerful in web development as it was designed for this purpose. It is a relatively simple
language, there is also plenty of documentation and online support available and it costs
nothing.
2.3.3
Mark-up Language and Cascading Style Sheets
2.3.3.1
HyperText Markup Language
HTML (HyperText Markup Language) is the universal standard mark-up authoring language,
used to create documents on the World Wide Web. HTML defines the structure and layout of
a web document by using a variety of tags and attributes.
2.3.3.2
Extensible HyperText Markup Language
XHTML (Extensible HyperText Markup Language) is a mark-up language that has the same
expressive possibilities as HTML, but a stricter syntax [20]. It has replaced HTML as the
standard mark-up for web documents. XHTML is an application of XML, due to it being a
stricter language the content can be delivered to PDA’s and other mobile devices. I chose to
implement the web site in XHTML.
2.3.3.3
Cascading Style Sheets
CSS (Cascading Style Sheets) is a style sheet language used to describe the presentation of a
web page written in a mark-up language (HTML/XHTML). It is used to define the layout,
colours and fonts etc. of web pages, therefore the web page content and presentation are
separate from each other. Without style sheets all the presentational attributes are contained
within the web pages and this would increase the amount of coding, even for simple web
pages, CSS allows the user to move the presentational information to the style sheet resulting
in considerably simple HTML/XHTML code. I will implement the web site in CSS along
with XHTML.
2.3.4
Server
A web server is the place where the web pages exist, it manages requests from a web browser
and returns the requested web pages to the client. There are two major web server
applications, Apache and ISS (Internet Information Services).
10
2.3.4.1
ISS
ISS is a Microsoft Windows Web server that allows you to publish information over the
internet. It provides a number of benefits, including greater cooperation with the host
operating system and easier management and control through a variety of standard tools and
utilities compared to the Apache server [14]. ISS is only designed and available to work only
within the windows environment. Also there is a major security issue, “with the recent
attacks by major viruses, research group Gartner is recommending that enterprises running IIS
switch to another, more secure Web server solution” [15].
2.3.4.2
Apache
The Apache Web Serve, unlike Microsoft’s IIS Web server is open source and has crossplatform capability. It is now the most widely used web server on the internet [16]. Apache is
scalable; it can be configured so that it can be run on a typical home or office PC, to provide
access to a small company’s web site [16]. The downside of Apache compared to Window’s
IIS is that it is a lot harder to set up, it requires a lot more configuration and is not as simple as
the Add/Remove Windows Components function which is used to add IIS in windows. Even
though the server installation is complex, I still chose Apache over IIS because it was open
source, it was designed to work with a wide range of languages and “significantly speeds up
the execution of dynamic components for languages like PHP, Perl and Python” [14].
2.4
Usability
Usability is extremely important in the development of any system and in particular this
project. The user must be able to effectively operate the application and be able to use it to its
full potential. If the usability is poor the user will fail to utilise the application to its full
extent and this will effectively result in wasting resources.
2.4.1
GOMS
GOMS is an acronym that stands for Goals, Operators, Methods and Selection. A GOMS
model is composed of Goals which is what the user wants to achieve, Operators which are the
actions the user must take to use the system, Methods which are the different alternative ways
to achieve the goal and Selection which is the chosen selection from the different types of
methods [21]. GOMS is effective at determining how a user performs a particular task,
therefore the developer can create an application where the user doesn’t alter the way he/she
uses the computer and therefore an application can be created that is simple for the user to
learn and adjust to.
11
Chapter 3
Analysis
3.1
Project Objective
The problem and its possible solutions were discussed with my client; following this
discussion a project objective was derived. The project objective was as follows:
“To produce an appropriate information system according to the business
needs. The system will consist of a database which will store details of
all the members, DVD titles and be able to carry out all the required
operations carried out by the business. The system will also consist of a
website which will be linked to the database and members will be able to
check their records online.”
3.2
Business Needs
It was extremely important that the objectives of this project, stated above met the needs of
the business as highlighted in the problem in section 1.2.
3.3
Requirements Capture
A range of different approaches for capturing the user requirements were researched, I
decided to adopt the more direct approach and capture the requirements by interviewing the
owner of the business, and write a requirement specification.
3.3.1
Interviews/Meetings
The technique used to capture the requirements was through meetings with the owner. At the
early stages of the project the meetings were primary used to discussing requirements. Later
on in the project when the implementation of the application begun they were also used to
demonstrate my current progress, feedback and possible changes required to the application
were raised, and the appropriate changes were made to the requirements. This flexibility was
ideal as I was adopting the prototyping methodology.
12
3.3.2
Requirements Specification
In [22] and in many other texts requirements specification are split into two categories,
functional requirements and non-functional requirements. Functional requirements define
what the end-product of the project is to do, and non-functional requirements are other
attributes of the application to be implemented that do not relate so much to what the system
is to do but how it is to do it.
The functional and non-functional requirements for Birkby Videos were determined and are
stated below. Please note that the requirements stated below are the minimum requirements
as well as the additional requirements that were added during the course of the project. The
minimum requirements can be seen in section 1.5.
The requirements specifications of the database application are shown below.
Database Application Functional Requirements:
•
Rent out a DVD
•
Return a DVD
•
Show when a DVD is due back
•
Add a new DVD title
•
Change/Delete a DVD title
•
Find a particular DVD by it’s DVD number or title
•
Show all current DVD’s on loan
•
Show all DVD’s on loan by a particular member
•
Show the rental history of a DVD
•
Add a new membership
•
Cancel/Change a membership
•
Find details of a member by their Membership Number/Date of Birth/Name
•
Show the rental history of a member
•
Add/Delete/Change the members online login details
•
Show how many times a DVD title has been rented
•
Show how much money a DVD title has made
Database Application Non-Functional Requirements:
•
Easy to use and navigate
•
A simple and explanatory application
•
Not to big or complex
13
•
Interface should remain consistent throughout the application
•
The interface should inform the user about what action needs to be taken to carry out
an operation
The requirements specifications of the website are shown below.
Website Functional Requirements:
•
A home page that contains details about the business
•
A contact us page that shows the location of the business, along with contact details
•
A page showing the current opening times
•
Member login section
•
An existing members page that shows them their details
•
An existing members page where they can check what DVD’s they have on loan and
when they are due back
•
Update contact details
•
Change login password
Website Non-Functional Requirements:
•
Easy to use and navigate
•
Simple and explanatory
•
Use colours that a simple and easy on the eye
•
Interface should remain consistent throughout the application
•
The interface should inform the user about what action needs to be taken to carry out
an operation
3.4
Initial Verses Additional Requirements
As the project progressed, Birkby Videos specified more requirements. The majority of these
requirements were further queries to write to the database application.
The minimum requirements are stated in section 1.5. The following enhancements and
additions to the requirements were developed.
3.4.1
Database Application
The user can now carry out the following additional operations.
•
View the full rental history of any DVD title.
•
View the full DVD rental history of any member.
14
•
Add/Delete/Change the members online login details.
•
See how many times a DVD has currently been rented.
•
See how much money a DVD title has currently made.
Note that a non-technical user manual for the database application was also produced as an
additional requirement.
3.4.2
Website
The user can now carry out the following additional operations.
•
It came to our attention that an opening times page was needed, because the times
varied during the course of the year.
•
A contact us page was added that shows the location of the business, along with
contact details.
•
An existing members page that shows them their details, the business holds.
•
Update contact details.
•
Change login password.
15
Chapter 4
Design
4.1
Introduction
This chapter is divided into two main sections. The first section is about the design of the
database application and this will be illustrated through an entity relationship diagram and
normalisation. The second section is about the design of the website.
4.2
Database
A number of different data modeling techniques were used to obtain the structure of the
database application. An entity relationship diagram, which is a graphical representation of
the relationships between the entities in the database, this was used to obtain an overall
structure of the application. Normalisation was then used to ensure that the structure of the
database was accurate by ensuring that there were no data duplication issues.
4.2.1
Entity Relationship Diagram
An entity relational diagram contains three key elements, entities, attributes and
relationships. An entity is defined as something “in the real world with an independent
existence” [23], this can be either something physical or conceptual. Whereas an attribute has
“properties that describes the entities characteristics” [23], for example the properties for the
entity Member could be FirstName, Postcode and Email. Finally, entities can be associated
with each other via a certain type of relationship. These relationships are split into three
types, one-to-one, one-to-many and many-to-many.
A one-to-one relationship is when a single entity is related to another single entity, for
example no member has more than one login username and no username is used by more than
one member. A one-to-many relationship is when a single entity is related to many instances
of another entity, for example a member has many DVD’s on loan, but a DVD can only be
loaned to one member at a time. Finally, a many-to-many relationship is when many
instances of an entity are related to many instances of another entity, for example a DVD title
can have more than one category, and that category can be used by many DVD titles.
16
The diagram below shows the entity relationships for the database application.
(1,N)
Member
(1,N)
Rental
DVD
(1,1)
OnlineUser
4.2.1.1
Explanation of Entity Relationship Diagram
There are four tables shown in the entity relationship diagram above. Three of these tables
are related via a one-to-many (1,N) relationship. For instance the Member table has a 1:N
relationship with the Rental table, this means that a member can have many DVD’s on loan,
but a single DVD can only be loaned to one member at a time. The DVD table also has a 1:N
relationship with the Rental table. There is a 1:1 relationship between the Member and
OnlineUser tables, this means that no member has more than one login username and no
username is used by more than one member.
4.2.2
Normalisation
Normalisation is applied on data to ensure that a set of tables in the database are organized
efficiently. There are two main goals of normalisation, to eliminate any redundant data, so
the same data is not stored in more than one table and to ensure data dependency, by only
storing data related to that table. These goals reduce the amount of space a database
consumes and ensures that the data is logically stored.
I will normalise my database to third normal form, as this is sufficient for my application and
for the business as a whole. The definitions of the first three normal forms taken from [24]
are stated below.
First normal form (1NF) sets the very basic rules for an organised database:
•
Eliminate duplicative columns from the same table.
17
•
Create separate tables for each group of related data and identify each row with a
unique column or set of columns (the primary key).
Second normal form (2NF) further addresses the concept of removing duplicative data:
•
Meet all the requirements of the first normal form.
•
Remove subsets of data that apply to multiple rows of a table and place them in
separate tables.
•
Create relationships between these new tables and their predecessors through the use
of foreign keys.
Third normal form (3NF) goes one large step further:
•
Meet all the requirements of the second normal form.
•
Remove columns that are not dependent upon the primary key.
The database tables for the Birkby Videos application is in 3NF (third normal form), the
normalised tables along with their entity relationships are shown below.
4.2.2.1
Data Definition Tables of Normalised Database
Below are the data definition tables of the database.
ONLINE USER
Attribute Name
MemberNo
Data Type
Integer
Description
The membership number.
Primary Key.
Username
Text
Online username.
18
Password
Text
Online password.
MEMBER
Attribute Name
MemberNo
Data Type
Integer
Description
The membership number.
Primary Key.
Title
Text
The member’s title.
FirstName
Text
Member’s first name.
LastName
Text
Member’s last name.
DateOfBirth
Date/Time
Member’s date of birth.
FirstLineAddress
Text
Member’s first line of address.
SecondLineAddress Text
Member’s second line of address.
PostCode
Text
Member’s post code.
TelephoneNo
Text
Member’s telephone number.
MobileNo
Text
Member’s mobile number.
Email
Text
Member’s email address.
DateJoined
Date/Time
The date the member joined.
DVD
Attribute Name
DVDNo
Data Type
Integer
Description
The DVD number.
Primary Key.
MovieTitle
Text
Title of the DVD.
Rating
Text
Rating of the DVD.
Category
Text
Category of the DVD.
RentalPrice
Currency
Rental price of the DVD.
DataAcquired
Date/Time
Date the DVD was acquired.
PurchasePrice
Currency
Purchase price of the DVD.
RENTAL
Attribute Name
RentalID
Data Type
AutoNumber
Description
The rental identification number.
Primary Key.
MemberNo
Integer
The membership number.
Foreign Key.
19
DVDNo
Integer
The DVD number.
Foreign Key.
DateRented
Date/Time
Date the DVD was rented.
DateDue
Date/Time
Date the DVD is/was due back.
DateReturned
Date/Time
Date the DVD was returned.
4.2.3
Graphical User Interface
Using Microsoft Access for the application was a grate advantage when it came to creating
the graphical user interface; this was because it offered a swift and easy solution to creating
the interface, without the need of any programming. I took advantage of its various tools to
create an interface that met the user requirements, and when it came to making changes to the
interface, it was a simple process without the need of much extra work.
When considering the design of the user interface, functionality and usability of the
application were the two most important issues. The aim was to create an interface that was
self explanatory, easy to use and navigate, and the interface remained consistent throughout,
as stated in the requirements in section 3.3.2.
The Main Menu of the database application is shown below.
4.3
Website
The next stage was to design the website, its interface and layout. It was an important factor
in the development process.
20
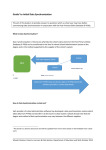
4.3.1
Website Framework
The diagram below shows the site structure. It shows the relationship between the web pages
and how they will link to each other.
index.html
about.html
login.html
contact.html
opening.html
details.php
update_contacts.php
4.3.2
change_password.php
Page Layout
In terms of the physical layout, each page will have a header, which will contain the menu
options and footer, and in between this the main content of the page will reside. To the left of
the main page content there will be a menu column. A diagram to illustrate this is shown
below.
Header/Main Menu
Logo
Menu/
Navigation
Main Page
Content
Footer
21
This is a very simple layout, and it will therefore enable the user to navigate easily through
the site and every operation carried out by the user should be self explanatory. This will
ensure that the user has a pleasant and user friendly experience when visiting the web site.
4.3.3
Look and Feel
Sharply contrasting and deep colours were avoided, so I opted for a soft green with plenty of
white space as the colour combination. Incorporated with this was dark text on the white
background, this was used to display the majority of the site content. This was used for
clarity and also fitted in well with the selected colour scheme. I made as much use of the
white space as possible, as white space helps keep the page looking clean and is easy on the
eye, whilst also improving readability. This colour combination will not divert the user’s
attention and will ensure a pleasant user friendly experience.
Only a limited number of images were used, and when they have been used, they have been to
aid the design. This was done to ensure its simplicity.
To ensure usability I ordered the menu options according to importance/relevance, this is
what most of the users would expect and be comfortable with. By also incorporating the
menu navigation into the header of every page, this ensured the usability of the website to its
highest level.
22
Chapter 5
Implementation
5.1
Introduction
Implementation was the next process in the project development phase. The database
application was created first, followed by the website. These were then integrated with the
dynamic aspect, and resulting in the full system.
5.2
The System
The full system was implemented on my laptop computer; it was running Microsoft Windows
XP Professional SP2. The Apache 2.0.55 server and the scripting language PHP 4.4.1 were
installed on the computer.
5.3
ODBC Connection
Before I could begin implementation I had to setup an ODBC (Open Database Connectivity)
connection on my laptop. This was a connection between the Microsoft Access Database and
the PHP scripts, to ensure connectively between the database and the website. The tutorial
[25] was followed to setup this connection, and it was a quick and simple process.
5.4
Database Implementation
The tables that were proposed in the design chapter were created in the Access database, with
the correct data types, this was a relatively simple process in Access as it had a wizard to
carry out this step, which was simple and self explanatory, this ensured this process was
carried out quickly and simply. I ensured that the tables had the correct entity relationships
between them.
Details of one of the implemented tables are shown over the page.
23
5.4.1
Database Queries
Once the tables had been implemented, I had to create the database queries for the application
this was the most time consuming process and some of the queries were quite difficult to
implement, and they required further understanding of Access/SQL. Below are the queries I
created for the database application.
All DVD’s currently on loan, to which member and when they are due back
SELECT Rental.RentalID, Rental.MemberNo, Rental.DVDNo, Rental.DateRented,
Rental.DateDue, Rental.DateReturned
FROM Rental WHERE (((Rental.DateReturned) Is Null));
Complete rental history of every member
SELECT Member.MemberNo, Member.FirstName, Member.LastName, Rental.DVDNo,
Rental.DateRented, Rental.DateDue, Rental.DateReturned
FROM Member INNER JOIN Rental ON Member.MemberNo = Rental.MemberNo;
DVD’s on loan by a member
SELECT Rental.MemberNo, Rental.DVDNo, DVD.MovieTitle, Rental.DateRented,
Rental.DateDue
FROM DVD INNER JOIN Rental ON DVD.DVDNo=Rental.DVDNo
WHERE (((Rental.MemberNo)=[Enter Member No:]) AND ((Rental.DateReturned) Is Null));
24
Rental history of a DVD
SELECT Rental.DVDNo, DVD.MovieTitle, Rental.MemberNo, Rental.DateRented,
Rental.DateReturned
FROM DVD INNER JOIN Rental ON DVD.DVDNo=Rental.DVDNo
WHERE (((Rental.DVDNo)=[Enter DVD No:]))
ORDER BY Rental.DateRented;
Rental history of a member
SELECT MemberHistoryOfDVDs.MemberNo, MemberHistoryOfDVDs.FirstName,
MemberHistoryOfDVDs.LastName, MemberHistoryOfDVDs.DVDNo,
MemberHistoryOfDVDs.DateRented, MemberHistoryOfDVDs.DateDue,
MemberHistoryOfDVDs.DateReturned
FROM MemberHistoryOfDVDs
WHERE (((MemberHistoryOfDVDs.MemberNo)=[Enter Member No:]));
Total bill amount of every rental
SELECT Rental.RentalID, Rental.MemberNo, Rental.DVDNo, Rental.DateRented,
Rental.DateDue, Rental.DateReturned, DVD.RentalPrice, IIf(([DateReturned][DateRented]=0),[RentalPrice],(([DateReturned]-[DateRented])*[RentalPrice])) AS
BillAmount
FROM DVD INNER JOIN Rental ON DVD.DVDNo=Rental.DVDNo;
Total income along with how many times every DVD has been rented
SELECT DISTINCTROW DVD.DVDNo, DVD.MovieTitle, DVD.Rating, DVD.Category,
DVD.RentalPrice, DVD.DateAcquired, DVD.PurchasePrice,
Sum(TotalBillAmount.BillAmount) AS TotalIncome, Count(*) AS NoOfTimesRented
FROM DVD INNER JOIN TotalBillAmount ON DVD.DVDNo = TotalBillAmount.DVDNo
GROUP BY DVD.DVDNo, DVD.MovieTitle, DVD.Rating, DVD.Category, DVD.RentalPrice,
DVD.DateAcquired, DVD.PurchasePrice;
Total income along with how many times a particular DVD has been rented
SELECT TotalIncome.DVDNo, TotalIncome.MovieTitle, TotalIncome.Rating,
TotalIncome.Category, TotalIncome.RentalPrice, TotalIncome.DateAcquired,
TotalIncome.PurchasePrice, TotalIncome.TotalIncome, TotalIncome.NoOfTimesRented
FROM TotalIncome
WHERE (((TotalIncome.DVDNo)=[Enter DVD No: ]));
25
Find DVD by its identification number
SELECT DVD.DVDNo, DVD.MovieTitle, DVD.Rating, DVD.Category, DVD.RentalPrice
FROM DVD
WHERE (((DVD.DVDNo)=[Enter DVD No:]));
Find DVD by its title
SELECT DVD.DVDNo, DVD.MovieTitle, DVD.Rating, DVD.Category, DVD.RentalPrice
FROM DVD
WHERE (((DVD.MovieTitle)=[Enter DVD title:]));
Find member by their date of birth
SELECT Member.MemberNo, Member.Title, Member.FirstName, Member.LastName,
Member.DateOfBirth, Member.FirstLineAddress, Member.SecondLineAddress,
Member.PostCode, Member.TelephoneNo, Member.MobileNo, Member.Email,
Member.DateJoined
FROM Member
WHERE (((Member.DateOfBirth)=[Enter Date of Birth: ]));
Find member by their name
SELECT Member.MemberNo, Member.Title, Member.FirstName, Member.LastName,
Member.DateOfBirth, Member.FirstLineAddress, Member.SecondLineAddress,
Member.PostCode, Member.TelephoneNo, Member.MobileNo, Member.Email,
Member.DateJoined
FROM Member
WHERE (((Member.FirstName)=[Enter First Name: ]) AND ((Member.LastName)=[Enter
Last Name: ]));
Find member by their membership number
SELECT Member.MemberNo, Member.Title, Member.FirstName, Member.LastName,
Member.DateOfBirth, Member.FirstLineAddress, Member.SecondLineAddress,
Member.PostCode, Member.TelephoneNo, Member.MobileNo, Member.Email,
Member.DateJoined
FROM Member
WHERE (((Member.MemberNo)=[Enter Member No: ]));
26
5.4.2
Graphical User Interface
Once the queries had been created it was time to create the graphical user interface as
discussed in section 4.2.3, and incorporate the queries I created earlier. Again this was a
simple and self explanatory process; this is one of the big advantages of using Microsoft
Access to create the application. The main menu of the database application is shown below.
The applications user interface met all the user requirements in terms of its usability and
simplicity.
The approach taken towards the implementation of the database application followed the over
project methodology.
5.5
Website Implementation
It was now time to implement the website. The approach taken towards the scripting of the
PHP server side files and the client side XHTML/CSS also followed the overall project
methodology.
5.5.1
CSS and XHTML
The look and feel aspects of the website were handled by the combination of a cascading style
sheet and XHTML. The research done into usability and design was followed exactly when it
came to implementing the CSS and XHTML, along with the user requirements that are stated
in section 3.3.2.
Despite the fact I had no prior knowledge of CSS, I still decided to adopt this. This was due
to the research I had done, and it had stated that without CSS all the presentational attributes
are contained within the web pages and this would increase the amount of coding, even for
27
simple web pages, CSS allowed me to move the presentational information to the style sheets
and this resulted in considerably simple XHTML code.
Ever though both XHTML and CSS were new to me, this did not create me any problems
because they were relatively simple to learn and implement, and when I did come across any
problems there was plenty of help available from textbooks and the internet.
The CSS and XHTML coding was done in the Notepad text editor.
Div elements were used for the main page layout, and were implemented according to the
page design in section 4.3.2. The look and feel was implemented according to section 4.3.3.
Screenshots of the web pages can be seen in Appendix C.
5.5.2
Static Web Pages
The static web pages that were created were as follows.
index.html was the home page and contained some information about the business and the
website.
about.html contained information about what the business was about.
login.html was the login page, were existing members of the business would use to login and
view their details.
contact.html contained the businesses contact details, along with its location.
opening.html contained the current opening times of the business.
These pages can be seen in Appendix C.
5.5.3
PHP
The coding of the PHP scripts was the most important part of the implementation, as this was
the chosen language for the database connection and manipulation. This was important in the
functionality of the website and the overall outcome of the system.
28
PHP was a new language to me, so before any implementation could begin I had to
familiarise my self with the language and its syntax. Two PHP books [26] and [27] were
studied before the implementation stated, they were also used during the implementation
process as reference.
Further help and tutorials were available on the internet, www.php.net and
www.phpfreaks.com, two particularly good sites, and were very useful when I came across
any problems and guided me in the right direction.
The PHP scripts were initially written separately from the CSS and XHTML, and
incorporated later on. I took this approach because I wanted to ensure functionality first and
worry about the output later; incorporating the PHP into the XHTML was a fairly simple task.
5.5.3.1
Connection Script
odbc.php was the connection script written to provide a connection between the database and
the website. The script is shown below:
<?php
$odbc = odbc_connect ('BirkbyDB', 'root', '') or die('Could Not Connect to ODBC Database!');
?>
This script establishes an ODBC connection between the database and the website, and
displays an error messages if the connection fails. In all of the PHP scripts I implemented,
before the website could retrieve or manipulate any data from the database, the odbc.php
script was called so a connection could be established.
5.5.3.2
PHP Scripts
check_login.php script checks that the username and password entered by the user matches
the ones stored in the database, if they do match the login is successful and this is displayed
on the web page, and if they do not match the appropriate message is displayed. It also
checks to ensure that the user has not missed entering their username or password.
details.php displays the members current personal details the business holds, along with what
DVD’s the member has on loan and states when they are due back.
29
update_contacts.php is a web page were the member that is logged in can change/update their
contact details via the web page. The current contact details that are stored in the database are
displayed on the web page, and a form is provided to insert their new contact details.
process_contacts.php script sends the changed/updated contact details to the database, which
is then subsequently updated, and displays a message telling the user weather the process has
been successful or not.
change_password.php is a web page were the member that is logged in can change their login
password via the web page. The member must enter their old password, their new password
and confirm their new password in the form on the web page.
process_password.php script processes the details entered in the change password form, and
sends the new password to the database, which is then subsequently updated, and displays a
message telling the user weather the process has been successful or not. It throws up an error
message if any of the fields have not been completed, or if the old password does not match
the one in the database, or if the new passwords entered do not match.
logout.php script logs out the current user, and return the user to the home page.
The PHP code of some of these scripts is shown in Appendix D.
5.6
Prototyping
I chose to adopt the Prototyping methodology for the development of this project, so in the
implementation phase of the development process a number of changes were made during the
course of the phase, after demonstrating my progress to my client. It allowed my client to
have an active involvement in the development of the system and ensured that the final
system met his needs.
I demonstrated the system to my client on four separate occasions, appropriate changes were
made and further functionality was added.
Below are some brief details of the changes that were made to the database application and
website during the course of the implementation of the system, by adopting the prototyping
methodology.
30
5.6.1
Database Application
•
Change the colour scheme of the application from white/black to green/gray.
•
Align the buttons of the application vertically instead of being clustered.
•
Enable the user to view the full rental history of any DVD title.
•
Enable the user to view the full DVD rental history of any member.
•
Enable the user to Add/Delete/Change the members online login details.
•
Enable the user to see how many times a DVD has currently been rented.
•
Enable the user to see how much money a particular DVD title has currently made.
5.6.2
•
Website
Add a web page for the opening times of the business, because the opening times
varied during the course of the year.
•
Add a web page that contains the contact details of the business, along with the
location of the premises.
•
Enable the existing member that is logged on to view their personal details the
business holds, so if there are any incorrect information the member can get it
changed.
•
Enable the member to update their contact details online.
•
Enable the member to change their login password online.
•
There were some layout issues of the content of some of the web pages, and these
were resolved.
5.7
Security
Security was not really an issue when implementing the system. This was due to the fact that
Birkby Videos did not carry out any electronic transactions (i.e. credit/debit card), and no
private or confidential details were stored on the system. All business transactions were cash
only, and therefore security was not an issue.
31
Chapter 6
Testing
6.1
Introduction
As mentioned previously the methodology I adopted was flexible, and the phases were not
clear cut. The testing of the database application, PHP scripts and the web pages started
during the implementation phase. As a section of the application was completed or some
code was written, tests were designed and implemented during the system implementation
process, this was done so error/mistakes could be corrected in the implementation phase.
Once the system was complete further testing was carried out to test the final system.
6.2
Unit Testing
Unit testing was undertaken during the implementation phase of the development. When ever
a part of the database application, PHP scripts or web pages was completed, they were
individually tested for any errors before they were merged into the system as a whole. It was
important to test early on in the development and consistently, so error could be detected and
eliminated early on. This would ensure that the system as a whole contained little or no
errors.
This method of testing proved to be very effective in discovering minor trivial errors, which
were easily fixed before it created further more complicated problems, later on down the line
in the development process.
6.3
Functional Testing
The testing approach here was to work through the entire database application and website,
and test the input and output of the system, making sure everything behaved as expected.
Below is the test plan along with its results for the database application and the website.
32
6.3.1
Database Application
Application Area
Main Menu
Description
All seven buttons in the menu take you to the correct
Success?
YES
location.
Rent DVD
The exit button exits the application.
YES
Filling in the form fields correctly updates the
YES
database.
‘Rent DVD’ button updates the database and clears
YES
the form fields.
Return DVD
The exit button exits the form.
YES
Filling in the ‘date returned’ field correctly updates
YES
the database.
DVD Details Menu
‘Find DVD No’ button launches the search window.
YES
The exit button exits the form.
YES
All eight buttons in the menu take you to the correct
YES
location or launch the appropriate forms.
Add New DVD Title
Filling in the form fields correctly updates the
YES
database.
The delete button deletes the correct record from the
YES
database.
Add new record button clears all the form fields.
YES
The find record button launches the search window.
YES
The exit button exits the form.
YES
Change/Delete DVD
Filling in the form fields correctly updates the
YES
Title
database.
The delete button deletes the correct record from the
YES
database.
Find DVD by Number
Add new record button clears all the form fields.
YES
The find record button launches the search window.
YES
The exit button exits the form.
YES
The enter DVD number window pops up.
YES
33
Displays the correct DVD details.
YES
The enter DVD title window pops up.
YES
Displays the correct DVD details.
YES
All Current DVDs on
Correctly display all the current DVDs that are out on
YES
Loan
loan.
DVDs on Loan by
The enter membership number windows pops up.
YES
Correctly displays all the DVD’s the member has out
YES
Find DVD by Title
Member
on loan.
Rental History
Member Details Menu
The enter DVD number window pops up.
YES
Correctly displays the rental history of that DVD.
YES
All seven buttons in the menu take you to the correct
YES
location or launch the appropriate forms.
Add New Member
Filling in the form fields correctly updates the
YES
database.
The delete button deletes the correct record from the
YES
database.
Add new record button clears all the form fields.
YES
The find record button launches the search window.
YES
The exit button exits the form.
YES
Change/Cancel a
Filling in the form fields correctly updates the
YES
Membership
database.
The delete button deletes the correct record from the
YES
database.
Find Details by
Add new record button clears all the form fields.
YES
The find record button launches the search window.
YES
The exit button exits the form.
YES
The enter membership number window pops up.
YES
Displays the correct details of the member.
YES
The enter date of birth window pops up.
YES
Displays the correct details of the member.
YES
The enter name windows pops up.
YES
Displays the correct details of the member.
YES
Membership No
Find Details by Date of
Birth
Find Details by Name
34
Members Rental History
Online User
The enter membership number window pops up.
YES
Correctly displays the rental history of that member.
YES
Filling in the form fields correctly updates the
YES
database.
The delete button deletes the correct record from the
YES
database.
Income Details
Add new record button clears all the form fields.
YES
The find record button launches the search window.
YES
The exit button exits the form.
YES
All three buttons in the menu take you to the correct
YES
location or launch the appropriate forms.
Details of all DVDs
Correctly displays the income details of all the DVDs.
YES
Details of a DVD
The enter DVD number window pops up.
YES
Displays the correct income details of the DVD.
YES
6.3.2
Website
Web Page
Description
Success?
index.html
Correctly displays its content.
YES
about.html
Correctly displays its content.
YES
log.html
Correctly displays its content.
YES
The login operation correctly works.
YES
contact.html
Correctly displays its content.
YES
opening.html
Correctly displays its content.
YES
check_login.php
Correctly displays its content.
YES
Login failed message appears, if you do not enter the
YES
username.
Login failed message appears, if you do not enter the
35
YES
password.
Login failed message appears, if the username or
YES
password are incorrect.
Login successful message appears, if the username or
YES
password is correct.
details.php
Correctly displays its content.
YES
Displays the logged in user’s correct details and the
YES
correct DVDs that are due back.
update_contacts.php
process_contacts.php
Correctly displays its content.
YES
Displays the logged in users correct contact details.
YES
Correctly displays its content.
YES
Update failed message appears, if the telephone was
YES
not entered.
Update successful message appears, if the update was
YES
a success.
change_password.php
process_password.php
Correctly displays its content.
YES
Displays the logged in users username.
YES
Correctly displays its content.
YES
Change password failed message appears, if you do
YES
not enter the old password.
Change password failed message appears, if you do
YES
not enter the new password.
Change password failed message appears, if you do
YES
not confirm the new password.
Change password failed message appears, if the new
YES
password and its confirmation do not match.
Change password failed message appears, if the old
passwords do not match.
Password change successful message appears, if the
update was a success.
36
YES
Logs the user out and returns them to the home page.
logout.php
6.4
YES
Browser Compatibility
It was important to test the system on different web browsers to ensure its compatibility, and
that the website was available to all of the Birkby Videos members. The website was tested
on three of the top browsers, which accounted for well over 90% of the internet users. The
results are shown below.
Browser
Results
Internet Explorer
Works correctly
Mozilla Firefox
Works correctly
Netscape Navigator
Works correctly
It can be seen from the results above that the website was compatible with all the browsers.
37
Chapter 7
Evaluation
7.1
Goals and Requirements
Determining weather the system met the original goals and requirements was extremely
important, as this was the whole aim of this project. The minimum requirements are stated in
section 1.5 and they were all met. The minimum requirements were exceeded and the
addition work that was carried out is stated in sections 1.6 and 3.4.
Both the database application and website were implemented according to the analysis and
design sections. Any additional needs and requirements that came up in the implementation
phase of the project were carried out. The whole structure of the system remained as
originally planned, just further functionality was added to both the database application and
the website. Overall the system met its goals and requirements, and exceeded them by a
substantial amount.
7.2
Usability
To evaluate the usability of the whole system, the process was split into two phases. The
website was evaluated by ten customers/members of Birkby Videos, as they were the
potential users of the website. This was carried out randomly at the business premises, during
its opening hours. The database application was evaluated by the client, as he was the
eventual end user of this application and this was appropriate. Questionnaires were prepared
for both the evaluation of the website and database application.
7.2.1
Website
The results of the questionnaire are shown in the table below; the numbers indicate the
number of users who ticked that box.
38
Question
Excellent
Above
Average
Average
How was it to navigate around the
Below
Poor
Average
8
2
0
0
0
5
4
1
.0
0
6
3
1
0
0
7
1
2
0
0
6
4
0
0
0
Was all the content appropriate?
8
2
0
0
0
How was the layout of the ‘Your
4
4
2
0
0
5
5
0
0
0
site?
What do you think of the colour
scheme?
How was it to find the content you
were looking for?
Was the language clear and
understandable?
How was the overall layout and
design of the site?
Details’ page?
How was the design and layout of
the forms in the website?
The most positive thing about the
There were a variety of different answers to this, but the
site.
most common answer was that the layout was nice and
simple, and the site was easy to navigate.
The most negative thing about the
Again there were a variety of answers, but a number of
site.
users said that their were no external links to other
movie related sites.
State any suggestions of
Users recommended having the DVD’s currently in
improvements.
stock on the website, along with users able to reserve
DVD’s online.
The eventual evaluators were chosen completely at random as they came into the business
promises. It can be seen from the results that the users seem to be happy with the websites
presentation, layout and its simple navigation; this is what was aimed from the outset of this
development. There was no ‘below average’ or ‘poor’ boxes ticked by the evaluators. The
improvement suggestions by the evaluators were considered for further development.
39
7.2.2
Database Application
The answers to the client’s questionnaire are shown below for the database application.
Question
Excellent
Above
Average
How was it to navigate around the
Average
Below
Poor
Average
X
application?
How was the presentation and
X
layout?
Was the language clear and
X
understandable?
How was the design and layout of
X
the application forms?
Were all the application buttons
X
appropriate?
Was all the content appropriate?
X
What do you think of the colour
X
scheme and design of the
application?
It can be seen from the results that the client was very happy with the applications
presentation, layout and its navigation; again this was something that was aimed for from the
outset of this development. The client ticked the ‘excellent’ box in all the sections, except
one which was the ‘above average’ box.
7.3
Limitations
There were no real major limitations during the course of the project, but there was one
limitation that was identified during the evaluation phase.
It was realised that the output of the tables in the database application could have been more
efficient. Instead of them appearing in a separate window, they could have been integrated to
the same window. This could have been resolved if there had been more time, and it is an
issue of further development later on.
40
7.4
Methodology and Schedule
The use of the prototyping methodology ensured that the evaluation of the system was carried
out throughout the development process, rather than just the end and the results were used to
make the required changes. This also ensured that the system was constantly assessed,
therefore the problems were corrected at the time and little or no errors were found in the
testing/evaluation stages.
Another advantage of adopting this methodology was that the user was actively involved in
the development from the very beginning. Therefore my client had a direct influence on how
the whole system was created, this was an important factor as the system was being created
for him and he was the eventual end user.
It was the correct decision to adopt the prototyping methodology, as the development was a
success and a system was created that met users needs and requirements. Had this
methodology not been chosen the client would only had the minimal of input into the
development and the necessary iterative stages would not have been accomplished.
The planned and actual schedules can be seen in Appendix B. The initial schedule
underestimated the time required for the background research and implementation; it nearly
took twice as much time as originally planned. This was due to the fact that both PHP and
CSS were new languages to me and lots of time was spent learning the languages, I did not
initially plan this. Overall this was not really an issue as the schedule was quite flexible and it
did not affect the outcome or delay the progress.
7.5
Further Development
There are a number of further developments that can be carried out. The client suggested
having the whole DVD database online, so members can view all the DVD’s that are in stock
from the website.
Another thing the client suggested was to create some sort of message board were the
members can leave feedback/reviews of the DVD’s they have rented. A reservation system
can also be created were the member can reserve particular DVD’s online and collect them
from the store later. Birkby Videos is only a small local business, that’s why these
suggestions were not requirements at the beginning of the project, and they can be developed
later on down the line.
41
The suggestions made by the users in section 7.2.1 can also be implemented later. Other
developments can be made as the business grows, there will probably come a time when the
business starts to take electronic transactions, and the database application may need to be
updated to accommodate this. As the business grows I am sure there will become a need for
extra functionary to both the database application and the website.
7.6
Conclusion
The final system that was created met my client’s requirements, and the client was pleased
with the outcome. After a trial period he hopes to adopt the system and use it for his everyday
running of his business.
The system has the desired functionality and much more. Overall it was a success, and
achieved what it set out to achieve.
42
Bibliography
[1]
B. Hughes and M. Cotterell, Software Project Management, Third Edition, 2002,
McGraw-Hill
[2]
J. Cadle and D. Yeates, Project Management for Information Systems, Fourth
Edition, 2004, Prentice Hall
[3]
Waterfall model – Wikipedia, Retrieved November 2005
http://en.wikipedia.org/wiki/Waterfall_Model
[4]
spiral_model.gif, Retrieved November 2005
http://www.elanman.org/teaching/gmu/swe620-infs622/Graphics/spiral_model.gif
[5]
The ITSC System Development Methodology Guidebook, Retrieved November 2005
http://www.itsc.org/PDF/M-3_ITSC_Sys_Dev_Meth_Guide.pdf
[6]
Microsoft SQL Server: How to Buy, Retrieved November 2005
http://www.microsoft.com/sql/howtobuy/default.mspx
[7]
Benefits and Constraints of using Microsoft Access Database, Retrieved November
2005
http://www.galleryimage.com.au/Why-Access-Database.htm
[8]
MySQL vs. PostgreSQL, Retrieved November 2005
http://builder.com.com/5100-6388_14-1050671.html
[9]
N. Gray, Web Server Programming, 2003, Wiley
[10]
Which Server-Side Language Is Right For You?, Retrieved November 2005
http://www.sitepoint.com/article/server-side-language-right
[11]
PHP: Hypertext Preprocessor, Retrieved November 2005
http://www.php.net/
[12]
The Perl Directory – perl.org, Retrieved November 2005
http://www.perl.org/
[13]
Macromedia - ColdFusion MX 7, Retrieved November 2005
http://www.macromedia.com/software/coldfusion/buy/
[14]
IS vs. Apache, Looking Beyond the Rhetoric, Retrieved December 2005
http://www.serverwatch.com/tutorials/article.php/3074841
[15]
Time to Switch from IIS, Retrieved December 2005
http://webdesign.about.com/cs/webservers/a/aa092501a.htm
[16]
The Apache HTTP Server Project, Retrieved December 2005
http://httpd.apache.org/
[17]
S. McConnell, Rapid Development, 1996, Microsoft
[18]
J. Bareham, Web Based Timetabling Aid, 2005, University of Leeds
43
[19]
A. Gabbay, A Database web solution for a property company, 2005, University of
Leeds
[20]
XHTML, Retrieved January 2006
http://en.wikipedia.org/wiki/XHTML
[21]
A. Dix, G. A bowd, R. Beale, Human Computer Interaction, Second Edition, Prentice
Hall
[22]
S. Robertson, J. Robertson, Mastering the Requirements Process, 1999, AddisonWesley
[23]
R. Elmasri, S. Navathe, Fundamentals of Database Systems, Third Edition, AddisonWesley
[24]
Database Normalization Basics, Retrieved December 2005
http://databases.about.com/od/specificproducts/a/normalization.htm
[25]
Microsoft Access Database, ODBC and PHP, Retrieved December 2005
http://www.phpfreaks.com/tutorials/61/0.php
[26]
T. Ratschiller, T. Gerken, Web Application Development with PHP 4.0, 2000, Sams
[27]
M. Zandstra, Teach Yourself PHP in 24 Hours, Second Edition, Sams
44
Appendix A: Reflection
Overall the whole final year project experience was useful and at times enjoyable. Upon
entering the final year project I was quite nervous, as I had never undertaken a project of this
scale before, and on top of that I had never built any sort of web based system. So when the
project started I felt I had a mountain to climb, and I did not know where to begin. It took
some time for reality to sink in and realise that I had a project to do, and I should just get on
with it.
I had a 40-40 module slit, and this was a worry due to my delayed start, as I would have a lot
of work to do in the second semester and the module workload was the same. I would
recommend to anyone doing a final year project to have a 50-30 split in the modules because
the vast majority of the project work is done in the second semester, and this would ease some
of the workload.
I found the whole project experience rewarding as I was creating a system for an actual
business and eventual it was going to aid the running of the business. This gave me the extra
motivation to work hard and get on with the task in hand.
The advice I would give to a final year student is that choosing the right methodology is
extremely important when carrying out a development like this, if I had not chosen the current
methodology the project would not have been a success, so you must have a methodology
when creating a system.
Another important thing in project development is time management, your time should be
carefully planned and adequate time should be left at the end for any possible delays. Time
management was my weakness, if I had to do the project again I would certainly mange my
time in a more efficient way, and would make a strict attempt to sticking to the schedule.
Another weakness was that I underestimated the time requited to write up the final report; I
would advice future students to leave ample time for the final write up as it takes a lot of work
and longer than you anticipate.
I have come out of this project with many new practical skills, such as learning and
implementing a new scripting language in limited time, and designing and implementing a
web based system, I know these skills will be useful for me in the future.
45
Appendix B: Project Schedule
PLANNED SCHEDULE
Task
BACKGROUND RESEARCH
ANALYSIS
Capture User Requirements
Specifications
DESIGN
Database
Database Queries
Website
IMPLEMENTATION
Database
Website
TESTING
FURTHER WORK
EVALUATION
WRITE REPORT
Octobe r
Nove mber De cember
15
31
15
30
15
31
January
15
31
February
15
28
March
15
31
April
15
30
Octobe r
Nove mber De cember
15
31
15
30
15
31
January
15
31
February
15
28
March
15
31
April
15
30
ACTUAL SCHEDULE
Task
BACKGROUND RESEARCH
ANALYSIS
Capture User Requirements
Specifications
DESIGN
Database
Database Queries
Website
IMPLEMENTATION
Database
Website
TESTING
FURTHER WORK
EVALUATION
WRITE REPORT
46
Appendix C: Website
Below are screenshots of the webpage’s of the website.
HOME
47
LOGIN
CONTACT US
48
OPENING TIMES
YOUR DETAILS
49
CHANGE CONTACT DETAILS
CHANGE PASSWORD
50
Appendix D: PHP Code
Here is some of the PHP code from the scripts I created.
Please note that these are not the complete scripts.
odbc.php
<?php
$odbc = odbc_connect ('BirkbyDB', 'root', '') or die('Could
Not Connect to ODBC Database!');
?>
check_login.php
<?php
session_start(); // to use session access
if(empty($_POST['username']))
{
$message_str = 'Login Failed! You did not enter your Username! <a href="index.html">Click here to try again</a>';
}
elseif( empty($_POST['password']) )
{
$message_str = 'Login Failed! You did not enter your Password! <a href="index.html">Click here to try again</a>';
}
else
{
require_once('odbc.php');
$query = "SELECT * FROM OnlineUser INNER JOIN Member ON OnlineUser.MemberNo = Member.MemberNo
WHERE OnlineUser.Username = '".$_POST['username']."' ";
$result = odbc_exec($odbc, $query)
or die (odbc_errormsg());
if($result)
{
$row = odbc_fetch_array($result); // get row
if( $row["Password"] == $_POST['password']) // check password
{
$message_str ='Login Successful! <a href="details.php">Click here to continue</a>';
$_SESSION['username'] = $_POST['username'];
$_SESSION['member_no'] = $row["MemberNo"];
}
else
{
$message_str = 'Login Failed! Username or Password is incorrect! <a href="index.html">Click
here to try again</a>';
}
}
}
?>
51
details.php
<?php
session_start(); // initiate session
// check that session username exists and is not empty!
if( !isset($_SESSION['username']) || (empty($_SESSION['username'])) )
{
header("Location: index.html"); // otherwise boot to login page
}
?>
<?php
require_once('odbc.php');
$sql = "SELECT * FROM Member WHERE MemberNo = " . $_SESSION['member_no'];
$query = odbc_exec($odbc, $sql) or die (odbc_errormsg());
while($row = odbc_fetch_array($query))
{
$dob_year = substr($row['DateOfBirth'], 0, 4);
$dob_month = substr($row['DateOfBirth'], 5, 2);
$dob_day = substr($row['DateOfBirth'], 8, 2);
$dob = $dob_day . '/' . $dob_month . '/' . $dob_year;
$datejoined_year = substr($row['DateJoined'], 0, 4);
$datejoined_month = substr($row['DateJoined'], 5, 2);
$datejoined_day = substr($row['DateJoined'], 8, 2);
$datejoined = $datejoined_day . '/' . $datejoined_month . '/' . $datejoined_year;
echo 'Membership Number: '.$row['MemberNo'].'<br />';
echo 'First Name: '.$row['FirstName'].'<br />';
echo 'Last Name: '.$row['LastName'].'<br />';
echo 'Date of Birth: '.$dob.'<br />';
echo 'Firstline of Address: '.$row['FirstLineAddress'].'<br />';
echo 'Secondline of Address: '.$row['SecondLineAddress'].'<br />';
echo 'Postcode: '.$row['PostCode'].'<br />';
echo 'Telephone No: '.$row['TelephoneNo'].'<br />';
echo 'Mobile No: '.$row['MobileNo'].'<br />';
echo 'Email: '.$row['Email'].'<br />';
echo 'Member Since: '.$datejoined.'<br />';
echo '<hr \>'; // <hr width="50%" siz3="3">
}
odbc_close($odbc);
?>
<table id="details">
<body bgcolor="#FFFFFF">
<table width="75%" border="1" cellspacing="1" cellpadding="1" bgcolor="#FFFFFF">
<tr bgcolor="#94AE62">
<td height="22"><b>DVD No</b></td>
<td height="22"><b>DVD Title</b></td>
<td height="22"><b>Date Rented</b></td>
<td height="22"><b>Date Due</b></td>
</tr>
<?php
require_once('odbc.php');
$sql = "SELECT Rental.DVDNo, DVD.MovieTitle, Rental.DateRented, Rental.DateDue
FROM DVD INNER JOIN Rental ON DVD.DVDNo=Rental.DVDNo
WHERE Rental.MemberNo= ".$_SESSION['member_no']." AND Rental.DateReturned Is Null
";
$query = odbc_exec($odbc, $sql) or die (odbc_errormsg());
echo "The current DVD's you have on loan. <br>";
//query database
while(odbc_fetch_row($query))
{
$dvdno = odbc_result($query, 1);
$dvdtitle = odbc_result($query, 2);
$daterented = odbc_result($query, 3);
$datedue = odbc_result($query, 4);
$daterented_year = substr($daterented, 0, 4);
$daterented_month = substr($daterented, 5, 2);
52
$daterented_day = substr($daterented, 8, 2);
$daterented = $daterented_day . '/' . $daterented_month . '/' . $daterented_year;
$datedue_year = substr($datedue, 0, 4);
$datedue_month = substr($datedue, 5, 2);
$datedue_day = substr($datedue, 8, 2);
$datedue = $datedue_day . '/' . $datedue_month . '/' . $datedue_year;
//format results
echo "<tr>";
echo "<td>$dvdno</td>";
echo "<td>$dvdtitle</td>";
echo "<td>$daterented</td>";
echo "<td>$datedue</td>";
echo "</tr>";
}
odbc_close($odbc);
?>
update_contacts.php
<?php
session_start(); // initiate session
// check that session username exists and is not empty!
if( !isset($_SESSION['username']) || (empty($_SESSION['username'])) )
{
header("Location: index.html"); // otherwise boot to login page
}
require_once('odbc.php');
$query = "SELECT *
FROM Member
WHERE MemberNo = ".$_SESSION['member_no']."
";
$result = odbc_exec($odbc, $query) or die (odbc_errormsg());
if($result)
{
$row = odbc_fetch_array($result);
}
?>
process_contacts.php
<?php
session_start(); // initiate session
// check that session username exists and is not empty!
if( !isset($_SESSION['username']) || (empty($_SESSION['username'])) )
{
header("Location: index.html"); // otherwise boot to login page
}
if( empty($_POST['telephone']) )
{
$message = 'Update Failed! Please enter your telephone number! <a href="update_contacts.php">Click
here to try again</a>';
}
else
{
require_once('odbc.php');
$query = "update Member set
TelephoneNo = '".$_POST['telephone']."',
MobileNo = '".$_POST['mobile']."',
Email = '".$_POST['email']."'
where MemberNo = ".$_SESSION['member_no']."
";
53
odbc_exec($odbc, $query) or die (odbc_errormsg());
// insert into login
$message ='Your contact details have been updated successfully! <a href="details.php">Click here to
continue</a>';
}
?>
change_password.php
<?php
session_start(); // initiate session
// check that session username exists and is not empty!
if( !isset($_SESSION['username']) || (empty($_SESSION['username'])) )
{
header("Location: index.html"); // otherwise boot to login page
}
?>
process_password.php
<?php
session_start(); // initiate session
// check that session username exists and is not empty!
if( !isset($_SESSION['username']) || (empty($_SESSION['username'])) )
{
header("Location: index.html"); // otherwise boot to login page
}
if( empty($_POST['old_password']) )
{
$message = 'Change Password Failed! Old Password is empty! <a href="change_password.php">Click
here to try again</a>';
}
elseif( empty($_POST['new_password']) )
{
$message = 'Change Password Failed! New Password is empty! <a href="change_password.php">Click
here to try again</a>';
}
elseif( empty($_POST['confirm_password']) )
{
$message = 'Change Password Failed! Password Confirmation is empty! <a
href="change_password.php">Click here to try again</a>';
}
elseif($_POST['new_password'] != $_POST['confirm_password'])
{
$message = 'Change Password Failed! Passwords do not match! <a href="change_password.php">Click
here to try again</a>';
}
else
{
require_once('odbc.php');
$query = "SELECT Password
FROM OnlineUser
WHERE Username = '".$_SESSION['username']."'
";
$result = odbc_exec($odbc, $query) or die (odbc_errormsg());
$row = odbc_fetch_array($result);
if($row['Password'] == $_POST['old_password'])
{
$query = "update OnlineUser set
Password = '".$_POST['new_password']."'
where MemberNo = ".$_SESSION['member_no']."
";
odbc_exec($odbc, $query) or die (odbc_errormsg());
54
// insert into login
$message ='Your password has been updated successfully! <a href="details.php">Click here
to continue</a>';
}
else
{
$message = 'Change Password Failed! Old Password does not match! <a
href="change_password.php">Click here to try again</a>';
}
}
?>
logout.php
<?php
session_start();
// reset session
$_SESSION['username'] = "";
$_SESSION['member_no'] = "";
// redirect to home page
header("Location: index.html");
?>
55
Appendix E: Non-technical User Manual
56
Birkby Videos
Database Application
User-Manual
Contents
1 Getting Started
1.1 Introduction………………………………………………………………3
1.2 Starting The Application………………………………..………………3
2 The Main Menu
2.1 Main Menu At A Glance………………………………………………..4
2.2 Rent A DVD……………………………………...……….……………..4
2.3 Return A DVD………………………….……..……...………………….5
2.4 DVD Details…………………………………………………………...…6
2.5 Member Details………………………………………………………….7
2.6 Online User………………………………………………………………7
2.7 Income Details…………………………………………………………..8
2.8 Exiting The Application……………………………………………...….8
3 DVD Details
3.1 Add New DVD Title……………………………………………..………9
3.2 Delete A DVD Title……………………………………………...………9
3.3 Changing Details Of A DVD Title………………..…………………..10
3.4 Find DVD Title……………………………………….…………………11
3.4.1 By Number………………………………………………..….11
3.4.2 By Title…………………………………………….………….11
3.5 All Current DVD’s On Loan…………………………….……………..12
3.6 DVD’s On Loan by Member…………………………………………..12
3.7 Rental History…………………………………...……………………..12
4 Member Details
4.1 Add A New Membership…………………………………………..….14
4.2 Cancel A Membership……………………………………………...…14
4.3 Changing Details Of A Member…………………………………...…15
4.4 Find Member Details……………………………….………….………16
4.4.1 By Membership Number…………….………….…………..16
4.4.2 By Date Of Birth……………………………….…………….16
4.4.3 By Name………………………..………….…………………17
4.5 Members Rental History………………………………………………17
5 Online User
5.1 Add An Online User…………………………………….……………..18
5.2 Cancel An Online User………………………………………………..18
5.3 Find An Online User……………………………………….………….18
6 Income Details
6.1 Details Of All The DVD’s………………………………….…………..19
6.2 Details Of A Particular DVD…………………………………………..19
7 Help
7.1 Additional Help…………………………………………….…………..20
7.2 Reporting Bugs…………………………………………….……….....20
2
1 – Getting Started
1.1 Introduction
Welcome to the non-technical user manual for the database application of
Birkby Videos. This is a simple, easy to understand user manual, which will
guide you through the process to carry out the required tasks.
By the end of this user manual you will completely understand how to use the
application and this will allow you to carry out the required tasks, this will
include:
•
•
•
•
Loan out a DVD to a member.
Add a new membership.
Check a member’s rental history.
AND MUCH MORE.
I hope you enjoy this manual and find it useful.
1.2 Starting The Application
Click on the following icon on the desktop called ‘Birkby Videos’.
The application will then load up, as shown above.
3
2 – The Main Menu
2.1 Main Menu At A Glance
From the Main Menu you can navigate through the application and carry out
the required tasks.
The seven buttons on the Main Menu carry out the following operations:
Rent DVD
Return DVD
DVD Details
Member Details
Online User
Income Details
Exit
Brings up the form to rent a DVD.
Brings up the form to return a DVD.
Takes you to ‘DVD Details’ menu.
Takes you to ‘Member Details’ menu.
Brings up a form to add/cancel an online user.
Takes you to ‘Income Details’ menu.
Closes the application.
2.2 Rent A DVD
To loan a DVD to a member, click on ‘Rent DVD’ in the Main Menu and the
following form will appear.
Enter the member’s number in ‘Member No’, the DVD number in ‘DVD No’,
today’s date in ‘DateRented’ and the due date of the DVD in ‘DateDue’.
4
NOTE
Enter the dates in the form DD/MM/YY or DD/MM/YYYY
throughout the whole application when required.
To rent out another DVD click on ‘Rent DVD’, and this will clear the fields in
the form so you can rent another DVD.
Click on the following button to close the form.
2.3 Return A DVD
If a customer returns a DVD, click on ‘Return DVD’ in the Main Menu and the
following form will appear.
To find the DVD you want to return, you can either use the arrows at the
bottom of the form to search through all the DVD’s currently out on loan or the
quicker method is to click on ‘Find DVD No’ and the following window will pop
up.
Enter the DVD number in the ‘Find What:’ field, click on ‘Find Next’ and it will
find the DVD you are looking for. Then close this window and enter the
today’s date (the date the DVD was returned) in ‘DateReturned’ and you can
repeat this process if another DVD is required to be returned.
5
Click on the following button to close the Return DVD form.
2.4 DVD Details
The ‘DVD Details’ button on the Main Menu takes you to the DVD Details
menu, as follows.
The eighth buttons on the DVD details menu carry out the following
operations:
Add New DVD Title
Change/Delete DVD Title
Find DVD by Number
Find DVD by Title
All Current DVDs on Loan
Brings up the form to add a new DVD title.
Brings up the form to change or delete a DVD title.
Brings up the window to find a DVD by its number.
Brings up the window to find a DVD by its title.
Displays all the current DVD’s out on loan and
when they are due back.
DVDs on Loan by Member Brings up the window to find the DVD’s on loan by
a particular member.
Rental History
Brings up the window to find the complete rental
history of a particular DVD title.
Main Menu
Takes you back to the Main Menu.
6
2.5 Member Details
The ‘Member Details’ button on the Main Menu takes you to the Member
Details menu, as follows.
The seven buttons on the Member Details menu do the following operations:
Add New Member
Cancel/Change a Membership
Find Details by Membership No
Find Details by Date of Birth
Find Details by Name
Members Rental History
Main Menu
Brings up the form to add a new member.
Brings up the form to cancel or delete a
membership.
Brings up the window to find a member by
his/her membership number.
Brings up the window to find a member by
his/her date of birth.
Brings up the window to find a member by
his/her name.
Brings up the window to find the complete
rental history of a particular member.
Takes you back to the Main Menu.
2.6 Online User
If you require adding a member to have online access, cancel a member’s
online access or find a member’s online login details, click on ‘Online User’ in
the Main Menu. The following window will appear.
7
2.7 Income Details
The ‘Income Details’ button on the Main Menu takes you to the Income
Details menu, as follows.
The three buttons on the Income Details menu do the following operations:
Details of all DVDs Displays the income details, along with how many times it
has been rented for all the DVD’s.
Details of a DVD
Brings up the window to display the income details of a
particular DVD, along with how many times it has been
rented.
Main Menu
Takes you back to the Main Menu.
2.8 Exiting The Application
To exit the application, click of the button ‘Exit’ in the Main Menu, and this will
exit the application.
8
3 – DVD Details
3.1 Add New DVD Title
To add a new DVD title, click on ‘Add New DVD Title’ in the DVD Details
menu and the following form will appear.
Fill in the above fields in the window, the DVD number, title, rating, category,
rental price, date the DVD was acquired and the purchase price.
To add another DVD title click on the bottom left button in the cluster of four,
and this allow you to add another DVD title by clearing all the fields.
NOTE
The following four buttons on a form will always carry out the
following operations:
Top Left
Top Right
Bottom Left
Bottom Right
Deletes a record.
Opens up the search find to find a record.
Adds a new record.
Closes the form.
3.2 Delete A DVD Title
To delete a DVD title, click on ‘Change/Delete DVD Title’ in the DVD Details
menu and the following form shown on the next page will appear.
9
To delete a record, find the DVD by either using the arrows at the bottom of
the form or search for the title by clicking on the top right button and the
search window will appear. Section 2.3 shows you how to search for a
particular title.
The following warning will appear when clicking on the delete button.
Click ‘Yes’ to confirm your deletion.
You will have successfully deleted a title.
3.3 Changing Details Of A DVD Title
To change the details of a DVD, click on ‘Change/Delete DVD Title’ in the
DVD Details menu and the following form will appear.
Find the DVD title you want to make changes to, as discussed above in
section 3.2. Then make the required changes and click on the bottom right
10
button to close the window when finished, or repeat the process if another
change needs to be made.
NOTE
When required to enter an amount in pounds you do not have to
include the pound sign ‘£’, it will be automatically added when
the field is complete.
3.4 Find DVD Title
In order to find a particular DVD title click on ‘Find DVD by Number’ or ‘Find
DVD by Title’ in the DVD Details menu, depending on whether you want to
search for it by its number or title.
3.4.1 By Number
By clicking on ‘Find DVD by Number’ the following window will appear.
Enter the DVD number in the field, click ‘OK’ and the details of that
DVD will appear. An example search result is shown below.
3.4.2 By Title
By clicking on ‘Find DVD by Title’ the following window will appear.
Enter the DVD title in the field, click ‘OK’ and the details of that DVD
will appear. An example search result is shown above in section 3.4.1.
11
3.5 All Current DVD’s On Loan
To find all the DVD titles currently out on loan, to which member and when
they are due back click on ‘All Current DVDs on Loan’ in the DVD Details
menu. An example result is shown below.
3.6 DVD’s On Loan by Member
To find all the DVD titles currently out on loan to a particular member and
when they are due back click on ‘DVDs on Loan by Member’ in the DVD
Details menu and the following window will appear.
Enter the member’s membership number in the field and click ‘OK’. An
example results is shown below.
3.7 Rental History
To find the complete rental history of a particular DVD title click on ‘Rental
History’ in the DVD Details menu and the following window will appear.
12
Enter the number of the DVD you want the history for and click ‘OK’. The
rental history will appear and an example search result is shown below.
You will have successfully found the complete rental history of a particular
DVD.
13
4 – Member Details
4.1 Add A New Membership
To add a new Membership, click on ‘Add New Member’ in the Member Details
menu and the following form will appear.
Fill in the above fields in the form, the new member number, title, first name,
last name, date of birth, first line of address, second line of address, post
code, telephone number, mobile number, email address and the date the
member joined.
To add another new member click on the bottom left button in the cluster of
four, and this allow you to add another member by clearing all the fields.
NOTE
The following four buttons will always carry out the following
operations:
Top Left
Top Right
Bottom Left
Bottom Right
Deletes a record.
Opens up the search find to find a record.
Adds a new record.
Closes the form.
4.2 Cancel A Membership
To cancel a membership click on ‘Cancel/Change a Membership’ in the
Member Details menu and the following form will appear as shown on the
next page.
14
To delete a membership, first find the member by either using the arrows at
the bottom of the form or search for the member by clicking on the top right
button and the search window will appear. Section 2.3 shows you how to
search for a particular member.
The following warning will appear when clicking on the delete button and click
‘Yes’ to confirm your deletion.
You will have successfully canceled a membership.
4.3 Changing Details Of A Member
To change the details of a member, click on ‘Cancel/Change a Membership’
in the Member Details menu and the following form will appear.
Find the member details you want to change, as discussed above in section
3.2. Then make the required changes and click on the bottom right button to
15
close the window when finished, or repeat the process if another change
needs to be made.
4.4 Find Member Details
In order to find the details of a particular member click on ‘Find Details by
Membership No’, ‘Find Details by Date of Birth’ or ‘Find Details by Name’ in
the Member Details menu, depending on whether you want to search for a
member by his/her membership number, date of birth or name.
4.4.1 By Membership Number
By clicking on ‘Find Details by Membership No’ the following window
will appear.
Enter the member’s membership number in the field, click ‘OK’ and the
member’s details will appear. An example search result is shown
below.
4.4.2 By Date Of Birth
By clicking on ‘Find Details by Date of Birth’ the following window will
appear.
Enter the member’s date of birth in the field, click ‘OK’ and the
member’s details will appear. An example search result is shown
above in section 4.4.1.
16
4.4.3 By Name
By clicking on ‘Find Details by Name’ the following window will first
appear.
Enter the members first name in the field, click ‘OK’ and this second
window will appear asking for the member’s last name, click ‘OK’ again
and the member’s details will appear. An example search result shown
in section 4.4.1.
You will have successfully searched for a particular member’s details.
4.5 Members Rental History
To find the complete rental history of a particular member, click on ‘Members
Rental History’ in the Member Details menu and the following window will
appear.
Enter the member’s membership number in the field, click ‘OK’ and the
member’s complete rental history will be shown. An example search results
in shown below.
17
5 – Online User
If you require adding a member to have online access, cancel a member’s
online access or find a member’s online login details, click on ‘Online User’ in
the Main Menu and the following form will appear.
5.1 Add An Online User
To add online access for a member click on the bottom left button in the
cluster of four as shown above and fill in the required fields, membership
number, username and password.
5.2 Cancel An Online User
To cancel a member’s online access, first search for the member’s online
details as shown in section 2.3. Once found click on the top left button and a
warning message will appear then click ‘OK’ and this will delete the record.
5.3 Find An Online User
To find the online details of a member click on the top right button and the
search window will appear, section 2.3 shows you how to use this to search
for a particular member.
18
6 – Income Details
6.1 Details Of All The DVD’s
To find the income details of all the DVD titles, along will how many times the
DVDs have been rented, click on ‘Details of all DVDs’ in the Income Details
Menu. The table will look something like this.
6.2 Details Of A Particular DVD
To find the income details of a particular DVD click on ‘Details of a DVD’ in the
Income Details menu. A window will appear asking for the number of the
DVD, enter the number and click ‘OK’. A table will appear showing the details
of that particular DVD, an example shown below.
19
7 – Help
7.1 Additional Help
If you require additional help please contact me on the email address below.
7.2 Reporting Bugs
If you find a bug in the application please report the problem by contacting me
on to the following email address.
[email protected]
20