1
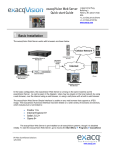
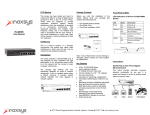
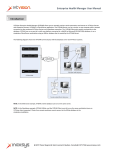
Web Service Quick Start Guide The IVTVision Web Service allows you to use a web browser to view live video, search and play back recorded video, and control pan/tilt/zoom functions on cameras connected to IVTVision servers. The Web Service connects to the IVTVision server as a client and transcodes captured video into JPEG files. The service then sends the JPEGs to the browser as fast as requested by the browser, or as fast as possible if the requested rate is too high for the connection. NOTE: The IVTVision Web Service is pre-installed on all IVTVision systems. The IVTVision Web Service works with browsers as shown in the following diagram: The IVTVision Web Service is normally run as an integrated system on an IVTVision Server. Alternatively, a distributed system with a dedicated web server can be used for higher-capacity systems. Video can be viewed on the local network by using a web browser, over the Internet using a web browser, or on a mobile device using a mobile browser or IVTVision application. The IVTVision Web Service Simple Interface can be used on any web browser that supports a JPEG image. The IVTVision Advanced Interface is supported on a wide variety of browsers and devices, including: Firefox 3.6 or later Internet Explorer 7 or later Safari 4.0 or later Opera 10.0 or later iOS 4.2 or later Android 2.2 or later 8272 Pascal Gagnon Saint-Leonard, Quebec, Canada H1P 1Y4 www.inaxsys.com Web Service Quick Start Guide The IVTVision Web Service must be enabled before you can use it. To start the Web Service, go to Start, Programs, IVTVision Web Service, and then Start IVTVision Web Service. It is recommended that you configure the service to start automatically in case of a power outage and unexpected system restart. If the IVTVision Web Service is not installed, download it from http://www.inaxsys.com/en/support/downloads/software-downloads.html. Run the setup file while logged in as the administrator of the server, and complete the following steps using the following illustration as a guide: 1. Select this to start the IVTVision Web Service automatically when the computer starts. 2. Enter the address of the IVTVision Server you will be connecting to. (If the service is running on the IVTVision Server, enter 127.0.0.1.) To connect to more than one IVTVision server, see the Advanced setup options. 3. Enter the port used by the IVTVision Server. By default, the port is 22609. 4. If you want to have an automatic login for web clients, select this box and fill in the Username and Password. If you do not select this option, the system will require the users to enter a username and password each time they log in. 5. Enter the username of the account that the IVTVision Web Service will use to connect to the IVTVision Server. 6. Enter the password of the account entered in the Username field. 7. Click Install. 8. On the Start menu, select All Programs, IVTVision Web Service, and then Start IVTVision Web Service. The LightTPD web server is then installed. You can find more information about this service at www.lighttpd.net. NOTE: The IVTVision Web Service uses a significant amount of computer resources to transcode video. Required resources increase in proportion to the number of simultaneous connections and the data rate of incoming video. Hardware upgrades might be necessary to support heavy Web Service workloads. 8272 Pascal Gagnon Saint-Leonard, Quebec, Canada H1P 1Y4 www.inaxsys.com Web Service Quick Start Guide Install IVTVision Client add user accounts to your IVTVision Server that will be used by the IVTVision Web Service to access the cameras. If you selected “Login Automatically” was selected during Web Service configuration, all users will share the designated account. If not, you must create an account for every Web Service user. To add new users, log in as an administrator, and click the Setup toolbar button. Expand the server’s setup menu by clicking the plus (+) button next to the IVTVision Server in the tree, and then select Users . Click the New User button; the Username field is automatically filled with New. Type the name of the new user and then tab to the Password field and enter a new password. Select the Password Confirm field and retype the password. Open the User Group drop-down box and select the type of access level for this user. Designate which cameras the user can access for viewing live and recorded video in the Authorized Sources tree, and click the Apply button to add the new user to IVTVision Server. For more detailed instructions, see the User Setup section of the IVTVision User Manual or the context-sensitive online help file. To verify the configuration, open a web browser on the IVTVision Web Service computer, enter address 127.0.0.1, select the Advanced Interface, log in (if necessary), and confirm that video can be viewed from a connected camera. 8272 Pascal Gagnon Saint-Leonard, Quebec, Canada H1P 1Y4 www.inaxsys.com Web Service Quick Start Guide The web client has two interfaces: Advanced and Simple. The Advanced Interface is similar to IVTVision Client in its features and functionality; the Simple Interface is more limited in its features, but it works on nearly every web browser in production and is designed for use on mobile phones. You can use any web browser to run the Web Client by entering the IP Address of the IVTVision Server as the URL. When a user connects using a web browser, the following page appears: Choose one of the following options: Click Advanced to open the Advanced Interface. Select a server from the drop-down list and click Go to use the Simple Interface. (Select Click Here to Login to enter a Username and Password when using the Auto Login option.) The following sections contain instructions for using each type of interface. 8272 Pascal Gagnon Saint-Leonard, Quebec, Canada H1P 1Y4 www.inaxsys.com Web Service Quick Start Guide The Simple Interface is designed to provide static images to any web browser that does not fully support JavaScript. This includes most cellular devices. When you first log in to the Simple Interface, a list of the cameras that are available on that server is displayed. Simply click on a link to view live video from that camera. 1. Refresh: This displays the most recently captured image. 2. Size: Click plus [+] to increase the size of the image or minus [-] to decrease the size. The smallest size is 128x96 pixels. 3. Quality: Click plus [+] to increase the image quality or minus [-] to decrease the quality. The highest quality is 10 and the lowest is 0. The lower the number, the more pixilated the image appears. 4. Rate: This is how many seconds you want to wait until receiving a new image. If your cell phone has difficulty displaying the image before it refreshes, increase this value. 5. Back: This displays the list of cameras available to you. 6. Logout: This logs out of the current account and allows you to log in as a new user. This appears only if you are not using the automatic login feature. 8272 Pascal Gagnon Saint-Leonard, Quebec, Canada H1P 1Y4 www.inaxsys.com Web Service Quick Start Guide The Advanced Interface is designed to be used by most modern web browsers that support JavaScript. To view a camera, simply drag it into the desired panel. Double-click a camera name to fill all the current layout panels, starting with the camera that was doubleclicked. 1. Layout Buttons: These buttons load a video window layout and allow you to view multiple cameras simultaneously. 2. Size: Click plus [+] to increase the image size or minus [-] to decrease the size. 3. Quality: Click plus [+] to increase the image quality or minus [-] to decrease the quality. The highest quality is 10 and the lowest is 0. The lower the number, the more pixilated the image appears. 4. Add Server: Click Add Server to display a drop-down list that contains all Web Service-enabled servers found on the network. Select a server and click Add. 5. Cameras List: Drag any of these cameras into any panel to view the live video. 6. Views List: Click Views to open a list of configured camera views (see next page). 7. Triggers List: Click Triggers to open a list of configured Triggers (see next page). 8272 Pascal Gagnon Saint-Leonard, Quebec, Canada H1P 1Y4 www.inaxsys.com Web Service Quick Start Guide When you click the Views button, the Cameras list is replaced by a list of camera views that are configured on the connected servers. Click a view name to open the cameras configured in the camera view. When you click the Triggers button, the Cameras or Views list is replaced by a list of triggers that are configured on the connected servers. Click a trigger name to activate an alarm, and click it again to deactivate the alarm. 8272 Pascal Gagnon Saint-Leonard, Quebec, Canada H1P 1Y4 www.inaxsys.com Web Service Quick Start Guide To search and play back video, complete the following steps: 1. Click the Search button. 2. Select one or more cameras by clicking their checkboxes. 3. Configure a search range by entering dates and selecting times. 4. Click Search. 5. Wait for the results appear under the timeline. The color-coded bars represent that continuous (green), motion (blue), or alarm (red) video has been recorded during the search range. 6. Select a camera to display the first frame from that camera. Hold down the Control key to select more than one camera. 7. Click the play button. 8. Navigate the video using the slider (a) or the other VCR controls (b). 9. Click the left (a) or right (b) arrows to shift the video timeline earlier or later. Click the Zoom In (plus) or Zoom Out 8272 Pascal Gagnon Saint-Leonard, Quebec, Canada H1P 1Y4 www.inaxsys.com Web Service Quick Start Guide To configure multiple video servers, you must modify the C:\Program Files\IVTVision\WebService\Webservice.ini file. A standard Webservice.ini file looks like this: [ServerX] is the server number, where X ranges from 0 to 15. Address is the IP Address of the IVTVision Server. Port is the port used by the IVTVision Server. By default, the port is 22609. PassthroughEnabled allows a user to log in without credentials. (1=enabled, 0=disabled) PassthroughUsername is the account used by the IVTVision Web Service to connect to the IVTVision Server. This functions like all the other accounts on the system. PassthroughPassword is the corresponding password of the account used as the PassthroughUsername. AutoPopulate is used to automatically pass through enabled servers. (1=enabled; 0=disabled) Timeout is the number of seconds that a search request will wait for results before timing out. The Timeout line is not included by default and must be added manually if desired. CSRF enables protection against cross-site request forgery exploits. CSRF applies to all servers and should remain under the [Settings] line. (1=enabled; 0=disabled) To add a server, copy the entire [Server0] section and paste it above the [Settings] section, and then change the information for the added server as desired. Be sure to increment the number of the server; for example, the first line for the second server would be [Server1], and for a third server it would be [Server2]. The Webservice.ini file for two servers might look like this: 8272 Pascal Gagnon Saint-Leonard, Quebec, Canada H1P 1Y4 www.inaxsys.com Web Service Quick Start Guide If you want to allow clients from outside your local area network access your IVTVision Web Service, you must change your router settings to forward port 80 to the Web Service’s IP address. See your router user manual or go to www.portforward.com/routers.htm for instructions. Alternatively, you can change the IVTVision Web Service port number. To do this, edit the following configuration file (the location and name of the file varies depending on the operating system where the Web Service is installed): Windows: C:\Program Files\IVTVision\WebService\LightTPD\conf\lighttpd-inc.conf Linux: /etc/lighttpd/lighttpd.conf In the configuration file, find the following entry: ## bind to port (default: 80) #server.port = 81 Change the port number in the second line and remove the number sign. For example, if you want to change the port number to 1111, the entry should be changed as follows: ## bind to port (default: 80) server.port = 1111 Save the file and restart the IVTVision Web Service to begin using the new port number. NOTE: If the IVTVision Web Service is reinstalled or upgraded, the port number could be reset to the default (80). After reinstalling or upgrading the Web Service, open the lighttpd.conf file and ensure that the port number is configured as desired. 8272 Pascal Gagnon Saint-Leonard, Quebec, Canada H1P 1Y4 www.inaxsys.com Web Service Quick Start Guide To set up IVTVision Web Server on a Linux system, complete the following steps: 1. Install the IVTVisionWebService.deb file. 2. Open the Terminal from the Start/Accessories menu. 3. Type the following command: sudo /usr/local/exacq/webservice/service.sh stop 4. Type sudo gedit /etc/webservice.conf and enter the root password. 5. Configure the Web Service using section 7 of this document (“Configuring Multiple Video Servers”) as a guide. 6. In the Terminal, run the following command: sudo /usr/local/exacq/webservice/service.sh automatic. This ensures that the service starts every time the system is started. 7. Run the following command: sudo /usr/local/exacq/webservice/service.sh start. This starts the Web Server. You should now be able to open a web browser on the server and enter http://127.0.0.1 as the address. This opens a login page (or passthrough page) with the Web Server options Simple and Advanced. 8272 Pascal Gagnon Saint-Leonard, Quebec, Canada H1P 1Y4 www.inaxsys.com