1
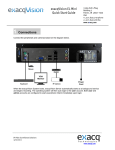
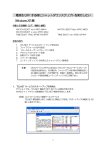
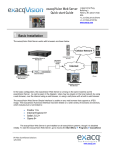
exacqVision Desktop Hybrid NVR Server Quick start Guide 1 11955 Exit 5 Pkwy Building 3 Fishers, IN 46037-7939 USA +1.317.845.5710 phone +1.317.845.5720 fax www.exacq.com Connections Connect the cables based on the diagram below. When the exacqVision System boots, exacqVision Server automatically starts as a background service and begins recording. The operating system will then auto login to the user account. Both user and admin accounts are configured to start exacqVision Client immediately upon login. The video recording factory defaults are: 1) All cameras enabled for motion based recording 2) All cameras recording at 2CIF resolution and 15 images per second 3) Audio recording is disabled To change any of these defaults, see the Setup Mode section of the user manual. 2 Operating System Setup IP Video Surveillance Solutions 3/6/2009 www.exacq.com Your exacqVision System has been configured to take advantage of operating system security features. The factory configuration includes two operating system accounts; admin and user. NOTE: The default passwords should be changed by the operator and written and stored in a secure fashion to prevent unauthorized access or modifications to the system. For Windows For Linux To change the passwords for your operating system accounts: To change the passwords for your operating system accounts: Switch operating system user to the admin account via the start menu Access the Start Menu ► Settings ► Control Panel ►User Accounts Pick the account to be changed Select Change Password Log off the user account by pressing the red power button in the lower left corner. Log in to the admin account. Default password is “admin256” Access the Start Menu ► System Administration ► Users & Groups Pick the account to be changed and select Properties Under Set Password by hand, enter the new password twice. Select OK, and OK again Once you successfully change the password for the admin and user accounts, write them in the space provided for future reference. Default Operating System Settings New Operating System Settings Username: Password: Privileges: admin admin256 computer administrator Username: admin Password: ____________________ Privileges: computer administrator Username: Password: Privileges: user user5710 restricted user Username: user Password: ____________________ Privileges: restricted user To continue using the autologin feature of Windows, you need to update it with your new user password. Access the Start Menu ► Run Type CONTROL USERPASSWORDS2 ► OK Check AND Uncheck the “Users must enter a user name and password to use this computer” box Click Apply Type the new password and confirm it ► OK Once the exacqVision Server begins recording video, it will continue even if no user is logged in or no exacqVision Client is running. It will stop recording only if: The exacqVision system is shut down The exacqVision Server service is stopped (Windows only) The exacqVision core.exe process is stopped To prevent this from happening inadvertently or maliciously, the ability to shut down the computer or access the operating controls has been restricted from the user account. To shut down the system or perform maintenance, it will be necessary to switch to the admin account. 3 exacqVision User Setup IP Video Surveillance Solutions 3/6/2009 www.exacq.com The exacqVision Server can be accessed from multiple exacqVision Clients, which may be running from the same computer as exacqVision Server or from remotely networked computers. Your exacqVision Server has been preconfigured with both an admin and user account: To log in to the system, see Section 2 for the log in names and passwords. Each operating system account maintains separate settings for exacqVision Client. These settings include usernames, passwords, and network addresses required for the exacqVision Client to access exacqVision Servers. By default both the user and admin operating system accounts have settings which provide administrator access to the instance of exacqVision Server running on the local exacqVision system. NOTE: To protect the exacqVision Server, Exacq recommends that as part of the initial exacqVision Server configuration, the operator configure a new user on the exacqVision Server with Restricted privileges toolbar button. Expand the server’s setup menu by clicking the “+” To add new users, press the Setup next to the exacqVision Server in the tree, then select Users . Click the New User button. The Username field is automatically populated with “New User” and highlighted in blue to begin adding the new user. Type in the name of the new user you are adding then tab to the Password field and enter a new password. Select the Password Confirm field and retype the password. Click the Group drop down box to select the type of assess level that will be assigned to this user. Restricted: Access to viewing live video and searching recorded video. User Admin: Access to viewing live video, searching recorded video, and adding and deleting users. Power User: Access to all features except adding or deleting users. Administrator: Access to all features of the system. Designate which cameras the user will be able to access for viewing live and recorded video in the to add the new user to the exacqVision Authorized Sources tree, and click the Apply button Server. For more detailed instructions, see the User Setup section of the exacqVision User Manual or the context sensitive online help file. 4 System Setup IP Video Surveillance Solutions 3/6/2009 www.exacq.com Once the new users have been created, you’ll need to customize the exacqVision System for your screen is where you set basic system parameters for the server installation. The System Setup application, including the System Name, Time Zone, and IP Address Settings. 1) The System Name field will default to the serial number on the sticker on the side of the chassis of the system you purchased. You can keep this name or change it by typing a new name over the serial number, but your system name must be unique. 2) The Time Zone will be set as Eastern (US) time. You can change the time zone by using the dropdown menu. Use the radio buttons to indicate Daylight Savings or Standard time. 3) Your exacqVision System is configured to receive an IP address dynamically via a DHCP server. To set your exacqVision System to use a static IP address, start the exacqVision Client on the exacqVision System. Go to the System Setup page and change it to static and enter the desired IP Address. Do not change the 127.0.0.1 IP address from the Add System page. The 127.0.0.1 address will always connect to the local computer, regardless of the IP address assigned by the router or user. 4) Click the Apply buttons to apply these settings to your Client application. Now, log off the operating system and log in as user. The exacqVision Client will start automatically. Go to the Add Systems menu, select the System Name from the System List, type user in the User Name field, type and confirm the password, and click Apply. You are now logged in as the user you have created. When the User account logs in, it will now use this account by default. IP Video Surveillance Solutions 3/6/2009 www.exacq.com 5 Network Configuration If you plan to have clients from outside your local area network access your exacqVision Server, you will need to change your router settings to forward port 22609 to the exacqVision Server’s IP address. See your router user manual or go to www.portforward.com/routers.htm for instructions. IP Video Surveillance Solutions 3/6/2009 www.exacq.com