1
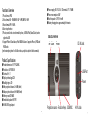
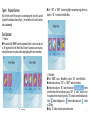
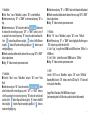
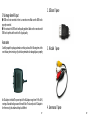
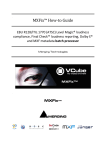
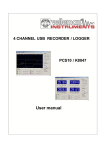
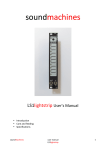
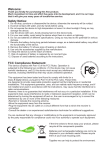
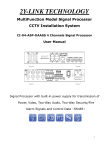
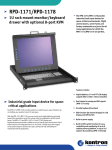
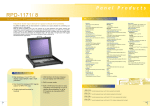
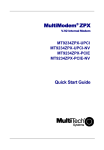
Adapt Pico Play ADPP-99 User Manual
Operating Instructions
Notice: Please read the user manual carefully before using this product
Safety and Maintenance Instruction
NTable of Contents
Safety and Maintenance Instruction ………………………………
Functions Overview …………………………………………………
Product Specifications ………………………………………………
Product Overview ……………………………………………………
Basic Operation ………………………………………………………
System Setup …………………………………………………………
Battery Recharging …………………………………………………
Trouble Shooting ……………………………………………………
Accessories ……………………………………………………………
To Prolong the life of the mini projector all the following safety, operating instructions
and maintenance should be read, adhered to and followed before the unit is operated.
2
3
3
4
5
9
11
12
13
For your Safety
1. Please carefully read this user manual before operating the unit.
2. Take a few moments to review the user manual while using it for the first time.
3. Do not place or store the unit where it can fall into water or other liquids,care should
be taken so that water or other liquid cannot be spilled onto the unit.
4. Protect the unit from vibration,shock or pinch,always keep it on a flat dry place.
5. The optical engine is one of the most important parts of the unit,great care should be
taken to protect it from collision or pressure.
6. Unplug the unit when it is not in use for extended periods, this will also safe the
battery lifetime.
Maintenance and Precaution
1. Please clean the unit with a soft dry cloth.
2. Do not touch the light engine lens directly with hands or sharp items, do not spray any
cleaning detergent directly on it.
3. Do not press the unit hard or place any other objects on it.
4. Never block the air outlet of the unit with materials such as cloth while the unit is
working.(air outlet as shown in Figure Ⅰ )
N-1-
N-2-
Functions Overview
● Power supply: DC +5V/2.5A DC terminal:3.5*1.3*8MM
● Power consumption: 4.5W
● Built-in speaker: 3.7V/1500 mAH
● Battery charging time: approximately 80 minutes
1. Photo format: JPEG
2. Video format: AVI、RM/RMVB、3GP、MPG/MPEG 、MP4
3. Music format: MP3、WMA
4. Basic setup function
5. Photo, music & video stored in mobile phone, U-DISK & IPod (Nano/Classic) can be
played via USB
6. Support IPhone 3G and above, iPod NANO 4 & above. Supports iPhone 4, iPAD and
iPOD touch.
Synchronized projection for YouTube videos, and photos (under slideshow mode).
Product Overview
Air Outlet
Reset
DC-IN Jack
Product Specifications
● Product dimension:105*56*22 MM;
● Resolution: 320*RGB*240
● Contrast:100:1
● Display technology:LCOS
● Backlight type: LED
● Min projection distance: 200 MM (4inch)
● Max projection distance:3000MM(64inch)
● Memory cards:SD/MMC
● Embedded speaker: 8R/1W*1
● AV-IN: CVBS signal input
USB Port
Power
Projection source Function Keys SD/MMC
N-3-
AV IN Jack
N-4-
Figure Ⅰ Projector Overview
Note: Reset the unit if it freezes and/or is not working properly. Insert a thin, pointed
object into Reset button(as shown in Figure Ⅰ ), the unit will turn off, reset itself and turn
back on automatically.
● Use “LEFT” or “RIGHT” buttons to highlight corresponding storage device icon,
and press “OK” to select and enter Media Menu.
Basic Operation
1、Power on
● Press and hold the "POWER" button for approximately three seconds to turn the unit
on. The projector will enter the "Home" Menu. If battery is too weak to power on, please
recharge before power on or power on while charging (altough this is not recomended).
Home Menu
N-5-
2、Photo Mode
● Press “PHOTO” icon on “Media Menu” and press “OK” to enter Photo Mode.
● Under photo mode, using “LEFT” or “RIGHT” button to select photo.
● Under photo mode, press “OK” button,the control bar
hidden
under the bottom of the screen will pop up, using “LEFT” or “RIGHT” button to select.
If no operation for ten seconds or by pressing “M” button, the control bar will auto hide.
Select
button to Magnify photo;
button to Rotate photo and
button
to LCD Setup.
● Using “M” button to return to previous menu in turn.
N-6-
3、Music Mode
● Select “Music” icon on “Media Menu” and press “OK” to enter Music Mode.
● Under music mode, using “UP” or “DOWN” to select music and pressing “OK” to
play.
● Under music mode, press “OK” button, the control bar
hidden under
the bottom of the screen will pop up, using “LEFT” or “RIGHT” button to select. If
no operation for ten seconds or by pressing “M” button, the control bar will auto hide.
Select
button to Repeat All musics in playlist,
button to Shuffle All musics
in playlist,
button to Play order according to playlist, and
button to repeat
currently playing song.
● When the control bar is hidden under the bottom of the screen, using“LEFT”or“RIGHT”
button to adjust volume.
● Using “M” button to return to previous menu in turn.
4、Video Mode
● Select the “Movie” icon on “Media Menu” and press “OK” to enter “Video
Mode”.
● Under video mode, press “OK” button, the control bar
hidden
under the bottom of the screen will pop up, use the “LEFT” or “RIGHT” button to
select.If no operation for ten seconds or by pressing “M”button, the control bar will
auto hide. Select
button to Repeat all videos in playlist,
button to Shuffle All
videos in playlist,
button to Play order according to playlist and
button to
repeat currently playing song.
N-7-
● Under video mode, using “UP” or “DOWN” button to fast forward or fast backward.
● When the control bar is hidden under the bottom of the screen, using“LEFT”or“RIGHT”
button to adjust volume.
● Using “M” button to return to previous menu in turn.
5、File Mode
● Select “File” icon on “Media Menu” and press “OK” to enter “File Mode”.
● Under File mode, using “UP’ or “DOWN” button to highlight a file,then long press
“OK” button to copy or delete the selected file.
A:Select “Copy” to copy files from SD/MMC card to USB Host or from “USB Host” to
SD/MMC card.
B:Select “Delete” to delete files stored in SD/MMC card or in “USB Host”
● Using “M” button to return to previous menu in turn.
6、AV IN
Select the “AV IN” icon on “Media Menu” and press “OK” to enter “AV IN Mode”
Operating Method:use the “OK” button to enter the LCD Setup. The “M” button will
revert you to the Home Menu.
Support IPhone 3G and above, iPod NANO 4 & above. Supports
Synchronized projection for YouTube videos, and photos (under slideshow mode).
N-8-
System SETUP
1.Slide Show Settings
● Slide Show: Slide show settings
● Language:
Language settings
● Keystone:
Keystone correction settings
● About:
Display current software version
● Default
Restore to system default settings
Operating method:use the “LEFT”,”RIGHT” button or “UP”,”DOWN” buttons to
select,then press “OK” to enter detailed
setting. The “M” button will revert you back to the home menu.
● Slide Speed: set slide show speed
● Transition: set transition effect
1. None
2. Random
3. Wipe effect
4. Box
5. Spiral
6. H/V bars
● Display Mode: set display mode
1. Fit to Screen
2. Normal
2. Language Settings
Select “Language” icon on “SETUP”,then press “OK” button to enter language
settings.
Operating method: use the “UP” or “DOWN” button to choose the desired setting,
then press the “OK” button to confirm. The “M” button will revert you back to the
N-9-
N-10-
Select the “SETUP” icon on the “Home Menu” and press “OK” to enter.
Select “Slide Show” icon on “SETUP”,then press “OK” button to enter slide show
settings.
Operating method:using “LEFT” or “RIGHT” button to highlight a setting item,then
using “UP” or “DOWN” button to choose desired parameter values,then press “OK”
button to confirm. “M” button will revert you back to the prev. menu.
Home menu setup
prev. menu.
3. Keystone Correction Settings
Select “Keystone” icon on “SETUP”,then press “OK” button to enter keystone
correction settings.
Operating method: using “LEFT” or “RIGHT” button to choose desired parameter
values, then press “OK” button to confirm. “M” button will revert you back to the
prev. menu.
4. About: This displays the current software version
5. Default: This will restore to the system default settings
4. The first time charge the battery for 8 hours and then use it till its totally empty. Repeat
this process a second time for the best battery performance. It is best to always use the
projector untill the battery is totally empty before recharging. Preferably do not charge
the projector when in use. This will improve the battery life.
Trouble Shooting
This part is to introduce some solutions to common problems, if any malfunction occurs,
please check the following first.If it still can not be solved, please contact the dealer or
authorized service center. Do not disassemble or repair it by yourself. If any questions you
can also visit the support section of www.adapt-mobile.com.
1. The Orange indicator will be on while charging and Green will be on while fully
charged. The Battery charging time is approximately 3 hours.
2. The projector can be operated while charging.
3. Connect the unit only to a power adaptor as described in this manual.Others are not
recommended by the manufacturer and may damage the unit. DC input must be 5V/2A.
The following are some common problems and solutions for reference.
1. The Projector can not power on
● Battery has run out.Please recharge battery before operate.
● Failed to press “POWER” button.The power button is a sensitive component, don't
press it with too much force
2. Image blurring
● Focus is not well adjusted. Adjust the setting of the lens to a proper position.
● The light source of the projector is too close or too far from the projection screen.The
best distance is between 200MM-2000MM.
3. No sound
● The volume is set to "MUTE" or turned off.
N-11-
N-12-
Battery Recharging
The projector is embedded with high capacity rechargeable Li-Polymer battery. When the
battery level indicator flashes as on the display, please charge it as soon as possible.
5 No image when AV input
2. USB cord 1 piece
● CVBS cord is not connected or there is a connection error. Make sure the CVBS cord is
properly connected.
● Poor contact or the CVBS cord is with quality problems. Make sure the connection with
CVBS cord is perfect and the cord itself is of good quality.
Accessories
Carefully unpack the package and make sure that you have all the following items.In the
event that any item is missing or if you find any mismatched or damaged,please promptly
An AC adaptor is included.The power input of the AC adaptor ranges from 100V to 240V,
covering all standard voltages around the world. Note: The above photo of AC adaptor is
for reference only, the actual model may look different
N-13-
3. AV cable 1 piece
4. User manual 1 piece
N-14-