1
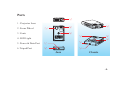
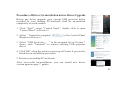
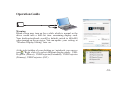
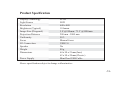
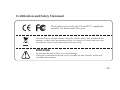
(Version No.1)
USB Pico Projector
Contents
Intended Use Statement....................................................................
1
Safety Information............................................................................
1
Package Content...............................................................................
5
Parts .................................................................................................
6
Driver Installation.............................................................................
7
Operation Guide................................................................................ 10
Product Specification........................................................................
12
Trouble-Shooting..............................................................................
13
Thanks for purchasing this Product, which is generated by a team of professional experts
whom invested much time and effort on it. I hope you enjoy the pleasure from the Product !
Intended Use Statement
The Product is operated with the specified accessories and in a normal environment.
0˚–50˚C
0–80% RH (without condensation)
The environment should be free of smoke, grease, oil and other contaminants that can
affect the projector. The adverse conditions will void the product warranty. As the light can
affect the performance of the projector, we suggest you operate the product in a dark
environment as you can.
Safety Information
Please read all the safety information before to operate the product, all safety information
should be retained for reference in future .
1. High Brightness Light source
The product LED is a Class 1 LED. Do not look at the light beam directly - especially the
children do not stare the light beam directly.
-1-
2. Operating Surface
Do not place the Product on an unstable surface. The unit may drop down causing
injury to children or damage the unit.
3. Water and Moisture
Do not expose the product in rain or moisture. Do not operate the product near water and
in a moist environment. If water enters into the product, disconnect the power source
immediately.
4. Object and Liquid Entry
Never insert objects into the vents and the USB port. Liquids enters the vents may
contact with voltage points and cause a short circuit that may result in electric shock or
fire. The LCD (liquid crystal display) panel of this product is made of glass, which can
be damaged by abnormal external force or sharp objects. If liquid crystal leaks, unplug
it from power source and clean immediately with soap and water.
5. Flammable Liquids
Do not operate or keep the product near flammable sprays or other such substances.
There is a dangerous of fire.
6. Heat
Keep the product away from any source of heating. Always position it in a ventilated
well environment. During operation, it is normal for the product to heat slightly.
-2-
7. Ventilation
When operate the Product, keep its vents clear and prevent overheating.
8. Product Malfunction
If the product emits smoke, noise, or a burning smell, disconnect from power source
immediately. There is a dangerous of electric shock or fire. send the products to agent
for checking.
9. Cleaning
Disconnect the product from power source before cleaning. Use a soft dry cloth only for
cleaning surfaces. Do not use liquid aerosol or any chemicals. Avoid touch the Lens and
keep free of dust/dirt. If dirty, first blow off particles if required, clean the Lens with a
specifically lens tissue or send the product to the recommended lens cleaning agent. Do
not use chemicals or solvents to clean the projector. Chemicals and solvents may
damage the plastic parts to discolor.
10. Servicing and Replacement Parts
Do not attempt to service the unit by yourself. Only original manufacturer’s parts from
an authorized service agent may be used. The non-original parts may damage the unit
and the warranty will be not in effect.
-3-
11. Transportation
Disconnect the power source before transporting. Allow the unit to cool down before
transportation, and handle with care.
12. Power Source
The product shall be connected only with the Mini Dual USB Cable provided in the
retail pack. When the unit is not in use for a long time, disconnect it from the power
source.
13. Cable and Connector Lead Protection
The Mini Dual USB Cable shall be positioned in a way it is not likely to be pinched by
items placed on or against them. Take care with cable and connector leads at attachment
points. There is a dangerous of electric shock or fire.
The manufacturer shall not be liable for errors contained herein or for incidental or
consequential damages. Both Important Safety Information and User Manual are subject
to further improvement without notice.
-4-
Package Content
1. USB Projector
1 PC
2. Mini Dual USB Cable
1 PC
3. Tripod
1 PC
4. User Manual
1 PC
5. Mini Disc with Driver inside
1 PC
①
②
③
④
⑤
Jazz
Classic
-5-
Parts
①
1 .Projector Lens
2. Focus Wheel
①
②
③
⑥
3. Vents
4. LED Light
5. Power & Data Port
⑤
④
6. Tripod Port
④
⑤
Jazz
②
⑥
③
Classic
-6-
Driver Installation
For successful driver installation, your desktop PC or notebook
must meet the following basic requirements:
-
Windows: 2000/XP/Vista
CPU: Pentium 4, 1.5 Ghz
(Picture 1)
RAM: 256 M
USB 2.0 port
Steps of Driver Installation
1. Insert the mini disc into CD-ROM of your desktop / notebook.
(Picture 2)
2. Browse and double click the file“Setup.exe”(Picture 1).
3. Click “Next” (Picture 2).
4. Click “I accept....”(Picture 3).
(Picture 3)
-7-
5. Restart the desktop / notebook after successful driver installation (Picture 4).
(Picture 4)
Attention:
The driver is designed under OS Windows Vista. If your OS is Windows 2000 or Windows XP,
intallation interface showed up may differ a little bit; a warning “not pass the Windows
Compatibility Test” might turn up, please ignore the warning, simply click “Continue” to
proceed.
-8-
Procedure of Driver Un-installation before Driver Upgrade
Before any driver upgrade, your current USB projector driver
installed in your desktop PC/notebook shall be un-installed
completely to avoid crashes:
1. Click “Start”, select “Control Panel”, double click to open
“Control Panel” as Picture 5.
2. Select “ Uninstall a program”
Window as Picture 6.
in the Control Panel
3. Select “USB Projector …. ” in the program list as Picture 7
shows, click “Uninstall” to remove existing USB projector
driver.
(Picture 5)
(Picture 6)
4. Click“OK” when the interface turns up as Picture 8, proceed to
finish the un-installation procedure.
5. Restart your desktop PC/notebook.
After successful un-installation, you can install new driver
version again as page 7 guides.
(Picture 7)
(Picture 8)
-9-
Operation Guide
Warning:
Blank screen may turn up for a while which is normal as the
driver would take a little bit time examining display card.
Your desktop/notebook would by default switch to 640x480
when turning on the projector. You can update your setting at
“Window Display Setting” later on.
At the right taskbar of your desktop pc / notebook, you can see
icon , Right click it to select different display mode : USBProjector (Mirror), USB-Projector(Extended), USB-Projector
(Primary), USB-Projector (Off ).
-10-
USB-Projector (Mirror)
Right click
to select display mode “USB-Projector (Mirror)”, or use hotkey Ctrl+F7, the
projected image would be the same as what you see on the monitor of your desktop / notebook.
USB-Projector (Extended)
Right click
to select display mode “ USB-Projector (Extended)”, or use hotkey Ctrl+F6,
you can move your windows outside the right boundary of your monitor and have it projected
at an extended virtual display area. Users enjoy privacy for personal work while presentation.
USB-Projector (Primary)
Right chick
to select display mode “USB-Projector (Primary)”, or use hotkey Ctr+F5, the
projector then would work as main display while monitor of your desktop/notebook as
secondary one.
USB-Projector (Off)
To turn off the Driver, right click
to select display mode “USB-Projector (Off)”, or use
hotkey Ctrl+F9. Nothing would be projected.
-11-
Product Specification
Display Technology
Light Source
Resolution
Brightness (Typical)
Image Size (Diagonal)
Projection Distance
Uniformity
Focus
I/O Connection
Speaker
Weight
Dimensions
Power Supply
LCoS
LED
640 x 480
10 lumen
5.0’@200mm / 73.5’@3000mm
200 mm - 3000 mm
90 %
Manual focus
USB 2.0
No
80 g
64 x 90 x 21mm(Jazz)
62 x 90 x 20mm(Classic)
Mini Dual USB Cable
Above specification subject to change without notice
-12-
Trouble-shooting
Contact your local distributor or service center for maintenance if below simple guide can not solve
your problems.
Problem
Checking
Repairing
1. Try to re-connect the cables to your
desktop/notebook and the projector.
No light
projected;
1. Check if the 2 USB are all plugged into
your desktop / notebook while another
side the Power / Data port plugged into
the USB projector main unit.
2. Check if the Driver is correctly installed.
2. Install the Driver with the Mini Disc.
3. Check if you have selected display mode
“USB-VGA (Off)” which would turn
off projection.
3. Select other display modes.
LED
Light is off
1. Try to re-connect the cables to your
desktop/notebook and the projector .
Projector
restarts
continuously
Check if the 2 USB is connected to
your desktop/notebook correctly.
2. Try with another desktop/noteook;
sometimes USB port of some old PC is
not using standard version which
affects signal transmission
-13-
Certification and Safety Statement
The Product is tested to be CE and FCC compliant,
suitable for home and office use.
Household users should contact either the retailer where they purchased this
product, or their local government office, for details of where and how they
can take this item for environmentally safe recycling.
WARNING
Do not open the unit as there is a risk of damage.
Under no circumstances should you try to repair the unit yourself, as this will
invalidate the warranty.
-14-