1
4.INSTALLATION
NOTE: Before installing the wireless device, we highly recommend to refer to RADIO SYSTEM INSTALLATION AND SIGNAL PENETRATION manual located at www.eldes.lt/download
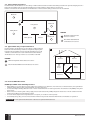
Never install in the following
locations:
7
Wireless
device
Recommended:
8
• inside the metal cabinet
• closer than 20cm (0.66ft)
from the metal surface
and/or power lines
0.5 m to 150 m
(1.64 to 492.13ft)
in open areas
Wireless
device
9
0,5 to 30m
(1.64 to 98.43ft)
inside the building
0,5 to 150m
(1.64 to 492.13ft)
in open areas
Wireless
device
Wireless
antenna
• face the front side of the
wireless device towards the
the front side of EPIR3.
0.5 m to 30 m
(1.64 to 98.43ft)
inside the building
EPIR3
• keep the distance: 0,5 to 30m
(1.64 to 98.43ft) inside the
building, 0,5 to 150m (1.64 to
492.13ft) in open areas
Recommended:
• face the front side of the
wireless device towards
the antenna.
• keep the distance: 0,5 to 30m
(1.64 to 98.43ft) inside the
building, 0,5 to 150m (1.64 to
492.13ft) in open areas
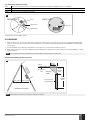
1. Detach the mounting plate by turning it counter-clockwise from
the back of EWF1 (see Fig. No. 5).
2. Secure the mounting plate to ceiling or wall with mounting
screws.(see Fig. No. 5).
3. Lift to open the battery pocket door (see Fig. No. 7)
4. Insert the battery into the battery pocket considering the polarity terminals indicated on the enclosure of EWF1. Ensure the
battery is securely connected. Red LED may flash briefly when
the battery is being installed.
5. Close the battery pocket door by snapping it into place.
6. Position the smoke detector to the mounting plate by turning
it clockwise to lock into place. Note that the device will not lock
into the mounting plate without the battery being present in
the battery pocket.
7. Push the TEST button to verify if the wirless smoke detector is
operational. See 4.1. Testing EWF1.
8. Bind the device to the alarm system using ELDES Configuration
Tool software. Open Wireless Device Management section
and enter a 8-digit wireless device ID located on the EWF1
enclosure and click the Add button (see Fig. No. 6). The device
can also be bind by sending a corresponding command via SMS
text message. For more details, please refer to the software‘s
HELP section and ELDES alarm system installation manual.
9. Upon the successful binding process, EWF1 device icon becomes visible in Wireless Device Management section as
well as Battery Level and Signal Level (see Fig. No. 6).
10. EWF1 wireless smoke detector is ready for use.
5
Mounting plate
Mounting slot
Screws
Battery pocket door
NOTE: If you are unable to bind the wireless device, please restore the parameters of the wireless device to default and try again. See
chapter 5.3. Restoring Default Parameters for more details.
EWF1 Manual v1.1
EN
5