Download EWK2, EWK2A User Manual (updated 2014.02.13)
Transcript
Тел: +7 495 7907870
Моб: +7 965 4429948
Skype: Discoverytelecom
Mail: [email protected]
www.discoverytelecom.ru
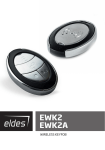
EWK2
EWK2A
WIRELESS KEYFOB
User Manual v1.1
Compatible with:
• ESIM264 v7.14.00 and up + EWT1 v16.18 and up.
• ESIM364 v02.04.10 and up.
• EPIR2 v01.01.08 and up.
Main Features:
•
•
•
•
Alarm system arming & disarming;
Panic button;
PGM output control;
Visual and audio indication of command status.
For more details, please refer to ELDES alarm system user and installation manuals.
EWK2/EWK2A is a wireless device intended to remotely arm and disarm ELDES alarm system, cause system alarm (Panic Button) or to
control any electric appliance connected to the alarm system’s PGM output. In order to start using wireless keyfob EWK2/EWK2A, it has to
be bound to ELDES wireless alarm system using ELDES Configuration Tool software or sending a corresponding SMS text message. EWK2
keyfob features four configurable buttons intended to operate according to individual needs,while EWK2A keyfob model features one configurable button. After the button is pressed, EWK2/EWK2A internal buzzer’s sound signal and red LED indicator confirms a transferred
command to ELDES alarm system via wireless connection. The status of the sent command can be checked by attempting to receive the
feedback signal from the alarm system. This can be performed by pressing down the same button again and holding it for 3 seconds. 3
short sound signals and LED indicator flashes indicate a successfully carried out command, while 1 long beep and LED indicator flash stands
for failed command and feedback signal failure. By default, one pair of buttons is already configured to arm and disarm the alarm system.
It is possible to connect up to 5 EWK2/EWK2A devices to ELDES alarm system at a time. The maximum wireless connection range is 150
meters (in open areas).
1.CONTENTS OF PACK
1. 1. EWK2/EWK2A...............................................qty. 1
2. CR2032 3V lithium battery.............................qty. 1
3. User manual......................................................qty. 1
2.TECHNICAL SPECIFICATIONS
EWK2
EWK2A
LED
indicator
1
LED
indicator
Arm the
system
Disarm the
system
Optional
functionality
Panic button
Optional
functionality
NOTE: Fig. No. 1 reflects the default EWK2/EWK2A button configuration. All EWK2 keyfob buttons are/EWK2A keyfob button is configurable according to individual needs.
2
EN
EWK2/EWK2A Manual v.1.1
2.1. Electrical & Mechanical Characteristics
Battery type
CR2032 Lithium
Battery voltage; capacity
3V; 240 mAh
Quantity of batteries
1
Battery operation time
~18 months*
Wireless transmitter-receiver frequency
868 Mhz
Range of operating temperatures
-20...+55ºC
Humidity
0-90% RH @ 0... +40 °C (non-condensing)
Dimensions
53 x 37 x 10 mm
Wireless communication range
Up to 30 meters in premises; up to 150 meters
in open areas
Compatible with alarm systems
ELDES Wireless
* This operation time can be achieved by pressing the keyfob button up to 4 times per day. The operation time depends on different conditions and may vary.
3.INSTALLATION
1. Remove the screw located on the back side of EWK2/EWK2A enclosure.
2
2. Once the enclosure is opened, remove the PCB from the EWK2/EWK2A enclosure and flip the PCB so that the back side would be facing
up.
3
3. Insert the CR2032 type battery provided in the EWK2/EWK2A pack. Before inserting the battery, ensure that it is positioned plusmarked side up.
4
EWK2/EWK2A Manual v.1.1
5
EN
3
4. Insert the CR2032 type battery provided in the EWK2/EWK2A package. Before inserting the battery, ensure that it is positioned plusmarked side up.
6
BATTERY
CR2032
+
5. Insert the PCB back to the enclosure and close it.
6. Bind the device to the alarm system using ELDES Configuration Tool software. Open Wireless Device Management section and
enter a 8-digit wireless device ID located on the EWK2/EWK2A enclosure and press Add button (see Fig. No. 7). The device can also be
bind by sending a corresponding command via SMS message. For more details, please, refer to the software‘s HELP section and ELDES
alarm system installation manual.
7
7. Press any EWK2 button/press the EWK2A button several times until the device is successfully bound. Upon the successful binding process EWK2/EWK2A icon, Battery Level and Signal Level values will appear in ELDES Configuration Tool software’s Wireless Device
Management section.
8. EWK2/EWK2A is ready for use.
NOTE: If you are unable to bind the wireless device, please, restore the parameters of the wireless device to default and try again. See
chapter 6. Restoring Default Parameters for more details.
4.PANIC BUTTON
By default, EWK2A keyfob supports a Panic Button feature allowing to cause an alarm at any time when the keyfob button is pressed.
EWK2 keyfob may support a Panic Button feature. This feature that can be configured using ELDES Configuration Tool software by creating a virtual zone of Panic/Silent or 24-Hour type and assigning it to Virtual Alarm option. The Panic Button feature can be set up on any button of EWK2.
5.BATTERY REPLACEMENT
1. 2. 3. 4. 5. Open EWK2/EWK2A enclosure.
Remove the old battery from the battery slot.
Postition the new battery according to the appropriate battery slot positive terminal indicated.
Insert the battery into the battery slot.
Battery replaced.
See 3. INSTALLATION for more details.
ATTENTION: Only CR2032 3V battery can be used. Install only new, high quality and unexpired batteries.
ATTENTION: The battery must be removed if the device is not in use.
4
EN
EWK2/EWK2A Manual v.1.1
ATTENTION: In order to avoid fire or explosion hazards, the system must be used only with approved battery. Special care must be
taken when connecting positive and negative battery terminals. Dispose old batteries only into special collection sites. Do not charge,
disassemble, heat or incinerate old batteries.
NOTE: The system sends an SMS message to a preset User 1 as soon as the battery level runs below 5%.
NOTE: The battery status can be monitored in real-time using ELDES Configuration Tool software.
6.RESTORING DEFAULT PARAMETERS
EWK2
1. Press and hold
and
buttons simultaneously.
2. Hold the buttons pressed until LED indicator and the buzzer provide several short flashes and beeps simultaneously.
3. Release the buttons.
4. Parameters restored to default.
EWK2A
1. Press and hold the lower side of the button.
2. Hold the button pressed until LED indicator and the buzzer provide several short flashes and beeps simultaneously.
3. Release the button.
4. Parameters restored to default.
7.ADDITIONAL INFORMATION
Limited Liability
The buyer must agree that the system will reduce the risk of fire, theft, burglary or other dangers but does not guarantee against such
events. “ELDES UAB” will not take any responsibility regarding personal or property or revenue loss while using the system. “ELDES UAB”
liability according to local laws does not exceed value of the purchased system. “ELDES UAB” is not affiliated with any of the cellular providers therefore is not responsible for the quality of cellular service.
Manufacturer Warranty
The system carries a 24-month warranty by the manufacturer “ELDES UAB”. Warranty period starts from the day the system has been
purchased by the end user. The warranty is valid only if the system has been used as intended, following all guidelines listed in the manual
and within specified operating conditions. Receipt must be kept as a proof of purchase date. The warranty is voided if the system has
been exposed to mechanical impact, chemicals, high humidity, fluids, corrosive and hazardous environment or other force majeure factors.
SAFETY INSTRUCTIONS
Please read and follow these safety guidelines in order to maintain safety of operators and people around:
• DO NOT use the system where it can be interfere with other devices and cause any potential danger.
• DO NOT use the system with medical devices.
• DO NOT use the system in hazardous environment.
• DO NOT expose the system to high humidity, chemical environment or mechanical impacts.
• DO NOT attempt to personally repair the system.
The WEEE (Waste Electrical and Electronic Equipment) symbol on this product (see left) means it must not be disposed of in
household waste. To prevent possible harm to human health and/or the environment, you must dispose of this product in an
approved and environmentally safe recycling facility. For further information contact your system supplier, or your local waste
authority.
EWK2/EWK2A Manual v.1.1
EN
5


