1
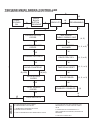
FOR THE SERVICE TECHNICIAN - A QUICK START GUIDE Hooking Up the Controller To hook up your controller, attach the copier or printer specific adaptor harness (sprig) to the controller’s output cable. Unless otherwise specified, attach the sprig to the personal counter connector in the copier or printer. If a green wire with ring connector comes with the sprig, securely attach it to an unpainted chassis grounding screw. DO NOT CUT UP THE OUTPUT CABLE (SPRIG). THIS IS NOT OK. Internal Settings Regarding the default standard capacity coin changer, the default settings are switch B OFF (full quarter tube), and switch C ON (accepts dollar coin). Regarding the optional premium capacity coin changer, the default setting for the US / Canadian switch is OFF. See the separate premium changer manual (PCManual.pdf) for additional information on its operation. Regarding the bill validator (M6500 / 6506), the dipswitches on the side of the housing are preset and should not be changed. The default settings are SW1 OFF (no coupons) and SW2 ON (accepts $5 bills). Putting in Coins Your M6000 Series Controller keeps track of the change available in two ways: 1) on a continuous basis, adding as change is inserted, and subtracting as change is paid out, and 2) on an updating basis, through a process called “initialization”. Initialization involves your controller’s main board looking at the state of all its payout tubes’ high and low sensors at specific times: power up, at the beginning of each vend cycle (when zero credit is first shown after making copies), when the bypass keyswitch is turned ON or OFF, and when the copier power (if monitored) is turned ON or OFF. High sensors are at the tops of the payout tubes, and low sensors are at the bottoms of the payout tubes. These sensors can either be covered (coins present) or exposed (coins absent). When you first set up your controller, the only practical way to insert a beginning “change bank” is by manual insertion, i.e. by putting coins directly into the payout tubes (see figure 3A, standard changer). It follows that the only way for the changer to know what change it is starting out with is through initialization. We therefore recommend at startup that you manually add change in one of the following three ways: * by manually putting the minimum amount of change in each payout tube, * by manually filling up each payout tube, or * by using a combination of these two methods, on a tube by tube basis. Using the first approach, manually insert about 12 nickels, 12 dimes, and 12 quarters in the three payout tubes. Initialize this manual change insertion by turning the bypass keyswitch from OFF to ON to OFF(see figure 4). Using the second approach, manually fill up each payout tube to the maximum. Again, initialize this manual change insertion by turning the bypass keyswitch from OFF to ON to OFF. Note: Filling up any payout tube half way at startup is basically a “waste” of change, because the changer will not know it has this extra change until one of the tube’s sensors changes state (is covered or exposed). M6000 SERIES CONTROLLER USER’S MANUAL and TECHNICAL MANUAL Copyright 2010 Advanced Technologies Incorporated. Tekvend is a registered trademark of Advanced Technologies Inc. Reproduction of this manual without written authorization from Advanced Technologies Inc. is strictly prohibited. -1- INTRODUCTION Thank you for choosing a Tekvend M6000 Series Controller for your image vending needs. This controller is designed to vend copies and impressions on most copiers and printers, using money. Three models are covered in this manual: * M6000: Multi-Coin, Multi-Vend, Single Price Changer. Accepts nickels, dimes, quarters, and dollar coins. Pays out change in nickels, dimes and quarters. Three payout tubes standard changer, five payout tubes premium changer. * M6500: Multi-Coin, Multi-Bill, Multi-Vend, Single Price Changer. Accepts nickels, dimes, quarters, dollar coins, and $1 and 5 bills. Pays out change in nickels, dimes and quarters. Three payout tubes standard changer, five payout tubes premium changer. * M6506: Same as the M6500, but supports up to 6 prices rather than a single price. Can be used only on certain models of copiers and printers. All Tekvend Controllers employ SmartCoinTM technology, which means that they accept or reject individual coins and (where applicable) bills according to how much change is available and needed for payout, as well as how much money you can put into the controller without exceeding the maximum credit allowed. Tekvend Coin Controllers have a number of advanced features, including: * a “single board, single chip” design for maximum reliability, * a two-line backlit LCD display (intensity adjustable), * a “multidrop bus (MDB)” changer utilizing electronic coin discrimination, * an MDB bill validator (M6500 / M6506), and * a bypass keyswitch for free copies. The two-line backlit LCD display shows (at different times) instructions for use, the amount of money (credit) left towards making copies, the number of copies made so far (copy counter), and programming / readouts information. The copy counter can be reset to zero at any time by the customer by pressing the red button on the top of the controller (see figure 2), allowing him or her to keep track of copies made per original, or total copies made. In readouts, various additional counters can be read off the display by an authorized person called a key operator. These counters track the usage of your Tekvend Controller by vended copies (by copy type), bypass (or free) copies, and deposits (net money inserted), both for the current usage period, and for the lifetime of the product. Only current usage counters can be reset to zero. In programming, the key operator has the ability to set all of the controller’s operational parameters, and the ability to inventory (or dump) a portion (or all) of the coins in any (or all) of the changer’s payout tubes. A coin return plunger (see figure 2) allows the user to 1) retrieve bent coins, or 2) retrieve any change due. A large coin return cup ensures that any large payout of coins will not spill out onto the floor. -2- Your Tekvend Controller runs entirely on low, safe 24VAC. Options available are: * premium capacity coin changer * locking cash box * floor pedestal The floor pedestal option is highly recommended for convenient and speedy mounting of the controller. CUSTOMER OPERATION When the bypass keyswitch is vertical, you are in VEND (or pay) mode. When the bypass keyswitch is horizontal, you are in BYPASS (or free) mode. Obviously, the copier or printer (referred to as copier from now on) must be ON in either of these modes to make images. The bypass key is removable in either of its positions. When the controller is in VEND mode, you pay for images (referred to as copies from now on) with money. Money inserted is shown on the controller’s display, and is called value, or credit. A vend cycle is defined as the the operation of the controller from zero credit (value displayed) to non-zero credit to zero credit. When the controller is in VEND mode and there is plenty of change, the controller acts normally, typically allowing you to insert different coin and (possibly) bill types (M6500 / 6506), and to make as many copies as you have sufficient credit for and want to make. When the controller is in VEND mode and there is little change, the controller dynamically make decisions on whether to accept particular coin and (possibly) bill types (M6500 / 6506), so as to not run out of change while in that vend cycle. When the controller is in VEND mode and change is severely depleted, the controller will go into EXACT CHANGE mode. In this mode, you may purchase one copy at a time of a particular copy type, using coins, in such a way that insertion of a particular coin will not exceed the single copy vend price for that copy type. (The M6500 does not distinguish copies by type, but the M6506 does.) EXACT CHANGE mode is indicated when the red LED on the top of the controller (see figure 2) is continuously illuminated. Sometimes a coin or bill will not be accepted in VEND mode because a parameter called maximum credit allowed would be exceeded if that coin or bill were accepted. Whenever a coin or bill is not accepted (for any reason), the red LED on the top of the controller blinks, telling you that you should look at the display for a message. To clarify what maximum credit allowed means, suppose it is set to nine dollars. For this case, $1, 2, and 5 bills may be accepted (if change is available to “cover” the bill insertion, and maximum credit allowed is not exceeded by the insertion of a particular bill), but $10 and 20 bills would never be accepted. The default value for maximum credit allowed is $6 In the normal operation of VEND mode, with zero credit displayed, the display will say what the price per copy is, and what the maximum credit allowed is. In order to make copies, a customer needs to insert money equal to at least the amount needed to vend one copy of the copy type selected, but not more than the maximum credit allowed. Once some money is inserted, the display will show that credit. As copies are made, the display will show remaining available credit, and how many copies have been made since the last time the red button was pressed during the current vend cycle. -3In VEND mode, you may retrieve any remaining monetary credit (change) at any time by pressing the coin return plunger (see figure 2). If during a vend cycle the display credit dips below the single copy price for the copy type selected, the remaining credit on the display is automatically paid out, and the vend cycle is completed. Note that there will be a small wait of a few seconds before change is given. This time delay allows the controller to monitor (and charge) for copies still coming out of the copier. KEY OPERATOR OPERATION The key operator is defined as the person who possesses the bypass key and the controller box key. The key operator can do three things: * Program the controller, * Tally all the readouts, and reset the current counters, * Inventory (or dump) any amount of coins currently in the payout tubes. A flowchart at the end of this manual should help you understand the instructions that follow. Programming the Controller Programming your M6000 Series Controller can be done with the copier ON or OFF. Turn the bypass keyswitch to the horizontal (ON) position, and press the little pushbutton on the main board inside the controller for a few seconds (see figure 1). You are now in SETTINGS mode.The display will say “READOUTS”. Press the white button on the top of the controller to advance the display to “PROGRAMMING” (see figure 2). Enter programming by pressing the red button once (see figure 2). If your controller is a M6506, the display will say “MULTIPLE PRICING ENABLED” or “MULTIPLE PRICING DISABLED” (or similar), whichever way it was set the last time (default is ENABLED). You can switch between DISABLED and ENABLED by repeatedly pressing the red button. Choose DISABLED for single price mode. Choose ENABLED for six price mode. If your controller is a M6506-S (S stands for Sharp), a third selection is also available (and should be chosen): “Sharp”. Whichever choice you make, press the white button to save your change in settings (if any), and to move on to the next programming variable. The next programming variable is “MAXIMUM CREDIT ALLOWED: $XX.XX”. You can set this variable to any value between $00.05 and $25.00. The default value is $06.00. To change the value, press the red button. By pressing it for a short time, the value increases by $00.05 amount; by pressing it and holding it down, you can speed select the value you want. If you overshoot the value you want, you can return to the minimum value ($00.05) by doing the following: while holding down the red button, press the white button, and then release both buttons. When you have finished setting the maximum credit, press the white button to save your change in settings (if any), and to move on to the next programming variable. The next programming variable is “PRICE PER COPY: $XX.XX”. If you have an M6500 Controller, or if you have an M6506 Controller and have previously chosen MULTIPLE PRICING DISABLED, you have only one price to set, otherwise you have six prices to set (A, B, C, D, E, and F). The default value for one price is 10¢. The default values for the six prices are A=10¢, B=15¢, C=25¢, D=$1.00, E=$2.00, and F=$4.00. Whether you have one price or six prices to set, the procedure is the same. You can set a price to any value between $00.05 and the maximum credit just programmed. To change a price, follow exactly the same procedure mentioned in the last paragraph for “MAXIMUM CREDIT ALLOWED”. If you are programming multiple prices, the price being programmed (A, B, C, D, E, F) shows up as the last character in the display. Be sure to save your change in settings (if any) and move on to the next price (or next variable) by pressing the white button. -4- The next programming variable is “TDR: X.X SECONDS”. TDR stands for time delay reset. Usually only a service technician would change this variable whose default value is 0.0 seconds. The purpose of the TDR adjustment is to delay turning off the copier enable just long enough to insure that the last copy paid for (before credit ran out) is fully imaged without any new copies being fed. You can set this variable to any value between 0.0 seconds and 6.0 seconds. This adjustment is not needed very often, except for Mita / Kyocera copiers. Press the white button to save your change (if any), and to move on to the next programming variable. The next programming variable is “PULSE PERIOD: > X.XX SECONDS”. PULSE PERIOD stands for the time period after a copy pulse during which another pulse is ignored. PULSE PERIOD is used to “debounce” any switching circuit that supplies the copy pulse, if that circuit is “noisy”. Usually only a service technician would change this variable whose default value is 0.25 seconds. You can set this variable to any value between 0.25 seconds and 2.50 seconds in 0.05 second increments. This adjustment is seldom needed. Press the white button to save your change (if any), and to move on to the next programming variable. The last programming variable is “COPIER OFF MODE”. When this mode is ENABLED, your M6500 / 6506 Controller turns off when the copier is turned off, and vice-versa. The default value is ENABLED. When this variable is set to DISABLED, the controller stays ON all the time. Pressing the red button repeatedly switches this variable’s value between DISABLED and ENABLED. Press the white button to save your change (if any), and to move on to the next programming variable. Once the display again says “PROGRAMMING”, press the white button to select “READOUTS”. Note: you can exit PROGRAMMING anytime you want, just by turning the bypass keyswitch to the off (vertical) position, but to save a change, you must press the white button after making the change. Tallying (and Resetting) the Readouts If you have not already done so, enter readouts by pressing the red button once. The first display will say “BYPASS COPIES: XXXX”. This counter is showing the current copies made with the bypass key. If you are taking readings, this is the time to tally this counter. The maximum value this counter can have is 9999, after which it rolls over to 0000. Press the white button to advance the display to the next counter. The next display will say “VENDED COPIES: XXXX”. This counter is showing the current copies made by inserting money. If you are taking readings, this is the time to tally this counter. The maximum value this counter can have is 9999, after which it rolls over to 0000. Press the white button to advance the display to the next counter. Note: If you have an M6506 Controller and have chosen MULTIPLE PRICING ENABLED, six counters will be displayed at this time, one for each price. A letter (A, B, C, D, E, or F) in the display indicates which counter is being read out. The next display will say “DEPOSITS: $XXXX.XX”. This counter is showing the current net deposits inserted. This amount equals the net money inserted to vend copies and value cards. If you are taking readings, this is the time to tally this counter. The maximum value this counter can have is $9999.95, after which it rolls over to $0000.00. Press the white button to advance the display to the next message. The next display will say “CLEAR COUNTERS?”. If you press the red button, you will clear the three counters just tallied; if you press the white button, you will not. In both cases, the display will automatically advance to the next counter. -5- The next three displays will say “TOTAL BYPASS COPIES: XXXXXX”, “TOTAL VENDED COPIES: XXXXXX”, and “TOTAL DEPOSITS: $XXXXXX.XX”. These three counters are the corresponding cumulative (lifetime) equivalent of the three counters already described. They cannot be reset. You advance through them by pressing the white button. Tally these readouts if you desire. Use these readouts as an audit check against the current counters. After the last counter, press the white button one more time to return to “READOUTS”. Note: If you have chosen MULTIPLE PRICING ENABLED, six TOTAL VENDED COPIES counters will be displayed at this time, one for each price. A letter (A, B, C, D, E, or F) in the display indicates which counter is being read out. Inventorying (Dumping) the Coins in the Payout Tubes From time to time, the key operator may wish to remove some or all the change from the payout tubes. This process of paying out coins exclusive of making change is called inventorying (or dumping change from) the payout tubes. Anytime you are in the SETTINGS mode, you may inventory the payout tubes by pressing the payout buttons. For the default standard capacity coin changer, the payout buttons are directly to the right of the payout tubes, and are clearly marked. You must hold down the appropriate button to keep the inventory (payout) process going. For the optional premium capacity coin changer, the payout buttons are on the upper right hand corner of the changer’s discriminator. Press the A button to inventory the left-most (or quarter) payout tube, the B button to inventory the next payout tube to the right (the nickel payout tube), etc. Momentarily press the appropriate button to start the inventory (payout) process, and momentarily press it again to stop the process. TEKVEND M6000 SERIES CONTROLLER MODEL NUMBER AND SOFTWARE VERSION GIVEN ON POWER UP OF CONTROLLER W START: BYPASS ON PRESS BLACK BUTTON ON BOARD READOUTS W R CURRENT BYPASS COPIES W MULTIPRICE: ENBLD / DISBLD / SHP CURRENT DEPOSITS W MAXIMUM CREDIT ALLOWED W (NO) TOTAL BYPASS COPIES W TOTAL VENDED COPIES PRICE PER COPY TIME DELAY RESET (1, 2, or 3) (1, 2, or 3) W PULSE PERIOD (1, 2, or 3) W COPIER OFF: ENABLED / DISABLED W LEGEND (1, 2, or 3) W CLEAR COUNTERS? W (4, 5) W W R (YES) R W CURRENT VENDED COPIES PROGRAMMING (4) W TOTAL DEPOSITS W = PRESS WHITE BUTTON TO SELECT R = PRESS RED BUTTON TO SELECT 1 = MOMENTARILY PRESS RED BUTTON TO INCREASE VALUE BY ONE UNIT 2 = HOLD DOWN RED BUTTON TO SPEED SELECT VALUE 3 = HOLD RED BUTTON, HOLD WHITE BUTTON, RELEASE BOTH, TO START OVER AT LOWEST VALUE 4 = PRESS RED BUTTON REPEATEDLY TO SELECT ENABLED OR DISABLED (OR SHARP FOR MULTIPRICE) 5 = APPLIES TO M6506 ONLY


![[ENG] EVO DSP TM 10-30 kVA User Manual v. 2.0](http://vs1.manualzilla.com/store/data/005715238_1-26b73917878f712f842422018d03a475-150x150.png)