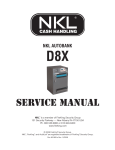
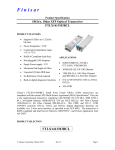
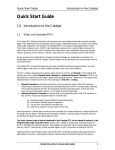
1
 NKL Edge Software User Manual Version 2.0 Created 09/30/09 Table of Contents 1 Introduction ......................................................................................................................... 1 2 PC Hardware and OS Requirements ..................................................................................... 2 3 Software Installation and Activation .................................................................................... 3 4 Setting up a Lantronix Device Server .................................................................................... 7 5 Setting up an External Modem ........................................................................................... 13 6 XLV Hardware Connections ................................................................................................ 16 •
•
•
6.1 Network Interface Connection ......................................................................................................... 16 6.2 External Modem Connection ................................................................................................................... 18 6.3 Direct Serial Connection .......................................................................................................................... 19 7 Configuration Menu ........................................................................................................... 20 •
•
•
7.1 Application Users ............................................................................................................................ 20 7.2 Serial Ports ............................................................................................................................................... 22 7.3 Systems .................................................................................................................................................... 23 8 Communication Menu ........................................................................................................ 30 •
•
•
•
8.1 Auto Call Feature ............................................................................................................................ 30 8.2 Retrieve Information ............................................................................................................................... 30 8.3 Work Online ............................................................................................................................................. 34 8.4 Comm Watcher ...................................................................................................................................... 38 9 Reports Menu ................................................................................................................... 39 •
•
•
9.1 AutoCalls Status .............................................................................................................................. 39 9.2 AutoCalls Information ............................................................................................................................. 40 9.3 Information Retrieved ............................................................................................................................. 41 10 DB Administration Menu .................................................................................................. 43 •
•
•
10.1 Backup DB .................................................................................................................................... 43 10.2 Clear DB ................................................................................................................................................. 44 10.3 Restore DB ............................................................................................................................................ 45 11 Filters .............................................................................................................................. 46 •
•
•
11.1 Event Filter.................................................................................................................................... 46 11.2 Users Filter ............................................................................................................................................. 50 11.3 Time Range Filter ................................................................................................................................... 50 1. Introduction This document covers the installation and operating instructions for NKL Edge software
and NKL Edge Plus software. This document does not cover the details of operating
the equipment that the software interfaces with. It is assumed that the user understands
the hardware and/or has the necessary hardware documentation.
Edge Software
The Edge software package allows remote interface with NKL Autobank or Intellisafe
cash handling safes equipped with AuditLok XLV electronics. Edge software allows
manual or automatic calling to the safes for the retrieval of audit data, user information,
and component configuration information. To use Edge software, the safe electronics
must be revision 3.0 or higher.
Edge Plus Software
The Edge Plus software package includes all features found in the Edge application, but
adds the capability to set nearly any parameter in the safes including managing users,
setting component parameters, and so forth. To use Edge Plus software, the safe
electronics must be revision 3.0 or higher.
AuditLok XLV
The AuditLok XLV electronics is used on various NKL Intellisafe and Autobank products. This electronics allows complete auditing operations for both security and financial
uses. This system provides access control to cash handling equipment and tracks all
user traffic and all money entering manual or validated drops, all money being removed
for bank deposit, and money entering or exiting through dispensing hardware.
Edge Software User Manual
Page 1 of 50 2. PC Hardware and OS Requirements Edge and Edge Plus software must be installed onto a PC running a Windows operating
system (OS). Basic hardware requirements must also be met for the software to run
and for the connection to be made to an AuditLok XLV system. The following section
will detail these requirements and specifications.
Supported Windows Operating Systems
•
•
•
•
•
•
Windows 98 (Requires 2nd Edition, Latest Updates must be installed)
Windows NT4 (Service Pack 6 Required)
Windows 2000 (Service Pack 2 required)
Windows Me
Windows XP
Windows Vista
Minimum PC Hardware Requirements
•
•
•
Processor - 233 MHz Pentium II or better
Free Hard Drive Space – 50 MB minimum, 40 GB or more recommended
CD- ROM Drive
Connection Methods
(PC must be equipped with one of the following) •
•
•
56K Modem
Ethernet network interface card w/ TCP/IP protocol installed and configured
properly
RS-232 serial port configured for 9600 N81 communication.
Edge Software User Manual
Page 2 of 50 3. Software Installation and Activation The provided installation CD will be used to install the Edge or Edge Plus software onto
your PC. The following section will guide you through the software installation process:
1) Insert the CD into the CD-ROM drive of the PC. The installation application should
automatically start. If the application started automatically, continue directly to step
3.
2) If the installation application did not start when the CD was inserted into the drive, open
the CD in Windows Explorer. Locate and launch the nkledge.exe file (Fig. 3.1).
Fig 3.1
3) Once the install application has been launched, left-click INSTALL NKL EDGE (Fig. 3.2)
Fig 3.2
Edge Software User Manual
Page 3 of 50 4) Select Next (Fig. 3.3), accept the License agreement, and then select Next again to
continue (Fig. 3.4)
Fig. 3.3
Fig. 3.4
5) You may now enter the User Name and Organization if you wish (Fig. 3.5), once finished
select Next to continue.
Fig 3.5
6) The next screen asks you to specify the destination directory where all the program files
will be stored. It is highly recommended that you keep the default directory path
(C:\Program Files\NKLEdge). If you do change the destination path, you must make
additional changes to the Edge program after the install has been completed. Select
Next after the destination directory is set (Fig. 3.6). Select Yes when asked if you want
to create the directory.
Edge Software User Manual
Page 4 of 50 7) On the next screen (Fig 3.7), select which version (97 or 2000) of Microsoft Access that
you would like Edge software to be compatible with. If you are unsure, or if Microsoft
Access is not installed on your PC, select Access 97. Select Next when finished.
Fig. 3.6
Fig 3.7
8) Choose the Start Menu folder (default folder NKLEdge recommended), that the program
will be installed to and then select Next (Fig. 3.8). On the next screen, click Install to
start the process (Fig. 3.9 and 3.10).
Fig. 3.9
Fig. 3.10
9) After the install process is complete, choose to restart your computer and then click
Finish to finalize the software installation process.
Edge Software User Manual
Page 5 of 50 10) You must now activate the Edge software you have just installed. After your PC has
rebooted, start Edge software on your PC. Type in “admin” for both the User name and
Password fields (Fig. 3.11).
Fig. 3.11
11) Select Help at the top of the program and then select About (Fig. 3.12).
Fig. 3.12
12) Double left-click the NKL icon (Fig. 3.13a) and the registration screen will appear (Fig
3.13b).
Fig. 3.13a
Fig. 3.13b
13) Immediately call FireKing Technical Support at 1-800-457-2424. A Fireking phone
technician will then guide you through the rest of the Edge Software activation
process.
14) Please continue to the following section(s) based on connection method being used to
connect your PC to the XLV safe:
Connection Type
Network Interface
External Modem
RS-232 Serial
Edge Software User Manual
Read Section(s)…
4 and 6.1
5 and 6.2
6.3
Page 6 of 50 4. Settin
S ng up a Lan
ntron
nix De
evice Serve
S
er To conne
ect a PC to an
a NKL elecctronics safe via networkk connection, a Lantronixx Device Server
must be used. This device along
g with all neccessary cables and supplies is availlable as a kit that
e Lantronix Device
D
Serve
er must be set
s up in order for it to fu
unction prope
erly.
can be ordered. The
To do this, the Lantrronix Device
e Server mu
ust first be connected to a PC via modem cable
and then
n set up. Be
elow are the
e instructionss on setting up
u a Lantron
nix Device Server.
S
Plea
ase
take note
e that some of the steps are very tim
me sensitive,, so it is sugg
gested that you
y read the
e
entire section before beginning:
Lantro
onix Deviice Setup
p Procedu
ure
Necessa
ary Supplies
s:
•
•
A PC
P equipped
d with a prop
perly configured TCP/IP protocol nettwork port/ca
ard and a fre
ee
serrial port
Lan
ntronix Devic
ce Server w// included po
ower, modem
m, and Cat - 5 cables
1) Co
onnect the 25 pin end off the modem
m cable to the
e Lantronix Device
D
Servver (Fig. 4.1a
a).
Co
onnect the power
p
cable to
t the Lantro
onix Device (Fig. 4.1b).
Fiig. 4.1a
Edge So
oftware User Manual
Fig. 4.1b
Page 7 of 50 2) Connect the other end of the modem cable to a free serial port on the PC (Fig. 4.2).
Fig 4.2
3) Run the HyperTerminal application on the PC. This can usually be found in the Start
Menu – Accessories – Communications – HyperTerminal (Fig. 4.3). HyperTerminal
may be in a different location depending in the operating system being used.
Fig. 4.3
4) Once HyperTerminal has started, type in any name, choose any icon that you wish, and
then select OK (Fig. 4.4).
Fig. 4.4
Edge Software User Manual
Page 8 of 50 5) On the next screen, use the drop down box next to “Connect using:” to choose the
serial port on your PC that the Lantronix Device is currently connected to (Fig. 4.5). This
is usually COM 1 or COM 2, but may be different depending on the configuration of the
PC being used.
Fig. 4.5
6) On the following screen, verify or change the settings as needed so that they are as
follows, then select OK (Fig. 4.6).
Edge Software User Manual
Page 9 of 50 ***STOP***
Steps 7 and 8 Require Precise and Quick Timing: Please Read Them Carefully
7) The Lantronix Device must now be put into Setup mode. Cycle power to the Lantronix
Device by unplugging it and then plugging it back in. As soon as the Lantronix device
is plugged back in, rapidly press “x” key (must be lower case) until the screen
pictured below (Fig. 4.7) appears on the HyperTerminal screen. This process must
be done before the status lights go green on the device. If the screen below does not
appear, make sure that HyperTerminal is still open and the Lantronix device is connected
via modem cable to the PC serial port. Retry step 7 until successful.
Fig. 4.7
8) After initiating the process in step 7, you must immediately press the Enter key to
enter Setup mode. If you fail to do so in time you will see the following ( Fig 4.8):
Fig. 4.8
If you see the above error indication then you must try to initiate Setup mode again.
Retry steps 7 and 8. If steps 7 and 8 were performed correctly, you will see the
following information displayed at the bottom of the HyperTerminal screen (Fig. 4.9):
Fig. 4.9
Edge Software User Manual
Page 10 of 50 9) Press “0” on the keyboard and the press Enter. Setup will ask for an IP Address,
separated into sets of 3 numbers, that you want to assign to the Lantronix Device. Press
Enter after entering each 3-number set to continue until all 4 sets are entered (Fig. 4.10).
Fig. 4.10
10) You may also set a Gateway IP address if needed. Typing Y and then Enter will bring up
a list of Gateway options (Fig. 4.11). If setting up a Gateway IP is unnecessary, type N
and then Enter to return to the main menu of the setup screen (Fig. 4.9).
Fig 4.11
11) Press 1 and then Enter to configure channel 1 of the Lantronix Device as follows (Fig.
4.12):
Fig. 4.12
12) When returned to the main menu of the setup screen, press 9 and then Enter to save all
changes and exit setup.
13) Remove the serial modem cable from the Lantronix device and the PC.
Edge Software User Manual
Page 11 of 50
14) Connect the Lantronix to your network using a Cat-5 cable (Fig. 4.13)
Fig. 4.13
15) The network setup and connection on the Lantronix Device can now be tested and
verified. Open up the DOS command prompt (Fig 4.14) by going to Start Menu – Run –
type in cmd – click OK.
16) On the DOS screen, type in telnet 192.168.001.002 9999 and then press Enter (Fig.
4.15). Note that the IP address in this command line used the default IP address. If you
changed the IP Address to something different in step 9, that will be entered in
place of the default IP and will be followed by 9999. If successfully completed you will
now be connected to the Lantronix Device through the network.
17) Pressing Enter will open up a setup program nearly identical in function and layout to the
set up program used in HyperTerminal. You may change or verify all settings on the
Lantronix Device using the telnet screens. When finished close the Window. The
Lantronix Device Server is now fully set up and functional. It will now need to be
connected to an AuditLok XLV safe. Please refer to Section 6: Hardware Connections
for detailed instructions.
Edge Software User Manual
Page 12 of 50 5. Se
etting
g up an
a Extternal Mod
dem ect a PC to an
a AuditLok XLV safe via modem co
onnection, 2 dial up mod
dems must be
b
To conne
used: one connected
d to the PC running
r
Edge
e Software and
a another connected to
t the XLV safe.
s
This secttion covers how
h
to set up the modem
m that will be
e connected
d to the safe.. Below are the
instructio
ons on settin
ng up an exte
ernal modem
m for use witth Edge Softtware.
ommended that
t
the Zoom modem kit
k supplied by
b FireKing is used, any
While it iss highly reco
complian
nt modem ma
ay be used instead.
i
The
e modem ussed must me
eet the follow
wing
requirem
ments:
•
•
•
•
•
•
100
0% AT Comm
mand Set Compatible
V.3
34 Compliantt
V.4
42 Compliantt
V.9
90 Compliantt
Autto-Answer
Autto-negotiates
s to achieve
e fastest connection posssible
Exterrnal Mode
em Setup
p Procedure
Necessa
ary Supplies
s:
•
•
A Windows
W
OS
S PC with a free
f
serial po
ort
Zoo
om External Modem w/ included
i
mo
odem and po
ower cable
1) Co
onnect the 25 pin end off the modem
m cable to the
e external modem
m
(Fig. 5.1a).
Co
onnect the re
emaining en
nd of the mod
dem cable to
o a PC seria
al port (Fig. 5.1b).
5
Fig 5.1a
Fig
g 5.1b
2) Co
onnect the power
p
cable to
t the modem and powe
er it on.
Edge So
oftware User Manual
Page 13 of 50 3) Run the HyperTerminal application on the PC. This can usually be found in the Start
Menu – Accessories – Communications – HyperTerminal (Fig. 5.2). Please keep in
mind that HyperTerminal may be in a different location on different operating systems.
Fig. 5.2
4) Once HyperTerminal has started, type in any name, choose any icon that you wish, and
then select OK (Fig. 5.3).
Fig. 5.3
5) On the next screen, use the drop down box next to “Connect using:” to choose the
serial port on your PC that the Lantronix Device is currently connected to (Fig. 5.4). This
is usually COM 1 or COM 2, but may be different depending on the configuration of the
PC being used.
Fig. 5.4
Edge Software User Manual
Page 14 of 50 6) On the following screen, verify or change the settings as needed so that they are as
follows, then select OK (Fig. 5.5).
7) You will now type in a series of commands (one at a time) into HyperTerminal. Once
each command is entered, you should get a response of OK (Fig. 5.6). The following is a
list of the commands that should be entered:
8) The modem has now been set up and tested. You may now close the HyperTerminal
program and remove the modem cable running from the modem to the PC. The external
modem will now need to be connected to an AuditLok XLV safe. Please refer to Section
6: Hardware Connections for detailed instructions.
Edge Software User Manual
Page 15 of 50 6. XLV Hardware Connections You must now connect the AuditLok XLV unit using one of the connection methods. As
previously mentioned, 3 connection methods are possible depending on the
configuration of your PC: a network interface connection, external modem to modem
connection, or RS-232 direct serial connection. The following section will cover all 3
types of connections including necessary supplies and connection instructions.
6.1 Network Interface Connection
A network interface connection requires that the on-site network is configured properly by an IT
professional so that the XLV can communicate properly to the PC running Edge software. It is
assumed that the Lantronix Device Server used in this procedure has been properly set
up as described in Section 4 of this manual.
Necessary Supplies:
•
•
•
Correctly configured Lantronix Device Server
PC running Edge software that is connected to the on-site network
T-15050095 Cable
1) Connect the T-15059095 cable to the correct port on the back of the XLV “C” unit (Fig.
6.1). The port may be labeled “MODEM” or EDGE” depending on the safes date of
manufacture.
Fig. 6.1
Edge Software User Manual
Page 16 of 50 2) Connect the remaining end of the T-15050095 connector to the RS-232 Port of the
Lantronix Device Manager (Fig. 6.3).
Fig. 6.3
3) If you have not already done so, connect the Lantronix Device to the on-site network
using a CAT 5 patch cable (Fig. 6.4). Make sure the Lantronix Device is plugged in and
powered up. The XLV safe is now connected to your network.
Fig. 6.4
Edge Software User Manual
Page 17 of 50 6.2 External Modem Connection
In the following procedure, it is assumed that the external modem used in this procedure has
been properly set up and tested as described in Section 5 of this manual.
Necessary Supplies:
•
•
•
Correctly configured Zoom External Modem
An analog phone line that can be connected to the external modem
T-15050095 Cable
1) Connect the T-15059095 cable to the correct port on the back of the XLV “C” unit (Fig.
6.5). The port may be labeled “MODEM” or EDGE” depending on the safes date of
manufacture.
Fig. 6.5
2) Connect the remaining end of the T-15050095 Cable to the external modem (Fig. 6.6).
Fig. 6.6
Edge Software User Manual
Page 18 of 50 3) If you have not already done so, connect the modem to an analog phone line and make
sure the modem is plugged in and powered up. The XLV safe is now connected to your
modem.
6.3 Direct Serial Connection
Necessary Supplies:
T-15050096 Adaptor
Standard CAT 5 Patch Cable
1) Connect a CAT 5 patch cable to the correct port on the back of the XLV “C” unit (Fig.
6.7). The port may be labeled “MODEM” or EDGE” depending on the safes date of
manufacture.
Fig 6.7
2) Connect the remaining end of the CAT 5 cable to the T-15050096 adaptor (Fig. 6.8).
Fig 6.8
3) Connect the remaining end of the adaptor directly to the serial port of the PC running
Edge Software. The XLV safe is now connected to your PC.
Edge Software User Manual
Page 19 of 50
7. Configuration Menu The Configuration Menu allows you to configure the serial ports of your modem or
cable, manage software users, and register a list of safes available for communication.
7.1 Application Users
This section will cover how to manage users with Edge software. Up to 100 users may
be enrolled in Edge Software. Each user will have a unique name and password. Each
user is assigned either Admin permissions or standard User permissions when they are
enrolled:
•
Admin
Can generate and view reports and work online, modify application users and
has access to database administration features
•
User
Can generate and view reports only.
1) Begin by selecting Configuration at the top of the program and then select Application
Users (Fig 7.1).
Fig. 7.1
Edge Software User Manual
Page 20 of 50 2) The Application Users Window will now be visible. Select the Add User Icon at the top
left of this box to add a new user (Fig. 7.2).
Fig. 7.2
3) Fill in all User information and permissions as desired (Fig. 7.3). Select the Save Data
button when finished. Repeat this process until all users are entered.
Fig. 7.3
Edge Software User Manual
Page 21 of 50 4) To edit or delete an existing user, first use the scroll arrows at the bottom of the
window until the user you want to edit is visible. Select the Edit User button at the top of
the window to edit a user, or select the Delete Data button at the bottom of the window to
permanently delete that particular user (Fig. 7.4).
Fig. 7.4
7.2 Serial Ports
If using the dial up modem or direct serial connection method, you must specify which
com port is to be used within Edge software.
1) Select Configuration at the top of the program and then select Serial Ports (Fig 7.5).
Fig. 7.5
Edge Software User Manual
Page 22 of 50 2) The Serial Ports Window will appear (Fig. 7.6). Select the correct serial port for the type
of connection you are using (serial or dial up modem). Select OK when finished.
Fig. 7.6
7.3 Systems
Before you can connect and pull information from a system, you must first define the
systems available to call. The Systems option is used to create, edit, or delete cash
handling safe systems from your master database.
• Adding a Group
Groups are used to cluster systems so that several systems may be called
together on the same schedule. This is most frequently done when managing
several locations. Often groups are used to arrange systems by market area. If the
groups feature is to be used, it should be set up before individual systems are
setup.
1) Select Configuration at the top of the program and then select Systems (Fig 7.7).
The System Information window will appear.
Fig. 7.7
Edge Software User Manual
Page 23 of 50 2) Select the Add Group icon at the top of the System’s Information window (Fig.
7.8)
Fig. 7.8
3) Click the Add Group icon in the group window (Fig. 7.9) and then enter the
appropriate information into the fields:
•
•
•
Group Name – Name of the group
Daily Auto Call – Enables/Disables Auto Call Feature for the group
Frequency – Specify how often Auto Call will be used. Options are Daily, Weekly, and
Monthly. Once the frequency is selected select next to further customize Auto Call for
the group
Select Save Data when finished. Repeat as needed until all groups have been added.
Fig. 7.9
Edge Software User Manual
Page 24 of 50 4) To edit or delete an existing group, first use the scroll arrows at the bottom of the
window until the group you want to edit is visible. Select the Edit Current Record
button at the top of the window to edit the selected group. When finished editing select
the Save Data button to save all changes. To delete a group, select the Erase Data
button at the bottom of the window (Fig. 7.10).
Fig. 7.10
• Adding a System
Systems must now be added to the Edge Software database
1) Select Configuration at the top of the program and then select Systems (Fig 8.11).
The System Information window will appear.
Fig. 7.11
Edge Software User Manual
Page 25 of 50 2) Create a company name using the Company icon (Fig. 7.12a). This procedure will
normally be done with the assistance of a FireKing Phone Technician during the
product Activation process described in Section 7.
•
•
•
•
Company Name – Name of your company
Software Serial Number – Required to use Edge Software. Given to you by a FireKing
phone technician during the product activation process. This same number must also be
entered into any XLV safes that you will be connecting to.
Maximum Retries – If Auto Call fails to connect, this is the number of times that Edge
will retry the connection before stopping
Maximum Time – If Auto Call fails to connect, this is the time of day that Edge will stop
trying to connect
Select Save Data when finished entering the company name and then close the
company window to return to the System’s Information window (Fig 7.12b).
Fig. 7.12a
Fig. 7.12b
3) Select the Add Safe Icon at the top left portion of the window to add a system (Fig.
7.13).
Fig. 7.13
Edge Software User Manual
Page 26 of 50 4) The System
m’s Informatiion window has
h been bro
oken up into
o smaller secctions for the
e
purposes of this manua
al. Refer to Figure 7.14 and then rea
ad the corre
esponding step to
ection if the System’s Information window.
learn more about each individual se
S
Step 5
Step
p 6 Ste
ep 8 Step
p 7 S
Step 9
Fig. 7.14
ered previou
usly. Althoug
gh any seria
al number ma
ay
5) Select a company and group if ente
nter the seria
al number off that stores “C” unit into
o the serial number
n
field if
be used, en
possible. Enter
E
the store name and
d store number into the correspondiing fields.
Edge So
oftware User Manual
Page 27 of 50 6) Select the Connection Method that will be used to connect your PC to the safe.
•
Direct Cable – If using a Direct Connection, simply select the Direct Cable
option.
•
Modem – If using a dial up Modem, select the Modem option and then type in
the phone number of the modem attached to the safe. If a number needs to be
entered before you can make an outgoing call (usually 8 or 9), be sure to include
this at the front of the phone number.
•
Network – If using a Network connection select the Network option and then
enter the IP Address and Port of the Lantronix Device Server attached to the
safe. Both of these values are required. You may also choose between UDP
and TCP network protocols.
7) Enter the location information of the safe.
Edge Software User Manual
Page 28 of 50 8) Enter the Auto Call preferences for the site.
•
If no group was selected in step 5, you must enable Auto Call if desired and then
specify the time in which Auto Call will occur for that system, the maximum
amount of communication retries, and the time of day to stop communication
retries.
•
If a group was selected in step 5, the groups Auto Call settings will be applied
instead of the system’s Auto Call settings.
9) You may print the systems information (Print), test the Network connection you set up
in step 6 (IP Test), save the system information you just entered into the database
(Save Data), or close the System’s Information window (Close).
10) You may edit a system by first selecting it using the scroll arrows at the bottom of the
window and then selecting the Edit Safe Information icon (Fig. 7.15). Select the
Save Data button to save any changes made or Delete Data to delete the system
from the database.
Fig. 7.15
Edge Software User Manual
Page 29 of 50 8. Communication Menu The Communication Menu allows you to enable the Auto Call feature, retrieve information on
demand from an XLV safe, set up an XLV safe (Edge Plus only), or enable the Comm Watcher.
8.1 Auto Call Feature
This option enables or disables the Auto Call feature in Edge software. Auto Call is one of the
most useful features in Edge software. When it is set up, Auto Call allows all registered safes to
call in automatically at the times specified during system setup. When the safes call in, all
information from each safe (audit, user, business day, etc.). is populated onto the Edge
software database, at which time you can view and print out any information you choose. For
the Auto Call feature to work, you must have Edge software running or minimized on
your PC.
•
To enable the Auto Call feature, simply select it from the Communication Menu (Fig.
8.1). A check mark will appear next to the option when it is enabled. The safes will
begin populating the database with information at the times you specified in the
Configuration Menu setup process.
Fig. 8.1
8.2 Retrieve Information
The Retrieve Information Feature lets you call into any registered safe and retrieve specific data
from it on demand. To use this feature:
1) Select the Communication Menu and then select Retrieve Information (Fig. 8.2). The
Connect and Retrieve Menu will then appear (Fig. 8.3)
Fig. 8.2
Edge Software User Manual
Page 30 of 50 Fig. 8.3
2) Select the company, group, or both until the safe(s) you wish to retrieve the information
from appear in the left side of the Safes To Call field (Fig. 8.4). Selecting the “>>”
button will select all safes, while selecting the “>” button will select each safe
individually. After you have selected the safes to call, they will move from the left portion
of the field to the right portion (Fig. 8.5).
Fig. 8.4
Edge Software User Manual
Fig. 8.5
Page 31 of 50 3) Select the information that you want to retrieve from the safe(s) by checking the box next
to the information type (Fig. 8.6). You may select multiple information types. The types
of information are as follows:
Fig. 8.6
4) You may choose to pre-filter the data that is downloaded. Filters can be used to
customize the data when viewing and printing reports (Fig. 8.7). These filters are
detailed in Section 11 of this manual.
Fig. 8.7
Edge Software User Manual
Page 32 of 50
5) Once you have chosen the information types and filters, select the Start Connection
Process button at the top right of the window (Fig. 8.8). During the connection process
you will be notified of the status of the request (Fig. 8.9).
Fig. 8.8
Fig. 8.9
6) When the connection process is complete, the status of the procedure is displayed. All
successful transmissions will be displayed in green lettering in the Successful
Connection field (Fig. 8.10). All unsuccessful transmissions will display an error code in
red lettering in the Failed Connections field. To view all retrieved information, select the
Reports menu and then select Information Retrieved. Please refer to Section 9 of this
manual for more information on the Reports Menu.
Fig. 8.10
Edge Software User Manual
Page 33 of 50 8.3 Work Online
The Work Online feature provides multiple configuration options for the XLV system you are
connected to. In general these settings are set up at the time of the install by a field service
technician and do not require any changes afterwards. To use the Work Online feature, you
must have Edge Plus software.
1) Select the Communication Menu and then select Work Online (Fig. 8.11).
Fig. 8.11
2) Using the drop down box, select the system that you want to connect with (Fig. 8.12).
Fig. 8.12
3) Once you are successfully connected to the system, the following screen will be
displayed (Fig. 8.13). There are 3 tabs to select from the Work Online screen: Devices,
Users, and Cash Boxes.
Fig. 8.13
Edge Software User Manual
Page 34 of 50 Devices Tab
•
The Devices tab will list all the safes on the system you are connected to as well as each
individual lock and bill reader that a safe has. You may rename any device, although
this is usually done by a field technician at the time of install.
•
Selecting a lock from the list will open up the timer options for that particular lock (Fig.
8.14). Simply select “Set Parameters” to apply any changes that were made
Fig. 8.14
•
Selecting the serial number at the top of the list will open up a series of additional series
of tabs with more options (Fig 8.15).
Fig. 8.15
•
The four tabs now available are: System, Site, Permissions, and Groups.
Edge Software User Manual
Page 35 of 50 ¾ System
The System tab provides general options for the system including PIN Code timers,
End of Day options, and Daylight Savings Time options (Fig. 8.16)
Fig. 8.16
¾ Site
The Site Tab allows you to adjust the idle text displayed, the site number, and the
date and time of the system (Fig. 8.17).
Fig. 8.17
¾ Permissions
The Permissions tab allows you to change the name of the User levels and
customize each group’s permissions (Fig. 8.18).
Fig. 8.18
Edge Software User Manual
Page 36 of 50 ¾ Groups
The Groups tab allows you to assign groups to each User level (Fig. 8.19).
Fig. 8.19
Users Tab
•
The Users tab allows you to enroll new users, inactivate users, or delete users (Fig.
8.20).
Fig. 8.20
•
When enrolling a new user, the set up screen will appear. The available user options
are Name, SSN, Authorization Level, Keyless User, and Key Number (Fig. 8.21)
Fig. 8.21
Edge Software User Manual
Page 37 of 50 Cash Boxes Tab
•
The Cash Boxes Tab is an advanced feature usually reserved for use by a field
technician and therefore will not be covered in this manual.
8.4 Comm Watcher
The Comm Watcher feature will only be used at the request of FireKing Technical Support for
the purposes of diagnosing communication issues. Because of this, the details of its use will not
be covered in this manual.
Edge Software User Manual
Page 38 of 50 9. Reports Menu The Reports Menu allows you to check the status of your Auto Calls, manage your Auto
Call information, and manage any retrieved information.
9.1 AutoCalls Status
This feature allows you to check the previous or current status of your Auto Calls. To use this
feature:
1) Select the Reports menu and then select AutoCalls Status (Fig. 9.1).
Fig. 9.1
2) To check the previous status of a location, first select the Previous option and then
select the date of the Auto Call(s) you want to check. A list of all the Auto Calls that
were attempted on the selected date will be displayed (Fig. 9.2). If the safe called in
without any issues, its serial number will be displayed under the Successful column. If
the safe did not call in as scheduled, its serial number will be displayed in the
Unsuccessful column.
Fig. 9.2
3) To check the current status of your scheduled Auto Calls, select the Current option. A
list of all the safes (by serial number) scheduled for Auto Calls will be displayed (Fig.
Edge Software User Manual
Page 39 of 50 9.3). Successful indicates the safe has transmitted, while Pending indicates the safe
has not called as of the time of the status check.
Fig. 9.3
9.2 Auto Calls Information
This feature allows you to retrieve information received from your Auto Calls. To use this
feature:
1) Select the Reports menu and then select Autocalls Information (Fig. 9.4).
Fig. 9.4
2) A dialog box will appear with a list of systems and information about the reports (Fig.
9.5). Each Auto Call report is an Audit report covering the period since the last Auto
Call. Select the date and then double left click any report to display the report on
screen. Once displayed, the report may be printed or exported to HTM format.
Fig. 9.5
Edge Software User Manual
Page 40 of 50 9.3 Information Retrieved
The Information Retrieved feature allows you to access any downloaded report, whether pulled
manually or using the Auto Call feature. To use this feature:
1) Select the Reports menu and then select Information Retrieved (Fig. 9.6).
Fig. 9.6
2) Select the safe system from the Safes field (Fig. 9.7)
Fig. 9.7
3) Select the report to generate from the Information Type list and then select the date from
the Available Downloads field (Fig. 9.8).
Fig. 9.8
Edge Software User Manual
Page 41 of 50 4) Some reports allow you to filter the data being viewed. This field will be located at the
bottom of the window once the information type has been selected (Fig. 9.9). The Build
End of Day and Build Deposit Report options will also be available in this field. For more
information on filters please refer to Section 11 of this manual.
Fig. 9.9
5) Once you have selected the information type and applied the filters, select the Preview
button to view the information (Fig. 9.10). The next screen allows you to print or export
the data being viewed (Fig. 9.11).
Fig. 9.10
Edge Software User Manual
Fig. 9.11
Page 42 of 50 10. DB Administration Menu The DB (database) Administration Menu lets you manage the database that Edge uses
to store and retrieve information. You may backup a database, remove safes from a
database, and restore a previously backed up database in the event of data loss. This
section will cover these menu options and procedures.
10.1 Backup DB
A back up of the database may be made at any point in time. It is recommended that
you back up your data at regular intervals. To make a backup copy of your database:
1) Select the Backup DB option from the DB Administration menu (Fig. 10.1).
Fig. 10.1
2) Enter a file name and select the file location. Select Save to complete the process
(Fig. 10.2).
Fig. 10.2
Edge Software User Manual
Page 43 of 50 10.2 Clear DB
The Clear DB option lets you remove systems from the database if desired. Please
keep in mind that this feature only removes systems and their associated reports and
Auto Call information from the database. Groups or company information will remain in
the database. You may clear all systems at once or just remove particular systems:
•
Clear All Safes
1) To remove all safes from the database, select the Clear DB option from the DB
Administration menu and then select All Safes (Fig. 10.3). A warning message will
appear asking if you would like to continue (Fig. 10.4). Select Yes to clear all safe
information from the database.
Fig. 10.3
Fig. 10.4
•
Clear Selected Safes
1) To clear specific safes from the database, select the Clear DB option from the DB
Administration menu and then choose Select Safes (Fig. 10.5).
Fig. 10.5
2) Select the safes that you want to delete from the database from the Safes List. All
values seen in the Safes List are the store numbers of the safes. Once you have
Edge Software User Manual
Page 44 of 50 selected the safes you want to delete, select the Clean option to erase them from the
database (Fig. 10.6).
Fig 10.6
10.3 Restore DB
The Restore DB option lets you restore a previous backup of the systems database.
This feature will permanently overwrite whatever active database is being used and
replace it with the backup database you choose. To use the Restore DB feature:
1) Select the Restore DB option from the DB Administration menu (Fig. 10.7).
Fig. 10.7
2) Select the database that you want to restore and then select Save to complete the
process (Fig. 10.8).
Fig 10.8
Edge Software User Manual
Page 45 of 50 11. Filters Filters may be used whenever you are using the Retrieve Information, AutoCalls
Information, and Information Retrieved functions in Edge software. These filters can
drastically reduce the length of a report and customize it so that only the information you
need is displayed. The 3 types of filters in Edge software are: Event Filter, User Filter,
and Time Range Filter. The following section will detail these filters.
11.1 Event Filter
The Event Filter contains a large number of customizable filter options (Fig. 11.1).
•
You may use the All, Loss Prevention, Customer (if previously saved), or Accounting
options at the bottom of the window to quickly select common filtering options.
•
By selecting an option, you remove that information type from the reports you
generate.
•
These options will be broken down by category and detailed. The Event Filter
categories are: Cash, Doors, Users, Alarms, Reports and Settings.
Fig. 11.1
Edge Software User Manual
Page 46 of 50 Cash
Option
Description\Instance
Bookmark
Buy Change
Buy Validate
Buy Vend
Deposit Cash
Deposit Macro
Invalid Load
Load
Macro End
Man Cash Drop
Man C.C. Drop
Man Check Drop
No Column Group
Unknown Denom
Unloaded Column
Unload Complete
Unload Delay
Validate
Valid Bill
Validator Full
Validator Jam
Vend
Vend Start
Vend Till
Bookmark is placed in a validator
Change is bought
Amount fed into validator during buy change operation
Amount vended during buy change operation
Total for a cash deposit
Total for a macro deposit
User loaded a tube into a bin without logging In
Tube loaded into safe
Macro remove cash complete
Manual cash envelope drop
Manual check envelope drop
Manual check envelope drop
User tried to vend from a column without access
Unknown bill validated
Column unload start
Column unload ended
Unload delay started
Validated drop
Bill validated during extended drop
Validator cassette full
Validator jammed
Tube vended
Tube vend started
Till vended
Doors
Option
Description\Instance
AC Confrm Logon
Door Closed
Door Open
Door Override
Door Violation
Dual Key User
Enter Time-Lock
Exit Time-Lock
No Lock Group
Lock Delay Start
Armor Car confirmation by safe user
Door closed
Door open
Override to open door completed
Door left open too long
Door required two users to open
Door entered Time-Lock
Door exited Time-Lock
User tried to open door without access
Door delay started
Users
Option
Description\Instance
Auto Delete
Auto Inactivate
Biometric Login
Change PIN
User is auto-deleted
User is auto-inactivated
User logged in via bio reader
User PIN code is changed
Edge Software User Manual
Page 47 of 50 Delete User
Enroll User
Inactivate User
Insta DRP Logoff
Insta DRP Logon
Key Login
User Logon
Wrong PIN
User is deleted
User is enrolled
User is manually inactivated
User logged off Insta-Drop button
User logged on to an Insta-Drop button
User logged in via Dallas key
User logged into the system
User entered the wrong PIN number
Alarms
Option
Description\Instance
Duress Activated
Security Violation
Valid. Almost Full
Validator Full
Valid. Cash Full
User entered Duress Pin, Ex. Actual PIN 1111 Duress is 1112
Wrong PIN entered too many times
Validator cassette almost full (JCM Bulks)
Validator cassette full (JCM Bulks)
All cassettes for cash are Full (JCM Bulks)
Reports
Option
Description\Instance
Audit Report
Cash Report
Config report
EndOfDay report
Grand X report
Operator Report
User Report
Audit Report Ran
Cash Report Ran
Config Report Ran
End of Day Ran
Grand X Ran
Operator Report Ran
User Info Report Ran
Settings
Option
Description\Instance
Add Ext Box
Bad Data
Box Down
Buoy 1
Buoy 2
Buoy 3
Buoy 4
Chg Auto Delete
Chg Auto Inact
Chg Pin Length
Chg PIN Life
Create Box Cash
Create macro
Delete Box Cash
Delete Macro
Device Down
Extended drop setup
Corrupt data packet received
Box Down (Remote Safe Not Responding)
Edge Use Only (Edge made a connection)
Edge Use Only (Edge made a connection)
Edge Use Only (Edge made a connection)
Edge Use Only (Edge made a connection)
Auto-Delete month value changed
Auto-Inactivate month value changed
PIN Length value changed
PIN Life Days value changed
Box Cash created
Macro created
Box Cash deleted
Macro deleted
Safe down
Edge Software User Manual
Page 48 of 50 Device Up
DST Time Chg
Edit Box Cash
Edit Def. Perm.
Edit Macro
Edit User Auth.
Edit User Group
Edit User Perm
Erase Page 1
Extend. DRP Set
No Permission
Override
Power Cycle
Purge User
Reactivate User
Remote Connect
Remove Display
Remove Rmt Box
Rmt Delete User
Rmt Enroll User
Rmt Inact. User
Set Account No.
Set Col Group
Set Col Values
Set Door Behind
Set Dual
Set End Day
Set Fire Time
Set Idle Text
Set Lock Access
Set Lock Alarm
Set Lock Delay
Set Lock Group
Set Name
Set Rec Print
Set Site
Set Time-Lock
Set Unload Delay
Set Vend Delay
Start EndOfDay
User Date Chg
User Time Chg
Sys Housekeep.
Edge Software User Manual
Safe up
DST changed
Box Cash edited
Default Permissions edited
Macro edited
User Authority edited
User Group edited
User’s Permissions edited
Unused (Legacy Product)
Extended Drop setup for user
User tried to access area without permission
Override used via Tech Support
Power cycle
User table purged
User reactivated
Edge connection established
Remote EPR removed
Remote Box (Safe) removed
Edge deleted a user
Edge enrolled a user
Edge inactivated a user
Account number edited
Tube Column groups edited
Tube Column values edited
Door’s Behind value edited
Door set to dual key access
Auto End of Day set
Set door’s fire time
Idle text edited
Lock Access Time edited in minutes
Lock Alarm Time edited in minutes
Lock Delay Time edited in minutes
Lock’s Group Value edited
Set Device’s name
Receipts that print value edited
Site Number edited
Set Lock’s Time-Lock parameters
Tube Unload Delay edited in minutes
Tube Vend Delay edited in minutes
End of Day started
A user has changed the date
A user has changed the time
Housekeeping completed (cleans up User Table)
Page 49 of 50 11.2 Users Filter
The User filter allows you to filter out specific User’s information. Simply select each individual
user you want to remove from the viewed reports or select the All button to remove all Users
information.
Fig. 11.2
11.3 Time Range Filter
The Time Range Filter allows you to filter out specific time ranges from the reports. To
use this filter, simply choose a start date and time and an end date and time from the
provided fields (Fig. 11.3).
Fig. 11.3
Edge Software User Manual
Page 50 of 50