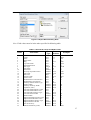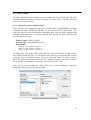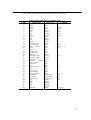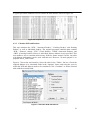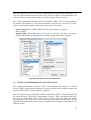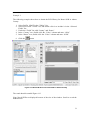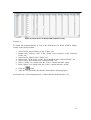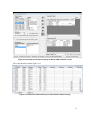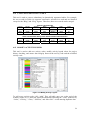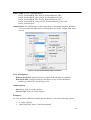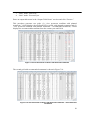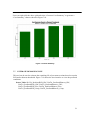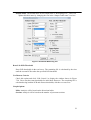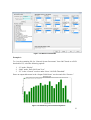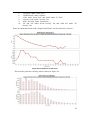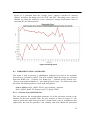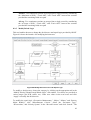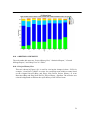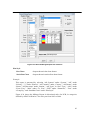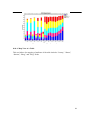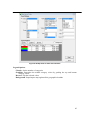
1
ODOT PMIS
USER’S MANUAL
Version 1.2.2
February, 2010
1
TABLE OF CONTENTS
SECTION 1 - INTRODUCTION.................................................................................................................1
1.1
1.2
1.3
1.4
1.5
1.6
SYSTEM INSTALLATION ................................................................................................................ 1
REINSTALLATION ......................................................................................................................... 2
UNINSTALLATION ........................................................................................................................ 2
SYSTEM REQUIREMENTS .............................................................................................................. 2
COMPACT DATABASE................................................................................................................... 2
REQUIRED TABLES ....................................................................................................................... 3
SECTION 2 - BASIC USER INTERFACE ELEMENTS .........................................................................4
SECTION 3 - FILE MENU ..........................................................................................................................5
3.1
3.2
3.3
3.4
3.5
3.6
3.7
OPEN DATABASE.......................................................................................................................... 5
PAGE SETUP ................................................................................................................................. 5
PRINT PREVIEW ............................................................................................................................ 6
PRINT ........................................................................................................................................... 9
PREFERENCE ................................................................................................................................ 9
COMPACT AND REPAIR DATABASE .............................................................................................10
CLOSE PMIS ...............................................................................................................................10
SECTION 4 - EDIT MENU........................................................................................................................11
4.1
4.2
4.3
4.4
OPEN ...........................................................................................................................................11
DESIGN........................................................................................................................................11
DELETE .......................................................................................................................................12
NEW ............................................................................................................................................12
SECTION 5 - VIEW MENU ......................................................................................................................14
5.1
5.2
5.3
SHOW OBJECT BROWSER (SHORTCUT KEY: CTRL+O)...............................................................14
SHOW TOOLBAR (SHORTCUT KEY:CTRL+T) .............................................................................15
REFRESH OBJECT BROWSER (SHORTCUT KEY:F5)......................................................................15
SECTION 6 - DATA MENU ......................................................................................................................16
6.1
6.2
6.2.1
6.2.2
6.2.3
6.2.4
6.3
6.3.1
6.3.2
6.3.3
6.4
6.5
6.6
6.7
6.8
6.9
6.10
6.11
6.12
6.13
6.14
6.15
6.16
IMPORT ROAD INVENTORY DATA ...............................................................................................16
DATA_PROJECT HISTORY ...........................................................................................................18
Project History Entry.............................................................................................................19
Populate Structural Number Added.......................................................................................20
Populate Modified Activity Code...........................................................................................20
Calculate Thickness Added....................................................................................................20
DATA_ODOT .............................................................................................................................21
Import Pavement Condition Data..........................................................................................21
Calculate PCR and Deducts ..................................................................................................23
Calculate PQI ........................................................................................................................24
APPARENT PROJECTS DETERMINATION .......................................................................................24
GENERATE PERFORMANCE BASE TABLE .....................................................................................24
GENERATE PERFORMANCE ANALYSIS TABLE .............................................................................24
GENERATE COST LOOKUP TABLE ...............................................................................................24
POPULATE PERFORMANCE BASE TABLE .....................................................................................24
POPULATE PERFORMANCE ANALYSIS TABLE ..............................................................................25
POPULATE DISTRICT FIELD .........................................................................................................26
IMPORT PLANNED PROJECTS .......................................................................................................26
GENERIC CLASSIFICATION TOOL .................................................................................................27
LINEAR SUPERPOSITION ..............................................................................................................29
CLEAN PAVEMENT DATA TABLE ................................................................................................34
MODIFY ACTIVITY LEGEND ........................................................................................................34
EDIT LOOKUP TABLE ..................................................................................................................35
2
SECTION 7 - ANALYSIS TOOLS MENU...............................................................................................37
7.1
7.2
7.3
7.4
7.5
7.5.1
7.5.2
7.5.3
7.5.4
7.5.5
7.6
7.7
7.8
EXCLUDE ACTIVITY OPTION ........................................................................................................37
TIME TO TREATMENT (ACTUAL).................................................................................................38
TIME TO TREATMENT SURVIVAL ANALYSIS ...............................................................................40
DERIVED PERFORMANCE TREND .................................................................................................43
GENERATE MARKOV PREDICTIONS .............................................................................................46
Statewide Rigid Pavements....................................................................................................46
Statewide Flexible Pavements ...............................................................................................46
Statewide Composite Pavements ...........................................................................................46
Individual Pavement Prediction ............................................................................................46
Selected Predictions ..............................................................................................................48
SHOW PREDICTED PAVEMENT CONDITIONS ................................................................................48
ESTIMATE REMAINING LIFE .........................................................................................................51
HISTOGRAM ................................................................................................................................54
SECTION 8 - REPORT MENU.................................................................................................................56
8.1
AVERAGE PERFORMANCE TREND ...............................................................................................56
8.2
REHABILITATION CANDIDATES ...................................................................................................59
8.2.1
Generate Statewide Rehab List..............................................................................................59
8.2.2
General U/G Rehab List ........................................................................................................60
8.2.3
General Priority Rehab List ..................................................................................................60
8.2.4
Priority System Major Rehab List .........................................................................................60
8.2.5
Modify Rehab Logic...............................................................................................................62
8.3
PROJECT PERFORMANCE .............................................................................................................64
8.4
PCR DROP ..................................................................................................................................65
8.5
AVERAGE COST...........................................................................................................................66
8.6
STRUCTURAL BUILDUP ...............................................................................................................68
8.7
TRAFFIC REPORT .........................................................................................................................70
8.8
PCR AND DISTRESS.....................................................................................................................72
8.8.1
Average by Project Age .........................................................................................................72
8.8.2
Average by Calendar Year.....................................................................................................74
8.9
RIDE QUALITY ............................................................................................................................76
8.10
ADDITIONAL REPORTS ................................................................................................................78
8.10.1
Project History Plot ..........................................................................................................78
8.10.2
Statistical Report...............................................................................................................80
8.10.3
General Mileage Report ...................................................................................................82
8.10.4
Map View of a Table .........................................................................................................84
SECTION 9 - WINDOW MENU ...............................................................................................................86
9.1
9.2
9.3
9.4
9.5
TILE HORIZONTALLY ..................................................................................................................86
TILE VERTICALLY .......................................................................................................................86
CASCADE ....................................................................................................................................86
ARRANGE ICONS .........................................................................................................................86
CLOSE ALL WINDOWS (SHORTCUT KEY: CTRL+Q)...................................................................86
SECTION 10 - HELP MENU.....................................................................................................................87
10.1
10.2
CONTENTS ...................................................................................................................................87
ABOUT ........................................................................................................................................87
3
SECTION 1 - INTRODUCTION
The Infrastructure Information System Laboratory at the University of Toledo has
developed a Pavement Database for the Ohio Department of Transportation using the
Microsoft Access database format. The ODOTPMIS includes the database and a set of
reporting tools to extract the data necessary for pavement performance analysis.
This section of the user’s manual includes installation procedures of the ODOTPMIS, an
introduction to the menu items, and a brief overview of the basic operations.
1.1
SYSTEM INSTALLATION
Three types of installations may be performed: full, lightweight, and executable file only.
The full version includes the entire database, and is necessary for new users. The
lightweight version is for users who have the database, but wish to update the program
and the required runtime components. During installation, click the “Yes,” “Next,” and
“OK,” buttons to install ODOTPMIS successfully. The default directory where PMIS is
installed is “C:\Program Files\ODOT Pavement Management Information System.”
Users can change this installation directory by selecting a different location. Figure 1.1
shows the sequential steps in installing ODOTPMIS for the full and lightweight versions.
Figure 1.1 Installation Procedure
Users requiring an executable file only installation should download the new executable
file from the ODOTPMIS download page and replace the existing executable file
(ODOTPMIS.exe) found in the installation directory.
Some program updates may also require updating tables in the database. To replace only
these tables in the database:
1.
2.
3.
4.
5.
6.
7.
Download the updated tables
Open the original database (odot.mdb) in Microsoft Access
Delete or rename the tables which will be replaced
Under the “File” menu choose “Get External Data” and click “Import”
Select the newly downloaded database
Select the updated tables
Click OK
1
Newer versions and updates of ODOT PMIS can be downloaded from
http://www.eng.utoledo.edu/civil/chou/index.htm under the OdotPMIS Download Page
link. Once ODOTPMIS is installed, it attempts to locate the most recently accessed
database. If no database can be found, it prompts the user to locate the database manually.
To store this path, go to the “File” menu, choose “Preference,” check the “Load Last
Database” and “Save Database Path” checkboxes, and click the “Apply” button. In the
future, ODOTPMIS will use this saved path as the default database path.
1.2 REINSTALLATION
After each reinstallation of the ODOPMIS, the user must locate the path to the database.
1.3 UNINSTALLATION
ODOTPMIS should be uninstalled before a full reinstallation. When uninstalling an older
version of the ODOTPMIS, the database is not deleted automatically. If a database with
the same name already exists in the same directory where a full version of ODOTPMIS is
to be installed, the new database can not be copied into the same directory. The user must
manually delete of the older database. This is done to prevent accidental overwriting of
the existing database.
1.4 SYSTEM REQUIREMENTS
Recommended software platform requirements for running this package are:
1. Windows 98 / Me / 2000 / XP
2. Microsoft Access 2000
Recommended minimum hardware platform requirements for running this package are:
1. Pentium II 300Mhz CPU
2. 128MB RAM
3. 14" color monitor
4. 2GB free hard disk space
5. Mouse
6. Color printer
7. 4MB video memory
8. CD-ROM drive
1.5
COMPACT DATABASE
Users may find it is necessary to compact the database when its size exceeds 1GB. The
database can be compacted by the following process.
1. Choose “Compact and Repair Database” in the “File” menu
2. Open the Access database file “ODOT.MDB” and in the “Tools” menu, choose
“Database Utilities,” and click on “Compact and Repair Database”
This operation may take 5 – 10 minutes, depending on the size of the database and the
specifications of the computer.
2
1.6
REQUIRED TABLES
For the PMIS utility to operate, several Data and Look-Up tables are required in the
database. The tables are:
Table 1.1 PMIS Required Tables
DATA_Apparent Projects LU_MarkovFamilyDistress LU_Slope
DATA_FutureProjects
LU_MarkovFamilyPCR
LU_STD Base Class
DATA_InitialCondition
LU_MarkovTree
LU_STD Surface Class
DATA_ODOT
LU_Median Type
LU_Structural Number
DATA_PERF_Analysis
LU_NLFID
LU_Weather
DATA_PERF_BASE
LU_Parameter Range
LU_STD Surface Class
DATA_Project History
LU_PaveType
LU_Structural Number
DATA_Road Inventory
LU_PQIParameters
LU_Weather
LU Pavement Layer
LU_Priority
LU_STD Surface Class
LU_Activity
LU_Project AggType
LU_Structural Number
LU_Activity Modified
LU_RehabCost
LU_Weather
LU_AggType
LU_Repair Limits
LU_Structural Number
LU_BinSummary
LU_Repair Logic
LU_Weather
LU_Centerline Length
LU_Route_Suffix
LU_Color
LU_FHWA Surface Class LU_Deduct_1998
LU_COST
LU_Functional Class
LU_Distress
LU_County
LU_Inflation
LU_Distress_1998
LU_Deduct
LU_Jurisdiction
LU_LAYER
PMIS prevents all operations from being performed in the database if any of these tables
are missing.
3
SECTION 2 - BASIC USER INTERFACE ELEMENTS
ODOTPMIS was developed using Microsoft Visual Basic 6.0 to replicate common
window-based graphical user interfaces. As such, the PMIS interface utilizes drop down
menus located at the top of the screen, a number of buttons located beneath the menus,
and an object browser to list queries and tables stored in the pavement management
database. The following is a screenshot of ODOTPMIS.
Figure 2.1 ODOTPMIS User Interface
4
SECTION 3 - FILE MENU
The following figure shows the “File” menu options.
Figure 3.1 ODOTPMIS File Menu
3.1
OPEN DATABASE
This command is used to open the desired database for use within ODOTPMIS. The
dialog box shown in Figure 3.2 is shown when this option is clicked.
Figure 3.2 Open Database Dialog Box
Choose the database file by selecting the directory from the drop down selector labeled
“Look in.” Select the file and click “Open.”
3.2
PAGE SETUP
The “Page Setup” command is a common Microsoft control used for selecting the printer,
controlling print and paper properties, orienting the layout, and setting margins. In the
“File” menu, click “Page Setup.” The following dialog box will appear.
5
Figure 3.3 Page Setup Dialog Box
3.3
PRINT PREVIEW
This command is a common Microsoft function used for viewing a table, report, or chart.
All the tools in ODOTPMIS have a “Print Preview” option. Check this option to get a
preview of the output obtained from the tools (reports, tables, or charts). Figure 3.4 shows
the preview of the lookup table “LU_Activity.”
To preview the same table, use the following process:
1. In the object browser, select “LU_Activity”
2. In the “File” menu, select “Print Preview”
3. The preview shown in Figure 3.4 will be generated
6
Figure 3.4 Print Preview of [LU_Actvity]
This preview page has the following options:
Print the current page only
Go to first page
Go to previous page
Current page number
Go to next page
Go to last page
Open the print setup window
Close the print preview
The “Print Setup” window provides options to customize the document for printing. This
allows users to change the layout, column widths, column orders, and other
organizational aspects. Figure 3.5 shows the “Print Setup” window.
7
Figure 3.5 Print Setup Dialog Box – Layout Tab
The “Print Setup” dialog has two tabs: layout and data. The layout tab, shown above in
Figure 3.5, provides options to select the printer, printed page range, orientation, layout,
line spacing, and header and footer spacing and text.
Figure 3.6 Print Setup Dialog Box – Data Tab
The data tab, shown above in Figure 3.6, lists the fields that will be printed, along with
options to change their appearance.
8
Users can click on any of the first three columns to change the font, style, and size of the
text as shown below in Figure 3.7. The following dialog box will be displayed when one
of the options is clicked. Users then select the required font, style, and size in the dialog
and click “OK.” The fields will reflect the new changes.
Figure 3.7 Font Dialog Box
The main “Print Setup” window has additional options for users to customize the data
printout. These options are explained below.
1. Color: Changes the text color of the data in selected column
2. Width: Columns are adjusted to a default width based on their length in the
printout. The “Width” field allows users to enter a custom width length in inches
3. Skip: Select a column to hide or show in the printout
4. Char: Shows the character length of the field
5.
The buttons on the right of the screen allow users to change the order
of the fields that will be on the printout
6. Preview: Displays a mockup with the changes applied
7. Print: Print and close the “Print Setup” window
8. Close: Closes the “Print Setup” window without making any changes
3.4
PRINT
This command under the “File” menu is used for printing a table, chart or a grid.
3.5
PREFERENCE
This option is used to set the default options for ODOTPMIS as shown in Figure 3.8. The
presence or absence of a checkmark next to an option indicates its state.
Startup options appear when the application is opened. These are explained below.
1. Show Splash Window: Displays a window showing application information
when ODOTPMIS is opened.
2. Load Last Database: Loads the last database opened on ODOTPMIS startup.
9
Exit options appear when the application is closed. These are explained below.
1. Confirm Exit: Displays a warning confirmation window when users attempt to
close the application.
2. Compact Database Before Exit: Compacts the database before each close.
3. Save Database Path: Saves the current database path to allow users to open the
same database without reentering the location the next time it is opened.
Figure 3.8 Preference Setup Interface
3.6
COMPACT AND REPAIR DATABASE
The “Compact and Repair Database” command activates a utility that compresses the
database, which increases the analysis speed. This command should be performed
regularly to ensure optimal performance. WARNING: If the database is allowed to
reach its maximum size of two gigabytes, none of the PMIS functions will function.
Furthermore, at two gigabytes, the database cannot be used for executing queries. To
prevent or alleviate these problems, compact the database regularly.
3.7
CLOSE PMIS
This option is used to exit from the PMIS application.
10
SECTION 4 - EDIT MENU
The “Edit” menu contains commands for changing, creating, and deleting tables and
queries. This menu will affect whichever data type is displayed in the object browser,
either a query or table. The commands included on this menu are “Open,” “Design,”
“Delete,” and “New.” The following figure shows the drop down menu
Figure 4.1 ODOTPMIS Edit Menu
4.1
OPEN
This option opens a table for editing values. To open a table, highlight a table in the
object browser and select “Open” in the edit menu.
4.2
DESIGN
The “Design” command allows for the creation and deletion of columns in tables or
modification of the SQL in queries. To modify a table or query, select it in the object
browser and in the “Edit” menu, choose “Design.” The dialog box shown below in Figure
4.2 will appear.
Figure 4.2 ODOTPMIS Design Menu
11
To add, click on the “Add Field” radio button in the lower left corner of the window. To
delete, select the field and click the “Delete” button in the lower left corner of the
window. To modify, select the field. ODOTPMIS will allow users to make the changes
directly in the table.
4.3
DELETE
This command deletes the selected table or query from the database.
4.4
NEW
Creating a New Table:
1. Click “New” in the “Edit” menu
2. The dialog box as shown in Figure 2.12 will appear
3. Enter the desired table name in the dialog and click “Create”
4. This will display the “Design Table Dialog” shown in Figure 2.13. Users can add
or delete fields, and set field properties like the field name, data type, and size, as
well as toggle whether this field is required and whether a zero length is allowed
Figure 4.3 New Table Name Input Interface
Figure 4.4 New Table Name Input Interface
12
Creating a New Query:
1.
2.
3.
4.
5.
6.
Select “Queries” in the sidebar of the object browser
Click “New” in the “Edit” menu
A dialog box as shown in Figure 2.14 will be displayed
Enter a name for the query in the “Query Name” text box
Type in a query. The typed query must follow the standard syntax as Access SQL
Close the dialog to auto-save
Figure 4.5 Query Edit Interface
Modifying an Existing Query
1.
2.
3.
4.
Select a query in the object browser
In the “Edit” menu, click “Design”
A similar dialog box as above will appear displaying the selected query
Change the query and close the dialog box to auto-save
13
SECTION 5 - VIEW MENU
The “View” menu contains commands for ensuring that the toolbars and the object
browser are updated and visible. The commands include “Show Toolbar,” “Show Object
Browser,” and “Refresh Object Browser.”
Figure 5.1 ODOTPMIS View Menu
5.1
SHOW OBJECT BROWSER (SHORTCUT KEY: CTRL+O)
This option is used to show the object browser. The presence of a check mark next to its
name in the “View” menu indicates that the object browser will be displayed in the main
ODOTPMIS window.
Figure 5.2 Show Object Browser
The object browser displays a list of the tables and queries in the current database. The
object browser contains two filters:
1. Tables: Displays a list of all the tables in the database
2. Queries: Displays a list of all the queries in the database
14
5.2
SHOW TOOLBAR (SHORTCUT KEY: CTRL+T)
This option is used to show or hide the toolbar, which contains the following buttons:
Print
Print Preview
Delete Table or Query
New
New
Sort the records of a table in ascending order for selected column (this
button appears only when a table is opened)
Sorts the records of a table in descending order for selected column (this
button appears only when a table is opened)
Linear Superposition*
Project History Plot*
Project History
Statistical Report*
Map View of a Table*
*See Part IV: Advanced Features
5.3
REFRESH OBJECT BROWSER (SHORTCUT KEY: F5)
This option is used to refresh the object browser to display updated information.
15
SECTION 6 - DATA MENU
The “Data” menu contains functions that add or modify tables needed for the successful
operation of PMIS.
Figure 6.1 ODOTPMIS Data Menu
6.1
IMPORT ROAD INVENTORY DATA
This tool allows users to update the road inventory table with new data from text files.
Road inventory tables include the following information: road geometry, classification,
priority, system, and traffic volume. These tables should be updated every year. The
name of this table in ODOTPMIS is DATA_Road Inventory.
Table to Apply: [DATA_Road Inventory]
Data file type: Fixed column position text file
Data format:
[Value 1][Value 2] [Value 3] [Value 4] … [Value 55]
[Value 1][Value 2] [Value 3] [Value 4] … [Value 55]
[Value 1][Value 2] [Value 3] [Value 4] … [Value 55]
…
To import data, click on the “Data” menu and select “Import Road Inventory Data.” The
window shown in Figure 6.2 will appear. Select the drive on which the file is stored using
the “Drives” drop down menu, or use the “Network” button to select a network drive.
Navigate to the directory of the data files using the “Folders” sub-window and use the
“File name” sub-window to select the correct text file. Click “OK.”
Users may or may not check the “Read only” box to prevent changes to the data,
depending on their uses for this specific table.
16
Figure 6.2 Import Road Inventory Data
Note: Field values must be in the order specified in following table.
Table 6.1 Field Order, Name and Data Format
Order
1
2
3
4
5
6
7
8
9
10
11
12
13
14
15
16
17
18
19
20
21
22
23
24
25
26
27
28
29
30
31
32
Field Name
Data
Type
Jurisdiction
County
Route
Route Suffix
Blog
Log Point Suffix
Road Identification
Data Type
Data Status
Transaction
Inventory Perpetuation Date
FIPS Code
Mile Class
Section Length
System Class
Standard Surface Classification
Standard Base Classification
Summary FHWA Surface Type
Surface Width
Summary Roadway Width
Population (100's)
Left Side Standard Surface Class
Left Side Standard Base Class
Left Side FHWA Surface Type
Left Side Surface Width
Median Width
Right Side Standard Surface Class
Right Side Standard Base Class
Right Side FHWA Surface Type
Right Side Surface Width
Year in Inventory
Federal-Aid Primary (FAP)
Text
Text
Text
Text
Text
Text
Text
Integer
Text
Number
Number
Number
Byte
Text
Text
Text
Text
Text
Number
Number
Number
Text
Text
Text
Number
Number
Text
Text
Text
Number
Number
Number
Column
Position
1
2-4
5-7
8
10-13
14
15
16-19
20
21
22-25
27-29
31
32-35
36
38
39
40-41
42-43
44-45
46-49
50
51
52-53
54-55
56-57
58
59
60-61
62-63
64-65
66-69
Example
S
ADA
032
R
0000
Space
D
PSTB
E
A
0100
Space
1
0035
M
G
L
I
48
64
0
G
L
I
24
60
G
L
I
24
96
0009
17
33
34
35
36
37
38
39
40
41
42
43
44
45
46
47
48
49
50
51
52
53
54
55
Number
National Highway System (NHS)
System
Highway Performance Monitoring
System
Maintenance Route Type
Population (over/Under 5000)
Municipality Name
Divided Highway Indicator
Access Control
Lanes
District
Number of Lanes (two character)
Station Equation Sort Field
Elog
Priority
Area Code
Functional Class
Car ADT
Truck ADT
Total ADT
ADT - Year of counts
ESALx1000
Year
NLFID
Text
Text
70
71
Text
72
Number
Number
Text
Text
Text
Number
Number
Number
Number
Number
Text
Number
Number
Number
Number
Number
Number
Number
Number
Text
73-74
75
76-91
92
93
94
95-96
97-98
99
100-103
104
105-107
108-109
111-116
117-122
123-128
129-130
133-137
138-141
142-155
S
SR
20
*
L
4
09
1
0035
P
000
02
4790
1370
6160
92
230
2000
SADASR00032**C
A typical road inventory text file will exhibit the data structure shown in Figure 6.3.
Figure 6.3 Snapshot of Road Inventory File
6.2
DATA_PROJECT HISTORY
The [Data_Project History] sub-menu contains tools that update the Data_Project History
table. The tools available under this menu are Project History Menu, Populate Structural
Number Added, Populate Modified Activity Code, and Calculate Thickness Added.
18
6.2.1 Project History Entry
Projects performed on pavement each year are recorded in the DATA_Project History
table. This table can be updated by selecting “Project History Entry” under the “Project
History Menu.” This will launch the data entry form shown in Figure 6.4 for users to
view, edit, and input the data to be displayed in the DATA_Project History table.
Table to Apply:
[DATA_Project History]
Data type and format: User input
Figure 6.4 Project History Entry
19
There are several options provided on the form for browsing, updating and deleting the
records. These are as follows:
Record navigator
Add a new blank record
Copy the current record as a new record
Restore the current record to its original status
Update current record and make all changes permanent
Delete current record. The deleted record cannot be restored.
Close this tool
Comments:
Until the user leaves the input window,
button can be used to restore the current
record to its original status and discard any changes. To permanently update the current
record,
button must be clicked. To delete the current record, user can use
button. If a record is deleted, it cannot be restored. You can also locate a record by using
the “Record Locator” search tool or the “Entry No.” box. Any field not having a specific
input box will appear in the “Extra Parameters” list. This means the user can input more
fields into table [DATA_Project History]. However, the total number of fields in any
table is limited to 256.
6.2.2 Populate Structural Number Added
This tool calculates the “Structural Number” of every entry in the DATA_Project History
table and adds a new field [SN_Add]. The “Structural Number” is calculated according to
the definitions in the table [LU_Structural Number].
6.2.3 Populate Modified Activity Code
This tool determines the “Modified Activity Code” for every entry in the DATA_Project
History table. “Modified Activity Code” differs from “Activity Code” only in that it
distinguishes between “Thin” and “Thick” overlays. If the thickness added of 50 or 60 is
less than or equal to 2 inches, its “Modified Activity Code” becomes 41 or 42
correspondingly. This tool facilitates the analysis of thin and thick overlays.
6.2.4 Calculate Thickness Added
This tool calculates the “Total Thickness Added” and stores the result DATA_Project
History table. A pavement can contain different layers. The thickness of each added layer
is stored separately in the table. Sometimes it is useful to know the total thickness added
to a pavement in a project. This tool calculates the total thickness added and stores the
result in DATA_Project History table.
20
6.3
DATA_ODOT
The Data_ODOT sub-menu contains tools that update the Data_ODOT table. The tools
available under this menu are Import Pavement Condition Data, Calculate PCR and
Deducts, and Calculate PQI.
6.3.1 Import Pavement Condition Data
This tool allows for updating of the DATA_ODOT table. In ODOTPMIS, pavement
condition data such as PCR, RN, IRI, PSI, etc. are stored in DATA_ODOT table. This
table also stores all road classification and distress data. This pavement condition data
should be updated annually. To import condition data correctly, the source data file must
have the required format.
Table to Apply: [DATA_ODOT]
Data file type: Coma delimited text file
Data format:
Value 1,Value 2,Value 3,Value 4,…
Value 1,Value 2,Value 3,Value 4, …
Value 1,Value 2,Value 3,Value 4,…
To import data, click on the “Data” menu and select “Import Pavement Condition Data.”
The window shown in Figure 6.5 will appear. Select the drive on which the file is stored
using the “Drives” drop down menu, or use the “Network” button to select a network
drive. Navigate to the directory of the data files using the “Folders” sub-window and use
the “File name” sub-window to select the correct text file. Click “OK.”
Users may or may not check the “Read only” box to prevent changes to the data,
depending on their uses for this specific table.
6.5 Import Pavement Condition Data
21
Note: Field values must be in the order specified in Table 6.2.
Table 6.2 Field Order, Name and Data Format
Order
Field Name
1
2
3
4
5
6
7
8
9
10
11
12
13
14
15-39
40
41
42
43
44
45
46
47
NLFID
District
County
Route
Station
Blog
Elog
Year
Priority
PCR
TDC
STRD
Pavement Type
Project Number
Code 1 – Code 25
Rater 1
Rater 2
Divided - RI
Divided - PCR
Mile Class
Urban Area Code
Functional Class
NHS Field
National
Highway
System (NHS)
Route Type
MPC
Access Control
Lanes
Surface Type
Surface Width
Sum Road Width
Truck ADT
Total ADT
ESALX1000
PSI
LIRI
RIRI
HCS
RN
PCR Date
48
49
50
51
52
53
54
55
56
57
58
59
60
61
62
63
64
Data Type
Text
Byte
Text
Text
Text
Single
Single
Integer
Text
Byte
Single
Single
Byte
Text
Text
Text
Text
Text
Text
Text
Integer
Integer
Text
Example
SDARUS00036**C
7
DAR
036R
UP
13.41
13.43
1996
G
97
3
0
3
22871
Code 1 = LE
RS
U
1
735
14
Text
Byte
Byte
Text
Byte
Text
Byte
Byte
Long Integer
Long Integer
Long Integer
Single
Integer
Integer
Integer
Single
Date
2
6
N
2
I
24
44
760
6210
288
3.69
6/10/1996
22
A typical pavement condition text file exhibits the data structure shown in Figure 6.6.
Figure 6.6 Snapshot of Pavement Condition File
6.3.2 Calculate PCR and Deducts
This tool calculates the “PCR,” “Structural Deduct,” “Cracking Deduct,” and “Rutting
Deduct” as well as individual deducts. The original pavement condition data contains
“PCR,” “Distress” ratings, “TDC” (Total Deduct), “STRD” (Structural Deduct), and
“CRD” (Cracking Deduct). However, individual distress deducts are not provided. This
tool enables a user to calculate all necessary fields for future analysis. In fact, any table
with distress information can be used with this tool. However, its main purpose is to
populate DATA_ODOT table.
Figure 6.7 shows the tool interface. Select the table in the “Tables” list box. Check the
required deducts to be calculated fields in the “Options” frame, and select the year for
which the PCR and deducts needs to be calculated. Click “Calculate” to fill the selected
table with the selected fields.
Figure 6.7 Calculate PCR and Deducts
23
6.3.3 Calculate PQI
This tool is used to calculate the Pavement Quality Index (PQI). PQI represents a
combination of PCR and IRI (average of LIRI and RIRI). PQI is calculated by Equation
6.1.
PQI = PCR − a × IRI b ,
(6.1)
Where a and b are read from LU_PQIParameters table.
6.4
APPARENT PROJECTS DETERMINATION
Note: This tool must be run before using the “Generating Performance Base Table”
and “Generate Performance Analysis Table” functions.
This tool creates a new table called DATA_Project History_Apparent in the database that
is similar to DATA_Project History. However, this table contains extra fields such as
“App Blog,” “App Elog,” and “App Year” which are determined from matching PCR
jumps with treatments. This tool also creates 999’s and 995’s if it finds a PCR jump of
greater than or equal to 6, but does not find a corresponding matching treatment.
DATA_PERF_BASE and DATA_PERF_ANALYSIS are generated based on this table.
6.5
GENERATE PERFORMANCE BASE TABLE
This tool generates the DATA_PERF_BASE table. The DATA_PERF_BASE table is the
base of most analysis functions and should be generated before
DATA_PERF_ANALYSIS. Note: It is recommended to perform a database compacting
operation before and after using this function.
6.6
GENERATE PERFORMANCE ANALYSIS TABLE
This tool generates the DATA_PERF_ANALYSIS table from the DATA_PERF_BASE
table. Most of the analysis tools in ODOTPMIS use this table. Note: It is recommended
to perform a database compacting operation before and after using this function.
6.7
GENERATE COST LOOKUP TABLE
To perform an “Average Cost” analysis of projects, a lookup table LU_COST is required
to begin analysis. This tool is used to generate the LU_COST table.
6.8
POPULATE PERFORMANCE BASE TABLE
The “Populate Performance Base Table” function opens a window to display variances of
user specified attributes in DATA_ODOT over time with respect to specified values of
DATA_Project History.
24
This tool replaces the “Key” and “Entry” numbers in the DATA_PERF_BASE table. The
keys are replaced with the selected values in the “DATA_ODOT” list box and entries are
replaced with selected parameter values in “DATA_Project History” list box.
Note: The resultant table cannot exceed 256 columns in width. Thus, if many parameters
are desired, the number of years selected should be decreased or conversely, if many
years are selected, the number of parameters may need to be reduced.
Source Table: DATA_PERF_BASE, DATA_Project History_Apparent,
DATA_ODOT
Output Table: The default name is Result_Base. However, the user can assign a
different table name by changing the text in the “Output Table Name” textbox.
Figure 6.8 Populate Performance Base Table
6.9
POPULATE PERFORMANCE ANALYSIS TABLE
The “Populate Performance Analysis Table” tool determines the changes of selected
DATA_ODOT values between consecutive projects on the same pavement section with
respect to data in DATA_Project History_Apparent.
This tool replaces the key and entry numbers in the DATA_PERF_ANALYSIS table with
the selected values. The Fields Corresponding to Entry-1, Entry and Entry2 List boxes
are used to select fields from DATA_Project History_Apparent table and Fields
Corresponding to Key List box is used to select fields from DATA_ODOT table. Like the
Populate Performance Base Table tool, the resultant table can support a maximum of 256
columns of data.
25
Source Table: DATA_PERF_ANALYSIS, DATA_Project History, DATA_ODOT
Output Table: The default name is Result_Analysis. However the user can assign a
different table name by changing the text in the “Output Table Name” textbox.
Figure 6.9 Populate Performance Analysis Table
6.10 POPULATE DISTRICT FIELD
This tool is used to populate the district field in a table, provided the selected table
contains a “County” field.
6.11 IMPORT PLANNED PROJECTS
This tool allows the importing of a work plan into ODOTPMIS. Generally, the work plan
file contains the planned treatments for the future, project cost, and location information.
The imported file is stored in DATA_FutureProjects. Each time this tool is used to import
a new work plan, the previous existing work plan in ODOTPMIS is overwritten. To
import condition data correctly, the source data file must have the required format.
Stored Table: DATA_FutureProjects
Data file type: Microsoft Excel File
Data format: Shown in Table 6.3
26
In the work plan file, certain columns can be left empty if they do not contain data.
However, the necessary fields (bolded) “PID,” “NLF ID,” “County Begin Number,”
“County End Number,” and “Pavement Treatment Type” should contain values.
Table 6.3 Work Pkan File Format
Order
Field Name
Example
1
2
3
4
5
6
7
8
9
10
11
12
13
14
15
16
17
PID
SUM Adjusted Total Amt
Sale Amount
District
Project Name (ie CRS)
Primary Work Category
Award Date Current
Award Date Actual
Requested STIP Yr
NLF ID
County Begin Number
County End Number
Actual Priority Miles
Actual Urban Miles
Actual General Miles
MAX Pvmt Treat Category Cd
Pavement Treatment Type
21052
8300000
2009
SLUCSR00002**C
30.23
30.8
0
0
1.14
60 - AC Overlay with Repairs
6.12 GENERIC CLASSIFICATION TOOL
This tool, shown in Figure 6.10, is used to classify numerical fields in a table. If the
original field name in the table is [fieldname], a new field called [fieldname
classification] will be added to the table.
If the table selected is [DATA_PERF_ANALYSIS], this field will automatically show in
the “Group By” list box provided on most of the analysis tools, such as “Average
Deterioration Trend,” “Time To Treatment (Actual),” “Time To Treatment Survival
Analysis” and “Derived Performance Trend.”
27
Figure 6.10 Generic Classification Tool
Value Range Reference Options
Lowest: Lowest value of the parameter
Average: Average value of the parameter
Highest: Highest value of the parameter
Classifications Options
Number of Categories: Number of categories to classify the selected “Fields”
Apply Change (button): Enter number of categories in the “Number of Categories”
text box and click this button to change the categories
Lower Bound: Lower bound/limit of a category (This value cannot be changed.)
Upper Bound: Upper bound/limit of a category (This value can be changed. The
changed value becomes the lower bound of the next category.)
Description: The description of each category. This description for each category of
fields is stored as a new field in the table.
Example:
The following example classifies AvgESAL in [DATA_PERF_ANALYSIS] into two
categories: High, If ESAL ≥ 1500 and Low if ESAL < 1500.
1. Open the “Generic Classification Tool”
2. In the “Tables” list select “DATA_PERF_ANALYSIS”
3. In the “Fields” list select “AvgEsal”
28
4. Change the number of categories to 2 and click the “Apply Change” button
5. Change the Upper bound of Category 1 to 1500 and change its description to
“Low”
6. Change the description of Category 2 to “High”
7. Click the “Classify” button
8. Close the tool and open the “Average Performance Trend” under the “Report”
menu. “AvgEsal Classification” will be displayed in the “GroupBy” list.
6.13 LINEAR SUPERPOSITION
The “Linear Superposition Operation” is a merge of multiple tables to obtain a single
dynamically segmented table. The output is stored in the “Output Table.” If the output
table named in the input box already exists, the tool will ask the user to replace the
existing table or exit from the tool. Figure 6.11 shows the user interface.
Figure 6.11 Linear Superposition User Interface
Commands
Tables: Lists all the tables in the database
Fields: Lists all the fields of the table selected under “Available Tables”
Selected Fields: Lists all the selected fields from “Fields”
29
The attributes listed in the “Fields” list box can be added to the query in three ways:
1. Select a field in the “Fields” list and drag it into the “Selected Fields” list (a hand
will appear when dragging and dropping)
icon
2. Double click a field to be selected under “Fields”
3. Select a field under “Fields” and click
The “Selected Field” window also provides the option of constraining the records
selected for merging. The comparison field in the “Selected Field” window provides a
drop down list of how the constraint is to be implemented (≥, ≤, >, <, or =). The “Value”
column specifies the desired value of the constraint.
Matching Fields
The “Matching Field” sub-window lists the fields required for merging. The default
selections are “County,” “Route,” and “Station,” as they typically specify a linear feature.
In some situations, “Year” may also be included.
Adding Matching Fields
Two techniques exist for adding additional selections into the “Matching Field” box. To
remove a matching field, double click a field in the “Matching Fields” sub-window.
1. Double click on field under “Selected Fields”
2. Select a field under “Selected Fields” and drag it to the “Matching Fields” box
The “Pull Out” option check boxes under “Options” limit the tables used to create
internal program indices. Consequently, if DATA_Project History or DATA_ODOT is
excluded in the analysis, its respective index should not be pulled out.
The “Unique Route ID” window displays all unique linear features specified in the
merge. Each button is assigned a specific operation and described below.
Add a selected field
Add all fields from a table
Remove a selected field
Remove all the selected fields
Run the linear superposition operation
Stop the linear superposition operation
Reset the values in the “Comparison” and
“Value” columns of “Selected Fields”
30
Example 1:
The following example shows how to obtain the PCR History for Route 032R in Adams
County.
1. Select DATA_ODOT in the “Tables” list
2. Select PCR in the “Fields” list, and double click it to include it in the “Selected
Fields” list
3. Under the “Fields” list, add “County” and “Route”
4. In the “County” row, double click the “Value” column and enter “ADA”
5. In the “Route” row, double click the “Value” column and enter “032R”
6. Click the
button
At this point, the “Linear Superposition” window should resemble Figure 6.12.
Figure 6.12 Get PCR Series for Route 032R in Adams County
The result should resemble Figure 6.13.
Note: Not all PCRs are displayed because of the size of the window. Scroll to reveal the
hidden PCRs.
31
Figure 6.13 PCR Series for Route 032R in Adams County
Example 2:
To obtain the treatment history as well as the PCR history for Route 032R in Adams
County, follow this procedure:
1. Select DATA_Project History in the “Tables” list
2. Double click “Activity Code” in the “Fields” list to include it in the “Selected
Fields” list
3. Select DATA_ODOT in the “Tables” list
4. Double click “PCR” in the “Fields” list to include it in the “Selected Fields” list
5. Add “County” and “Route to the “Selected Fields” list
6. In the “County” row, double click the “Value” column and enter “ADA”
7. In the “Route” row, double click the “Value” column and enter “032R”
button
8. Click the
9. After above 8 operations, the interface looks like the following figure
At this point, the “Linear Superposition” window should resemble Figure 6.14.
32
Figure 6.14 Get PCR and Treatment History for Route 032R in Adams County
The result should resemble Figure 6.15.
Note: Not all PCRs are displayed because of the size of the window. Scroll to reveal the
hidden PCRs.
Figure 6.15 PCR and Treatment History for Route 032R in Adams County
33
6.14 CLEAN PAVEMENT DATA TABLE
This tool is used to remove redundancy in dynamically segmented tables. For example,
the two records in Table 6.4 represent consecutive sections in a road and are identical
except for the “Blog” and “Elog” figures. Therefore, these two records can be merged.
County
Route
Table 6.4 Original Data
Station
Blog
Elog
Year
PCR
ADA
032R
Down
2.33
2.84
2002
91
ADA
032R
Down
2.84
6.29
2002
91
Table 6.5 Data After Using Clean Pavement Data Table Function
County
Route
Station
Blog
Elog
Year
PCR
ADA
032R
Down
2.33
6.29
2002
91
6.15 MODIFY ACTIVITY LEGEND
This tool is used to add new activity codes, modify activity legend colors for project
history checking, and ensure data integrity between the activity code and the modified
activity code.
Figure 6.16 Modify Activity Legend
To add a new activity code, click “Add.” This will add a new row at the end of the
window (Figure 6.17). Enter the required information including the “Code” (numerical),
“Color,” “Activity,” “Class,” “SN Item,” and “Max Life.” Avoid entering duplicate data.
34
Figure 6.17 Add New Activity
6.16 EDIT LOOKUP TABLE
This tool updates the lookup tables necessary for all analyses in ODOTPMIS.
Table to Apply: [LU_XXXXX]
Tool to use: [Data] Æ [Edit Lookup Table]
Figure 6.18 Edit Lookup Table
35
Users can add, modify, or delete a current record in a lookup table. However, the user
cannot change the field name or add/delete a field from a lookup table.
Record navigator
Add a new blank record
Copy the current record as a new record
Restore the original record
Update and make all changes permanent
Delete current record. Deleted records cannot be restored.
Close this tool
Example 1:
In the current ODOT database, only ten distresses are defined for Continuous Reinforced
Concrete pavement. To change distress information for distress code 11 for pavement
type 1 (Continuous Reinforced Concrete),
1. Select “Edit Lookup Table” under the “Data” menu
2. Select LU_Distress in the “Lookup Table” list
3. Go to “Pavement Type 1” and “Code 11” by using the
button in the record
navigator. The interface of the tool should resemble Figure 6.19.
4. Click the “Field Name” to be changed
Figure 6.19 LU_Distress Table
Figure 6.20 demonstrates the valid format of the data to be entered.
36
Distress Name (Cannot be Null)
Distress Weight (Valid Positive Number)
Distress Multipliers
(Valid Positive Number)
Distress is Cracking Distress if true.
Distress is Structural Distress if true.
Severity and Extent
Descriptions (Null Accepted)
Figure 6.20 Modifying LU_Distress
5. After entering the changes, click “Update”
6. The changes will be made in two tables: LU_Distress and LU_Deduct.
ODOTPMIS uses LU_Deduct table to calculate “PCR,” “Structural Deduct,”
“Cracking Deduct,” and individual deducts.
7. To restore old values, click “Restore.” This only works if the user clicks the
“Restore” button before closing the tool, and only restores one record at a time.
SECTION 7 - ANALYSIS TOOLS MENU
This menu contains functions that perform analyses comparing time to treatment,
condition deterioration, pavement condition prediction, and remaining life estimation.
Figure 7.1 ODOTPMIS Analysis Tools Menu
7.1
EXCLUDE ACTIVITY OPTION
Analysis tools such as “Time To Treatment (Actual),” “Time To Treatment Survival
Analysis,” and “Derived Performance Trend” provide an option giving the user the
ability to exclude certain activities from the analysis. For example, consider a pavement
section with the treatment history as shown in Figure 7.2.
37
Figure 7.2 Example for Exclude Activity
This pavement section will not be included in the analysis if the “From Activity” is set to
50 and the “To Activity” to 50 because this tells the program to search for projects that
are Activity 50 (overlay without repairs) and immediately followed by another Activity
50. However, this pavement section is included in the analysis, if both the “From
Activity” and “To Activity” are set to 50, and Activity 20 is selected in the “Exclude
Activity” list box.
7.2
TIME TO TREATMENT (ACTUAL)
This tool is used to determine the average time between types of treatments or the
average time to a certain PCR threshold.
Source Table: DATA_PERF_ANALYSIS
Intermediate Table Generated: DATA_PERF_AVGLIFE
Output Table: The default name for the output table is “Actual Time to Treatment
Analysis.” Users can update this table name by changing the text in the “Output
Table name” text box.
38
Figure 7.3 Time to Treatment (Actual)
Example 1:
To generate the “Average Life of Overlay on Priority System Flexible Pavements,” select
the following options on the tool:
1. “All Systems” under “System”
2. “All” under “Priority”
3. “All Districts” under “District”
4. “All Counties” under “County”
5. “All Types” under “Pave Type”
6. “All Directions” under “System”
7. “1985” under “From Year,” and “2006” under “To Year”
8. “Activity Code” under “Activity” list
9. “50” and “60” under “From Activity” list, and “Add All” under “To Activity” list
10. “By Mileage” under “Analysis Options”
Enter an output table name in the “Output Table Name” text box and click “Calculate.”
39
Figure 7.4 shows the mileage of pavements that failed or received treatment in each time
period. The average life of an overlay on priority systems, according to the calculations,
is 7.6 years.
Figure 7.4 Time to Treatment (Actual) Output
for Flexible Overlays on Priority System
7.3
TIME TO TREATMENT SURVIVAL ANALYSIS
This tool is used to calculate the time to the next treatment based on the Kaplan-Meier
Survival Curve method. The advantage of Kaplan-Meier Survival Curve method is that it
allows the inclusion of surviving pavement sections in the analysis.
Source Table: DATA_PERF_ANALYSIS
Intermediate Table Generated: DATA_PERF_REMLIFE
Output Table: The default name for the output table is “Pavement Survival Life
Analysis.” Users can update this table name by changing the text in the “Output
Table name” text box.
40
Figure 7.5 Time to Treatment Survival Analysis User Interface
Analysis Options
Include Open End Projects: Checking this option will include open-ended projects
(projects or pavements still in existence)
PCR Threshold: A pavement is considered failed if it undergoes treatment. Checking
this option marks all pavements with PCR levels below the threshold as failed.
Output Options
Histogram: This option plots a histogram showing the number of censored and
uncensored points for each section.
Survival Analysis Output
In certain scenarios including open ended projects, the survival curve will not reach
zero percent surviving. This curve is called a stub survival curve. In the PMIS, a
Weibull survival function is used to complete the survival curve. The Weibull fit,
along with the original survival curve, is shown in the output graph.
41
Example 1:
The following example shows the survival analysis of “Overlay on Priority System
Flexible Pavements.” Select the following options on the tool:
11. “All Systems” under “System”
12. “All” under “Priority”
13. “All Districts” under “District”
14. “All Counties” under “County”
15. “All Types” under “Pave Type”
16. “All Directions” under “System”
17. “1985” under “From Year,” and “2006” under “To Year”
18. “Activity Code” under “Activity” list
19. “50” and “60” under “From Activity” list, and “Add All” under “To Activity” list
20. “By Mileage” under “Analysis Options”
Enter an output table name in the “Output Table Name” text box and click “Calculate.”
Figure 7.6 shows the “Survival Curve (Raw Data),” the survival curve obtained using the
raw data. It can be seen that this survival curve does not reach 0% probability, and any
estimates using this curve are not reliable. Hence a “Survival Curve (Weibull Fit)” is
fitted to the original curve.
Figure 7.6 Time to Treatment (Actual) Output for
Overlays on Priority System
42
A histogram showing mileages of projects that have been repaired and still exist can also
be generated by selecting “Histogram” under “Output Options.” Figure 7.7 shows the
mileage histogram for the survival curve in Figure 7.6.
Figure 7.7 Time to Treatment Survival Curve Mileage Histogram
7.4
DERIVED PERFORMANCE TREND
This tool analyzes the series of survival curves to determine the pavement condition
deterioration of a group of user specified pavement repairs.
Source Table: DATA_PERF_ANALYSIS, DATA_ODOT
Intermediate Table Generated: DATA_PERF_ SURVIVAL
Output Table: The default name for the output table is “Derived Performance.” The
user can change this table name by updating the text in the “Output Table Name”
text box.
43
Figure 7.8 Derived Performance Trend
Output Options
Survival Curve: Display survival curves for PCR from 100 to 50.
Example 1:
The following example shows the Derived Performance Trend for District 3 General
System Flexible Pavements with Overlays. Select the following options on the tool:
1. “All Systems” under “System”
2. “G” under “Priority”
3. “All Districts” under “District”
4. “All Counties” under “County”
5. “All Types” under “Pave Type”
6. “All Directions” under “System”
7. “1985” under “From Year,” and “2006” under “To Year”
8. “Activity Code” under “Activity” list
9. “50” and “60” under “From Activity” list, and “Add All” under “To Activity” list
10. “By Mileage” under “Analysis Options”
11. Check “Survival Curve” under “Output Options”
Enter an output table name in the “Output Table Name” text box and click “Calculate.”
Figure 7.9 shows the “Derived Performance Curve.”
44
Figure 7.9 Derived Median Performance Curve For District 3 General System Flexible
Pavements with Overlays
This tool also generates the survival curves used for the “Derived Median Performance
Curve” shown in the following figure. It can be seen that Weibull curves are used instead
of stub survival curves.
Figure 7.10 PCR Survival Curves
45
7.5
GENERATE MARKOV PREDICTIONS
This menu can be used to predict the PCR and distress for every pavement section in the
database based on Markov process. However, for certain groups of pavements, the
Markov transition matrix cannot be generated since only a few pavement sections are
available. In that case, simple linear extrapolation is used for predicting distress and PCR.
The tools available under this menu are “Statewide Rigid Pavements,” “Statewide
Flexible Pavements,” “Statewide Composite Pavements,” “Individual Pavement
Prediction,” and “Selected Predictions.”
The transition matrix table DATA_TransitionMatrix is created when using the “Statewide
Rigid Pavements,” “Statewide Flexible Pavements,” and “Statewide Composite
Pavements” options. Note: It is recommended that the user not delete this table, since it is
used in the “Individual Pavement Prediction” and “Show Pavement Prediction” tools.
7.5.1 Statewide Rigid Pavements
This option generates statewide rigid pavement PCR and distress predictions for the next
twenty years. Four tables will be generated. Note: It is recommended that the user not
delete these tables unless new pavement condition data and/or project data are added in
the database.
The tables created are: DATA_PredictedPCR_JRC, DATA_PredictedDistress_JRC,
DATA_PredictedPCR_CRC, and DATA_PredictedDistress_CRC.
7.5.2 Statewide Flexible Pavements
This option generates statewide flexible pavement PCR and distress predictions for the
next twenty years. Two tables will be generated. It is recommended that the user not
delete these tables unless new pavement condition data and/or project data are added in
the database.
The tables created are: DATA_PredictedPCR_Flex, DATA_PredictedDistress_Flex.
7.5.3 Statewide Composite Pavements
This option generates statewide composite pavement PCR and distress predictions for the
next twenty years. Two tables will be generated. It is recommended that the user not
delete these tables unless new pavement condition data and/or project data are added in
the database.
The tables created are: DATA_PredictedPCR_Comp, DATA_PredictedDistress_Comp.
7.5.4 Individual Pavement Prediction
This tool can be used to view the predicted PCR of an individual pavement section.
Markov prediction is combined with Monte-Carlo simulation to generate the PCR
46
predictions and confidence intervals. The user has the ability to choose between various
confidence intervals. Figure 7.11 shows the user interface.
Source Table: DATA_Transition Matrix
Output Table: The default name for the output table is “Pavement Section
Prediction.” Users can update this table name by changing the text in the “Output
Table name” text box.
Figure 7.11 Individual Pavement Section Prediction
Example 1:
To view the predicted PCR for Allen County, Route 030R Up Direction, for the next
twenty years with an 80% confidence limit, select following options:
1.
2.
3.
4.
5.
“All” under “County”
“030R” under “Route”
“UP” under “Station”
“80” under “Confidence Limits”
“20” under “Prediction Years”
Enter an output table name in the “Output Table” text box and click “Execute.”
Figure 7.12 shows the output grid which displays the results.
47
Figure 7.12 PCR Prediction Grid
Click on any part of the grid to generate a PCR prediction plot that shows the confidence
limits as shown in Figure 7.13.
Figure 7.13 PCR Prediction Confidence Limits
7.5.5 Selected Predictions
This tool has the same functionality as the Markov prediction tool, but is designed for
more advanced users to select pavement families for transition matrices.
7.6
SHOW PREDICTED PAVEMENT CONDITIONS
This tool can be used to view the Markov predicted pavement conditions. Figure 7.14
shows the user interface to view the predicted conditions.
48
Source Table: DATA_Transition Matrix,
DATA_PredictedPCR_JRC, DATA_PredictedDistress_JRC,
DATA_PredictedPCR_CRC, DATA_PredictedDistress_CRC,
DATA_PredictedPCR_Flex, DATA_PredictedDistress_Flex,
DATA_PredictedPCR_Comp, DATA_PredictedDistress_Comp, and
DATA_FutureProjects
Output Table: The default name for the output table is “PavementCondition_WithPlan.”
Users can update this table name by changing the text in the “Output Table name”
text box.
Figure 7.14 View Predicted Pavement Condition
Work Plan Options
Without Work Plan: Analysis based on original PCR and distress predictions
With Work Plan: Analysis based on result from overlay of PCR and distress
predictions with DATA_FutureProjects file
Output Options
Start Year: Start year of the analysis
Forecast Upto: End year of the analysis
Example 1:
To view pavement conditions with the plan for District 3, select the following options:
1. “3” under “District”
2. “With Work Plan” under “Work Plan Options”
49
3. “2001” under “Start Year”
4. “2010” under “Forecast Upto
Enter an output table name in the “Output Table Name” text box and click “Execute.”
This procedure generates two grids: (1) “view pavement condition with planned
treatments,” which displays the predicted PCR overlaid with planned treatments and (2)
“view pavement condition with planned treatments – recommended treatments,” which
displays the recommended treatments from the current year until 2010.
Figure 7.15 View Pavement Condition with Planned Treatments
The second grid with recommended treatments is shown in Figure 7.16.
Figure 7.16 View Pavement Condition with Planned Treatments – Recommended
Treatments
50
Users can right click the above grid and select “Generate Cost Summary” to generate a
“Cost Summary” chart as shown in Figure 7.18.
Figure 7.18 Cost Summary
7.7
ESTIMATE REMAINING LIFE
This tool can be used to estimate the remaining life of pavement sections based on certain
PCR and/or distress thresholds. Figure 7.19 shows the user interface to view the predicted
conditions.
Source Table: DATA_PredictedPCR_JRC, DATA_PredictedDistress_JRC,
DATA_PredictedPCR_CRC, DATA_PredictedDistress_CRC,
DATA_PredictedPCR_Flex, DATA_PredictedDistress_Flex,
DATA_PredictedPCR_Comp, DATA_PredictedDistress_Comp.
51
Output Table: The default name for the output table is “Remaining Life.” Users can
update this table name by changing the text in the “Output Table name” text box.
Figure 7.19 Estimate Remaining Life
Rem. Life PCR Threshold
Enter PCR thresholds in the text boxes. The remaining life is calculated by the time
until the current PCR reaches the specified PCR threshold.
Use Distress Criteria
Check this option and click “Edit Criteria” to display the window shown in Figure
7.20. Users can then enter thresholds for individual distresses. The remaining life is
calculated using both the PCR and distress thresholds, whichever occurs first.
Graph Options
Miles: Analysis will be based on the directional miles
Sections: Analysis will be based on the number of pavement sections
52
Figure 7.20 Distress Thresholds
Example 1:
To view the remaining life for “General System Pavements” from 2007 based on a PCR
threshold of 55, select the following options:
1. “G” under “Priority”
2. “2008” under “Rem Life From Year”
3. “55” in the “General” text box under “Rem. Life PCR Threshold”
Enter an output table name in the “Output Table Name” text box and click “Execute.”
Figure 7.21 Remaining Life on General Systems
53
7.8
HISTOGRAM
This tool is used to generate a histogram for a selected field in a table.
Figure 7.22 Histogram Tool
Data Source
Table/Query: Table or query from which a field is selected to generate histogram
Statistical Field: Field from the selected table
Weight field: sum of selected field in each category of statistical field
Number of Category: Number of categories for histogram
Use (Elog-Blog): Total mileage under each category.
Example 1:
Figure 7.23 shows the histogram for PCR, weighted by mileage from DATA_ODOT.
This is generated by selecting “DATA_ODOT” in “Table/Query,” “PCR” in
“Statistical Field,” “None” in “Weight Field,” “5” in “Number of Category,” and
enabling “Use (Elog-Blog) As Weight.”
54
Figure 7.23 Example of a PCR Histogram Tool
55
SECTION 8 - REPORT MENU
This menu contains tools to generate reports of the database.
Figure 8.1 ODOTPMIS Report Menu
8.1
AVERAGE PERFORMANCE TREND
This tool generates an average performance report for parameters from DATA_ODOT.
Source Table: DATA_PERF_ANALYSIS, DATA_ODOT
Intermediate Table Generated: DATA_PERF_CURVE
Output Table: The default name for the output table is “Average Deterioration Trend
Analysis.” Users can update this table name by changing the text in the “Output Table
name” text box.
56
Figure 8.2 Average Deterioration Trend User Interface
Analysis Options
Include Open End Projects: Enabling this option will include open-ended projects
(projects/pavements which still exist)
Change Curve: Enabling this option will generate a graph based on the rate of
deterioration.
Output Options
Show Average: Enabling this option calculates and displays an average category
based on the current categories displayed on the chart. For example, if the average
deteriorations of Districts 1 and 3 are displayed, checking this option will display an
additional category that is the average of deterioration trends on Districts 1 and 3.
Example:
The following example shows the average deterioration trend report for PCR and RN
for all systems, priorities, pavement types and counties in district 1 for Activity codes
50 and 60 and from 1985 to 2006. Select following options on the tool:
1.
2.
3.
4.
“All Systems” under “System”
“All” under “Priority”
“1” under “District”
“All Counties” under “County”
57
5.
6.
7.
8.
9.
10.
“All Types” under “Pave Type”
“All Directions” under “System”
“1985” under “From Year,” and “2006” under “To Year”
“Activity Code” under “Activity” list
“PCR” and “RN” under “Parameters”
“50” and “60” under “From Activity” list, and “Add All” under “To
Activity” list
Enter an output table name in the “Output Table Name” text box and click “Execute.”
Figure 8.3 shows the average deterioration trends for PCR and RN.
Figure 8.3 Performance Trend Curve
This tool also generates a mileage chart as shown in Figure 8.4.
58
Figure 8.5 is generated when the “Change Curve” option is checked in “Analysis
Options” and shows the change curve for “PCR” and “RN.” The change curve values are
obtained by taking the difference of two consecutive average deterioration values. It
represents the rate of deterioration.
Figure 8.5 Change Curve
8.2
REHABILITATION CANDIDATES
This menu is used to generate a rehabilitation candidate list based on the treatment
decision trees provided by ODOT. The tools available under this menu are “Generate
Statewide Rehab List,” “Generate U/G Rehab List,” “Generate Priority Rehab List,”
“Priority System Major Rehab List,” and “Modify Repair Logic.” For all the tools under
this menu, the following tables are used in the background:
Source Tables: DATA_ODOT, DATA_Project History_Apparent,
DATA_PERF_BASE, LU_Repair Logic, LU_Repair Limits
8.2.1 Generate Statewide Rehab List
This tool generates the recommended treatments for all the pavement sections in the
database for the latest available PCR. The user interface is shown in Figure 8.6. The
output is stored in the table name given in the “Output Table” text box. In addition to this
output table, this tool also generates a bin summary table that contains the directional
59
miles that fall under each bin category. If the output table name is [table name], the bin
summary table created will be named
[table name_Bin Summary].
Figure 8.6 Rehab Candidates
8.2.2 General U/G Rehab List
This tool generates the recommended treatments (bin’s) list only for pavement sections
on urban and general systems. The user interface is similar to above in Figure 8.6,
however, in the “Priority” combo box, the default value is “U/G.”
8.2.3 General Priority Rehab List
This tool generates the recommended treatments (bin’s) list only for pavement sections
on urban and general systems. The user interface is similar to Figure 8.6, however the
“Priority” combo box is defaulted to “P.”
8.2.4 Priority System Major Rehab List
This tool generates the candidate sections eligible for major rehab on priority systems
based on the decision tree provided by ODOT. The user interface is shown in Figure 8.7.
The decision tree and repair logic are also shown in the user interface.
60
Figure 8.7 Priority System Major Rehab List
Include Treatments for Treatments Check
This option allows the user to select the treatments that will be included in the “# of
treatments” check in the decision tree.
Merge Continuous Sections Options
These options allow the user to control how continuous sections are merged. The
options provided are
Default: Two continuous sections are merged into a single record by considering
the “Minimum PCR,” “Maximum Total ADT,” and “Truck ADT” between the
sections, provided the remaining fields are equal
All Equal: Two continuous sections are merged into a single record if all the
fields are equal
All Min: Two continuous sections are merged into a single record by considering
the “Minimum of PCR,” “Total ADT,” and “Truck ADT” between the sections
provided the remaining fields are equal
61
All Max: Two continuous sections are merged into a single record by considering
the “Maximum of PCR,” “Total ADT,” and “Truck ADT” between the sections
provided the remaining fields are equal
All Avg: Two continuous sections are merged into a single record by considering
the “Average of PCR,” “Total ADT,” and “Truck ADT” between the sections
provided the remaining fields are equal
8.2.5 Modify Rehab Logic
This tool enables the user to change the decision tree and repair logic provided by ODOT.
Figure 8.8 shows the interface for modifying decision trees.
Figure 8.8 Modify Decision Trees and Repair Logic
To modify a decision tree, choose the category by clicking on the appropriate tab in the
“Modify Priority/Urban/General Rehab Logic” sub-window. Text boxes are provided at
various stages (for PCR, traffic, etc.). Enter new values in the text boxes and click
“Apply” to modify the decision tree.
To modify the repair logic (“Preventive Maintenance,” “Major,” “Minor,” and “Priority
Major Rehab”), click “Miscellaneous Criteria.” Select the “Pavement Type,”
“Preservation,” and “Priority System” in the “Record Locator” and click “Search.” The
62
“Miscellaneous Criteria” tab provides options to change the “Functional Class,” “PCR
Limits,” and “Traffic” as shown in Figure 8.9. This is the basic procedure:
Note: If the value for criteria is empty, it is not considered in the repair logic.
1. Change the “Functional Class” in the “Functional Class” list
2. Change the “PCR Limits” in the “PCR Lower Limit” and “PCR Upper Limit” text
boxes
3. Change the “Traffic Limits” in the “Total ADT” and “Truck ADT” text boxes
4. Change the “Cracking Index Limit” in the “Max Cracking Index” text box
5. For two lanes, apply the “Two-Lane Only” option
6. Select appropriate distress levels for each code under “Allowable Distress”
7. Click “Apply” to save the changes
To change the logic for a repair check i.e., to include or remove any distress from the
repair logic, use the “View and Edit Repair Logic” text box.
Figure 8.9 shows the allowable distress for a structural check of a general system, flexible
pavement. The repair logic is “6 and 9 and ( 15 or 3 )”. The user can edit the text in this
text box to add or remove any distress, however, the default syntax must be used to make
any changes. This syntax is shown in Figure 8.9.
Figure 8.9 Edit Repair Logic
63
Syntax for Editing Repair Logic
1. Enter any distresses by their code numbers
Example: If the logic is “Rutting” or “Wheel Track Cracking” for flexible
pavement, the user should input “6 or 9”
2. Separate text by spaces
Example: The correct syntax for the command “1or2or3” is “1 or 2 or 3”
3. Separate brackets by spaces
Example: The correct syntax for the text “1or(2and3)or4” is “1 or ( 2 and
3 ) or 4”
8.3
PROJECT PERFORMANCE
In the “Report” menu, click “Project Performance.” This tool generates the project
performance reports.
Source Table: DATA_Project History_Apparent, DATA_ODOT
Output Table: The default name for the output table is “Project Performance.” Users
can update this table name by changing the text in the “Output Table name” text box.
Figure 8.10 shows the window used for generating this report. The “Analysis Range”
frame selects the project number and parameters to be used to generate the report.
Figure 8.10 Individual Project Performance
Example:
Figure 8.11 shows the Project Performance Report for Project Number 701-99 for
PCR and RN (Ride Number). This report is generated by selecting “Project Number
64
701-99” in the “Project Number” list box, and “PCR” and “RN” in the “Parameter”
list box.
Figure 8.11 Example of Individual Project Performance Output
8.4
PCR DROP
This tool generates a list of pavement sections with a quantity of PCR drops greater than
or equal to a specified value, and with specific treatments performed. PCR Drop for this
tool is defined as decrease in PCR value between any two years.
Source Table: DATA_Project History_Apparent, DATA_ODOT,
DATA_PERF_BASE
Output Table: The default name for the output table is “PCR Drop List.” Users can
update this table name by changing the text in the “Output Table name” text box.
65
Figure 8.12 PCR Drop Tool
Analysis Options
PCR Drop >=: When checked, this option will calculate the number of PCR Drops
greater than or equal to the value selected in the drop down box and between the
values selected in the “From Year” and “To Year” drop down boxes
# Of Treatments Performed: When checked, this option will calculate the number
of treatments performed between the values selected in the “From Year” and “To
Year” drop down boxes. The treatments selected in “Include Activities” will be
counted
8.5
AVERAGE COST`
This tool generates an average cost report for each activity. To generate this report,
the look up table LU_COST must exist in the database. In the “Data” menu, click
“Generate Cost Lookup Table” to generate LU_COST.
Source Table: DATA_Project History, LU_COST
Output Table: The default name for the output table is “Unit Cost Analysis.” Users
can update this table name by changing the text in the “Output Table name” text box.
66
Figure 8.13 Average Cost Analysis Interface User Interface
Example:
Figure 8.14 shows the cost report for Activities 50 and 60 per lane mile, for all
systems and in each district from 1985 to 2006.
This report is generated by selecting “All Systems” under “System,” “All” under
“District,” “1985” under “From Year,” “2006” under “To Year,” “Activity Code”
under “Activity,” “District” under “Group By,” “50” and “60” under “Activity,” and
“Unit Cost in Dollar Per Lane Mile” under “Cost Unit.”
67
Figure 8.14 Average Cost Per Lane Mile for Overlays
8.6
STRUCTURAL BUILDUP
This tool generates a current pavement structure report.
Source Table: DATA_Project History, DATA_PERF_BASE
Output Table: The default name for the output table is “Recent Pavement Structure
Report” Users can update this table name by changing the text in the “Output Table
name” text box.
68
Figure 8.15 Pavement Structure Report
Example:
Figure 8.16 shows the current pavement structural buildup for Route 032R in Adams
County. This report is generated by selecting “ADA” in the “County” list and 032R
in the “Route” list.
Figure 8.16 Recent Pavement Structure Report Output
69
8.7
TRAFFIC REPORT
This tool generates the average Traffic, ESAL, and summary statistics report.
Source Table: DATA_ODOT
Output Table: The default name for the output table is “Traffic Report” Users can
update this table name by changing the text in the “Output Table name” text box.
Figure 8.17 Traffic Report User Interface
Example:
Figure 8.18 shows the charts for ESALX1000, Total ADT, and Truck ADT for all
systems, priorities, pavement types, and routes in District 1 from 1985 to 2006. The
tool also generates a report, shown in Figure 8.19.
The charts and report are generated by selecting “All Systems” under “System,” “All”
under “Priority,” “1” under “District,” “All Counties” under “County,” “All Types”
under “Pave Type,” “All Directions” under “System,” “1985” under “From Year,”
“2006” under “To Year,” “Year” under “Group By,” “By Mileage” under “Analysis
Options,” “Line Chart” under “Output Options,” and “Show Average” under “Output
Options.”
70
Figure 8.18 Traffic Report Charts
71
Figure 8.19 Traffic Report
8.8
PCR AND DISTRESS
This menu is used to generate the average PCR and distress by project age or calendar
year.
Source Tables: DATA_ODOT, DATA_PERF_ANALYSIS
8.8.1 Average by Project Age
This tool generates the average distresses, CRD (cracking deduct), PCR, and STRD
(structural deduct) for a project year. The user interface is shown in Figure 8.20.
72
Figure 8.20 Average PCR and Distresses by Project Age
Example:
Figure 8.21 shows “Year 0” or the condition immediately after overlays, on priority
system, flexible pavements. This report is generated by selecting “All Systems” under
“System,” “P” under “Priority,” “All” under “District,” “All Counties” under
“County,” “3-Asphalt” under “Pave Type,” “1985” under “From Year,” “2006” under
“To Year,” “50 and 60” under “Activity,” “0” under “Project Year,” “Add All” under
“Activity,” and “By Mileage” under “Analysis Options.”
73
Figure 8.21 Average PCR and Distresses by Project Age Output
8.8.2 Average by Calendar Year
This function reports the average distresses, CRD (cracking deduct), PCR and STRD
(structural deduct) by pavement type, district, and county for a given calendar year.
74
Figure 8.22 Average PCR and Distresses by Calendar Year
Example:
Figure 8.24 shows the PCR and Distress Average by Calendar Year report for all
distresses in flexible pavements, for all systems, all priorities, in District 1 from 1985
to 2006.
75
Figure 8.23 PCR and Distresses by Calendar Year Output
8.9
RIDE QUALITY
This report gives the ride quality (in terms of LIRI, RIRI and RN) distribution in
miles by pavement type, district, year, etc
Source Table: DATA_ODOT, LU_Parameter Range (parameter categories defined
by ODOT)
Output Table: The default name for the output table is “LIRI Mileage Report.”
Users can update this table name by changing the text in the “Output Table name”
text box.
76
Figure 8.24 Ride Quality Report
Example:
Figure 8.26 shows the Ride Quality Report in miles for LIRI for categories defined by
ODOT in District 1 for each year from 1998 to 2006.
This report is generated by selecting “All Systems” under “System,” “All” under
“Priority,” “1” under “District,” “All Counties” under “County,” “All Types” under
“Pave Type,” “1985” under “From Year,” “2006” under “To Year,” “LIRI” under
“Parameter,” “Year” under “Group By,” and “Stackbar Chart” under “Plot Style.”
77
Figure 8.25 Ride Quality Report Output (Left IRI)
8.10 ADDITIONAL REPORTS
The tools under this menu are “Project History Plot,” “Statistical Report,” “General
Mileage Report,” and “Map View of a Table.”
8.10.1 Project History Plot
This tool, shown in Figure 8.26, is used for viewing the changes in data – PCR, for
example – from DATA_ODOT over time for a particular route within a county based
on the Original Record (Blog and Elog) from DATA_Project History, or Auto
Detection (Blog and Elog) from DATA_Project History_Apparent. The tool also uses
colored backgrounds to indicate the repair history of the selected route.
78
Figure 8.26 Project History Plot
The plot shown in Figure 8.27 was generated by selecting “ADA” under “County,”
“032R” under “Route,” and “Original Log” under “Options.” Figure 8.29 was
generated with the same settings but using “Auto Detected” under “Options.” Figure 8.29
demonstrates that the Activities are adjusted according to PCR jumps.
Figure 8.27 Project History Plot Based on Original Log
Figure 8.28 Project History Plot Based on Auto Detected
79
8.10.2 Statistical Report
This tool is used to calculate average or weighted average values for a user selected
parameter. This tool is similar to Traffic Report explained earlier; however in this tool
the user can select any parameter from ODOT in addition to traffic and ESAL.
Source Table: DATA_ODOT
Output Table: The default name for the output table is “Statistical Report.” Users
can update this table name by changing the text in the “Output Table name” text box.
Figure 8.29 Statistical Report User Interface
Output Options
Bar Chart
Output shown in bar chart format
Line Chart
Output shown in line graph format
Show Average
Average of all data shown on graph
Example:
Figure 8.31 shows the Statistical Report for PCR and RN (Ride Number) for all
systems, all priorities, all pavement types, in each county and on all routes in District
1, for each year from 1985 to 2006.
80
This report is generated by selecting “All Systems” under “System,” “All” under
“Priority,” “1” under “District,” “All Counties” under “County,” “All Types” under
“Pave Type,” “1985” under “From Year,” “2006” under “To Year,” “PCR” and “RN”
under “Parameter,” “Year” under “Group By,” “By Mileage” under “Analysis
Options,” and “Line Chart,” Show Average” and “Print Preview” under “Output
Options.”
Figure 8.31 shows the generated statistical report. ODOT began collecting RN (ride
number) data in 1998, and hence RN data slots are empty prior to 1998.
Figure 8.30 Statistical Report Output
Figure 8.31 shows the PCR chart with an average line.
81
Figure 8.31 PCR Chart
Figure 8.32 shows the RN chart with an average line.
Figure 8.32 RN (Ride Number Chart)
8.10.3 General Mileage Report
This tool calculates the amount of directional mileage covered for a user selected
parameter.
Source Table: DATA_ODOT,
Output Table: The default name for the output table is “PCR Mileage Report.”
Users can update this table name by changing the text in the “Output Table name”
text box.
82
Figure 8.33 General Mileage Report User Interface
Plot Style
Bar Chart
Output shown in bar chart format
Stack Bar Chart
Output shown in stacked bar chart format
Example:
This report is generated by selecting “All Systems” under “System,” “All” under
“Priority,” “3” under “District,” “All Counties” under “County,” “All Routes” under
“Route,” All Directions” under “Station,” “All Types” in “Pave Type,” “1985” under
“From Year,” “2006” under “To Year,” “PCR” under “Parameter,” “Year” under
“Group By,” and “Stackbar Chart” under “Plot Style.”
Figure 8.34 shows the Mileage Report in directional miles for PCR, in categories
defined by ODOT in District 3 for each year from 1985 to 2006.
83
Figure 8.34 PCR Mileage Report Output
8.10.4 Map View of a Table
This tool allows for mapping of attributes if the table includes “County,” “Route,”
“Station,” “Blog,” and “Elog” fields.
84
Figure 8.35 Map View of Table User Interface
Legend Options
Classify: Set the number of categories
Gradient: Determine the middle category colors by grading the top and bottom
category colors
Reverse: Flip the selected colors
Background: Superimpose map against Ohio geographical outline
85
SECTION 9 - WINDOW MENU
The “Window” menu includes normal Microsoft functions for controlling the
simultaneous display of multiple open windows.
Figure 9.1 ODOTPMIS Window Menu
9.1
TILE HORIZONTALLY
Horizontally tile all non-minimized windows.
9.2
TILE VERTICALLY
Vertically tile all non-minimized windows.
9.3
CASCADE
Cascade all non-minimized windows.
9.4
ARRANGE ICONS
Arrange icons for minimized windows.
9.5
CLOSE ALL WINDOWS (SHORTCUT KEY: CTRL+Q)
Close all opened tables and queries.
86
SECTION 10 - HELP MENU
Figure 10.1 ODOTPMIS Help Menu
10.1 CONTENTS
Click this option to open the help file. The help file can also be activated by pressing the
F1 key. Select the form or tool in question and press F1. Help for that topic will be
displayed.
10.2 ABOUT
This option provides downloads of the latest updates for ODOTPMIS and specifies the
current version number.
Figure 10.2 ODOTPMIS About Dialog Box
87