1
›
›
After retracting the front jacks for the fifth time, do the same with the rear jacks (button 11). Let the
rear jacks perform five full extending and retracting strokes as well. Also keep checking whether the
oil level does not drop below five centimetres. When bleeding the system, also take into account the
formation of foam, and - if necessary - wait a moment. When the rear jacks have been retracted for the
fifth time, the tank can finally be filled up to 2 centimetres below the edge.
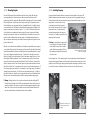
Make sure that all passages (for cables, hydraulic hoses, wiring, etc.) made are carefully sealed. We
recommend injecting the complete cylinders - including hose connections - with an anti-corrosive
agent. This layer (e.g. tectyle) will protect the system against erosion and rust.
STEP 7 Taking the system into operation
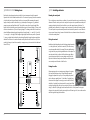
!! TEST 1: now look whether both left jacks come down when you press button 10. In this way you
can check whether all hydraulic hoses have been connected properly. If this is not the case (a
cylinder extends at both the left and right side), two or more hydraulic hoses have been
interchanged. This is a common mistake.
!! TEST 2: Check the safety function of the hand brake. Make sure the cylinders are extended.
Now switch off the system, let the motor run, place your foot on the brake and release the hand
brake. Now the system should produce a beep sound and immediately retract the jacks.
›
STEP 8 Programming the zero point
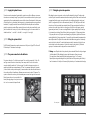
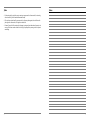
Place the car on an even floor. Switch on the control panel (button 5) and set it to manual operation
(button 6). Take a spirit level and place it on the floor of the camper where you can see it. By manually
operating the jacks, make sure that the camper is level. During this process, the red LED (LED 1) may
flash continuously. Ignore this LED. When the camper is perfectly level lengthways and widthways, you
have found the zero point. In order to program this zero point, you must first switch off the installation
(button 5) and then switch it on again (press button 5 once more). Then press 5 times subsequently
on the button for extending the front jacks (button 12). This operation is confirmed through a beep
sound. Then press five time subsequently on the button for the rear jacks (button 11). Once more a
beep will sound to confirm (5 times). Now all the LEDs will light. Then press 3 times on the button for
retracting the jacks (button 8). Only the LED for manual operation will remain on (LED 9). Now switch
off the installation (button 5) and switch it on again (button 5 once more). Now the green LED between
the four arrows in the middle will light, which means that you have successfully programmed the zero
point (LED 14).
STEP 9 Finishing the installation
›
STEP 10 Maintenance of the system
The oil in the hydraulic system should be changed every three years. Regularly check the oil level.
Annually injecting the system with anti-corrosive agent will significantly increase the product’s life span.
Five brief tips for the customer
• Under no circumstances should the system be used as a replacement for tyres or to install snow
chains.
• During winter sports: put something (e.g. a piece of carpet) under the jacks to avoid sliding.
• Manual operation is particularly recommended for bad surfaces. In manual operation, all jacks
should always be extended. In manual mode, the system also has a semi-automatic function (see the
user manual for this).
• Always operate cylinders 2 at a time at 1 side. When retracting, operate all 4 at the same time. Only
in case of short additional retraction, briefly operate all 4 cylinders separately.
• The system cannot handle all angles. In that case, bring the camper as close as possible to the zero
point by means of manual operation. Another option is to drive the camper on wedges and filling up
the jacks.
For a further, extensive description of what is possible or what is not possible, please see the included
user manual of the E&P Levelling System.
Questions? Call the experts of E&P Hydraulics:
+31 6-53750529 (Pierre Blom) or +31 6-53175137 (Eric Klinkenberg).
For installation photos and tips, also see our internet page: www.ep-hydraulics.nl.
!!TEST: Press on the button for automatic mode (button 7). The system will now retract the jacks and
it will level the vehicle again – this time fully automatic. When it is finished, the green LED between
the arrows will light again to indicate that the test was successful.
66
67