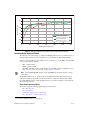
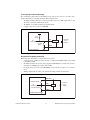
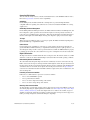
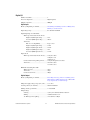
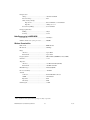
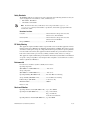
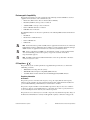
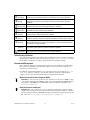
1
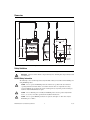
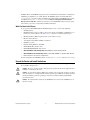
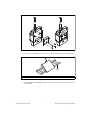
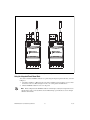
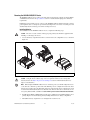
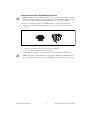
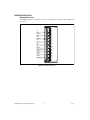
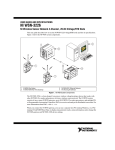
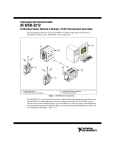
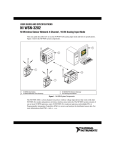
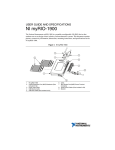
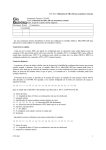
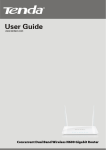
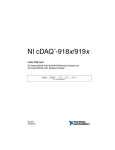
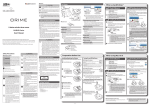
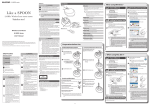
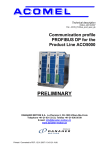
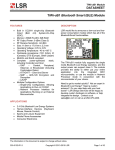
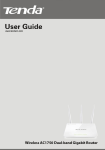
USER GUIDE AND SPECIFICATIONS NI WSN-3230/3231 NI Wireless Sensor Network RS-232/RS-485 Serial Interface Nodes This user guide describes how to use the NI WSN-3230/3231 RS-232/RS-485 interface serial nodes and lists their specifications. Figure 1 shows the NI WSN system components. The NI WSN-3230 is a low power wireless node with one RS-232 port. The NI WSN-3231 is a low power wireless node with one RS-485 port. These nodes work with other NI WSN-32xx nodes and gateways to form a wireless sensor network. 6 2 Or 3 4 Or 1 1 5 1 2 3 NI WSN-32xx Nodes NI 9792 WSN Real-Time Programmable Gateway NI WSN-9791 Ethernet Gateway 4 5 6 NI CompactRIO Chassis NI 9795 WSN C Series Gateway PC Running NI Software Figure 1. NI WSN System Components The NI WSN system receives and analyzes distributed sensor data through one or more NI WSN gateways, up to 36 NI WSN nodes per gateway, and multiple PCs. When you connect the NI WSN gateway, you can use a separate host PC running Windows, or a NI CompactRIO chassis running NI LabVIEW Real-Time, to display measurement results, status information, and to change the NI WSN gateway and NI WSN-3230/3231 device settings. Dimensions Figure 2 shows the NI WSN-3230/3231 device dimensions. 235 mm (9.25 in.) 124 mm (4.88 in.) 55.9 mm (2.20 in.) 86.4 mm (3.40 in.) 42.4 mm (1.67 in.) 25.40 mm (1.00 in.) 50.8 mm (2.00 in.) Figure 2. NI WSN-3230/3231 Device Dimensions Safety Guidelines Operate the NI WSN-3230/3231 device only as described in this user guide. Hot Surface This icon denotes that the component may be hot. Touching this component may result in bodily injury. NI WSN Safety Information The following section contains important safety information that you must follow when installing and using NI WSN products. Caution Do not operate the NI WSN product in a manner not specified in the user manual or operating instructions. Product misuse can result in a hazard. You can compromise the safety protection built into the product if the product is damaged in any way. If the product is damaged, return it to National Instruments for repair. Caution Do not substitute parts or modify the NI WSN product. Use the product only with the devices, accessories, and cables specified in the installation instructions. Caution Do not operate NI WSN products in an explosive atmosphere or where there may be flammable gases or fumes. NI WSN-3230/3231 User Guide and Specifications 2 ni.com Caution If you need to clean a NI WSN product, wipe it with a dry towel. The product must be completely dry and free from contaminants before you return it to service. Caution Operate the product indoors only at or below Pollution Degree 2. Pollution is foreign matter in a solid, liquid, or gaseous state that can reduce dielectric strength or surface resistivity. Caution You must insulate signal connections for the maximum voltage for which the NI WSN product is rated. Do not exceed the maximum ratings for the product. Do not install wiring while the product is live with electrical signals. Do not remove or add connector blocks when power is connected to the NI WSN system. Avoid contact between your body and the connector block signal wiring when hot-swapping devices. Caution To comply with safety regulations, use only recommended batteries with this product. Refer to the Battery Power section for the recommended battery types. Safety Guidelines for Hazardous Locations The NI WSN-3230/3231 is suitable for use in Class I, Division 2, Groups A, B, C, D, T4 hazardous locations; Class I, Zone 2, AEx nC IIC T4 and Ex nL IIC T4 hazardous locations; and nonhazardous locations only. Follow these guidelines if you are installing the NI WSN-3230/3231 in a potentially explosive environment. Not following these guidelines may result in serious injury or death. Caution Observe the battery manufacturers’ operating temperature ratings listed in the Battery operating temperature range specification section. Caution Do not disconnect the power supply wires and connectors from the device unless power has been switched off. Caution Do not install or remove the device unless power has been switched off. Caution Substitution of components may impair suitability for Class I, Division 2. Caution For Zone 2 applications, install the WSN system in an enclosure rated to at least IP 54 as defined by IEC 60529 and EN 60529. Special Conditions for Hazardous Locations Use in Europe The NI WSN-3230/3231 has been evaluated as Ex nA nL IIC T4 equipment under DEMKO Certificate No. 07 ATEX 0626664X. Each module is marked II 3G and is suitable for use in Zone 2 hazardous locations, in ambient temperatures of –40 °C ≤ Ta ≤ 70 °C. Electromagnetic Compatibility Guidelines This product was tested and complies with the regulatory requirements and limits for electromagnetic compatibility (EMC) as stated in the product specifications. These requirements and limits are designed to provide reasonable protection against harmful interference when the product is operated in its intended operational electromagnetic environment. This product is intended for use in industrial locations. There is no guarantee that harmful interference will not occur in a particular installation, when the product is connected to a test object, or if the product is used in residential areas. To minimize the potential for the product to cause interference to radio and television reception or to experience unacceptable performance degradation, install and use this product in strict accordance with the instructions in the product documentation. Furthermore, any changes or modifications to the product not expressly approved by National Instruments could void your authority to operate it under your local regulatory rules. © National Instruments Corporation 3 NI WSN-3230/3231 User Guide and Specifications The following statements contain important EMC information needed before installing and using this product: Caution To ensure the specified EMC performance, product installation requires either special considerations or user-installed, add-on devices. See the product installation instructions for further information. Caution To ensure the specified EMC performance, operate this product only with shielded cables and accessories. Caution To ensure the specified EMC performance, operate this product with a DGND terminal on the I/O connector tied to earth ground or use the NI recommended external power supply (NI part number 780703-01) or equivalent. Caution The inputs/outputs of this product can be damaged if subjected to Electrostatic Discharge (ESD). To prevent damage, industry-standard ESD prevention measures must be employed during installation, maintenance, and operation. Caution This product may become more sensitive to electromagnetic disturbances in the operational environment when test leads are attached or when connected to a test object. Related Documentation Check ni.com/manuals for the most recent documentation. For a complete list of documentation related to the NI WSN system, refer to ni.com/info and enter rdwsnrd or refer to ni.com/info and enter wsnsoftware. In addition to this guide, the following documents may be useful when configuring your NI WSN system: • The getting started guide for your NI WSN gateway • The user guide and specifications for your NI WSN node(s) • Configuring WSN in MAX, available from Start»All Programs»National Instruments»NI-WSN • LabVIEW Help for WSN Devices, available in LabVIEW from Help»LV Help»WSN Devices Help • NI-WSN Readme, available on the software installation disc included with your gateway Training Courses If you need more help getting started developing an application with NI products, NI offers training courses. To enroll in a course or obtain a detailed course outline, refer to ni.com/training. Technical Support on the Web For additional support, refer to ni.com/support or zone.ni.com. Software Overview Note Refer to the NI WSN Readme, available on the software installation disc included with your gateway, for NI software application version support. The NI-WSN software is supported by Windows 7/Vista/XP and contains the following components: • NI Measurement & Automation Explorer (NI MAX) • NI-WSN NI WSN-3230/3231 User Guide and Specifications 4 ni.com NI-WSN software and NI MAX manage the low-level communications and hardware configurations, simplifying programmatic access to I/O channels. The NI-WSN software is downloadable from ni.com/drivers and on the software installation disc included with your NI WSN gateway. Using your Web browser, go to ni.com/support and select Drivers and Updates»Distributed I/O» Wireless Sensor Networks, and then select the latest version of NI-WSN software. If you are using other software, refer to the accompanying installation instructions. What You Need to Get Started To set up and use NI LabVIEW with the NI WSN-3230/3231 device, you need the following: • NI WSN gateway • NI WSN-3230/3231 device(s) with a 5–30 V power supply or four alkaline or lithium AA 1.5 V batteries for each node. Refer to the Battery Power section for recommended battery types. • Mounting hardware (DIN rail, panel-mount, or rack mount accessory) • Ethernet cable/connection • 1/8 in. flathead and number 2 Phillips screwdrivers • NI-WSN 1.3 or later • Host PC running Windows 7/Vista/XP • NI LabVIEW 2011 (32-bit) or later • NI LabVIEW WSN Module 2011 or later • (NI 9792 WSN Real-Time Gateway Only) NI LabVIEW (32-bit) Real-Time Module • (NI 9795 WSN C Series Gateway Only) NI-RIO 4.0 and NI LabVIEW (32-bit) Real-Time Module • Related hardware and software documentation For more information about NI-WSN software versions, go to ni.com/info and enter wsnsoftware. Unpack the Device and Install the Antenna Remove the device from the package and inspect the device. Contact NI if the device appears damaged. Do not install a damaged device. Caution The device is static sensitive. Always properly ground yourself and the equipment when handling or connecting to the device. Caution An electrostatic discharge (ESD) to the antenna connector when the product is operating may cause interference or disruption of the wireless signal. To prevent ESD, do not attempt to remove the antenna while the product is operating or ensure that you employ industry-standard ESD prevention measures. Caution The antenna must be attached to the NI WSN device in order for the NI WSN device to function correctly. © National Instruments Corporation 5 NI WSN-3230/3231 User Guide and Specifications To attach the antenna, align the antenna with the mount and screw it on, as shown in Figure 3. N INATIO ST N RU AL ME NT S NATIONAL INSTRUMENTS Figure 3. Attach the Antenna to the Device Mounting the NI WSN-3230/3231 Device You can mount the NI WSN-3230/3231 on a panel or on a 35 mm DIN rail. For kit accessory ordering information, refer to the NI WSN product page accessory section at ni.com. Before using any of these mounting methods, remove and save the serial number sticker located on the back of the NI WSN-3230/3231 device for future use when configuring your device in the software. For the NI WSN-3230/3231 device dimensions, refer to Figure 2. Caution Your installation must allow 50.8 mm (2 in.) of clearance in front of the device for common connector cabling, such as the 18-terminal detachable screw terminal connector. Attaching the NI WSN-3282 DIN Rail (Optional) You can mount the NI WSN-3230/3231 on a standard 35 mm DIN rail using a NI WSN-3282 DIN rail clip, NI part number 781074-01. Complete the following steps to mount the NI WSN-3230/3231 on a DIN rail: Caution Power off the device before mounting it to the DIN rail. Note Use thread-forming screws to permanently affix the DIN rail clip to the device. Unscrewing and reinstalling the thread-forming screws will produce a compromised connection between the DIN rail clip and the device. 1. Fasten the DIN rail clip to the NI WSN-3230/3231 using a number 2 Phillips screwdriver and the four 8-32 × 5/16 in. thread-forming screws that shipped with the DIN rail clip(s). Figure 4 shows how to fasten the DIN rail clip to the NI WSN-3230/3231. Caution Do not use screws longer than 5/16 in. to fasten the DIN rail clip to the NI WSN-3230/3231. NI WSN-3230/3231 User Guide and Specifications 6 ni.com Figure 4. NI WSN-3230/3231 Device DIN Rail Installation 2. Insert one edge of the DIN rail into the deeper opening of the DIN rail clip, as shown in Figure 5. 1 2 1 DIN Rail Clip (Without Device) 2 DIN Rail Figure 5. DIN Rail Clip Installation 3. Press down firmly on the NI WSN-3230/3231 to compress the spring until the clip locks into place on the DIN rail. © National Instruments Corporation 7 NI WSN-3230/3231 User Guide and Specifications Using a Panel Mount Accessory The NI WSN-3280/3281 panel mount accessories, part numbers 780999-01 and 781073-01, each include a retention clip and knob and integrated strain relief for power and I/O wires. You can use the NI WSN-3280 panel mount accessory to attach the NI WSN-3230/3231 device to a panel or other flat surface. The NI WSN-3281 panel mount accessory also includes a magnetic mount for attaching the NI WSN-3230/3231 device to metallic surfaces. Figure 6 shows the NI WSN-3230/3231 panel mounting dimensions. 78.74 mm (3.100 in.) 44.02 mm (1.733 in.) 4.5 mm (5× Ø.177 in.) 55.88 mm (2.200 in.) 183.79 mm (7.236 in.) 53.34 mm (2.100 in.) 13.97 mm (0.550 in.) 25.40 mm (1.000 in.) 25.40 mm (1.000 in.) Figure 6. NI WSN-3230/3231 Device Panel Mount Dimensions NI WSN-3230/3231 User Guide and Specifications 8 ni.com 5 1 2 3 N INATIO ST N RU AL ME NT S 4 5 1 2 3 Retention Knob Retention Clip Mounting Hole 4 5 Integrated Mounting Pin Power and I/O Strain Relief Figure 7. Panel Mount Accessory Refer to Figure 7 while completing the following steps to mount the NI WSN-3230/3231 on a panel: 1. (NI WSN-3280) Bolt or screw the panel mount accessory to a panel using five 8-32 or M4 screws. (NI WSN-3281) Attach the panel mount accessory using the integrated magnet. 2. Slide the NI WSN-3230/3231 device into the panel mount accessory, as shown in Figure 7. 3. Slide the retention clip down and tighten the panel mount knob to secure the NI WSN-3230/3231 device, as shown in Figure 8. 4. (Optional) Secure any I/O signal or power supply cabling to the panel mount accessory using a zip-tie and the integrated strain relief slots. © National Instruments Corporation 9 NI WSN-3230/3231 User Guide and Specifications NATIONAL INSTRUMENTS NATIONAL INSTRUMENTS Figure 8. Slide Retention Clip Down and Tighten Panel Mount Knob Using the Integrated Panel Mount Slots You can also mount the NI WSN-3230/3231 to a panel using the integrated panel mount slots, as shown in Figure 9. 1. Attach three number 8 or M4 pan head screws in the mounting panel, leaving 0.1 in. space under the head of each screw. Refer to Figure 2 for the correct hole pattern and dimensions. 2. Slide the NI WSN-3230/3231 device onto the panel. Note In this configuration, the NI WSN-3230/3231 is held in place only by the weight of the device and the friction of the screw attachment. Use the DIN rail clip or panel mount accessories in high vibration environments. NI WSN-3230/3231 User Guide and Specifications 10 ni.com Figure 9. Integrated Panel Mount Slots Caution Disconnect power before removing the device from the panel. Setting Up the NI WSN-3230/3231 Device The following sections discuss setting up the NI WSN-3230/3231 for use. Installing the Software For more information about NI-WSN software, go to ni.com/info and enter wsnsoftware. You must be an administrator to install NI software and devices on your computer. Before connecting the hardware, install the following software in the following order: 1. NI LabVIEW 2011 or later 2. NI LabVIEW Real-Time Module 2011 or later (required for NI 9795 and NI 9792 support) 3. NI-RIO 4.0 or later (required for NI 9795 support) 4. NI LabVIEW WSN Module 2011 or later, which installs NI-WSN 1.3 or later (required) and NI MAX (required) 5. NI-WSN 1.3 or later (includes NI MAX) Tip NI-WSN 1.3 or later and NI MAX are also included on the software installation disc included with your NI WSN gateway and are also available for download at ni.com/support. Note After installation of NI-WSN, the NI Wireless Sensor Network Getting Started Guide is available from Start»All Programs»National Instruments»NI-WSN. © National Instruments Corporation 11 NI WSN-3230/3231 User Guide and Specifications Powering the NI WSN-3230/3231 Device The NI WSN-3230/3231 device can be powered by either an external power supply or four AA alkaline or lithium batteries. Refer to the Specifications section for details about the input power and battery requirements. If both battery and external power are connected, the NI WSN-3230/3231 functions from the external power input. The device is designed to provide battery backup in the event of loss of external power and automatically switches to battery power when external power is lost. Installing Batteries To install batteries in the NI WSN-3230/3231 device, complete the following steps: Caution The device is static sensitive. Always properly ground yourself and the equipment when handling or connecting to the device. 1. Loosen the battery compartment retention screw and remove the compartment cover, as shown in Figure 10. 1 1 Battery Retention Screw Figure 10. NI WSN-3230/3231 Battery Compartment Caution Using the incorrect battery type creates an explosion risk. Do not use rechargeable batteries. Refer to the Battery Replacement and Disposal section for information about how to dispose of used batteries. Note When using the NI WSN-3230/3231 device on battery power, you should configure the device as an end node so that it sleeps most of the time. Running a device configured in router mode from battery power greatly reduces the battery life. The device ships from the factory configured as an end node. For more information about how to switch the node from an end node to router mode, refer to Configuring WSN in MAX, available from Start»All Programs»National Instruments»NI-WSN. 2. Install four AA alkaline or lithium batteries in the device, making sure to install them with the correct polarity. Figure 12 shows the battery polarity markings inside the device battery compartment. 3. Reinstall the battery compartment cover and tighten the retention screw. NI WSN-3230/3231 User Guide and Specifications 12 ni.com Connecting External Power to the NI WSN-3230/3231 Device Caution To ensure that specified EMC performance, do not connect the power input to a DC mains supply or to any supply requiring a connecting cable longer than 30 m (100 ft.). A DC mains supply is a local DC electricity supply network in the infrastructure of a certain site or building. To connect an external power supply to the NI WSN-3230/3231, complete the following steps: 1. Remove the 2-position mini-combicon plug from the device. Loosen the retaining screws if necessary. Figure 11. 2-Position Mini-Combicon Plug 2. Connect the external power supply positive lead to the V terminal. 3. Connect the negative (common) lead to the C terminal. 4. Reinstall the 2-position mini-combicon plug in the device and tighten the retaining screws. Caution You must use a UL Listed ITE power supply marked LPS with the NI WSN-3230/3231. The power supply must also meet any safety and compliance requirements for the country of use. © National Instruments Corporation 13 NI WSN-3230/3231 User Guide and Specifications Device Interface Figure 12 shows the NI WSN-3230/3231 device interface. 1 2 3 9 4 8 5 7 6 1 2 3 4 5 Antenna WSN Connect Button Signal Strength/Status LEDs User LED Battery Slots/Polarity Indicators 6 7 8 9 I/O Connector Reset Button Pro2 Port (Reserved for Future Use) 5–30 V External Power Input Figure 12. NI WSN-3230/3231 Node Interface NI WSN-3230/3231 User Guide and Specifications 14 ni.com Signal Strength/Status LED Indicators The NI WSN-3230/3231 has four signal strength/status LED indicators, which flash twice before displaying signal strength information. Table 1 shows the status and signal strength LED patterns. Table 1. Signal Strength and Status LED State/Node Status LED Indication Mode Signal Strength— LEDS 1–4 blink twice and then display the signal strength for three seconds LED State LED Pattern LED 1–4 OFF Device Status Low Signal 1 2 3 4 LED 1 ON, LED 2–4 OFF Poor 1 2 3 4 LED 1–2 ON, LED 3–4 OFF Fair 1 2 3 4 LED 1–3 ON, LED 4 OFF Good 1 2 3 4 LED 1–4 ON Excellent 1 2 3 4 Status Indication Each LED 1–4 blinking in succession Searching for a network 1 2 3 4 1 2 3 4 1 2 3 4 1 2 3 4 LED 1, 4 and 2, 3 alternate blinking Updating firmware 1 2 3 4 LED 1–4 continuously blinking © National Instruments Corporation 1 2 3 4 1 2 3 4 1 2 3 4 15 Error. Reboot device. If problem persists, reset device to factory default settings. Go to ni.com/ support for additional troubleshooting steps. NI WSN-3230/3231 User Guide and Specifications WSN Connect Button Note Refer to your NI WSN gateway documentation for detailed instructions about how to connect a NI WSN-3230/3231 to the NI WSN gateway. The NI WSN-3230/3231 is equipped with a WSN connect button, as shown in Figure 12. The button controls network connection and the LEDs, which display connection status. Pressing the WSN connect button results in the device responses shown in Table 2. Table 2. WSN Connect State/Device Status Current Device State Duration of Button Press Result Initial power on, not connected Any duration Node turns on and searches for an available network. Connected to a NI WSN gateway <5 seconds Node blinks all four signal strength LEDs twice, and then displays the signal strength as shown in Table 1. ≥5 seconds Node leaves current network and searches for a new network. Reset Button The NI WSN-3230/3231 is equipped with a reset button as shown in Figure 12. Pressing the reset button results in the following device responses: • When pressed for fewer than 5 seconds, the device reboots with the current configuration. • When pressed for 5 seconds or more, the device reboots into Factory Default Mode, which returns the device user configuration to the factory-set defaults Using the NI WSN-3230/3231 Device The NI WSN-3230/3231 is a programmable interface to serial sensors, laboratory instruments, industrial devices and embedded circuits. These nodes can interrogate and control serial devices and share data over an NI wireless sensor network. By programming your node with the NI LabVIEW WSN Module, you can create a high-performance and power-managed device interface that optimizes traffic on your wireless connection and the battery life of your node. You can send and receive serial traffic, parse and process strings, and selectively send data wirelessly back to your host system. The sample interval of the node and how the node interacts with serial sensors is determined by the NI LabVIEW WSN Module application running on the node. The node sample interval, which determines how often the node wakes up to execute the sample case is configurable by WSN configuration nodes or in MAX. Typically, the sample case will contain your serial transmission or reception and any string processing or data reduction. Because of the sampling behavior of NI-WSN, the NI WSN-3230/3231 are not intended for applications requiring a streaming, wireless serial connection. Refer to the LabVIEW Wireless Sensor Network Module Help for more information. RS-232 and RS-485 Compatibility The NI WSN-3230 has one RS-232 DTE port. The port is fully compatible with the ANSI/EIA/TIA-232 standard. The NI WSN-3231 has one RS-485 DTE port. The port is fully compatible with the ANSI/EIA/TIA-485 standard. For more information about RS-232 and RS-485, refer to the NI Serial Hardware Specifications and Features Guide at ni.com/manuals. © National Instruments Corporation 16 NI WSN-3230/3231 User Guide and Specifications NI WSN-3230 RS-232 Port Wiring the RS-232 Port The NI WSN-3230 has one 18 position combicon screw terminal for connectivity to RS-232, DIO, and sensor power. 0 1 2 3 4 5 6 7 8 9 10 11 12 13 14 15 16 17 TX RX DGND RTS CTS DGND NC NC NC NC NC DGND SEN PWR 12V DIO 0 DGND DIO 1 DGND DIO PWR Figure 13. NI WSN-3230 Pinout NI WSN-3230/3231 User Guide and Specifications 17 ni.com NI WSN-3231 RS-485 Port Wiring the RS-485 Port The NI WSN-3231 has one 18 position combicon screw terminal for connectivity to RS-485, DIO, and sensor power. 0 1 2 3 4 5 6 7 8 9 10 11 12 13 14 15 16 17 TX TXDGND RX+ RXDGND NC NC NC NC NC DGND SEN PWR 12V DIO 0 DGND DIO 1 DGND DIO PWR Figure 14. NI WSN-3231 Pinout Operating Modes The NI WSN-3231 has two operating modes: four wire operating mode and two wire auto mode. Four Wire Mode In this mode, output buffers and receivers are always enabled. In this mode of operation, you have two different pairs of transmission and reception lines and so the transmission lines (TX+ and TX–) are always enabled for transmission and they always drive the lines. Likewise, the reception pair (RX+ and RX–) are always ready to accept the bytes. Two Wire Auto Mode In this mode, the transmitter is enabled automatically when needed and disabled as soon as transmission is finished. The receivers are disabled whenever the transmitter is enabled, to avoid the echo. This is the recommended mode of operation for 2-wire data transmission, because you do not have to enable or disable the transmitters manually. Battery Considerations The expected battery life of your NI WSN-3230 and NI WSN-3231 can vary greatly based on your NI LabVIEW WSN program, sampling interval, length and baud rate of serial transmission, serial cabling, temperature, and type of cells. The following graphs are provided as a reference to demonstrate estimated battery life under common conditions. For more information, refer to ni.com/info and enter WSNBatterylife. NI WSN-3230/3231 User Guide and Specifications 18 ni.com 4 3.5 Battery Life (Years) 3 2.5 2 1.5 1 115200 Baud 9600 Baud 0.5 4800 Baud 0 0 100 200 300 400 500 600 Sampling Interval (Seconds) Figure 15. Battery Life vs. Sampling Interval and Baud Rate1 4 3.5 Battery Life (Years) 3 2.5 2 1.5 1 1 Value (Single Precision) 10 Values (Single Precision) 0.5 50 Characters (String) 0 0 100 200 300 400 500 600 Sampling Interval (Seconds) Figure 16. Battery Life vs. Sampling Interval and Data Transmitted to the Gateway2 1 2 Test Conditions: 50 Bytes per serial message, 10 Values (Single Precision) sent back to Gateway per sampling interval Test Conditions: 9600 Baud, 50 Bytes per Serial Message © National Instruments Corporation 19 NI WSN-3230/3231 User Guide and Specifications 4 3.5 Battery Life (Years) 3 2.5 2 1.5 Tx 10 User-defined I/O Variable Every 10 Intervals 1 Tx 1 User-defined I/O Variable Every Interval 0.5 0 0 50 100 150 200 250 300 Sampling Interval (Seconds) Figure 17. WSN-3230/1 Battery Life vs. Sample Interval at Various Transmit Intervals1 Controlling Digital Inputs and Outputs The following sections discuss how to configure the NI WSN-3230/3231 device for different types of input and output, and how to connect external devices to the NI WSN-3230/3231 DIO terminals. On the 18-position combicon screw terminal connector, terminals 13–17 are the DIO section. The DIO section has the following terminals: • DIOx—signal terminal • DGND—ground terminal • DIO PWR—DIO Power positive (required when one of the DIO channels is configured for Drive High (Sourcing) or Drive High and Low (Sinking and Sourcing) mode) Note Use the Node Properties dialog box in the LabVIEW Project Explorer window to change DIO settings. The NI WSN-3230/3231 device has two bi-directional digital I/O channels. Each channel supports eight operational modes depending on whether the channel is configured as digital output or digital input. The NI-WSN software controls the different modes of operation by turning on and off the high side and low side switches. Digital Output Operational Modes The channels support the following digital output operational modes: 1 • Drive High (Sourcing) • Drive Low (Sinking) • 3V TTL Logic (Open-Collector with Pull-Up) • Drive High and Low (Sinking and Sourcing) Test Conditions: 9600 Baud, 50 bytes per Serial Message NI WSN-3230/3231 User Guide and Specifications 20 ni.com Note When configured in a digital output mode, reading the channel returns the state of the pin voltage with TTL thresholds. Digital Input Operational Modes The channels support the following digital input operational modes: • 24V Sinking • 24V Sinking with Power Management • TTL Logic • Contact Closure 3V TTL Pull Up DIO PWR High Side Switch DI (Internal) DIOx Low Side Switch DGND 24V Sinking Load NI WSN-3230/3231 Figure 18. Simplified Circuit Diagram of One DIO Channel Connecting Digital Outputs You can connect a variety of industrial devices such as solenoids, relays, and indicators to the NI WSN-3230/3231 device. Refer to the Specifications section to ensure compatibility. Note You must use 2-wire ferrules to create a secure connection when connecting more than one wire to a single terminal on the NI WSN-3230/3231. Note You can connect only one external DIO PWR supply to the NI WSN-3230/3231. The power supply provides the current for the devices you connect to the NI WSN-3230/3231. Connect the power supply positive lead to DIO PWR terminal and the power supply negative lead to one of the DGND terminals. The DIO PWR terminal on the NI WSN-3230/3231 is internally connected to each digital channel. Refer to the Specifications section for information about the power supply voltage range. Note The Drive High (Sourcing) and Drive High and Low (Sinking and Sourcing) modes require an external power supply connected to the DIO PWR terminal. © National Instruments Corporation 21 NI WSN-3230/3231 User Guide and Specifications Drive High (Sourcing) Drive High (Sourcing) mode is for devices that require high side drive or a sourcing output. When using this mode: • Connect the device to DIOx and connect the device common to the DGND terminal corresponding to that DIOx terminal. • The DIOx terminal is driven to the voltage supplied to DIO PWR when you turn on the channel. • Writing a digital value of 1 turns on the channel, and 0 turns off the channel. • The channel is high impedance when the channel is turned off (0). DIO PWR High Side Switch DI (Internal) DIOx + External Power – Supply Device DGND NI WSN-3230/3231 Figure 19. Connecting a Device to the NI WSN-3230/3231 in Drive High Mode Drive Low (Sinking) Drive Low (Sinking) mode is for devices that require low side drive or a sinking output. When using this mode: • The DIOx terminal is pulled to DGND when you turn on the channel. • Writing a digital value of 0 turns on the channel, and writing a digital value of 1 turns off the channel. • The channel is high impedance when the channel is turned off (1). • When driving inductive loads, use an external flyback diode or snubber circuit as shown in Figure 20. Flyback Diode DI (Internal) DIOx Low Side Switch DGND Device + External Power – Supply NI WSN-3230/3231 Figure 20. Connecting a Device to the NI WSN-3230/3231 in Drive Low (Sinking) Mode NI WSN-3230/3231 User Guide and Specifications 22 ni.com 3V TTL Logic (Open-Collector with Pull-Up) The 3V TTL Logic (Open-Collector with Pull-Up) mode can be used to connect to 3 V and 5 V logic inputs with TTL Logic compatible thresholds. When using this mode: • The DIOx terminal is pulled-up to 3 V through a pull-up resistor for a DIO output value of 1 and driven low to ground for a DIO output value 0. • The DIO line is read with 3V TTL Logic input thresholds. • A supply voltage is not required on DIO PWR. 3V TTL Pull Up DIOx DI (Internal) Low Side Switch TTL Device + External Power – Supply DGND NI WSN-3230/3231 Figure 21. Connecting a Device to the NI WSN-3230/3231 in 3V TTL Logic Mode Drive High and Low (Sinking and Sourcing) When using Drive High and Low (Sinking and Sourcing) mode: • Connect the device to DIOx and connect the device common to the DGND terminal corresponding to that DIOx terminal. • The DIOx terminal is driven to the voltage supplied to DIO PWR when you turn on the channel, and is driven to DGND when you turn off the channel. • If a supply voltage is not connected to DIO PWR, it operates as if it is set to the Drive Low (Sinking) mode. • Writing a digital value of 1 turns on the channel and writing a 0 turns the channel off. DIO PWR High Side Switch DI (Internal) DIOx Device + External Power – Supply Low Side Switch DGND NI WSN-3230/3231 Figure 22. Connecting a Device to the NI WSN-3230/3231 in Drive High and Low Mode © National Instruments Corporation 23 NI WSN-3230/3231 User Guide and Specifications Connecting Digital Inputs You can connect a variety of sensors, switches, and industrial devices to the NI WSN-3230/3231 device. Refer to the Specifications section to ensure compatibility. 24V Sinking In 24V Sinking mode, the DIOx terminal has a low impedance to ground and input thresholds compatible with 24 V signaling. Select this mode for connection to industrial 24V/IEC1131 sourcing output devices. 24V Sinking with Power Management In 24V Sinking with Power Management mode, the DIOx terminal is similar to 24V Sinking mode, but the low impedance path to ground is removed when the inputs are not being actively read. This can reduce the power consumption of the output device. This mode should only be used with output devices that have valid output states within 100 μs of having a low impedance path presented to the output. TTL Logic TTL Logic mode is suitable for most 3 V or 5 V logic signals. The DIOx terminal has high impedance inputs with TTL Logic compatible thresholds. Contact Closure Contact Closure mode is suitable for connections to contact switches wired between the input and ground. The DIOx terminal has TTL Logic compatible thresholds and provides a pull-up resistor to 3 V when the input is being read. If a contact to ground remains closed while the DIO Notification property is enabled, the current into the contact switch increases power consumption and can reduce battery life. Digital I/O Protection The high side switch on each I/O channel has short circuit protection. The low side switch on each I/O channel is oversized to be able to withstand higher currents than when in normal operating conditions. Understanding Short Circuit Protection The current that flows through the high side switch is continuously sensed. If a current above the trip limit is detected, the current protection trips and turns off the high side switch. The protection latches in the tripped state and only resets when the high side switch is given the command to turn off. High inrush currents that exist for a short time do not trip the short-circuit protection. Refer to the Specifications section for more information about the maximum continuous output current, short circuit behavior, and short circuit trip time. Preventing an Overcurrent Condition Follow these recommendations to prevent an overcurrent condition: • Do not connect DIO PWR to ground. • Do not ground unused terminals. • Do not exceed the output current rating of the channel. • Do not exceed the voltage ratings of the channel. Detecting a Overcurrent Condition To check whether or not the short circuit protection is tripped, the logic state of the DIO pin can be read when driving high using the digital input function. If DO is set to Drive High (Sourcing) or Drive High and Low (Sinking and Sourcing) modes and a digital value of 1 is written to the channel, a logical 1 should be read from the channel. If a logical 0 is read instead, then the current protection is tripped or a fault is preventing the high side switch from driving the output high. NI WSN-3230/3231 User Guide and Specifications 24 ni.com Resetting Channels After an Overcurrent Condition To reset the short circuit protection turn off the high side switch by writing a digital value of 0 to the channel. Then, check the wiring and remove any possible faults. The correct functionality of the circuit should be confirmed by writing a digital value 1 to the channel and then reading a logical 1 from it. Powering an External Sensor The NI WSN-3230/3231 can provide up to 50 mA at 12 V to external sensors through its sensor power (SEN PWR 12V) terminal. You can configure this sensor power output using NI LabVIEW WSN software to turn on a sensor at any time. Figure 23 shows the sensor power circuit connected to a device. SEN PWR 12V Powered Sensor Serial DGND NI WSN-3230/3231 Figure 23. External Sensor Connected to the NI WSN-3230/3231 Make sure the device you are connecting is compatible with the NI WSN-3230/3231 sensor power circuit voltage and current ranges. Refer to the Specifications section for more information. The clamp-on ferrite, included with your device, must be installed onto any wires connected to the sensor power port as close to the WSN node with a full turn, as shown in Figure 24. Figure 24. NI WSN-3230/3231 Cable Connection Specifications These specifications are typical from –40 to 70°C, unless otherwise noted. Refer to the LabVIEW WSN Pioneer Performance Benchmarks document, at zone.ni.com for more information. For the NI WSN gateway specifications, refer to the gateway documentation. NI WSN-3230/3231 User Guide and Specifications 25 ni.com RS-232 Baud rate ................................................................300, 600, 1200, 1800, 2400, 4800, 7200, 9600, 14400, 19200, 28800, 38400, 56000, 57600, 115200, 128000, 153600, 230400 bps Data bits .................................................................7 or 8 Stop bits .................................................................1 or 2 Parity ......................................................................Odd, even, or none Flow control ...........................................................Hardware (RTS/CTS), software (XON/XOFF), none Maximum cable length ..........................................2500 pF equivalent Note Cable capacitance greater than 1000 pF may adversely affect the maximum baud rate. Maximum RS-232 continuous voltage, (RX, CTS)..............................±15 V Data line ESD protection (human body model).....±8 kV Overvoltage protection...........................................±30 VDC RS-485 Maximum cable length ..........................................1.2 km (4,000 ft) Baud rate (standard baud rates only) .....................300, 600, 1200, 1800, 2400, 4800, 7200, 9600, 14400, 19200, 28800, 38400, 56000, 57600, 115200, 128000, 153600, 230400 bps Supported modes....................................................4 wire, 2 wire auto Data bits .................................................................7 or 8 Stop bits .................................................................1 or 2 Parity ......................................................................Odd, even, or none Flow control ...........................................................Software (XON/XOFF), none Maximum RS-485 common-mode voltage........................................... –7 V to +12 V Data line ESD protection (human body model).....±8 kV Overvoltage protection...........................................±30 VDC Sensor Power Voltage ...................................................................12 V ±10% Current ...................................................................50 mA maximum Protection Short circuit proof..........................................Indefinitely Overvoltage protection...................................±30 V NI WSN-3230/3231 User Guide and Specifications 26 ni.com Digital I/O Number of channels ...............................................2 Power-on output state.............................................High impedance DIO pin capacitance...............................................2000 pF Digital Input Modes (configurable per channel) .........................24V Sinking, 24V Sinking with Power Management, TTL Logic, Contact Closure Input voltage range ................................................0 to 30 VDC maximum Digital input logic level thresholds TTL Logic and Contact Closure modes High level (ON) input voltage ...............≥2 V Low level (OFF) input voltage...............≤0.8 V 24V modes IEC 1131-2 compatibility ......................Type 1 and 3 High level (ON) input voltage ...............≥10 V High level (ON) input current................≥2 mA High level (OFF) input voltage..............≤6 V Low level (OFF) input current ...............≤1 mA Input current TTL Logic and Contact Closure modes.........≤375 μA at 30 V ≤110 μA at 5 V ≤80 μA at 3 V Contact Closure mode pull-up current...........≤175 μA through closed contact 24V modes .....................................................≤6.4 mA at 30 V ≤3.2 mA at 15 V Minimum detectable pulse width TTL Logic mode............................................30 μs 24V modes .....................................................30 μs Contact closure mode.....................................100 μs Digital Output Modes (configurable per channel) .........................Drive High (Sourcing), Drive Low (Sinking), Drive High and Low (Sinking and Sourcing), and 3V TTL Logic (Open-Collector with Pull-Up) DIO power supply voltage range (VDIO_PWR) ........3.3 to 24 V Sourcing current (one channel)..............................250 mA maximum Sinking current (per channel) ................................1 A maximum Output voltage Sourcing .........................................................>(VDIO_PWR–750 mV) with IOUT <0.25 A Sinking ...........................................................<90 mV with IOUT <1 A 3V TTL Logic mode pull-up .........................>2 V with IOUT <20 μA © National Instruments Corporation 27 NI WSN-3230/3231 User Guide and Specifications DO protection Voltage ...........................................................+30 VDC maximum Reversed voltage ............................................None Short circuit (sourcing) Trip current ............................................0.26 A minimum, 1.2 A maximum Trip time.................................................<250 μs, at 1.2 A Overcurrent (sinking).....................................6.5 A maximum DO propagation delay Sinking ...........................................................150 μs Sourcing .........................................................2.5 ms Node Resources for LabVIEW WSN User flash size ........................................................188 Kbytes Number of flash erase cycles per sector ................100,000 Wireless Characteristics Radio mode ............................................................IEEE 802.15.4 RF data rate............................................................250 Kbps Range Americas ........................................................Up to 300 m International ...................................................Up to 150 m Frequency band1 ....................................................ISM 2.4 GHz (2400 MHz to 2483.5 MHz) Channels1 ...............................................................11–24 TX power Americas ........................................................+17 dBm maximum (50 mW) International ...................................................+10 dBm maximum Modulation type.....................................................DSSS (O-QPSK) Receiver sensitivity ................................................–102 dBm Antenna Connector.......................................................Female RP-SMA connector VSWR............................................................2.0 maximum Impedance ......................................................50 Ω Directivity ......................................................Omni Nominal gain..........................................................1.5 dBi 1 Due to regulations, the frequency bands depend upon country of operation. NI WSN-3230/3231 User Guide and Specifications 28 ni.com Power Requirements The following power requirements specifications are typical at 25 °C. Battery Power Caution Do not use rechargeable batteries. Internal battery .......................................................4 AA 1.5 V alkaline or lithium batteries Only use the following batteries ............................Energizer E91 AA, alkaline Duracell MN1500 AA, alkaline Energizer L91 AA, lithium Battery operating temperature range Energizer E91.................................................–18 °C to 55 °C Duracell MN1500 ..........................................–20 °C to 54 °C Energizer L91.................................................–40 °C to 60 °C Power consumption Sleep mode.....................................................0.3 mW Note Power consumption and battery life will vary per application. Refer to the Battery Considerations for examples of how settings like baud rate and sample interval impact battery performance. For more information, refer to ni.com/info and enter WSNBatterylife. External Power Caution You must use a UL Listed ITE power supply marked LPS with the NI WSN-3230/3231. The power supply must also meet any safety and compliance requirements for the country of use. Voltage range .........................................................5 to 30 V Power input mating connector ...............................2-position mini-combicon, Phoenix Contact part number: 1714977 Power consumption1 Sleep mode.....................................................1 mW 60 second sample interval..............................1 mW at 12 V 1 second sample interval................................20 mW at 12 V Router mode2 .................................................200 mW at 12 V Physical Characteristics Screw-terminal wiring ...........................................14 to 24 AWG wire Torque for screw terminals ....................................0.2 to 0.25 N · m Dimensions ............................................................Refer to Figure 2 for device dimensions Weight ....................................................................Approx. 242 g (8.5 oz) Weight with antenna .............................................Approx. 256 g (9 oz) 1 2 Device executing NI LabVIEW WSN Default VI on the Node. End node mode. Router connected directly to a NI WSN gateway. 1 second sample interval. © National Instruments Corporation 29 NI WSN-3230/3231 User Guide and Specifications Safety Standards The NI WSN-3230/3231 is designed to meet the requirements of the following standards of safety for electrical equipment for measurement, control, and laboratory use: • IEC 61010-1, EN 61010-1 • UL 61010-1, CSA 61010-1 Note For UL and other safety certifications, refer to the product label, or go to ni.com/ certification, search by model number or product line, and click the appropriate link in the Certification column. Hazardous Locations U.S. (UL) ...............................................................Class I, Division 2, Groups A, B, C, D, T4; Class I, Zone 2, AEx nC IIC T4 Canada (C-UL) ......................................................Class I, Division 2, Groups A, B, C, D, T4; Class I, Zone 2, Ex nL IIC T4 Europe (DEMKO)..................................................Ex nA nL IIC T4 RF Safety Warning This equipment complies with FCC radiation exposure limits set for uncontrolled equipment and meets the FCC radio frequency (RF) Exposure Guidelines in Supplement C to OET65. This product generates and radiates radio frequency energy. To comply with the radio frequency radiation exposure guidelines in an uncontrolled environment, this equipment should be installed and operated with at least 20 cm between the radiator and the person’s body (excluding extremities: hands, wrists, feet, and legs). This equipment complies with the European Council Recommendation (1995/519/EC) on the limitation of exposure of the general public to electromagnetic fields. Compliance was determined in accordance with the requirements in EN 50371. Environmental For outdoor use, mount the system in a suitably rated enclosure. Operating temperature (IEC-60068-2-1 and IEC-60068-2-2) ....................–40 to 70 °C Storage temperature (IEC-60068-2-1 and IEC-60068-2-2) ....................–40 to 85 °C Operating humidity (IEC-60068-2-56) ..................10 to 90% RH, noncondensing Storage humidity (IEC-60068-2-56)......................5 to 95% RH, noncondensing Pollution Degree (IEC 60664) ...............................2, indoor use only Maximum altitude..................................................2,000 m Indoor use only. Shock and Vibration Operating vibration, random (IEC 60068-2-64) ....5 grms, 10 to 500 Hz Operating shock (IEC 60068-2-27) .......................30 g, 11 ms half sine, 50 g, 3 ms half sine, 18 shocks at 6 orientations Operating vibration, sinusoidal (IEC 60068-2-6) ....5 g, 10 to 500 Hz NI WSN-3230/3231 User Guide and Specifications 30 ni.com Electromagnetic Compatibility This product is designed to meet the requirements of the following standards of EMC for electrical equipment for measurement, control, and laboratory use: • EN 61326-1 (IEC 61326-1): Class A emissions; Basic immunity • EN 55011 (CISPR 11): Group 1, Class A emissions • AS/NZS CISPR 11: Group 1, Class A emissions • FCC 47 CFR Part 15B: Class A emissions • ICES-001: Class A emissions The NI WSN-3230/3231 also meets the requirements of the following EMC standards for intentional radiators: • EN 300 328 • EN 301 489-1 and EN 301 489-17 • FCC 47 CFR Part 15C • IC RSS-210 Note In the United States (per FCC 47 CFR), Class A equipment is intended for use in commercial, light-industrial, and heavy-industrial locations. In Europe, Canada, Australia and New Zealand (per CISPR 11) Class A equipment is intended for use only in heavy-industrial locations. Note Group 1 equipment (per CISPR 11) is any industrial, scientific, or medical equipment that does not intentionally generates radio frequency energy for the treatment of material or inspection/analysis purposes. Note For EMC certification and additional information, refer to the product label or the Online Product Certification section. CE Compliance This product meets the essential requirements of applicable European Directives, as amended for CE marking, as follows: • 2006/95/EC; Low-Voltage Directive (safety) • 2004/108/EC; Electromagnetic Compatibility (EMC) Directive • 1999/5/EC; Radio and Telecommunications Terminal Equipment (R&TTE) Directive Regulatory Information United States This product generates and radiates radio frequency energy. To comply with the radio frequency radiation exposure guidelines in an uncontrolled environment, this equipment must be installed and operated while maintaining a minimum body-to-antenna distance of 20 cm. This product complies with Part 15 of the FCC Rules. Operation is subject to these two conditions: (1) this device may not cause harmful interference, and (2) this device must accept any interference received, including interference that may cause undesired operation. This product does not contain any user serviceable components. Any unauthorized product changes or modifications will invalidate the warranty and all applicable regulatory certifications and approvals. © National Instruments Corporation 31 NI WSN-3230/3231 User Guide and Specifications Canada This product complies with Industry Canada RSS-210. Cet appareil est conforme aux norme RSS210 d’Industrie Canada. Europe—EU Declaration of Conformity Marking by the above CE symbol on the label indicates compliance with the Essential Requirements of the R&TTE Directive of the European Union (1999/5/EC). This equipment meets the following conformance standards: EN 300 893, EN 300 328, EN 301 489-17, EN 60950. Europe – Restrictions for Use of 2.4 GHz Frequencies in European Community Countries België/ Belgique: For private usage outside buildings across public grounds over less than 300 m no special registration with IBPT/BIPT is required. Registration to IBPT/BIPT is required for private usage outside buildings across public grounds over more than 300 m. For registration and license please contact IBPT/BIPT. Voor privé-gebruik buiten gebouw over publieke groud over afstand kleiner dan 300 m geen registratie bij BIPT/IBPT nodig; voor gebruik over afstand groter dan 300 m is wel registratie bij BIPT/IBPT nodig. Voor registratie of licentie kunt u contact opnemen met BIPT. Dans le cas d'une utilisation privée, à l'extérieur d'un bâtiment, au-dessus d'un espace public, aucun enregistrement n'est nécessaire pour une distance de moins de 300 m. Pour une distance supérieure à 300 m un enregistrement auprès de I'IBPT est requise. Pour les enregistrements et licences, veuillez contacter I'IBPT. Deutschland: License required for outdoor installations. Check with reseller for procedure to follow. Anmeldung im Outdoor-Bereich notwendig, aber nicht genehmigungspflichtig.Bitte mit Händler die Vorgehensweise abstimmen. France: Restricted frequency band: only channels 1 to 7 (2400 MHz and 2454 MHz respectively) may be used outdoors in France. Bande de fréquence restreinte : seuls les canaux 1- 7 (2400 et 2454 MHz respectivement) doivent être utilisés endroits extérieur en France. Vous pouvez contacter I'Autorité de Régulation des Télécommuniations (http://www.art-telecom.fr) pour la procédure à suivre. Italia: License required for indoor use. Check with reseller for procedure to follow. E'necessaria la concessione ministeriale anche per l'uso interno. Verificare con i rivenditori la procedura da seguire. Nederland: License required for outdoor installations. Check with reseller for procedure to follow. Licentie verplicht voor gebruik met buitenantennes. Neem contact op met verkoper voor juiste procedure. Japan The certified radio equipment is embedded in this device. 本機器には認証済み無線設備が内蔵されています Singapore Complies with IDA Standards DA105692 NI WSN-3230/3231 User Guide and Specifications 32 ni.com Taiwan R.O.C. 低功率電波輻射性電機管理辦法 第十二條經型式認證合格之低功率射頻電機,非經許可,公司、商號或使 用者均不得擅自變更頻率、加大功率或變更原設計之特性及功能。 第十四條低功率射頻電機之使用不得影響飛航安全及幹擾合法通信;經發 現有幹擾現象時,應立即停用,並改善至無幹擾時方得繼續使用。 前項合法通信,指依電信規定作業之無線電信。低功率射頻電機須忍受合法通信 或工業、科學及醫療用電波輻射性電機設備之幹擾。 EU Regulatory Statements Česky [Czech] National Instruments tímto prohlašuje, _e tento NI WSN-3230/3231 je ve shodě se základními po_adavky a dalšími příslušnými ustanoveními směrnice 1999/5/ES. Dansk [Danish] Undertegnede National Instruments erklćrer herved, at fřlgende udstyr NI WSN-3230/3231 overholder de vćsentlige krav og řvrige relevante krav i direktiv 1999/5/EF. Deutsch [German] Hiermit erklärt National Instruments, dass sich das Gerät NI WSN-3230/3231 in Übereinstimmung mit den grundlegenden Anforderungen und den übrigen einschlägigen Bestimmungen der Richtlinie 1999/5/EG befindet. Eesti [Estonian] Käesolevaga kinnitabNational Instruments seadme NI WSN-3230/3231 vastavust direktiivi 1999/5/EÜ põhinõuetele ja nimetatud direktiivist tulenevatele teistele asjakohastele sätetele. English Hereby, National Instruments, declares that this NI WSN-3230/3231 is in compliance with the essential requirements and other relevant provisions of Directive 1999/5/EC. Español [Spanish] Por medio de la presente National Instruments declara que el NI WSN-3230/3231 cumple con los requisitos esenciales y cualesquiera otras disposiciones aplicables o exigibles de la Directiva 1999/5/CE. Ελληνική [Greek] ΜΕ ΤΗΝ ΠΑΡΟΥΣΑ National Instruments ΔΗΛΩΝΕΙ ΟΤΙ NI WSN-3230/3231 ΣΥΜΜΟΡΦΩΝΕΤΑΙ ΠΡΟΣ ΤΙΣ ΟΥΣΙΩΔΕΙΣ ΑΠΑΙΤΗΣΕΙΣ ΚΑΙ ΤΙΣ ΛΟΙΠΕΣ ΣΧΕΤΙΚΕΣ ΔΙΑΤΑΞΕΙΣ ΤΗΣ ΟΔΗΓΙΑΣ 1999/5/ΕΚ. Français [French] Par la présente National Instruments déclare que l'appareil NI WSN-3230/3231 est conforme aux exigences essentielles et aux autres dispositions pertinentes de la directive 1999/5/CE. Italiano [Italian] Con la presente National Instruments dichiara che questo NI WSN-3230/3231 è conforme ai requisiti essenziali ed alle altre disposizioni pertinenti stabilite dalla direttiva 1999/5/CE. Latviski [Latvian] Ar šo National Instruments deklarē, ka NI WSN-3230/3231 atbilst Direktīvas 1999/5/EK būtiskajām prasībām un citiem ar to saistītajiem noteikumiem. Lietuvių [Lithuanian] Šiuo National Instruments deklaruoja, kad šis NI WSN-3230/3231 atitinka esminius reikalavimus ir kitas 1999/5/EB Direktyvos nuostatas. Nederlands [Dutch] Hierbij verklaart National Instruments dat het toestel NI WSN-3230/3231 in overeenstemming is met de essentiële eisen en de andere relevante bepalingen van richtlijn 1999/5/EG. Malti [Maltese] Hawnhekk, National Instruments, jiddikjara li dan NI WSN-3230/3231 jikkonforma mal-htigijiet essenzjali u ma provvedimenti ohrajn relevanti li hemm fid-Dirrettiva 1999/5/EC. © National Instruments Corporation 33 NI WSN-3230/3231 User Guide and Specifications Magyar [Hungarian] Alulírott, National Instruments nyilatkozom, hogy a NI WSN-3230/3231 megfelel a vonatkozó alapvetõ követelményeknek és az 1999/5/EC irányelv egyéb elõírásainak. Polski [Polish] Niniejszym National Instruments. oświadcza, że NI WSN-3230/3231 jest zgodny z zasadniczymi wymogami oraz pozostałymi stosownymi postanowieniami Dyrektywy 1999/5/EC. Português [Portuguese] National Instruments declara que este NI WSN-3230/3231 está conforme com os requisitos essenciais e outras disposições da Directiva 1999/5/CE. Slovensko [Slovenian] National Instruments izjavlja, da je ta NI WSN-3230/3231 v skladu z bistvenimi zahtevami in ostalimi relevantnimi določili direktive 1999/5/ES. Slovensky [Slovak] National Instruments týmto vyhlasuje, _e NI WSN-3230/3231 spĺňa základné po_iadavky a všetky príslušné ustanovenia Smernice 1999/5/ES. Suomi [Finnish] National Instruments vakuuttaa täten että NI WSN-3230/3231 tyyppinen laite on direktiivin 1999/5/EY oleellisten vaatimusten ja sitä koskevien direktiivin muiden ehtojen mukainen. Svenska [Swedish] Härmed intygar National Instruments att denna NI WSN-3230/3231 står I överensstämmelse med de väsentliga egenskapskrav och övriga relevanta bestämmelser som framgår av direktiv 1999/5/EG. Íslenska [Icelandic] Hér með lýsir National Instruments yfir því að NI WSN-3230/3231 er í samræmi við grunnkröfur og aðrar kröfur, sem gerðar eru í tilskipun 1999/5/EC. Norsk [Norwegian] National Instruments erklærer herved at utstyret NI WSN-3230/3231 er i samsvar med de grunnleggende krav og øvrige relevante krav i direktiv 1999/5/EF. Online Product Certification Refer to the product Declaration of Conformity (DoC) for additional regulatory compliance information. To obtain product certifications and the DoC for this product, visit ni.com/certification, search by model number or product line, and click the appropriate link in the Certification column. Environmental Management NI is committed to designing and manufacturing products in an environmentally responsible manner. NI recognizes that eliminating certain hazardous substances from our products is beneficial to the environment and to NI customers. For additional environmental information, refer to the NI and the Environment Web page at ni.com/ environment. This page contains the environmental regulations and directives with which NI complies, as well as other environmental information not included in this document. Waste Electrical and Electronic Equipment (WEEE) EU Customers At the end of the product life cycle, all products must be sent to a WEEE recycling center. For more information about WEEE recycling centers, National Instruments WEEE initiatives, and compliance with WEEE Directive 2002/96/EC on Waste and Electronic Equipment, visit ni.com/environment/weee. Battery Replacement and Disposal Cd/Hg/Pb Battery Directive After replacement, recycle the old battery. For information about the available collection and recycling scheme (and your nearest National Instruments Branch Office) or on Battery Directive compliance (Directive 2006/66/EC of the European Parliament and Council) in a particular EU country visit ni.com/company/citizenship/product.htm#battery. NI WSN-3230/3231 User Guide and Specifications 34 ni.com Taiwan R.O.C. 廢電池請回收 ⬉ᄤֵᙃѻક∵ᶧࠊㅵ⧚ࡲ⊩ ˄Ё RoHS˅ Ёᅶ᠋ National Instruments ヺড়Ё⬉ᄤֵᙃѻકЁ䰤ࠊՓ⫼ᶤѯ᳝ᆇ⠽䋼ᣛҸ (RoHS)DŽ ݇Ѣ National Instruments Ё RoHS ড়㾘ᗻֵᙃˈ䇋ⱏᔩ ni.com/environment/rohs_chinaDŽ (For information about China RoHS compliance, go to ni.com/environment/rohs_china.) Where to Go for Support The National Instruments Web site is your complete resource for technical support. At ni.com/support you have access to everything from troubleshooting and application development self-help resources to mail and phone assistance from NI Application Engineers. National Instruments corporate headquarters is located at 11500 North Mopac Expressway, Austin, Texas, 78759-3504. National Instruments also has offices located around the world to help address your support needs. For telephone support in the United States, create your service request at ni.com/support and follow the calling instructions or dial 512 795 8248. For telephone support outside the United States, visit the Worldwide Offices section of ni.com/niglobal to access the branch office Web sites, which provide up-to-date contact information, support phone numbers, email addresses, and current events. LabVIEW, National Instruments, NI, ni.com, the National Instruments corporate logo, and the Eagle logo are trademarks of National Instruments Corporation. Refer to the Trademark Information at ni.com/trademarks for other National Instruments trademarks. Other product and company names mentioned herein are trademarks or trade names of their respective companies. For patents covering National Instruments products/technology, refer to the appropriate location: Help»Patents in your software, the patents.txt file on your media, or the National Instruments Patent Notice at ni.com/patents. Refer to the Export Compliance Information at ni.com/legal/ export-compliance for the National Instruments global trade compliance policy and how to obtain relevant HTS codes, ECCNs, and other import/export data. © 2011–2012 National Instruments Corporation. All rights reserved. 373305B-01 Jan12