1
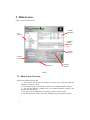
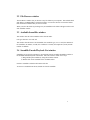
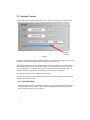
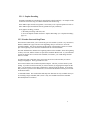
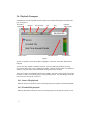
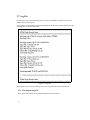
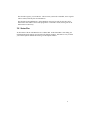
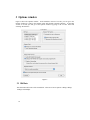
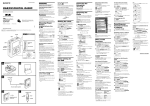
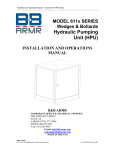
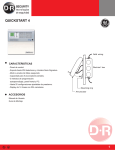
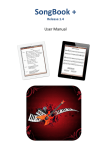
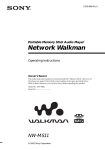
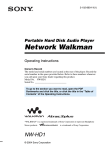
1 Overview ......................................................................................................................... 1
2 Main Screen..................................................................................................................... 2
2.1 Main Screen Overview ........................................................................................... 2
2.2 File Browser window .............................................................................................. 3
2.3 Available Soundfiles window ................................................................................. 3
2.4 Soundfile Encode/Playback List window ............................................................... 3
2.5 Encoder Controls .................................................................................................... 4
2.5.1 Batch Encoding............................................................................................... 4
2.5.1.1 Gapless Encoding ................................................................................... 5
2.5.2 Encoder Start and Stop Times ........................................................................ 5
2.6 Playback Transport ................................................................................................. 6
2.6.1 Source File playback....................................................................................... 6
2.6.2 Encoded File playback.................................................................................... 6
2.6.3 Real Time Encode/Decode ............................................................................. 7
2.7 Log File ................................................................................................................... 8
2.7.1 Clearing the Log File ...................................................................................... 8
2.8 Status Bar ................................................................................................................ 9
3 Options window ............................................................................................................ 10
3.1 Bit Rate ................................................................................................................. 10
3.2 Output File Names ................................................................................................ 11
3.2.1 Include bit rate in file name .......................................................................... 11
3.2.2 Overwrite existing files................................................................................. 11
3.2.3 Rename file ................................................................................................... 11
3.3 Output Path ........................................................................................................... 11
3.3.1 Output to source file folder........................................................................... 11
3.3.2 Use specified folder ...................................................................................... 11
3.4 Output file format ................................................................................................. 12
3.4.1 with RIFF wave file header .......................................................................... 12
3.4.2 without RIFF wave file header and create property file ............................... 12
3.4.3 Gapless Recording ........................................................................................ 12
3.5 Audio Output Device ............................................................................................ 12
3.6 Encoding Finished ................................................................................................ 12
i
ii
1 Overview
This software performs professional ATRAC3plus encoding.
Formats supported include stereo ATRAC3 at a data rate of 132kbps, and stereo ATRAC-X encoding at data rates of 48kbps, 64kbps, and 256kbps.
A player allows listening to soundfiles, both encoded and unencoded soundfiles.
Installers are included for Windows and Mac OS X. The software can only be run on one
computer at a time, because it requires the copy-protection dongle in order to work. The dongle
can easily be moved from one computer to another.
The operation of the Windows and Mac versions are nearly identical, as well as the layout of the
screens in each version.
1
2 Main Screen
Figure 1 shows the Main Screen.
Available
Soundfiles
File
Browser
Soundfile
Encode/
Playback
List
Display
Log File
encoder
controls
status bar
playback
transport
Figure 1
2.1 Main Screen Overview
The general workflow goes like this:
1) You will use the File Browser window to browse to the folder that holds the
soundfiles you want to encode.
2) The soundfiles in the selected folder are listed in the Available Soundfiles window.
3) You will drag-and-drop soundfiles from the Available Soundfiles window to the
Soundfile Encoder window.
4) You perform the encoding process by using the encoder controls window.
5) You can audition the "before" and "after" soundfiles using the Playback Transport.
2
2.2 File Browser window
The File Brower window lets you browse to any file folder on you computer. This includes hard
disk folders, CD-ROM folders, and network folders. You use this browser to locate the folders
that contain the soundfiles that you want to encode.
When you select the folder (by clicking on it), all soundfiles in the folder will appear in the Available Sounfiles window.
2.3 Available Soundfiles window
This window lists all of the soundfiles in the selected folder .
File types listed are .wav and .aiff.
This window lists the name of each soundfile, the sound file type (.wav or .aiff), the duration of
the soundfiles (in minutes, seconds, and 1/100ths of a second), the sample rate (in Hz), and the
number of channels.
2.4 Soundfile Encode/Playback List window
Soundfiles are selected for encoding by moving them from the Available Soundfiles window to
the Soundfile Encode/Playback List window. This can be done in either of two ways:
1) Drag-and-drop the soundfile by using the left mouse button.
2) Double click on the soundfile in the Available Sound
Each new soundfile is added to the bottom of the list.
To remove a soundfile from the list, double-click on the soundfile.
3
2.5 Encoder Controls
The Encoder Controls initiate the encoding process. The encoder controls can also be used to
specify start and stop times if you only want to encode a part of a soundfile (see Figure 2).
Encode
Progress
Indicator
Figure 2
Encoding is initiated by clicking on the Encode button. The encoder will encode every one of the
sounfiles in the Soundfile Encoder window, starting at the top of the list.
During the encoding process, the Soundfile Encoder window will indicate the encoding status of
each soundfile in the "status" column of the window. If a sounfile is being encoded, it’s status
will be "In Progress". A soundfile that is not yet encoded will be listed as "Not Encoded". A
soundfile which has completed the encoding process will be listed as "Complete".
The Stop button will abort the encoding that is in progress.
A progress bar under the Encode and Stop buttons shows the encoder progress for the particular
soundfile that is being encoded.
2.5.1 Batch Encoding
To perform batch encoding of multimple soundfiles, just place all the soundfiles in the Soundfile Encode/Playback List window. When you click the Encode button, all of the files listed
will be encoded, starting at the top of the list.
4
2.5.1.1 Gapless Encoding
Sometimes soundfiles are intended to by played back-to-back seamlessly. An example of this
is when the end of one song in a album crossfades into another song.
Since ATRAC3plus encodes in segments, it is necessary to do a special operation in order to
make ATRAC3plus-encoded files that are guaranteed to play seamlessly.
To do gapless encoding, you must
1) Do batch processing of the files, and
2) Go to the Options window and select "Gapless Recording" (see “Gapless Recording” ,
page 12).
2.5.2 Encoder Start and Stop Times
The Encoder Controls allow you to encode only part of a sounfile if you like. Say, for instance,
that the soundfile has a gap of silence at the beginning, that you want to leave out of the
encoded soundfile. You can use the Start and Stop times of the Encoder Controls to exclude
part of the beginning or the end of the soundfile from the encoded soundfile.
The Start and End times default to the beginning and end of the soundfile, where the beginning
is always zero time, and the end time is equal to the soundfile duration time. If you wanted the
encoder to skip the first 5 seconds of the soundfile, for instance, you would change the start
time to 5 seconds.
To change the Start or End time, drag your mouse cursor across the time that you want to
change, to highlight it. Then type in the new time.
You can also transfer times from the Playback Transport. This lets you locate times by auditioning. If you have located a time that you want to transfer (by stopping the transport at that
time), you can transfer it to the Start or End time by clicking on the Set button. If you decide
that you want to go back to the default time (zero for Start and duration for End) you can click
on the Reset button.
***PLEASE NOTE: The encoded Start and Stop Time functions are only available when you
are encoding a single soundfile (that is, there is only one soundfile listed in the Soundfile
Encode/Playback List window).
5
2.6 Playback Transport
Soundfiles listed in the Soundfile Encoder window can be auditioned using the Playback Transport (see Figure 3).
Rewind to
Playback
Rewind
Fast forward
Stop
Play
beginning
Time Display
Time Locator
Volume Control
Level Meters
Figure 3
To play a soundfile, click on the sounfile to highlight it. Then click on the Play button on the
transport.
You can also play multiple soundfiles on the list. Select the additional soundfiles by using
Ctrl-Click or Shift-Click to select additional soundfiles. Then hit the Play button. The Playback
Transport will play all the selected soundfiles, starting from the top of the list.
Time Locator shows the playback location in the soundfile. The Time Locator can be moved with
the mouse, so that you can quickly jump to a new playback location. The Time Display shows the
time of the Time Locator as you move it.
2.6.1 Source File playback
When the Source File button is selected, the transport plays the original (unencoded) soundfile.
2.6.2 Encoded File playback
When the Encoded File button is selected, the transport plays the encoded file (if there is one).
6
2.6.3 Real Time Encode/Decode
When the Real Time Encode/Decode button is selected, the transport will take the unencoded
file, and process it through the encoder and decoder in real time. This lets you preview how a
soundfile will sound with ATRAC3plus encoding, without creating an encoded file.
7
2.7 Log File
N-code keeps a log of the encoding process. Everytime a soundfile is encoded, a new entry is
added to the top of the log file.
The Log File is a text file that gives information about the file that was encoded, parameters in the
encoding process, and encoder results.
Figure 4 A Log File
The Log File can be viewed by clicking on the View Log File button on the Main Screen.
2.7.1 Clearing the Log File
The Log File will continue to accumulate information until you clear it.
8
The clear the Log File, you can delete it. The next time you encode a soundfile, a new Log File
will be created, with only the new information.
The filename is EncodeStatus.log. In the Windows version of N-code, the Log File can be
found in the same folder as the N-code program file. In the Mac version, the Log file can be
found in the root directory.
2.8 Status Bar
At the bottom of the N-code Main Screen is a Status Bar. In this Status Bar is text telling you
information about the options you selected in the Options window. This makes it easy to check
your selected options without the need to go to the Options window.
9
3 Options window
Figure 5 shows the Options window. In the Windows version of N-code, you can get to the
Options window by going to the Options menu and selecting "Encoder Options". In the Mac
version of N-code, you can get to the Options window by going to the "n-code" menu and
selecting "Preferences".
Figure 5
3.1 Bit Rate
This determines the bit rate of the encoded file. There are 4 bit rate options: 48kbps, 64kbps,
132kbps, and 256kbps.
10
3.2 Output File Names
3.2.1 Include bit rate in file name
ATRAC-X encoding gives you a choice of 3 different bit rates. This option adds some text to
the end of the file name that will indicate the bit rate. For instance, if you encode mysong.wav,
and you encode at 64kbps, the file name of the encoded file will be "mysong.atx" without this
option, and "mysong64k.atx" with this option.
3.2.2 Overwrite existing files
This option is mutually exclusive with the next option, "Rename file".
This option will cause the previously encoded file to be overwritten with the new encoded file.
3.2.3 Rename file
This option is mutually exclusive with the previous option, "Overwrite existing files".
This option saves previously encoded copies of this file as well as the new one. It adds a
number to the filename to keep track of the multiple copies. For instance, if the file being
encoded is "mysong.wav", the first encoded file would be "mysong_01.atx", the second
encoded file would be "mysong_02.atx", and so on.
3.3 Output Path
3.3.1 Output to source file folder
This option is mutually exclusive with the next option, "Use specified folder".
With this option selected, the encoded soundfile is stored in the same folder as the original .wav
or .aiff file (the "source" file).
3.3.2 Use specified folder
This option is mutually exclusive with the previous option, "Output to source file folder".
This option allows you to select a file folder where the encoded files will be stored.
You can either type a pathname into the window, or click on the button labeled "..." to browse to
the desired folder.
11
3.4 Output file format
3.4.1 with RIFF wave file header
This option is only available when "ATRAC-3 132k bps" is chosen as the Bit Rate. This option
is mutually exclusive with the following option, "without RIFF wave file header and create
property file".
3.4.2 without RIFF wave file header and create property file
This option is only available when "ATRAC-3 132k bps" is chosen as the Bit Rate. This option
is mutually exclusive with the following option, "with RIFF wave file header".
This option allows backward compatibility with earlier uses of ATRAC-encoded files.
If a RIFF wave file header is not selected, a "property file" is created to replace the information
that would have been placed in the file header.
3.4.3 Gapless Recording
Often, in a recording, it is necessary for the sound playback to continue uninterrupted between
tracks. For this to work correctly on ATRAC3plus-encoded soundfiles, special consideration is
required in the encoding process to ensure no gaps in the playback between soundfiles.
Choosing this option removes the clicks, pops, or other anomolies that could occur when
attempting seamless playback.
3.5 Audio Output Device
If your computer has more than one audio output device, you can choose which one ot use for
soundfile playback. Just click on your selection.
3.6 Encoding Finished
N-code can notify you when encoding is completed.
At the bottom of the Options window is a checkbox that says "Show message dialog at end of
encode. If this box is checked, a small window will pop up at the end of the encoding process to
tell you that it is done.
12
A
audio output device 12
Available Soundfiles window 3
B
batch encoding 4
bit rate 10
D
dongle 1
E
Encoded File button 6
Encoder Controls 4
F
file
property 12
File Brower window 3
file names
output 11
G
Gapless encoding 5, 12
I
Include bit rate 11
M
Main Screen 2
O
Options window 10
output device 12
output file format 12
Output file names 11
output path 11
overview 1
overwrite existing file 11
P
Playback Transport 6
property file 12
R
rate
bit 10
i
Real Time Encode/Decode 7
rename file 11
RIFF wave header 12
S
Soundfile Endcode/Playback List window 3
Source File button 6
Start Time 5
Stop Time 5
T
Transport
playback 6
W
window
Available Soundfiles 3
File Browser 3
Options 10
Soundfile Encode/Playback List 3
ii