1
User’s
Manual
PRM
Synchronization Tool
IM 01R01A20-01E
IM 01R01A20-01E
9th Edition
Toc-1
PRM Synchronization Tool
IM 01R01A20-01E 9th Edition
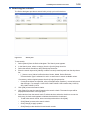
CONTENTS
A
Symbol Marks in the User’s Manual........................................................A-1
1Overview..................................................................................................... 1-1
System Configuration.................................................................................... 1-1
PRM Synchronization Tool activities............................................................. 1-1
Device for Tool............................................................................................... 1-2
Supported communication protocol....................................................... 1-2
Devices .................................................................................................. 1-2
Data for Tool.................................................................................................. 1-2
Devices data........................................................................................... 1-2
2
Operation Preparation.............................................................................. 2-1
Software operation condition......................................................................... 2-1
Create a PRM user account with the correct privilege.................................. 2-2
Establish connection to the PRM network..................................................... 2-2
Define PRM Server to connect to.................................................................. 2-3
3
PRM Synchronization Tool start.............................................................. 3-1
3-1
Restoring device information from PRM to FieldMate.................................. 3-2
To restore device information:....................................................................... 3-2
Handling overwrite messages....................................................................... 3-5
3-2
Backing up device information from FieldMate to PRM................................ 3-6
To back up device information:...................................................................... 3-6
Handling overwrite messages....................................................................... 3-8
3-3
Synchronizing device information between PRM and FieldMate................ 3-9
To synchronize device information:............................................................... 3-9
Handling conflict messages........................................................................ 3-11
3-4
Performing advanced configurations and searching devices................... 3-12
Performing advanced configurations.......................................................... 3-12
History.................................................................................................. 3-13
Memo................................................................................................... 3-14
Documents........................................................................................... 3-15
Parameter sets..................................................................................... 3-15
DTM data.............................................................................................. 3-17
Searching for a device................................................................................. 3-18
Media No. IM 01R01A20-01E (CD) 9th Edition : Oct. 31, 2014 (KP)
All Rights Reserved Copyright © 2008, Yokogawa Electric Corporation
IM 01R01A20-01E
Toc-2
4
Device Tag Extension Mode..................................................................... 4-1
Outline of PRM/FieldMate synchronization compatibilities........................... 4-1
Preconditions for PRM/FieldMate Synchronization...................................... 4-1
Synchronizing Devices with HART Device Tag Display Format................... 4-2
Synchronizing Devices in STARDOM Upstream Project.............................. 4-3
Appendix......................................................................................................... App.-1
References......................................................................................................App.-1
IM 01R01A20-01E
A-1
<A Symbol Marks in the User’s Manual>
A
Symbol Marks in the User’s Manual
The symbol marks appearing in the user’s manual have the following meanings.
WARNING
Indicates a potentially hazardous situation which, if not avoided, could result in death or serious
injury.
CAUTION
Indicates a potentially hazardous situation which, if not avoided, may result in minor or
moderate injury. It may also be used to alert against unsafe practices.
IMPORTANT
Indicates that operating the hardware or software in this manner may damage it or lead to
system failure.
NOTE
Draws attention to information essential for understanding the operation and features.
TIP
This symbol indicates information important to understanding the operations and functions.
SEE ALSO
This symbol indicates items to be referred to.
If the reference target is indicated in green, the reference target item can be accessed.
If the reference target is indicated in black, the reference target item cannot be accessed.
IM 01R01A20-01E
1-1
<1 Overview>
1
Overview
PRM Synchronization Tool realizes device information exchange between FieldMate
and Plant Resource Manager (PRM). The consolidated database management in PRM is
providedbyutilizingfielddeviceinformationimplementedandacquiredbyFieldMate
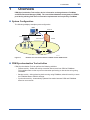
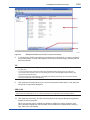
SystemConfiguration
Thefollowingsdisplayssamplesystemconfiguration
PRM
Ethernet
Control station
Data Transfer
Firewall
FieldMate
Field device
010101E.ai
Figure1-1
Establish the connection between FieldMate and the PRM network
PRM Synchronization Tool activities
PRMSynchronizationToolcanperformthefollowingactivities:
• Restoreactivity-SelectthisactivitytotransferdatarecordsfromPRMtoFieldMate.
Thisenablesuserstorefertopreviousdatawhenperformingon-sitedevicetuningusing
FieldMate.
• Backupactivity-AfterperformingdevicetuningusingFieldMate,selectthisactivitytostore
theFieldMatedatatoPRMforstorage.
• Synchronizeactivity-AutomaticallyupdatesinformationbetweenPRMandFieldMate
basedonnewrecords.
IM 01R01A20-01E
1-2
<1 Overview>
Device for Tool
Supported communication protocol
FOUNDATION fieldbus
HART
BRAIN
Devices
Devices registered in FieldMate
Devices registered in PRM
Data for Tool
The following data are object of Synchronization Tool
Devices data
NOTE
Descriptions of Device maintenance Information in R2.06 or before are different form the ones
in R3.01.
In this User’s Manual, descriptions above are based on R2.06 or before. When R3.01 is used,
please refer to Table 1-1.
Table 1-1
PRM/FieldMate Object data
Before FieldMate R2.06
FieldMate R3.01
PRM Synchronization
Device details
Device status
History
Memo (AXF Verification date)
Attachment-Memo (AXF Verification date)
Sticky Note
Images
Memo
Parameter (All Parameters, ZERO Adjustment
Parameters)
Documents
Attachment-Document Link
Documents
Parameter sets (Parameter
Manager)
Attachment-PM Data
Parameter sets (Parameter
Manager)
DTM data
Attachment-DTM Data
DTM data
TIP
AXF Verification data are synchronized, however these are attached in Memo and cannot be viewed in
PRM
IM 01R01A20-01E
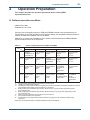
2
2-1
<2 Operation Preparation>
Operation Preparation
This chapter describes the operation preparation before starting PRM
Synchronization Tool.
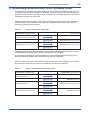
Software operation condition
PRM R3.02 or later
FieldMate R1.03 or later
Since the new functionality support on PRM and FieldMate needs to be considered such as
new DD Menu for e-EDDL and Device Tag Extension Mode, the compatibility between different
versions of PRM and FieldMate is shown as below.
PRM R3.01 or earlier and FieldMate R1.02 or earlier are excluded because PRM/FieldMate
Synchronization function is not supported.
Table 2-1
Version compatibility between PRM and FieldMate
R3.05 Limited
R3.10 synchronization
support
*3 *6
FieldMate
R2.01.00
R2.01.10
Limited
Limited
synchronization synchronization
support
support
*2
*3
Limited
Full support
synchronization based on
support
FieldMate R2.01
*3
specification
*4
Limited
Limited
synchronization synchronization
support
support
*3 *6
*3 *6
R3.11 Limited
R3.12 synchronization
support
*3 *6
Limited
synchronization
support
*3 *6
R1.03
PRM R3.02 Full support
based on
FieldMate R1.03
specification *1
R3.03 Limited
R3.04 synchronization
support
*3
Limited
synchronization
support
*3 *6
R2.02/R2.03/R2.04
Limited
synchronization
support
*3 *6
Limited
synchronization
support
*3 *6
R2.05/R2.06/R3.01
Limited
synchronization
support
*3 *6 *7
Limited
synchronization
support
*3 *6 *7
Full support based
on FieldMate
R2.02/R2.03 /
R2.04
specification
*5
Full support based
on FieldMate
R2.02/R2.03 /R2.04
specification
*5
Limited
synchronization
support
*7
Full support based
on FieldMate
R2.05/
R2.06/R3.01
specification
*8
*1: Except e-EDDL data and Device Tag Display Extension Mode
*2: Handling of e-EDDL Data is limited
*3: Handling of e-EDDL Data and Device Tag Extension Mode functionalities are limited. Depending on Device
Tag Extension Mode setting, synchronization is not functional.
*4: Both e-EDDL Data and Device Tag Extension Mode except Long Tag are fully supported by PRM
Synchronization tool
*5: Both e-EDDL Data and Device Tag Extension Mode including Long Tag are fully supported by PRM
Synchronization tool
*6: When Long Tag is specified, synchronization is not functional.
*7: AXF Verification data is not supported.
*8: e-EDDL data, Device Tag Extension Mode including Long Tag and AXF Verification data are fully
supported.
Bold line is recommended version combination between PRM and FieldMate.
IM 01R01A20-01E
2-2
<2 Operation Preparation>
NOTE
PRM Synchronization Tool is included in the FieldMate R1.03/R2.01 or later. It will be
installed simultaneously.
Create a PRM user account with the correct privilege
• Create PRM user account.
• Apply the Update PRM Synchronization Tool privilege on your PRM user account.
SEE ALSO
For details, please see:
IM 33Y05Q10-11E, Plant Resource Manager Reference.
Establish connection to the PRM network
Use Ethernet to connect the PC where FieldMate was installed to the PRM network which
includes the PRM server and the PRM client. The connection needs to be established to allow
FieldMate to communicate with PRM’s database.
NOTE
Before connecting to the PRM network, make sure that the computer where FieldMate was
installed is adequately protected against security threats. Ensure that the latest security
patches are installed and an antivirus program is running.
Connect PRM and FieldMate on the network with security such as firewall.
These measures prevent computers in the network to be compromised.
IM 01R01A20-01E
<2 Operation Preparation>
2-3
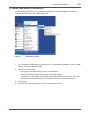
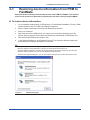
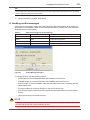
Define PRM Server to connect to
Use FieldMate’s PRM Setup Tool to specify the PRM Server where FieldMate will connect to.
To specify the PRM server set in PRM Setup Tool:
020201E.ai
Figure2-1
PRM Setup Tool Start
1.
On your desktop, select [Start] > [All Programs] > [YOKOGAWA FieldMate] > [Tools] > [PRM
Setup]. This starts PRM Setup Tool.
2.
Select a connection type:
• Select [Use One PRM Server] to enter one PRM Server.
• Select [Use Multiple PRM Servers] to specify multiple servers.
To add a server, click [Add]. This opens the Connection dialog box where you can enter
the Server Set and the PRM Server. Click [OK] to close the Connection dialog box.
3.
Click [Apply].
4.
From the menu bar, select [File] > [Exit] to close PRM Setup Tool.
IM 01R01A20-01E
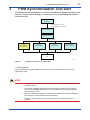
3-1
<3 PRM Synchronization Tool start>
3
PRM Synchronization Tool start
This chapter provides detailed steps on how to use the Restore, Backup, and Synchronize
activities. The figure below displays a comprehensive view of the PRM Synchronization
Tool process flow.
Operation
Preparation
• Create PRM User account
• Define PRM Server connection
Network connect
SYNC Tool Start
• Select activity
Backup
PRM<-FieldMate
Initial registration
Backup
PRM<-FieldMate
Restore
PRM->FieldMate
Synchronization
PRM<->FieldMate
*1
Close
030301E.ai
Figure3-1
PRM Synchronization Tool process flow
*1 Initial Registration
Device registration and data update can be executed for the devices which are not been
registered in PRM
NOTE
• Use an Ethernet cable to connect the computer where FieldMate was installed to
the PRM network.
• Close other FieldMate applications before starting the PRM Synchronization
Tool. Other FieldMate applications cannot be used at the same time with PRM
Synchronization Tool.
• Before the data transfer process, PRM Synchronization Tool adjusts FieldMate’s
time settings to follow PRM Server’s time settings.
• During the data transfer process, devices that are not selected will not be
affected.
IM 01R01A20-01E
3-2
<3 PRM Synchronization Tool start>
3-1
Restoring device information from PRM to
FieldMate
Select the Restore activity to transfer data records from PRM to FieldMate. This enables
users to refer to previous data when performing on-site device tuning using FieldMate.
To restore device information:
1.
On your desktop, select [Start] > [All Programs] > [YOKOGAWA FieldMate] > [Tools] > [PRM
Synchronization Tool]. The PRM-Login dialog box appears.
2.
Enter or select a User Name from the [User Name] drop-down list.
3.
Enter your password.
4.
Select the name of the PRM Server you want to use in the [Server Set] drop-down list.
[Server Set] only appears if more than one PRM Server was defined in PRM Setup Tool.
5.
Click [OK] to start PRM Synchronization Tool.
6.
In the Welcome dialog box, click [Restore Devices]. This closes the Welcome dialog box
and displays the PRM Synchronization Tool window.
TIP
• To skip showing the Welcome dialog box, click [Do not show this again] to display the check mark. The
Welcome dialog box will not appear the next time you start PRM Synchronization Tool.
• To enable Welcome dialog box, click [Do not show this again] to remove the check mark: The Welcome
dialog box will now appear every time you start PRM Synchronization Tool.
• Aside from the Welcome dialog box, you can also select an activity from the toolbar or the Action menu.
030302E.ai
Figure3-2
Welcome dialog box
IM 01R01A20-01E
3-3
<3 PRM Synchronization Tool start>
7.
Select a PRM Device Navigator option:
• [Plant View] to display Plant view in the right pane.
• [Network View] to display Network view in the right pane.
• [Class View] to display Class view in the right pane.
• [Custom View] to display Custom view in the right pane.
• [Search] to perform a search.
• [Selected Devices] to display selected devices for Restore.
SEE ALSO
For Search, please see:
“Searching for a device” in 3-4, “Performing advanced configurations and searching devices”
030303E.ai
Figure3-3
PRM Synchronization Tool window - Restore activity
IM 01R01A20-01E
3-4
<3 PRM Synchronization Tool start>
8.
In the right pane, click the check boxes corresponding to the devices you want to include in
the activity. A check mark appears on the top of the device tag to indicate that the device is
selected. Device tags that appear in blue indicate that the device was included in the list of
the previous data transfer.
Device layout displayed in the right pane is not always identical to the ones in PRM.
TIP
To view selected devices, select [Selected Devices] to view them. This will display all selected devices in the
right pane.
• T
o search for devices, select [Search]. This displays the Search pane where you can enter the search
keyword in [Values] and then click [Search].
NOTE
The number of selected and current devices in FieldMate should not exceed 500. The total
number of selected and current FieldMate devices is displayed at the bottom of the right pane.
9.
Click [Advanced Configurations] if you want to change device data options. This opens the
Advanced Configurations dialog box.
SEE ALSO
For Advanced Configurations instructions, please see:
“Using Advanced Configurations” in 3-4, “Performing advanced configurations and searching devices”
10. Click [Start Restore]. The Restore Devices in Progress dialog box appears to display the
activity progress.
When you start the activity, a dialog box appears to display the activity progress. Click
[Show Details] to display the activity details. Activity details are categorized according to
type, date, time, and remarks.
TIP
For Advanced Configurations instructions, please see:
“Using Advanced Configurations” in 3-4, “Performing advanced configurations and searching devices”
11. When the activity is finished, click [Close].
IM 01R01A20-01E
3-5
<3 PRM Synchronization Tool start>
Handling overwrite messages
During the Restore activity, the Overwriting Message dialog box appears when the device
information from FieldMate is different from the device information in PRM. This dialog box
enables you to select the overwrite rule.
Table3-1
Situations that trigger the Overwriting Message
PRM Timestamp
FieldMate Timestamp
Result
Same
Same
None.
Newer
Older
Overwriting Message appears.
Older
Newer
Overwriting Message appears.
030304E.ai
Figure3-4
Overwriting Message dialog box
Click on the buttons corresponding to the following options:
• [Yes] to overwrite FieldMate data with PRM data for the current device.
• [Yes to All] to overwrite FieldMate data with PRM data for all devices.
• [No] to discard PRM data and retain FieldMate data for the current device.
• [No to All] to discard PRM data and retain FieldMate data for all devices.
• [Stop] to stop the activity.
NOTE
If an option is not selected within 30 minutes, the data transfer will skip the affected device and
proceed with the transfer for the remaining devices.
IM 01R01A20-01E
3-6
<3 PRM Synchronization Tool start>
3-2
Backing up device information from
FieldMate to PRM
After performing device tuning using FieldMate, select the Backup activity to transfer
device information from FieldMate to PRM. This feature enables FieldMate to make full
use of the larger capacity of PRM to store device information. Before proceeding with the
activity, you can enable an option to delete selected devices in FieldMate after the data
transfer.
Newly-imported devices in PRM appear in the Spare folder of Plant view, in the respective
protocol folder in Network view, and under the actual class of the device in Class view.
Devices that were included in the previous data transfer will remain in the same view and
folder.
To back up device information:
1.
On your desktop, select [Start] > [All Programs] > [YOKOGAWA FieldMate] > [Tools] > [PRM
Synchronization Tool]. The PRM-Login dialog box appears.
2.
Enter or select a User Name from the [User Name] drop-down list.
3.
Enter your password.
4.
Select the name of the PRM Server you want to use in the [Server Set] drop-down list.
[Server Set] only appears if more than one PRM Server was defined in PRM Setup Tool.
5.
Click [OK] to start PRM Synchronization Tool.
6.
In the Welcome dialog box, click [Backup Devices]. This closes the Welcome dialog box and
displays the PRM Synchronization Tool window.
TIP
Aside from the Welcome dialog box, you can also select an activity from the toolbar or the Action menu.
IM 01R01A20-01E
3-7
<3 PRM Synchronization Tool start>
7.
Select a FieldMate Device Navigator option:
• [All] to display all FieldMate devices in the right pane.
• [Favorites] to display favorite devices in the right pane.
• [Search] to perform a search.
• [Selected Devices] to display selected devices for synchronization.
SEE ALSO
For Favorites, please see:
“Device Navigator” in IM 01R01A01-01E FieldMate Versatile Device Management Wizard
For Search, please see:
“Searching for a device” in 3-4, “Performing advanced configurations and searching devices”
030305E.ai
Figure3-5
8.
PRM Synchronization Tool window - Backup activity
In the right pane, click the check boxes corresponding to the devices you want to include in
the activity. A check mark appears on the top of the device tag to indicate that the device is
selected.
TIP
•
o view selected devices, select [Selected Devices] to view them. This will display all selected devices in
T
the right pane.
•
o view devices marked as favorite, select [Favorites]. This will display all favorite devices in the right
T
pane. The Favorite option appears when you are viewing devices from the FieldMate database during the
Synchronize or Backup activity.
•
o search for devices, select [Search]. This displays the Search pane where you can enter the search
T
keyword in [Values] and then click [Search].
IM 01R01A20-01E
3-8
<3 PRM Synchronization Tool start>
9.
Click the [Delete selected devices from FieldMate after Backup Activity] check box if you
want to delete the devices in FieldMate after the activity.
10. Click [Start Backup]. The Backup Devices in Progress dialog box appears to display the
activity progress.
When you start the activity, a dialog box appears to display the activity progress. Click
[Show Details] to display the activity details. Activity details are categorized according to
type, date, time, and remarks.
TIP
You can also stop the activity at any point in time. To stop the activity, click [Stop] from the Backup Devices in
Progress dialog box. When an activity is stopped, the process is halted but the information that was processed
before stopping the activity will not be reverted.
11. When the activity is finished, click [Close].
Handling overwrite messages
During the Backup activity, the Overwriting Message dialog box appears when the device
information from FieldMate is different from the device information in PRM. This dialog box
enables you to select the overwrite rule.
Table3-2
Situations that trigger the Overwriting Message
PRM Timestamp
FieldMate Timestamp
Result
Same
Same
None
Newer
Older
Overwriting Message appears
Older
Newer
Automatic overwrite
SEE ALSO
For handling overwrite prompts, please see:
“Handling overwrite messages“ in 3-1, “Transferring device information from PRM to FieldMate”
TIP
In the case that the PRM has backed up the Sticky Note, Image, and Parameter of the FieldMate R3.0 1, file
names are as shown here.
Sticky Note: The content of the Sticky Note is shown in the content of the memo. {FieldMate StickyNote}
Image: The image data is recorded as a Memo attachment file. {FieldMate Image}
(The file name is the same as that which the user selected for FM.)
Parameter (All/Zero adjustment parameters): This is recorded as a Memo attachment file. {FieldMate
Parameter}
The file name is applied automatically. [User Name]_[Date]([Tag Name]).xml
Example: DefaultUser_20140701103121(TAG002).xml
(The information within {} is the Memo title after the PRM has performed backup.).
IM 01R01A20-01E
3-9
<3 PRM Synchronization Tool start>
3-3
Synchronizing device information between
PRM and FieldMate
Select the Synchronize activity to update information between FieldMate and PRM based
on new records. Newly-imported devices in PRM appear in the Spare folder of Plant view,
in the respective protocol folder in Network view, and under the actual class of the device
in Class view. Devices that were included in the previous data transfer will remain in the
same view and folder.
To synchronize device information:
1.
On your desktop, select [Start] > [All Programs] > [YOKOGAWA FieldMate] > [Tools] > [PRM
Synchronization Tool]. The PRM-Login dialog box appears.
2.
Enter or select a User Name from the [User Name] drop-down list.
3.
Enter your password.
4.
Select the name of the PRM Server you want to use from the [Server Set] drop-down list.
[Server Set] only appears if more than one PRM Server was defined in PRM Setup Tool.
5.
Click [OK] to start PRM Synchronization Tool.
6.
In the Welcome dialog box, click [Synchronize Devices]. This closes the Welcome dialog
box and displays the PRM Synchronization Tool window.
TIP
Aside from the Welcome dialog box, you can also select an activity from the toolbar or the Action menu.
7.
Select a FieldMate Device Navigator option:
• [All] to display all FieldMate devices in the right pane.
• [Favorites] to display favorite devices in the right pane.
• [Search] to perform a search.
• [Selected Devices] to display selected devices for synchronization.
SEE ALSO
For Favorites, please see:
“Device Navigator” in IM 01R01A01-01E FieldMate Versatile Device Management Wizard
For Search, please see:
“Searching for a device” in 3-4, “Performing advanced configurations and searching devices”
IM 01R01A20-01E
3-10
<3 PRM Synchronization Tool start>
030306E.ai
Figure3-6
8.
PRM Synchronization Tool window - Synchronize activity
In the right pane, click the check boxes corresponding to the devices you want to include in
the synchronization. A check mark appears on the top of the device tag to indicate that the
device is selected.
TIP
• To view selected devices, select [Selected Devices] to view them. This will display all selected devices in
the right pane.
• To view Favorite devices, select [Favorites]. This will display all favorite devices in the right pane.
The Favorite option appears when you are viewing devices from the FieldMate database during the
Synchronize or Backup activity.
• To search for devices, select [Search]. This displays the Search pane where you can enter the search
keyword in [Values] and then click [Search].
9.
Click [Advanced Configurations] if you want to change device data options. This opens the
Advanced Configurations dialog box.
SEE ALSO
For Advanced Configurations instructions, please see:
“Using Advanced Configurations” in 3-4, “Performing advanced configurations and searching devices”
10. Click [Start Synchronizing]. The Synchronizing Devices in Progress dialog box appears to
display the activity progress.
When you start the activity, a dialog box appears to display the activity progress. Click
[Show Details] to display the activity details. Activity details are categorized according to
type, date, time, and remarks.
IM 01R01A20-01E
3-11
<3 PRM Synchronization Tool start>
TIP
You can also stop the activity at any point in time. To stop the activity, click [Stop] in the Synchronize Devices in
Progress dialog box. When an activity is stopped, the process is halted but the information that was processed
before stopping the activity will not be reverted.
11. When the activity is finished, click [Close].
Handling conflict messages
During the synchronization activity, the Conflict Message dialog box appears when the device
information from FieldMate is older than the device information in PRM or when both PRM and
FieldMate have new information.
Table3-3
Situations that trigger the Conflict Message
PRM Timestamp
FieldMate Timestamp
Result
Same
Same
None
Newer
Older
Conflict Message appears.
Older
Newer
Automatic overwrite from FieldMate to PRM.
Newer
Newer
Conflict Message appears.
030307E.ai
Figure3-7
Conflict Message dialog box
To resolve conflicts, click the following options:
• [PRM Data] to overwrite FieldMate data with PRM data for all devices.
• [FieldMate Data] to overwrite PRM data with FieldMate data for all devices.
• [Latest Data] to overwrite FieldMate older data with PRM newer data, comparing with the
latest Update Date.
• [Prompt] to select the overwrite direction for the current device only.
• [Continue] to apply the selected conflict resolution and proceed with the synchronization
activity.
• [Stop] to stop the synchronization activity.
NOTE
If an option is not selected within 30 minutes, the data transfer will skip the affected device and
proceed with the transfer for the remaining devices.
IM 01R01A20-01E
3-4
3-12
<3 PRM Synchronization Tool start>
Performing advanced configurations and
searching devices
PRM Synchronization Tool includes advanced configurations and search options.
Performing advanced configurations
The Advanced Configurations option appears in the Synchronize and Restore activities. This
dialog box allows you to select the data to be included in the data transfer. During the data
transfer, device details and device status are automatically included. Other data such as history
messages, memos, documents, parameter sets, and DTM data can be included or removed
manually from the transfer.
When you include maintenance data like history messages, memos, and documents in the data
transfer, PRM Synchronization Tool will transfer this information for all selected devices. On the
other hand, you can configure Parameter sets and DTM data for each selected device.
The following table summarizes the device data that can or cannot be configured for each
activity:
Table3-4
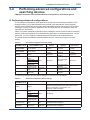
Device data configuration for each activity
Before Data PRM/
FieldMate R2.06
Data FieldMate R3.01
Device details
Device details
Device status
Device status
History
History
AttachmentMemo
Sticky Note
Images
Parameter
AttachmentDocument Link
Attachment-PM
Data
AttachmentDTM Data
Memo
Documents
Parameter sets
DTM data
Restore
Automatically
included
Automatically
included
All devices
Memo
All devices
Documents
All devices
Parameter
sets
DTM data
Backup
Automatically
included
Automatically
included
No configuration
needed
No configuration
needed
No configuration
needed
No configuration
All or each device
needed
No configuration
All or each device
needed
Synchronize
Automatically
included
Automatically
included
All devices
All devices
All devices
All or each device
All or each device
The following table provides the default settings for Advanced Configurations:
Table3-5
Advanced Configurations default settings
Before Data PRM/
FieldMate R2.06
History
Memo
Documents
Parameter sets
DTM data
Data FieldMate R3.01
History messages for the last 14 days.
Data items include Maintenance alarm, Device Event,
Device Configuration, and Operation Log.
Maximum of 1000 messages.
History
AttachmentMemo
Sticky Note
Images
Parameter
AttachmentDocument Link
Attachment-PM
Data
AttachmentDTM Data
Default settings
Memo
100 Memos
Documents
Included. No configuration is necessary.
Parameter
sets
Auto-Selection with the [The latest dated ‘Do not Archive’ set
and the latest dated set] option.
Auto-Selection with the [The latest dated ‘Do not Archive’ set
and the latest dated set] option.
DTM data
IM 01R01A20-01E
3-13
<3 PRM Synchronization Tool start>
NOTE
On the first time you open PRM Synchronization Tool, it uses the default Advanced
Configuration settings. However, when you apply changes in the Advanced Configuration
dialog box, PRM Synchronization Tool will save these settings for reuse in the next operation.
To use the default Advanced Configurations settings again, click [Default].
Also, the saved Advanced Configuration setting for Synchronize activity is different from the
Advanced Configuration setting for Restore activity. Each activity can have different Advanced
Configuration settings.
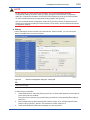
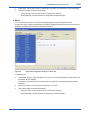
History
History messages can be included in the data transfer. When included, you can specify the
history message items you want to include.
030308E.ai
Figure3-8
Advance Configuration dialog box - History tab
TIP
PRM Synchronization Tool can include maintenance alarm messages from PRM but cannot acknowledge or
create new messages.
To select history messages:
1.
Under Data Options, select the [History] check box. A check mark appears and the options
in the History tab are enabled.
The options in the tabs are only enabled after you select the corresponding Data Options
check box.
2.
Select a date range by either entering the number of days, or by selecting specific dates
using the [From] and [To] buttons. The maximum number of days is 14.
3.
Under Items Selection, select the messages you want to include.
IM 01R01A20-01E
3-14
<3 PRM Synchronization Tool start>
4.
Under Limit, specify the number of messages to include. The maximum is 1000 messages.
5.
Click [OK] to apply and save the settings.
• Click [Cancel] to revert to the previous configuration settings.
• Click [Default] to use the Advanced configurations default settings.
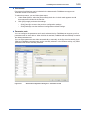
Memo
You can include a maximum of 1000 memos during data transfer. Both approved and
unapproved memos will be transferred from PRM to FieldMate. Memos that are transferred from
FieldMate to PRM will be created as unapproved memos.
030309E.ai
Figure3-9
Advanced Configurations dialog box - Memo tab
To select memo:
1.
Under Data Options, select the [Memo] check box. A check mark appears and the options in
the Memo tab are enabled.
The options in the tabs are only enabled after you select the corresponding Data Options
check box.
2.
Enter the number of memos to be included from 1 to 1000.
3.
Click [OK] to apply and save the settings.
• Click [Cancel] to revert to the previous configuration settings.
• Click [Default] to use the Advanced configurations default settings.
IM 01R01A20-01E
3-15
<3 PRM Synchronization Tool start>
Documents
Documents for all devices can be included in the data transfer. FieldMate can support an
unlimited number of documents.
To select documents, you can follow these steps:
1.
Under Data Options, select the [Documents] check box. A check mark appears and all
documents are included in the transfer.
2.
Click [OK] to apply and save the settings.
• Click [Cancel] to revert to the previous configuration settings.
• Click [Default] to use the Advanced configurations default settings.
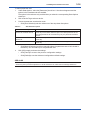
Parameter sets
You can configure the parameter set for each selected device. FieldMate can support up to five
parameter sets for each device. When this limit is reached, FieldMate will automatically overwrite
the oldest parameter set.
You can select parameter sets either automatically or manually. In the Synchronize activity, both
PRM and FieldMate parameter sets can be manually selected. In the Restore activity, only PRM
parameter sets can be manually selected.
030310E.ai
Figure3-10
Advanced Configurations dialog box – Parameter set tab
IM 01R01A20-01E
3-16
<3 PRM Synchronization Tool start>
To select parameter sets:
1.
Under Data Options, select the [Parameter] check box. A check mark appears and the
options in the Parameter tab are enabled.
The options in the tabs are only enabled after you select the corresponding Data Options
check box.
2.
Click a Device Tag to select a device.
3.
Choose a parameter set selection mode:
• Click [Auto-Selection] and then select one of the drop-down list options:
Table3-6
Auto-Selection options
Auto- Selection options
Definition
The latest dated ‘Do not
Archive’ set and latest date set
Selects the latest parameter set that has been assigned with the Do not
Archive key and the latest dated set option. If the latest parameter set has
been assigned with the Do not Archive key, only one parameter set will be
selected.
The latest dated ‘Do not
Archive’ set
Selects the latest parameter set that has been assigned with the Do not
Archive key.
The latest dated set
Selects the latest parameter set, regardless of the assignment of the Do not
Archive key.
• Click [Manual Selection] and then manually select the parameter sets to be included in
the activity. You can select up to five parameter sets.
4.
Click [OK] to apply and save the settings.
• Click [Cancel] to revert to the previous configuration settings.
• Click [Default] to use the Advanced configurations default settings.
SEE ALSO
For “Do not Archive key”, please see:
“Performing device parameter adjustment” in A6 IM 33Y05Q10-11E, Plant Resource Manager Reference.
IM 01R01A20-01E
3-17
<3 PRM Synchronization Tool start>
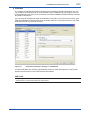
DTM data
The method for selecting DTM data is identical to the method for selecting parameter sets. You
can configure the DTM data set for each selected device. FieldMate can only support up to five
DTM data sets for each device. When this limit is reached, FieldMate will automatically overwrite
the oldest DTM data set.
You can select DTM data sets either automatically or manually. In the Synchronize activity, both
PRM and FieldMate DTM data sets can be manually selected. In the Restore activity, only PRM
DTM data sets can be manually selected.
030311E.ai
Figure3-11
Advanced Configurations dialog box - DTM Data tab
To select DTM data sets, select the [DTM Data] check box under Data Options. A check mark
appears and the options in the DTM Data tab are enabled.
SEE ALSO
For selecting DTM data sets instructions, please see:
“Parameter sets“ in “Performing advanced configurations”
IM 01R01A20-01E
<3 PRM Synchronization Tool start>
3-18
Searching for a device
The Device Navigator provides a search facility to help you look for devices.
030312E.ai
Figure3-12
Search pane
To use search:
1.
Select [Search] from the Device Navigator. The Search pane appears.
2.
In the Search pane, select a category from the [Look In] drop-down list.
3.
Select the search criteria from the [Criteria] drop-down list.
4.
Enter the search keyword in [Values] or select a recently-used keyword from the drop-down
list.
• [...] button next to Values is effective when Vendor, Model, Device Revision,
Communication Type is selected in Look In to assist user to search available values.
If necessary, select a logical operator from the [Logic] drop-down list.
• If several conditions are specified, refer to example below. Bracket ( ) comes before and
after OR logic. For example: 1 AND 2 OR 3 AND 4 AND 5 OR 6 means that (1 AND 2)
OR (3 AND 4 AND 5) OR 6
5.
Click [Add] to insert the search criteria.
6.
Click [Search] to start the search based on the search criteria. The search output will be
displayed at the bottom of the right pane.
7.
Select devices from the search result. To select devices, select the check box next to the
device tag. A check mark appears to indicate that the device is selected.
• To add other search criteria, enter a new keyword and then click [Add].
• Click [Delete] to remove the search criteria.
• Click [Change] to apply updates.
• Click [Reset] to clear both the list and search results.
IM 01R01A20-01E
4
4-1
<4 Device Tag Extension Mode>
Device Tag Extension Mode
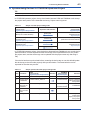
Outline of PRM/FieldMate synchronization compatibilities
Devices with extended device tag are recognized and handled according to HART Device
Tag Display Format such as “Tag + Descriptor” or “Descriptor” or “Message” on both PRM and
FieldMate sides.
On PRM R3.03 or later and FieldMate R2.01.10 or later, the extended device tag generated as
the result of HART Device Tag Display Format in PRM are recognized and fully supported by
FieldMate (and vice versa).
NOTE
When it is enabled, settings must be exactly the same on both sides. Otherwise, PRM/
FieldMate Synchronization displays an error message and exit.
However, FieldMate does not recognize the Device Tag Extension mode for STARDOM Project
Name Support as described example in the following sheet.
Preconditions for PRM/FieldMate Synchronization
This table summarizes the conditions where PRM/FieldMate Synchronization are allowed.
Device Tag Extension mode for STARDOM Project Name Support is ignored when FieldMate
synchronizes with PRM.
Table 4-1 Preconditions for PRM/FieldMate Synchronization
Device Tag Extension
Mode
STARDOM
Project
Name
Support
HART Device
Tag Display
Format
PRM R3.02
-
-
PRM R3.03
PRM R3.04
PRM R3.05
Off
On
PRM R3.05
PRM R3.10
PRM R3.11
PRM R3.12
Off
On
Tag
FieldMate
R1.03/
R2.01.00
FieldMate
R2.01.10/R2.02/R2.03/R2.04/R2.05/
R2.06/R3.01
FieldMate
R2.02/
R2.03/
R2.04/
R2.05/
R2.06/
R3.01
HART Device Tag Display Format
Tag
Tag +
Descriptor Message Long Tag
Descriptor
√
√
×
×
×
×
√
√
×
×
×
×
Tag + Descriptor
×
×
√
×
×
×
Descriptor
×
×
×
√
×
×
Message
×
×
×
×
√
×
Tag
√
√
×
×
×
×
Tag + Descriptor
×
×
√
×
×
×
Descriptor
×
×
×
√
×
×
Message
×
×
×
×
√
×
Long Tag
×
×
×
×
×
√
Note
√:
Synchronization is effective.
×:
Synchronization is not effective.
Note: When Long Tag is specified for HART6,7 devices, setting of HART5 devices follows the bold line of individual Device Tag
Extension Mode shown above.
IM 01R01A20-01E
<4 Device Tag Extension Mode>
4-2
Synchronizing Devices with HART Device Tag Display Format
The same Device Tag Extension Mode needs to be set on PRM and FieldMate. Even if the user
renames the device tag on one side, it is updated to the other side after the synchronization as
long as the HART Device Tag Display Format of the device is consistent with the HART Device
Tag Display Format on the other side.
Sample case is shown as below, if HART Device Tag Display Format is set to “Tag+Descriptor”
and all the devices in the database are registered or updated with the same mode, then the
following outcomes can be expected.
Table 4-2 Sample case with same setting mode
PRM devices
Current mode: Tag+Descriptor
Operation and Outcome
FieldMate devices Current mode:
Tag+Descriptor
EJX004-PIPE02
Registered mode: Tag+Descriptor
Restore OK
[Not exist]
[Not exist]
Backup OK
EJA005-PIPE02
Registered mode: Tag+Descriptor
Sync OK
EJA001-PIPE01
Registered mode: Tag+Descriptor
EJA001-PIPE01
Registered mode: Tag+Descriptor
Sync OK
Registering devices using PRM/FieldMate Synchronization means that the devices do not exist
in PRM database originally and the devices are imported from FieldMate.
In HART Device Tag Display Format is enabled, it can be expected that the device tags of the
devices imported to PRM do match the device tags shown in FieldMate.
However, if the HART Device Tag Display Format of the device in the database does not match
the mode of the other side, then the synchronization of the device is prohibited.
Table 4-3 Sample case with different device setting mode
PRM devices
Current mode: Tag+Descriptor
Operation and Outcome
FieldMate devices
Current mode: Tag+Descriptor
EJX006
Registered mode: Tag
Prohibit Restore
[Not exist]
[Not exist]
Prohibit Backup
EJA007
Registered mode: Tag
EJX002
Registered mode: Tag
Prohibit Sync
EJX002-PIPE01
Registered mode: Tag+Descriptor
Sync OK
EJA003-PIPE02
Registered mode: Tag+Descriptor
Sync OK
EJA003
Registered mode: Tag
Prohibit Sync
IM 01R01A20-01E
<4 Device Tag Extension Mode>
4-3
Synchronizing Devices in STARDOM Upstream Project
TIP
The followings describes sample case and operation work flow only for STARDOM user.
In STARDOM upstream project, the synchronization between PRM and FieldMate works except
the project name portion of the extended device tag. Project name is ignored.
Table 4-4 Sample case with project setting mode
PRM devices
Current mode:
Tag+Descriptor+Project Name
[Not exist]
(Backup as “EJA005-PIPE02”)
EJX004-PIPE02_WELL01
Registered mode:
Tag+Descriptor+Project Name
FieldMate devices
Current mode:
Tag+Descriptor
Operation and Outcome
EJA005-PIPE02
Registered mode:
Tag+Descriptor
Backup OK
Restore OK
EJA001-PIPE01_WELL01
Registered mode:
Tag+Descriptor+Project Name
[Not exist]
(Restored as “EJX004-PIPE02”)
Sync OK
EJA001-PIPE01
Registered mode:
Tag+Descriptor
Sync OK
In STARDOM upstream project, since the devices imported from FieldMate do not contain device
path information, it is also expected that the device tags of the imported devices do not contain
the project name, and the device tags can be updated with the project name only after Plug &
Play.
If the device has been synchronized before, renaming the device tag on one side will still update
the device tag on the other side properly after synchronization. The same behavior can be
expected for the other way around.
Table 4-5 Sample operation flow with project setting mode
Step Procedure
PRM
Current mode:
Direction
Tag+Descriptor+Project Name
FieldMate
Current mode:
Tag+Descriptor
Outcome
1
Before Sync
EJX004-PIPE02_WELL01
[Not exist]
2
Restore device EJX004-PIPE02_WELL01
to FieldMate
EJX004-PIPE02
Device is restored
without the project
name portion
3
Rename the
device tag on
FieldMate
EJX004-PIPE02_WELL01
EJX004-PIPE02
↓
EJX001-PIPE01
Device is renamed
on FieldMate
4
Synchronize
device back to
PRM
EJX004-PIPE02_WELL01
EJX001-PIPE01
5
After Sync
EJX001-PIPE01_WELL01
EJX001-PIPE01
Device is updated
in PRM while
keeping the project
name portion
IM 01R01A20-01E
App.-1
Appendix
References
1.
FieldMate Versatile Device Management Wizard (IM 01R01A01-01E).
IM 01R01A20-01E
Revision Information
Title
: FieldMate: PRM Synchronization Tool
Manual No. : IM 01R01A20-01E
Revision No.
Revised Date
Major Changes
1st Edition
April 2008
Newly published
2nd Edition
January 2009
FieldMate R2.01
3rd Edition
April 2009
FieldMate R2.01.10
4th Edition
June 2010
FieldMate R2.02
5th Edition
February 2011
FieldMate R2.03
6th Edition
September 2011
FieldMate R2.04
7th Edition
August 2012
FieldMate R2.05
8th Edition
May 2013
FieldMate R2.06
9th Edition
October 2014
FieldMate R3.01
IM 01R01A20-01E