1
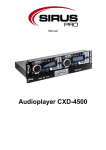
Manual
Audioplayer CSX-4000
Table of contents
Safety instructions ............................................................................................................................ 3
1.1.
For safe and efficient operation ............................................................................................... 3
2. Designated use ................................................................................................................................ 4
3. Introduction ....................................................................................................................................... 5
4. Control .............................................................................................................................................. 5
4.1.
Back view................................................................................................................................. 5
4.2.
Front view ................................................................................................................................ 6
5. Technical data .................................................................................................................................. 7
1.
2/8
1. Safety instructions
•
•
•
•
•
•
This device is suitable for indoor use (not outdoors) only.
All modifications to the device will void the warranty.
Repairs are to carry out by skilled personnel only.
o
Use only fuses of the same type and original parts as spare parts.
Protect the unit from rain and humidity to avoid fire and electric shocks.
Make sure to unplug the power supply before opening the housing.
housing
1.1. For safe and efficient operation
Be careful with heat and extreme temperature!
temperature
Avoid exposing it to direct rays of the sun or near a heating appliance.
Not put it in a temperature bellow 32°F
32 /0°C, or exceeding 104°F /40°C.
Keep away from humidity, water and dust!
dust
Do not place the set in a location with high humidity or lots of dust.
Containers with water should not be placed on the set.
To avoid placing on un-stable
stable location!
location
Select a level and stable location to avoid vibration.
Do not use chemicals or volatile liquids for cleaning!
cleaning
Use a clean dry cloth to wipe off the dust, or a wet soft cloth for stubborn dirt.
If out of work, contact sales agency immediately!
immediately
Any troubles arose, remove the power plug soon, and contact with an engineer for repairing, do not
open the cabinet by yourself,
lf, it might result a danger of electric shock.
Take care with the power cable!
cable
Never pull the power cable to remove the plug from the receptacle, be sure to hold the plug. When not
using the device for an extended period of time, be sure to disconnect the
the plug from the receptacle.
IMPORTANT!
Damages caused by the disregard of this user manual are not subject to warranty. The dealer will not
accept liability for any resulting defects or problems. Make sure the electrical connection is carried out
by qualified
ified personnel. All electrical and mechanical connections have to be carried out according to
the European safety standards.
3/8
2. Designated use
This device was developed for professional use on stages, in discos, theatres etc. The device is only
approved for a connection up to 230V 50/60 Hz AC voltage and only for indoor use.
Regular breaks during operation increase the lifetime of your device.
Avoid convulsions or any kind of forceful impact during the installation or the start-up of the device.
Make sure that the device is not exposed excessive heat, humidity or dust at the place of installation.
Take care that no cables are lying around. You would endanger your own safety and also the safety of
a third party.
Do not operate the device during thunderstorms. Excess voltage could destroy the device.
Unplug the power supply during thunderstorms.
Surrounding objects or surfaces should not be in contact with the device.
Make familiar yourself with the functions of the device before start-up. People without experience
should not handle with the device. The most cause of functional disorder is inappropriate handling.
Do not use chemicals or volatile liquids for cleaning. Use a clean dry cloth to wipe off the dust, or a
wet soft cloth for stubborn dirt.
For transport use the original packing or designated accessory to avoid damages during the transport.
For reasons of safety unauthorized changes are forbidden!
A usage of the device which differs from usages which are described in this manual can cause
damages of the device. In that case the warranty expires. Additional you should notice that every
differed usage is related with dangers and can cause e.g. an electrical short, fire, electric shock or
crash.
4/8
3. Introduction
Thank you for buying the CXS-4000. It is a powerful device.
For a successful installation and operation, please read this manual carefully.
4. Control
4.1. Back view
1.
Power connector
To connect with the mains. Cable is included. Please pay attention to the correct mains voltage. A small
switch next to the power connector is compatible between 100 and 230 V. In Germany the switch must
be set to 230 V!
2.
Balanced output stereo right
Here you can plug in a XLR cable to lead the audio signal stereo right to an amp or a mixer.
3.
Balanced output stereo left
Here you can plug in a XLR cable to lead the audio signal stereo left to an amp or a mixer.
4.
Volume control for the right XLR out
With this button you can adjust the volume of the output.
5.
Volume control for the left XLR out
With this button you can adjust the volume of the output.
6.
Analogue audio output
This L/R outputs are unbalanced jack outputs for your audio signal.
7.
6,3mm jack for headphones
Pre-listening.
8.
Volume control for headphones
With this button you can adjust the volume of the headphones.
5/8
4.2. Front view
1.
On/Off Switch
The button is backlit when the unit is switched on.
2.
Eject button
With this button you can eject the CD. To insert a new CD insert the CD into the slot with light pressure
to drive. The CD player pulls in the CD automatically.
3.
Cue button
When you press this button, the current search point is stored as a new search point. Browsing item you
are investing in the press to pause and move to the back and forward buttons in a specific location.
4.
Play/Pause button
Each time you press this button the mode changes from play to pause or from pause to play.
5.
Rewind button
Press this button to select, in a track to search backwards.
6.
Fast-Forward button.
Press this button to select, in a track to search forwards.
7.
Track Select
This control allows you to select different tracks. If the knob is pressed jump +10 songs.
8.
Remote Control
Here, an optional remote control can be used.
9.
Sound Switch button
Here you can select the audio source between audio disc or USB.
10. Repeat button
Here you can select various repeat modes by pressing the button. Single or all.
11. Single / cont
In single mode, playback stops after each track while in the Cont mode does not stop the playback and
continues to run.
12. Time button
Use this button to set the time display.
13. IN button (loop)
With this button you set the starting point of their loops. The light flashes.
6/8
14. Out button (loop)
Use this button to set the final point of their loops. At the same time they start the loop. To exit the loop
again, press the button just once.
15. Reloop button (loop)
With this button you can retrieve the last saved loop again. To stop the loop, press the button again.
16. Pitch button
This button activates the pitch function.
17. Temporary Slowdown button
This button will decrease the speed, as long as you stay on it. When you release him, return immediately
back to the original speed.
18. Temporary Speed button
This button will increase the speed, as long as you stay on it. When you release him, return immediately
back to the original speed.
19. Pitch Control
If you turn this dial to the right to increase the speed permanently (Blue light). When you turn the dial to
the left you decrease the speed continuously (Blue light). When you press the control again returns the
speed back to 0 (Red light).
20. USB Port
USB input, accepts all major standards.
21. LC Display
The display shows current information.
5. Technical data
Frequency
Frequency response
20 Hz – 20 kHz
Power supply
Voltage
100-240 V, 50/60 Hz
General
Format
CD / CDRW / CDR / MP3 / WAV
THD
<0,,01% (200 Hz LPF 20 kHz LPF)
Dynamic zone
>98 dB (20 kHz LPF a-wtd)
SNR
96 dB
Connections
Input
USB Port
Outputs
XLR balanced, RCA, Headphones
Hardware
Dimension (L/B/H)
483 x 320 x 44 mm
Weight
3,9 kg
7/8
Importer:
B & K Braun GmbH
Industriestraße 2
D-76307 Karlsbad
www.bkbraun.com
[email protected]
8/8