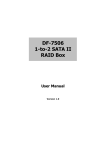
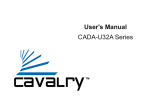
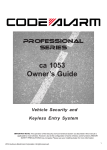
1
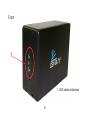
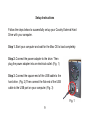
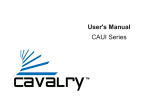
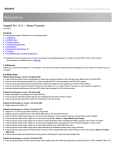
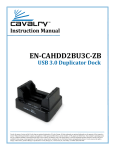
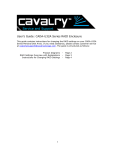
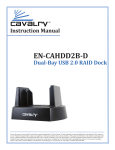
User's Manual
CADT-SA2 Series
Preface
Copyright
Please respect copyrighted content. Duplication or modification of this publication in whole or in
part is prohibited without written authorization.
Usage
Strong impacts or dropping the product may cause damage. Allow only qualified personnel to
repair this product. Disassembling or opening this product will void your warranty.
Disclaimer
Cavalry is not liable for compensation for data loss which may result from a malfunction of the
product or from changes due to improper use, repairs, defects, or battery change. Please back
up your data to avoid unexpected losses. Cavalry reserves the right to make changes to the
content of this manual without notice. The most current manuals and software are available for
download at our download page: www.cavalrystorage.com/su_download.htm
2
Thank you for choosing Cavalry.
We at Cavalry extend our sincere gratitude for your purchase of this product.
We hope our dedication to delivering high quality products with excellent
customer service will ensure your continued interest in our products.
This manual will assist in the operation of the product. To optimize your
experience with this product, we recommend reading this entire manual
before usage. Please keep this manual for future reference.
3
Table of Contents
Preface ....................................................................................................
List of Accessories .............................................................................
Product Illustrations ...........................................................................
Features .............................................................................................
Setup Instructions ..............................................................................
RAID ..................................................................................................
Change Product Settings ...................................................................
Partitioning and formatting your drive ................................................
Troubleshooting .................................................................................
Warranty and Contact ........................................................................
4
2
5
6
8
9
13
14
20
22
25
List of Accessories
1.
2.
3.
4.
5.
External power adapter / power cord
(may vary with product)
SATA to eSATA adapter cable
with bracket
eSATA cable
USB 2.0 cable
Resources CD
4
5
3
1
2
5
Front
1
1. LED status indicators
6
Back
2. Ventilation fan
3. 0-7 Settings
Dial
4. Power switch
5. Power jack
6. eSATA port
7. USB 2.0 port
2
6
3
4
5
7
7
Features
Plug-and-play for Mac OS v9.x and newer
USB 2.0 and eSATA interface
Pre-formatted in Mac OS X Extended
Supports RAID levels 0, 1 and 0+1
Exceptional heat dissipating ability
LED light indicators
Nearly silent operation
Designed for use with a Mac
8
Setup Instructions
Follow the steps below to successfully set up your Cavalry External Hard
Drive with your computer.
Step 1. Start your computer and wait for the Mac OS to load completely.
Step 2. Connect the power adapter to the drive. Then
plug the power adapter into an electrical outlet. (Fig. 1)
Step 3. Connect the square end of the USB cable to the
hard drive. (Fig. 2) Then connect the flat end of the USB
cable to the USB port on your computer. (Fig. 3)
Fig. 1
9
SATA Users: If you do not already have an eSATA interface on your
computer, first install the bracket when the computer is off. Then use the
eSATA cable to connect the drive to the bracket. Turn on the unit then turn on
the computer. (Please note that SATA is not required to use your product.)
USB Cable Plug
Fig. 2
USB Port
Fig. 3
Step 4. Turn the power switch on.
NOTE: Connect the USB cable to the drive before connecting the cable to
the computer. To disconnect, remove the cable from the computer first.
10
Step 5. Installing drivers for the Cavalry External Hard Drive.
Mac OS
This drive is preformatted to be plug-and-play for Mac OS 9.x and
above. No formatting or drivers should be needed.
Windows 2000/XP/Vista
Requires reformatting to NTFS: go to the "Contents" folder of the
Resources CD and follow the "Formatting Instructions" Guide. After
that, your drive is plug-and-play: no device drivers or configuration
required. The computer will detect the USB External Hard Drive as a
new USB device and display messages on the bottom-right corner
reading "USB Mass Storage Device Detected" and "Your new
hardware is installed and ready to use."
11
Windows 98/Me
1. Make sure Windows 98/Me is fully updated. Follow the
"Formatting Instructions" PDF (in the "Contents" folder of the CD.)
2. Download drivers from www.cavalrystorage.com/su_download.htm
Click on "Windows 98 Driver" to download file. Extract the file.
3. Navigate the device manager.
4. Right-click on the yellow question mark (unknown storage device).
5. When the device driver wizard starts, click on the "Browse" button
to select the search directory to find drivers.
6. Find the USB 2.0-98 driver in the extracted file.
7. Click "Next" to continue.
Step 6. Your external hard drive is now ready to use.
12
RAID
Your product can be set up as RAID 1 (mirrored). "Mirrored" means that each
of the two drives in your array store the same data, providing protection
against the failure of one drive; however, when the drive appears on your
computer, it will be recognized as a single hard drive.
NOTE: Although the box indicates two hard drives are included, the total
capacity in RAID 1 mode will not equal the sum of the two because the
second drive is used as a "backup" of the first drive. (e.g. two 250GB drives
do not have a 500GB capacity. Instead, only 250GB is available for storage,
while the other 250GB is a backup of that data.)
The drive is not preset in RAID mode (it is preconfigured in SPANNING
mode). To change the product settings, please refer to the next section.
13
Change RAID Settings
There are two ways to change the product settings. We recommend using
the SteelVine software included with your drive; you may also use the "0-7
Settings Dial" (p17). Changing RAID settings erases any data on the drive.
NOTE: Mac Users with OS v10.5 and newer proceed to page 17 for manual
configuration of your RAID settings. For questions, please contact customer
support by emailing [email protected].
I. Using the SteelVine (GUI) software (In order to use GUI, your unit's "07 Settings Dial" must be set to "7," which is the factory default)
Step 1. Turn the product on.
Step 2. Open the Resources CD in "My Computer," open the folder
"Contents/STEELVINE/" and open the folder corresponding to your operating
system. Install the pkg file (Mac) or the "setup" file (Windows).
14
Step 3. Follow the on-screen
instructions to install the
software.
Step 4. After installation is
completed, open the 57xx
SteelVine Manager.
Step 5. Once the program has
loaded, go to Edit >> Configure
Box. When prompted, enter the
default password "admin."
15
Step 7. Select the setting that you prefer under "Storage Policy", then press
"Apply." NOTE: Changing the settings will erase any data on the unit.
Step 8. Your unit will take a few moments to start rebuilding. Once it has
started, it may take several hours rebuild, depending on the setting you
choose. You can monitor the progress in the SteelVine Manager main
window. Keep the unit turned on and stationary while it rebuilds. The "HDD1"
and "HDD2" lights will be lit during the rebuilding process. When completed,
your SteelVine Manager should indicate so.
Step 9. Proceed to part III, where you partition and format your RAID system.
NOTE: If you encounter problems trying to install/use the Steelvine software,
you may need a different version of the software. There are older versions of
the software in the "Contents/STEELVINE/Extra Software/" folder. Try
installing the "older MAC.pkg" (for Mac) or the "setup" file in the "older
windows" folder (for Windows). If you still have problems, contact us at
[email protected].
16
II. Using the "0-7 Settings Dial" (For Mac OS 10.5 users or users who
cannot use the SteelVine software)
Step 1. Make sure the unit is off.
Step 2. Refer to the following and identify the appropriate number of the
setting you would like. Cavalry recommends RAID 1 for data protection:
0
SPANNING, drives are concatenated into one large volume
1
JBOD, drives show up individually
2
RAID 0 / Striped, single big volume, parallel access, fastest,
no data redundancy
3
RAID 1 / Mirrored, 100% data redundancy, data retained as
long as one drive is functioning
4
RAID 0+1: 33% mirrored, remaining space is concatenated
5
RAID 0+1: 66% mirrored, remaining space is concatenated
6
Unused
7
SteelVine (GUI) software (default setting)
17
Step 3. Turn the unit on its side and look into the hole with the numbers "0"
to "7" printed around it (Figure 1). Inside the hole you should see a dial
(Figure 2).
Figure 1.
18
Figure 2.
Step 4. Using a small, flathead
screwdriver, turn the dial to the
appropriate number of the setting you
chose from Step 2. Once you have
done this, lay the unit upright and set
the unit where you would like it to be.
Step 5. Turn the unit on.
Step 6. Press the "Reset" or "Update" button located on the back of the
product (Figure 1.) This will cause the unit to automatically "rebuild" into the
new setting. The "HDD1" and "HDD2" indicator lights will flash while the unit
is rebuilding. This process could take up to 12 hours. Do not move or turn off
the unit while this process takes place. Your unit will be ready to use once
the indicator lights stop flashing.
Step 7. Proceed to Part III to partition and format your newly reconfigured
RAID system.
19
III. Partitioning and formatting your RAID system
These instructions are for users running Mac OS X (10.0+) and above. If you
have another operating system, please refer to the Formatting Guide, found
in the "Contents" folder of the Resources CD or online at
www.cavalrystorage.com/su_download.htm
Step 1. Go to the top menu and select ”Go”, “Applications”, “Utilities” and,
then click on the “Disk Utility “ program.
Step 2. The external drive will be listed on the left pane window. Click on the
Drive header which lists the drive capacity.
Step 3. Click on “Partition” at the top of the window. Under the “Volume
Scheme” header choose on the scroll down menu “1 partition”. The preview
partition should show up as a rectangular graph.
20
Step 4. Click on “Options” under the graph. A small window will appear.
Choose “default” for partition type. Then click “ok” to exit.
Step 5. Now on the right of the graph you can choose your format type.
Select “MAC OS Extended (journaled).”
Step 6. Now click on the “partition” button on the lower right.
Step 7. Allow several minutes for the utility to finish formatting the drive. The
new Volume will now appear on the desktop.
Step 8. If it fails to format, repeat this process again, but choose “MAC OS
Extended” format type instead of “MAC OS Extended (journaled).”
Step 9. Your hard drive is ready to use!
21
Troubleshooting
LED light indicator does not turn on
Make sure the power adapter is securely connected to a working electrical
outlet. Secondly, make sure the USB or eSATA cable (whichever interface
you chose to use) is inserted correctly into the hard drive and the computer.
Turn on the power switch (Page 7).
Computer does not detect hard drive
Make sure the USB/eSATA cables are securely connected. If this does not
work, attach another known working device and working cable into the
USB/eSATA port on the computer. If the computer does not detect your
known working device the problem could be your computer's USB/eSATA
port. If the the port and cable both work and the hard drive is still not
contacted, please contact customer support.
22
Loud noises coming from external hard drive
In most cases, loud noises coming from the drive suggest it may either be
defective or a part is loose. We apologize for any inconvenience this may
cause. Please contact customer service for assistance.
"HDD1" or "HDD2" LED lights become red
This indicates one of the drives may need replacing. If the drive is set up with
RAID1, the hard drive must be replaced by another hard drive of the same
capacity, brand, and model number. Open the enclosure, remove the failed
hard drive and replace with the new drive. After inserting the new drive and
closing the unit, turn it on and the new hard drive will automatically be rebuilt
using a copy of the data from the good hard drive. The unit does not need to
be connected to the computer in order to be rebuilt. Do not turn off the power
during the rebuilding process.
23
Cannot use SteelVine (GUI) software
Please confirm that your "0-7 Settings Dial" is set to "7." Follow instructions
on page 17 to change the dial to 7 if necessary.
Drive will not work with my PC
You may have to reformat to NTFS by following the "Formatting Guide" found
in the Resources CD or at www.cavalrystorage.com/su_download.htm
I reformatted with Mac OS 10.5 and the drive does not work
Mac OS 10.5 formatting does not work with the RAID hardware. If you have
Mac OS 10.5 and reformatted, you need to contact Cavalry customer support.
If you have more questions, please refer to the Frequently Asked
Questions section online at: www.cavalrystorage.com/su_faq.htm. You may
also contact Cavalry tech support at [email protected].
24
Warranty
This product comes with a one year warranty from the date of purchase.
Please register your product at www.cavalrystorage.com/prodreg.htm to
activate the warranty. Please have your Serial Number and Model Number
ready. We are not responsible for any loss of data. Please back up your data
often to avoid unexpected losses.
Contact
Cavalry Storage, Inc.
555 E. Easy St.
Simi Valley, CA 93065
[email protected]
www.cavalrystorage.com
CA1053
062708
25