1
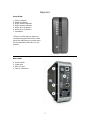
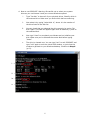
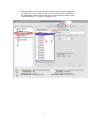
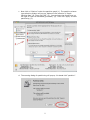
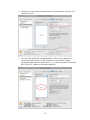
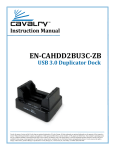
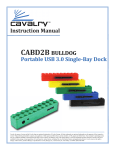
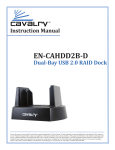
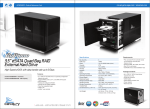
User’s Guide: CADA-U32A Series RAID Enclosure
This guide contains instructions for changing the RAID settings on your CADA-U32A
Series Personal Disk Array. If you need assistance, please contact customer service
at [email protected]. The guide is structured as follows:
Product Diagrams
RAID Settings Overview with Explanations
Instructions for Changing RAID Settings
1
-
Page 2
Page 3
Page 4
Diagrams
Front View:
1.
2.
3.
4.
5.
6.
7.
Power indicator
Rebuild indicator
HDD1 Access Indicator
HDD2 Access Indicator
HDD1 Error Indicator*
HDD2 Error Indicator*
Ventilation
*The error LEDs light up when the
corresponding hard drive fails, when
there are rebuilding errors and when
the corresponding hard drive is not
present.
Rear View:
1.
2.
3.
4.
Power switch
Power port
USB 2.0 port
Fan for ventilation
2
RAID Settings Descriptions
SINGLE MODE
Array will show up as two independent drives. This function
can be used if only if two different brands and/or capacities
of HDDs (Hard Disk Drives) are installed.
SPANNING MODE
Two HDDs will show up as a single drive with the combined
capacity of both drives. Spanning writes data sequentially
across two drives.
RAID 0 (Striping)
Two HDDs will show up as a single drive with the combined
capacity of both drives. Speed and performance increase.
The two HDDs “stripe" data across the two drives. This splits
each piece of Data across both HDDs in segments in a way
that speeds up reading and writing times. However, RAID 0
does not offer any data protection: if one drive fails or is
damaged, all data can be lost.
RAID 1 (Mirroring)
The RAID controller creates an extra copy (or mirror) of data
on the two drives. Only a single drive will show up on your
computer, and it will have the capacity of a single drive.
Data is protected from the failure of one drive. If one drive
fails, replace it with an identical drive and the data rebuilds
automatically.
Using this mode requires 2 identical HDDs; the two drives
must be the same capacity, brand and model number.
3
Changing RAID Settings
1.
Start your computer and wait for your operating system to load completely.
2.
Connect the square end of the USB 2.0 cable to your CADA-U32 disk array.
Connect the flat end of the USB 2.0 cable to your computer.
3.
Connect the power cable to your CADA-U32 disk array. Connect the other end
of the power cable to an electrical outlet.
4.
Turn on the drive.
5.
You will need to uninitialize the drive before changing RAID settings. To do
this, follow the instructions for your Operating System. (Windows users, see
below; Mac OS X users, see page 7) If your operating system is not listed,
contact customer service for assistance.
Windows 2000/XP/NT/Vista
a. Go to the Start
Menu and click
on “Run”.
4
b. The Run dialog box will show up. Enter “cmd” in the text box then press
the <ENTER> key.
c. Virtual DOS command console window will start. You will see the blinking
cursor where you can type commands. Now type “diskpart” as shown then
press the <ENTER> key.
5
d. Now to use DISKPART. Warning: Be careful not to select your system
drive as you could erase it and your current Windows system!
i.
Type “list disk” to show all of your physical drives. Identify which is
the external drive. Make sure you know which before continuing.
ii.
Now select it by typing “select disk #”, where # is the number of
the drive listed in the disk list.
iii.
You can check that you selected the drive properly by typing “list
disk” again. The table will appear again with an asterisk (*) next to
the selected disk.
iv.
Now type “clean” to completely un-allocate and un-initialize your
disk. Make sure you’ve selected the correct disk before typing
“clean”.
v.
The drive is cleaned now. You can type “exit” to exit DISKPART and
type “exit” again to exit the virtual DOS window, or just close the
window to get back to your Windows desktop. Continue to Step 6
(p.12).
i. ii. iv. v. 6
Mac OS X
a. Go to top menu “Go” and select “Utilities”. The Utilities window opens.
Select “Disk Utility” to start the disk utility program.
7
b. Click the header on the left which starts with the drive size in gigabytes
(1). Now click on the “partition” tab on top (2). Disk Utility will switch to
it’s partitioning function pane. Now click on the dual arrow button under
“Volume Scheme” (3). Choose “1 partition” (4).
8
c. Now click on “Options” under the partition graph (1). The partition scheme
type selection window will pop up. Make sure the selection is “Apple
Partition Map” (2). Then click “OK” (3). You can leave the format type on
the right to “MAC OS extended (journaled)” (4). Then click “Apply” to start
partitioning (5).
d. The warning dialog for partitioning will pop up. Go ahead click “partition”.
9
e. The drive will start partitioning as shown. It should take a minimum of 2
minutes to finish.
f.
You now have a MAC OS extended partition. We can now delete the
volume and clear the drive. Click anywhere on the partition graph
representing the partition. Notice the [+ / -] under the graph on the lower
left. Click the [-] button to delete the partition.
10
g. The warning dialog for erasing the partition will pop up. Go ahead click
“Remove”.
h. Your drive is now clean of all partitions. Continue to Step 6 on the next
page.
11
6.
After the drive is completely uninitialized, turn off your drive. Set the CADAU32 on its side. Remove the cover by removing the screws on the bottom of
unit. The screws only need to be removed on the "top" side. The "top" side is
the side to which the power switch (on the back of the unit) is closest. Once
the screws are removed, insert the screw-driver into the holes left by the
screws and push upward to release the top cover.
12
7.
Locate the “Jumper Block”. The Jumper Block consists of 6 Jumper Pins, with
4 pins being covered by two black “Jumper Shunts” at any given time.
Back of drive
The Jumper Block
The Jumper Shunts on
a standard business
card for scale.
13
8.
Decide which RAID setting
you want, and, following
the diagram to the right,
move the jumper shunts to
cover the appropriate pins.
(On the diagram to the
right, grey indicates that a
pin is covered; white
indicates an uncovered pin.)
The jumper shunts may be
moved by gently pulling
them upwards (vertically)
until they are free, then
pushing them downwards
onto the appropriate two
pins.
NOTE: If switching from any mode to RAID 1 mode, you must first configure
the jumper block to “Single” mode. Then connect your drive to your
computer, turn on your drive, and repeat step 5 (un-initialization) on BOTH
drives (in single mode, the array will show up as two drives). Then you may
continue again from Step 6 and configure the jumper block to RAID 1.
NOTE: When placing the jumper shunts, make sure they are oriented
along the longest axis of the drive. For example, if you want RAID 1
mode, one jumper shunt would cover pins 1 and 2, and another jumper shunt
would cover pins 4 and 5, as opposed to one jumper shunt covering pins 1
and 4, and another jumper shunt covering pins 2 and 5.
Fig. A (below) shows how the [uncovered] jumper pins are numbered. The
black arrow points to the back of the drive.
Fig. A
14
9.
Your jumper block should look something like this when finished changing
settings. Shown is RAID 0 (striping) with pins 1, 2, 5, and 6 covered. Note
that the jumper shunts are oriented along the longest axis of the drive.
10.
Replace the cover of your CADA-U32. With your disk array connected to your
computer and turned on, initialize and format your new volume. If you need
help initializing and formatting your drive, see the Formatting Guide, located
on our Downloads page: www.cavalrystorage.com/su_download.htm
11.
After initializing and formatting, your drive will be ready to use!
If you have any questions, visit our website at www.cavalrystorage.com for FAQs,
manuals and more, or contact us at [email protected].
15