1
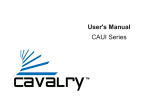
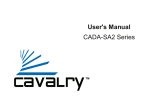
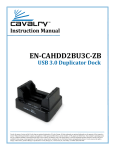
User's Manual
CADA-U32A Series
Preface
Copyright
Please respect copyrighted content. Duplication or modification of this publication in whole or in
part is prohibited without express or written authorization.
Usage
Strong impacts or dropping the product may cause damage. Only allow qualified personnel to
repair this product. Disassembling or opening this product will void your warranty.
Disclaimer
Cavalry is not liable for compensation for data loss which may result from a malfunction of the
product or from changes due to improper use, repairs, defects, or battery change. Please back
up your data to avoid unexpected losses. Cavalry reserves the right to make changes to the
content of this manual without notice. The most current manuals and software are available for
download at our download page: www.cavalrystorage.com/su_download.htm
2
Thank you for choosing Cavalry.
We at Cavalry extend our sincere gratitude for your purchase of this product.
We hope our dedication to delivering high quality products with excellent
customer service will ensure your continued interest in our products.
This manual will assist in the operation of the product. To optimize your
experience with this product, we recommend reading this entire manual
before usage. Please keep this manual for future reference.
3
Table of Contents
Preface ....................................................................................................
List of Accessories .............................................................................
Product Illustrations ...........................................................................
Features .............................................................................................
Setup Instructions ..............................................................................
RAID .................................................................................................
Troubleshooting .................................................................................
Warranty ............................................................................................
Contact ...............................................................................................
4
2
5
6
8
9
13
15
18
19
List of Accessories
1.
2.
3.
External power adapter / power cord (may vary with product)
USB 2.0 cable
Resources CD
3
1
2
5
Front
1
1. LED status indicators
6
Back
2. Power switch
3. 5-pin power jack
4. USB 2.0 port
5. Ventilation fan
2
3
4
5
7
Features
Plug-and-play for Windows 2000/XP/Vista
USB 2.0 interface
Pre-formatted to NTFS
Supports RAID levels 0 and 1 for data protection
Exceptional heat dissipating ability
LED light indicators
Nearly silent operation
Designed for use with a PC
8
Setup Instructions
Follow the steps below to successfully set up your Cavalry External Hard
Drive with your computer.
Step 1. Start your computer and wait for Windows to load completely.
Step 2. Connect the power adapter to the drive. Then
plug the power adapter into an electrical outlet.
NOTE: Make sure the flat end of the plug is facing
toward the power switch to prevent damage to the pins.
9
Step 3. Connect the square end of the USB cable to the hard drive. Then
connect the flat end of the USB cable to the USB port on your computer.
USB Cable Plug
USB Port
Step 4. Turn the power switch on.
NOTE: Connect the USB cable to the drive before connecting the cable to
the computer. To disconnect, remove the cable from the computer first.
10
Step 5. Installing drivers for the Cavalry External Hard Drive.
Windows 2000/XP/Vista
Plug-and-play. No device drivers or configuration required. The
computer will detect the USB External Hard Drive as a new USB
device and display messages on the bottom-right corner reading
"USB Mass Storage Device Detected" and "Your new hardware is
installed and ready to use."
Windows 98/Me
1. Make sure Windows 98/Me is fully updated
2. Download drivers from www.cavalrystorage.com/su_download.htm
by clicking on "Windows 98 Driver". Extract the file.
3. Navigate the device manager.
11
4. Right-click on the yellow question mark indicating an unknown
external storage device.
5. When the device driver wizard starts, click on the "Browse" button
to select the search directory to find drivers.
6. Find the USB 2.0-98 driver in the extracted file.
7. Click "Next" to continue.
Mac OS X 10.4 and older
Reformat the external hard drive using Disk Utility on the OS.
Step 6. Your external hard drive is now ready to use.
NOTE: When the hard drive is on, the blue "Power" LED light will appear on
the front of the drive. The "HDD1 ACCESS" and "HDD2 ACCESS" lights will
turn on when the computer is accessing these drives.
12
RAID
Your product is already set up as RAID 1 (mirrored). "Mirrored" means that
each of the two drives in your disk array stores the same data, protecting
against the failure of one drive; however, when the drive appears on your
computer, it will be recognized as a single hard drive.
NOTE: Although the box indicates two hard drives are included, the total
capacity in RAID 1 mode will not equal the sum of the two because the
second drive is used as a "backup" of the first drive. (e.g. two 250GB drives
do not have a 500GB capacity. Instead, only 250GB is available for storage,
while the other 250GB drive is used to back up this storage.)
13
NOTE: Though your product is preconfigured to RAID 1, it is also capable of
being configured to RAID 0 (striped). In RAID 0 mode, the speed
performance of your unit will be increased, and the total capacity will be
equal to the sum of the two hard drives inside. However, your data will not be
mirrored as in RAID 1. Total data loss can occur if either drive fails.
If you wish to configure your product to RAID 0, please email
[email protected] for assistance.
14
Troubleshooting
LED light indicator does not turn on
Make sure the power adapter is securely connected to a working electrical
outlet. Secondly, make sure the USB cable is inserted correctly into the hard
drive and the computer. Turn on the power switch (page 7).
Computer does not detect hard drive
Make sure the USB cable is securely connected. If this does not work, attach
another known working device and working cable into the USB port on the
computer. If the known working device is not detected, the problem could be
your computer's USB port. If the port and cable both work and the hard drive
is still not detected, contact customer support.
15
Loud noises coming from external hard drive
In most cases, loud noises coming from the drive suggest a defective drive or
a loose part. We apologize for any inconvenience this may cause. Please
contact customer service for assistance.
"HDD1 ERROR" or "HDD2 ERROR" lights appear
This indicates one of the drives may need replacing. The hard drive must be
replaced by another hard drive of the same capacity, brand, and model
number. Open the enclosure, remove the failed hard drive and replace with
the new drive. After inserting the new drive and closing the unit, turn it on and
the new hard drive will automatically be rebuilt using a copy of the data from
the good hard drive. The unit does not need to be connected to the computer
in order to be rebuilt. Do not turn off the power during the rebuilding process.
16
Hard drive will not work with my Mac
Macs require special formatting. If you have Mac OS 10.5 and wish to
reformat for use with a Mac, you cannot do so; Mac 10.5 formatting will not
work with the RAID hardware. If you have Mac OS 10.5, contact Cavalry
customer support. For Mac OS 10.4 and older, format the hard drive
according to the instructions provided by your Mac.
If you have more questions, please refer to the Frequently Asked
Questions section online at: www.cavalrystorage.com/su_faq.htm. For
further inquiries, you may contact Bason/Cavalry tech support at
[email protected].
17
Warranty
This product comes with a one year warranty from the date of purchase.
Please register your product at www.cavalrystorage.com/prodreg.htm to
activate the warranty. Please have your Serial Number and Model Number
ready. We are not responsible for any loss of data. Please back up your data
often to avoid unexpected losses.
18
Contact
Cavalry Storage, Inc.
555 E. Easy St.
Simi Valley, CA 93065
Email:
[email protected]
Website:
www.cavalrystorage.com
19
CA1043
062708