1
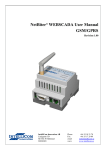
User Manual AnybusCommunicator for LonWorksLWTool Rev. 1.1 HMS Industrial Networks AB Germany Japan Sweden U.S.A. France Italy China +49 +81 +46 +1 +33 +39 +86 - 721 – 96472 – 0 - 45 – 478 – 5340 - 35 – 17 29 20 - 312 – 829 – 0601 - 3 89 32 76 76 - 347 – 00894 -70 - 10 – 8532 – 3183 [email protected] [email protected] [email protected] [email protected] [email protected] [email protected] [email protected] Table of Contents Table of Contents Preface ................................................................................................................................... 1 About This Document .......................................................................................................... 1 How To Use This Document......................................................................................................................................... 1 Important User Information .......................................................................................................................................... 1 Revision List ...................................................................................................................................................................... 2 Support ............................................................................................................................................................................... 3 About the ABC LON-RTU Slave ......................................................................................... 1 Overview ............................................................................................................................................................................ 1 Connectors ......................................................................................................................................................................... 2 LED ........................................................................................................................................................................... 2 LonWorks Connector ............................................................................................................................................. 3 RS232/RS422/RS485 ............................................................................................................................................. 3 Power connector ..................................................................................................................................................... 3 General .................................................................................................................................. 4 Software Installation ............................................................................................................. 6 System Requirements ....................................................................................................................................................... 6 Minimum:.................................................................................................................................................................. 6 Recommended: ........................................................................................................................................................ 6 Installation Procedure ...................................................................................................................................................... 6 User Interface information ................................................................................................... 7 Node Menu............................................................................................................................................................... 7 Network Variable Menu Explanation .................................................................................. 8 Config Properties Menu........................................................................................................ 9 File Management ................................................................................................................ 10 Templates ................................................................................................................................................................ 10 External Interface Files (.XIF) ............................................................................................................................ 10 Node Documentation Files (.HTML) ............................................................................................................... 10 Configuration Files (.DAT) ................................................................................................................................. 10 Create a non-LonMark Compliant Project & Add Network Variables ............................... 11 Open an Existing Project & Import an Object with Predefined Variables ................................................ 12 Create a LonMark Compliant Project & Add an Empty Object ............ Error! Bookmark not defined. Download Program ............................................................................................................. 13 Preface Preface About This Document How To Use This Document This document contains a general introduction as well as a description of the technical features provided by the Anybus Communicator, including the PC-based configuration software The reader of this document is expected to be familiar with industrial networking systems, and communication systems in general. For more information, documentation etc., please visit the HMS website, „www.anybus.com‟. Important User Information The data and illustrations found in this document are not binding. We, HMS Industrial Networks AB, reserve the right to modify our products in line with our policy of continuous product development. The information in this document is subject to change without notice and should not be considered as a commitment by HMS Industrial Networks AB. HMS Industrial Networks AB assumes no responsibility for any errors that may appear in this document. There are many applications of this product. Those responsible for the use of this device must ensure that all the necessary steps have been taken to verify that the application meets all performance and safety requirements including any applicable laws, regulations, codes, and standards. Anybus® is a registered trademark of HMS Industrial Networks AB. All other trademarks are the property of their respective holders. The examples and illustrations in this document are included solely for illustrative purposes. Because of the many variables and requirements associated with any particular implementation, HMS Industrial Networks cannot assume responsibility or liability for actual use based on these examples and illustrations. Warning: This is a class A product. In a domestic environment this product may cause radio interference in which case the user may be required to take adequate measures. ESD Note: This product contains ESD (Electrostatic Discharge) sensitive parts that may be damaged if ESD control procedures are not followed. Static control precautions are required when handling the product. Failure to observe this may cause damage to the product. 2 Revision List Revision Date Author Chapter Description 0.10 02-11-11 ANGU All Created 1.00 03-01-21 ANGU All Updated 1.01 03-01-22 MFA 1.1 09-03-19 ICI/CHDA HMS version All New layout 3 Support HMS Sweden (Head Office) E-mail: Phone: Fax: Online: [email protected] +46 (0) 35 - 17 29 20 +46 (0) 35 - 17 29 09 www.anybus.com HMS North America E-mail: Phone: Toll Free: Fax: Online: [email protected] +1-312-8290605 888-8-Anybus +1-312-738-5873 www.anybus.com HMS Germany E-mail: Phone: Fax: Online: [email protected] +49-721-96472-0 +49-721-964-7210 www.anybus.com HMS Japan E-mail: Phone: Fax: Online: [email protected] +81-45-478-5340 +81-45-476-0315 www.anybus.com HMS China E-mail: Phone: Online: [email protected] +86 10 85 32 3023 www.anybus.com HMS Italy E-mail: Phone: Online: [email protected] +39 039 59662 27 www.anybus.com 1 About the Anybus Communicator for LonWorksOverview The Anybus Communicator for LonWorks, or „ABC‟ is a product that interfaces between a ModBus RTU network and a LonWorks network. The gateway acts as ModBus slave. All data in the variables are presented in the ModBus registers without any interference; no calculations, scaling or customizations are made. The gateway makes it possible to convert ModBus registers data to LonWorks Variables (SNVT‟s and/or UNVT‟s). You can create a set of variables according to LonMark functional Profiles or you can create your own set of variables with User defined Network Variables (UNVT‟s). Configuration is made with the configuration tool “ABC LWTool” which can be purchased from HMS. Holding registers (4X reference) will be connected to network output variables (NVO). Input registers (3X reference) will be connected to network input variables (NVI). 2 Connectors LED LED 1 Function Flashing Green: This node has an application but is not yet installed in a network (unconfigured). Off: This node is configured and installed in a network. Solid Green: This node is unconfigured and application less. Indicates errors detected by the Neuron Self-Test routine. 2 Off: Normal state Flashes Red: A wink command is received on the LonWorks network. 3 4 Not used Solid Green: The module has been initiated correct and is working ok. Flashes Red: Software error. Restart the module. Solid Red: A hardware error has occurred. 5 Solid Red: At start and if no Modbus messages have been received for more than 5 sec. Solid Green: After receiving correct Modbus message and correct start-up. 6 Solid Green: Normal state. Flashes Red: No configuration saved in the gateway. LED 3 Service pin Power connector LonWorks connector RS232/RS422/RS485 Pin 1 Configuration connector LonWorks Connector Pin Function 1 Shield 2 - 3 - 4 Net B 5 Net A Pin1 RS232/RS422/RS485 Pin Function RS232 RS422 RS485 1 + 5VDC ● ● ● 2 RS232 Rx ● 3 RS232 Tx ● 4 Not connected 5 GND ● ● 6 RS422 Rx + ● 7 RS422 Rx - ● 8 RS485 + / RS422 Tx + ● ● 9 RS485 - / RS422 Tx - ● ● ● Power connector Pin Function 1 Vin +24 VDC 2 GND Pin1 4 DIN rail mounting 1 2 5 Introduction to LWTool The ABC LWTool is an easy to use configuration tool suitable for the Anybus Communicator interface. It provides a user friendly way of specifying a desired set of network variables and map them to ModBus registers. The finished configuration can then be downloaded via the HMS LWDownload utility, see 13 “ConfigDownload Program” A fast learning curve and visual user interface allows complete network configurations to be built without spending precious time learning a new program. (For installation instructions, see 4-1 “Software Installation”). Nodes can be customized to fit a specific application. Customized configurations is be made up of User defined Variables only, while LonMark compliant nodes require predefined Standard Network Variables. Furthermore, projects and objects can be stored to build a custom library, resulting in a more efficient way to do the next project in the same area of application; just open a suitable project and make the necessary adjustments and/or add a suitable object. 6 Software Installation System Requirements Minimum: Windows 98/ME/NT/2000/XP/Vista Pentium class CPU running at 133MHz 32Mb RAM 800x600 resolution color display Recommended: Windows 98/ME/NT/2000/XP Pentium class CPU running at 200MHz or higher 64Mb RAM 1024x768 resolution display 16 bit color Installation Procedure The installation screen should appear automatically when inserting the supplied software CD. If not, open the CD device and double click on „\index.html‟. • • • Install ABC LWTool by clicking „LWTool‟ and follow the on screen instructions. Install the serial hardware driver by clicking „Hardware driver‟ and follow the on screen instructions. Click „Readme.txt‟ to read supplementary information such as release notes etc. 7 User Interface information Node Menu When starting the LWTool program you will see the following windows on the screen: 1. Additional info This information will be presented in the Self Documentation string, seen by the network Management tool. Choose a suitable name for your node. 2. Program ID Here you chose if you are going to do a configuration that should comply with a LonMark approved Functional Profile or not. NOTE! The possibility to create LonMark configurations is disabled by default. Please contact [email protected] if you need to create a LonMark configuration. LonMark When choosing LonMark, the boxes need to be filled in. This can be generated with the Program ID calculator. Consult the LONMARK® Application Layer Interoperability Guidelines for more inforamtion 3. ASCII This field is used when no LonMark profiles are used. You can write max. 8 character as a description of the node/product in ASCII format. Network variable alias table Network variable aliases are required on a node when a single network variable output on the node must be connected to two or more network variable inputs on another node. 4. Standard transceiver type This Gateway only supports the FTT-10 Transceiver type. 8 Network Variable Menu Explanation When adding a Network Variable, the following windows will be shown on the screen: 1. Name The name should start with nvi or nvo depending on if it is an input or an output, i.e. nviChillerEnable, nvoOnOff 2. SNVT Type In this field you can change the SNVT type, or chose a User defined variable, UNVT. To easy find the SNVT variable you want, start writing the variable name and you will see suggestions on names coming up. 3. SNVT Type Size If selecting UNVT, you will have to set Variable type size. Otherwise it is just for your information. 4. Selfdoc ® This string is auto generated. To understand the string, see LONMARK Application Layer Interoperability Guidelines, chapter 5. 5. Member Nr This is the variable index in the object. See the specific LonMark Profile object for more information. In the 8040 object, index of nviChillerEnable is 1, index of nvoActiveSetpt is 4 and so on. 6. Add info This information will be placed after the semicolon in the self documentation string. Usually the info could be ChillerEnable for nviChillerEnable. 7. Directions Here you select the direction of the variables; the icon of the variable is green for input and red for output variables. 8. Class This information is maintained from LonMark and is specified for each variable in the Object of a Profile. 9. Default Service Type ® Set default as Acknowledge; see LONMARK Application Layer Interoperability Guidelines for further information. 10. Service type may be modified Set if the network management tool will be able to change service type (recommended in most cases) 11. Use polling This functionality is for nvi´s only. If this option is selected, the ABC will send a network variable poll message to the connected nvo to synchronize the variable during start-up. 9 Config Properties Menu When adding a Variable in the Configuration Properties, the following windows will appear: 1. Name The name should begin with „nci‟, e.g. „nciLocation‟ 2. Selfdoc For non LonMark compliant nodes it is possible to add additional information (see previous page). For LonMark compliant nodes, consult the LONMARK® Application Layer Interoperability Guidelines for more information about the self documentation string. 3. SCPT Type This field specifies the SCPT variable type for the nci-name. If a user defined variable is used (UCPT), Index and Scope has to be entered. (see below) 4. Index When using UCPT variables, this field should contain the index number. (Consult the LONMARK® Application Layer Interoperability Guidelines for specific information.) 5. Scope This field is only used when using UCPT variables, consult the LONMARK® Application Layer Interoperability Guidelines for specific information. 6. SNVT Type When using UCPT variables, this field should contain a suitable SNVT variable. 7. Class Consult the LONMARK® Application Layer Interoperability Guidelines for more information. 8. Default Service Type Set by default as „Acknowledged‟; consult the LONMARK® Application Layer Interoperability Guidelines for further information. 9. Set initial value: This field is used to set the initial value in hexadecimal “raw-data” form, i.e. if the range of the variable is –163.840% to 163.830 (0.005%), this means that each step is 0.005%. If you want to set 100% as default, it would be 100/0.005 which is 20000 = 4E,20 in HEX 10. Only changeable when offline: When this option is enabled, it is only possible to make changes to the variable when the node is off line. 11. Service type may be modified: This option should be set if the network management tool should be able to change the service type (recommended in most cases) 12. Config applies to…: This entry defines the scope of the configuration property. Configuration properties that belong to an object shall be declared as a part of the object and not declared as a part of the node. Similarly, a configuration property associated with a specific network variable(s) shall be declared as belonging to the network variable(s) and not the object or the node. Consult the LONMARK® Application Layer Interoperability Guidelines for more information. 10 File Management Project Files (.PRJ) The configuration can be saved for later use using the menu entries „Save‟ and „Save As...‟ in the „File‟ menu. To retrieve the saved project at a later stage, use the „Open‟ entry. Please note that project files cannot be downloaded directly into the LonWorks interface. To do this, the project must be exported as a Configuration File (.DAT), see 3-6 “Configuration Files (.DAT)”. Templates Projects can be saved as templates to be used as a basis for new implementations. To create a new template, save the project in the „\templates\‟ sub folder in the ABC LWTool program folder. To use a template, select the „New‟ entry in the „File‟ menu. Select the desired template in the dialog box that follows and click „OK‟. External Interface Files (.XIF) This file is used by the Network Management tool when installing the LonWorks interface. To export a .XIF file, select the „XIF File‟ entry in the „Export‟ menu. It is also possible to import .XIF files from existing products with similar functionality to use as a basis for new implementations. Node Documentation Files (.HTML) A node documentation file contains information about the configuration in standard .HTML format. To export a node documentation file, select the „Node Documentation (HTML)‟ entry in the „Export‟ menu. Note: It is not possible to import Node Documentation files. Be sure to save the project using the „Save‟ / „Save as‟ entries in the „File‟ menu. Configuration Files (.DAT) The finished configuration can be exported as a.DAT file to be downloaded into the LonWorks interface using the Firmware Download utility (see A-1 “HMS Firmware Download Utility”). Note: It is not possible to import .DAT files into the ABC LWTool utility. Be sure to save the project using the „Save‟ / „Save as‟ functions in the „File‟ menu. 11 Create a non-LonMark Compliant Project & Add Network Variables After starting ABC LWTool, select the „New‟ entry in the „File‟ menu, and choose „Empty Object‟. This gives the node a Virtual Object where network variables and Configuration Properties can be added by right clicking on „Network Variables‟/ ‟Configuration Properties‟, and choosing „Add Network variable‟/ „Add Config Property‟ 1. Select „Node‟ and enter a name for the node under „Additional info‟ in „Node Options‟ 2. Select „ASCII‟ and write max. 8 character name for „Program ID‟ 3. Enter no. of entries in the „Network Variable alias table‟ 4. Add network variables by right clicking on „Network Variables‟ and select „Add network variable‟ 5. Change the name of the variable to either to „nvi‟ or „nvo‟. 6. Change SNVT type to UNVT (User defined). 7. The „Member number‟ will increase automatically, but can be altered manually if necessary. 8. Enter the name in „Add. info‟. 9. Enter the length of the UNVT variable 10. Select the direction of the variable („In‟ or „Out‟) 11. Select the „Manufacturer‟ entry under „Class‟ 12. Select the desired „Default Service Type‟ 13. If no special customer demands are required, enable „Service type may be modified‟ 12 14. „Use polling‟ - this functionality is for „nvi´s‟ only. If this option is selected, the LMS will send a network variable poll message to the connected „nvo‟ to synchronize the variable during start-up. Repeat until all network variables are added 15. Right click on „Config Properties‟ and select „Add Config Property‟ 16. Enter the name of the variable using „nci‟ in the beginning of the variable under „Name‟ 17. Enter the name without „nci‟ under „Selfdoc‟ 18. Select SCPT type or use a UCPT if you need something not listed. Note that when using UCPT, additional information must be entered („Variable Index‟ and „SNVT Type‟) 19. Choose Class 20. Choose the Default Service Type 21. If necessary, set the initial value by clicking on the „Initial Value‟ button. 22. Only changeable when offline: Make it possible to do changes to the variable only when the node is offline 23. Service type may be modified: Enable this option if the network management tool should be able to change service type (recommended in most cases) 24. Scope: This declaration defines the scope of the configuration property. Configuration properties that belong to an object shall be declared as a part of the object and not declared as a part of the node. Similarly a configuration property that is associated with a specific network variable(s) shall be declared as belonging to the network variable(s) and not the object or the node. See LONMARK® Application Layer Interoperability Guidelines for more information. 25. Save the project using the „Save as‟ function in the „File‟ menu 26. Export the project as XIF/Configuration File/Node Documentation file using the functions in the „Export‟ menu. Open an Existing Project & Import an Object with Predefined Variables 1. 2. 3. 4. 5. Start ABC LWTool Click the right mouse button on „Node‟ Select „Import object‟ Select „8040_10 Chiller Controller.lbj‟ Click „Open‟ 13 ConfigDownload Program In your Start menu you will have an Icon for the download program under the menu for the LWTool. When you start you will see this window: 1. Click File, open and chose the Configuration file (dat-file) you want to download into the gateway. You will see that the Configuration information will change. 2. Set the Address of the gateway and all the other ModBus specific settings 3. Connect your gateway with the computer via the Configuration Cable. There are possibilities to change COM port under Settings. 4. Power-up the gateway 5. Press start It is possible to change the communication settings only, without downloading a configuration file. To clear the .dat-file from the download program (if loaded), chose “new”. This will clear the information in the configuration information field (you will only have zeros in the fields). Change your settings and press START.