1
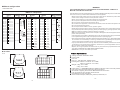
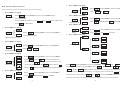
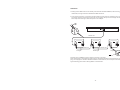
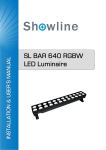
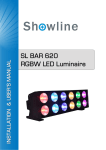
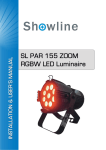
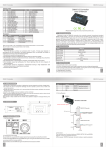
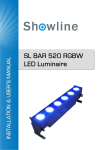
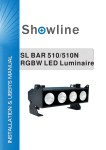
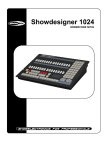
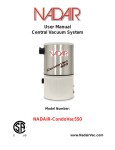
LED Butter fly Light
Instruction Manual
LED Butter fly Light
HD AUDIO SYSTEM INC.
ADDRESS : 2112 Lee Ave. South El Monte, CA 91733
TELEPHONE : +1 (626) 433-0357 +1 (844) 223-7809
FAX : +1 (626) 433-0315
EMAIL : [email protected]
DMX512 configuration
WARNING
1 and 4 channel mode
FOR YOUR OWN SAFETY, PLEASE READ THIS USER MANUAL CAREFULLY
BEFORE YOUR INITIAL START-UP!
DMX 5 12 configuration
Chase
CH1
0-15
16-31
32-47
38-63
64-79
80-95
96-111
112-127
128-143
144-159
160-175
176-191
192-207
208-223
224-239
240-255
Dimmer Strobe
CH1
OFF
Chase1
Chase2
0-199
Chase3
Chase4
C h as e 5
Chase6
Chase7
Chase8
Chase9
Chase10 200-247
Chase11
Chase12
Chase13
Chase14 248-255
Chase15
Dimmer
from
dark
to
bright
Strobe
from
Slow
to
Fast
Always on
Bead 1
CH2
Bead 2
CH3
OFF
R
G
B
0-14
15-29
30-44
45-59
60-74
75-89
90-1049
105-114
120-139
135-144
150-169
165-174
W
WR
WG
WB
RG
BG
BR
RGB
RGW
180-199
195-204
210-229
225-23
BGW
RBW
RGBW
RGBW
240-255
Chasing
0-14
15-29
30-44
45-59
60-74
75-89
90-1049
105-114
120-139
135-144
150-169
165-174
180-199
195-204
210-229
225-23
240-255
Motor rotation
CH4
OFF
R
G
B
W
WR
WG
WB
RG
BG
BR
RGB
RGW
BGW
RBW
RGBW
0-9
Stop
Fast
10-120
Slow
121-134
Stop
Slow
35-245
Fast
246-255
RGBW
Chasing
Overview
Stop
The manufacturer will not accept liability for any resulting damages caused by the non-observance
of this manual or any unauthorized modification to the equipment.
• Never let the power-cable come into contact with other cables. Handle the power-cable
and all mains voltage connections with particular caution!
• Never remove warning or informative labels from the equipment.
• Do not open the equipment and do not modify the equipment.
• Do not connect this equipment to a dimmer-pack.
• Do not switch the equipment on and off in short intervals, as this will reduce the system's life.
• Only use the equipment indoors.
• Do not expose to flammable sources, liquids or gases.
• Always disconnect the power from the mains when equipment is not in use or before cleaning!
Only handle the power-cable by the plug. Never pull out the plug by pulling the power-cable.
• Make sure that the available voltage is between 110v/240v.
• Make sure that the power-cable is never crimped or damaged. Check the equipment and the
power-cable periodically.
• If the equipment is dropped or damaged, disconnect the mains power supply immediately.
Have a qualified engineer inspect the equipment before operating again.
• If the equipment has been exposed to drastic temperature fluctuation (e.g. after transportation),
do not switch it on immediately. The arising condensation might damage the equipment.
Leave the equipment switched off until it has reached room temperature.
• If your product fails to function correctly, discontinue use immediately. Pack the unit securely
(preferably in the original packing material), and return it to your Prolight dealer for service.
• Only use fuses of same type and rating.
• Repairs, servicing and power connection must only be carried out by a qualified technician.
THIS UNIT CONTAINS NO USER SERVICEABLE PARTS.
• WARRANTY; One year from date of purchase.
140
296
271
Front
195
271
351
296
Voltage: AC220V-240V/50Hz-60Hz
Power: 40W
fuse: 5A
LED: 2 x 10W R G B W 30000hr rated
Packing size: 296×271×140mm ( M - L194B )
296×271×195mm ( M - L194C )
Weight: 4.0kg ( M - L194B )
4.5kg ( M - L194C )
Fitted with 2 x 10W RGBW LEDs,the DMXFury fills the entire room with powerful and
laser-like muticolor beams,delivering fabulous effects.
Great built-in lighting shows under Master/Slave Sound Active
Full range dimmer and variable strobe effects
LED display for easy navigation
Idear for discotheques,clubs,bars,patties,mobile DJs,ect
296
-01-
-4-
6、 press “MENU” to display
Menu function display instruction:
FF
, Pressing ENTER to confirm,using UP/DOWN
Select
(Note: The following operation must be saved each time by press ENTER key.)
FF-- Off;
select
1、 press “MENU” to display
I
and press ENTER .
Pressing MENU to saved and back.If
select
I
FF ,Master is Auto-run ;
-- sound active .
select
P
P
IP
Display inverse
Select
I P , Pressing ENTER to confirm,using UP/DOWN
select
I P - same directions ;
YES
1
, Pressing ENTER to confirm,using UP/DOWN
Select
, Pressing ENTER to confirm,using UP/DOWN
Select
Reset
select YES -- reset;
select DMX512 address.
FF
C
1
C
2
C
3
C
4
000
255
3、 press “MENU” to display
C
select
4C
Choose Channel Mode
Manual function
, Pressing ENTER to confirm,using UP/DOWN
Select C
1C
or
4C
001
Slave mode
2
001
Select
,pressing ENTER to confirm,using UP/DOWN
select
(master),
same direction;
1 (slave 1) and master have
(master),others is
1
2 (slave 2),then all lights will synchronous performance.
Select
, Pressing ENTER to confirm,using UP/DOWN
Select
select
FF -- sound off;select
Sound
-2-
000
255
000
255
-- sound on.
, Pressing ENTER to confirm,using UP/DOWN select
Pressing ENTER to confirm, using UP/DOWN select C
C
5、 press “MENU” to display
FF
255
2 and master in opposite directions.The
lights in series connection with
(slave1)or
000
.
4、 press “MENU” to display
1
- - no reset.
9、 press “MENU” to display
DMX512 address seting
1C
I P -oppositedirections .
8、 press “MENU” to display
2、 press “MENU” to display
512
-- on.
7、 press “MENU” to display
,Pressing ENTER to confirm,using UP/DOWN select
Select
Master mode
Led display
3 - - Bead 2 C
4
1
FF
-- Off;
- - Dimmer Strobe C
- - on.
2
- - Bead 1
- - Motor rotation. Manual function not only can use as master,but also use
as four channels controller(only for this light). The lights in series connection with
manual function, others are slave.in
( master)for
-- on,using UP/DOWN select Ch1-Ch4 adjust
select
bead color you like and motor speed to saved,then all lights will synchronous performance.
-3-
DMX MODE:
1.Setting mode: DMX mode is controlled by international standards DMX512, When setting
DMX mode, the light need to be distributed a DMX channels.
2.Control and connecting: Connecting with XLR-XLR line from output of controller to the input
of first light, and then connecting from output of first light to the input of second light. As the
same steps to the last light. Take follow picture for example:
DMX512
INPUT
Controller line
Controller line
First Lights
Controller line
Second Lights
N Lights
3.Before using of DMX512 control, please turn power on the light.
Note: Please keep in mind that the signal output of final lamp should be connected to the circuit
plug, circuit plug has a 120 ohm resistance between 2 feet and 3 feet, the circuit plus can avoiding
signal reflecting phenomenon during DMX 512 transmission.
-5-