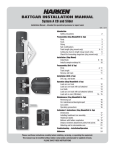
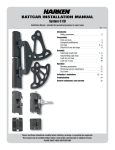
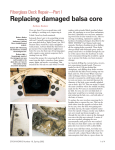
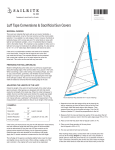
1
SMALL BOAT UNDERDECK FURLER
477, 493, 478
Installation and User Manual – Intended for specialized personnel or expert users
4428 5/15
Preassembly
Safety precautions/terms/general information2
Parts descriptions/specifications3
Planning Installation
Hoistable halyard swivel
4
Tools4
Furler requires drained compartment
5
Assembly
Stay loading
Stay angle
Deck plate
5
5
6
Commissioning
Furling line
Upper swivel
7
8
Operation
Unfurling/furling8
Maintenance
Clean8
Inspect8
Maintenance8
Deck Drill Templates
477 Small Boat underdeck furler
493 Medium underdeck furler
478 Small Boat underdeck furler
9 - 10
11 - 12
13 - 14
Appendix
Sailmaker instructions
15
Addresses
16
Please read these instructions carefully before installing, servicing, or operating the equipment.
This manual may be modified without notice. See: www.harken.com/manuals for updated versions.
PLEASE SAVE THESE INSTRUCTIONS
Safety Precautions/Terms/General Information
Introduction
This manual gives technical information on installation and service. This information is destined exclusively for specialized personnel or
expert users. Installation, disassembling, and reassembling by personnel who are not experts can cause serious damage to property or
injury to users and those in the vicinity of the product. If you do not understand an instruction, contact Harken.
The user must have appropriate training in order to use this product.
Harken accepts no responsibility for damage or harm caused by not observing the safety requirements and instructions in this manual.
See limited warranty, general warnings and instructions at www.harken.com/manuals.
Purpose
Harken jib furling is designed to roll sails on sailboats so wind has little effect on the sail. Use of this product for
other than normal sailboat applications is not covered by the limited warranty.
Safety Precautions
WARNING! Strictly follow all instructions to avoid potential hazards that can kill or hurt you and
others. See www.harken.com/manuals for general warnings and instructions.
Clevis pin
Deck plate ball
Deck
Deck plate
Bullseye
Swivel assembly
Spool
Drum assembly
Furler
477
493
478
2
Description
Underdeck furler/small
Underdeck furler/medium
Underdeck furler/large
Clevis pin
Ø
in
mm
1/4
6
5/16
8
7/16
11
Bridge
Maximum
working load
lb
kg
950
431
2000
907
3000
1361
477, 493, 478 Small Boat underdeck furling
Line
Ø
in
/ – 5/32
5/32 – 3/16
3/16 – 1/4
1 8
mm
3–4
4–5
5–6
Parts Descriptions and Specifications
A
B
C
D
E
F
G
H
I
Furler
in
mm
in
mm
in
mm
in
mm
in
mm
in
mm
in
mm
in
mm
in
mm
477
493
478
45/8
511/16
7
118
144
177
45/16
55/16
53/4
147
135
147
19/16
113/16
27/16
40
45
61
55/8
7
93/8
143
179
238
63/16
73/8
81/2
157
188
215
69/16
713/16
91/2
166
198
240
21/2
4
43/4
64
102
121
5/16
8
9.5
11.5
3
4
51/2
76
100
140
3/8
7/16
H
C
G
AB
E F
477
D
I
Components
Furler
Upper
swivel
Part No.
Hoistable
swivel
Part No.
Weight
Hoistable swivel
oz
g
Upper swivel
oz
g
Drum
Part No.
Drum
477
164
464*
HC9226
2.6
74
2.9
82
493
207
465* HC10893
9.2
261
8.9
252
478
HCP141
482*
HC9976
15
431
16.8
477
*Hoistable halyard swivels (464, 465, 482) are not included with 477, 493, or 478.
oz
g
24
42.6
81
680
1201
2296
Part No. in
464
43/16
465
511/16
482
719/32
mm
124
144
193
Tangs for Attaching Sail to Lower Unit
Furler
Tack
adapter tang
Part No.
Pin-to-pin
length
in
mm
Wire
Ø
in
mm
3/4
1/8
477
HCP649*
19
5/32
493
489
13/8
35
5/32
478
479
11/2
38
3/16
478
480
11/2
38
7/32
478
481
11/2
38
*See parts required below. **Upper tang hole pin size listed.
*The following parts must be ordered with the
HCP649
Part No.
Qty
HCP650
HFS118
HSB99
2
1
1
Description
Neoprene O-ring
Cotter pin 1/16 X.500 18-8
Clevis pin 1/4 X .672 SS
3
4
4
5
6
Clevis pin
Ø
in
mm
/ **
5/16**
5/16**
3/8**
7/16**
1 4
6**
8**
8**
10**
11**
Weight
oz
g
lb
kg
—
—
5.2
5.2
5.2
—
—
147
147
147
—
—
3000
3000
3000
—
—
1361
1361
1361
Upper
adapter tang
hole
HCP649 tang
479
480
481
489
477, 493, 478 Small Boat underdeck furling
3
Planning Installation
Hoistable Halyard Swivel
An optional hoistable ball bearing halyard swivel can be installed on
headstay to raise or lower the sail without removing headstay. Hoistable
halyard swivels are independent of headstay, allowing luff to be tensioned
separately from mast rake. Hoistable swivels work along with standard
Harken Small Boat furler.
Upper
swivel
IMPORTANT! Hoistable halyard swivel must be loaded on stay before
terminals are made. Make sure the end with circlip is facing up.
Halyard
Circlip
Hoistable
swivel
End of halyard
swivel with
circlip faces up
When using hoistable halyard swivel adapter tangs provide
a “Y” attachment to connect both stay and sail tack to
lower unit. A sailmaker eye may also be used. The eye
consists of a swage marine eye with a hole designed
for lashing or shackling the tack to terminal.
Un
fur
Sail tack
securing points
l
Furl
Sailmaker eye
Adapter tang
Tools/Parts You Will Need
4
1
6
7
5
2
8
3
1. Hole saw
2. Center punch
3. Scissors
4. Rigging or black tape
5. Deck sealant
6. File for beveling
7. Wrench for deck plate bolts
8. Power drill/drill bit for pilot holes
B
A
C
or
Fasteners for Mounting Unit to Deck (Not Supplied)
Unit
Fastener Ø
C–deck plate thickness*
1/4" (6 mm)
477
5 mm
1/4" (6 mm)
493
5 mm
3
/8" (10 mm)
478
6 mm
*Add deck thickness to this measurement
4
Hole Saw Size – Refer to information below and choose hole saw for deck plate.
Deck Plate Ball Ø
Recommended Hole Saw Ø
A
B
Requires some beveling
Requires no beveling
Unit
in
mm
in
mm
in
mm
in
mm
477
2.6
66
2.7
68.5
2.5 or smaller*
65 or smaller*
2.75
70
493
3
76
3.25
83
3 or smaller*
75 or smaller*
3.25
85
478
4.25
108
4.5
114
4.25 or smaller* 110 or smaller*
4.5
115
* A smaller hole than listed may be used to fashion a socket in the deck to conform to the ball shape. This
can improve appearance and reduce amount of sealant required. See drilling template in appendix.
477, 493, 478 Small Boat underdeck furling
Planning Installation
Furler Requires Drained Compartment
The drum assembly is designed to keep much of the water from entering the compartment. Water will drip through furler during rain, or
when sailing in heavy weather.
IMPORTANT! Furling compartment must drain.
Assembly
Stay Loading
The drum assembly is designed for either transferring headstay loads
to deck or for transferring the loads to an underdeck chainplate.
If securing to deck only, make sure deck is strong enough and designed
for this purpose. A cored deck will not provide adequate strength.
Use stay attachment belowdeck. A turnbuckle is used to connect
chainplate to bridge on furler. It must be carefully tensioned
as mast is tensioned to neutralize load on deck.
Bridge
Turnbuckle
Turnbuckle to bridge
Stay Angle
The Harken deck plate angle matches a stay angle of 72° when compared
to deck. Stay angle can vary between 71° and 73°.
IMPORTANT! If stay angle does not fall between 71° to 73° furler will
be difficult to furl and can create excessive force on deck and furler. To
correct problem, change mast rake or make shims using structural epoxy.
71°–73°
477, 493, 478 Small Boat underdeck furling
5
Assembly
Deck Plate
Carefully locate center point in deck to locate deck plate. Line from mast to underdeck chainplate must intersect this center point. Mark
center fore/aft and athwartships lines. Line up template. Mark four outer holes and center pilot hole. Make sure closer pair of holes is forward. Mark center hole for drilling large hole.
If using an interior chainplate, check hole position by drilling pilot hole and running a
low stretch line from masthead to chainplate.
Tip: After pilot drill bit clears deck, drill final hole from bottom using pilot hole
to line up hole drilled from top. This will prevent glass from chipping.
Tip: Run line through fairlead and deadend line into spool before mounting
lower unit.
Make sure hole is just large enough so deck plate bears against deck. It is better
to make hole slightly smaller and file opening larger to fit. Use template to mark
large hole and bolt holes. Once hole is located in line with chainplate and required
shimming is done, drill hole 90° to deck.
Use screws, washers, and deck sealant to
fasten lower unit to deck (see chart at right).
Note: Make sure there is sufficient thread
engagement into deck plate.
Furler
477, 493
478
Minimum thread
in deck plate
1/4" (6 mm)
3/8" (10 mm)
Deadend line before mounting
6
477, 493, 478 Small Boat underdeck furling
Commissioning
Furling Line
To figure line length, measure distance from furler to furling cleat. Add length indicated below.
Part
No.
477
493
478
Line Ø
in
mm
1/8 – 5/32
3–4
5/32 – 3/16
4–5
3/16 – 1/4
5–6
Measure distance from furler to cleat and add
ft
m
10
3
13
4
15
4.5
Determine Fairlead Location - The fairlead location determines furling direction. The furler is shipped with fairlead
mounted on side of bridge. Refer to chart below to determine if port fairlead mounting will work. If necessary,
remove fairlead and assemble on starboard side.
Fairlead side
Port
Starboard
Furling direction
Counterclockwise
Clockwise
Charge spool by rotating
Clockwise
Counterclockwise
Suncover (if used) on
Starboard
Port
Fairlead
Switch fairlead for opposite
furling rotation
Set up lead block so furling line runs perpendicular to drum when line leaves bullseye. The bullseye can correct small differences
in line angle. Lead line aft using ball bearing blocks where line makes a turn more than 30°. Install cleat.
Feed line through bullseye and into nearest opening.
477, 493, 478 Small Boat underdeck furling
7
Commissioning
Upper Swivel
2
1. Run line out of hole in bottom of spool
and tie a single overhand knot.
Note: On 493 deadend hole is in hub.
2. Pull knot back up to seat at hole.
1
493 deadend hole
477, 478 deadend hole
Counterclockwise furling direction
Rotate drum clockwise to charge spool.
Wind 10-15' (3-4.5 m) of line on spool.
Clockwise furling direction
Rotate drum counterclockwise to charge spool.
Wind 10-15' (3-4.5 m) of line on spool.
Commissioning
Upper Swivel
Attach upper swivel to jib halyard. Fasten head of unfurled jib to upper swivel and attach tack to top of drum. Hoist sail with halyard,
snug up, and cleat. When using hoistable swivel, attach head of sail to shackle.
OperationUnfurling/Furling
To furl jib, pull furling line to roll sail up around its own luff. To unfurl, uncleat furling line and pull jib sheet.
MaintenanceInspect/Clean
Inspect
1) Unit for signs of chafe, wear, or damage.
2) Rigging components for signs of stress/corrosion.
4) Turnbuckle below drum or inside torque tube for signs of loosening.
5) Headstay tension for signs of loosening.
6) All clevis pins, locking rings, and cotter pings to make sure they are secure.
7) Wire for signs of wear or unraveling.
8
477, 493, 478 Small Boat underdeck furling
477 Small Boat Underdeck Furler
Deck Drill Template
Maintenance
Keep unit clean. When washing boat, flush unit with soap and fresh water. Occasionally
lower sail and flush halyard swivel with soap and fresh water.
To clean drum bearings, squirt mild detergent and water solution into small gap between
plastic ball and spool extension as shown at right. Spin drum and let soak. Follow with
one minute flushing with hose.
Clean drum bearings
477 Small Boat Underdeck Furler
Deck Drill Template
Hole Saw Size Recommendations. Read before drilling.
65 mm (2 1/2") – Requires some beveling of bottom edge of deck hole to provide a good fit. Alternatively, a smaller hole may be used
to fashion a socket in deck to conform to ball shape. This may improve appearance and reduce amount of water that enters.
70 mm (2 3/4") – Use if no beveling to underside of deck is desired.
35 mm
(13/8")
!
BOW
Hole saw size
see above
65 mm (2 1/2")
Hole saw size
see above
70 mm (2 3/4")
107 mm
(43/16")
477 Small Boat
deck drill template
STERN
83 mm (3 1/4")
IMPORTANT! When printing this template from a computer
file, measure to confirm template is correct size.
477, 493, 478 Small Boat underdeck furling
9
This page intentionally left blank
10
477, 493, 478 Small Boat underdeck furling
493 Medium Underdeck Furler
Deck Drill Template
Hole Saw Size Recommendations. Read Before Drilling.
75 mm (3") – Requires some beveling of bottom edge of deck hole to provide a good fit. Alternatively, a smaller hole may be used to
fashion a socket in deck to conform to ball shape. This can improve appearance and reduce amount of water that enters.
85 mm (3 1/4") – Use if no beveling to underside of deck is desired.
31.75 mm (11/4")
!
BOW
Hole saw size
see above
75 mm (3")
Hole saw size
see above
85 mm (31/4")
140.5 mm
(517/32")
493
Deck drill template
STERN
95 mm (33/4")
IMPORTANT! When printing this template from a computer
file, measure to confirm that template is the correct size.
477, 493, 478 Small Boat underdeck furling
11
This page intentionally left blank
12
477, 493, 478 Small Boat underdeck furling
478 Small Boat Underdeck Furler
Deck Drill Template
Hole Saw Size Recommendations. Read Before Drilling.
110 mm (4 1/4") – Requires some beveling of bottom edge of deck hole to provide a good fit. Alternatively, a smaller hole may be used
to fashion a socket in deck to conform to ball shape. This may improve appearance and reduce amount of water that enters.
115 mm (4 1/2") – Use if no beveling to underside of deck is desired.
86 mm (3 3/8")
BOW
31.75 mm (11/4")
!
70 mm (23/4")
Hole saw size
see above
110 mm (4 1/4")
Hole saw size
see above
115 mm (4 1/2")
5 29/32"
(150 mm)
478 Small Boat
deck drill template
208 mm
(8 3/16")
IMPORTANT! If you print this template from a computer file,
measure to confirm that template is the correct size.
130 mm (5 1/8")
STERN
163 mm (6 7/16")
477, 493, 478 Small Boat underdeck furling
13
This page intentionally left blank
14
477, 493, 478 Small Boat underdeck furling
Appendix
Sailmaker Instructions
Consult specifications for swivel and drum pin-to-pin lengths to determine luff length deductions. If using optional hoistable halyard
swivel, make sure to deduct for this.
Standard Upper Swivel Only
Sailmaker will often install a 1 x 19 stainless steel wire sewn into the luff with thimbles that are secured to the tack and head so they
will not turn while furling. In this case, the luff wire becomes the headstay. The jib remains on the boat in its furled position when it is
not in use and a cover protects the sail from UV exposure. Alternatively a temporary “mast assist” line is used.
Direction of Wire Lay (All Installations)
When installing wire, coordinate the lay of wire with direction of furling so twist in strands are tightening when sail is pulling aft as it
is furled. The furler may be set up to work in either direction. Consult the chart below and note load direction on the wire strands.
Fairlead side
Spool charged
Sail rolled
Load on wire strands
Port
Clockwise
Counterclockwise
Clockwise
Starboard
Counterclockwise
Clockwise
Counterclockwise
Note: The outside of the roll will be on starboard. See diagram below.
Circlip
Hoistable Halyard Swivel: If a hoistable halyard swivel is used, the sailmaker will use
a luff sleeve or small snap straps so sail can be hoisted onto a permanent stay
and removed with the headstay left in place. Make sure head and tack thimbles are
secured to sail to handle furling loads.
End of halyard
swivel with
circlip faces up
IMPORTANT! Load hoistable halyard swivel onto stay before terminals are assembled.
Use tangs to provide a sail attachment to lower furler. A sailmaker eye may also be used.
Attach headstay
to upper hole
Port fairlead —
Counterclockwise furling
direction
Wire should tighten
when sail puts a
clockwise load on the
strands. Outside
of roll is on starboard.
Attach furler
to this hole
Secure sail
here
Starboard fairlead —
Counterclockwise furling
direction
Wire should tighten
when sail puts a
counterclockwise
load on the strands.
Outside of roll is
on port.
477, 493, 478 Small Boat underdeck furling
15
Corporate Headquarters
N15W24983 Bluemound Rd, Pewaukee, WI 53072 USA
Telephone: (262) 691-3320 • Fax: (262) 701-5780
Web: www.harken.com • Email: [email protected]
Harken Australia Pty, Ltd.
1B Green Street, Brookvale, N.S.W. 2100, Australia
Telephone: (61) 2-8978-8666 • Fax: (61) 2-8978-8667
Web: harken.com.au • Email: [email protected]
Harken France
ZA Port des Minimes, BP 3064, 17032 La Rochelle Cedex 1, France
Telephone: (33) 05.46.44.51.20 • Fax: (33) 05.46.44.25.70
Web: harken.fr • Email: [email protected]
Harken Italy S.p.A.
Via Marco Biagi, 14, 22070 Limido Comasco (CO) Italy
Telephone: (39) 031.3523511 • Fax: (39) 031.3520031
Web: harken.it • Email: [email protected]
Harken New Zealand, Ltd.
158 Beaumont Street
Unit 11, Orams Marine Centre
Westhaven, Aukland, 1010, New Zealand
Telephone: (64) 9-303-3744 • Fax: (64) 9-307-7987
Web: harken.co.nz • Email: [email protected]
Harken Polska SP ZOO
ul. Rydygiera 8, budynek 3A, lokal 101, I piętro, 01-793 Warszawa, Poland
Tel: +48 22 561 93 93 • Fax: +48 22 839 22 75
Web: harken.pl • Email: [email protected]
Harken Sweden AB
Main Office and Harken Brandstore: Västmannagatan 81B
SE-113 26 Stockholm Sweden
Telephone: (46) 0303 61875 • Fax: (46) 0303 61876
Mailing address: Harken Sweden AB, Box 64, SE -440 30 Marstrand
Web: harken.se • Email: [email protected]
Harken UK, Ltd.
Bearing House, Ampress Lane, Lymington, Hampshire S041 8LW, England
Telephone: (44) 01590-689122 • Fax: (44) 01590-610274
Web: harken.co.uk • Email: [email protected]
Please visit: http://www.harken.com/locator.aspx
to locate Harken dealers and distributors
Printed in USA 4428 5/15