1
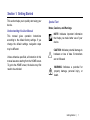
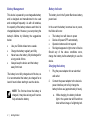
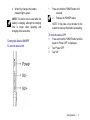
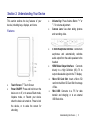
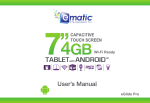
eGlide Prism 7” Tablet PC User Manual Please read this manual before operating your device. Keep it for future reference. Understanding Your Device | 3 IMPORTANT CUSTOMER INFORMATION This manual contains important safety measures and information about how to correctly use this device. To avoid an accident, make sure you carefully read this manual before operation. Many services and applications offered through this device may be provided by third parties. Before you use, link to or download a service provided by a third party, or an application such as a location-based GPS-type service, chat room, marketplace or social network from your device, you should review the terms of such service or application and applicable privacy policy. Personal information you submit may be read, collected or used by the service or application provider and/or other users of those forums. Ematic is not responsible for any information, content or services you access, download, or use from the Internet. You are responsible for maintaining virus and other Internet security protections when accessing service certain other specially identified terms govern your use of any Ematic products and services. This manual may not reflect your actual device’s operation. All information is subject to change without prior notification. Please follow your actual device’s operational procedures. Table of Contents Section 1: Getting Started .................................. 1 App Shortcuts .................................................... 9 Understanding this User Manual ........................1 Applications ..................................................... 10 Special Text .......................................................1 Section 3: Settings............................................11 Battery Management ..........................................2 Display ............................................................ 11 Battery Indicator.................................................2 Applications ..................................................... 12 Charging the battery...........................................2 Email ............................................................... 13 Turning the Device ON/OFF ...............................3 Backup & Reset............................................... 14 Micro SD Card....................................................4 Language & input ............................................ 14 Section 2: Understanding Your Device............... 5 Date & time ..................................................... 15 Features ............................................................5 About tablet ..................................................... 15 Home Screen .....................................................6 Section 4: Care and Maintenance.................... 16 Display Settings .................................................6 Section 5: Troubleshooting .............................. 17 Navigation..........................................................7 Section 6: Specifications .................................. 18 System Bar ........................................................8 Section 7: Warranty Information....................... 19 Notifications .......................................................8 Section 1: Getting Started This section helps you to quickly start using your device. Understanding this User Manual This manual gives operation instructions according to the default factory settings. If you change the default settings, navigation steps may be different. Unless otherwise specified, all instruction in this manual assumes starting from the HOME screen. To get to the HOME screen, the device may first need to be unlocked. Special Text Notes, Cautions, and Warnings NOTE: Indicates important information that helps you make better use of your device. CAUTION: Indicates potential damage to hardware or loss of data if instructions are not followed. WARNING: Indicates a potential for property damage, personal injury, or death. Getting Started | 1 Battery Management Battery Indicator This device is powered by a rechargeable battery and is designed and manufactured to be used and recharged frequently. As with all batteries, the capacity of the battery reduces each time it is charged/depleted. However, you can prolong the battery’s lifetime by following the suggestions below: The battery icon in the System Bar shows battery power level. • • • • Use your Tablet at least once a week. Charge the battery regularly and fully. Never leave the battery fully discharged for a long period of time. Always keep the device and the battery away from heat. The battery is not fully charged out of the box, so it is recommended the battery be charged for at least 4 hours before starting to use the device. NOTE: The first two times the battery is charged, it may take as long as 6 hours to fully activate the battery. 2 | Getting Started In the event the battery becomes low on power, the follow will occur: • The battery icon will show no power • Device will power OFF automatically • Operation buttons will not respond • Red signal appears in right corner of device Should any of the above conditions occur, charge the battery before attempting to use the device. Charging the battery 1 Plug the power adapter into an electrical wall outlet. 2 Connect the power adapter to the device’s power interface port to fully charge the battery before use (approximately 4 hours). a. While charging, the battery indicator light in the system bar will fill and then drain with an image of a lightning bolt. b. When fully charged, the battery indicator light is green. NOTE: The device can be used while the battery is charging, although the charging time is longer when operating and charging at the same time. Turning the Device ON/OFF To turn the device ON: 1 Press and hold the POWER button for 3 seconds. 2 Release the POWER button. NOTE: It may take a few minutes for the system to start-up. Wait before proceeding. To turn the device OFF: 1 Press and hold the POWER button until the option to “Power OFF” is displayed. 2 Tap “Power OFF”. 3 Tap “OK”. Getting Started | 3 SD Card Installing a Micro SD Card 1 Carefully insert a Micro SD card until it clicks into place. Removing an Micro SD Card CAUTION: Use care to properly remove the Micro SD Card. Any sudden removal may cause damage to the device or to data stored on the Micro SD Card. 1 2 3 4 | Getting Started Confirm all files or programs running from the Micro SD Card have been closed. Carefully press the Micro SD Card to cause it to automatically eject. Remove the Micro SD Card from the slot. Section 2: Understanding Your Device This section outlines the key features of your device, including keys, displays, and icons. Features • • • • • • • Touch Screen: 7” Touch Screen Power ON/OFF: Press and hold to turn the device on or off, or to access Silent mode, Airplane mode, or Restart your device when the device is turned on. Press to lock the device, or to wake the screen for unlocking. • Volume Key: Press Volume Button “+” or “-” for volume adjustment. Camera Lens: Use when taking pictures and recording video. 3.5mm Headphone Interface: Connects to earphones and automatically switches audio output from the audio speakers to the headset HDMI Video Output Interface: Connects directly to a High Definition (HD) TV to output video/audio signal to the TV display. Micro SD Card Slot: Insert a Micro SD card into the Micro SD Card Slot for storage of files. Mini USB: Connects to a PC for data transfer and charging; or to an external USB flash drive. Understanding Your Device | 5 Home Screen Display Settings The HOME screen is the starting point for using your device. After powering ON the device, the “Ematic” logo will be displayed and then the HOME screen below: The display settings can be customized to your preferences. Application - Software which allows you to perform a specific task. Your device is preloaded with a variety of applications, and additional ones can be downloaded from the App Shop. Press the icon to enter the main menu. Widget - A small application which resides on the Desktop screen and provides quick and easy access to information. Shortcut - A link you can put on your Desktop Screen to provide quicker access to an application or a folder containing contacts or bookmarks. System Bar - Always present at the bottom of the screen to show notifications, system status, and navigation buttons. 6 | Understanding Your Device Navigation Your device has a multi-touch screen that allows quick, easy and convenient navigation for all applications. CAUTION: A touch screen responds best to a light touch from the pad of your finger. Using excessive force or a metallic object when pressing on the touch screen may damage the tempered glass surface and void the warranty. Throughout this User Manual, you are instructed to use the following navigation methods: Tap: Quickly tap and release one time on the screen. • Selects the items on the screen including options, entries, images, and icons. • Starts applications. • Presses the buttons on the screen. • Inputs text using the on-screen keyboard or number keypad. Swipe: Touch and slide your finger across the screen and then release. • Moves items such as images and icons on the screen. • Moves the adjustment icon along a track to change a setting (i.e., volume, brightness, screen unlock, etc.). • Moves the desktop screen horizontally to expose additional display space. Touch and Hold: Touch and hold in place approximately 2 seconds and then release. • Displays an options window. • Moves applications from the All Application screen to the desktop or a folder. • Deletes email accounts and contacts. Getting Started | 7 System Bar The System Bar offers navigation tools, plus information about your device’s current status. HOME Tap Home to display the HOME screen. BACK Tap Back to return to the previous screen, option, or file. RECENT APPS Tap Recent Apps to view apps you recently launched. From Recent Apps, tap an app to re-launch it. Notifications The right side of the System Bar shows the current time, with network, battery status and other details, including these icons. Battery Level: Shown fully charged. 8 | Understanding Your Device Charging Indicator: Battery is charging. Device Power Critical: Charge immediately to avoid device shut down. USB Charging Indicator: Connected to PC via USB cable. When connected to a PC, the battery only charges when the device is turned off. USB Connected: Connected to a PC using a USB cable. Download in progress: An application is being downloaded to the device. Download Successful: A recent application download or update completed successfully. New Email Message: You have new email. Touch the icon for additional information. Configure input methods: When the keyboard is displayed, touch for a menu of quick keyboard settings. Music Player: A song is playing. Touch the Music icon or Status details to see the song title and controls. Wi-Fi Active: Wi-Fi is connected, active, and communicating with a Wireless Access Point (WAP). App Shortcuts Use App shortcuts to quickly access applications from the HOME screen, Adding Shortcuts from the HOME Screen 1. Touch and Hold on the screen 2. Tap App Shortcuts to display available shortcuts. Scroll the shortcuts by swiping your finger right or left. 3. Tap a shortcut to add it to the HOME screen. –OR– Touch and Hold a shortcut, then drag it to the HOME screen. Adding shortcuts from Apps 1. Touch Apps. 2. Touch and hold on an app, then drag it to the HOME screen. Navigation Active: Navigation App is active. Removing Shortcuts 1. Touch and hold the Shortcut until the option to Delete/Trash appears. 2. Drag the shortcut to the Delete/Trash icon. Getting Started | 9 Applications The ALL APPLICATION screen holds all applications installed on your device. Calendar: Record events and appointments to manage your schedule. 1. Camera: Take pictures or record videos. 2. 3. From the HOME screen, touch Apps. Swipe your finger left or right to browse the available applications. Tap an icon to launch the application. Clock: Schedule alarms to remind you of appointments or events, or as a wake-up. Email: Send and receive email from your device. Apps pre-loaded on your device include: Browser: Access the Internet. Calculator: Perform mathematical calculations. 10 | Understanding Your Device File Manager: View and manage information stored on your device or on an installed memory card. Music Player: Play music. Section 3: Settings Display Brightness Set the default screen brightness. 1. 2. 3. From the Home screen, touch Apps Settings Display Brightness. Swipe the slider to set the brightness, or touch Automatic Brightness. Touch OK to save the setting. Screen display Set the wallpaper background for the Home and Lock screens. From the Home screen, touch Settings 1. Display. Touch an option, then follow the prompts: 2. • Home screen: Touch Wallpaper to select a background for the HOME screen, from pictures in Super-HD player, Live Wallpapers, or preloaded Wallpapers. 11 | Settings • Lock screen: Touch Wallpaper to select a photo from the Super-HD player. Auto-rotate screen When enabled, the screen’s orientation changes automatically when you rotate the device. From the HOME screen, touch Settings 1. Display. Touch Auto-Rotate screen to enable or 2. disable automatic screen rotation. Sleep Set the length of delay between the last key press or screen touch and the automatic screen timeout (dim and lock). From the HOME screen, tap Settings 1. Display Sleep. Tap a setting to select it. 2. Applications You can download and install applications fromWKH App Shop NOTE: Some applications are workable only from the SD Card. Not all third-party software is suitable for this device. 12 | Settings Manage applications Manage and remove applications from your device. 1. From the HOME screen, touch Settings Apps Manage applications. Tap an application to view and update 2. information about Downloaded, All or Running applications, including memory usage, default settings and permissions. Email Configuring Email Accounts You can configure Email for most accounts in just a few steps. Configuring the first email account From the Home screen, touch Apps ➔ 1. Email. Select your email provider, then follow the 2. prompts to set up your email account. Configuring additional email accounts From the Home screen, touch Apps ➔ 1. Email. Tap Menu ➔ Account settings ➔ Add 2. account. Select your email provider, then follow the 3. prompts to set up your email account. Composing and Sending Email 1. From the Home screen, touch Apps ➔ Email. 2. Select an account, then touch Compose. Tap entry fields to enter recipients and the 3. email text. While composing a message, you can use 4. these options: • Touch Save Draft to save the message for sending later. • Touch Attach to add a file to the message. • Touch Discard to close the message without saving. 5. Tap Send to send the message. Settings | 13 Backup & Reset Language & input Select a language for your device’s screens, manage a dictionary of words you’ve added to the device, and configure other input options. Select language From the Home screen, touch Apps Settings Personal Language & input Select language. 2. Tap a language from the list. 1. Restore device to factory settings. From the Home screen, touch Settings 1. Personal Backup & reset. 2. Tap Factory data reset. CAUTION: This process erases all data on the device. 14 | Settings Personal dictionary From the Home screen, touch Apps 1. Settings Personal Language & input Personal dictionary. 2. Tap words to edit or delete them from the dictionary. 3. Tap ADD on the Application bar to add a word. Date & time By default, your device receives date and time information from the wireless network. When you are outside network coverage, you may want to set date and time information manually using Date & time settings. 1. 2. From the HOME screen, touch Settings System Date & time. Tap a setting to configure: • Automatic date & time: Touch to enable or disable automatic date and time updates from the wireless network. When enabled, a check appears in the check box. • Set time: Enter the current time (only available when the Automatic setting is disabled). • Select time zone: Choose your local time zone (only available when the Automatic date & time setting is disabled). • Use 24-hour format: Set the format for time displays. • Select date format: Set the format for date displays. About tablet • Set date: Enter the current date (only available when the Automatic date & time setting is disabled). View information about your tablet, including status, legal information, hardware and software versions, and a tutorial. 1. From the Home screen, touch Apps Settings System About tablet. Touch items to view details. 2. Settings | 15 Section 4: Care and Maintenance Your device is a product of superior design and craftsmanship and should be treated with care. The suggestions below will help you fulfill any warranty obligations and allow you to enjoy this product for many years: Keep your Device away from: • Liquids of any kind Keep the device dry. Precipitation, humidity, and liquids contain minerals that will corrode electronic circuits. If the device does get wet, do not accelerate drying with the use of an oven, microwave, or dryer, because this may damage the device and could cause a fire or explosion. Do not use the device with a wet hand. Doing so may cause an electric shock to you or damage to the device. • Extreme heat or cold Avoid temperatures below 0°C / 32°F or above 45°C / 113°F. • Microwaves Do not try to dry your device in a microwave oven. Doing so may cause a fire or explosion. • Dust and dirt Do not expose your device to dust, dirt, or sand. • Cleaning solutions Do not use harsh chemicals, cleaning solvents, or strong detergents to clean the device. Wipe it with a soft cloth slightly dampened in a mild soap-and-water solution. • Shock or vibration Do not drop, knock, or shake the device. Rough handling can break internal circuit boards. • Paint Do not paint the device. Paint can clog the device’s moving parts or ventilation openings and prevent proper operation. Care and Maintenance | 16 Section 5: Troubleshooting Device fails to turn on. • Check battery power level. • Connect to adaptor and re-check. • If device fail to start up after charging, please contact distributors or service personnel. No sound via earphone. • Check if volume is set at the lowest. • Check if audio file is damaged. Play other audio to re-confirm. Damaged file may result in noise or static only. 17 | Troubleshooting Copy function is not working, fails to play music. • Check if device is properly connected to PC. • Confirm whether storage space is full. • Confirm whether USB cable is damaged. • Confirm USB is properly connected. Twinkling screen after turn-on or sudden shut off after starting up. • Battery low, charge the device. Section 6: Specifications OS Android 4.0 CPU 1.0Ghz Storage 8GB RAM 512 MB DDRIII Micro SD Support up to 32G Display 800*480 pixels Mini USB 2.0 OTG 3D G-sensor 4 directions Recorder Built in MIC Video MKV(H.264HP), AVI, RM/BMVB, FLV, MPEG-1/2 Audio MP3, WMA, APE, FLAC, AAC, AC3, WAV Photo JPEG, BMP, GIF, PNG, TIF Specifications | 18 Section 7: Warranty Information Limitaions of Liability Statement Links to Third Party Sites The Ematic User Manual may contain links to third-party sites, however, please be aware that Ematic is not responsible for and cannot control these other sites. Ematic makes no representations or claims whatsoever about any other website which you may access through this user manual. When you access a non-Ematic website, even one that may contain an Ematic logo, please understand that is independent from Ematic, and that Ematic may have no control over the content on that website. In addition, a link to a non-Ematic website does not mean Ematic endorses or accepts any responsibility for the content, or the use, of such website. It is up to you to take precautions to ensure that whatever you select for your use is free of such items as viruses, worms, Trojan horses and other items of a destructive nature. The Ematic User Manual is for your exclusive benefit and you assume all risks, losses and/or damages of whatever nature that may result in using the Ematic User Manual. Limitation of Liability and Indemnity To the maximum extent permitted by applicable law, Ematic shall not be liable for any damages suffered as a result of using, modifying, contributing, copying, distributing, or downloading the materials, use of the Ematic User Manual or use of any Ematic product and/or software. In no event shall Ematic be liable for any indirect, extraordinary, exemplary, punitive, special, incidental, or consequential damages (including, without limitation, loss of data, revenue, profits, use or other economic advantage) however arising, whether for breach or in tort, even if Ematic has been previously advised of the possibility of such damage. You agree that you have sole responsibility for adequate protection and backup of data and/or equipment used in connection with the product and software and will not make a claim of any Warranty Information | 19 nature against Ematic for lost data, inaccurate output, work delays or lost profits resulting from the use of the materials. You agree to indemnify, hold harmless and defend Ematic, together with its affiliates, parent and subsidiary entities, successors, assigns, partners, managers, members, employees, officers, directors and shareholders, from and against any and all damages, liens, liabilities, losses, demands, actions, causes of action, claims, costs and expenses (including, without limitation, reasonable attorneys' fees, charges and disbursements, as well as the cost of in-house counsel and appeals) arising from or related to Ematic, the use of The Ematic User Manual or any Ematic product and/or software. Some states do not allow the exclusion or limitation of incidental or consequential damages, so the above limitation or exclusion may not apply to you. Android is a trademark of Google Inc. Use of this trademark is subject to Google Permissions. © 2012 Ematic Inc. All rights reserved. 20 | Warranty Information The Bluetooth® word mark, figure mark (stylized “B Design”), and combination mark (Bluetooth word mark and “B Design”) are registered trademarks and are wholly owned by the Bluetooth SIG. Adobe and Flash are either registered trademarks or trademarks of Adobe Systems Incorporated in the United States and/or other countries. Wi-Fi®, the Wi-Fi CERTIFIED logo, and the Wi-Fi logo are registered trademarks of the Wi-Fi Alliance.