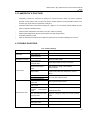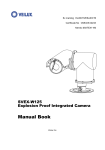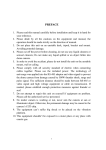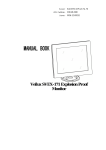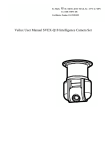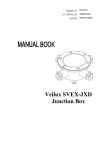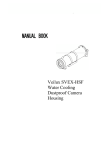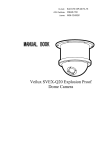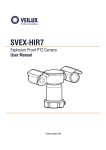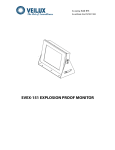
1
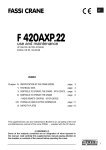
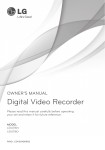
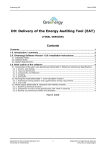
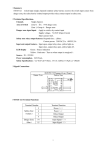
YHW125-3 EX
(Ex) mark:
Explosionproof
PTZ Camera
Manual
ExdⅡCT6
/ DIP A20
TA,Book
T6
Ver: 2.3
Certificate No.: CNEx10.1195
License: XK06-014-00898
Veilux SVEX-W125-3
Explosion Proof PTZ Camera
SVEX-W125-3 (Ex) Explosion proof PTZ Camera Manual
Book
Ver: 2.3
Please carefully read the Manual Book before your operation
1. Installation
„
Please install under required environment
„
Ensure stable and reliable mounting in case camera be damaged
„
Ensure supply power same as nameplate marked before equipment being powered
„
Do not open the pan/tilt and enclosure under humid atmosphere, otherwise video picture will be influenced
because of enclosure good sealing, humidity could not go outside.
„
Please connect cable correctly
2. Maintenance
„
Please shut off before maintenance and repair
„
Pay attention to the flameproof path while disassembly and assembly
SVEX-W125-3 (Ex) Explosion proof PTZ Camera Manual
Book
Ver: 2.3
CONTEN T
1. BRIEF ........................................................................................ 4
2. TECHINICAL ............................................................................ 4
2.1 Type Code ........................................................................ 4
2.2 Certificate ......................................................................... 4
2.3 Electric Data ..................................................................... 5
2.4 Camera Data ..................................................................... 5
2.5 Mechanical ....................................................................... 5
2.6 Environmental .................................................................. 6
2.7 Dimension......................................................................... 6
2.8 Mounting Size .................................................................. 6
3. INSTALLATION ....................................................................... 7
3.1 Caution ............................................................................. 7
3.2 Pole Mounting .................................................................. 7
3.3 Bracket Mounting ............................................................. 8
3.4 Cable Working.................................................................. 8
4. APPLICATION ....................................................................... 10
4.1 System Connection ......................................................... 10
4.2 Cable Definition ............................................................. 11
4.3 Address Set ..................................................................... 12
4.4 Function Set .................................................................... 14
4.5 Circuit board structure and function definition .............. 15
4.6 Camera Connection ........................................................ 16
4.7 Control signal connection ............................................... 17
4.8 Special Preset.................................................................. 18
4.9 Washer System ............................................................... 19
5. FLAMEPROOF STRUCTURE ............................................ 20
6. TROUBLE SHOOTING ........................................................ 20
7. SHIPPING AND STORGE ................................................... 21
8. QUALITY GUARANTEE....................................................... 21
9. COMPNY COMITTMENT .................................................... 21
3
SVEX-W125-3 (Ex) Explosion proof PTZ Camera Manual
Book
Ver: 2.3
1. BRIEF
This EXPLOSIONPROOF PAN TILT ZOOM CAMERA(therefore as SVEX-W125-3 Camera)as a new
monitoring equipment adopts advanced production techniques and matured quality management system to make
its quality, performance and appearance a leading position in explosion proof monitoring products. It can be
used in flammable and explosive environment to realize monitoring purpose.
Strictly according to Standards of GB3836.1-2000 Electrical apparatus for explosive atmosphere: General
requirements,
GB3836.2-2000
Electrical
apparatus
for
explosive
atmosphere:
Flameproof
„d‟
and
GB12476.1-2000 Electrical apparatus for explosive dust: Using enclosure and limiting surface temperature for
protecting electrical apparatus Chapter 1: Technical requirements, this camera owns advantage of small volume,
light weight and easy installation features and could be used in petroleum, chemical industry, jetty, port, mine,
space, army and foodstuff area.
YHW125-3 with speedy pan/tilt and decoder controlling system, multi-protocol and communication rates, can
response any host machine directives. The Camera body adopts integrated structure design, no cable between
camera housing and pan/tilt, goes 360° turning horizontally and ±90° pitching. Camera with sunshield, wiper and
auto heating system can adapt itself for hazardous area applications
2. TECHINICAL
2.1 Type Code
SVEX
W
125-3
Ex
Explosionproof
Design No.
Series No,
Veilux
2.2 Certificate
Ex Mark
ExdⅡCT6 / DIP A20TA, T6
Ex Certificate
CNEx10.1195
4
SVEX-W125-3 (Ex) Explosion proof PTZ Camera Manual
Book
Ver: 2.3
License
XK06-014-00898
2.3 Electric Data
Input voltage
100~240VAC
Working current
< 1A
Power consumption
85 W
Electric connection
6-core cable for video, power and control signal
Communication
RS-485
Communication speed
multiple, could be set, factory set as 4800bps
Communication protocol
multiple, could be set, factory set as Pelco D
Prepositioning
128
Preposition error
≤0.1°
Auto-heating
work while temperature under -10℃
2.4 Camera Data
Brand
HITACHI
Type
VK-S858EN
Mode
PAL
Scan
Line scan
CCD
1/4” CCD
Line Scan
15.625KHz
Site scan
50Hz
Pixel
Lens
Min focus
View angle
470,000/795(H) x 596(V)
High performance /23X optic zoom / auto focus / F1.6, f=3.6~82.8mm
0.01m(wide)/ 1.0m(tele)
54°(wide)/ 2.5°(tele)
Low Lux
0.1Lux(color)/ 0.01Lux(black)
TVL
540(color)/ 600(black/white)
SNR
> 50dB
Video output
BNC joint / 1.0±0.2Vp-p / 75Ω
2.5 Mechanical
Material
Stainless 304 or 316L
IP level
IP68
Pan
360° continuous
Tilt
±90°±2°
5
SVEX-W125-3 (Ex) Explosion proof PTZ Camera Manual
Book
Ver: 2.3
Pan speed
0.1°/S~25°/S
Tilt speed
0.1°/S~25°/S
Unit weight
27Kg
Ship weight
30Kg
Mounting
fixed bracket, base and pole
2.6 Environmental
Air pressure
86~106KPa
Environment temperature
-40℃~+60℃
Relative humidity
U95%RH (+25℃)
2.7 Dimension
Unit:mm
P1. SVEX-W125-3 out
dimension
2.8 Mounting Size
6-Ø8.
unit:mm
P2. camera bottom fix hole on diameter 216mm round
6
SVEX-W125-3 (Ex) Explosion proof PTZ Camera Manual
Book
Ver: 2.3
3. INSTALLATION
3.1 Caution
Please carefully check before installation
a. If there is ex-marking license
b. The ex-marking satisfy environment use
c. All ex-proof and flameproof parts are complete enough for structure
d. Inside and outside earth are ready
Stop immediately while there is any unconformity
3.2 Pole Mounting
SVEX-W125-3
Mount base
Camera
cable
pole
Junction Box
Fix here
Junction box
Cable out
Cable out
hole
concrete
bolt
P3. make the concrete and install a pole
Make concrete base before install pole and
previously lay screws and some holes for cable out
P4. mount camera and connect cable
As shown in Picture 2 and 4 make the camera bottom
cable through Cable Laid-in hole. The Junction
Box normally locates at a easy installation and
under the base. Attention: Pole‟s type shall
maintenance level with screw fixed, and must
changes according to monitoring scope, wind
speed and height. So please consult the supplier
while design the pole
be with ex-proof tube for protection or with armored
cable
SVEX-W125-3 (Ex) Explosion proof PTZ Camera Manual
Book
Ver: 2.3
3.3 Bracket Mounting
Mount bracket
SVEX-W125-3
Camera
cable
Junction box
Cable tunnel or
bridge
P5. Mount Bracket and Junction Box
Cables go to Control
Room by Tunnel or
Bridge
P6. Mount Camera and Connect Cables
Make a mount hole at proper level and fix the
Refer to Picture 2 to mount camera bottom, and
bracket with screw. Junction Box shall be at
make the camera cable go through cable hole on
easy work level and cable goes through tunnel
the bracket until reaching Junction Box. With
or bridge to nearby Junction Box.
Ex-proof Flexibility Tube for protection or
armored cable
3.4 Cable Working
3.4.1 Ex Cable Use
a. As P 7, open the tighten screw on the base of camera, open ex cable screw joint for future use
8
SVEX-W125-3 (Ex) Explosion proof PTZ Camera Manual
Book
Ver: 2.3
Ex cable
Crew
Cable out
gasket
Cable out
base
Tighten nut
Rubber
gasket
P7.
b. as P8, remove tighten nut, keep standard gasket and rubber gasket, put on screw joint and ex cable
Ex cable
gasket
Cable out
Out
hole
base
Rubber
gasket
Screw joint
P8.
c. as P9 firstly tight screw joint and then tight ex cable
Ex cable
fix
base
P9.
3.4.2 Armored Cable Use
a. As Picture 10, remove proper length cable protection cover and cut off not used part.
9
SVEX-W125-3 (Ex) Explosion proof PTZ Camera Manual
Book
Ver: 2.3
Ex-proof Gland Parts
Armored cable
Protection Cover
Cable inner layer
Steel belt
Cable core wire
Rubber
Sealing Loop
Nut
Bushing
Gasket
Bushing
Connection
Joint
Taper Volt
P10.
b. As Picture 11, install Ex-proof Gland to Armored Cable, as the method please refer to Document for
Installation of Ex-proof Gland.
Armored cable Out Cover
Finished Gland
Cable Inner Layer
Screw Thread
P11.
c. as P12,Armored cable with ex-proof Gland could connect with any ex-proof equipment directly
Armored
cable
Ex gland
Cable out
P12.
4. APPLICATION
4.1 System Connection
10
SVEX-W125-3 (Ex) Explosion proof PTZ Camera Manual
Book
Ver: 2.3
P12. System Connection
4.2 Cable Definition
While camera leaves factory, we supply a Composite Cable** with camera, the cable goes out from Camera
bottom with length at least 2 meters. So while connection the system, just connect the cable with Junction Box.
(*Composite Cable: A special cable, one Composite Cable includes one group power, one group control and one group
video, it is generally used in Industry CCTV system.)
Table 1: Cable Definition
Composite Cable
Name
Control shielded
Power
Video
Function
Live
wire
Neutral
wire
Ground
wire
A
B
Color
Brown
Grey
Black
Red
Blue
Standard Video
Cable
11
SVEX-W125-3 (Ex) Explosion proof PTZ Camera Manual
Book
Ver: 2.3
4.3 Address Set
TO SET BAUD RATE AND PROTOCOL
PAY ATTENTION TO THE
FLAMEPROOF JOINT PROTECT
SIDE COVER
P13. COMMUNICATION SET
Camera address adopts binary system, ON to1, OFF to 0. Normally address has been set down before camera
leaving factory, but if there is need to adjust the address, please refer to Picture 13, open the Camera Top Cover
as Table 2 to adjust the SW1 code for set again.
P14. Decode Switch SW1
T2. Address Set
ADDR
0
1
2
3
4
5
6
7
8
9
10
11
12
13
14
15
16
17
18
19
20
21
22
23
24
25
26
27
28
29
30
31
32
33
34
35
36
37
38
DIP1
0
1
0
1
0
1
0
1
0
1
0
1
0
1
0
1
0
1
0
1
0
1
0
1
0
1
0
1
0
1
0
1
0
1
0
1
0
1
0
DIP2
0
0
1
1
0
0
1
1
0
0
1
1
0
0
1
1
0
0
1
1
0
0
1
1
0
0
1
1
0
0
1
1
0
0
1
1
0
0
1
DIP3
0
0
0
0
1
1
1
1
0
0
0
0
1
1
1
1
0
0
0
0
1
1
1
1
0
0
0
0
1
1
1
1
0
0
0
0
1
1
1
DIP4
0
0
0
0
0
0
0
0
1
1
1
1
1
1
1
1
0
0
0
0
0
0
0
0
1
1
1
1
1
1
1
1
0
0
0
0
0
0
0
DIP5
0
0
0
0
0
0
0
0
0
0
0
0
0
0
0
0
1
1
1
1
1
1
1
1
1
1
1
1
1
1
1
1
0
0
0
0
0
0
0
DIP6
0
0
0
0
0
0
0
0
0
0
0
0
0
0
0
0
0
0
0
0
0
0
0
0
0
0
0
0
0
0
0
0
1
1
1
1
1
1
1
DIP7
0
0
0
0
0
0
0
0
0
0
0
0
0
0
0
0
0
0
0
0
0
0
0
0
0
0
0
0
0
0
0
0
0
0
0
0
0
0
0
DIP8
0
0
0
0
0
0
0
0
0
0
0
0
0
0
0
0
0
0
0
0
0
0
0
0
0
0
0
0
0
0
0
0
0
0
0
0
0
0
0
ADDR
128
129
130
131
132
133
134
135
136
137
138
139
140
141
142
143
144
145
146
147
148
149
150
151
152
153
154
155
156
157
158
159
160
161
162
163
164
165
166
DIP1
0
1
0
1
0
1
0
1
0
1
0
1
0
1
0
1
0
1
0
1
0
1
0
1
0
1
0
1
0
1
0
1
0
1
0
1
0
1
0
DIP2
0
0
1
1
0
0
1
1
0
0
1
1
0
0
1
1
0
0
1
1
0
0
1
1
0
0
1
1
0
0
1
1
0
0
1
1
0
0
1
DIP3
0
0
0
0
1
1
1
1
0
0
0
0
1
1
1
1
0
0
0
0
1
1
1
1
0
0
0
0
1
1
1
1
0
0
0
0
1
1
1
DIP4
0
0
0
0
0
0
0
0
1
1
1
1
1
1
1
1
0
0
0
0
0
0
0
0
1
1
1
1
1
1
1
1
0
0
0
0
0
0
0
DIP5
0
0
0
0
0
0
0
0
0
0
0
0
0
0
0
0
1
1
1
1
1
1
1
1
1
1
1
1
1
1
1
1
0
0
0
0
0
0
0
DIP6
0
0
0
0
0
0
0
0
0
0
0
0
0
0
0
0
0
0
0
0
0
0
0
0
0
0
0
0
0
0
0
0
1
1
1
1
1
1
1
DIP7
0
0
0
0
0
0
0
0
0
0
0
0
0
0
0
0
0
0
0
0
0
0
0
0
0
0
0
0
0
0
0
0
0
0
0
0
0
0
0
DIP8
1
1
1
1
1
1
1
1
1
1
1
1
1
1
1
1
1
1
1
1
1
1
1
1
1
1
1
1
1
1
1
1
1
1
1
1
1
1
1
12
SVEX-W125-3 (Ex) Explosion proof PTZ Camera Manual
Book
Ver: 2.3
39
40
41
42
43
44
45
46
47
48
49
50
51
52
53
54
55
56
57
58
59
60
61
62
63
64
65
66
67
68
69
70
71
72
73
74
75
76
77
78
79
80
81
82
83
84
85
86
87
88
89
90
91
92
93
94
95
96
97
98
99
100
101
102
103
104
105
106
107
108
109
110
111
112
113
114
115
116
117
118
119
120
121
122
123
124
125
126
127
1
0
1
0
1
0
1
0
1
0
1
0
1
0
1
0
1
0
1
0
1
0
1
0
1
0
1
0
1
0
1
0
1
0
1
0
1
0
1
0
1
0
1
0
1
0
1
0
1
0
1
0
1
0
1
0
1
0
1
0
1
0
1
0
1
0
1
0
1
0
1
0
1
0
1
0
1
0
1
0
1
0
1
0
1
0
1
0
1
1
0
0
1
1
0
0
1
1
0
0
1
1
0
0
1
1
0
0
1
1
0
0
1
1
0
0
1
1
0
0
1
1
0
0
1
1
0
0
1
1
0
0
1
1
0
0
1
1
0
0
1
1
0
0
1
1
0
0
1
1
0
0
1
1
0
0
1
1
0
0
1
1
0
0
1
1
0
0
1
1
0
0
1
1
0
0
1
1
1
0
0
0
0
1
1
1
1
0
0
0
0
1
1
1
1
0
0
0
0
1
1
1
1
0
0
0
0
1
1
1
1
0
0
0
0
1
1
1
1
0
0
0
0
1
1
1
1
0
0
0
0
1
1
1
1
0
0
0
0
1
1
1
1
0
0
0
0
1
1
1
1
0
0
0
0
1
1
1
1
0
0
0
0
1
1
1
1
0
1
1
1
1
1
1
1
1
0
0
0
0
0
0
0
0
1
1
1
1
1
1
1
1
0
0
0
0
0
0
0
0
1
1
1
1
1
1
1
1
0
0
0
0
0
0
0
0
1
1
1
1
1
1
1
1
0
0
0
0
0
0
0
0
1
1
1
1
1
1
1
1
0
0
0
0
0
0
0
0
1
1
1
1
1
1
1
1
0
0
0
0
0
0
0
0
0
1
1
1
1
1
1
1
1
1
1
1
1
1
1
1
1
0
0
0
0
0
0
0
0
0
0
0
0
0
0
0
0
1
1
1
1
1
1
1
1
1
1
1
1
1
1
1
1
0
0
0
0
0
0
0
0
0
0
0
0
0
0
0
0
1
1
1
1
1
1
1
1
1
1
1
1
1
1
1
1
1
1
1
1
1
1
1
1
1
1
1
1
1
1
1
1
1
1
1
1
1
1
1
1
1
0
0
0
0
0
0
0
0
0
0
0
0
0
0
0
0
0
0
0
0
0
0
0
0
0
0
0
0
0
0
0
0
1
1
1
1
1
1
1
1
1
1
1
1
1
1
1
1
1
1
1
1
1
1
1
1
1
1
1
1
1
1
1
1
0
0
0
0
0
0
0
0
0
0
0
0
0
0
0
0
0
0
0
0
0
0
0
0
0
1
1
1
1
1
1
1
1
1
1
1
1
1
1
1
1
1
1
1
1
1
1
1
1
1
1
1
1
1
1
1
1
1
1
1
1
1
1
1
1
1
1
1
1
1
1
1
1
1
1
1
1
1
1
1
1
1
1
1
1
1
1
1
1
0
0
0
0
0
0
0
0
0
0
0
0
0
0
0
0
0
0
0
0
0
0
0
0
0
0
0
0
0
0
0
0
0
0
0
0
0
0
0
0
0
0
0
0
0
0
0
0
0
0
0
0
0
0
0
0
0
0
0
0
0
0
0
0
0
0
0
0
0
0
0
0
0
0
0
0
0
0
0
0
0
0
0
0
0
0
0
0
0
167
168
169
170
171
172
173
174
175
176
177
178
179
180
181
182
183
184
185
186
187
188
189
190
191
192
193
194
195
196
197
198
199
200
201
202
203
204
205
206
207
208
209
210
211
212
213
214
215
216
217
218
219
220
221
222
223
224
225
226
227
228
229
230
231
232
233
234
235
236
237
238
239
240
241
242
243
244
245
246
247
248
249
250
251
252
253
254
255
1
0
1
0
1
0
1
0
1
0
1
0
1
0
1
0
1
0
1
0
1
0
1
0
1
0
1
0
1
0
1
0
1
0
1
0
1
0
1
0
1
0
1
0
1
0
1
0
1
0
1
0
1
0
1
0
1
0
1
0
1
0
1
0
1
0
1
0
1
0
1
0
1
0
1
0
1
0
1
0
1
0
1
0
1
0
1
0
1
1
0
0
1
1
0
0
1
1
0
0
1
1
0
0
1
1
0
0
1
1
0
0
1
1
0
0
1
1
0
0
1
1
0
0
1
1
0
0
1
1
0
0
1
1
0
0
1
1
0
0
1
1
0
0
1
1
0
0
1
1
0
0
1
1
0
0
1
1
0
0
1
1
0
0
1
1
0
0
1
1
0
0
1
1
0
0
1
1
1
0
0
0
0
1
1
1
1
0
0
0
0
1
1
1
1
0
0
0
0
1
1
1
1
0
0
0
0
1
1
1
1
0
0
0
0
1
1
1
1
0
0
0
0
1
1
1
1
0
0
0
0
1
1
1
1
0
0
0
0
1
1
1
1
0
0
0
0
1
1
1
1
0
0
0
0
1
1
1
1
0
0
0
0
1
1
1
1
0
1
1
1
1
1
1
1
1
0
0
0
0
0
0
0
0
1
1
1
1
1
1
1
1
0
0
0
0
0
0
0
0
1
1
1
1
1
1
1
1
0
0
0
0
0
0
0
0
1
1
1
1
1
1
1
1
0
0
0
0
0
0
0
0
1
1
1
1
1
1
1
1
0
0
0
0
0
0
0
0
1
1
1
1
1
1
1
1
0
0
0
0
0
0
0
0
0
1
1
1
1
1
1
1
1
1
1
1
1
1
1
1
1
0
0
0
0
0
0
0
0
0
0
0
0
0
0
0
0
1
1
1
1
1
1
1
1
1
1
1
1
1
1
1
1
0
0
0
0
0
0
0
0
0
0
0
0
0
0
0
0
1
1
1
1
1
1
1
1
1
1
1
1
1
1
1
1
1
1
1
1
1
1
1
1
1
1
1
1
1
1
1
1
1
1
1
1
1
1
1
1
1
0
0
0
0
0
0
0
0
0
0
0
0
0
0
0
0
0
0
0
0
0
0
0
0
0
0
0
0
0
0
0
0
1
1
1
1
1
1
1
1
1
1
1
1
1
1
1
1
1
1
1
1
1
1
1
1
1
1
1
1
1
1
1
1
0
0
0
0
0
0
0
0
0
0
0
0
0
0
0
0
0
0
0
0
0
0
0
0
0
1
1
1
1
1
1
1
1
1
1
1
1
1
1
1
1
1
1
1
1
1
1
1
1
1
1
1
1
1
1
1
1
1
1
1
1
1
1
1
1
1
1
1
1
1
1
1
1
1
1
1
1
1
1
1
1
1
1
1
1
1
1
1
1
1
1
1
1
1
1
1
1
1
1
1
1
1
1
1
1
1
1
1
1
1
1
1
1
1
1
1
1
1
1
1
1
1
1
1
1
1
1
1
1
1
1
1
1
1
1
1
1
1
1
1
1
1
1
1
1
1
1
1
1
1
1
1
1
1
1
1
1
1
1
1
1
1
1
1
1
1
1
1
1
1
1
1
1
1
1
1
1
1
13
SVEX-W125-3 (Ex) Explosion proof PTZ Camera Manual
Book
Ver: 2.3
4.4 Function Set
Please firstly confirm the communication protocol and Baud rate, then set SW2 according to Table 3,4 and 5.
P15.
Dip Switch SW2
4.4.1 Baud Rate Set
Set the baud rate carefully according to communication requirements. It goes into effect when power on.
T3. Baud Rate Set
BAUD RATE
DIP2
2400 bps
OFF
OFF
4800 bps
ON
OFF
9600 bps
OFF
ON
DIP3
4.4.2 Protocol Set
System supports PLECO P/D protocol, including pan/tilt rotation, lens control, assistant switch, preset operation
etc. Under PELCO-P, equipment address might differ 1 digit from output instruction of control system.
T4. Protocol Set
PROTOCOL
DIP4
DIP5
PELCO-P
OFF
OFF
PELCO-D
ON
OFF
4.4.3 Lens control method
The enough space of inner housing enables itself to install cameras of multi models. When using modular
cameras, adopt RS232 could provide more functions. See below table for different camera models the
equipment supports (You need to confirm the camera brand first and then confirm the camera is with RS232
port). Relay control can be chosen for other cameras supporting the zoom, focus and iris function.
T5. Lens control set
Camera
DIP6
DIP7
DIP8
Relay Control
ON
ON
ON
HITACHI
OFF
ON
ON
14
SVEX-W125-3 (Ex) Explosion proof PTZ Camera Manual
Book
Ver: 2.3
ON
OFF
ON
SONY
SANYO
OFF
OFF
ON
LG
ON
ON
OFF
HONEYWELL
OFF
ON
OFF
4.5 Circuit board structure and function definition
This product has equipped special connection board for main circuit board to provide reliable connection and fix
for cables. Connection board and main board connect through pins and the main board provides two connector
jack to install extend function sub-board.
5
2
7
1
6
3
4
P17. Main circuit board picture
T6. Main board main function definition
No.
Mark
Name
1
U2
CPU
2
—
Camera control sub-board
Function
Control core of the whole system
Different sub-board could control different type of
cameras. There are two types of sub-boards by far:
15
SVEX-W125-3 (Ex) Explosion proof PTZ Camera Manual
Book
Ver: 2.3
No.
Mark
Name
Function
OB.RS:RS232, RS485 modes to control camera
OB.RL : Relay output, voltage modes to control
camera
Address
3
select
code
S1
Address set
switch
Function
4
select
code
S2
Function set such as protocol, baud rate, etc
switch
5
JC3
Main connection pin 1
Connect with the electric of connection board
6
JC4
Main connection pin 2
Connect with the electric of connection board
7
—
Radiator
Driver heat release device could be used two sides
1
3
3
4
5
4
2
OB.RL
OB.RS
P18. Connection board picture
T7. Connection board main function definition
No.
Mark
Name
1
J1~J6
2
VR1
3
-
Connection pin 1
Connect with main board
4
-
Connection pin 2
Connect with main board
Relay
Potentiometer
Function
Voltage control the lens
Adjust the lens voltage from 6VDC
to 12VDC. 10VDC is default
Choose the camera control ways of
RS485 or RS232. One way can be
5
JMP4
Function jumper
chosen each time. TXD/RXD is for
RS232 and A/B is for RS485.
4.6 Camera Connection
Open the back cover of camera housing and get out of the drawer layer for assembly of camera. Fix the
16
SVEX-W125-3 (Ex) Explosion proof PTZ Camera Manual
Book
Ver: 2.3
camera on the bottom holes. Test the camera to see if there is any dead angle. Adjust the drawer layer to fix
camera. There is wire connection board on the drawer layer, the definition is as follows:
T8.
Wire Connection Board Definition
No.
Name
Function
Note
1
TXD
RS232 Transmit
2
RXD
RS232 Receive
3
COM
signal
4
ZOOM
Zoom
5
FOCUS
Focus
6
IRIS
Iris
7
12VDC
DC12V Power +
8
GND
DC12V Power Ground
Power supply for camera
9
12VDC
DC12V Power +
and heater
10
GND
DC12V Power Ground
RS232 control lens
Relay control lens. 10VAC
output. It supports most of
lens
4.7 Control signal connection
When this system applies in the industrial environment spot. It shall be equipped with Ex-proof junction box,in
which connect the video cable, control cable and power cable together.
While connecting Control Source and Cameras as below, please use Control Code Distributor. Besides adding a
120Ohm Terminal Resistor between Terminal A and B (as TB Communication Board, Jumper JMP1 under off
position, refer to Table 9.
Camera
Camera
AB
Gnd
AB
Gnd
120Ω
120Ω
AB
Gnd
Camera
Camera
AB
Gnd
120Ω
AB
Gnd
AB
Gnd
AB
Gnd
Control
AB
Gnd
distributo
code
AB
Gnd
r
AB
Gnd
Control
signal
source
120Ω
P19. Star Connection of Cameras
17
SVEX-W125-3 (Ex) Explosion proof PTZ Camera Manual
Book
Ver: 2.3
Camera
A
B Gnd
A
B Gnd
Camera
A
Camera
B Gnd
A
B Gnd
120Ω
Control
P20. “chrysanthemum” Connection of Cameras
While connecting Control Source and Camera as below, please just add one 120Ohm Terminal Resistor
between Terminal A and B(take off JMP1 from the board).
4.8 Special Preset
Special functions as listed below can be realized by special preset positions. These presets can not be used for
common use and they are only the “Key” to special functions
T9. Special Presets
Preset
Function
Description
32
Start Position
Startup Position when self-examination program finishes
33
Pan Rotation
Flip, Pan will rotate 180 degree
34
Pan Zero Position
Zero, Pan rotates to zero point
63
Sprayer Position
Definition
Realized by closing Aux switch 1
80
Open AUX1
Open AUX1 for starting wiper
81
Close AUX1
Close AUX1 for starting sprayer
83
Start Preset Touring
1~16 presets touring
84
Short Time Stay
Between Preset Touring
Time for stay can be specified between 2 presets
85
Normal Time Stay
Between Preset Touring
Time for stay can be specified between 2 presets
86
Long Time Stay
Between Preset Touring
Time for stay can be specified between 2 presets
90
Open AUX2
Open AUX2
91
Close AUX2
Close AUX2
92
Set Left Limit
Set Left Limit by preset 99
93
Set Right Limit
Set Right Limit by preset 99
94
Remote Reset
Remote Reset and the camera will do the self-examination
96
Stop Scan
Stop Scan
18
SVEX-W125-3 (Ex) Explosion proof PTZ Camera Manual
Book
Ver: 2.3
97
Start Preset Touring
1~16 presets touring
99
Start Scan
Start Scan between preset 92 and 93
4.9 Washer System
1253 camera
window
Cable outlet
Water
tank
is
connected to camera
Add water here
Water nozzle
Camera base
window
Cable outlet
Add water here
Water nozzle
P16. Camera with water tank
The washer system is equipped on PTZ base to clean window of PTZ. The whole system is composed of 2.5 liter
water tank with a pump inside and water nozzle. The nozzle position is fixed on the camera base. When the
window needs to be cleaned, run No. 90 Preset (or open AUX. 2 switch). The PTZ will go to special position for
nozzle and water will spray out on the window for 2 seconds. The wiper will work at this time. When the cleaning
process finishes, the PTZ will go back to the original position. Pay attention special spray liquid is required to
avoid freezing in low temperature.
P17. Dimension with water tank
19
SVEX-W125-3 (Ex) Explosion proof PTZ Camera Manual
Book
Ver: 2.3
5. FLAMEPROOF STRUCTURE
„
Completely consider the explosive air getting into ex-proof structure, which may lead to explosion
because of some reason and to confirm and ensure camera explosion proof performance based on its
structure gap, length and max temperature it will get to.
„
Enclosure shall burden water pressure testing for 1.5Mpa for 10~12 seconds without leakage as pass,
which is ordered in GB3836.2-2000.
„
Camera surface temperature max shall not over 80℃ while it is working.
„
Window glass adopts steel glass to burden Impact and Heat change testing.
„
Enclosure protection to IP66
„
Cable for Camera uses inlaid device to tighten its screw and nut and make cable tight and no move.
6. TROUBLE SHOOTING
P14. Trouble shooting
Problems
No image
Sometime no image
Reason
Method
Power off
Video cable not
good connection
Video cable not
good connection
Not good connection
of Signal cable
Too long communication
distance make signal
loose
Make sure the power is ok
Control error
Signal reflect
Not correct Address
Not correct Protocol
Not correct Baud rate
No enough pressure in the
water tank
Block on the water filling
hole is loose
The gas leaks from
pressure
enhancement
outlet
Wash system error
The gas leaks from water
spraying outlet
Check the Video Cable
Check the Video Cable
Check Signal Cable is correct connection
Add repeaters to make communication
distance longer
Short connect the farthest camera decoder
board‟120 and add 120Ω resistance to remove
reflect
To re-set refer to Manual book
Use air pump to add pressure
Screw down the block with tools to assure airproof
Repair or change the valve core of pressure
enhancement outlet
Repair or change the valve core of water spraying
outlet
Water spraying outlet stop
up
Clean out water spraying outlet
Water pipe craze
Change the water pipe
Water tank craze
Send it back to factory to repair
20
SVEX-W125-3 (Ex) Explosion proof PTZ Camera Manual
Book
Ver: 2.3
7. SHIPPING AND STORGE
After package, without rain or snow fall directly to product, shipment could do by air or sea and store for one year
under the environment of 0℃~+40℃, humidity >90%.
8. QUALITY GUARANTEE
For any camera produced by Veilux, we promise one year to repair warranty
. During Guarantee period, we supply free service except following situations:
„
User does not operate as manual book requires
„
User un-install the whole product by themselves
„
Lightning or Act of God
If there are additional agreements between Veilux and buyer, then agreements shall be strictly done
9. COMPNY COMITTMENT
„
Veilux owns the final design changing and final specification rights and no responsibility to inform
user
„
This manual book belongs to Veilux rights, without permits or any book inform, any company or
private copy of whole or part of the book shall be prohibited.
802 GREENVIEW DR STE 200
GRAND PRAIRIE, TX. 75050
Website: www.veilux.net
E-mail: [email protected]
Phone # 1-800-510-6528
21