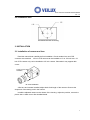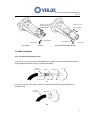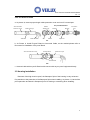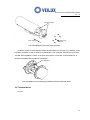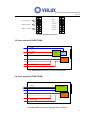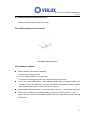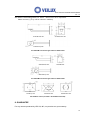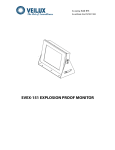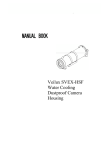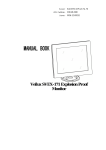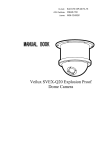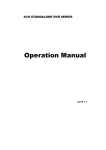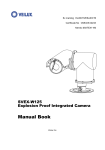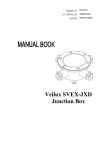
1
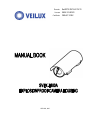
常州裕华 硬件手册 Ex-mark: ExdⅡCT6/ DIP A20 TA.T6 License: XK06-123-00251 Certificate: CNEx07.1032X VEILUX, INC. SVEX-T300 EX HOUSING MANUALBOOK Ver: 1.2 Please carefully read the Manual Book before your operation 1. Installation 1、Please read manual carefully before installation and application, and obey the import notice. 2、Ensure power off before the equipment is maintained and repaired. 3、Do not open the equipment under serious lampblack, dust, high temperature, moisture condensation , otherwise video picture will be influenced. 4、Please connect cable correctly, otherwise it will break down. 5、Ensure protect flameproof cover when the equipment is maintained, avoid metal fragment or other object into the inner side of the equipment. 6、Do not decompose and reconstruct the equipment. 2. Environmental protection The products contain spare parts which may pollute the environment, e.g. PCB, electric component, plastic goods, lubricating grease and so on. Please collect and control the pollution sources when the equipment is maintained and scrapped. Don’t discard it. Please pass it to environmental department, or it will influence the environment. 2 SVEX-T300 EX HOUSING MANUALBOOK Ver: 1.2 CONTENT 1. BRIEF ......................................................................................... 4 2. TECHNICAL DATA .................................................................. 4 2.1 Type code .......................................................................... 4 2.2 Certificate .......................................................................... 5 2.3 Mode .................................................................................. 5 2.4 Electrical ............................................................................ 5 2.5 Mechanical......................................................................... 5 2.6 Environmental ................................................................... 6 2.7 Dimension.......................................................................... 6 2.8 Installation size .................................................................. 7 3. INSTALLATION ........................................................................ 7 3.1 Installation of camera and lens .......................................... 7 3.2 Cable treatment .................................................................. 8 3.3 Housing installation ........................................................... 9 3.4 Terminal block ................................................................. 10 3.5 Inner structure:SVEX-T 300A...................................... 11 3.6 Inner structure:SVEX-T300B ....................................... 11 3.7 Install housing to electric Pan/Tilt ................................... 12 3.8 Install housing to fixed bracket ....................................... 12 3.9 Installation caution .......................................................... 12 4. FLAMEPROOF STRUCTURE ............................................. 13 5. TROUBLE SHOOTING ......................................................... 13 6. SHIPMENT AND STORAGE ................................................ 13 7. INSTALLATION ACCESSORY ............................................ 13 8. GUARANTEE .......................................................................... 14 9. STATEMENT .......................................................................... 15 3 SVEX-T300 EX HOUSING MANUALBOOK Ver: 1.2 1. BRIEF SVEX-T300A Ex-proof housing is mature Ex-proof monitor equipment. It is approaching to advanced manufacture technology. Because of the demand of high quality control system, the quality and function of the products are in the lead of this field. SVEX-T300A has the character of small size, light weight, collocate nimble and so on. SVEX-T300A Ex-proof housing is Strictly according to European Directive EC/94/9 and EN50014, Standards of GB3836.1-2000 GB3836.1—2000 Electrical apparatus for explosive atmosphere: General requirements, GB3836.2-2000 Electrical apparatus for explosive atmosphere: Flameproof ‘d’ and GB12476.1-2000 Electrical apparatus for explosive dust: Using enclosure and limiting surface temperature for protecting electrical apparatus Chapter 1: Technical requirements. The housing is made of stainless steel, Ip68 SVEX-T300 Ex-proof housing has 2 kinds. The one is the long type which can be installed zoom lens; another one is the short type which can be installed fixed lens camera or integrated camera. 2. TECHNICAL DATA 2.1 Type code SV EX T 300 A/B B 为短形护 罩 A is long type, Deign No B is short type Housing code Company 4 SVEX-T300 EX HOUSING MANUALBOOK Ver: 1.2 2.2 Certificate Ex-marking ExdⅡCT6/ DIP A20 TA, T6 License XK06-123-00251 Certificate CNEx07.1032X 2.3 Mode SVEX-T300A Ex-proof housing, long type SVEX-T300B Ex-proof housing, short type 2.4 Electrical Input Voltage 220VAC or 24VAC 50/60Hz Input Voltage Scope ±10% Working Current ≤0.5A Camera power 12VDC (outer equipment offers) Auto-heat Work while it is below -10℃±5℃ Power Consumption 30W Electric Connection 2-core cable is used for power 4-core cable is used for lens control Video is used to output video signal 2.5 Mechanical Material stainless steel 304 or 316L Protection IP66 Dimension SVEX-T300A 540(L) x 190(H) x 186(W) mm SVEX-T300B 431(L) x 190(H) x 186(W) mm Inner diameter SVEX-T300A SVEX-T300B 260(L) x 90(H) x 70(W) mm 140(L) x 90(H) x 70(W) mm Window Thickness 15mm Window area Φ66mm Weight/Ship weight 5 SVEX-T300 EX HOUSING MANUALBOOK Ver: 1.2 SVEX-T300A 14Kg / 16Kg SVEX-T300B 11.5Kg / 13Kg Outlet hole quantity 3 Outlet hole screw thread size Mount type G-3/4” Electric Pan/Tilt, fixed Pan/Tilt, fixed bracket 2.6 Environmental Air Pressure 86~106KPa Environment Temperature -25℃~+60℃ Relative Humidity 95%RH (+25℃) 2.7 Dimension P1. SVEX-T300A ex-proof housing dimension P2. SVEX-T300B ex-proof housing dimension 6 SVEX-T300 EX HOUSING MANUALBOOK Ver: 1.2 2.8 Installation size P3. Bottom fixed hole of housing 3. INSTALLATION 3.1 Installation of camera and lens Read the manual book carefully before installation. Check weather lens and CCD connector are matched. 1/3 inch CCD camera can be installed to 1/3 or 1/2 inch lens. 1/2 inch CCD camera only can be installed to 1/2 inch camera. Otherwise it may appear dark corner. Tighten screws after installation P4. Lens installation After lens and camera installed, adjust back focal length of the camera. Observe the sharpness of the testing card in the monitor. Install the adjusted camera to the drawer of the housing. Adjust the position, ensure the picture has no dark corner after installed barrel. 7 SVEX-T300 EX HOUSING MANUALBOOK Ver: 1.2 Adjust the camera location forwards and backwards Adjust the camera location forwards and backwards Fix it with screw Fix it with screw SVEX-T300A SVEX-T300B P5. Install camera and zoom lens P6. Install camera and zoom lens 3.2 Cable treatment 3.2.1 Use Ex-proof Flexibility Tube a. As picture 7, put on the Ex-proof flexibility part to cable, remove the Tighten Nut, keep the original gasket and rubber loop (or use the spare parts). Ex-proof Flexible Tube Gasket Screw Joint Cable Outlet Rubber Loop Cable P7. b. As Picture 8, firstly turn tight the screw connection head and then tight the Ex-proof Flexibility Tube. Ex-proof Flexible Tube Cable Outlet P8. 8 SVEX-T300 EX HOUSING MANUALBOOK Ver: 1.2 3.2.2 Use Armored Cable a. As picture 9, remove proper length cable protection cover and cut off not used part. Ex-proof Gland Parts Armoured cable Protection Cover Cable inner layer Steel belt Cable core wire Rubber Sealing Loop Nut Bushing Gasket Bushing Connection Joint Taper Volt P9. b. As Picture 6, install Ex-proof Gland to Armoured Cable, as the method please refer to Document for Installation of Ex-proof Gland. Armoured cable Out Cover Finished Gland Cable Inner Layer Screw Thread P10. c. Armored cable with ex-proof Gland could connect with any ex-proof equipment directly 3.3 Housing installation Because of the high level ex-proof, the flameproof joint of the housing is very strictness. Pay attention to the protection of the flameproof joint when installing. As picture 11, back of the post operculum and barrel is flameproof joint. No hurting or scratching when installing. 9 SVEX-T300 EX HOUSING MANUALBOOK Ver: 1.2 Ex-proof surface Force equally Fix back cover with bolt P11. Install back part of ex-proof housing carefully Insulation spacer is used between drawer board and back cover plate. Pay attention to the insulation character in case it needs to be dismantled. The insulation resistance is more than 100 MΩ after installation. Center of the post operculum is connected circumscribed bolt. It should be installed when equipment installation. Insulated floor P12. Pay attention to the insulating layer between post operculum and drawer 3.4 Terminal block As P13 10 SVEX-T300 EX HOUSING MANUALBOOK Ver: 1.2 IrisIris+ ZoomZoom+ FocusFocus+ CCD power Wiper power Wiper on/off P13. Terminal block of the barrel 3.5 Inner structure SVEX-T300A Control Power out Video Wiper power Camera Lens Wiper Wiper on/off P14. SVEX-T300A inner structure for camera and zoom lens 3.6 Inner structure SVEX-T300B Power Video out Control Wiper power Zoom Camera Wiper Wiper on/off P15. SVEX-T300B inner structure, integrated camera installation 11 SVEX-T300 EX HOUSING MANUALBOOK Ver: 1.2 3.7 Install housing to electric Pan/Tilt Follow the manual book of electrical pan/tilt. 3.8 Install housing to fixed bracket P16. SVEX-T300 bracket picture 3.9 Installation caution Please carefully check before installation a. If there is ex-marking license b. The ex-marking satisfy environment use c. All ex-proof and flameproof parts are complete enough for structure Choose the correct cable; lead in cable diameter should match to the seal rubber ring. According to the seal rubber ring, choose the smallest outer diameter. Keep to tighten nuts and seal rubber ring is under the demand of ex-proof. The nameplate and warming sign“No opening when power on” shows in the clear area. Choose inner hole Φ8 seal ring when installing connection. End face shows ≥Φ7.5. Choose the outer diameter of the cable matched to the inner hole diameter of the seal ring. As picture 17. 12 SVEX-T300 EX HOUSING MANUALBOOK Ver: 1.2 ≥Φ7.5 P17. Seal ring picture 4. FLAMEPROOF STRUCTURE Completely consider the explosive air getting into ex-proof structure, which may lead to explosion because of some reason and to confirm and ensure camera explosion proof performance based on its structure gap, length and max temperature it will get to. Enclosure shall burden water pressure testing for 1.5Mpa for 10~12 seconds without leakage as pass, which is ordered in GB3836.2-2000. Camera surface temperature max shall not over 80℃ while it is working Window glass adopts steel glass to burden Impact and Heat change testing. Window glass adopts steel glass to burden Impact and Heat change testing. 5. TROUBLE SHOOTING Problems No image Reason Method Mark Power off Check connection Do it oneself Signal line off Check connection Camera is broken Change a camera Lens are broken Change lens Do it oneself Communicate with manufacturer Communicate with manufacturer 6. SHIPMENT AND STORAGE After package, without rain or snow fall directly to product, shipment could do by air or sea and store for one year under the environment of 0℃~+40, humidity >90%. 7. INSTALLATION ACCESSORY 8mm rubber seal ring will be installed in the camera outlet hole. 8mm blockage and press tighten nuts should be installed as well. One 10mm, one 12mm rubber seal ring and desiccant 13 SVEX-T300 EX HOUSING MANUALBOOK Ver: 1.2 are offered. The housing offers 1/4″6mm、12mm screw when requested. Other accessory: (They will be ordered in addition) SVEX-M1 side view SVEX-M1 face view SVEX-M1 top view P18. SVEX-M1 wall mounting bracket for SVEX-T300A SVEX-M2 side view SVEX-M2 face view SVEX-M2 top view P19. SVEX-M2 wall mounting bracket for SVEX-T300B Pan/tilt top view Pan/tilt side view Pan/tilt bottom view P20. SVEX-F1 swivel (included in the SVEX-F1/2 bracket) 8. GUARANTEE For any camera produced by VEILUX, INC, we promise one year warranty. 14 SVEX-T300 EX HOUSING MANUALBOOK Ver: 1.2 During warranty, we supply free service except following situations: User does not operate as manual book requires User un-install the whole product by themselves Lightning or Act of God If there are additional agreements between VEILUX, INC and buyer, then agreements shall be strictly done. 9. STATEMENT VEILUX, INC. owns the final design changing and final specification rights and no responsibility to inform user This manual book belongs to VEILUX, INC. rights, without permits or any book inform, any company or private copy of whole or part of the book shall be prohibited. 802 GREENVIEW DR STE 200 GRAND PRAIRIE, TX. 75050 Website: www.veilux.net E-mail: [email protected] Phone # 1-800-510-6528 15