1
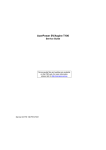
LCD1U15-15-8KVM
LCD/Keyboard/Mouse All In one
User's manual
LLCD1U15-15-8KVM-N
User Manual
Table of Contents
1. Function and Information
LCD1U15-15-8KVM-N
User Manual
1. Function and Information
1.1 Product Overview
1.1.1 Front View(see fig.1)
1.1 Product Overview
1.1.1 Front View
1.1.2 Rear View
1.2 Product Feature
1. front panel
1.3 Product Specifications
2. handle
1.4 Mechanical Dimensions
3. LCD display
2. Installation
4. keyboard(88keys)
5. touch-pad
2.1 Rack Mounting
6. front panel locker
2.2 Cable Connection
7. guide rail
3. Operation
4. Safety and Environment
Fig.1
8. front brackets
9. OSD control button(see LCD OSD function list)
10. rear slide way
5. KVM Session
6. Packing List
Warning:
1. Read this guide thoroughly and carefully before of use
2. Power off your computer before any installation / un-installation.
3. Must be pull out the console before opening front panel for use
LCD OSD function list
Items
Description
LCD POWER
Turn on and off the monitor power
MENU SELECT
Calls OSD menu and select the function to be adjusted
EXIT
Exit from the OSD function or Back to previous menu.
SL-/SL+
Moves the selector left and right on the OSD menu
LED(indicates the
Green: normal
status of monitor)
mode or disconnection of signal cable
Black off Red
1
power saving
LCD1U15-15-8KVM-N
User Manual
1.1.2 Rear View( see fig.2)
LCD1U15-15-8KVM-N
User Manual
1.3 Product Specification
LCD1U15-15-8KVM Specifications
Item
4
LCD TFT Display
Fig.2
1. console port
Key Board
2. power socket
3. Gnd
4. cascade port
Touch Pad
(with 2 button)
Specification
Note
Display area
304.1(H)
Display colors
16.7M (true)
Number of pixels
1024
Typical white
250 nit (typ)
Luminance
8mA
Contrast ratio
400
Pixel pitch
0.297
Power Consumption
20w (power on)
MTBF
LCD
Key number
105 Keys(88+17)
Interface
PS/2
1
0.297(mm)
* 15"LCD TFT Flat Panel Display, high contrast, high brightness, high resolution
* Support PS/2 thinness Keyboard with 105keys(88+17)
10 million
Microsoft Windows 9x/me/NT/2000/XP
x/y position resolution
>1,000 points/inch(40points/mm)
Interface
PS/2
O/S support
Microsoft Windows 9x/me/NT/2000/XP
1 million uses
47Hz ~ 63Hz
MTPF
Color
Net Weight
* Front panel lock / unlock
Dimensions
* Guide rail automatically lock and unlock
Shipping weight
Shipping size
Rack mounting
depth range
100,000hrs(25
Steel or Aluminium
Black or optional
12 kg
448
420
42 mm(W D
H)
13.5 kg
608
672
143 mm W
400mm~810 mm
Temperature angle 0~50
2
90~264V AC/12V DC/48W
Input voltage DC
* Support PS/2 Touch-Pad
30,000hrs
O/S support
Power Supply
Enclosure
3w (stand by)
50,000hrs,backlight
Keystroke life
Rated life
* Rack mountable in 19''system rack
15" TFT LCD
768
1.2 Product Features
*The console is integrated with 15" LCD/keyboard,/touch-pad In 1U high
228.1(V)
(Operating)
D
H
with rear brackets
-20~60
3
(Storage)
)
LCD1U15-15-8KVM-N
User Manual
LCD1U15-15-8KVM-N
User Manual
1.4 Mechanical Dimensions (see fig.3)
KVM
Console
Front bracket
Rear slide way
Rear bracket
Fig.4
2.2. Cable Connection
KVM CABEL
The KVM cable with HD-15m connector plugs in the console port. The KVM
cable with VGA/KB/Mouse connectors links to computer or KVM switch. (See
fig.5)
Unit : mm
Fig.3
2. Installation
2.1 Rack Mounting
The LCD1U15-15-8KVM-N is meet for rack mounting in a 19" system
...
rack. Push it into the rack from front to rear for installation .then insert
the rear mounting brackets into the slide way and secure the unit to the rack
with the front and rear brackets, finally screw the front and rear brackets.
Rack mounting depth rangeis from 400mm to 810mm(see fig.4)
4
Fig.5
5
LCD1U15-15-8KVM-N
User Manual
LCD1U15-15-8KVM-N
User Manual
Power Cord
* The AC power cord plugs in power socket see (fig.6)
open
close
Unlock
Fig.7
* After sliding the KVM module out and unlock ,flip up the LCD panel for use
LCD monitor ,keyboard and touch-pad
Fig.6
* The panel can be Open to 120 for use;(see fig.8)
* Touch down the LCD POWER key(Red),the LCD power is on, the LED is green.
3. Operation
Before of use :
* Make sure that all devices on the installation are properly grounded.
* Make sure that the KVM cable and power cord should be connected correctly
In use:
auto lock
* First pull LCD1U15-15-8KVM-N front panel module out and
the slide railis locked automatically; Power is on;
* Release the front panel locker;(see fig.7)
6
unlock
Fig.8
7
LCD1U15-15-8KVM-N
User Manual
5. KVM Session
LCD1U15-15-8KVM-N
Hot-key Command Operation
Start Up
1.
User Manual
Calling OSD Menu
The channels that have PC connected and it is switch on will have a
flash blue LED on that channel.
2.
The blue LED will indicate the selected channel.
3.
7 segments LED will display the bank number.
4.
Press HotKey to select the channel.
5.
Enter the password, default is “00000000” eight zeros.
6.
Otherwise the keyboard & mouse will be locked.
Fn
Scroll
+
+
Scroll
+
Space Bar
HotKey Command
●
Simple key sequence.
●
Press “ Fn” + “Scroll Lock” twice within 2 seconds and then press "Space Bar"
●
Follow with a beep sound, going into the hot key mode.
●
Need to key in the hot key within 2 seconds.
●
Go back to Operation System Control state.
Tab
£
/
¤
Port Select
£
/
PgUp
Bank Select
PgDn
8
Quit
Esc
Insert
Enter
9
Next
Edit
Complete
LCD1U15-15-8KVM-N
User Manual
After use:
* First turn off the LCD power button in OSD control panel
* Close down and lock the front panel
* Release the guide rail lock (see fig.8)
* Push Front panel module in properly ,the power is off automatically
4. Safety and Environment
Operating Environment
Item
Long term
Operating temperature
Relative humidity
Short term
0~ 40
0~ 50
5%~90%
5%~95%
Safety approval : FCC ,CE,UL approved
6. Packing List
This package contains:
Item
Description
Quantity
1
Console
1
2
KVM Connector cable
8 X 6-ft
3
4
1 X 6-ft
AC Power Cord
Rack Mounting Kit
5
6
Note
1 pair
front brackets
1 pair
Rear brackets(L)
1
User Manual
10