1
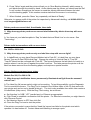
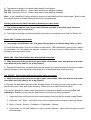
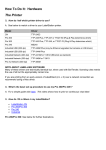
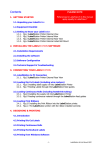
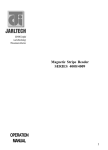
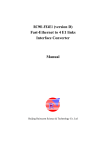
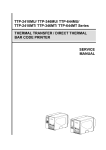
TROUBLE-SHOOTING: Error States
Please note, there is much commonality between the different models of LabelStation and therefore it
is advisable to read the comments on other models if you cannot find a diagnosis relating to your
own.
Printer stuck off-line
Q. I am using a desk-top LabelStation and the green Ready light is not illuminating (or is
winking). Why is this?
A. Check that the printer is not out of ribbon or label stock. A LabelStation can go off-line if no labels
are present, or if the ribbon has expired. However, it is okay to have no ribbon fitted if you are
printing in Direct Thermal mode. Also, if using die-cut labels, check there are no missing labels on
the label roll.
Persistent error state
Q. My printer is still showing error state even though the problem that caused it has been
fixed. How do I clear this?
A. Initialise the printer:
Pro 200/Pro 300 & CN: Switch the printer off for a few seconds.
Industrial and Pro XL: Initialise the printer using the LCD and keypad. Refer to the user manual.
Printer stalls before printing
Q. Why does my printer go to error state before starting to print?
A. If you are printing in Thermal Transfer mode, make sure you have fitted the ribbon correctly. See
'Terminology' and 'How To Do It'. If you have just fitted a new ribbon, make sure that you have
advanced the leader foil sufficiently to clear the ribbon sensor. Rotate the spent ribbon rewind
spindle (front spindle) until the silver foil is no longer visible.
If you are using colour ribbon you might need to recalibrate the ribbon sensor. See 'How To Do It'.
Printer stalls during printing
Q. Why does my desk-top LabelStation go to error state or slow down and then stop during
printing?
A. You might not be using the correct power adaptor. The printer must be used with a LabelStation
adaptor.
Alternatively, if the adaptor is correct and working, 'look-alike' power failure can be caused by the
ribbon rubbing against the lid when it is closed. Spindles fitted the wrong way around do this. The
ribbon spindles should be orientated with the flanges on the right. Verify this by printing with the
upper part of the machine lifted.
Model CN: Printer stalls during lengthy print run
Q. Why does my LabelStation CN permanently shut down during a long run when there is
apparently nothing wrong?
A. This model is not designed for heavy duty printing and can automatically shut down to prevent
overheating, eventually recovering by itself.
Although thermal cut-out is a design feature of this printer, the machine was tested with a full roll of
100mm wide die-cuts printing a heavily populated label (in an attempt to observe the shut-down) and
just kept printing!
Printer produces one label then stalls
Q. Why does an error condition arise after printing one label, sometimes after only part of a
label?
A. One of the following might apply:
1. You have entered your dimensions in the wrong units. E.g. you have measured the label in
inches but the software is set to millimetres, or vice versa. To see how to change the default
measuring units in your software, see below:
LabelView: Click 'Options' > 'Configuration' > ' Display'
LabelDirect: Click 'Layout' (menu) > 'Ruler' > 'Ruler' (Tab)
In most versions of LabelDirect there is a quicker way. In the Design window, click the button where
the rulers meet (top left corner). See below:
This toggles the units between millimetres and inches.
2. You have your template set to 'Cutter' when there is no cutter fitted to the printer, or you have your
template set to Peel-off when there is no Peeler unit fitted.
Try your label with this setting:
LabelDirect: ‘Printer Settings’ > 'Change' (button) > 'Removal Method: None'
BarTender: ‘File’ (menu) > ‘Print’ > ‘Document Properties’ (button) > ‘Stock’ (tab) > ‘Media Handling
– Post Print Action’ > ‘None’ or ‘Tear-off’
3. Gap sensor failure. To check this possibility, recalibrate the gap sensor using die-cut labels (see
'How To Do It'). If the printer feeds out an unusual number of labels then stops with a green light, this
is because it thinks it is loaded with continuous label (indicating that the sensor is not working). To
cross-check this diagnosis, print some die-cut labels with Sensor Type set to None instead of Gap. If
this produces labels without causing an error condition then the sensor lens needs cleaning or the
sensor has failed.
If you have a bench-top model, which incorporates a keypad and display, such as the Pro 240,
Industrial or Pro XL you can test the Gap Sensor in real-time by doing as follows:
1. Open the printer and leave the print-head carriage closed so that the display reads 'Ready'.
2. Using the ‘Left’, ‘Right’, and ‘Select’ keys on the keypad, work through the menu as follows:
3. Menu > Setup > Sensor > Calibration > Gap Mode > Manual.
4. At this point you will see 'Paper Len.' with a number against it. Ignore this and open the printhead carriage.
5. Press ‘Select’ and you will see 'Gap Size'
6. Press ‘Select’ again and the printer will ask you to 'Scan Backing Intensity' which means to
pull labels through the printer by hand. As the labels pass the sensor you should see the 'Ref.
Level' number changing as the sensor is reads the density difference between the label
and the backing paper. If this number remains static then the sensor is not working.
7. When finished, press the ‘Menu’ key repeatedly until back at 'Ready'.
Otherwise, to arrange uplift of the printer for inspection by Advanced Labelling, call 01202 683212 or
email [email protected].
Printer produces correct label, then blanks, then stalls
Q. Why does my printer produce one correct label followed by blanks then stop with error
state?
A. You have set your label template to 'Gap' for labels that are 'Black Line' or vice versa. See
'Terminology'
Printer stalls but sometimes with no error status
Pro 200/Pro 300 & 342:
Q. Why does my printer produce only one label then stop with no error light?
A. In LabelDirect you may have Removal Method set to Peel-Off. In LabelView you may have
Sensor Type set to Peel-Off/Vertical Gap'. Change the setting to 'Vertical Gap' or 'Tear-Off'.
'Tear-Off' should not be confused with 'Peel-Off'. The former advances the last label of a batch to a
position where it can be torn off against the printer's exit bar. The latter pauses the printer until the
label has been removed from the backing paper, and requires a special module.
Printer displays permanent error status
Models Pro 200, Pro 300 & CN:
Q. Why does my LabelStation have a permanently illuminated red light from the moment I
switch it on?
A. The Head Up (lid) sensor switch might not be working. To test this possibility use the Diagnostic
Tool to override the sensor. The Diag Tool is located in the Utilities folder of the CD that came with
your printer and can be run by double-clicking it. The tool is also available from within later versions
of LabelDirect (Help menu). With the Diag Tool running, do as follows:
a. Set 'Interface' to 'USB', 'LPT' (parallel port) or Ethernet as appropriate.
b. Click 'Read' to establish a connection with the printer. For Ethernet connection you might have to
click 'Discover Device'
c. Set Head-up Sensor to OFF then click Set
d. Close the Diag Tool and re-test the printer.
If the printer now works it means that the 'Head-Up' sensor has failed or the plastic stud which
operates it is has broken off. Contact Advanced Labelling to arrange repair.
Model 342:
Q. I am using a LabelStation 342. The green ‘Ready’ light is not illuminating. Why is this?
A. Check that the printer is not out of ribbon or label stock. The LabelStation goes off-line if label
stock is not present, or if the ribbon has expired. However, it is okay to have no ribbon fitted if you
are printing in thermal transfer mode.
Printing two columns-wide die-cut labels causes error state
Model 342:
Q. I am printing two-labels wide die-cuts on a 342 LabelStation. Why does the error light keep
coming on?
A. If you did not buy your labels from Advanced Labelling, the central gap (horizontal gap) between
the two columns of labels might be too large. If this gap is greater than 2mm wide then the printer’s
optical gap sensor (mounted centrally) cannot detect the passing of each label. Ideally there should
be no left-to-right gap between the labels. There should only be gaps above and below (called the
'vertical gap').
Other models:
Q. When printing labels of more than one column, printing does not complete until the ‘Done’
button is clicked. Why?
NOTE: In later versions of this software the ‘Done’ button is labelled ‘Return to Label Design’
A. In LabelDirect, incomplete rows do not print until the ‘Done’ button is clicked.
E.g. If you print 10 labels on four-wide label stock you get two rows comprising four labels each after
clicking ‘Print’. After clicking the ‘Done’ button you get one row comprising two labels and two blanks.
If you click to print one label only, you get nothing until you click ‘Done’.
LabelDirect works this way to avoid wasting labels when successive batches of labels with different
information are being printed.
Printer exhibits bizarre symptoms
Q. I am having strange problems with my LabelStation and have checked everything. Why
does the error state keep recurring?
A. Your printer probably needs a full reset. See 'How To Do It'.
Pro 200/300: Banner (long label) problems
Q. Why does my very long label only print partially or cause errors?
A. The maximum length of a banner (label height) is as follows:
Pro 200: Nominally 200 cm. (exact value depends on labelling software)
Pro 300: Nominally 100 cm. (exact value depends on labelling software)
Note: In the LabelDirect Design window a dotted line indicates the limit of label height. Bear in mind
that height equates to length when the label is printed landscape.
Printer produces one label followed by blank space, then stalls
Q. The printer produces one correct label followed by blank space then stops with error
condition. How can I correct this?
A. You might be printing on continuous label-stock with your template set to 'Gap' or 'Black Line'.
Model 342: Peristent error state
Q. I am using a LabelStation 342. The green Ready light is not illuminating. Why is this?
A. Check that the printer is not out of ribbon or label stock. The LabelStation goes off-line if labels
are not present, or if the ribbon has expired. However, it is okay to have no ribbon fitted if you are
printing in thermal transfer mode.
Model 342: Good label followed by blanks then error state
Q. Why does my printer produce one good label, then blanks, then stop with an error state,
even when only one label is set to be printed?
A. Perhaps the label does not pass under the gap sensor (you have threaded it through the ribbon
path by mistake) or the Gap Sensor has failed or is contaminated and needs cleaning.
Pro 200/300: Good Label followed by blanks then error state
Q. Why does my printer produce one good label, then blanks, then stop with an error state,
even when only one label is set to be printed?
A. Perhaps the label does not pass under the gap sensor (it is resting on top of the guides) or the
Gap Sensor lens is dirty and needs cleaning. Worst case, the Gap Sensor has failed.
If you have a bench-top model, which incorporates a keypad and display, such as the Pro 240,
Industrial or Pro XL you can test the Gap Sensor in real-time by doing as follows:
1. Open the printer and leave the print-head carriage closed so that the display reads 'Ready'.
2. Using the ‘Left’, ‘Right’, and ‘Select’ keys on the keypad, work through the menu as follows:
3. Menu > Setup > Sensor > Calibration > Gap Mode > Manual.
4. At this point you will see 'Paper Len.' with a number against it. Ignore this and open the printhead carriage.
5. Press ‘Select’ and you will see 'Gap Size'
6. Press ‘Select’ again and the printer will ask you to 'Scan Backing Intensity' which means to
pull labels through the printer by hand. As the labels pass the sensor you should see the 'Ref.
Level' number changing as the sensor is reads the density difference between the label
and the backing paper. If this number remains static then the sensor is not working.
7. When finished, press the ‘Menu’ key repeatedly until back at 'Ready'.
Immediate error state using continuous label
Q. When printing on continuous label the printer goes to error condition before printing
anything. Why?
A. Even when printing on continuous label the Gap sensor needs to be calibrated correctly.
Recalibrate the Gap sensor using the Diagnostic Tool. In LabelDirect this option might be greyed out
for continuous label but the Diagnostic Tool is usually available on the CD that came with your
printer. If necessary you can recalibrate your printer independently of the PC. See ‘How To Do It’.
Ribbon motor noisy, barely turns
Q. The ribbon motor on my Pro 200 (or Pro 300) strains to turn and the printer goes to error
state immediately. Why?
A. Press ‘Feed’ on the printer. If this produces an error state then run the Diagnostic Tool and click
the ‘Get Status’ button. If this returns the message: ‘Ribbon Encoder Err.’ then:
a. Click the ‘Factory Default’ button to clear the problem.
and/or
b. Clean the ribbon sensor lens.
‘Paper Out’ or ‘Out of Paper’ message displays on the LCD
Q. Why does my LabelStation produce the ‘Out of Paper’ message even though a roll of label
has been fitted correctly?
A. If you are using a model of LabelStation which has a movable gap sensor (e.g. Pro 240, Industrial
or Pro XL) to print horticultural labels, the following might apply:
Labels with vertical perforations (e.g. the tear-off lines between side-by-side loop-locks) can produce
this message if the gap sensor is positioned directly above the line of perforations. Generally this is
no problem but sometimes the perforations leak enough light to make the optical sensor think there is
no label. When setting up the printer for such labels it is natural to align the sensor with the centre of
the punched hole, as in the picture below, but it is best to align it very slightly to one side.
Sensor position indicated by a triangle on the sensor arm
Also, in the label template, make sure Gap Size is set to almost the diameter of the punched hole
(10mm is ideal for horticultural labels) otherwise, if the label comes to a halt with a punched hole
under the sensor, the printer might think there is no label fitted.
‘Ribbon Encoder Error’ message
Q. My printer is stalling and passing to error condition when I try to print, and when I
interrogate it with the Diagnostic Tool I see the message ‘Ribbon Encoder Error’. What does
this mean?
A. The ribbon sensor lens might be dirty or the sensor could have developed a fault.
The following should be noted. If the ribbon runs out during a print run the system will generate this
message:
Ribbon End Err.
Alternatively, if the ribbon is removed and subsequently an attempt is made to print labels from a
template which is set to Thermal Transfer then the system will generate this message:
Ribbon Encoder Err.
From this we may deduce that an incorrectly fitted ribbon (ribbon not seen by the ribbon sensor) can
produce the second message.
‘Paper Jam’ message
Q. The ‘Paper Jam’ message appears when I print die-cut labels or when I press the ‘Form
Feed’ button, even though the printer has Gap Sensor calibrated successfully.
A. The Gap Sensor might not be working or its lens is too dirty to work. Try doing a gap sensor
calibration with continuous label fitted and see what happens, and try printing die cut labels with the
sensor set to Continuous. If these tests cause no error message it suggests a failed Gap Sensor.