1
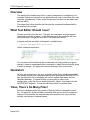
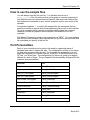
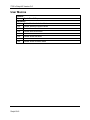
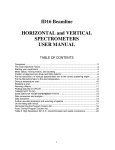
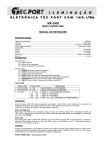
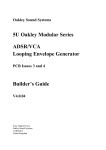
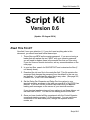
Script Kit Version 0.6 Script Kit Version 0.6 (Update: 25 August 2014) Read This First!!! Now that I have your attention If you don’t read anything else in this document, you should read and follow these steps. 1. These files use MPW as the master password. If you are not using a loader that will replace the text “MPW” with your numeric password, you will need to replace these in the sample files that you’ll be using. If you don’t have a favorite text editor, see my recommendation on the next page. 2. In your text files, search for QUICKSTART and customize the files (if not already done). 3. Download the init.scm file to the controller first! This file contains the command that changes the password from the default to the one you just defined. You can load the other files in any order. (See page 8-2, Console Port, of the 7330 User Manual.) 4. Set the Delay-Per-Character and Delay-Per-Line values in your terminal emulator as shown in the table on page 8-16 of the 7330 User Manual. If you don’t do this, at baud rates over 9600 you will see loading error messages on the screen of your terminal emulator. If your terminal emulator does not have options to set these delays, set the baud rate to 9600. You will not see loading errors at this rate. 5. Once you have loaded all files, experiment with the Control Operator commands starting on page 7 of this document. You can use these commands to link and unlink ports, change the repeater access modes, etc. Script Kit-1 7330 Script Kit Version 0.6 Overview This sample kit includes script files of various categories for configuring your controller. Below are instructions on which pieces to use to customize your own controller programming. These script files are text files that can be edited with any text editor. The pages that follow describe the files and the commands implemented by the macros in the scripts. What Text Editor Should I use? Choose one that colors the text. This way, the comments and commented lines show up clearly in green. Lines that execute on the controller will be in colors like black, orange and blue like in the screenshot below. A simple and free text editor is Notepad++ available here: http://notepad-plus-plus.org/ Here’s a sample screenshot: You can see how the lines that are commented out clearly show up in green making it easier to understand what commands in these files are actually going to make a change. We highly recommend working in this environment. Quickstart I’m sure you’re anxious to get your controller on the air as quickly as possible! The sample scripts have comments starting with the keyword QUICKSTART to take you directly to the commands you have to update right away, like the Identifier Message. For each file that you are going to use in your configuration, copy the file to a working directory, open it, then search for the QUICKSTART keyword. Follow the instructions that I’ve written there. Yikes, There’s So Many Files! Don't be overwhelmed by the number of files and all the commands in each file. For each file, all the possible commands that can be used to configure a feature of the controller are entered there as comments, but only a few are actually used except for special cases. Script Kit-2 Script Kit Version 0.6 How to use the sample files You will always need the Init.scm file. You will also need a set of Portx_yyyy.scm files for each port that you're going to connect equipment to. And there are optional common and port-specific user and control macro files that implement commands for your control operators and for your users of the repeater. A comment character, ';', is used in the sample files for commands that we want the controller to ignore when the programming file is sent to the controller. To use a command that's currently a comment simply delete the comment character, provide any specific values required, and send the file to the controller. The Master Password is shown in the commands as 'MPW'. You must replace that with your own password that matches the one you set in the controller with the command you specify in the Init file. Port Personalities Each of your controller ports is going to be wired to a particular piece of hardware and used in a particular way. The configuration is likely to be unique for each port and personality as well. For example, the equipment on a port might be a repeater, or a control receiver, or an IRLP or Echolink Node, or an RF Link, or a Wired Link. The configuration for the port is going to be slightly different for each of these. The port-specific files are already configured for the common “port personalities”. Port Use File Repeater Portx_Repeater Repeater, Link Hub Portx_LinkHubRepeater Link, RF, Full-Duplex Portx_LinkFullDuplex Link, RF, Half-Duplex Portx_LinkFullDuplex Link, Wired, Full-Duplex Portx_LinkWired Remote Base, Half Duplex Portx_RemoteBase Control Receiver Portx_ControlReceiver IRLP Portx_IRLP Autopatch Portx_Autopatch 7K Portx_7K Script Kit-3 7330 Script Kit Version 0.6 Controller Initialization File The Init.scm file defines the commands to be customized and sent to the controller that provide general configuration for the controller. This file provides commands for the following areas: Security: Passwords, Front Panel Control Misc Macros: Power-On Macro Messaging Defaults: Warm Reset Message, Command Response Messages Paths Logic Inputs Logic Outputs Clock and Calendar Scheduler The file also contains commands that the following files depend on, like turning off all paths until they’re enabled in a later file. Port Configuration Files Files are provided for the most common types of port configurations. Portx_Repeater Portx_LinkFullDuplex Portx_LinkWired Portx_LinkHubRepeater Portx_ControlReceiver Portx_RemoteBase Portx_IRLP Portx_Autopatch Portx_7K You will choose one for each port of the controller that you will be using. You don’t need one for any unused ports. Control Operator Macro Files Files are provided that contain typical macros that would be used by a control operator remotely controlling the repeater or while servicing the equipment. There are a set of common macros and a set that are port specific. Common_ControlMacros Portx_ControlMacros Later in this document is a table that you can use to create a command sheet for your control operators. Script Kit-4 Script Kit Version 0.6 User Macro Files Files are provided that contain typical macros that a repeater owner could offer to his users. There are a set of common macros and a set that are port specific. Common_UserMacros Portx_UserMacros Portx_ModeMacros Later in this document is a table that you can use to create a command sheet for your users. Macro Names Explained Macro Names are normally assigned by the owner when programming the controller. It helps to plan what ranges of Macro Names will be used for each set of functions. The set defined here are what you'll find in the sample scripts. You can change them if you want to any other valid names. User and Mode Macro Names To keep these names short, the range of 0 through 999 is reserved for macro names that are used most often, especially for users that might be driving. Keeping them short also makes them easier to remember. Control Operator Macro Names These macro names are longer and are organized as General Use Macros and Port-Specific Macros. 6000 through 6099 are defined for General Use. 6p00 through 6p99 are specific to a port, eg. 6100 thru 6199 would control port 1. Internal Macro Names These are defined for use only inside the controller. Think of them as subroutines that can be executed by the Scheduler or when a particular internal event is detected. In addition, these are divided into General Use Macros and Port-Specific Macros. A000 through A099 are General Purpose. Ap00 through Ap99 are specific to a port, eg. A200 through A299 apply to port 2. Script Kit-5 7330 Script Kit Version 0.6 User Macros General 9* Speak Time-Of-Day Net Modes 121* Enable Weather Activation Mode 120* Disable Weather Activation Mode 131* 130* Enable Normal Net Mode Disable Normal Net Mode 151* 150* Enable ARES Net Mode Disable ARES Net Mode 181* Enable ARES Activation Mode 180* Disable ARES Activation Mode Script Kit-6 Script Kit Version 0.6 Control Operator Macros Common 6060 Say Firmware Version 6070 Clear the Power Cycle Notification 6098 Say the Short Time in Hours/Minutes/Seconds for Checking Clock Drift 6099 Check the Battery Status Script Kit-7 7330 Script Kit Version 0.6 Port 1 Mode Commands 6100* Set Mode Normal 6101* Enable Port, Both RX and TX 6102* Disable Port, Both RX and TX Crosslink Port Commands 6120* Disable Port 2 Crosslink 6121* Enable Port 2 Crosslink 6122* Monitor Receiver 2 6123* Set RX2-to-TX1 COR Access 6124* Set RX2-to-TX1 COR-And-CTCSS Access 6125* RX2-to-TX1 DTMF Mute Off, Pass DTMF Tones 6126* RX2-to-RX1 DTMF Mute On, Mute DTMF Tones 6129 * RX2-to-TX1 Reset Timeout Timer 6130* Disable Port 3 Crosslink 6131* Enable Port 3 Crosslink 6132* Monitor Receiver 3 6133* Set RX3-to-TX1 COR Access 6134* Set RX3-to-TX1 COR AND CTCSS Access 6135* RX3-to-TX1 DTMF Mute Off, Pass DTMF Tones 6136* RX3-to-RX1 DTMF Mute On 6139 * RX3-to-TX1 Reset Timeout Timer Transmitter Commands 6140* Transmitter PTT Disabled 6141* Transmitter PTT Enabled 6142* Transmitter Key With No Timeout 6143* Force Initial Identifier Sequence Receiver Commands 6150* Receiver Access Disabled To All Paths 6151* Receiver Access Enabled To All Paths 6153* Set Receiver to COR Access 6154* Set Receiver to COR-And-CTCSS Access 6155* RX1-to-TX1 DTMF Mute Off, Pass DTMF Tones 6156* RX1-to-TX1 DTMF Mute On, Mute DTMF Tones 6159 * RX1-to-TX1 Reset Timeout Timer Maintenance Commands 6190* Command Responses Off For Commands In Macros 6191* Command Responses On For Commands In Macros 6192* Send CW Test Tones, 0 thru 9 6193* Send Paging Test Tone 1084Hz, 8 Seconds 6194* Send DTMF Test Tones, Digit 5, 10 Seconds Script Kit-8 Script Kit Version 0.6 Port 2 Mode Commands 6200* Set Mode Normal 6201* Enable Port, Both RX and TX 6202* Disable Port, Both RX and TX Crosslink Port Commands 6210* Disable Port 1 Crosslink 6211* Enable Port 1 Crosslink 6212* Monitor Receiver 1 6213* Set RX1-to-TX2 COR Access 6214* Set RX1-to-TX2 COR-And-CTCSS Access 6215* RX1-to-TX2 DTMF Mute Off, Pass DTMF Tones 6216* RX1-to-TX2 DTMF Mute On, Mute DTMF Tones 6219 * RX1-to-TX2 Reset Timeout Timer 6230* Disable Port 3 Crosslink 6231* Enable Port 3 Crosslink 6232* Monitor Receiver 3 6233* Set RX3-to-TX2 COR Access 6234* Set RX3-to-TX2 COR AND CTCSS Access 6235* RX3-to-TX2 DTMF Mute Off, Pass DTMF Tones 6236* RX3-to-TX2 DTMF Mute On 6239 * RX3-to-TX2 Reset Timeout Timer Transmitter Commands 6240* Transmitter PTT Disabled 6241* Transmitter PTT Enabled 6242* Transmitter Key With No Timeout 6243* Force Initial Identifier Sequence Receiver Commands 6250* Receiver Access Disabled To All Paths 6251* Receiver Access Enabled To All Paths 6253* Set Receiver to COR Access 6254* Set Receiver to COR-And-CTCSS Access 6255* RX2-to-TX2 DTMF Mute Off, Pass DTMF Tones 6256* RX2-to-TX2 DTMF Mute On, Mute DTMF Tones 6259* RX2-to-TX2 Reset Timeout Timer Maintenance Commands 6290* Command Responses Off For Commands In Macros 6291* Command Responses On For Commands In Macros 6292* Send CW Test Tones, 0 thru 9 6293* Send Paging Test Tone 1084Hz, 8 Seconds 6294* Send DTMF Test Tones, Digit 5, 10 Seconds Script Kit-9 7330 Script Kit Version 0.6 Port 3 Mode Commands 6300* Set Mode Normal 6301* Enable Port, Both RX and TX 6302* Disable Port, Both RX and TX Crosslink Port Commands 6310* Disable Port 1 Crosslink 6311* Enable Port 1 Crosslink 6312* Monitor Receiver 1 6313* Set RX1-to-TX3 COR Access 6314* Set RX1-to-TX3 COR-And-CTCSS Access 6315* RX1-to-TX3 DTMF Mute Off, Pass DTMF Tones 6316* RX1-to-TX3 DTMF Mute On, Mute DTMF Tones 6319 * RX1-to-TX3 Reset Timeout Timer 6320* Disable Port 2 Crosslink 6321* Enable Port 2 Crosslink 6322* Monitor Receiver 2 6323* Set RX2-to-TX3 COR Access 6324* Set RX2-to-TX3 COR AND CTCSS Access 6325* RX2-to-TX3 DTMF Mute Off, Pass DTMF Tones 6326* RX2-to-TX3 DTMF Mute On 6329 * RX2-to-TX3 Reset Timeout Timer Transmitter Commands 6340* Transmitter PTT Disabled 6341* Transmitter PTT Enabled 6342* Transmitter Key With No Timeout 6343* Force Initial Identifier Sequence Receiver Commands 6350* Receiver Access Disabled To All Paths 6351* Receiver Access Enabled To All Paths 6353* Set Receiver to COR Access 6354* Set Receiver to COR-And-CTCSS Access 6355* RX3-to-TX3 DTMF Mute Off, Pass DTMF Tones 6356* RX3-to-TX3 DTMF Mute On, Mute DTMF Tones 6359* RX3-to-TX3 Reset Timeout Timer Maintenance Commands 6390* Command Responses Off For Commands In Macros 6391* Command Responses On For Commands In Macros 6392* Send CW Test Tones, 0 thru 9 6393* Send Paging Test Tone 1084Hz, 8 Seconds 6394* Send DTMF Test Tones, Digit 5, 10 Seconds Script Kit-10 Script Kit Version 0.6 Script Kit-11