1
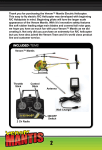
THE FPI MANTIS
Installation and User Guide
DCS6009-02 The FPI Mantis | 2012 Oct | © 2012 Focal POINT. All rights reserved
`
Disclaimer
Focal Point, Inc. has taken every precaution in the preparation of this manual. However, we make no representations
or warranties with respect to the contents of this manual. In addition, information contained in the manual is subject
to change without notice. Moreover, Focal Point assumes no responsibility for errors or omissions or any damages
resulting from the use of the information contained in this manual.
You may reproduce and distribute unaltered copies of this manual in any manner without the permission of Focal
Point for the purposes of selling the Mantis and providing technical support. Otherwise, you may not reproduce or
transmit this manual in any form or by any means, electronic or mechanical, without the express written permission of
Focal Point.
All trademarks mentioned in this document belong to their respective owners.
We are committed to manufacturing high quality products and supporting our products after they leave our
manufacturing facility. Please send us your comments or notify us of any errors at: [email protected].
© 2012 Focal Point, Inc. All rights reserved.
Focal Point, Inc.
22960 Shaw Road, STE 100
Sterling, VA 20166
(703) 787-8059
DCS6009-02 The FPI Mantis | 2012 Oct | © 2012 Focal POINT. All rights reserved
Table of Contents
INTRODUCTION ....................................................................................................................... 3 SUPPLIED COMPONENTS ...................................................................................................... 3 SYSTEM FEATURES ................................................................................................................ 4 ADJUSTABLE CAMERA HEIGHT ............................................................................................. 4 C20 CODEC INSTALLATION.................................................................................................... 5 SX20 CODEC INSTALLATION ................................................................................................. 7 CAMERA INSTALLATION ......................................................................................................... 9 TOUCH PANEL POWER SUPPLY ........................................................................................... 9 SYSTEM CONNECTIONS ...................................................................................................... 10 SYSTEM OPERATION ............................................................................................................ 10 SPECIFICATIONS ................................................................................................................... 11 Weights: ........................................................................................ 11 Dimensions: .................................................................................. 11 Power Rating: ............................................................................... 11 System Connections: .................................................................... 11 DCS6009-02 The FPI Mantis | 2012 Oct | © 2012 Focal POINT. All rights reserved
2
INTRODUCTION
The Mantis is a multi-media system, integrated with a Cisco C20 or SX20, easily transforms existing displays or
projectors into “room based” video conferencing solutions, maximizing previous investments of audio/visual devices.
The Mantis works with almost any flat screen or projection device. Lightweight and highly portable, the Mantis moves
easily between rooms and different areas of the building. The integrated audio system ensures everyone in the room
has a quality experience. The Mantis is perfect for a wide variety of environments, from Education to the Boardroom,
Healthcare settings to Hospitality, and beyond!
SUPPLIED COMPONENTS
The following items are included:
Part # MTS-Mantis-01(for Cisco C20/SX20 codec) consists of:
• Integrated cart without codec and camera
• Full Range Column Speaker
• 15 Watts x 2 Audio Amplifier
• Miniature Cardioid Condenser Boundary Microphone
• Camera Mounting Plate (for Cisco 4x or 12x PHD Camera)
• 5” and 10” Camera Extension Poles
• 5 port Ethernet Switch (2 ports on rear connector panel)
• 15’ AC Power Cord for North America
• 15’ HDMI male to DVI-D male cable
• DVI-D female to HDMI male adapter
• Internal 12VDC power supply for internal devices and codec
• Bracket for mounting touch panel power supply with Ethernet and ac Y cable
• Cable wrap
• Ancillary Basket
• 2 x RCA Y cables for SX20 codec (2 RCA female jacks to 3.5mm plug)
• 2.1mm to 2.5mm adapter for SX20 codec power
• set of SX20 mounting brackets
• 8 x small tie wraps
• 2 x large tie wraps
• 2 x tie wrap holders, self adhesive
• 2 x M3 x 12 screw for C20 codec (1 spare)
• Installation & Operation Manual
DCS6009-02 The FPI Mantis | 2012 Oct | © 2012 Focal POINT. All rights reserved
3
SYSTEM
M FEATU
URES
ADJUS
STABLE
E CAMER
RA HEIG
GHT
DCS6009-02 Thee FPI Mantis | 20012 Oct | © 2012 Focal POINT.. All rights reservved
D
4
C20 CODEC INSTALLATION
Follow these steps for installing the Cisco C20 codec. Skip these steps if the codec was installed by Focal Point Inc.
1
Remove accessory basket if required, loosen the thumb
screw and pull basket away from rear panel.
3
Slide C20 codec into channels as shown with I/O
facing in towards cables.
2
Open the rear access door by loosening the top and
bottom thumb screws.
4
Carefully move C20 codec and visually align mounting
hole to codec fastening threads. Then insert supplied
M3 screw and tighten codec. Insert screw cap into
hole.
DCS6009-02 The FPI Mantis | 2012 Oct | © 2012 Focal POINT. All rights reserved
5
5
Install the 10” and the 5” extension poles so that cables
may be installed for full extension lenght. Loosen the
thumbscrew (circled in red) and insert the 10”
extension pole and tighten the thumbscrew. Then
repeat for the 5” extension pole.
6
Cables may have already been installed at
manufacturing, if so just push cables up the extension
poles as required. Otherwise insert camera cables into
the large opening in the pole down into the cabinet and
connect to the codec.
7
Connect cables to the codec (follow cable labels for
connections) and fasten the camera cables with
supplied tie wraps. Make sure to leave a loop at the top
for proper door movement.
DCS6009-02 The FPI Mantis | 2012 Oct | © 2012 Focal POINT. All rights reserved
6
SX20 CODEC INSTALLATION
Follow these steps for installing the Cisco SX20 codec. Skip these steps if the codec was installed by Focal Point Inc.
1
2
Remove top and bottom C20 mounting brackets and
replace them with the SX20 mounting brackets using
the same screws.
Slide the SX20 codec into the brackets and tighten the
thumb screws located on the sides, making sure to not
over tighten and the codec is all the way in.
4
3
C20 codec
SX20 codec
Using the supplied Y cable adapters connect the 2
cables as shown above to SX20 codec. Also use the
supplied 2.1mm to 2.5 mm power adapter.
Install the 10” and the 5” extension poles so that cables
may be installed for full extension length. Loosen the
thumbscrew and insert the 10” extension pole and
tighten the thumbscrew. Then repeat for the 5”
extension pole.
DCS6009-02 The FPI Mantis | 2012 Oct | © 2012 Focal POINT. All rights reserved
7
5
Cable may have already been installed at
manufacturing, if so just push cables up the extension
poles as required. Otherwise insert camera cables into
the large opening in the pole down into the cabinet and
connect to the codec.
6
Connect cables to the codec and fasten the camera
cables with supplied tie wraps. Use the supplied tie
wraps to fasten the cables neatly and verify that cables
don’t interfere with door movement.
DCS6009-02 The FPI Mantis | 2012 Oct | © 2012 Focal POINT. All rights reserved
8
CAMERA INSTALLATION
Follow these steps for installing the camera.
1
Place the camera onto the camera bracket and tighten
Phillips screw, do not over tighten.
2
Insert the camera with camera bracket over the system
pole and tighten the rear thumb screw (may need to
loosen the thumb screw first). Then connect the cables
to the camera. Once completed, basket can be
reattached to cart.
TOUCH PANEL POWER SUPPLY INSTALLATION (Optional)
Follow these steps for installing the touch panel power supply.
1
Install the touch panel power supply to power supply
bracket within cart. Fasten using tie wrap adhesive
holders and tie wraps as shown. Locate and connect
the Ethernet cable to Power supply. Also use the
supplied Y ac cable to connect power.
2
Insert touch panel cable through hole in pole and
connect to power supply. Follow touch panel setup
instructions to complete installation.
DCS6009-02 The FPI Mantis | 2012 Oct | © 2012 Focal POINT. All rights reserved
9
SYSTEM CONNECTIONS
1
PC/LAPTOP
DISPLAY
LAN
2
MICROPHONE
1
Connect the system Ethernet cable to the local area
network. This cable is supplied with the codec. Connect
the supplied HDMI cable to your display source. Also
connect PC/laptop and microphone as required. These
connections are located at the bottom rear of the cart.
Plug the power cord to the AC outlet and turn on the
system power by pressing on the “l”.
SYSTEM OPERATION
Please refer to Cisco C20 or SX20 User Manual for codec/camera operation and setup.
DCS6009-02 The FPI Mantis | 2012 Oct | © 2012 Focal POINT. All rights reserved
10
SPECIFICATIONS
Weights:
Cart without codec and camera:
Shipping Weight without codec and camera:
Cart with codec and 12x camera:
Shipping Weight with codec and 12x camera:
40Lbs
64Lbs
48Lbs
72Lbs
Dimensions:
Cart footprint:
Maximum Height:
Minimum Height :
20”(W) x 20.5”(D)
66.5” with 12x camera
51.5” with 12x camera
Power Rating:
Voltage Rating:
Power Consumption:
100-240 VAC, 50-60Hz.
Typical 50 Watts with C20 codec/12x camera
System Connections:
Inputs:
DVI-I Analog/digital PC input
Line level PC audio input (3.5mm stereo jack)
Microphone input for “Quickset” Microphone
Outputs:
HDMI Digital output for external display
Network:
LAN connection (RJ45)
Ethernet jack for PC/laptop (RJ45)
Internal Ethernet cable for Cisco TelePresence Touch
DCS6009-02 The FPI Mantis | 2012 Oct | © 2012 Focal POINT. All rights reserved
11