1
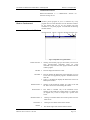
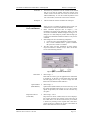
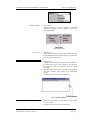
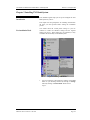
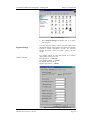
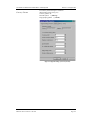
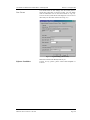
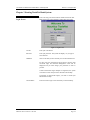
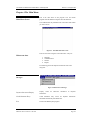
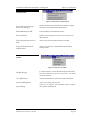
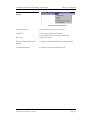
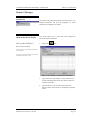
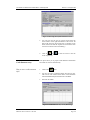
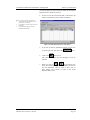
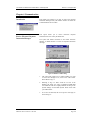
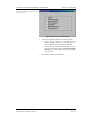
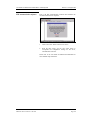
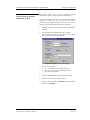
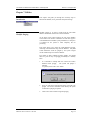
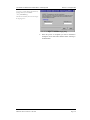
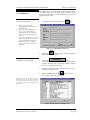
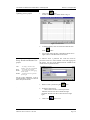
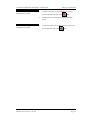
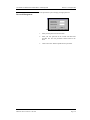
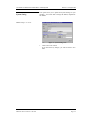
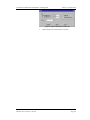
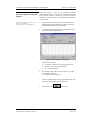
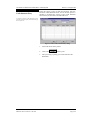
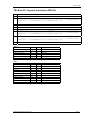
Mauritius
TradeNet Phase 3 System
Bank’s User Manual
Mauritius Network Services Ltd © 2001
User Guide for Mauritius TradeNet Phase 3 Bank System
Release 1.0 August 2001
CONTENT
Chapter 1 Introduction ............................................................................... 1-1
WHAT IS TN3 BANK SYSTEM?..................................................................................................................1-1
WHAT IS EDI? ...........................................................................................................................................1-1
FUNCTIONS OF TN3 BANK SYSTEM ..........................................................................................................1-1
CAPABILITIES OF TN3 BANK SYSTEM .......................................................................................................1-1
OTHERS COMPONENTS IN TN3 BANK SYSTEM..........................................................................................1-1
WINDOWS FUNDAMENTALS ......................................................................................................................1-2
BUTTONS USED .........................................................................................................................................1-6
Chapter 2 Installing TN3 Bank System. .................................................... 2-1
INTRODUCTION..........................................................................................................................................2-1
PRE-INSTALLATION TASKS ........................................................................................................................2-1
REGIONAL SETTINGS .................................................................................................................................2-2
Number Format ....................................................................................................................................2-2
Currency Format ..................................................................................................................................2-3
Date Format .........................................................................................................................................2-4
SOFTWARE INSTALLATION ........................................................................................................................2-4
Chapter 3 Starting TradeNet Bank System................................................ 3-1
LOGIN SCREEN ..........................................................................................................................................3-1
LICENSE SCREEN .......................................................................................................................................3-2
Chapter 4 The Main Menu ......................................................................... 4-1
MAIN MENU SCREEN ................................................................................................................................4-1
MAIN MENU ITEMS ....................................................................................................................................4-1
Chapter 5 Messages .................................................................................... 5-1
INTRODUCTION..........................................................................................................................................5-1
PAYMENT INSTRUCTION ENQUIRY ............................................................................................................5-1
How to make PI Enquiry? ....................................................................................................................5-1
CREDIT STATEMENT ENTRY ......................................................................................................................5-2
How to enter credit statement info ?.....................................................................................................5-2
Chapter 6 Communication ......................................................................... 6-4
INTRODUCTION..........................................................................................................................................6-4
RECEIVE ELECTRONIC PAYMENT INSTRUCTION MESSAGES ......................................................................6-4
EDI COMMUNICATION SOFTWARE .............................................................................................................6-6
EXPORT ELECTRONIC PAYMENT INSTRUCTIONS TO HOST .........................................................................6-7
EXPORT CREDIT STATEMENT TO MACSS SYSTEM ...................................................................................6-8
Chapter 7 Utilities ....................................................................................... 7-1
INTRODUCTION..........................................................................................................................................7-1
WORKFILE PURGING .................................................................................................................................7-1
USER MAINTENANCE .................................................................................................................................7-3
Create a new profile .............................................................................................................................7-3
Giving user access rights......................................................................................................................7-3
Updating a user profile ........................................................................................................................7-4
Reset, Revoke and Resume User profile ...............................................................................................7-4
Deleting user profile.............................................................................................................................7-5
Printing user profile ............................................................................................................................7-5
PASSWORD MANAGEMENT ........................................................................................................................7-6
SYSTEM SETTING ......................................................................................................................................7-7
Mauritius Network Services Pte Ltd
Page I
User Guide for Mauritius TradeNet Phase 3 Bank System
Release 1.0 August 2001
Chapter 8 Reports ....................................................................................... 8-8
INTRODUCTION..........................................................................................................................................8-8
MESSAGES RECEIVED................................................................................................................................8-8
AUDIT TRAIL .............................................................................................................................................8-8
ERROR LOG ............................................................................................................................................. 8-10
ELECTRONIC PAYMENT INSTRUCTION REGISTER ....................................................................................8-11
CREDIT STATEMENT ENTRY ....................................................................................................................8-12
Appendix A Report Preview Screen
Appendix B Payment Instructions ASCII file
Mauritius Network Services Pte Ltd
Page II
User Guide for Mauritius TradeNet Phase 3 Bank System
Release 1.0 August 2001
Chapter 1 Introduction
What is TN3 Bank System?
The TradeNet Phase 3 (TN3) system is an initiative of the
Ministry Of Finance. It represents an increase in efficiency and
effectiveness compared to the current manual process. This is in
line with the Government’s and private sector’s objective of
modernising our economy and to enhance productivity.
TN3 Bank System is the bank portion of the TN3 system. This
system allows users to receive electronic EDI documents from
the relevant parties; i.e. the Declarants.
What is EDI?
EDI, or Electronic Data Interchange, is the direct electronic
transfer of structured business information between computer
systems in different organisations. In order for the recipient to
understand the data received, there must be a prior Interchange
Agreement. The scope of agreement includes the following:
•
•
•
The data element
Message structure
Transmission syntax
An international standard that defines the syntax rules for the
transmission of messages has been established. This standard is
known as United Nations/EDI for Administration, Commerce
and Transport or UN/EDIFACT, for short.
Functions of TN3 Bank System
Banks can use this system to receive Payment Instructions (PI)
from Declarants, if they submit them electronically. Electronic
Payment Instructions (PI) are deposited at a central electronic
mailbox where the banks would use this system to retrieve them.
The System enables the bank to prepare the Credit Instruction for
the Comptroller of Customs account located at the Bank of
Mauritius.
TN3 Bank has the following capabilities:
Capabilities of TN3 Bank
System
Data Entry
The system allows the preparation of the following document:
• Credit Statements
Extraction of Credit Statements to MACSS System
The system can export Credit Statements into SWIFT MT102
Message Format to be loaded into the MACSS System.
EDIWorks Translator
Others Components in TN3
Bank System
Mauritius Network Services Pte Ltd
This is an EDI converter software which assists in encoding and
decoding data in the messages using the EDIFACT format.
Page 1-1
User Guide for Mauritius TradeNet Phase 3 Bank System
Release 1.0 August 2001
Communication Software
EDIAccess/UNIX:WIN is
electronic message service.
a
communication
software
for
Windows present programs to you in a consistent way. Every
program that runs under Windows uses the Windows interface.
So the window that you see for one program will have
similarities to every other program. A window has the following
common features :
Windows Fundamentals
Parts of a Window
control-menu box title bar menu bar minimise maximise close
Fig 1.1 Components of a typical window
Control-menu box
Title Bar
• Clicking on this button pops up a menu where you can access
some program-control commands. These are global
commands - they affect the entire program instead of an item
within a program.
• This bar displays the Window’s name.
Menu Bar
• This bar displays the Menu items of the application. You can
access most of an application program’s commands from the
menu bar.
• In Fig 1.1 the Menu bar displays the Menu items of the TN3
Bank System window.
Minimise button
• Clicking on this shrinks the window to a button on the task
bar. This is the reverse of maximising the window.
Restore button
• This button is available only in the maximised screen.
Clicking on this makes the window shrink to a smaller size
(its original size), so that it occupies only a portion of the
screen.
Maximise button
•
Clicking on maximise makes the window spread across the
whole screen.
Close button
•
Clicking on close button will close the window.
Borders
•
The outside edges of the window form the borders.
Mauritius Network Services Pte Ltd
Page 1-2
User Guide for Mauritius TradeNet Phase 3 Bank System
Release 1.0 August 2001
Scroll Bars
•
Scroll bars are provided to view the contents of the window
that do not fit into the window. When the contents of the
window consist of more than one screen, the scroll bars are
added automatically. To view the contents beyond the screen
size of the window, click on the arrows of the scroll bars.
Workspace
•
The area inside the window constitutes the workspace.
How to use Dialog Boxes, Check •
Boxes and Buttons
•
•
•
When you issue a command to Windows from a menu, you
sometimes have to enter some additional information.
Menu commands displayed with an ellipsis (..) are
incomplete and require more information. When you click
one of these commands, Windows displays a dialog box. A
dialog box is a small, temporary window that interrupts you
to ask for the additional information needed to carry out the
command.
Most dialog boxes have the following components :
• A place for you to enter information or choose options
• One or more command buttons - pictures of buttons
that you click to execute a command.
The place where you enter information or choose options
may be structured in a number of ways. There will at least
be one of the following elements :
Fig 1.2 Options ,Commands and Data fields
Data Fields
•
Refer to Fig 1.2
Data fields are used to give the application the information
it prompts for. To fill text in a data field, click on the field
and start typing the text. Fig 1.2 shows a single line data
field. There exist multi-line data fields also.
Option Buttons
(Radio Buttons)
•
Refer to Fig 1.2
Option buttons (Radio buttons) are used to select any one of
the options presented in that group. For e.g. in Fig 1.2 three
options are presented, out of which the user can select any
one option.
•
Refer to Fig 1.2 & 1.3
Drop–down List boxes (Combo boxes) are used to display a
list of items, upon the user's request. Click on the arrow of
the Combo box to view the list. From this list you can make
a selection by clicking on the required item. Note that a
vertical scroll bar is added in the list box if the number of
items is more than the List box can hold.
Drop-Down List box
(Combo Box)
Mauritius Network Services Pte Ltd
Page 1-3
User Guide for Mauritius TradeNet Phase 3 Bank System
Release 1.0 August 2001
Fig 1.3 Drop – down list box ( Combo box )
Command Buttons
•
Refer to Fig 1.2
Command buttons are used to represent a Command
graphically. Clicking on these buttons executes the
associated command.
Fig 1.4 Check boxes
•
Refer Fig to 1.4
Check boxes are similar to Option buttons (Radio buttons),
the only difference being that more than one or all the check
boxes in a group can be selected.
To Resize a Window •
Refer to Fig 1.5
A Window can be resized according to your requirements. If
you want to have two or more windows on your screen at
the same time, then the windows must be resized
accordingly.
Place the mouse pointer on one of the edges of the window.
The mouse pointer's shape changes to a double-sided
pointer.
Drag the mouse to the new position and release.
Check boxes
•
•
Fig 1.5 Resizing a Window
To Move a Window •
•
Mauritius Network Services Pte Ltd
Place the mouse pointer over the title bar of the window
you want to move.
Drag the mouse to the new position and release.
Page 1-4
User Guide for Mauritius TradeNet Phase 3 Bank System
To Close a Window •
•
Mauritius Network Services Pte Ltd
Release 1.0 August 2001
Refer to Fig 1.1
Click on the Close button of the window. You can also
click on the Control Menu box and select Close.
Page 1-5
User Guide for Mauritius TradeNet Phase 3 Bank System
Release 1.0 August 2001
Buttons Used
Tool Bar Buttons
New Button
Select this button to create a new document/record/entry.
This allows you to add/create a new set of information to the database.
After clicking on the button, you can start to enter information and save
the entry using the Save button.
Retrieve Button
Select this button to retrieve information from the database.
This allows you to retrieve a record for viewing or modification.
A search dialog box with the list of documents/items currently available
will be displayed for selection.
Delete Button
Select this button to delete information from the database.
This allows you to delete unwanted information from the database. If you
had already opened a record with the Retrieve button, then clicking on the
Delete button will delete the current record.
Duplicate Button
Select this button to duplicate information from the database.
This button can only be found in the tax returns entry screens.
A search dialog box will be displayed showing all existing records where
you can select one for duplication. After that, you can continue to modify
the duplicated record and later save it using the Save button.
Save Button
Select this button to save modifications done into the database.
A confirmation dialog box will be displayed, in which you have to click
on the <OK> button to confirm the save operation.
Send Button
Select this button to send messages.
You can send either one or multiple messages. If you had already opened
a record with the Retrieve button, then clicking on the Send button will
only send the current record.
Print Button
Select this button to print.
You can print one or multiple records. If you had already opened a record
with the Retrieve button, then clicking on the Print Button will print the
current record.
Clear Button
Select this button to clear the screen.
This allows you to clear the screen so that you can open another record.
If you had made modifications to the existing record, you will be
prompted to save before the screen is cleared.
Exit Button
Select this button to exit the current screen.
This allows you to exit the current screen to return back to the main menu.
If you had made modifications to the existing record, you will be
prompted to save before exiting.
Mauritius Network Services Pte Ltd
Page 1-6
User Guide for Mauritius TradeNet Phase 3 Bank System
Release 1.0 August 2001
Other Button Used
Click on one of these to go to next or previous record.
Click on this to clear column information in a table.
Click on this to delete the selected row on the table.
Click on this insert a new row into the table.
Click on this to view/update the access rights to menu items for a user.
Click on these buttons to either preview or print a report.
Mauritius Network Services Pte Ltd
Page 1-7
User Guide for Mauritius TradeNet Phase 3 Bank System
Release 1.0 August 2001
Chapter 2 Installing TN3 Bank System.
Introduction
This installation guide helps you set up and configure the TN3
Bank System on your PC.
This chapter lists the prerequisites for installing and describes
the tasks you must perform before starting the installation
process.
Pre-installation Tasks
You should check the control panels settings in your PC
windows to ensure the date/time settings and the regional
settings are correct. These settings are very important, as they
will affect the functionality of TN3 Bank System.
Figure 2.1 Invoking Control Panel
1.
Mauritius Network Services Pte Ltd
You can invoke the Control Panel by clicking on the Start
button on your Desktop, followed by clicking on Settings
and lastly clicking on Control Panel. Please refer to
Fig 2.1.
Page 2-1
User Guide for Mauritius TradeNet Phase 3 Bank System
Release 1.0 August 2001
Figure 2.2 Control Panel
2.
Regional Settings
Number Format
Select Regional Settings and double click on it. Please
refer to Fig 2.2.
You must check the number, currency and date formats under
the Regional Settings. These settings are important in TN3 Bank
System to perform computation correctly. The following
describe the setting required for number, currency and date
formats.
The standard settings for TN3 Bank System are as follows
(Please follow exactly as Fig 2.3):
Decimal symbol: ‘.’ (full stop)
Digit grouping symbol: ‘,’ (comma)
No. of digits after Decimal: 2
Negative sign symbol: ‘-’ (minus)
Figure 2.3 Regional Settings (Number Format)
Mauritius Network Services Pte Ltd
Page 2-2
User Guide for Mauritius TradeNet Phase 3 Bank System
Currency Format
Release 1.0 August 2001
The currency format settings are as follows:
(Please follow exactly as Fig 2-4.)
Currency symbol: ‘$’
Decimal symbol: ‘.’ (full stop)
Digit grouping symbol: ‘,’ (comma)
Figure 2.4 Regional Settings (Currency Format)
Mauritius Network Services Pte Ltd
Page 2-3
User Guide for Mauritius TradeNet Phase 3 Bank System
Date Format
Release 1.0 August 2001
You should check the date settings from the control panel to
ensure that system date are always accurate. You can double
click the Date/Time icons on the Control Panel (in Fig 2-2).
You will see the system date & time displayed. You can correct
them if they are inaccurate. (Please refer to Fig 2-5.)
Figure 2.5 Regional Settings (Date Format)
Software Installation
Mauritius Network Services Pte Ltd
MNS will install the TN3 Bank System for you.
If there are any queries, please contact MNS Helpdesk at
2112525.
Page 2-4
User Guide for Mauritius TradeNet Phase 3 Bank System
Release 1.0 August 2001
Chapter 3 Starting TradeNet Bank System
This is the entry point to the software. Double click on the TN3
Bank System icon on the Desktop to obtain this Login screen.
Login Screen
Figure 3.1 Login screen
User ID
Enter your User ID here.
Password
Enter your password. The system will display * as you type in
each character.
Ok Button
Click on this after you have entered your User ID and Password.
For new users, the password will be the same as the ID. After
successful login, the Password Management screen will be
displayed and you must change your password in order to
proceed.
If three unsuccessful Login attempts are registered, the system
will exit this screen and you will be returned to the Desktop.
In situation of unsuccessful Logins, you need to consult your
administrator for help.
Cancel Button
Mauritius Network Services Pte Ltd
This will exit the Login screen and return you to the Desktop.
Page 3-1
User Guide for Mauritius TradeNet Phase 3 Bank System
License Screen
Release 1.0 August 2001
On successful Login, the license screen will be displayed.
Click on the <OK> button to proceed to the Main Menu.
Figure 3.2 License screen
Mauritius Network Services Pte Ltd
Page 3-2
User Guide for Mauritius TradeNet Phase 3 Bank System
Release 1.0 August 2001
Chapter 4 The Main Menu
Main Menu Screen
This is the main menu of the program. You can launch
programs from the different categories from the menu bar.
Your administrator may disabled some of the menu items which
you cannot access.
Figure 4.1 TN3 Bank main menu screen
There are four main categories in the main menu. They are:
Main menu items
1.
2.
3.
4.
Messages
Communications
Utilities
Reports
The following part of this chapter will describe each of the
categories:
Messages
Figure 4.2 Menu items of Messages
Payment Instruction Enquiry
Enquiry screen
Instructions.
Credit Statement Entry
Credit Statement entry screen for Payment Instructions
submitted electronically from Declarants.
Exit
Exit the TN3 Bank System program.
Mauritius Network Services Pte Ltd
for
Electronic
submission
of
Payment
Page 4-1
User Guide for Mauritius TradeNet Phase 3 Bank System
Release 1.0 August 2001
Communication
Figure 4.3 Menu items of Communication
Receive Electronic Payment
Instructions Messages
Initiates connection to the central electronic mailbox via MNS
network to receive Payment Instruction messages.
EDI Communications S/W
Launch the EDIAccess/UNIX:WIN software.
Reset Send Status
Displays a search dialog where you can select records to reset
their send status.
Export Payment Instructions to
Host
Allows you to export Payment Instructions to the Host.
Export Credit Statements to
MACSS System
Allows you to export the Credit Statements into the MT102
Message Format.
Utilities
Figure 4.4 Menu items of Utilities
Workfile Purging
To delete transaction (Credit Statements/Payment Instructions),
audit trail, transaction log and error log records. All deleted
records are archived.
User Maintenance
Allows the administrator to perform user profile maintenance.
Password Management
Allows you to change your password.
System Setting
Allows you to setup the system parameter such as company
name, address and mailbox id.
Mauritius Network Services Pte Ltd
Page 4-2
User Guide for Mauritius TradeNet Phase 3 Bank System
Release 1.0 August 2001
Reports
Figure 4.5 Menu items of Reports
Message Received
To preview/print a list of received messages.
Audit Trail
To preview/print a listing of the audit trail.
Error Log
To preview/print a list of errors related to importing &
exporting of messages.
Electronic Payment Instruction
Register
To print a list of Payment Instructions received electronically.
Credit Statement Entry
To print a list of the Credit Statements entered.
Mauritius Network Services Pte Ltd
Page 4-3
User Guide for Mauritius TradeNet Phase 3 Bank System
Release 1.0 August 2001
Chapter 5 Messages
Introduction
This chapter will guide you through the necessary steps to view
Payment Instructions and also the preparation of Credit
Statements to Comptroller of Customs.
Payment Instruction Enquiry
This screen allows you to search and browse through the
Electronic Payment Instructions.
How to make PI Enquiry?
1.
Click on the
button.
How to use the search dialog?
The search can be performed by Job Number or
Declarant name.
Type in the search value and the table will be
listed with the matching records.
Figure 5.1 Search dialog – Payment Instructions Enquiry
Mauritius Network Services Pte Ltd
3.
Type in the search value and press <TAB>. If there are any
records conforming to the search value, those records will
be shown on the table.
4.
After selecting a row, click on the <OK> button. The
Enquiry screen as shown in Fig 5.2 will display the selected
record.
Page 5-1
User Guide for Mauritius TradeNet Phase 3 Bank System
Release 1.0 August 2001
Figure 5.2 Browsing the Payment Instruction records
Credit Statement entry
How to enter credit statement
info ?
5.
You can now view the next or previous record using the
arrow buttons on the right hand bottom of the screen. All
data on the screen are for browsing only; no changes can be
made. (Please note that the sequence of records is the same
as how it was shown in the search dialog.)
6.
Click on
or
screen respectively.
to clear the screen or exit the
This option allows you to prepare Credit Statement information
for PI that was received electronically.
1.
Click on the
button.
2.
You can now select a Declarant Name from the List box.
The List box will contain all the names of the Declarants
who had submitted Payment Instructions to the Bank.
3.
Select the TN JobNo.
Figure 5.3 Credit Statement entry screen (Retrieving)
Mauritius Network Services Pte Ltd
Page 5-2
User Guide for Mauritius TradeNet Phase 3 Bank System
Release 1.0 August 2001
You will see that the Payment Instruction details for the selected
Declarant and TN JobNo are retrieved.
4.
Proceed to enter the Actual Debit Date, Credit Date to IR
and the Credit Amount. All the fields are mandatory.
When you save, the system will check that
•
Actual Debit Date & Credit Date is not
greater than current date.
•
Credit Date is not earlier than the Actual
Debit Date.
•
Credit Amount is different from the
Scheduled debit amount.
Figure 5.4 Credit Statement entry screen (Entry)
5.
If you wish to clear any information entered, you can do so
by selecting the rows and click on the
Mauritius Network Services Pte Ltd
button.
6.
button to save.
Click on the
The system will display any error messages if errors are
detected.
7.
or
, if any changes were
When you click on
made, the system would prompt you whether you want to
save the information. Click on <OK> to save, <No> to
abort changes and <Cancel> to return to the Credit
Statement Entry screen.
Page 5-3
User Guide for Mauritius TradeNet Phase 3 Bank System
Release 1.0 August 2001
Chapter 6 Communication
Introduction
Receive Electronic Payment
Instruction Messages
This chapter will explain to you how to retrieve the Payment
Instruction Messages from your mailbox and how to extract the
Credit Statements into ascii files.
This option allows you to receive Electronic Payment
Instructions that were sent by the Declarants.
The system will initiate connection to the central electronic
mailbox via MNS network to receive the Payment Instruction
messages.
Figure 6.3 Confirmation for receive process
Figure 6.4 Mailbox Conflict dialog
Mauritius Network Services Pte Ltd
1.
The system will prompt you to confirm whether you want
to receive the messages. If so, click on the <OK> button.
Please Refer to Fig 6.3
2.
Referring to Fig 6.4. There would be an error if the
Mailbox ID which was setup in EDIAccess/UNIX:WIN
were different from the Company Mailbox ID setup in the
System Settings of TN3 Bank System. Please check with
your administrator.
3.
If no errors are detected, the receive process will begin, as
shown in Fig 6.5.
Page 6-4
User Guide for Mauritius TradeNet Phase 3 Bank System
Release 1.0 August 2001
The check boxes will show you the current stage
of the receive process.
Figure 6.5 Receive process check list dialog
Mauritius Network Services Pte Ltd
4.
There are two possible outcomes to the receive process.
• Receive process carried out successfully (with or
without messages received). If no messages were
received, please try to receive again at a later time.
• Receive process carried out unsuccessfully. It can be
total or partial failure, please read the instructions
carefully in the error dialog at the end of the failed
receive process.
5.
You will be returned to the Main Menu.
Page 6-5
User Guide for Mauritius TradeNet Phase 3 Bank System
EDI communication software
Release 1.0 August 2001
This is the EDI communication software that facilitates the
communication between computers.
Figure 6.10 EDIAccess/UNIX:WIN Communication software
1.
Click on the <OK> button on the license screen.
2.
From the main menu, you can now select option to
view/update the configuration settings for the server,
communication and users.
Please refer to the User Guide for EDIAccess/UNIX:WIN for
more detailed setup instructions.
Mauritius Network Services Pte Ltd
Page 6-6
User Guide for Mauritius TradeNet Phase 3 Bank System
Export Electronic Payment
Instructions to Host
Release 1.0 August 2001
This option allows you to export Electronic Payment
Instructions you have received into an external ASCII file.
If you have an in-house system, you can use this exported file to
upload the electronic PI into your system for necessary
processing. If you require the format of the export file, you can
request a copy of the technical specifications from MNS.
1.
Referring to Fig 6.12. You must enter the Received Date to
continue.
2.
You can either enter the Batch No or leave it blank.
To extract/export all payment instructions for the entered
date, you need not to enter the Batch No.
Figure 6.12 Export PI to host option dialog
Mauritius Network Services Pte Ltd
3.
Select the export option.
• New – those that are not exported previously.
• Re-export – those that were exported previously.
• All – all will be exported.
4.
Check the Default Directory and the Export File Name.
5.
Finally click on the <OK> button to export.
6.
In this case the export file – 05161023.txt will be located in
directory C:\ EXPORT
Page 6-7
User Guide for Mauritius TradeNet Phase 3 Bank System
Export Credit Statement to
MACSS System
Release 1.0 August 2001
This option allows you to export the Credit Statement into a file
respecting the MT102 Format.
The Ascii file can then be loaded into the MACSS System
NB : User cannot extract more than 20
Credit Statements
Figure 6.13 Export Credit System to MACSS System
Credit Statement Already Exported
Mauritius Network Services Pte Ltd
1.
Upon display, table will contain all the Credit Statement
that must be processed for the Current Date.
2.
Enter the File Name
3.
Select the Credit Statement to be exported
4.
Click on Ok Button
5.
System will prompt that export has been successful or not
6.
A Report containing the details on the exported credit
Statements will be sent automatically to the printer.
In the case where the user would export the same Credit
Statements once again,
- Choose the Radio Button ‘Credit Statement Already
Exported’
- Enter the corresponding MACSS Job No
- Click on OK Button
Page 6-8
User Guide for Mauritius TradeNet Phase 3 Bank System
Release 1.0 August 2001
Chapter 7 Utilities
Introduction
This chapter will guide you through the necessary steps to
maintain the database, users, passwords and system settings.
Workfile Purging
Workfile purging is to remove records from the TN3 Bank
database and transfer records into an archive database.
As the usage of the system increases, the size of the database
will increase. This increase in database size will take up space
in the harddisk and will affect system performance, as less space
is available for the system to create temporary file for
processing.
This option allows you to purge the Credit Statement records,
Audit Log and Transmission Log from the database. Only sent
Credit Statements would be purged by the system. Purged
records would be kept in an archive database.
The volume of these workfiles increases rapidly. You should
make it a point to carry out purging periodically on a monthly
basis.
1.
It is advisable to backup both the current and archive
database before purging.
The system will prompt a
reminder.
To proceed, click on the <Yes> button.
Figure 7.1 Backup Reminder dialog
Mauritius Network Services Pte Ltd
2.
Next, you will need to enter the date range of records to be
purged. The record’s send date will be used by the system
to determine if purging is required.
3.
Click on the <Start> button to begin the purging.
Page 7-1
User Guide for Mauritius TradeNet Phase 3 Bank System
Release 1.0 August 2001
A log file is created showing the date/time of
purging, number of records deleted.
( 'arch_YYYYMMDD.log' )
The status bar will show you the current stage of
the purging process.
Figure 7.2 Workfile Purging dialog
4.
Mauritius Network Services Pte Ltd
When the process is completed, you will be reminded to
backup the current and archive database before returning to
the Main Menu.
Page 7-2
User Guide for Mauritius TradeNet Phase 3 Bank System
Release 1.0 August 2001
User maintenance
This option allows you to manage the profile of all users of the
TN3 Bank System. You can create, update and delete users’
profiles, provided that your system administrator gives you the
appropriate access rights.
Create a new profile
1.
1.
2.
3.
To create a new user profile, Click on the
button.
If user logged in as System
Administrator, he will have access to
all the functions.
If user type ‘AD’ (Administrator)
users log in, (excluding System
Administrator), the user will not be
given rights to create and delete user
profiles.
If user type ‘GE’ (General User) users
log in, the profile for the user would
be shown immediately. All fields are
disabled for a ‘GE’ user and no
changes can be made in the access
rights lists.
Figure 7.3 User Maintenance main screen
Giving user access rights
2.
Click on the
button to continue. You will see that the
Menu Items button is enabled.
1.
Click on the
button.
A table showing all available menu items in the TN3 Bank
System is displayed. The access rights column is initially
all set to ‘Y’. Please refer to Fig 7.5.
2.
To change, double click on the same row and the “Y” will
change to “N” and vice versa.
3.
Finally you MUST click on the
button to save or
else no rights would be given to the user.
Giving Menu Items access rights to the user
means that the user can activate the particular
program from the main menu. If the user has no
access rights to the item, it is disabled in the
Main Menu.
Figure 7.5 Menu Items Access Rights screen
Mauritius Network Services Pte Ltd
Page 7-3
User Guide for Mauritius TradeNet Phase 3 Bank System
Updating a user profile
1.
Release 1.0 August 2001
Click on the
button.
A table of existing users is shown. Refer to Fig 7.6.
Figure 7.6 List of users
2.
To modify a profile, select a row from the table and click
on the
3.
Reset, Revoke and Resume User
profile
None
Reset
Revoke
Resume
button.
You can now change the user’s information and the access
rights from the User Maintenance main screen.
In situations where a particular user could not recall his
password or there is a need to disable a user from logging into
the System. You can use the different actions available in the
Action list box to perform the task.
– No change, select this when
updating other user’s information
– To reset the user password
– To prevent the user from logging
into the System
– To allow the user to log into the
System again
Only the System Administrator is able to
perform this update. General users will not be
able to select from this List box.
Figure 7.7 Action list box
1.
.
2.
3.
Mauritius Network Services Pte Ltd
Retrieve a user’s profile using the
button.
From the Action List box,
Select “Reset User ID” to reset the password.
OR Select “Revoke User ID” to disable the login.
OR Select “Resume User ID” to allow the user to login
again.
Click on the
button to save.
Page 7-4
User Guide for Mauritius TradeNet Phase 3 Bank System
1.
Release 1.0 August 2001
To delete user profile, you can either select one or more
Deleting user profile
rows from the table and click on the
button.
2.
The deleted users will not be able to login to TN3 Bank
System.
1.
To print user profile, you can either select one or more rows
Printing user profile
from the table and click on the
Mauritius Network Services Pte Ltd
button.
Page 7-5
User Guide for Mauritius TradeNet Phase 3 Bank System
Release 1.0 August 2001
This option allows you to manage your login password.
Password Management
Figure 7.8 Password Management dialog
Mauritius Network Services Pte Ltd
1.
Enter your old password in the first field.
2.
Enter your new password in the second and third field
provided. The two new passwords entered must be the
same.
3.
Click on the <OK> button to update the new password.
Page 7-6
User Guide for Mauritius TradeNet Phase 3 Bank System
System Setting
Release 1.0 August 2001
This option allows you to update the System Settings for your
company. You will be able to change the address, telephone &
fax number.
Mailbox settings are not editable
Figure 7.9 System Setting screen
1.
Mauritius Network Services Pte Ltd
Click on the <Exit> button.
If you had made any changes, you will be asked to save
them.
Page 7-7
User Guide for Mauritius TradeNet Phase 3 Bank System
Release 1.0 August 2001
Chapter 8 Reports
Introduction
This chapter will guide you through the necessary steps to print
the different types of reports.
NB : Refer to APPENDIX A for explanation on report preview window usage.
Select this option to print a report of all received messages.
Messages Received
1.
The date range will be default to current date.
Enter the date range to print. Please refer to Fig 8.3.
2.
Next, select the type of message that you want to print.
If you do not select any item from the message type list
box. A complete list of all types of messages that are
received within the date range will be printed.
.
Figure 8.3 Report option dialog (Messages Received)
3.
Click on the Preview or Print button to continue.
Select this option to print the audit trail for the system.
Audit Trail
Mauritius Network Services Pte Ltd
1.
The date range will be default to current date.
Enter the date range to print. Please refer to Fig 8.4.
2.
Next, select the User ID that you want to print.
If you do not select any item from the User ID list box. A
complete list of audit trail records for all users that are
within the date range will be printed
Page 8-8
User Guide for Mauritius TradeNet Phase 3 Bank System
Release 1.0 August 2001
Figure 8.4 Report option dialog (Audit Trail)
3.
Mauritius Network Services Pte Ltd
Click on the Preview or Print button to continue.
Page 8-9
User Guide for Mauritius TradeNet Phase 3 Bank System
Release 1.0 August 2001
Select this option to print out the error log.
Error Log
1.
Select a log entry from the list box. Please refer to Fig 8.5.
2.
Click on the Preview or Print button to continue.
Figure 8.5 Error Log file listing
.
Mauritius Network Services Pte Ltd
Page 8-10
User Guide for Mauritius TradeNet Phase 3 Bank System
Electronic Payment Instruction
Register
By choosing Debit Date, you cannot select
Group by or the Batch No.
The From and To Dates are Mandatory.
Release 1.0 August 2001
Select this option to print out the Electronic Payment
Instructions that you have received. You can dispatch this report
to the relevant parties or branches to process the Payment
Instructions. The records can be searched based on Debit Date
or Receive Date.
1.
Choose Debit date or Receive date. The From Date in the
Printing Range will be defaulted to the earliest date which
Payment Instructions have not been printed.
2.
To print all Payment Instructions for the entered date range,
you need not enter the Batch Number.
Figure 8.6 Print PI Register option dialog
Mauritius Network Services Pte Ltd
3.
Select the PI Print Status.
• Not Printed – those that were not printed previously.
• Re-print – those were printed previously.
• All – all will be printed.
4.
Next, if Date chosen is Receive Date, select how you want
the sort order of the report.
• By Branch Name or Batch No.
1.
Click on <Populate Table> button to populate the table with
the records which satisfies your search criteria.
2.
Finally click on the
button to print.
Page 8-11
User Guide for Mauritius TradeNet Phase 3 Bank System
Credit Statement Entry
Release 1.0 August 2001
Select this option to print out both the Electronic and NonElectronic Credit Statement entries. You can use this report as a
checklist to proofread the accuracy of the Credit Statement
entries before you send them to the Inland Revenue.
To perform a search on the displayed records,
select the search by option, send status and type
in the search text.
.
Figure 8.7 Print Credit Statement Entry dialog
Mauritius Network Services Pte Ltd
1.
All records shown will be printed.
2.
Click on the
3.
After previewing or printing, you will be returned to the
Main Menu.
button to print.
Page 8-12
APPENDIX A
Report Preview Screen
Command Buttons of the Report Preview screen
Action
Buttons
Click on the ZOOM button to view the report layout before
printing.
ZOOM
Click on the PRINT button to print the report in preview.
PRINT
Click on this button to view the first page of the report.
FIRST PAGE
Click on this button to view the previous page of the report.
PREVIOUS PAGE
Click on this to view the next page of the report.
NEXT PAGE
Click on this to view the last page of the report.
LAST PAGE
To Print From Report Preview
•
•
Click on the PRINT button to print the report in preview. By
default, all the pages in the report are printed once on the
default printer. However, the user may change the printer and
can also select pages and number of copies. The report is
usually printed in a hardcopy.
If ‘Print to File’ is selected, the report will be printed to a file.
Print Option from the Report Preview
January 2005
TN3 Bank FE - Payment Instructions ASCII file
Line
1
2
Contents
H yyyymmdd hh:mm:ss nnn yyyymmdd hh:mm:ss
D Branch Name----35-----------------x yyyymmdd AC----20-----------x Payer Name-------70-----------------------------------------------------------x 999999999999999
Sender MB-------x yymmddnnnnncccccccc yyyymmdd hh:mm:ss 999
3
4
n
n+1
:
:
:
:
H yyyymmdd hh:mm:ss nnn yyyymmdd hh:mm:ss
D Branch Name----35-----------------x yyyymmdd AC----20-----------x Payer Name-------70-----------------------------------------------------------x 999999999999999
Sender MB-------x yymmddnnnnncccccccc yyyymmdd hh:mm:ss 999
:
D Branch Name----35-----------------x yyyymmdd AC----20-----------x Payer Name-------70-----------------------------------------------------------x 999999999999999
Sender MB-------x yymmddnnnnncccccccc yyyymmdd hh:mm:ss 999
:
:
Line 1
‘H’
PI Received Date
PI Received Time
Batch No
Export Date
Export Time
1
3
12
21
25
34
1
8
8
3
8
8
1
3
39
48
69
140
156
174
198
207
216
1
35
8
20
70
15
17
23
8
8
3
Format / Remarks
‘H’
yyyymmdd
hh:mm:ss
system date
system time
Line 2
‘D’
Branch Name
Debit Date
A/C No
Payer Name
Debit Amt
Sender Mailbox
Sender’s Job No
PI Sent Date
PI Sent Time
Serial No
Mauritius Network Services Ltd
Format / Remarks
‘D’
yyyymmdd
yyyymmdd
hh:mm:ss
Payment Serial
Page 1


![[December] [2010] Oracle Part Number E51712-01](http://vs1.manualzilla.com/store/data/005705420_1-4b383e67b8ec6628c44005398bb7935f-150x150.png)