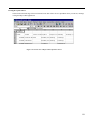
1
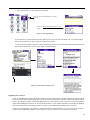
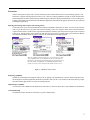
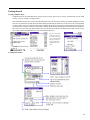
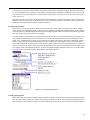
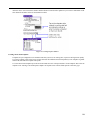
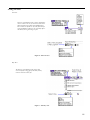
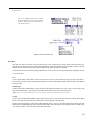
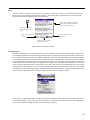
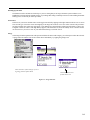
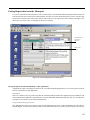
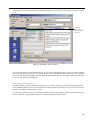
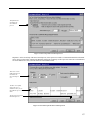
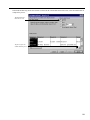
U S E R’ S
G U I D E
AllTime
Copyright ©2003 iambic. All rights reserved. Reproduction, adaptation, or translation of
this manual is prohibited without prior written permission of iambic Software, except as
allowed under copyright laws. iambic is a registered trademarks of iambic Software. The
following are trademarks or registered trademarks of Palm, Inc.: Graffiti, Palm Computing, Palm, and Palm OS. All other product names used in this document are trademarks or registered trademarks of their respective owners. All names of persons and
companies contained herein are fictitious and have been designed solely for use in documenting iambic products.
iambic, Inc.
Sunnyvale, CA
April 2003
Welcome to AllTime for the Palm Computing Platform ................. 4
Getting Started .................................................................................. 5
System Requirements..................................................................................................
What’s on the CDROM or What did I Download?.....................................................
Installing AllTime to Your Handheld Device.............................................................
Upgrading from version 3 ...........................................................................................
5
5
5
6
Overview ............................................................................................ 7
Entering and Viewing Time, Expense and Autolog entries........................................
Reporting capabilities .................................................................................................
Import/Export capability.............................................................................................
Automatic Backup ......................................................................................................
7
7
7
7
Getting Started .................................................................................. 8
Creating validation items ............................................................................................
Creating Time Entries .................................................................................................
Creating Expense Entries............................................................................................
Creating Autolog Entries ............................................................................................
Viewing your entries...................................................................................................
Rate Rule.....................................................................................................................
Notes ...........................................................................................................................
Creating Reports .........................................................................................................
Backing up your data ..................................................................................................
Preferences..................................................................................................................
Purge ...........................................................................................................................
8
8
9
9
11
12
13
13
14
14
14
Getting Report data from the Memopad .......................................... 15
Moving the Report from the Palm Desktop to other applications .............................. 15
Viewing the report in Excel ........................................................................................ 19
Appendix ............................................................................................ 20
Tips for Leveraging the Palm Device ......................................................................... 20
ii
Welcome to AllTime for the Palm Computing Platform
Thank you for choosing AllTime!
AllTime is optimized to track time and expenses quickly and easily for maximum profitability. AllTime is perfect for the
professional, business person, or anyone else who needs to keep track of his or her time, expenses, and mileage.
AllTime is designed for superfast capture of time and expenses as they occur. Later you can use the reports feature to output
your data to the memopad application or TinySheet which can synchronize with Excel on Windows PCs
You now have the power to organize your busy life and more efficiently keep track of your time and expenses!
iambic strives to make the best business tools possible for the Palm Computing platform. We welcome your suggestions and
comments. You can give us your feedback at http://www.iambic.com/support. If you enjoy the program, please refer us to
your friends and associates. In addition, please take the time to try out our many other iambic solutions for the Palm
Computing platform.
Special offer
AllTime is a member of the TimeReporter time and expense tracking suite of solutions for the Palm Computing connected
organizer. Your purchase of AllTime comes with an anytime, full trade- in guarantee. If at any time in the future you would
like to trade it in for one of the other TimeReporter solutions, iambic will give you credit for the full retail value of AllTime
towards your new purchase. Available from iambic Software are TimeReporter for the Palm Computing Platform which
includes a complete desktop Windows application, synchronization functionality, multi-user capability, enterprise level
scalability and configurability. We also have TimeReporter for Timeslips, the direct synchronization solution for Timeslips
users.
For the latest news and updates on this application and others, please visit our website at http://www.iambic.com.
4
Getting Started
System Requirements
Palm Computing Connected Organizer
AllTime will run on all Palm OS Devices running Palm OS 3.5 or higher
AllTime requires 281 KB of space on your handheld device. Plus additional space will be needed for your data which can
vary depending on the amount of data you enter.
Personal Computer
AllTime can be loaded onto a handheld device from any personal computer that has the Palm Install Tool or equivelant.
Because AllTime uses the Palm device Memopad to transfer report data to a PC, the only requirement to transfer data to the
PC is the Palm Desktop program which comes with the Palm device or for Macintosh users, that comes with the MacPac.
What’s on the CDROM or What did I Download?
AllTime
1. The AllTime application (AllTime.prc) for your Palm
2. The AllTime user manual (this file)
Demos of Other iambic products for the Handheld Device
Also included on the CDROM are full working demo versions of TimeReporter for the Palm Computing Platform (with
TimeReporter for Windows), TimeReporter for Timeslips, SalesWarrior, and Agendus. The demo license keys needed to
try these applications can be requested the webpage for that product at http://www.iambic.com
Installing AllTime to Your Handheld Device
Macintosh
1. From the Palm menu-bar icon, select HotSync Manager
2. Under the HotSync menu, select Install
3. Click on Add to List
4. Find the AllTime.prc file.
Windows
1. Launch the Palm Install Tool by tapping on Start | Programs | Palm Desktop | Palm Install Tool.
2. Choose your Palm device User name from the drop down list of the install tool. The install tool will queue the application for installation to your handheld device on the next hotsync. If you are not sure of your Palm device User name,
tap the HotSync icon on your Palm device. A screen will appear which says, “Welcome, ‘name’”. This is the name
which must appear in the User Name field of the Install Tool. If the correct name is not one of the choices on the drop
down list, then you will need to first HotSync the handheld device to establish the name on the User Name list.
3. Select the AllTime.prc. Use the Add (browse) button in the install tool to locate this file on the CDROM or your
download folder. Choose the file and click the Install button.
4. Place your Palm Computing connected organizer in the cradle and press the HotSync button.
5
5. Tap on the AllTime icon. You should see the AllTime.
After you have installed AllTime you will see
this icon.
Enter your name and default hourly rate you
charge.
Figure 1. Starting AllTime
6. You will now be presented with a user name and user rate screen. The rate is the hourly rate you typically charge,
other more specific rates by clients, projects or tasks can be set later.
7. Enter the code. Tap Menu > Options > About > Purchasing > Enter Code as shown in the figure below then enter the
demo code or unlock code you received via email or with the package...
Figure 2. Entering the AllTime code
Upgrading from version 3
If you are upgrading from version 3, then when running version 4 for the first time you will be asked if you want to Import
& Convert. If you do not import this data now you can do so later from the Menu | Options | Import from AllTime 3 menu
choice. All of the time, expense, autolog and validation entries will be imported. Note: version 3 let you write in validation
items without adding them to the list, in version 4 all items must be in the validation list. Due to this change all validation
items used on time, expense and autolog entries in version 3 will be added to the validation lists of version 4.
Version 4 is a paid upgrade, your AllTime v3 unlock code will be imported and allow you to use version 4 for 15 days so
you have time to purchase the upgrade. Also note that the reporting capability is now integrated into AllTime.
6
Overview
AllTime is designed to capture time, expense and autolog entries which can then later be used for billing purposes, reimbursement, or general tracking purposes for later review. There are reporting capabilities to help you export the data to the
palm memopad or TinySheet (sold separately) which integrates with Excel during synchronization. If you are looking for a
solution with automatic synchronization with a Windows application and seamless integration check out our more advanced
TimeReporter application.
Entering and Viewing Time, Expense and Autolog entries
Use the time entry form to record information about what you did and how much time you spent. You can view all your time
entries or just the entries for a given time interval in the summary report view. Expenses entries can be created to track the
expenses incurred, this is useful because expenses that might have otherwise gone unreported or forgetten can be captured
as they occur. Autolog entries can be captured as well, these are a special type of expense where you can enter the distance
travelled and information about the purpose of the trip for reimbursement or billing purposes..
Here are completed entries of each type. New clients, projects, and
other validation items can be added on the fly or you can pick one
from the list. If you tap in the field and enter a few letters the rest of
the name will be auto-filled for you. Additional fields and values
specific to an entry can be entered on the details or notes screen.
Figure 3. The three entry screens
Reporting capabilities
The Reports functionality also integrates with your PC by putting your individual time, expense, and auto log entries into
the memopad or TinySheet application which then synchronize with your PC. You can then use these files directly, import
them into another application or save them for backup purposes.
Import/Export capability
You can turn events scheduled in the datebook into time entries or turn time entries into events scheduled in the datebook.
Automatic Backup
The databases used in AllTime are backed up to your PC during hotsync.
7
Getting Started
Creating validation items
Validation items are the individual clients, projects, tasks, accounts, payees, types, vehicles, currencies that you use when
creating your time, expense or autolog entries.
Each validation item has some of all of the following fields. The code is used for entering an optional alphanumeric code.
The rate is for the hourly rate that this client will be charged if billed by the client rate. The rate rule is for selecting which,
of many possible rates, is to be used on time entries with this client. If one rate is always used for this client then you can
set the rate rule to CLIENT, otherwise if this client is billed at different rates depending on the task then select TASK to be
the rate rule. On each time entry in the details screen you can always edit the rate for that particular entry. See the section
later in this manual called Rate Rule for more information on this topic.
Tap on a client name
to edit it or tap New
to create a New Client. Use the control in
the upper right corner to select which
validation list you
want.
Creating Time Entries
8
Use the time entry form to record information about what you did and how much time you spent. Tap on the field name to
see a list of validation items of that type or start writing in a name and the rest will be auto-filled for you.You can view all
your time entries or just the entries for a given time interval in the list, day or cross tab view. To edit a time entry tap on it
in any of the views
Time entries can also be created by importing meetings from the datebook, to do this tap on Menu | Options | Import from
Datebook. Then put a check next to each meeting you want to import then tap Import. Time entries can be exported to the
Datebook as well with the Menu | Options | Export to Datebook.
Creating Expense Entries
Expense entries are used for capturing expenses that you incur in the course of doing your work such as travel, lodging,
meals, parking, fuel, entertaining clients, etc. These can be recorded along with all of the related information as the expenses
occur, this can be very helpful because the details can be recorded at the time which can be much easier than trying to back
track later to make sure you accounted for everything.
The fields unique to expense entries are the currency selector, this is where you can select which currency you paid in if you
want AllTime to handle the currency conversion for you. You can add or edit the currency list and exchange rates in the
Menu | View | Validation Lists | Currency screen. The line to the right of the currency selecter is for entering the expense
amount. The quantity field can be used if multiple items were purchased for the same price. In the details screen the is a
reciept and reimbursable checkbox which you can check if it applies. Split expenses are also supported, this is a feature in
which you can create one expense entry that has items with different types. This can be useful for a hotel bill which could
have lodging, meals, entertainment, phone bills, etc and is all combined together and paid to one payee. To use this feature
tap on the line for type then tap on the icon that appears to the right of that line.
Figure 4. Creating Expense Entries
Creating Autolog Entries
Entries of this type are useful for tracking the distance travelled, if using a personal car for business this is helpful in keeping
track the exact number of miles for reimbursement. If using a company car this can still be useful for tracking purposes to
know the purposes the vehicles are being used for. The fields unique to this type of entry are the distance and start and end
9
odometer values. You can enter the distance and the odometer controls will be updated or you can use a combination of the
start odometer and miles field to set the distance travelled.
Figure 5. Creating Expense Entries
Creating entries from templates
Templates are pre-configured sets of validation items that you can use to creating time, expense or autolog entries quickly.
To create a template you’ll need to create a entries that uses the validation items then tap Menu | Create Template or graffiti
shortcut W, then name the template and tap OK.
To create entries from templates tap on the New button and select one of the options that is “from Template” then select the
template. Note: Autolog, Time and Expense templates are separate since each has fields specific to that entry type.
10
Viewing your entries
List View
This view is available for time, expense and autolog
entries. It shows one row for each entry and can be
filtered by date range and/or and validation item.
You can also sort by date or any other field. The filtering capabilities of this view are especially important when you are generating a report.
Figure 6. The List View
Day View
The day view is available for time entries, this
view is useful for seeing gaps of time that you may
need to create time entries for.
Figure 7. The Day view
11
Cross-Tab view
This view is available for time entries, it shows
the the totals of time entries for the selected day
and week. And also shows overall totals for the
current day and week.
Figure 8. The Cross-Tab view
Rate Rule
Each time you create a new client, you can set the rate rule to user, client/project or activity. After a rate rule has been set,
the next time you create a time entry, alltime will automatically use the rate rule that you specified. Rates, per hour, are then
multiplied by the amount of time enteres and are applied to the particular client for reporting.
To edit the rate rule for current clients, tap the Menu button | View | Client List. Next tap on the client to change the rate rule.
Using the Rate Rule
User
Create a client called “Coffee House”, and set the rate rule to user. Next, create a time entry of any type for Coffee House.
The user rate you entered when you first installed AllTime, or entered at the Menu | Options | Edit User Info will be applied
to the time entry.
Client/Project
Create a Client called “Donut House”, set the rate rule to Client/Project and enter a rate. Next, create a new time entry with
the Client “Donut House”. This entry will now reflect the rate that you just entered for the rate rule.
Note: In the case of the Client/Project rate rule, projects with rates will always take precidence.
Activity
Create a new client called “Bagel House” and set the rate rule to activity. Next, create a new time entry with the client “Bagel
House” and select an activity. The rate for this activity will be applied to this time entry
Tap the time span on the entry (which is the field immediately below “Activity”) to bring up the Set Time picker. Pick start
and end times by highlighting the start time and end time button. The pop-up choices let you adjust time in 5 minute intervals. Select No Time, if you don’t need to track this information.
12
Notes
The Notes field is an 4 kilobyte text field where you can enter notes that are too long to fit in the 255 character purpose
fields. Notes can more fully describe and identify the entry. The Notes field is an excellent place to use text shortcuts.
Tapping the Note button expands the note area to full screen.
Time, Expense & Auto log entries
have a notes field that is limited
only by the system memory
Click this icon on the
slip to bring up a notes
view
Done accepts and closes
the note
Increase or decrease the
font size here
Delete the note text only,
not the entire entry
Figure 9. Notes section of an entry.
Creating Reports
The Reports functionality is for exporting your time, expense and autolog entries to other programs. While in the List view
you can apply whichever filters then tap Menu | Options | Reports or graffiti shortcut M to open the Report creation screen.
Here you can select the type of report, if TinySheet is installed you can select it the other option is the memopad. TinySheet
is a spreadsheet application for your Palm that is developed by iambic. This application can synchronize directly with MS
Excel on a Windows PC. In this Reports screen you can title the report, select the format, and include headers. The headers
are the labels for each field. Note: There is an additional filter on this screen, the Include filter which lets you select if you
want to report only unreported entries, reported entries or all entries. The action field is for marking the entries as reported
or deleting them or leaving them as is. If you choose to send the report data to the memopad the report may need to be split
in multiple pieces since the memopad hotsync conduit is limited to memos of 4 kilobytes. Using the TinySheet option is one
way to put all the report data in one file without having to piece the data back together on the PC.
Figure 10. Reports Screen
If you choose to send the Report data to TinySheet then on the next hotsync the data will be in an Excel file on your PC, see
the TinySheet Manager on your PC for the location of the file. If you choose to send the report data to the memopad then
see the section labelled Getting Report Data from the Memopad on page 15.
13
Backing up your data
The databases used in AllTime are backed up to your PC during hotsync as long as the Palm system conduit is set to
Handheld Overwrites Desktop (default setting). If you change this setting to Desktop Overwrites or Do Nothing the normal
backup process of the hotsync will be prevented.
Preferences
In this screen you can set whether timers can be toggled on and off by tapping on the right column in the list view. You can
also set what type of record to create when tapping on an empty line in the list view. New in this version is the preference
for high resolution, this option will only appear if your Palm device supports high resolution or high density (ie Sony Clie,
Tungsten or other OS 5 device with high density support). This allows the list, cross-tab and day views to fit more entries
on each screen so you can see more of your data without having to scroll the screen.
Purge
Select Purge from the Options menu. This option will delete all entries in the category you selected prior to the date selected.
A purge cannot be undone You can also delete entries individually, by tapping the garbage icon.
Delete all entries by date and type by selecting Purge from the Options Menu
Delete individual entries
from the delete icon
Figure 11. Purge function.
14
Getting Report data from the Memopad
To view the report that transferred to the PC after your last hotsync, open the Palm desktop and tap the Memo button icon
at the far left of the screen. This accesses the Palm memo list. This is a list of all the memos/reports you have. Tap the report
memo that you created on the memo pad list and you will be able to see the report in the memo window to the right. If you
did not give your report a title, it will appear on the list as “Untitled”
.
The data in the
report is in
this view.
Here is our
report
Figure 12. Palm desktop-Memo list with Reports
.
Moving the Report from the Palm Desktop to other applications
Admittedly the report is not going to be much use to you in the Palm Desktop application, so you need to get the report out
and into a spreadsheet or other application.
Spreadsheets
There are a number of ways to get the report data out of the Palm desktop and into other applications like spreadsheets. The
easiest and most direct approach is described below. You may find another method that you prefer; however, if the data does
not appear as you expect it try the method detailed below.
Using the Palm desktop Export feature
First, highlight the report icon you want to export from the Palm Memo list. Next, on the Palm desktop File menu, tap File,
and then Export. You will then be presented with a screen which states that you can only export non-private records. Tap
15
OK and proceed. You will be presented with a dialog box asking you for a file name, and for where you want to save the
file to.
Access the
Export dropdown menu from
this screen.
Figure 13. Choosing to export a report
Note: You can save the file in four different formats. You can save it in Memopad Archive (*.mpa), as a comma separated
file, as a tab separated file, or as a text file. Save the file in as a text file. In addition, make sure the range is set to currently
selected records. Tap the Export Button. This will export the data from the report into a file which you have just named and
to a place where you have just designated.
Saving and opening the report in Excel
Find the report that you just exported and saved on your PC or network. Open up Microsoft Excel and then open up the
report with Microsoft Excel. If you can not locate the file in Microsoft Excel, then change the “Files of Type” that you are
looking for from Microsoft Excel Files to all Files.
If you saved the report in a text file, you will then be presented with the Microsoft Excel wizard, when attempting to open
up and view the file. Choose Delimited file for the first step of the Microsoft Excel wizard.
16
This field must be
checked in the
Excel Wizard
process.
Figure 14. First step in Excel wizard process.
Important: In the second step of the Excel wizard process, if the report was created as a Comma Delimited file on the Palm
device, then you must check comma in the Delimiter field in the second step. If the report was created as a Tab Delimited
file on the Palm device, then you must check tab in the Delimiter field.
This is the second
field which must be
checked in the
Excel wizard process.
You have successfully
chosen the correct
delimiters when you see
the fields line up in columns
Tap Next to proceed with
the Wizard process
Figure 15. Second step in the Excel wizard process
17
In the third and final step, make sure General is selected in the Column data format field. Next, select the Finish button to
complete the process.
This field must have
General selected.
Tap Next to proceed
with the Wizard process
18
Viewing the report in Excel
Select Finish in the final stage of the Excel Wizard. Your data will now be in a spreadsheet where you can sort, rearrange
or drag and drop to other applications.
Figure 16. Partial view of Report Data Opened in Excel
19
Appendix
Tips for Leveraging the Palm Device
The Palm device has several capabilities that are not well-known. These capabilities are so useful in increasing your productivity, we mention them below.
Mapping the AllTime Applications to Palm Device Buttons
The four tactile buttons at the base of the handheld device, as well as, the silk-screened calculator button, can be customized
to map to the application of your choice. You may want to reconfigure one of the Palm device buttons to open an AllTime
application instead of a Palm device application.
To reconfigure the Palm device buttons, open the “Prefs” application from the Launcher and select “Buttons” from the top
right drop-down list. In the next screen, tap the downward pointing triangle next to the button you wish to change. From the
list which will appear, tap the application that you want to access by pressing the button. If you choose to customize a button,
the original application is still available from the Launcher application.
Try reconfiguring the handheld device buttons. If you change your mind at a later time, you can always restore them to the
original configuration.
Using the Text Shortcuts
If you find yourself using the same phrases and word combinations over and over again, as frequently happens when you
meet with one particular client, perform one particular service or incur one particular type of expense, you may want to
create a text shortcut for commonly used phrases. For example, if you perform a great deal of research, you may want the
letter “r” to represent and write the word “research” on your handheld device.
To do this, select the “Prefs” application from the launcher and choose “Shortcuts” from the right corner drop-down list.
Use the new button to add a new shortcut. Pick a series of letters that you will remember to represent that phrase. To invoke
the shortcut, make a fish on its tail symbol in the graffiti box at the bottom of the handheld device. The handheld device will
recognize the shortcut and replace the shortcut letter or letters with the phrase that the shortcut represents.
Please note that the first recognized shortcut will be executed. If you have a one letter shortcut that begins with a “m”, and
a two letter shortcut that begins with the letter “m”, then the two letter shortcut will never be executed. This is because the
one letter shortcut will always be executed first.
20
C
code 8
D
Deleting entries 14
E
Excel
Saving and opening
Reports 16
Wizard process 17
Export
From Palm desktop
Reports 15
Reports 16
Reports to text file 16
N
Notes 13
Entries 13
P
Palm Desktop Export feature
Reports 15
Palm device buttons 20
Purge 14
R
Rate Rule 12, 14
Edit 12
Reports
Palm desktop Export
feature 15
Save as a comma separated file 16
Save as a tab separated file 16
save as a text file 16
Saving and opening
in Excel 16
Requirements
System 5
S
Shortcuts
Palm device 20
Stopwatch
Described 13
Restarting 13
System Requirements 5
T
Templates 10
Timer
Described 13
TimeReporter 4
single day view 7, 8
time slips 7, 8
TimeReporter module
ExpenseDirector
module
Reports module 5
TinySheet 13
U
Untitled 15
Use 7
V
Validation items 8