1
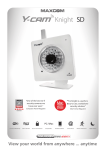
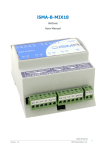
User Manual GSM Mobile Telephone Maxcom mm822 2 For technical assistance is please call the hotline at: (+48) 32 325 07 00 or email: [email protected] Our website: http://www.maxcom.pl/ Your Package Contains: Mobile Telephone GSM Charger (travel adapter) Battery User Manual Warranty Card Headphones set Desk Adapter Keeping the package is highly recommended as it might be useful for transport. Keeping the receipt is necessary to use the warranty. Please note – the telephone works in GSM 900/1800 network. Insert a SIM card prior to switching on your phone. 3 GSM 900/1800 Mobile Telephone Big Illuminated Keypad Colorful Display Camera MicroSD Card Slot Emergency Key (Emits emergency sound, makes automatic calls, and send text messages to previously assigned numbers) Big fonts, Easy Menu Speakerphone Contacts -100 Entries Sending & Receiving Text Messages Speed Dial up to 7 Numbers Call Duration Display Loud Ringtone Bluetooth Radio FM Flashlight/torch Calculator Alarm clock Battery 800 mAh Idle time up to 260 hours* Conversation time up to 7 hours* Earpiece weight:100g *depending on conditions and signal strength of the GSM network 4 Table of Contents 1. Important safety precautions Błąd! Nie zdefiniowano zakładki. 2. Getting started ..................... Błąd! Nie zdefiniowano zakładki. 2.1 SIM Card and Battery Installation ..... Błąd! Nie zdefiniowano zakładki. 2.2 Charging the Battery ......... Błąd! Nie zdefiniowano zakładki. 2.2.1 Desk Adapter (optional) ....................................................12 2.3 Low Battery Message ....... Błąd! Nie zdefiniowano zakładki. 3. Keys .................................... Błąd! Nie zdefiniowano zakładki. 4. Using your phone................. Błąd! Nie zdefiniowano zakładki. 4.1 Switching on Your Phone.. Błąd! Nie zdefiniowano zakładki. 4.2 Switching off Your Phone.. Błąd! Nie zdefiniowano zakładki. 4.3 Idle Mode.......................... Błąd! Nie zdefiniowano zakładki. 5. MENU .....................................................................................22 6. Contacts .............................. Błąd! Nie zdefiniowano zakładki. 6.1 Saving Contacts ............... Błąd! Nie zdefiniowano zakładki. 6.2 Viewing Contacts .............. Błąd! Nie zdefiniowano zakładki. 6.3 Deleting Contacts ................................................................24 6.3.1 How to Delete a Single Contact ..... Błąd! Nie zdefiniowano zakładki. 6.3.2 How to Delete Multiple Contacts .... Błąd! Nie zdefiniowano zakładki. 6.3.3 How to Delete All ContactsBłąd! Nie zdefiniowano zakładki. 6.4 Copying Contacts ............. Błąd! Nie zdefiniowano zakładki. 6.4.1 How to Copy a Single ContactBłąd! Nie zdefiniowano zakładki. 6.4.2 How to Copy Multiple Contacts ...... Błąd! Nie zdefiniowano zakładki. 6.5 Transfering Contacts ........ Błąd! Nie zdefiniowano zakładki. 6.6 Mark Multiple .................... Błąd! Nie zdefiniowano zakładki. 6.7 Contacts Settings ............. Błąd! Nie zdefiniowano zakładki. 6.7.1 Speed Dialing ................ Błąd! Nie zdefiniowano zakładki. 6.7.2 Addiditonal Numbers ..... Błąd! Nie zdefiniowano zakładki. 6.7.3 Memory Level ................ Błąd! Nie zdefiniowano zakładki. 7. Calling ................................. Błąd! Nie zdefiniowano zakładki. 7.1 Direct Dialing .................... Błąd! Nie zdefiniowano zakładki. 7.2 Making a Call from ContactsBłąd! Nie zdefiniowano zakładki. 7.3 Redialing the Last Number Błąd! Nie zdefiniowano zakładki. 7.4 Speed Dialing ................... Błąd! Nie zdefiniowano zakładki. 5 7.5 Adjusting the Call Volume . Błąd! Nie zdefiniowano zakładki. 7.6 Options during a CAll ........ Błąd! Nie zdefiniowano zakładki. 7.7 In Case of Emergency (ICE) keyBłąd! Nie zdefiniowano zakładki. 7.8 Emergency Calls .............. Błąd! Nie zdefiniowano zakładki. 7.8.1 Emergency Contacts ..... Błąd! Nie zdefiniowano zakładki. 7.8.2 Information about the UserBłąd! Nie zdefiniowano zakładki. 7.8.3 Emergency Text MessageBłąd! Nie zdefiniowano zakładki. 7.8.4 Deactivating Emergency ModeBłąd! Nie zdefiniowano zakładki. 7.8.5 Emergency Message ..... Błąd! Nie zdefiniowano zakładki. 7.8.6 Emergency Key ............. Błąd! Nie zdefiniowano zakładki. 7.9 Receiving Calls ................. Błąd! Nie zdefiniowano zakładki. 8. Call log ................................ Błąd! Nie zdefiniowano zakładki. 9. Text message (SMS) and Multimedia (MMS) MessagesBłąd! Nie zdefiniowano zakładki. 9.1 Creating and Sending Text MessagesBłąd! Nie zdefiniowano zakładki. 9.2 Reading and Replying to Text Messages Błąd! Nie zdefiniowano zakładki. 9.3 Text message Boxes ........ Błąd! Nie zdefiniowano zakładki. 9.3.1 Inbox ............................. Błąd! Nie zdefiniowano zakładki. 9.3.2 Sent messages .............. Błąd! Nie zdefiniowano zakładki. 9.3.3 Drafts................................................................................37 9.3.4 Outbox........................... Błąd! Nie zdefiniowano zakładki. 9.4 Deleting Messages ........... Błąd! Nie zdefiniowano zakładki. 9.5 Message Settings ............. Błąd! Nie zdefiniowano zakładki. 9.5.1 Text Message ................ Błąd! Nie zdefiniowano zakładki. 9.5.2 Multimedia Message ...... Błąd! Nie zdefiniowano zakładki. 9.6 Voicemail .......................... Błąd! Nie zdefiniowano zakładki. 10. Additional Features .............. Błąd! Nie zdefiniowano zakładki. 10.1 Calendar ........................... Błąd! Nie zdefiniowano zakładki. 10.2 Calculator ......................... Błąd! Nie zdefiniowano zakładki. 10.3 Alarm Clock .........................................................................41 10.4 Torch ................................ Błąd! Nie zdefiniowano zakładki. 10.5 World Time ....................... Błąd! Nie zdefiniowano zakładki. 10.6 Network Service ............... Błąd! Nie zdefiniowano zakładki. 10.6.1 Wireless Application Protocol (WAP) ................................42 10.6.2 SIM Features ....................................................................42 10.7 File Manager .................... Błąd! Nie zdefiniowano zakładki. 6 11. Camera................................ Błąd! Nie zdefiniowano zakładki. 12. Radio FM ................................................................................45 13. Multimedia ..............................................................................47 13.1 Image Viewer ................... Błąd! Nie zdefiniowano zakładki. 13.2 Video Recorder................. Błąd! Nie zdefiniowano zakładki. 13.3 Video Player ..................... Błąd! Nie zdefiniowano zakładki. 13.4 Audio Player ..................... Błąd! Nie zdefiniowano zakładki. 13.5 Voice Recorder ................. Błąd! Nie zdefiniowano zakładki. 14. Settings ............................... Błąd! Nie zdefiniowano zakładki. 14.1 Profiles ................................................................................49 14.2 Telephone Settings ........... Błąd! Nie zdefiniowano zakładki. 14.2.1 Setting Date and Time ... Błąd! Nie zdefiniowano zakładki. 14.2.2 Language ...................... Błąd! Nie zdefiniowano zakładki. 14.2.3 Display .......................... Błąd! Nie zdefiniowano zakładki. 14.2.4 Flight Mode.................... Błąd! Nie zdefiniowano zakładki. 14.3 Call Settings ..................... Błąd! Nie zdefiniowano zakładki. 14.3.1 Blocking Caller ID .......... Błąd! Nie zdefiniowano zakładki. 14.3.2 Call Waiting ................... Błąd! Nie zdefiniowano zakładki. 14.3.3 Call Forwarding ............. Błąd! Nie zdefiniowano zakładki. 14.3.4 Call Barring.................... Błąd! Nie zdefiniowano zakładki. 14.3.5 Advanced Settings ......... Błąd! Nie zdefiniowano zakładki. 14.4 M1/M2 Memory....................................................................54 14.5 Network Settings .................................................................54 14.6 Connectivity ...................... Błąd! Nie zdefiniowano zakładki. 14.6.1 Bluetooth ..........................................................................55 14.6.2 Access Point Name (APN) Profile .....................................55 14.7 Security Settings ............... Błąd! Nie zdefiniowano zakładki. 14.7.1 PIN.....................................................................................56 14.7.2 Phone Security .............. Błąd! Nie zdefiniowano zakładki. 14.8 Restore Factory Settings .. Błąd! Nie zdefiniowano zakładki. 15. PC Connections ................... Błąd! Nie zdefiniowano zakładki. 16. FAQ (Troubleshooting) ..........................................................57 17. Safety Precautions ............... Błąd! Nie zdefiniowano zakładki. 18. Warranty .............................. Błąd! Nie zdefiniowano zakładki. 19. Battery Information .............. Błąd! Nie zdefiniowano zakładki. 20. SAR information......................................................................63 21. Protecting the Environment .. Błąd! Nie zdefiniowano zakładki. 22. CE Marking .......................... Błąd! Nie zdefiniowano zakładki. 7 8 1. Important Safety Precautions Reading these guidelines minimize the risk of misusing your telephone. Do not use your telephone in all areas where the use of mobile phone is restricted such as at refueling points or hospitals. The use of mobile phones in such places might impose danger to others. Do not switch on your phone if it might interfere with other devices! Do not use your telephone without hands-free accessories while driving. Do not use your telephone in hospitals, airplanes, at refueling points and near flammable materials. Telephone emits electromagnetic field that might negatively interfere with other electronic devices sensitive to external RF energy, including medical equipment. A safe distance between a telephone and implanted medical devices such as a heart pacemaker should be maintained as recommended by manufacturers of medical equipment. Users with implanted devices should read and follow the instructions by manufacturers of implanted medical devices. Users with heart pacemakers should not carry telephones in their front chest pockets and they should hold a telephone next to the ear opposite to the medical device in order to minimize the risk of interference. If they have any reasons to suspect interference with a pacemaker, they should switch off the phone immediately. 9 A device and its accessories might contain small parts. Keep your phone and all parts out of the reach of children. Never repair or try to modify your phone by yourself. Only qualified service is authorized to repair your phone. Use only original Maxcom batteries and chargers. Using any unauthorized accessories could damage your phone or might cause an explosion. LIQUID RESISTANCE – your telephone is not water or liquid resistant. Keep your phone dry. 2. Getting Started Before switching on your phone you need to correctly install the Subscriber Identity Module (SIM) card. Pay close attention not to damage the card while inserting it. Keep SIM cards away from children. 2.1 SIM Card and Battery Installation Before inserting a SIM card, make sure your phone is switched off. The charger should be disconnected as well. In order to insert the SIM card, first follow the written and graphic instructions on how to remove the battery: 10 When your phone is switched off, with your fingernail pull up the battery cover on the right side at the bottom of your phone. Remove the battery by pulling it up with your fingernail from the top side of your phone. Insert the SIM card into the SIM card socket with the metal contacts of the card face into the phone. Make sure the notched corner of the card is positioned downward as well. A memory MicroSD card should be inserted below the SIM card socket. Position the pin to your right, and lift the pin. Insert MicroSD card so the contacts of the MicroSD card touch the phone contacts, close the pin and position the pin back to your left. Be careful while using the memory card, especially while installing and uninstalling it. Some memory cards must be formatted on a PC before the first use. Export the data stored on the card in use to other devices to make backup 11 copies, if you use SD cards! Misuse of the card or other factors might cause damage or loss of data stored on the cards. 2.2 Insert the battery with the contacts +/- face into the phone, After installing the battery put the battery cover back and slightly press the battery against the back of the phone until it clicks into place. Charging the Battery Note: Use only the original Maxcom battery included in the package. Using other batteries could damage your phone; the manufacturer’s warranty does not cover damage of your phone caused by the use of any unauthorized accessories. Never plug in the charger with the back cover open. In order to charge your phone. 1. Plug the charger into a power outlet. 2. Plug the end of the charger into a jack at the left side of your phone. A message about connecting the charger will appear on the display, and the bars in the battery icon will repeatedly fill to show that the battery is charging. 3. When the battery is fully charged, unplug the charger from the power outlet and disconnect it from your phone. The message Fully Charged will 12 appear on the display, and the battery icon will disappear. 2.2.1 Desk Adapter In case of using a desk adapter, first plug the small end of the wall charger into the jack of the desk adapter, and next plug the power adapter into a power outlet. To charge the battery, just position your phone into the desk adapter with the contacts face into the base. Your phone might be either open or closed while charging. If the phone is open, make sure the contacts of the charger touch the contacts of the phone - if the phone moves slightly forward, the charging will discontinue and the desk adapter will just serve as a base. Note: o o o Before connecting the charger, make sure the phone’s battery in correctly installed, Do not remove the battery while charging - doing this could damage your phone, If the battery voltage is too low for your phone to work, you will see the Power-Off message on the display, and your phone will switch off automatically, 13 o If the battery is fully discharged (e.g. due to leaving a torch on) and you plug in the charger, you will wait several minutes before a charging icon will appear. o 2.3 Low Battery Message When the battery is low, your phone will emit a warning tone (if the phone’s current Profile permits warning tones) and display a low battery message. The message „Battery critically low” will appear on your display. You will also see the battery icon on your screen. Recharge the battery to continue using your phone. 14 3. Keys 3 1 2 4 1 Slot for headphones, micro USB, or charger 2 3 4 Torch on/off key Camera Low battery, missed call or unread text message indicator 15 5 8 6 9 7 10 11 14 15 12 13 5 Speaker 11 M2 Memory 6 7 Green receiver M1 Memory 12 13 ICE MENU Alphanumeric keys 16 8 9 10 UP/DOWN key Red receiver/Power key Camera key 14 Volume Up 15 Volume Down 17 16 18 19 16 Contact for charging by the base 17 18 19 Torch Ringtones speaker Emergency key 17 18 Basic Keys Functions: Key Red receiver/power key Green receiver Function Press to return to Idle mode and to end your phone call. Press & hold to switch your phone on and off. Press to make a phone call, in Idle mode press to enter the Call Log, in MENU confirm your selection Klawisze nawigacyjne UP MENU DOWN Contacts 1 2 0 3-9 Press: digit 1 Press & hold: voice mail Press: digit 2 Press & hold: Displaying MENU ICE „Emergency” Digit 0 Press: digits 3 up to 9 Press & hold: activates preprogrammed speed dialing option * Entering symbols: *, +, P, W. For texting: special symbols # Press Change of mode wprowadzania podczas pisania 19 Side keys +/- Klawisze funkcyjne Emergency key Torch Key lock Camera key M1 & M2 memory keys SMS; entering the # key Press & hold: Turning on and off the Silent Profile While calling, press to play the radio and adjust volume, in Idle mode to adjust key volume. Press & hold to mute speakers or maximize key volume, holding + while talking initiates recording of the conversation. Press & hold to turn the emergency procedure: calling and texting the assigned numbers Press & hold while the phone is open to switch the torch on or off. Press to lock the keys in Idle mode. If the keypad is locked, press & hold to unlock the keypad. Press to switch on the camera, take a photo If a contact is not assigned, press to enter your contact. If the contact is assigned press to call your contact. 4. Using Your Phone 20 4.1 Switching on Your Phone Press and hold a red receiver/power key to switch on your phone. If a message asking for a Personal Identification Number (PIN) code appears, you must enter your PIN. You can find the PIN in a SIM card starter kit. Upon entering the code, press the green receiver key to confirm. Warning: If you enter incorrect PIN three times in a raw your SIM card will be locked. You might unlock your card by entering the PIN Unlock Key (PUK) code. Entering incorrect PUK code ten times in a raw will permanently lock the SIM card. When you use your phone with the SIM card for the first time (or after restoring factory settings) you will get a chance to enter the date and time, and to import your contacts from the SIM card to your phone. First, use the keypad to enter the correct time, press the DOWN key, use the keypad to enter the correct date, press the DOWN key, and next press the green receiver key. A message: „Import all from SIM to phone?” will appear. Select YES if you want to import all contacts from the SIM card to your phone’s memory. Otherwise, select NO. 21 4.2 Switching off Your Phone To switch off your phone, press and hold the red receiver/power key. 4.3 Idle Mode If the phone is switched on, but there are no activities, the phone goes into Idle mode. 1 Description of Display 3 2 5 4 6 1. Network signal 2. Icons to indicate functions: Sound only Sound + vibrations Vibrations followed by sound 22 Headphones connected New Text Message New Media Message Vibrations only Mute Alarm active Forward Torch on Missed Phone Call Icons may vary depending on the software installed 3. 4. 5. 6. Keypad Locked Roaming Active * icon also appears in domestic roaming if the subscriber uses the network of another provider Battery level Provider information Time Date 5. MENU To enter MENU press the UP key in Idle mode. To navigate in MENU use the keys UP and DOWN. To confirm the selected option press the green receiver key. To return to the previous MENU (go back) right press the red receiver. To go into Idle mode press and hold the red receiver. 23 6. Contacts 6.1 Saving Contacts There are two ways to save a new contact: 1. You can save the number from the list of missed and received phone calls. In order to do this, press the green receiver key in Idle mode, select the number you want to save and press Options (green receiver). Select Save in Contacts, press the green receiver, and select the location of your contact (either your phone’s memory or the SIM card). Press Options ->Edit and enter the contact’s information. Press Save, next press Options ->Save. 2. You can add a new contact directly to the list of Contacts. In order to do this, in Idle mode press the key UP, next select Contacts ->New Contact>Add. Select your location. Press Options->Edit and enter the contact’s information. Press Save. Use the DOWN key to enter the input number field, press Options->Edit and enter the number. Press Save, and next press Options->Save. 24 6.2 Viewing Contacts Way 1 1. Enter MENU and select Contacts, 2. Type the first character of the Contact you are looking for. 3. The phone will go to names starting with this character. Use UP/DOWN keys to scroll up and down in the contact list. Pressing the key „#” will change the mode of entering the text. Way 2 1. In Idle mode press the DOWN key, 2. Type the first character of the Contact you are looking for. 3. The phone will go to names starting with this character. Use UP/DOWN keys to scroll up and down in the contact list. Pressing the key „#” will change the mode of entering the text. 6.3 Deleting Contacts 6.3.1 How to Delete a Single Contact If you want to delete a contact from your phone or the SIM card, do as follows: 1. Select Contacts in MENU, 25 2. Select the Contact you want to delete, press Options>Delete, 3. Press green receiver to confirm. 6.3.2 How to Delete Multiple Contacts If you want to delete multiple contacts from your phone or the SIM card, do as follows: 1. In MENU select Contacts->Options->Select multiple-> Delete multiple, 2. Select the contact, and Options ->Mark. You can mark as many contacts as you want. 3. Select Options->Delete marked. 6.3.3 How to Delete All Contacts If you want to delete all contacts from your phone or the SIM card, do as follows: 1. In MENU select: Contacts->Options->Settings>Delete all. 2. Select deleting contacts either from the SIM card or the phone’s memory, and confirm by pressing YES. 6.4 Copying Contacts 6.4.1 How to Copy a Single Contact If you want to copy your contacts from the SIM card to your phone or from your phone to the SIM: 1. Enter MENU and select Contacts, 2. Select the contact you want to copy, 26 3. Press Options ->Copy, select the location (copy to), and press the green receiver. 6.4.2 How to Copy Multiple Contacts If you want to copy multiple contacts from the SIM card to your phone or from your phone to the SIM: 1. Enter MENU and select: Contacts->Options>Settings->Copy all. 2. Select your location (copy to). 3. Mark all contacts you want to copy. To do this, press Options->Mark. You can mark as many contacts as you want. If you want to copy all contacts, select Options->Mark all. 4. Press again Options->Copy Marked. 6.5 Transfering Contacts You may transfer contacts from the SIM card to the phone’s memory or from your phone’s memory to the SIM card. To do this, select MENU->Contacts->Options>Settings->Transfer All. Next, keep following the instructions in point 6.4.2 on copying multiple contacts (items 2-4). 6.6 Mark Multiple In MENU select: Contacts->Options->Mark Multiple, and: - send a text message, if you want to text multiple recipients, 27 - delete multiple, if you want to delete multiple contacts, see point Błąd! Nie można odnaleźć źródła odwołania. 6.7 Contacts Settings 6.7.1 Speed Dialing In MENU select: Contacts->Options->Settings->Speed Dial->Status to turn speed dialing on or off. If speed dialing is activated and the keys 3-9 have assigned numbers, press and hold the appropriate key to call the assigned number. To assign a number to a Speed Dial entry, in MENU select Contacts->Options->Settings->Speed Dial->Assign Keys. Next, select the key to assign a number to, press the green receiver, select the number from your Contacts, and press the green receiver again. 6.7.2 Additional Numbers In MENU select Contacts->Options->Settings>Additional Numbers->FDN to turn on or off the option of Fixed Dialing Number. 6.7.3 Memory Status This options allows you to check the memory status on both the SIM card and your phone. In MENU select ->Contacts->Options->Settings>Memory Status 28 7. Calling 7.1 Direct Dialing 1. Enter the number you want to dial. For international phone calls, dialing „00” or „+” before the number is required. To enter „+” the key„ ” should be pressed twice. 2. Press the green receiver to get connected to a selected number. 3. To end the call, press the red receiver. 7.2 Making a Call from Contacts In Idle mode press the DOWN key to enter the Contacts. Scroll the UP/DOWN keys to select the required name. If you want to find a name starting with the letter for example U, press the 8 key twice. If you want to get connected with your Contact, press the green receiver and select Call. 29 7.3 Redialing the Last Number With your phone in Idle mode, press the green receiver to access the Call Log list. Use the UP/DOWN keys to scroll through the list until the number you want highlights. Press the green receiver, and select Call to get connected. 7.4 Speed Dial If you have already assigned numbers to keys 3-9, in Idle mode press and hold a required key to make a phone call. 7.5 Adjusting the Call Volume During a call, press the Volume keys on the right side of the phone + or – to either increase or decrease the volume level. 7.6 Options During a Call During a call, press Options to turn on additional features: - Speakerphone: turns on and off the speakerphone, - Suspend: suspends a phone call, - End: ends the phone call, - Contacts: allows to access Contacts e.g. to verify the number, - Call log: allows to see all the phone calls, - Messages: allows to see received/saved messages, - Voice recorder: allows to record conversations, - Mute: turns the microphone on and off. 30 7.7 In Case of Emergency (ICE) Key In Case of Emergency (ICE) inform rescue workers who to call in case of emergency. Pressing and holding the 2 ICE key displays Contacts and information about the user. ICE is well recognized all over the world and the option allows to obtain important information about the user, if injured, therefore entering data into emergency contacts (ICE contacts) and providing information about the user is highly recommended, see Emergency Contacts (7.8.1) and Information about the User (7.8.2) below. 7.8 Emergency Calls If you have not set any emergency number, pressing and holding the emergency key will get you connected with the number 112. You can set four emergency numbers. Emergency mode will be activated by pressing and holding the emergency key (in the back of your phone). The phone will activate the emergency sound and will automatically text all emergency contacts, one by one. Every emergency number will be dialed three times. If the phone fails to get connected with a number in 20 seconds, it will dial the next number on the list. If any of the emergency contacts answers the phone call, the speakerphone will get switched on, and the emergency procedure will get ended. If none of the assigned numbers answers the phone call, the phone will automatically send an emergency text 31 message to assigned numbers; the user’s medical history will be displayed, and the phone will remain in emergency mode for an hour: all incoming phone calls will be answered in hands-free mode. Press the emergency key to deactivate emergency mode. 7.8.1 Emergency Contacts You can select up to four emergency numbers. To set an emergency Contact, press the UP key to enter MENU. Select: Emergency Settings->ICE Contacts. Select the position you want to change, press the green receiver, and select options: Edit, to edit a saved emergency number or to manually enter an emergency number, Add from Contacts, to add a new emergency number from Contacts. After selecting the required Contact, press the green receiver to confirm. Delete, to delete an emergency number that has already been saved, Delete All, to delete all emergency numbers. 32 7.8.2 Information about the User In MENU select Emergency Settings->Info about User to enter his/her name, his/her medical history, allergies, and his/her blood type. Such information will be displayed upon pressing the 2 ICE key. 7.8.3 Emergency Text Message You can edit a text message to be sent during an emergency call. „Emergency text message! Call me! is a default message. To edit this message, enter MENU and select Emergency Settings->Emergency Message>Edit. Type your message and press Save. You can activate or deactivate sending the emergency texts in emergency mode. To do this enter MENU and select: Emergency Settings->Emergency Message>Status. 7.8.4 Deactivating Emergency Sound You can switch on or off the emergency sound. In order to do this, enter MENU: Emergency Settings->Emergency Sound. 7.8.5 Emergency Message If the emergency message is activated and emergency phone call is answered, a recipient will hear the message: Emergency call, press 5. If the recipient does not press the key in 10 seconds, the phone will dial the next emergency number from the list. Pressing the 5 key is required to 33 make sure the phone call is answered by a human not by e.g. a voice mail. Emergency message might be switched off only if we are sure that saved emergency contacts have all forwarding to voicemail deactivated (if busy, does not answer, out of reach, unavailable, etc. 7.8.6 Emergency Key You can switch on or off the emergency key. To do this, in MENU select: Emergency Settings->Status. 7.9 Receiving Calls To receive an incoming call, press the green receiver. To reject an incoming call, press the red receiver. To mute an incoming call, press the # key. 8. Call Log In order to view Log of Calls enter MENU, select Call Log, and select: Missed calls (to display missed phone calls). If you have not answered a phone call, in standby mode a receiver will appear in the left top corner of the display and an indicator will flash green on the screen, Dialed numbers (to display dialed numbers), Received phone calls (to display received phone calls), Clear Call Log (to delete highlighted phone calls), All phone calls (to display all phone calls). 34 Note: In order to view Call Log, press the green receiver. Icons of different colors inform you about the type of phone calls: Dialed phone calls Received phone calls Missed phone calls Select the required type of phone calls and press the green receiver to access additional options: - Call, calls the required number, - Send SMS, sends a text message, - View, displays details of the phone call, - Send MMS, sends a multimedia message, - Save in Contacts, adds a number to Contacts, - Edit before dialing, allows to edit the number before placing a phone call, - Delete, deletes a given entry. 9. Text (SMS) and Multimedia (MMS) Messages You can send and receive text messages (SMS) and multimedia messages (MMS). When the icon appears on the display or the indicator flashes blue on the screen, you have at least one unread message. 35 To enter the MENU Text Messages, in Idle mode select the UP key, and select: Messages –>Inbox. If the inbox if full, the icon will flash. To solve the problem, delete messages out of your inbox. 9.1 Creating and Sending Text Messages 1. Enter MENU and select: Messages->Create message->SMS, to open the text input field. 2. Type your message. Changing the mode of entering the text: In order to change mode of entering the text (digits, upper or lower case characters) press the key„#”, if you want to enter a symbol, press „ ”. 3. Sending SMS: Press the green receiver key to access Options, select Send and select whether you want to enter the recipient’s number manually or add it from your contacts. Either type or highlight the recipient’s number and press OK. If you want to text multiple recipients, you might add other phone numbers. To send the message, press Send. 4. Saving SMS: To save a text message press the green receiver key and select: Save. The message will be saved in “Drafts” folder. If you want your sent messages to be automatically saved, enter MENU, select: Messages >Settings->Text Messages->Save Sent Messages. 36 If you want to send a multimedia message (MMS) enter MENU, select Messages->Create Message>MMS, enter the message, press Options and select content, select Options and Send. 9.2 Reading and Replying to Text Messages 1. If the icon of unread message appears on the display or the indicator on the screen flashes or you want to read a received message enter MENU and select Messages->Inbox. To read the message, press Options and select View. While viewing the message, you might use additional options by pressing the green receiver key. 2. Your message has not been read yet, if the icon appears next to the message. By pressing Options while viewing your message additional features will be displayed: - Reply by SMS: text the sender, - Reply by MMS: send an multimedia message to the sender, - Make a phone call: call the sender, - Delete: delete the message, - Forward: forward the message to other recipients, - Advanced: use the number or the URL address. 37 9.3 Text Message Boxes 9.3.1 Inbox Received messages are displayed in order they have been received. Use the UP and DOWN keys to scroll through the inbox. In order to display additional features, while viewing your inbox press Options: - View: read a message, - Reply by SMS: text the sender, - Reply by MMS: send a multimedia message to the sender, - Make a phone call: call the sender, - Forward: forward the message to other recipients, - Delete: delete the message - Delete All: delete all messages stored in your inbox. 9.3.2 Sent Messages If you use the option Send & Save Sent Messages, all your sent messages are saved in „Sent” folder. Use the keys UP and DOWN to scroll through the “Sent” folder. 38 9.3.3 Drafts You can save unsent messages in the „Drafts” folder. In order to do this, type your message, press the green receiver key and select SAVE. Enter “Drafts” to send, delete or edit your messages. 9.3.4 Outbox If the message were not successfully sent, it would be saved in the Outbox. 9.4 Deleting Messages To delete a selected message, enter Options and select Delete. 9.5 Message Settings Enter MENU and select Messages->Settings, and next select: 9.5.1 Text Message SIM - Phone number to Short Message Service Center. It assists users in sending text messages. To send a text message from your phone, the SMS Center’s number should be dialed. You can get this number from your service provider. 39 - Delivery report: You can set your phone to receive a return message confirming delivery of your text message to the recipient (network feature), - Return Path, allows to turn on and off the return path, - Voice mail: allows you to change the number of your voice mail, - Memory Status, allows to check the memory status on the SIM card and on your phone. Save sent messages, allows to activate and deactivate saving of sent messages, Select memory, allows to decide to save messages on your phone or on the SIM card. 9.5.2 Multimedia Message Data account, allows to select a data account necessary to send multimedia messages Common Wspólne - Composition: allows to set an image display time and automatic signature, - Send: allows to set delivery report, priority, auto save, - Retrieve: allows to retrieve multimedia messages both in and out your home network, and set message filters, - Store Preferences, allows to select a location to store your messages, - Memory Status, allows to check the status of memory. 40 9.6 Voice mail Voicemail is a network feature to allow callers to leave voice messages when you do not answer incoming calls. To learn more, contact your service provider. If you would like to change the number of your voicemail in MENU select: Messages->Settings->SMS->SIM->Voicemail and enter the number. You can get the voicemail number from the service provider. To call the voicemail press the key . 10. Additional Features 10.1 Calendar To activate the calendar, in MENU select: Extras>Calendar. Use the UP/DOWN keys to go a previous/next day. Press the green receiver to access additional options: - Go to date: enter the date you need, - Go to today: allows you to return to the current date. 41 10.2 Calculator To activate a calculator, in MENU select: Extras>Calculator. It performs arithmetic operations such as adding, subtracting, multiplying and dividing numbers. Use the keys 0-9 to enter the first number, use the UP/DOWN keys to select an operation, enter the second number and press OK again. 10.3 Alarm Clock You can set five independent alarm clocks in your phone. To set a new alarm in MENU select: Extras->Alarm Clock. Select the alarm and press Edit. You can set and unset the alarm, set the time, type, and snoozing options. If the phone is switched off, the alarm will work as long as the battery is not discharged. If the alarm goes on, press the green receiver to switch it off. Press the red receiver to snooze it, and the alarm will go on again in 5 minutes. 10.4 Torch Use MENU to switch on and off the torch. You can also do it by pressing a key on the cover of your phone. 42 10.5 World Time You can see what time it is in other countries. 10.6 Network Service 10.6.1 Wireless Application Protocol (WAP) A phone browser lets you use various WAP services. Your phone has preset settings of some service providers. To enable, in MENU select: Extras->Network service>WAP->Settings->Data account->select the required account and select OK. Because of display size, the web pages open in your phone might look quiet different from the ones on your PC or laptop. Some details might be lost. To learn more about available services, rates, and manuals contact your service provider. Configuration settings required to browse web pages might be obtained from a service provider, see point 14.6.2, APN Profile. Some providers facilitate remote telephone configuration. 10.6.2 SIM Features Independently from your phone’s functions, the SIM card might offer some additional features. What it offers depends on available services. Service that require an Internet connection might not be available. 43 10.7 File Manager In MENU select: Extras->File Manager. Press the green receiver [Options]: Open – Select to open a selected folder, Format - to format a selected drive, Details After the folder gets open, press the left key to access the following options: Open New Folder- to create a new folder in selected location, Rename the folder, Delete: Delete an existing folder To open a given file, press the green receiver [Options] and select View or Play. You might also select other functions. 11. Camera Your phone can capture and view photos and videos. To enable the camera, in MENU select Camera or in Idle mode press the camera key and an image will appear on your display. The camera has a digital zoom (enlarging), 44 Press the UP key to zoom in the subject of your photo and press the DOWN key to zoom out. To resize your photo (176x220, 160x120, 320x240, 640x480), press Options->Image Settings->Image Size. To take a photo, press the camera key. The photo is saved automatically. To access more options, press the green receiver. Switch to video Switch on the video recorderr Photos Turns on the Image Viewer Camera Settings Photo Settings Changes the camera’s settings, e.g,. antiflickering, self-timer Resizes an image and adjusts its quality White balance Adjusts the color balance Scene modes Automatic or night Allows to select the location of a saved photo: either on the SIM card or in the phone’s memory Restore factory Restores the camera’s settings factory settings The phone’s memory is limited just to few photos. To store more photos, install the Micro SD card. Memory While using the function Photos use the UP/DOWN keys to select a photo, and press the green receiver key to access more options: 45 - View, zooms in the selected image. Use the UP/DOWN keys to see another photo, - Share, sends a photo via Bluetooth, - Rename, renames the photo, - Delete, deletes the photo, - Memory, allows to select whether to display images stored on the memory card or in the phone’s memory, - Image Details, displays details about the photo. After zooming in the photo, press Options to see additional functions: - View, starts a slideshow, - Rotate image, rotates the photo, - Set as, you can set your photo as a wallpaper or screensaver, - Share, sends a photo as a multimedia message or via Bluetooth, - Image details – displays details about the photo. 12. Radio FM The phone is equipped with a built-in radio player FM. To use the radio, plug in your headphones as they doubles as an antenna. 46 Warning: Quality of reception depends on your location. Reception of radio stations are influenced by a lot of different factors and a low quality of reception, if any, shall not be considered a valid reason to file a complaint. To switch on the radio in MENU select: Radio FM. To switch off the radio, press the # key. If an option Play in background is enabled, press the key # to stop the playing and press the red receiver before you switch off the radio. Otherwise, your radio will remain on. Key functions with the radio on: +/- (on the left side): volume up/down, UP: radiofrequency goes up by 0,1 MHz DÓŁ: radiofrequency does down by 0,1 MHz #: pause/unpause playing, * (star): automatic tuning in a radio station, Red receiver: return to MENU, Green receiver – Options: Channels list, manual tuning, automatic tuning, settings (play in background, speaker), Keys 1 – 9: selecting radio stations from the list of channels (the channels must be assigned). 47 13. Multimedia 13.1 Image Viewer In MENU select: Multimedia->Image Viewer. You can view all captured images. Options available in the Image Viewer are identical to options in Photos, please see point Błąd! Nie można odnaleźć źródła odwołania.. 13.2 Video Recorder To switch on the video recorder, in MENU select: Multimedia->Video recorder. Press the green receiver to enable the recording option. Press the camera key to start and to pause recording. Press the red receiver to stop recording. Installing MicroSD card is required to use the video recorder (it is not included in the package). Save a video on the memory card: Options ->Memory, and select a memory card. You can import photos and videos taken by your phone to a PC. To learn more, go to the section: Connecting Phone to PC. 13.3 Video Player In MENU select: Multimedia->Video Player. You can use the video player to view captured videos (folder Videos). 48 Use the UP/DOWN key to select a video. Press the # key to start and pause playing. Press the * key to stop playing. Press the 1 key to fit the image to the screen. The video player supports the following file formats: AVI and 3GP. While viewing the list of videos, press Options to access more options: - Play - Share - Rename - Delete. 13.4 Audio Player You can use the Audio Player to play audio files. They must be stored in My Music folder. If you want to add new files, after switching on the Audio Player select Options >Refresh the list. Press the # key to start or pause playing. If you don’t want audio files to be played in the background, stop the playing by pressing # before you switch off the player. Use the UP/DOWN keys to move back and forth between subsequent recordings. To change options of playing, select: List->Options->Settings. Press the * key to change options of play-lists. Use the keys + and – on the right side of the phone to adjust volume. Your phone supports the following file formats: WAV, AAC, AMR. 49 13.5 Voice Recorder You can record music or any sounds. - In MENU select: Multimedia->Voice Recorder, - Press * to start or pause recording, - Select the red receiver to stop recording. Default recordings are saved in the File Manager folder >Memory Card->Audio. Select Options to set the voice recorder (list of recordings, where to save files, quality of recording). 14. Settings In MENU select: Settings, and select: 14.1 Profile Your phone has several profiles to be quickly adjusted to current conditions. You can enable each profile and adjust it to your needs. Your phone supports the following profiles: General, Silent, Meeting, Outdoor. In each profile (apart from Silent) use the Adjust function to change: - Tone settings (ringtone only or vibration only, etc.) - Ringtone type (single or multiple) - Ringtone, - Ringtone volume, - Message alert tone, - Message alert tone volume, - Keypad ringtones - Keypad ringtone volume, - Cover opening, - Cover closing. 50 - Warning ringtones (eg. Low battery ringtone) In Idle mode press and hold the # key to enable the Meeting profile, and press and hold the # key again to return to the previous profile. 14.2 Telephone Settings 14.2.1 Setting Date and Time To set the Date and Time, in MENU select: Settings>Phone Settings->Time & Date. Select „Time Zone” to set the required location, and select „Set Time/Date” to enter the time and date. To move between date and time, use the UP/DOWN keys. To enter the date and time, use the keys 0-9. You can also set Time Format (12h or 24h), Date Format (DD/MM/YYYY, MM/DD/YYYY or YYYY/MM/DD). After removing the battery, the Date and Time have to be reset. 51 14.2.2 Language It allows you to change the phone language. If you accidently set a foreign language, to set it to the language you know in Idle mode press: - 1x UP - 2x DOWN - 1x Green receiver - 1x DOWN - 1x Green receiver - 1x DOWN - 1x Green receiver, select the language you want and press the green receiver. 14.2.3 Display You can set a wallpaper, display contrast and backlight time. 14.2.4 Flight Mode All radio connections are switched off in the flight mode. 52 14.3 Call Setttings 14.3.1 Blocking Caller ID It is a network feature. If your provider offers such a service, configuration will be required. It allows you to hide your own number while placing a phone call. Select: Sets Network->Block Caller ID->Send number, and press OK. 14.3.2 Call Waiting It is a network feature. If your provider offers such a service, configuration will be required. To check the availability and select whether you want to enable such a function in MENU select an option: Settings->Call Settings->Call Waiting. If Call Waiting is enabled, and the user makes a phone call, he or she will be notified about every other incoming call by a special sound signal to allow the user to receive the second call and suspend the first one. 14.3.3 Call Forwarding It is a network feature. If your provider offers such a service, configuration will be required. The user might set forwarding incoming calls directly to voicemail box or to any other number. 53 1. To set the Call Forwarding service in MENU select Settings->Call Settings->Call Forwarding. 2. Select, when you want to forward your calls from an available list: 1. All Voice Calls - (all incoming voice calls will be forwarded to the assigned number), 2. If unavailable - (if your phone is switched off or you are out of reach, all incoming voice calls will be forwarded), 3 If not answered - (if you do not answer your phone, all incoming voice calls will be forwarded), 4 If busy - (If your phone is engaged, all incoming voice calls will be forwarded), 5. Forward All Calls 6. Cancel All Forwards. 3. Press Enable and enter the number you want to forward your voice calls to, or Disable to switch off the service. 4. To see what is the current status of the service, select Check Status. 14.3.4 Call Barring It is a network feature. If your provider offers such a service, configuration will be required. This function allows you to restrict certain types of calls. 1. In MENU select Settings->Call Settings->Call Barring. 2. Select calls you want to bar from the list. You can bar all outgoing calls, all international outgoing calls, international calls except to home, incoming calls and incoming if abroad calls. You can also change a barring password. 54 14.3.5 Advanced Settings Auto Redial: if enabled, the option redials the number automatically if the person you called does not answer or the line is busy, Time Reminder: You can set a signal to remind you of length of your call. You will hear a beep informing you that your time is up every set period (31-60 seconds) or after a set period (2-3000 seconds). Answering incoming calls: You can set to answer incoming calls by opening a flip, pressing any key or automatically with the headphones on. 14.4 M1/M2 Memory In MENU select: Settings->M1/M2 Memory->Set M1>Select Contact. In Contacts, select the contact you want to assign to the M1 key and press OK. Follow the same procedure for assigning the M2 key. If you want to delete the assigned contact, select Settings->M1/M2 Memory->Set M1->Delete and confirm by pressing Yes. 14.5 Network Settings Selecting network: You can select a provider manually or automatically. GPRS Connection: It allows you to select whether the GPRS connection is to be established on your wish or permanently, 55 Preferred transfer GPRS. 14.6 Connectivity 14.6.1 Bluetooth Bluetooth is a short-range wireless communications technology that allows you to send and receive files. You can also hook up other devices such as wireless headphone set. In MENU select Settings->Connectivity>Bluetooth. In Bluetooth you can select one of the following options: Bluetooth Visibility My Device Phone Name Turn Bluetooth on or off Turn it on so other people can find your phone Devices you have been previously connected to Select a name for your device Files sent to the mm720 telephone are saved in the Received Folder. 14.6.2 Access Point Name (APN) Profile In MENU select: Settings->Connectivity->APN Profile. Your phone has preset WAP/MMS and GPRS connectivity settings by some network providers. To edit/delete/add an account, in MENU select Settings->Connectivity->APN Profile. 56 You can obtain a correct configuration from a service provider. Some providers facilitate remote telephone configuration. 14.7 Security Settings 14.7.1 PIN Code You might select to be asked for entering PIN every time you turn on your phone and to change your PIN. 14.7.2 Phone security You can enable locking your phone. Every time you turn on your phone, you will have to enter the phone security code. Default code is 0000. 14.8 Restore Factory Settings You can restore your phone’s factory settings. In MENU, select Settings->Rest. Factory Sett., enter the security code, and press the green receiver to confirm. Warning: Default phone security cod is 0000. 15. PC Connections You can connect your phone to a PC with a USB cable, and you can copy and transfer files from/to your phone and to/from the computer. To connect: 57 - plug the USB cable into your phone, - plug the other end of the cable into a jack on the computer, - your phone will display a message: Mass Storage Device and COM Port. Select Mass Storage Device. 16. FAQ (Troubleshooting) Only qualified service is authorized to repair your phone. Unauthorized repair and modifications void the manufacturer’s warranty! Green receiver flashing on the flip (LED indicator)) Blue envelope flashing on the flip i Red battery flashing on the flip Cannot call a number You have a missed incoming phone call You have an unread text message (SMS) Low battery, charge your battery Make sure your number is correct. If you make an international phone call, dial a country code before the actual number (eg. 0049 or +49 for Germany). If you have a prepaid card, make sure there are sufficient funds available on the card to place a phone call. No SIM card, Make sure the SIM card is installed correctly. emergency calls only (112) 58 My phone does not charge when plugged in Your phone might be switched off. To switch on your phone press the red receiver key (power key) for about 3 seconds. If you have not used the phone for a long time, the battery might be “deeply-discharged”, to recover a deeplydischarged battery leave your charger plugged in, although there will be no image on the display. Can I make a If you are out of the country and roaming is phone call from enabled, your phone automatically will use the abroad? foreign telephone network. To learn more, contact your service provider. Can I make an If you are in an area with no reception of any emergency call network, no phone calls can be made. if there is no reception or if If the user has no funds available on the account, there are no emergency call to 112 might be made. funds on my account? A message „Not working” appears on the display How to get the if there is no signal or there are no funds most out of my available on the account. In such a case, reception? however, making emergency calls to 112 is possible provided you are in area covered by reception of other service provider. Places such as buildings also reduce signal strength, therefore standing near a window or going to an area not surrounded by many buildings might give you better reception. 59 It is the service provider’s center number storing all text messages. The number is stored on the SIM card, but you can change the number and enter another number in MENU. When is the fee A fee for making a phone call is charged as soon for making a as the phone call is made. To learn more about phone call charging details, contact your service provider. charged? How to verify Enable Delivery Report option. As soon as the whether a text text message is delivered to the recipient, you will message has get a return message (network feature). been delivered to a recipient? What is the center of text messages? 60 17. Safety Precautions Do not switch on your phone if it might interfere with other devices! Using your phone while driving without a hands-free set is prohibited. Telephone emits electromagnetic field that might be subject to interference with other electronic devices including medical equipment. A safe distance between a telephone and implanted medical devices such as a heart pacemaker should be maintained as recommended by manufacturers of medical equipment. Users with implanted devices should read and follow the instructions by manufacturers of implanted medical devices. Users with heart pacemakers should not carry their telephones in their front chest pockets and they should hold telephones next to the ear opposite to the medical device in order to minimize the risk of interference. If they have any reason to suspect interference with a pacemaker, they should switch off the phone immediately. Do not use your telephone in hospitals, airplanes, at refueling points and near flammable materials. Do not to repair or modify your phone by yourself. Only qualified service is authorized to repair your phone. Your phone and accessories might contain small parts. Keep your phone and its part out of reach of children. 61 Do not use any chemicals or caustic substances to clean your phone. Do not use your telephone in close proximity to credit and debit cards – it might cause the loss of date on the card. For safety reasons, do not talk on the phone while charging. Your phone is not water or liquid resistant, do not expose your phone to water or any other liquid. Do not place your phone in places exposed to splashing with water or any other liquid. Do not expose your phone to very low or very hot temperatures or direct sunlight. Do not place your phone next to heating devices such as radiators, heaters, ovens, furnaces, camp fires, barbeque, etc. Protect your hearing! Excessive exposure to sound at high volumes can cause hearing damage. Use the minimum volume setting necessary to listen to music and do not keep the device next to your ear when using a speaker. Always turn the volume down before plugging the earphones into an audio source. 62 18. Warranty Your phone is covered by a warranty; to get the warranty, a proof of purchase is required. There is an extra charge for repairing your phone in case of misuse, electrostatic discharge or lightning strike. Unauthorized repair and modifications void the manufacturer’s warranty! Above statement is for information only. 19. Battery Information There is a battery in your phone. The battery can be charged with a charger that is included in the package. The battery life depends on conditions in which your phone is used. Our distance from a relay transmitter, number and duration of phone calls significantly reduce the battery life. While moving, the phone switches between relay transmitters and such switching also significantly affects the battery life. After multiple charges and discharges, the battery eventually will lose its ability to hold a charge. Please get a new battery if you notice a significant drop in the battery’s performance. Use only batteries recommended by the manufacturer. 63 Do not keep your phone in excessively hot places. High temperatures might negatively impact both the battery and your phone. Do not use a battery that is clearly damaged. Doing this might cause a short circuit, and might damage your phone. Make sure to install the battery according to correct polarization. Leaving the battery in excessively high or cold places will reduce the battery life. The recommended storage temperature range is between 15°C and 25°C. Installing a cold battery into your phone might cause your phone to malfunction and might damage your phone. A Li-ion battery is included in the package. Old batteries pose environmental risks. They should be disposed of at a special place in a special container in compliance with current regulations. Never throw old batteries or chargers to municipal solid waste, they should be collected for disposal. NEVER PUT BATTERIES AND CHARGERS INTO FIRE! 20. SAR Information The phone meets international requirements on impact of radio waves. The device is both a sender and receiver of radio waves. The phone is designed not to exceed the 64 limits of radio waves as recommended by international guidelines. These guidelines have been developed by the International Commission on Non-Ionizing Radiation Protection (ICNIRP), an independent scientific organization with regard to safety margin to protect all people regardless their age and health condition. These guidelines use a measurement unit called Specific Absorption Rate (SAR) – the real absorption. Border value of SAR for portable devices is 2,0 W/kg, as recommended by ICNIRP. SAR value is taken at the maximum transmit power whereas the actual SAR value of a device in use is usually lower. Such differences result from automatic adjustments at power level to optimize the phone’s use of power. Although SAR values vary for various models of the phone or even for different positioning of the phone in use, they all remain compliant with pertaining regulations on safe radiation level. According to World Health Organization (WHO), based on current research, there are no special restrictions in use of mobile phones. To reduce the impact of radiation, however, WHO recommends to limit the number of phone calls or to use headphones or speakerphone while talking not to hold the phone in close proximity to your head or body. For this model, the maximum SAR value measured in tests is 0.435W/kg for EGSM900 and 0.338W/kg for DCS1800. 65 SAR values might vary depending on domestic reporting and testing requirements and on radio frequency used by a given network. 21. Protecting the Environment Note: The phone follows the European Waste Electrical and Electronic Equipment Directive 2002/96/EC (WEEE) and the Polish Act on Waste Electrical and Electronic Equipment with the symbol of a crossed out wheelie bin with a single black line underneath the symbol. The WEEE logo tells us that the equipment, after use, should not be disposed of in the normal waste stream. Note: Never throw your phone to municipal solid waste!!! The product should be utilized in authorized places. As the product contains hazardous components, improper storage and use of such equipment might lead to serious consequences harmful for both people and natural environment. To avoid such consequences, proper handling of waste electrical and electronic equipment is essential! 66 22. CE Marking 67 Some of the contents in this user manual may differ from your phone, depending on your phone configuration, on software installed, your service provider or a SIM card. The product and its functions are subject to change without any obligations to inform about such changes. For technical support please call +48 32 325 07 00 or email: [email protected] 68 69 MAXCOM S.A. 43-100 Tychy, ul Towarowa 23a POLAND tel. + 48 32 327 70 89 fax: +48 32 327 78 60 www.maxcom.pl [email protected] 70 MM822 v01 09-2014 1313