1
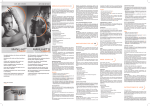
Torn cruciate
ligament
Joint replacement
TEP knee
Joint replacement
TEP hip
Fractured or
sprained foot
Fractured or
sprained hand
Everything your foot needs
Our feet
What makes you susceptible?
They do what we want them to: They lift up,
lower themselves, stretch out. And over the
course of a lifetime they carry us more than
160,000 km.
A large proportion of bone fractures are caused by the exertion of external forces, in car
accidents, during sport activity or falls during
leisure or work time.
Our feet are miracles of nature, and ingenious
all-rounders. We can run, walk and jump with
them. They carry our bodies and help to stop
and move them. Some of us take over 5 million strides each year - no, not someone like a
marathon runner. We cover this distance just
with normal everyday activity.
In everyday situations, uneven floors, stairs or
sidewalk edges often hide potential dangers.
All that can change within a tenth of a second.
One trip, one fall, an accident - and everything
that was taken for granted before suddenly no
longer functions.
If the force exerted from outside is larger
than the bone elasticity, the bone will fracture.
Depending on the strength, direction and
speed of the force being exerted, the fracture
may be simple or more complicated.
Anatomie of the foot
Fibula
Shin-bone (tibia)
Syndesmosis
Achilles tendon
Outer ankle
(malleolus)
Lateral
ligaments
Heel bone
Upper ankle
Ankle bone (talus)
Navicular bone
(naviculare)
Metatarsal
(Metatarsals)
Toe bones
(phalangeal bones
of the foot)
Fractures to the foot and ankle
Injuries to the foot and ankle are among the
most frequent injuries of all. Since more than
a quarter of the bones in the human body are
located in the feet, such injuries are very
varied and often involve the joints in-between.
Fracture of the outer malleolus is caused by
the foot becoming twisted. In most cases the
ligaments of the ankle are also affected.
Typical signs of a fractured ankle are strong
pain when there is pressure or movement, as
well as swelling, and sometimes visible
bruising above the inner and outer malleolus.
Ankle/outer malleolus
Feet
Between 40,000 and 50,000 fractures of the
upper ankle occur each year in Germany.
This is 10 percent of all fractures. They usually
occur through indirect trauma (twisting), and
less often through direct trauma.
A fracture of the outer malleolus is, along with
knee injuries, one of the most frequent sports
injuries. Elderly people suffer more often than
young people from a fracture of the outer
ankle.
The main causes of a fracture to the foot are
an accident on an uneven surface, a fall or a
sports injury.
Jumps from a height, such as from a ladder,
may result in a sprain or a fracture of the
heel bone.
Distortion / Sprain
Torn Achilles tendon
A sprain or distortion occurs when the joint
structures are pushed against each other. This
displacement occurs when a force is applied
which pushes apart the joint surfaces more
than normal. But this displacement is only temporary. Once the application of force ends, the
joint structures return to their initial position.
The classic Achilles tendon rupture is usually
caused by damage from overload in dynamic
sports activity.
Pains and swelling are the typical signs of a
distortion. Pulling apart the joint surfaces for
just a short time can cause considerable injury
to the joint capsule and to the ligament apparatus. Symptoms can vary, depending on the
severity of the injury.
As a consequence, an Achilles tendon rupture
is suffered most frequently by those involved
in active sports. There is a predominance of
injuries in men between the ages of 30 and 50
who actively pursue sport.
When the Achilles tendon is torn, this is an
indirect trauma, which feels like a blow or
kick against the heel. Often the patient feels a
sharp pain, as if stabbed with a knife, which
is often accompanied by a loud bang. At the
point of the tear a bump can initially be felt,
and standing on the toes is no longer possible.
The most common tear site (90% of cases) in
spontaneous ruptures is the so-called tendon,
which is located some 2-4 cm above the connection on the heel bone.
Diagnosis and treatment
The description of how the accident happened
provides the physician with the first clues
about the injuries. A precise diagnosis is usually made only after the
X-ray examination.
Depending on the type and location of the
fracture, the physician selects the appropriate
treatment method. In the past, fractures were
immobilized for lengthy periods with a plaster
cast. Now the bone parts are often fixed with
screws, plates and then protected with
VACO®ped. The advantage of the current approach is that it takes less time before the patient can put weight on and mobilize the
injured body part.
A conservative treatment, that is without surgery, is only to be recommended if the anatomy of the foot is not impaired or altered.
In this case, only VACO®ped (previously a
plaster cast) is applied. The splint immobilizes
the foot or the joint for the next few weeks.
If a conservative treatment is not possible,
surgery must be performed. After surgery, the
foot is also immobilized with VACO®ped.
Surgery or not – you, yourself, can do a
number of things to ensure that the healing
process is fast and successful.
Your steps towards recovery
PHASE 1
Surgery is over but you are still
recuperating!
PHASE 2
PHASE 3
PHASE 4
The first step is always the hardest,
but it gets easier!
The biggest hurdle
has been overcome
– it's time to get
back to normal!
I can be active
again – if I want to!
How to
find your
way in this
brochure
Description of each of the phases
PHASE x
Objective
Phases
In the following weeks you will pass through various phases during rehabilitation. You can find these here.
Objective
Duration
Your physician will
recommend to you
the order, duration
and frequency of the
measures in your
individual treatment
plan.
Each phase of the rehabilitation program contains different
objectives.
You can see here which objective you can reach in the
respective phase.
Measure
Measure
Behandlungsrichtlinien
in Zusammenarbeit mit Prof. Dr. N. Haas,
Unfall- und Wiederherstellungschirurgie Charité Berlin
Behandlungswoche
1
2
3
4
5
Unfall- und Wiederherstellungschirurgie
6
7
8
9
There are appropriate measures to help you when you aim
for these objectives.
10
Weber A
0°
Weber B
operativ
Weber C/
Maisonneuve
0°
-10°
+10°
0°
0°
0°
-10°
+10°
0°
0°
-10°
+10°
Pilon-Tibial
Calcaneus
operativ
Calcaneus
konservativ
0°
-10°
+10°
-10°
+10°
0°
-10°
+10°
-10°
+10°
0°
Belastungssteigerung nach
Röntgenbefund
Belastungssteigerung nach
Röntgenbefund
-10°
+10°
0°
Metatarsal
Belastungssteigerung nach
Röntgenbefund
VACO-pedes
0° Laufsohle
0°
Jones Fraktur
0°
VACO-pedes
Entlastungssohle
0°
-10°
+10°
0°
Belastungssteigerung nach
Röntgenbefund
0°
0°
Achillessehne
operativ/konservativ
30°
Entlastung/Sohlenkontakt
You can read here which measures will help you to achieve
the objective more quickly.
Belastungssteigerung nach
Röntgenbefund
-10°
+10°
Arthrodese
OSG
15°
15°
Lagerung
Lagerung
im VACOsplint
0°/15°/30°
Immobilisierung
mit 0°, 15° oder 30° Fix-Adapter
(dorsal und ventral)
Teilbelastung
Vollbelastung
OPED GmbH
Orthopädische Produkte
Mühlbachweg 2 . D-83626 Valley
Tel. 0 80 20 / 90 79-0 . Fax 0 80 20 / 90 79-99
e-mail:[email protected] . www.oped.de
0°
-10°
+10°
Physiotherapie
-10°
+10°
Beweglichkeit
Freigabe OSG mit ROM-Adapter
(dorsal und ventral)
WM-BHRL-15-3
Arthrodese
USG
-10°
+10°
0°
Hallux
PHASE 1
Surgery is over but you are still
recuperating!
PHASE 1
Surgery is over - but you are still recuperating!
Objective
Pain relief
Your objectives in this phase:
Reduction in
swelling
· Pain relief
· Reduction in swelling
· Wound healing
Wound healing
The period after surgery is considered by the
physician to be very crucial, because patients
tend to overload the foot in this phase.
Apart from the exercise phases, you should
rest the leg concerned in the first few days
after surgery.
Keep your leg elevated and use the measures
to relieve swelling and pain. Please also read
the following pages concerning this.
Measure
Avoid getting up and walking around frequently, as well as sitting for a long time with
the legs hanging down. Because this leads to
an increase in swelling and pain again, which
can delay the rehabilitation.
For this reason, you should slow down until
the second phase begins - about 10 days after
the OP / injury.
"The winner is decided at the finishing line,
not in the first few meters…“.
PHASE 1
Objective
"Boys don't cry" - you probably remember this
saying from your childhood. But after surgery
it is usually not sensible to "endure" the pain.
Pain refief
Caution Danger of thrombosis!
If the body feels pain, the muscles restrict
certain movements and thus "lock" joints,
which can lead to problems later on.
For this reason you should not be afraid of
taking pain-killers for a short phase after
surgery. This will help to prevent chronic
fibromyalgia from developing. Ask your
physician for a preparation suitable for you.
In addition, drugs are also used to inhibit
inflammation and to stabilize the mineral
and electrolyte balance.
If you notice the following signs, contact a
physician immediately! The progression of
thrombosis can be fatal!
· Muscle aches and pain in the calves
· Complaints increase when standing,
decrease when lying down
· Increased veinous markings of the surface
veins (bypass circulation), especially on the
front of the shin
· Feeling overly warm
· Stretched, glossy skin
· Pressure pain in the calves
(Lowenberg sign)
· Pain in the calves when lifting foot
(Hohmann sign)
Measure
Drugs
PHASE 1
Surgery is over - but you are still recuperating!
Objective
Pain relief
Cold reduces nerve activity, which causes pain
relief. Limited cold stimulation of up to 5 minutes causes a narrowing of the vessels and a
slight rise in blood pressure.
Important to know: ice does not reduce swelling - it only stops it from occurring or from
increasing. But it does have an anti-inflammatory effect and relieves acute pain.
For this reason you can use ice selectively
after loads or to reduce pain.
Cooling - but not ice-cold! This is the principle
of the so-called cryotherapy, which is used to
relieve pain. And this is how it works: The
temperature that is applied to the skin should
be between 6 and 8 °C (hot ice), and this
should not be applied for more than 12 minutes. Then 3 minutes of room temperature is
required. This change should be made several
times.
The necessary cooling can be achieved with
icy water, but also with appliances that keep
the water at the optimal cooling temperature.
Some appliances combine cooling with pulsating compression.
This method has proven to be especially
effective.
Measure
Cryotheraphy
Hot ice
PHASE 1
Objective
The lymphatic backflow is still disrupted after
surgery. This means: the body cannot yet
regulate the tissue fluids "normally", so that
swellings may occur, especially after loads.
Reduction in
swelling
You should often put your feet up during
breaks. This helps to reduce the pressure that
exists in the tissue concerned. This can simply
be done with cushions, but also by using
braces, and best in combination with slight
movement.
With the help of the lymph vessels, tissue fluid
from the soft tissue is transported away and
into the blood vessels. If the lymph system is
disrupted in its function, body fluids may
collect in the tissue and swelling may occur
(edema).
Measure
Lymph drainage is an appropriate means of
restoring the balance that has been disrupted.
Lymph drainage also stimulates the immune
system.
Putting feet up
Lymph drainage
An appropriately trained therapist can stimulate lymph drainage. Alternatively, there are
appliance systems that use compression
sleeves to stimulate lymph drainage.
PHASE 1
Surgery is over - but you are still recuperating!
Objective
Stabilization
Mobilization
With VACO®ped you have received a modern
medical device to help you in your daily
activities. We would like to give you some tips
to help you in the handling of VACO®ped and
to speed up your recovery. You can find more
detailed information on usage in the user
manual.
A vacuum cushion ensures an optimal fit to
the shape of your foot and ankle. If irritating
pressure points should develop, or the cushion
no longer fits, you can re-adjust the vacuum
cushion (see user manual Chapter: Valve
functions).
VACO®ped
Behandlungsrichtlinien
in Zusammenarbeit mit Prof. Dr. N. Haas,
Unfall- und Wiederherstellungschirurgie Charité Berlin
Behandlungswoche
1
2
3
4
5
6
0°
Weber B
operativ
Weber C/
Maisonneuve
0°
You can find much more information, as
well as a video user manual, at
www.vacoped.com.
7
8
9
10
-10°
+10°
0°
0°
0°
-10°
+10°
0°
0°
-10°
+10°
Pilon-Tibial
The timeline these adjustments for weight
bearing and physical therapy has been set
forth by your physician. Be sure to discuss the
details of your protocol you’re your doctor.
Unfall- und Wiederherstellungschirurgie
Weber A
Calcaneus
operativ
Calcaneus
konservativ
0°
-10°
+10°
0°
-10°
+10°
0°
0°
Metatarsal
-10°
+10°
-10°
+10°
Belastungssteigerung nach
Röntgenbefund
Belastungssteigerung nach
Röntgenbefund
Belastungssteigerung nach
Röntgenbefund
-10°
+10°
VACO-pedes
0° Laufsohle
0°
Jones Fraktur
0°
Hallux
VACO-pedes
Entlastungssohle
0°
Arthrodese
USG
-10°
+10°
0°
-10°
+10°
0°
Belastungssteigerung nach
Röntgenbefund
-10°
+10°
Arthrodese
OSG
Belastungssteigerung nach
Röntgenbefund
0°
0°
Achillessehne
operativ/konservativ
30°
Entlastung/Sohlenkontakt
15°
15°
Lagerung
Lagerung
im VACOsplint
0°/15°/30°
Immobilisierung
mit 0°, 15° oder 30° Fix-Adapter
(dorsal und ventral)
Teilbelastung
Vollbelastung
0°
-10°
+10°
Physiotherapie
-10°
+10°
Beweglichkeit
Freigabe OSG mit ROM-Adapter
(dorsal und ventral)
OPED GmbH
Orthopädische Produkte
Mühlbachweg 2 . D-83626 Valley
Tel. 0 80 20 / 90 79-0 . Fax 0 80 20 / 90 79-99
e-mail:[email protected] . www.oped.de
Fig. Treatment guidelines
WM-BHRL-15-3
Measure
Adjusting the ankle joint position and releasing
the hinges to enable mobility can be done with
the help of the yellow key and the adapters
(user manual Chapter: Assembling the
Adapter).
PHASE 1
Objective
Wounds heal in different ways. The healing
process and the scar formation associated with
this is dependent on one's age and personal
constitution, on the localization and degree of
severity of the tissue injury, as well as on the
treatment and care.
Skin with poorer circulation, which is thin and
dry, will require longer to heal, but will heal
with less scar formation. Younger people tend
to produce more tissue than necessary when
they have injuries. Because of this, larger and
thicker scars often subsequently occur. A
selective scar treatment can prevent this.
In the first weeks
after surgery the
scars should be
left alone. Under
no circumstances
should you
scratch the
scab off.
Wound healing
It is best if this
falls off on its
own. But you can also gently remove the
scab with a special wound-cleansing agent.
Only when the wound is closed and wellhealed should you take care o fit yourself.
Keep the tissue around the wound supple
through damp compresses and an ointment.
Measure
Scar care
Every open wound (as long as there is no
connective tissue occlusion through new skin
growth) represents an infection risk. Therefore
the wound should always be covered with a
bandage to prevent it from getting dirty.
Through scar care, you will not only achieve
better cosmetic results. The tissue around the
closed wound will become more elastic and
also more load-resistant.
The wound should be prevented from contact
with water during daily hygiene routines.
Use a washcloth or cover the wound with a
watertight bandage. You can even take a
shower in comfort.
PHASE 1
Surgery is over - but you are still recuperating!
Objective
Load
Walking
Walking with crutches requires some practice
at the beginning. Here are some tips to help
you cope better:
The height of the crutches should be adjusted
individually. The handle height should be
adjusted so that it is at the height of the wrists
when standing up straight and holding the
hands down to the sides.
3-point walk with crutches
1
Starting point
2
Place the two lower arm supports one step
length in front of you, the injured leg should
also move forwards (root of foot at about the
level of the line connecting the two supports).
3
Move your weight onto the supports and set
your healthy leg one step in front of the
injured leg.
Measure
Gait training
Make sure that you roll over correctly!
Then move your weight to the good leg and
repeat the process, as shown in Figures
2 and 3.
PHASE 1
Objective
Walking with crutches requires some practice
at the beginning. Here are some tips to help
you cope better:
Load
Walking
Going up stairs
Put your good leg one step higher, then place
the crutch and the injured leg next to the leg
already put forwards.
Going down stairs
First put the crutches, together with your affected leg, one step lower. Only then should
you place your good leg on the same step.
Measure
Gait training
PHASE 2
Surgery is over but you are still
recuperating!
PHASE 2
Surgery is over - but you are still recuperating!
Objective
Strenght
Phase 2 begins some 10 days after your surgery or injury. You should wait at least until
the stitches have been removed.
Endurance
Your objectives in this phase:
· Retaining the mobility of healthy joints
On the following pages you will find gymnastics exercises that you can do at home in the
early phase after surgery. The load-bearing
capacity is different for every patient and
depends on the constitution and general level
of fitness, among other factors. This is why
there are no specific repeat details for most
of the exercises.
Measure
It is important that you exercise for at least
half an hour each day. Do each exercise for
about one minute. After a short pause, repeat
the sequence of exercises two to three times.
The following basic rules apply for all the
exercises in this brochure:
· If you are in pain, stop the exercise immediately! Then try out a different exercise or
take a break. If you are unsure whether the
exercise is suitable for you, ask your
physician or physiotherapist.
· The exercises have been chosen so that
other joints and muscles in the entire mobility chain are also exercised. This is
important in restoring harmonic movement
sequences.
· Always start your phase 2 training sessions
with coordination exercises, since these
must be performed at full concentration.
You can then perform strength and
endurance training.
PHASE 2
Objective
Scar massage
Fig. lattice
fence massage
A scar massage causes strong blood circulation in the area of the scar and the dissolution
or loosening of adhesions in the connective
tissue.
The massage strokes described below should
be carried out quickly and about 5-10 times
each:
Start by moving around the scar tissue, as
illustrated above. Then make diagonal strokes
with one finger in a "mesh pattern" (like lattice
fencing) across the scar tissue. This is done in
two stages: First massage all parallel running
diagonal lines in one direction (repeat each
stroke 5-10 times). After this, massage the
lines that cross in the other direction
(see figure).
The massage is followed by stroking gently
and broadly over the scar and the surrounding
tissue.
Wound healing
The application of appropriate active ingredients can reduce the occurrence of scars to
a considerable degree. The active ingredients
contained in scar ointments, such as allantoin,
dexpanthenol and urea, make the tissue soft
and supple. A number of healing ointments
also contain ionized trace elements and
electrolytes, which support the healing
process of the skin and reduce scar formation.
You can apply such an ointment just a few
days after the wound has closed. This helps
to prevent an ugly scar from forming.
But existing scars can also be treated. The
active ingredients work directly on the scar
tissue and stimulate regeneration back to a
normal skin structure.
Apply the ointment or gel to fresh scars 1-3
times per day. Massage the ointment gently
with your fingertips from the center of the scar
to the outside, until it has fully penetrated the
skin.
Visible success will only be achieved, however,
if you continue the treatment consistently over
a period of up to six months.
Measure
Scar massage
PHASE 2
Surgery is over - but you are still recuperating!
Objective
Strenght
The interaction of hip and knee
Endurance
Place yourself in the all fours position on a
training mat. Support yourself here with
your lower arms rather than your hands.
Lift up the affected leg and simultaneously
stretch it upwards. Stretch it out as far as you
can, so that knee and hip are fully stretched.
Make sure that your pelvis remains horizontal
and parallel to the floor, and does not twist.
Leg and spinal column form a slanting line
upwards. Try and prevent your back from
becoming too hollow.
Measure
Strengthening
exercise
Stop stretching and move your leg slowly back
again, but keep it above the floor.
Repeat this movement a number of times,
without putting your foot
PHASE 2
Objective
Strenght
Exercise for stretching and
strengthening the hips
Endurance
To go a step beyond the previous exercise,
you can use an elastic training band, as shown
in the illustration..
Measure
Strengthening
exercise
PHASE 2
Surgery is over - but you are still recuperating!
Objective
Strenght
Endurance
Exercise for stretching and
strengthening the hips
Lie on a training mat, prop up your head.
The unaffected leg lies at a slight angle on the
floor. Attach an elastic training band to the
other foot (with VACO®ped) so that your leg
is pulled slightly forwards.
The band can be attached to a table leg or
attached to the door frame with a special
anchor under the door.
Measure
Strengthening
exercise
Pull the elastic band with the outstretched leg
upwards and at the same time slightly backwards. The toes should point to the front when
doing this.
Then move your leg back again, but keep it
above the floor.
Repeat the exercise several times. You can
gradually increase the number of repetitions.
A few training sessions for your good leg will
certainly do it no harm.
PHASE 2
Objective
Strenght
The interaction of hip and knee
Endurance
Lie on your back with arms outstretched next
to your upper body. Raise your buttocks and
stretch the leg with the VACO®ped forwards
into the air.
Now move the raised leg with the knee
towards your head and back again. The leg
is bent here and then stretched out again.
Try and keep the pelvis in a stable position.
Repeat the movement sequence several times.
After a short rest, do the exercise again.
Measure
Strengthening
exercise
PHASE 2
Surgery is over - but you are still recuperating!
Objective
Strenght
Strengthening the quadriceps
Endurance
Attach an elastic training band using a special support on the upper edge of the door.
Pull the band with the relevant leg back so that
hip and knee are fully stretched.
Move only the leg when doing this. Try and
keep the upper body as still as possible.
Measure
Strengthening
exercise
PHASE 2
Objective
Strenght
Strengthening the rear side of the thighs
Endurance
Sit down in a sturdy chair (not an office chair
or other types of movable seats).
Hold the seating surface tight with both hands.
The affected leg is attached to the training
band and stretched forwards.
Now bend your leg until your foot is on the
floor. Slowly stop resisting the pull of the
training band until your leg is stretched out
again.
Repeat this a few times using smooth movements.
Measure
You can also do this exercise with your good
leg.
Strengthening
exercise
PHASE 2
Surgery is over - but you are still recuperating!
Objective
Strenght
Strengthening the rear side of the thighs
Endurance
Lie on your stomach on a training mat. Support your forehead with your hands, so that
your head does not need to turn.
Attach the elastic training band to a table leg
or door frame using a special anchor.
Pull the band with the affected leg upwards by
bending the leg.
Let your leg fall slowly down again. Avoid any
jerking movements when doing this.
This exercise can also be done with both legs.
Measure
Strengthening
exercise
PHASE 2
Objective
Strenght
Mobilization of the lumbar-pelvis
hip region
Endurance
Walking with crutches can lead to muscle
tension in the lumbar-pelvis-hip region, which
causes back pain in many patients.
This exercise can help you to avoid tension, or
be of help if you are in pain.
Bend the leg with the VACO®ped upwards.
With the opposite hand, move it slowly
downwards on the mat, as shown in Figure 2.
Remain in this position for a few seconds before repeating the exercise.
Measure
It is important here that the shoulder and arm
on the other side remain on the floor.
If possible, turn your head as well in the opposite direction.
This will stretch the whole region from the
lumbar to the hips. To vary the stretching, you
can place the leg at different angles. This will
make the exercise even more effective.
Do this exercise on both sides as well.
Strengthening
exercise
PHASE 2
Surgery is over - but you are still recuperating!
Objective
Mobility
Rump Stabilization with gymnastic ball
Kneel down on a training mat and lay your
upper body on a gymnastic ball. Attach a
training band with two handles to a table
leg or the underside of the door.
Now with both arms simultaneously, pull the
training band as far back as possible. Your
hands should now be at about the same level
as your ear lobes.
Allow your arms to be pulled by the band and
move your arms back to the front. Try to hold
your arms slightly bent when doing this, rather
than completely stretched.
Measure
Strengthening
exercise
PHASE 2
Objective
Strenght
Rump stabilization lying on your stomach
Endurance
Lie on your stomach on a training mat and
slightly raise your upper body. Your head
should be bent down slightly, and you should
keep your neck straight if possible.
Now also slightly raise your arms, which are
bent sideways. Try to keep your hands slightly
higher than your elbows when doing this.
Move your raised arms to and fro, as shown in
the illustration. Your feet should remain on the
floor as you do this.
Perform this movement continually for at least
30 seconds before lowering your arms and
upper body. After a short rest, repeat the exercise once or twice.
Measure
Strengthening
exercise
PHASE 2
Surgery is over - but you are still recuperating!
Objective
Strenght
Endurance
Variations on rump stabilization
lying on your stomach
Variation 1:
Once you have mastered the basic exercise,
you can heighten the training effect by exercising with weights. Two plastic bottles can be
used for this, for example, which you initially
fill with a little, and later with more water.
Measure
Variation 2:
Strengthening
exercise
Here you move your arms in opposite directions. While you push one arm forwards, pull
the other one back. As in the basic exercise,
arms, head and upper body are slightly raised
during the
entire sequence of the movement.
Your feet should remain on the floor.
PHASE 3
The biggest hurdle
has been overcome –
it's time to get back
to normal!
PHASE 3
The biggest hurdle has been overcome – it's time to get back to normal!
Objective
Increasing the
load to full
capacity
Improving the
general
condition
Measure
The critical phase has been overcome. You are
now faced with the following objectives:
· Step-by-step increase of the load until you
can walk freely.
· Improvement of your general condition
and mobility. Training, performed right from
the beginning, is increased continuously.
You will feel increasingly assured in your
movements.
PHASE 3
Objective
You should take a few days when transferring
to walking without crutches.
You can discard your crutches once you can
walk normally, without limping. At the beginning you should only attempt short stretches
(e.g. in your home) without crutches. As you
become more assured you can walk longer
stretches without crutches.
If you feel very unsure at the beginning, just
turn the crutches around, hold them in front of
you in your hands, and use them as walking
sticks. This increases the load without removing support entirely.
Full load
Walking with just one crutch is not recommended, since it delays a "limp-free" gait. You
should therefore use both supports until you
can walk without any support.
Measure
Gait training
PHASE 3
The biggest hurdle has been overcome – it's time to get back to normal!
Objective
Pain relief
Reduction of
swelling
You should immediately reduce the load on the
leg if pain, swelling and/or a warming of the
tissue surrounding the joint should occur or
increase.
A cottage cheese compress reduces
swelling, is anti-inflammatory, relieves
pain and is pleasantly cooling.
· Spread the cottage cheese about 0.5 cm
thick on a compress or a cloth and cover the
treatment area liberally. To avoid infection it
is essential to cover the wound with a watertight bandage.
· The cottage cheese should be cool but not
ice cold and left to soak in for about 15
minutes or until it has become warm/dry
· Repeat if necessary
If these symptoms occur after the load, you
should react immediately with
Measure
Ointment
· 15 to 45 min. of cryotherapy
(for selective use of cold for
pain relief. see phase 1).
· Ointment dressing
Cryotherapy
· Cottage cheese compress
Quark compress
PHASE 3
Objective
EMS is the abbreviation for electrical muscle
stimulation, a therapy to restore normal
muscle function after immobility or injury.
Gentle electrical impulses cause the rigid
muscles to contract (tighten), thus helping
them to gain more strength.
If you use this method, make sure that the
electrodes are correctly attached, as shown in
the figure.
With an appropriate electrotherapy device
you can also strengthen other weak muscles in
your body, loosen muscle tension or relieve
pain using the TENS program (see Phase 1).
Strenght
Strengthening the lateral lower
leg muscle (peroneus)
Endurance
The lateral lower leg muscles (peroneus) have
the task of maintaining the stability of the
ankle and preventing it from twisting inwards.
After an injury to the ankle these muscles lose
their reflex-like capacity to contract and a large
part of their strength. For this reason it makes
sense to specifically train the peroneus muscle
using EMS equipment.
Measure
Electrotherapy
(EMS procedure)
PHASE 3
The biggest hurdle has been overcome – it's time to get back to normal!
Objective
Strength
Endurance
Mobility
Strengthening exercise with
gymnastic ball
Lie on your back in front of a wall so that there
is space for the gymnastic ball between your
feet and the wall.
With your affected foot, press the ball lightly
against the wall, as illustrated in the first
drawing.
Now roll the ball up and down against the wall
as illustrated in the second drawing.
Measure
Stabilization
and balancing
exercise
Exercise with strong and even pressure on
the ball. Once you can do the exercise you
can increase the pressure applied. This can be
increased until your pelvis is raised from the
floor, which additionally trains your physical
coordination.
PHASE 3
Objective
Strength
Strengthening and stabilization exercise
with training band
Make sure that your knees are always pointing
forwards so that your toes, knee and hip remain on the same axis.
Endurance
Attach the elastic training band to something
at a medium height, such as a door handle or
in the door frame. Sit on a chair with your
good leg closest to the anchor point.
Pull the band past your body with both hands,
from one side to the other and back again. Try
to keep the movement smooth and avoid any
jerking movement. Sit still while doing this and
only move your upper body.
As a variation of the exercise you can later sit
the other way round, so that the traction pulls
from the other side. This increases the load on
your leg. To make it more difficult, do the exercise sitting on a gymnastic ball.
The best way to check your movements is to
exercise in front of a mirror.
Measure
Stabilization
and balancing
exercise
PHASE 3
The biggest hurdle has been overcome – it's time to get back to normal!
Objective
Mobility
Stretching the thigh muscles
Front of thigh and hip extensor muscle
Stand in a walking position, with the affected
leg to the back. Keep your upper body straight
and push your hips forwards. The knee of your
standing leg moves forward when you do this,
the other leg remains as stretched as possible.
Inner side of thigh
Measure
Stretching
exercise
You should stand on your good leg. The movement is in the direction of the arrow, until you
feel a clear stretch on the inside of your thigh.
Maintain this stretch for a few seconds.
Rear side of thigh
You already know this exercise from phase
1. Place the leg with the VACO®ped onto the
seat of a chair. Lean your upper body forwards
until you can feel the rear of the thigh stretching. Keep your back slightly hollowed.
PHASE 3
Objective
Strength
Strengthening the posterior musculature
Endurance
For this exercise you need a robust chair and
an elastic training band. Attach one end of
the band to the back of the chair and the other
end to your VACO®ped. Stand behind the chair
as illustrated.
Stand with your good leg on the training band.
With the other leg, pull the band to the side
and slightly to the rear.
Try and keep the upper body still and straight
when doing this. Extend your leg outward and
then back a number of times, without touching
the floor.
Measure
Stretching
exercise
PHASE 3
The biggest hurdle has been overcome – it's time to get back to normal!
Objective
Strength
Rump stabilization
Endurance
Attach your training band at a medium
height to the door. Sit on a gymnastic ball
and support yourself with both legs firmly on
the floor. You should hold the two ends of the
training band at about eye height.
Now pull the two ends of the band with your
elbows bent at this height, and with both arms
held out behind you as far as you can. Your
back should go into a slightly hollow position.
Make sure that you do not pull up your shoulders. Also try and keep your wrists quite
straight.
Measure
Stretching
exercise
Then let the band pull your hands back and
they will return to the starting position. Increase the number of times you repeat the
exercise, depending on your state of strength
and endurance.
PHASE 3
Objective
Mobilization
To ease the transition to the next phase when
you will no longer need your VACO®ped, it is
recommended to utilize the ROM feature of
your VACO®ped.
The ROM adapter activates the hinges on the
VACO®ped and allows you to walk with
controlled range of motion.
Through this your joints will slowly get used to
normal movement again. Releasing the clips to
enable mobility can often take place very early
on, depending on the type of injury and the
treatment. Ask your physician when you can
make this switch.
Step 1:
Remove the front adapter
Measure
Step 2:
Replace the rear FIX adapter
with the ROM adapter
Switching the
adapters on the
VACO®ped
PHASE 4
I can be active
again – if I want to!
PHASE 4
I can be active again – if I want to!
Objective
Coordination
Proprioception
Proprioception is another term for the feeling
of movement or deep sensitivity - that is, the
interaction of the senses for posture, movement and force.
Proprioception enables us to perceive the
position (sense of place) and the movements
(kinestesia) of joints and limbs. It is also an
estimation of the necessary muscle power
(sense of force) to maintain or change positions. It is therefore the requirement for coordinated movements and motoric reflexes.
This movement control can be disrupted by various factors, such as injuries to the nerves,
damage to the mobility apparatus (especially
to joints, tendons, ligaments, muscles), and by
immobility that persists for a long time.
Measure
If your motion sensors tell your brain that the
surface on which you are standing is very slippery (e.g. ice), your leg muscles will create a
different tension (you will move differently)
than on a firm surface. If the pain and mechanoreceptors report that there is a disorder/injury in the joint (such as after an accident or
an operation), this causes a restriction in
movement. Your leg feels stiff and inflexible.
With the following exercises you can maintain
or restore your capacity for movement.
But this will only work if you train regularly preferably on a daily basis.
But how does this control of movements
function?
PHASE 4
Objective
A trauma, or surgery, results in certain receptors no longer functioning or being removed
entirely.
This disrupts the interaction between the
central nervous system and the muscles. The
same thing occurs with immobility. The longer
the joint is kept immobile, the greater the
disruption.
Coordination
Receptors are special nerve cells which record
stimulations and pass these on to the central
nervous system. Each receptor is responsible
for specific information. All this information is
processed in the central nervous system and is
used as the basis for reactions to disruption in
our bodies.
Proprioception
Consequence: The readiness of the muscles to
react is reduced. Movements, balancing ability
and the coordinative ability of the body no
longer function as smoothly as normal.
Through selective coordinative training,
your body can learn to compensate for these
deficits. The remaining receptors take over
additional tasks here. In this way the readiness
of the muscles to react can be restored.
Measure
Coordinative
training
PHASE 4
I can be active again – if I want to!
Objective
Coordination
Principle of coordinative training (mainly
stabilization and balance exercises):
Proprioception
· Always begin your training session with
coordination exercises.
Begin the exercises slowly and carry them
out as exactly as possible.
· Exercise conscientiously and with full
concentration.
Move up from simple to more difficult
movement requirements.
· End the exercise if you notice that you are
getting tired and can no longer fully
concentrate.
Move on to the next degree of difficulty
only when you have mastered the more
simple level.
Measure
PHASE 4
Objective
Coordination
Mobilization oft he ankle
with the rocker board
Proprioception
This exercise helps to provide your ankle on
the affected leg with more mobility.
Move the rocker board to the left and right
with your foot. Practice first in a sitting position, and later standing in a walking position
(the good leg is standing on the floor). Make
sure that the movement does not cause any
pain in the ankle.
Measure
Mobilization
training
PHASE 4
I can be active again – if I want to!
Objective
Coordination
Foot-ABC
Proprioception
Sit on a table so that your foot has no contact
with the ground. Now write the alphabet with
the affected foot. You can improve mobility
in this way.
Measure
Mobilization
training
PHASE 4
Objective
Coordination
Increasing exercise for stance stabilization and balancing exercises
In coordinative training, especially for stance
stabilization, a wide range of variations are
possible. Each variation means an increase in
the training effect. Please observe the following principles when doing this:
Exercise with bare feet.
Step up the exercises slowly, from simple
to more difficult movement requirements.
Start, for example, with both legs on the
floor, and increase the load by practicing in
a walking position, later on one leg, and
finally on the rocker board.
Practice on less and less stable surfaces
(stable floor to start with - then seesaw
board horizontal - rocker board forwards/
backwards - rocker board side to side rocker board tilted - balance disc.). Practice
first in a walking position (healthy leg on the
floor, see figure), later with both legs on the
board. Advanced students can also try it
standing with one leg on the rocker board.
Step up from exercises with much information (in front of mirror) to exercise forms
with less and less information (without
mirror - looking straight ahead - one eye
closed - both eyes closed).
Measure
Increase the requirements only when you
have fully mastered an exercise.
Coordinative
training
PHASE 4
I can be active again – if I want to!
Objective
Coordination
Stabilization exercise with gymnastic ball
Practice first with your good leg in front,
then change to the leg that has been
operated on.
Move your leg in this exercise so that the
knee is always pointing straight in front.
At the beginning, support your knee slightly
with the hands, and later take your hands
away.
Measure
Stabilization
and balancing
exercise
Always perform the coordination exercises at
the beginning of the training session with full
concentration - strength and endurance exercises always after these.
PHASE 4
Objective
Coordination
Leg axis training for a more stable stance
For this exercise you need a rocker board
with the tilting axis right/left. Here you may
use your crutches for stability. As soon as
you feel safe you can just discard the supports.
To start with you can lessen the tilting movements by using a training mat or foam material.
Measure
Stabilization
and balancing
exercise
PHASE 4
I can be active again – if I want to!
Objective
Coordination
Stance stabilization with traction
from the front
Measure
Stabilization
and balancing
exercise
Start this exercise with both legs on the floor
without a rocker board.
Make sure that: the knees are slightly bent,
the back is straight or slightly hollowed.
Keep your arms stretched sideways and
slightly forwards. Pull the elastic training
band slowly backwards, as shown in the figure, and then move your arms evenly to the
front.
Step up the exercise according to the rules of
coordinative training. Practice first with both
legs on the floor, then in a walking position,
and later in a walking position with rocker
board and finally with both feet on the board
(with tilting axis forwards/backwards).
PHASE 4
Objective
Coordination
Stance stabilization on the seesaw board
Proprioception
Increase the exercises on the seesaw board
step by step, as is the intention of coordinative
training.
Practice first standing with both feet on the
seesaw board, then standing in a walking
position (support yourself slightly with the
toes of the rear foot) and finally standing
on one leg.
Measure
Stabilization
and balancing
exercise
PHASE 4
I can be active again – if I want to!
Objective
Improvement in
everyday motor
activity
Transition
to specific
training
Recovering "full use" of the leg is the objective
of the entire rehabilitation phase. You should
"feel fit" again and manage all movements
without restriction. This is not restricted just to
the leg that has been operated on, but refers
to all your body.
The principal objective of phase 4 is therefore
to further develop strength and endurance, so
that the resilience of the foot increases.
Building this strength up is a slow but continuous process. Increase the exercise units step
by step, from short loads to longer training
sessions.
Measure
Be aware of your body's reactions and adjust
the load accordingly.
If you feel just as fit as before your injury, then
you have achieved your final objective.
PHASE 4
Objective
Strength
Stance stabilization with traction
from the front
You can do this exercise on both sides, that is,
use the affected leg as the standing leg.
Keep the upper body straight and slightly inclined forwards. Try and stretch out the pulling
leg backwards.
Coordination
If you have difficulty balancing at the beginning, you can support yourself on the wall
until you can stand safely on one leg.
A further variation on this exercise with a
rocker board can be found at the end of this
training phase.
Measure
Stabilization
and balancing
exercise
PHASE 4
I can be active again – if I want to!
Objective
Strength
Coordination
Stance stabilization with sideways
traction – standing leg at front
This also involves standing firmly on one leg,
this time with traction from the side.
The elastic training band can be attached
with a support at a low height at the door.
Your standing leg is on the "door side".
Measure
Stabilization
and balancing
exercise
Stretch the other leg slightly backwards and attach the training band to it. Now pull the band
outwards as far as you can and then move it
slowly back to the starting point.
Make sure with the standing leg that the toes,
knees and hips form a straight line. The knee
is slightly bent.
PHASE 4
Objective
Strength
Stance stabilization with sideways
traction – standing leg behind
In this exercise your pulling leg is on the "door
side", where your training band is attached. At
the beginning, keep the training band as close
as possible to the standing leg (low rotational
force). When your muscles have become stronger, pull the band in front of the standing leg,
or beyond it (larger rotational force).
Coordination
In this exercise you should ensure in particular
that your standing leg remains firm - the knee
must not move inwards.
You can also do this exercise, like all those in
phase 4, on both sides.
Measure
Stabilization
and balancing
exercise
PHASE 4
I can be active again – if I want to!
Objective
Strength
Strengthening the calf muscles
Coordination
If you can put a full load on your leg again,
stand on the balls of your feet on some stairs.
Hold on to the staircase or the wall with both
hands.
Measure
Stabilization
and balancing
exercise
Now move slowly down with your heels until
you feel tightness in your calf muscles. Then
push yourself upwards on your toes.
Repeat this exercise 15 to 20 times.
PHASE 4
Objective
Strength
Stance stabilization on an
unstable surface
As already mentioned, this is a progression
from the first exercise in this chapter.
With the rocker board with the tilting axis forwards/ backwards, your coordination ability is
optimally exercised.
Coordination
If you can master this exercise on both sides,
the coordinative training of the past few weeks
has been worthwhile. Your body is again in
control of the most important movement
sequences for a safe stance – perhaps even
better than before your injury.
Measure
Stabilization
and balancing
exercise
PHASE 4
I can be active again – if I want to!
Objective
Strength
Endurance
You can now venture to tackle sports activities
again. But for the time being you should only
do activities that you can do well, and movements that can be well controlled.
Problematic:
· Sudden changes of direction
· Unpredictable players/opponents or
contact sports
· Load requirements with sudden stopping
and lots of jumping
Measure
Sports
activities
Stop doing a sport if you feel tired or unfit.
In this condition your muscles will have a
delayed reaction to stabilization requirements.
PHASE 4
Objective
Strength
Endurance
Measure
Sports
activities
WM-INVP-20-2-EN, © www.artraction.de, 11/08
www.fuss-reha.info
Now it’s up to you...
OPED GmbH
Medizinpark 1
83626 Valley/Oberlaindern
Germany
OPED AG
Hinterbergstrasse 26
6330 Cham
Switzerland
Fon +49 (0)8024 / 60 81 82-10
Fax +49 (0)8024 / 60 81 82-99
[email protected]
www.oped.de
Fon +41 (0)41/ 748 53 35
Fax +41 (0)41/ 748 53 40
[email protected]
www.oped.ch
Schutzgebühr: € 9,90
let yourself be helped!