1
by
Portable Power Solutions
USER MANUAL
Thank you for choosing the Jump Starter 12K/21K by Powercases.
Always follow basic safety precautions when using electrical appliances. Before operating your new device, please read this user’s
manual carefully. Please keep this instruction manual for easy reference.
TABLE OF CONTENTS
A. DIAGRAM
3
B. USAGE INSTRUCTIONS
4
1. Current-charge capacity
4
2. Charging
4
3. Jump start your vehicle
5
4. Jump start your vehicle (Easy steps)
7
5. Smart extension cable
7
6. Charging mobile phones and tablets
8
7. Torch(Flashlight) function
8
8. Emergency light function
8
9. Charging laptops
8
C. FAQ
9
D.TECHNICAL SPECIFICATIONS
10
E.PARTS LIST
11
F. SAFETY WARNINGS
11
G. PRODUCT WARRANTY
12
H. CONTACT INFORMATION
12
2
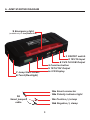
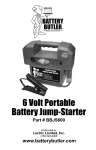
A. JUMP STARTER DIAGRAM
9 Emergency light
(available only on JumpStarter 21K)
1 ON/OFF switch
2 15V/1A Input
3 5V/2.1A USB Output
4 Function button
5 12/16/19V Output
6 LCD Display
7 Jump Start socket
8 Torch(Flashlight)
10a Smart connector
10b Polarity indicator light
10
Smart jumper
cable
10c Positive (+) clamp
10d Negative (-) clamp
3
11a Smart connector
11
Smart extension
cable
11b Polarity indicator light
11c Positive (+) lug
11d Negative (-) lug
12
AC adapter
13
Car adapter
14
USB Adapter cable
15
Laptop connectors
B. USAGE INSTRUCTIONS
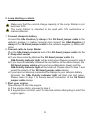
1. Check the current-charge capacity of the Jump Starter
Slide the 1 ON/OFF switch to On position to turn on the power, the
current-charge level will be displayed in percents on 6 LCD Display.
When charging, the percentage shown on 6 LCD Display will slowly
increase in time up to 100. When charging is complete, 6 LCD Display
will show 100%.
2. Charging the Jump Starter
1. Plug the 12 AC adapter into
the wall socket.
1. Plug the 13 Car adapter into
the cigarette lighter socket in
your car/truck/boat.
2. Connect the round end of the
13 Car adapter to the
2 15V/1A Input port of the
Jump Starter.
2. Connect the round end of the
12 AC adapter to the
2 15V/1A Input port of the
Jump Starter.
4
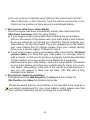
3. Jump starting a vehicle
Make sure that the current-charge capacity of the Jump Starter is not
less than 30%.
The Jump Starter is intended to be used with 12V automotive or
marine batteries.
1. Connect clamps to battery
Connect the 10c Positive (+) clamp of the 10 Smart jumper cable to the
vehicle’s positive (+) battery terminal and connect the 10d Negative (-)
clamp of the 10 Smart jumper cable to the vehicle’s negative (-) battery terminal.
2. Connect cable to Jump Starter
Plug the 10a Smart connector end of the 10 Smart jumper cable into the
7 Jump start socket.
a) If you have correctly attached the 10 Smart jumper cable, the
10b Polarity indicator light will be solid green.Please proceed to step 3.
b) If you have accidentally reversed the connection of the cable clamps, the
10 Smart jumper cables will sound an audible alarm (beep) and the
10b Polarity indicator light will be solid red. Please return to step 1 and
corect the polarity of the 10 Smart jumper cable clamps.
c) If you have not securely connected the clamps to your vehicle’s battery
terminals, the 10b Polarity indicator light will flash red and green.
Please return to step 1 to ensure secure connection of the 10 Smart
jumper cable clamps.
3. Start your engine
Now attempt to start the engine.
a) If the engine starts, proceed to step 4.
b) If engine does not start, wait 10 seconds before attempting to start the
engine again.
5
c) Do not continue to attempt jump starting if the vehicle will not start
after 5 attempts. In this instance, have the vehicle serviced by a mechanic as the problem is likely beyond a discharged battery.
4. Disconnect cable from Jump Starter
Once the engine has been successfully started, then disconnect the
10a Smart connector from the Jump Starter.
a) If your engine is still running after disconnecting the Jump Starter,
and you are aware of the reason why your main battery was drained,
drive your vehicle as normal and your alternator should recharge your
main battery. On the other hand, if you are unaware as to the reason
your main battery lost it’s charge, please drive your vehicle directly
home or to a service station. Proceed to step 5.
b) If your engine stops running immediately after removing the 10 Smart
jumper cable, it is likely that your main battery is no longer able to
hold a charge, or that you do not have a properly functioning alternator.
In this instance, you may use the Jump Starter as a temporary
replacement for your main battery. Leave the Jump Starter connected
to your main battery, and drive your vehicle directly home or to a service station. Depending on the size of the vehicle and the electrics in
use, you can expect to drive over 60 miles (100 KM) with a fully
charged Jump Starter.
5. Disconnect clamps from battery
First disconnect the 10d Negative (-) clamp and then finally the
10c Positive (+) clamp from battery terminals.
Please be aware that the Jump Starter is not intended to be used as a
permanent replacement for your main battery. Lastly please note that
your vehicle's alternator will not recharge the Jump Starter.
6
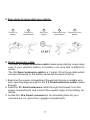
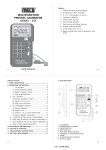
4. Easy steps to jump start your vehicle.
1
2
3
4
5
Connect to
battery
Connect to
Jump Starter
Start your
engine
Disconnect from
Jump Starter
Disconnect from
battery
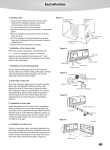
5. Smart extension cable
The new 11 Smart extension cable makes jump starting super easy
even if your vehicle’s battery is located in an area that is difficult to
acces.
The 11 Smart extension cable is a 1 meter (3 foot) long cable which
can be hard-wired to the battery terminals for ease of acces.
1. Examine the engine compartment firewall and locate a suitable wire
loom opening large enough for the 11 Smart extension cable to pass
through.
2. Feed the 11 Smart extension cable through the firewall, from the
engine compartiment and connect the eyelets (lugs) to the battery terminals.
3. Locate the 11a Smart connector in an accesible place for your
convenience (i.e. glove box, luggage compartment).
7
6. Charging mobile phones and tablets
1. Make sure the electronic device is 5V powered.
2. Connect the 14 USB adapter cable to the 3 5V/2.1A USB Output
port on the Jump Starter.
3. Attach the compatible charging adapter to the electronic device.
4. Slide the 1 ON/OFF switch to the On position to start charging.
7. Torch (Flashlight) function
1. Slide the 1 ON/OFF switch to the On position.
2. Press and hold 4 Function button for 3 seconds to turn on the
8 Torch(Flashlight). Press and hold again for 3 seconds to turn off.
3. Press 4 Function button once for flashing mode.
4. Press 4 Function button once again for SOS mode.
5. Press 4 Function button one more time to turn off
8 Torch(Flashlight).
8. Emergency light function (feature only available on JumpStarter 21k)
1. Slide the 1 ON/OFF switch to the On position.
2. Double-press 4 Function button to turn on 9 Emergency light.
Double press again to turn off.
9. Charging laptops
1. Slide the 1 ON/OFF switch to the On position.
2. Press 4 Function button repeatedly to cycle through the power
output options; your selection will appear on the 6 LCD Display.
Select either 12V, 16V, or 19V according to your laptop model.
3. Use the appropriate 15 Laptop connector to connect your laptop to
the Jump Starter’s 5 12/16/19V Output port.
8
C. FAQ
Q. How many times can the Jump Starter charge a mobile phone?
A. It depends on the size and current charge level of your mobile
phone. However for example, it can fully charge an iPhone
approximately three times.
Q. How many times can the Jump Starter on a full charge start my vehicle?
A. This depends greatly on the temperature and the size of the engine being
started. However, for example a small car can be started 20 times, and a
motorcycle 50 times.
Q. How long will the Jump Starter hold it’s charge without use?
A. The Jump Starter will lose approximately 10% of it’s charge every
month, we recommend recharging the unit every 6 months.
Q. Will reversing polarity connections of the jump starter cable damage the
vehicle?
A. No, the Jump starter is very safe as it is equiped with a 10 Smart jumper
cable that will prevent applying the wrong polarity to your vehicles battery.
If you have accidentally connected the red and black cable clamps to the
wrong polarity terminals, the 10 Smart jumper cable will sound an audible alarm (beep) and the indicator light will be solid red. Simply correct the
connection of the jumper cable clamps polarity.
Q. What if it doesn’t jump start the vehicle?
A. Check that the clamps are well-connected to the battery terminals.
If the vehicle does not start, remove the clamps, clean the terminals,
reconnect, and try again.
9
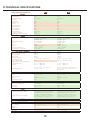
D.TECHNICAL SPECIFICATIONS
Jump Starter Specifications
Features
Emergency Jump Starting
On-Off Switch
Jump Start Setting
USB Ports
Laptop Port
Hazzard Lights
Inverter
Vent/Cooling Fan
Flashlight(Torch)
Built-in Charger
Digital Readout
Charge Indicator
% of Charge Indicator
Volt Meter for Internal Battery
12K
21K
Yes
Yes
Automatic
2
Yes
No
No
No
Yes
No
Yes
Digital
Yes
Digital
Yes
Yes
Automatic
2
Yes
Yes
No
No
Yes
No
Yes
Digital
Yes
Digital
Lithium Iron Phosphate
("LFP", LiFePO4)
12,000 mAh
12,000 mAh
0.144 kWh
12 V
1000+ cycles
-20C to 60C
6 Months
Lithium Iron Phosphate
("LFP", LiFePO4)
21,000 mAh
21,000 mAh
0.252 kWh
12/24 V
1000+ cycles
-20C to 60C
6 Months
600 A
560 A
400 A
600 A
Specs
7.2 kW (6.7 kW cold)
N/A
750 A
600 A
500 A
750 A
Specs
9 kW (7.2 kW cold)
18 kW (14.4 kW cold)
6.0 L (200 HP)
3.0 L (160 HP)
7.2 L (600 HP)
4.0 L (400 HP)
Typical Application
Large Cars and Small
Trucks/Vans
Class 6 Trucks and Mid-size
Construction/Industrial
Equipment
Charging Outputs
USB 1
USB 2
4 in 1 USB cable
Laptop
Latop Adapter cable
5 V, 1 A
5 V, 2.1 A
Yes
16/19V, 3.5 A
Yes
5 V, 1 A
5 V, 2.1 A
Yes
16/19V, 3.5 A
Yes
Charging
Input
Time from full discharge
AC Charger
Car Charger
15 V, 1 A
3.5 Hours
90 to 250 V
12 V
15 V, 1 A
4.5 Hours
90 to 250 V
12 V
12 Volt Smart Aligator Clamps
12 inches, 8 AWG, Audible
reverse polarity warning,
Overheating protection
12 inches, 8 AWG, Audible
reverse polarity warning,
Overheating protection
12 Volt Smart Extension Cables
3 feet, 8 AWG, Audible
reverse polarity warning,
Overheating protection
3 feet, 8 AWG, Audible
reverse polarity warning,
Overheating protection
N/A
N/A
Material
Size (L x W x H)
Weight
Waterproof
Painted Rubber, HDPE
18 x 9 x 4 cm
420 g
No
Painted Rubber, HDPE
18 x 9 x 4 cm
573 g
No
Packaging
Soft Zip Case
Soft Zip Case
Battery
Type
Size
True (Usable) Capacity
Energy
Volts
Lifetime
Workiing Temperature
Charge Hold Time (to 50%)
Jump Starter Performance
Cranking Amps (CA)
Cold Cranking Amps (CCA)
Starting Current
Peak Current
Alternator Voltage
Power output (12 V)
Power output (24 V)
Largest Engine Starting Capability
Gasoline (Petrol)
Diesel
Cables
Inverter
Outlet
Physical Enclosure
10
E.PARTS LIST
#
Parts name
QTY
#
Parts name
QTY
1
Jump Starter
1
5
Jumper cable
1
2
4 in 1 USB cable
1
6
Extension cable
1
3
AC adaptor
1
7
User manual
1
4
Car adaptor
1
8
Soft zip-case
1
9
Laptop connectors / cable
1
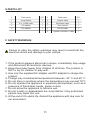
F. SAFETY WARNINGS
Failure to obey the safety warnings may result in electrical fire,
electrical shock and damage to your vehicle.
1. If the product appears abnormal in shape, immediately stop usage
and disconnect all electronic devices.
2. Keep the product away from children at all times. The product is
NOT a toy for children to play with.
3. Use only the supplied AC adapter and DC adapter to charge the
product.
4. Charge only at ambiental temperatures between -30° C and 60° C
5. Do not store in locations where the temperature may exceed 70°C
6. Do not operate the appliance in explosive atmospheres, such as in
presence of flammable liquids, gases or dust.
7. Do not allow the appliance to become wet.
8. Do not modify or disassamble the Jump Starter. Only authorized
parties may repair this unit.
9. At the end of it’s useful life, discard the appliance with due care for
our enviroment.
11
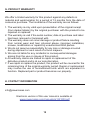
G. PRODUCT WARRANTY
We offer a limited warranty for this product against any defects in
material and workmanship for a period of 12 months from the date of
consumer purchase. The conditions of the warranty are as follows:
1. The warranty is only valid upon presentation of the original receipt
(from dealer/retailer) by the original purchaser with the product to be
repaired or replaced.
2. The warranty is void if the serial number, date of purchase and label
has been removed or tampered with.
3. The warranty does not cover damage or product failure resulting
from normal wear and tear, physical abuse, improper installation,
misuse, modification or repairs by unauthorized third parties.
4. We do not assume responsibility for any loss or damage incurred
during shipment or as a result of a force majeure.
5. We are not liable for any incidental or consequential damages
arising from the use or misuse of this product.
6. AII warranty claims are limited to repair or replacement of the
defective product and is at our sole discretion.
7. lf we repair or replace the product, the product will be covered for the
remaining time of the original warranty period. Repair or replacement
may involve the use of reconditioned units which are equivalent in
function. Replaced part or product becomes our property.
H. CONTACT INFORMATION
[email protected]
Electronic version of this user manual is available at
www.powercases.com/manuals/jp1221000.pdf
12