1
STP 8-91G15-SM-TG
SOLDIER’S MANUAL
AND TRAINER’S GUIDE
MOS 91G
PATIENT
ADMINISTRATION
SPECIALIST
SKILL LEVELS 1/2/3/4/5
JULY 2002
HEADQUARTERS, DEPARTMENT OF THE ARMY
DISTRIBUTION RESTRICTION: Approved for public release; distribution is unlimited.
STP 8-91G15-SM-TG
*
SOLDIER TRAINING
PUBLICATION
No. 8-91G15-SM-TG
HEADQUARTERS
DEPARTMENT OF THE ARMY
Washington, DC, 26 July 2002
SOLDIER'S MANUAL and TRAINER'S GUIDE
MOS 91G
Soldier's Manual, Skill Levels 1/2/3/4/5 and Trainer's Guide,
MOS 91G, Patient Administration Specialist
Skill Levels 1, 2, 3, 4 and 5
TABLE OF CONTENTS
PAGE
Table of Contents ...................................................................................................................... i
Preface ...................................................................................................................................... v
Chapter 1. Introduction ........................................................................................................1-1
1-1. General ..........................................................................................................1-1
1-2. Battle Focused Training..................................................................................1-1
1-3. Relationship of Soldier Training Publications (STPs) to Battle Focused
Training ..................................................................................................................1-1
1-4. Task Summaries ............................................................................................1-1
1-5. Soldier's Responsibilities ................................................................................1-2
1-6. NCO Self-Development and the Soldier's Manual ..........................................1-2
1-7. Trainer's Responsibilities.................................................................................1-3
1-8. Training Tips for the Trainer ...........................................................................1-5
1-9. Training Support.............................................................................................1-6
*
DISTRIBUTION RESTRICTION: Approved for public release; distribution is unlimited.
*This manual supersedes STP 8-71G15-SM-TG, 7 February 1995.
i
STP 8-91G15-SM-TG
Chapter 2. Trainer's Guide ....................................................................................................... 2-1
2-1. General .............................................................................................................. 2-1
2-2. Part One, Section I. Subject Area Codes......................................................... 2-3
2-3. Part One, Section II. Duty Position Training Requirements ............................ 2-4
2-4. Part Two. Critical Tasks List............................................................................. 2-5
Chapter 3. MOS/Skill Level Tasks........................................................................................... 3-1
Skill Level 1
081-866-0003
081-866-0057
081-866-0118
081-866-0122
081-866-0061
081-866-0191
081-866-0101
081-866-0102
081-866-0022
081-866-0123
081-866-0124
081-866-0132
081-866-0039
081-866-0199
081-866-0200
081-866-0201
081-866-0202
081-866-0027
081-866-0105
081-866-0040
081-866-0041
081-866-0042
ii
Subject Area 1: Admissions and Dispositions
VERIFY THE ELIGIBILITY OF A PATIENT ............................................... 3-1
COMPLETE DA FORM 2985 (ADMISSION AND CODING
INFORMATION) .......................................................................................... 3-3
PREPARE A PATIENT ADMISSION PACKET.......................................... 3-6
PREPARE AN ADMISSION AND DISPOSITION (AAD) REPORT .......... 3-9
INITIATE DA FORM 2173 (STATEMENT OF MEDICAL
EXAMINATION AND DUTY STATUS)...................................................... 3-12
PERFORM ADMISSION PROCEDURES................................................ 3-13
COORDINATE PATIENT CONTROL WITH A CIVILIAN HOSPITAL
REGARDING ABSENT SICK PATIENTS ................................................. 3-17
COORDINATE THE TRANSPORT OF AN ABSENT SICK PATIENT
TO A MILITARY TREATMENT FACILITY ................................................ 3-19
Subject Area 2: Patient Trust Fund
COMPLETE DA FORM 3696 (PATIENT'S DEPOSIT RECORD)........... 3-21
FORWARD FUNDS AND VALUABLES AFTER THE DISPOSITION
OR TRANSFER OF A PATIENT ............................................................... 3-23
MAKE DISPOSITION OF THE FUNDS AND VALUABLES OF A
MENTALLY INCOMPETENT PATIENT .................................................... 3-24
MAKE DISPOSITION OF THE FUNDS AND VALUABLES OF A
DECEASED SERVICE MEMBER............................................................. 3-26
Subject Area 3: Medical Records
PREPARE A PATIENT RECORDING CARD .......................................... 3-28
INITIATE MEDICAL RECORDS............................................................... 3-30
FILE FORMS IN MEDICAL RECORDS................................................... 3-32
SCREEN AN INCOMING MEDICAL RECORD ...................................... 3-34
PERFORM MEDICAL RECORDS MANAGEMENT FUNCTIONS .......... 3-36
RETRIEVE OR FILE A TERMINAL DIGIT FILE FOR TREATMENT
RECORD ................................................................................................... 3-40
RELEASE MEDICAL INFORMATION...................................................... 3-41
Subject Area 4: Casualty Reporting
COMPLETE DA FORM 2984 (VERY SERIOUSLY ILL/SERIOUSLY
ILL/SPECIAL CATEGORY PATIENT REPORT)...................................... 3-43
PREPARE A PROGRESS REPORT FOR A VSI, SI, OR SPECAT
PATIENT .................................................................................................... 3-44
PREPARE A VSI, SI, AND SPECAT PATIENT ROSTER....................... 3-46
STP 8-91G15-SM-TG
081-866-0043 COMPLETE DA FORM 3894 (HOSPITAL REPORT OF DEATH) .......... 3-47
081-866-0044 INITIATE DD FORM 2064 [CERTIFICATE OF DEATH
(OVERSEAS)]............................................................................................ 3-49
081-866-0145 ASSEMBLE A DEATH PACKET .............................................................. 3-51
Subject Area 5: Third Party Liability
081-866-0062 SUBMIT AN INITIAL NOTIFICATION FOR POSSIBLE THIRD
PARTY LIABILITY ..................................................................................... 3-52
081-866-0063 INITIATE DA FORM 2631 (MEDICAL CARE - THIRD PARTY
LIABILITY NOTIFICATION) ....................................................................... 3-54
Subject Area 6: Evacuation and Transfer
081-866-0121 PREPARE FOR AN AEROMEDICAL EVACUATION ............................. 3-56
081-866-0129 PREPARE A PATIENT FOR AN AEROMEDICAL EVACUATION.......... 3-60
Subject Ar ea 7: Coding
081-866-0053 CODE A DIAGNOSIS USING ICD-9 CODES.......................................... 3-62
081-866-0146 CODE A PROCEDURE USING CPT-4 CODES...................................... 3-65
081-866-0194 PROCESS RECORD CODING DATA USING CHCS ............................. 3-66
Subject Area 8: CHCS
081-866-0154 PERFORM PATIENT REGISTRATION FUNCTIONS USING THE
CHCS......................................................................................................... 3-69
081-866-1002 PERFORM PATIENT ADMISSIONS FUNCTIONS USING THE
CHCS......................................................................................................... 3-73
081-866-1003 PERFORM PATIENT DISPOSITION FUNCTIONS USING THE
CHCS......................................................................................................... 3-75
081-866-0193 PERFORM RECORDS FUNCTIONS USING CHCS .............................. 3-77
081-866-0196 PROCESS DEFICIENT/DELINQUENT RECORDS USING CHCS ........ 3-83
081-866-0197 COMPLETE MSA FUNCTIONS USING CHCS....................................... 3-86
081-866-1004 PERFORM MASS CASUALTY OPERATION FUNCTIONS USING
THE CHCS................................................................................................. 3-89
Subject Area 9: TAMMIS
081-866-0216 PREPARE COMMERCIAL-OFF-THE-SHELF (COTS)
COMPONENTS FOR OPERATION.......................................................... 3-92
081-866-0203 PERFORM TAMMIS ADMINISTRATION FUNCTIONS .......................... 3-94
081-866-1052 COMPLETE MEDPAR FUNCTIONS USING TAMMIS ........................... 3-96
081-866-1051 PRODUCE MEDPAR REPORTS USING TAMMIS ............................... 3-101
Subject Area 10: Miscellaneous
081-866-1041 PERFORM TPOCS FUNCTIONS .......................................................... 3-104
081-866-1042 PERFORM MASCAL FUNCTIONS........................................................ 3-108
Skill Level 2
Subject Area 11: Administration (SL 2)
081-866-0292 COMPLETE DA FORM 4160 (PATIENT'S PERSONAL EFFECTS
AND CLOTHING RECORD).................................................................... 3-110
081-866-0293 PROCESS SF 523A (MEDICAL RECORD - DISPOSITION OF
BODY)...................................................................................................... 3-112
iii
STP 8-91G15-SM-TG
081-866-1016 PERFORM INPATIENT RECORDS SUPERVISORY FUNCTIONS
USING THE CHCS .................................................................................. 3-113
081-866-1040 SUBMIT PATIENT EVACUATION REQUESTS.................................... 3-116
081-866-0095
081-866-0302
081-866-1045
081-866-1043
081-866-1044
081-866-1047
081-866-0094
081-866-0198
081-866-0325
081-866-0317
Skill Level 3
Subject Area 12: Administration (SL 3)
REVIEW SF 523 (CLINICAL RECORD-AUTHORIZATION FOR
AUTOPSY) ............................................................................................... 3-122
COORDINATE A MEDICAL EVALUATION BOARD (MEB)
PROCEEDING......................................................................................... 3-124
PROCESS DECEDENT AFFAIRS FORMS........................................... 3-127
Subject Area 13: TAMMIS (SL 3)
SUPERVISE TAMMIS ADMINISTRATION FUNCTIONS ..................... 3-129
PERFORM MEDPAR CC FUNCTIONS ................................................. 3-132
SUPERVISE MEDREG FUNCTIONS .................................................... 3-135
Skill Level 4
Subject Area 14: Administration (SL 4)
INITIATE NOTIFICATION TO NEXT OF KIN (NOK) OF A
DECEASED SERVICE MEMBER........................................................... 3-139
PERFORM PARRTS FUNCTIONS ........................................................ 3-141
LOAD SOFTWARE FOR PATIENT ACCOUNTING REPORTS AND
REALTIME TRACKING SYSTEM (PARRTS) MOBILE ON A
PERSONAL COMPUTER ....................................................................... 3-146
Subject Area 15: TAMMIS (SL 4)
GENERATE REPORTS USING MEDREG............................................ 3-150
Appendix A.................................................................................................................................A-1
Glossary.........................................................................................................................Glossary-1
References................................................................................................................ References-1
iv
STP 8-91G15-SM-TG
PREFACE
This publication is for skill level 1, 2, 3, 4, and 5 soldiers holding military occupational specialty
(MOS) 91G and for trainers and first-line supervisors. It contains standardized training
objectives, in the form of task summaries, to train and evaluate soldiers on critical tasks that
support unit missions during wartime. Trainers and first-line supervisors should ensure soldiers
holding MOS/SL 91G1/2/3/4/5 have access to this publication. This STP is available for
download from the Reimer Digital Library (RDL).
This manual applies to both Active and Reserve Component soldiers.
The proponent of this publication is HQ, TRADOC. Send comments and recommendations on
DA Form 2028 (Recommended Changes to Publications and Blank Forms) directly to Academy
of Health Sciences, ATTN: MCCS-HTI, 1750 Greeley Rd, STE 135, Fort Sam Houston, TX
78234-5078.
v
STP 8-91G15-SM-TG
CHAPTER 1
Introduction
1-1. General
This manual identifies the individual MOS training requirements for soldiers in MOS 91G.
Commanders, trainers, and soldiers should use it to plan, conduct, and evaluate individual
training in units. This manual is the primary MOS reference to support the self-development
and training of every soldier.
Use this manual with Soldier's Manuals of Common Tasks (STP 21-1-SMCT and STP 21-24SMCT), Army Training and Evaluation Programs (ARTEPs), and FM 25-101, Battle Focused
Training, to establish effective training plans and programs which integrate soldier, leader, and
collective tasks.
1-2. Battle Focused Training
As described in FM 25-100, Training the Force, and FM 25-101, Battle Focused Training, the
commander must first define the mission essential task list (METL) as the basis for unit training.
Unit leaders use the METL to identify the collective, leader, and soldier tasks which support
accomplishment of the METL. Unit leaders then assess the status of training and lay out the
training objectives and the plan for accomplishing needed training. After preparing the longand short-range plans, leaders then execute and evaluate training. Finally, the unit's training
preparedness is reassessed, and the training management cycle begins again. This process
ensures that the unit has identified what is important for the wartime mission, that the training
focus is applied to the necessary training, and that training meets established objectives and
standards.
1-3. Relationship of Soldier Training Publications (STPs) to Battle Focused Training
The two key components of enlisted STPs are the Trainer's Guide (TG) and Soldier's Manual
(SM). The TG and SM give leaders important information to help in the battle focused training
process. The TG relates soldier and leader tasks in the MOS and SL to duty positions and
equipment. It provides information on where the task is trained, how often training should occur
to sustain proficiency, and who in the unit should be trained. As leaders go through the
assessment and planning stages, they should use the TG as an important tool in identifying
what needs to be trained.
The execution and evaluation of soldier and leader training should rely on the Armywide training
objectives and standards in the SM task summaries. The task summaries ensure that soldiers
in any unit or location have the same definition of task performance and that trainers evaluate
the soldiers to the same standard.
1-4. Task Summaries
Task summaries contain information necessary to conduct training and evaluate soldier
proficiency on tasks critical to the MOS. A separate task summary is provided for each critical
task. These task summaries are, in effect, standardized training objectives which ensure that
soldiers do not have to relearn a task on reassignment to a new unit. The format for the task
summaries included in this manual is as follows:
1-1
STP 8-91G15-SM-TG
• Task Title. The task title identifies the action to be performed.
• Task Number. A 10-digit number identifies each task or skill. Include this task number,
along with task title, in any correspondence relating to the task.
• Conditions. The task conditions identify all the equipment, tools, references, job aids,
and supporting personnel that the soldier needs to perform the task in wartime. This section
identifies any environmental conditions that can alter task performance, such as visibility,
temperature, and wind. This section also identifies any specific cues or events that trigger
task performance.
• Standards. The task standards describe how well and to what level you must perform a
task under wartime conditions. Standards are typically described in terms of accuracy,
completeness, and/or speed.
• Performance Steps. This section includes a detailed outline of information on how to
perform the task.
• Evaluation Preparation (when used). This subsection indicates necessary modifications
to task performance in order to train and evaluate a task that cannot be trained to the
wartime standard under wartime conditions. It may also include special training and
evaluation preparation instructions to accommodate these modifications and any instruction
that should be given to the soldier before evaluation.
• Performance Measures. This evaluation guide identifies the specific actions that the
soldier must do to successfully complete the task. These actions are listed in a GO/NO-GO
format for easy evaluation. Each evaluation guide contains a feedback statement that
indicates the requirements for receiving a GO on the evaluation.
• References. This section identifies references that provide more detailed and thorough
explanations of task performance requirements than that given in the task summary
description.
Additionally, some task summaries include safety statements and notes. Safety statements
(danger, warning, and caution) alert users to the possibility of immediate death, personal injury,
or damage to equipment. Notes provide a small, extra supportive explanation or hint relative to
the performance measures.
1-5. Soldier's Responsibilities
Each soldier is responsible for performing individual tasks which the first-line supervisor
identifies based on the unit's METL. The soldier must perform the tasks to the standards listed
in the SM. If a soldier has a question about how to do a task or which tasks in this manual he or
she must perform, it is the soldier's responsibility to ask the first-line supervisor for clarification.
The first-line supervisor knows how to perform each task or can direct the soldier to the
appropriate training materials.
1-6. NCO Self-Development and the Soldier's Manual
Self-development is one of the key components of the leader development program. It is a
planned progressive and sequential program followed by leaders to enhance and sustain their
military competencies. It consists of individual study, research, professional reading, practice,
and self-assessment. Under the self-development concept, the NCO, as an Army professional,
has the responsibility to remain current in all phases of the MOS. The SM is the primary source
for the NCO to use in maintaining MOS proficiency.
1-2
STP 8-91G15-SM-TG
Another important resource for NCO self-development is the Army Correspondence Course
Program (ACCP). Refer to DA Pamphlet 350-59 for information on enrolling in this program and
for a list of courses, or write to: AMEDDC&S, ATTN: MCCS-HSN, 2105 11TH STREET SUITE
4191, FORT SAM HOUSTON TX 78234-5064.
Unit learning centers are valuable resources for planning self-development programs. They can
help access enlisted career maps, training support products, and extension training materials.
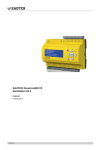
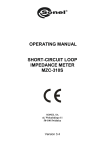
A life cycle management diagram for MOS 91G soldiers is on page 1-4. You can find more
information and check for updates to this diagram at http://das.cs.amedd.army.mil/ooc.htm
(scroll down to LIFE CYCLE MANAGEMENT, select ENLISTED, and find the appropriate tab
along the bottom.) This information, combined with the MOS Training Plan in Chapter 2, forms
the career development model for the MOS.
1-7. Trainer's Responsibilities
Training soldier and leader tasks to standard and relating this training to collective missionessential tasks is the NCO trainer's responsibility. Trainers use the steps below to plan and
evaluate training.
• Identify soldier and leader training requirements. The NCO determines which tasks
soldiers need to train on using the commander's training strategy. The unit's METL and ARTEP
and the MOS Training Plan (MTP) in the TG are sources for helping the trainer define the
individual training needed.
• Plan the training. Training for specific tasks can usually be integrated or conducted
concurrently with other training or during "slack periods." The unit's ARTEP can assist in
identifying soldier and leader tasks which can be trained and evaluated concurrently with
collective task training and evaluation.
• Gather the training references and materials. The SM task summary lists all references
which can assist the trainer in preparing for the training of that task.
• Determine risk assessment and identify safety concerns. Analyze the risk involved in
training a specific task under the current conditions at the time of scheduled training. Ensure
that your training preparation takes into account those cautions, warnings, and dangers
associated with each task.
• Train each soldier. Show the soldier how the task is done to standard, and explain stepby-step how to do the task. Give each soldier one chance to do the task step-by-step.
• Emphasize training in mission-oriented protective posture (MOPP) level 4 clothing.
Soldiers have difficulty performing even the very simple tasks in an NBC environment. The
combat effectiveness of the soldier and the unit can degrade quickly when trying to perform in
MOPP 4. Practice is the best way to improve performance. The trainer is responsible for
training and evaluating soldiers in MOPP 4 so that they are able to perform critical wartime
tasks to standards under NBC environment conditions.
1-3
MOS 91G
PATIENT ADMINISTRATION SPECIALIST
CAREER/TRAINING LIFE CYCLE
RANK
AMEDD Course
NR
E1 - E5
513-91G10
6-8-C40
E6 - E9
5K-F3/520-F3
5K-F6/520-F6
6-8-C42
LENGTH
LOCATION
ATTENDANCE
REQUIREMENT
Basic Combat Training Course
9 wks
Ft. LW
Ft. Sill
Ft. Jackson
Ft. Benning
IET
Patient Administration 91G10
PLDC
6 wks, 3 days
4 wks
FSH, TX
Multiple sites
IET
IET/MOS
Leadership
7wks 1 day
FSH, TX
Leadership
10 days
5 days
2 wks
6 wks
9 wks
6 wks
5 wks
AHS, FSH, TX
AHS, FSH, TX
Multiple Sites
USAREC
Multiple Sites
FSH, TX
USASMA
Just in time SQI-H
Just in Time
Just in time ASI P5
Just in time
Just in Time SQI-X
Leadership
Just in time SQI-M
SGM Course
9 months
USASMA
Just in time MEL-A
5K-F13/520-F10
CSM Course
1 wk
USASMA
Just in time/leadership
5K-F7/520-F7(PILOT)
Advanced Instructor Training
6 wks, 2 days
USASMA
Just in time - ASI 2S
5K-F8/520-F8(PILOT)
Education and Training for the 21st Century
TRAINING
BNCOC 91G30
Instructor Courses
Instructor Training Course
Small Group Instruction Training
Master Fitness Trainer
Recruiter
Drill Sgt School
ANCOC (SL4)
First Sergeant Course
Battle Staff
Self-Development
Course NR
SELF-DEVELOPMENT
LENGTH
LOCATION
ATTENDANCE
REQUIREMENT
On-Line
Correspondence
Correspondence
Just in Time
Sustainment
Sustainment
Correspondence
Correspondence
Correspondence
Correspondence
Correspondence
Sustainment
Sustainment
Sustainment
Sustainment
Sustainment
Correspondence
Correspondence
Correspondence
Sustainment
Sustainment
Sustainment
Fort Sam Houston, TX
Just in Time
Army Correspondence Course Program
081-CBRNE-W
805C M15
MD0010
MD0750
MD0751
MD0752
MD0753
MD0754
MD0755
MD1230
MD1233
*
91G converts to 91Z at Grade SGM 01 Oct 01.
Note:
Expert Field Medical Badge and DEPMEDS if assigned PROFIS
Introduction to CBRNE
Administrative Course (71L20)
Patient Admin Spec Sustainment Course 081-91G
Subcourses
Basic Medical Terminology
Intro Medical Records/Patient Administration
Outpatient Medical records Branch
Patient Accountability Branch
Medical Records Administration Branch I
MEDICAL RECORDS ADMINISTRATION BRANCH II
Patient Affairs Branch
ASMART
Rapid Train Up
Specialty Courses
CBRNE TRAINER EVALUATOR
2 Days
1 Wk, 3 Days Fort Sam Houston, TX
4 Weeks
Fort Sam Houston, TX
Army Correspondence Course Program
805C M15
Administrative Course (MOS 75B20)
PPSCP
Correspondence
Just in time
75/71 Personnel/Retention Legal/EO
4 days
SA,TX
Just in Time
300-A0704
Medical Logistics Enlisted Supervisor Short Cr
4 days
SA, TX
Leadership
300-A0710
MEDCOM CSM/SGM NCO Short Course
4 days
SA, TX
Leadership
340-A0715
340-A0743
CSM/SGM SR NCO Course
4 days
Landstuhl, Germany
Leadership
1-4
STP 8-91G15-SM-TG
• Check each soldier. Evaluate how well each soldier performs the tasks in this manual.
Conduct these evaluations during individual training sessions or while evaluating soldier
proficiency during the conduct of unit collective tasks. This manual provides an evaluation
guide for each task to enhance the trainer's ability to conduct year-round, hands-on evaluations
of tasks critical to the unit's mission. Use the information in the MTP as a guide to determine
how often to train the soldier on each task to ensure that soldiers sustain proficiency.
• Record the results. The leader book referred to in FM 25-101, appendix B, is used to
record task performance and gives the leader total flexibility on the method of recording training.
The trainer may use DA Forms 5164-R (Hands-On Evaluation) and 5165-R (Field Expedient
Squad Book) as part of the leader book. The forms are optional and locally reproducible. STP
21-24-SMCT contains a copy of the forms and instructions for their use.
• Retrain and evaluate. Work with each soldier until he or she can perform the task to
specific SM standards.
1-8. Training Tips for the Trainer
Prepare yourself.
• Get training guidance from your chain of command on when to train, which soldiers to
train, availability of resources, and a training site.
• Get the training objective (task, conditions, and standards) from the task summary in this
manual.
• Ensure you can do the task. Review the task summary and the references in the
reference section. Practice doing the task or, if necessary, have someone train you on the task.
• Choose a training method.
• Prepare a training outline consisting of informal notes on what you want to cover during
your training session.
• Practice your training presentation.
Prepare the resources.
• Obtain the required resources identified in the conditions statement for each task.
• Gather equipment and ensure it is operational.
• Coordinate for use of training aids and devices.
• Prepare the training site according to the conditions statement and evaluation preparation
section of the task summary, as appropriate.
1-5
STP 8-91G15-SM-TG
Prepare the soldiers.
• Tell the soldier what task to do and how well it must be done. Refer to the standards
statement and evaluation preparation section for each task as appropriate.
• Caution soldiers about safety, environment, and security.
• Provide any necessary training on basic skills that soldiers must have before they can be
trained on the task.
• Pretest each soldier to determine who needs training in what areas by having the soldier
perform the task. Use DA Form 5164-R and the evaluation guide in each task summary to
make this determination.
NOTE: Deficiencies noted in soldiers' ability to perform critical tasks taught in schools or by
extension training materials should be reported to the proponent school.
Train the soldiers who failed the pretest.
• Demonstrate how to do the task or the specific performance steps to those soldiers who
could not perform to SM standards. Have soldiers study the appropriate materials.
• Have soldiers practice the task until they can perform it to SM standards.
• Evaluate each soldier using the evaluation guide.
• Provide feedback to those soldiers who fail to perform to SM standards and have them
continue to practice until they can perform to SM standards.
Record results in the leader book.
1-9. Training Support
This manual includes the following information which provides additional training support
information.
• Appendix A, DA Form 5165-R (Field Expedient Squad Book). This appendix provides an
overprinted copy of DA Form 5165-R for the tasks in this MOS. The NCO trainer can use this
form to set up the leader book described in FM 25-101, appendix B. The use of this form may
help preclude writing the soldier tasks associated with the unit's mission essential task list, and
can become a part of the leader book.
• Glossary. The glossary, which follows the last appendix, is a single comprehensive list of
acronyms, abbreviations, definitions, and letter symbols.
• References. This section contains two lists of references, required and related, which
support training of all tasks in this SM. Required references are listed in the conditions
statement and are required for the soldier to do the task. Related references are materials
which provide more detailed information and a more thorough explanation of task performance.
1-6
STP 8-91G15-SM-TG
CHAPTER 2
Trainer's Guide
2-1. General. The MOS Training Plan (MTP) identifies the essential components of a unit
training plan for individual training. Units have different training needs and requirements based
on differences in environment, location, equipment, dispersion, and similar factors. Therefore,
the MTP should be used as a guide for conducting unit training and not a rigid standard. The
MTP consists of two parts. Each part is designed to assist the commander in preparing a unit
training plan which satisfies integration, cross training, training up, and sustainment training
requirements for soldiers in this MOS.
Part One of the MTP shows the relationship of an MOS skill level between duty position and
critical tasks. These critical tasks are grouped by task commonality into subject areas.
Section I lists subject area numbers and titles used throughout the MTP. These subject areas
are used to define the training requirements for each duty position within an MOS.
Section II identifies the total training requirement for each duty position within an MOS and
provides a recommendation for cross training and train-up/merger training.
• Duty Position column. This column lists the duty positions of the MOS, by skill level, which
have different training requirements.
• Subject Area column. This column lists, by numerical key (see Section I), the subject areas
a soldier must be proficient in to perform in that duty position.
• Cross Train column. This column lists the recommended duty position for which soldiers
should be cross trained.
• Train-up/Merger column. This column lists the corresponding duty position for the next
higher skill level or MOSC the soldier will merge into on promotion.
Part Two lists, by general subject areas, the critical tasks to be trained in an MOS and the type
of training required (resident, integration, or sustainment).
• Subject Area column. This column lists the subject area number and title in the same order
as Section I, Part One of the MTP.
• Task Number column. This column lists the task numbers for all tasks included in the
subject area.
• Title column. This column lists the task title for each task in the subject area.
• Training Location column. This column identifies the training location where the task is first
trained to soldier training publications standards. If the task is first trained to standard in the
unit, the word “Unit” will be in this column. If the task is first trained to standard in the training
base, it will identify, by brevity code (ANCOC, BNCOC, etc.), the resident course where the
task was taught. Figure 2-1 contains a list of training locations and their corresponding
brevity codes.
2-1
STP 8-91G15-SM-TG
UNIT
AIT
ANCOC
BNCOC
Trained in the Unit
Advanced Individual Training
Advanced NCO Course
Basic NCO Course
Figure 2-1. Training Locations
• Sustainment Training Frequency column. This column indicates the recommended
frequency at which the tasks should be trained to ensure soldiers maintain task proficiency.
Figure 2-2 identifies the frequency codes used in this column.
BA
AN
SA
QT
MO
BW
WK
-
Biannually
Annually
Semiannually
Quarterly
Monthly
Bi-weekly
Weekly
Figure 2-2. Sustainment Training Frequency Codes
• Sustainment Training Skill Level column. This column lists the skill levels of the MOS for
which soldiers must receive sustainment training to ensure they maintain proficiency to
soldier’s manual standards.
2-2
STP 8-91G15-SM-TG
2-2. Part One, Section I. Subject Area Codes.
Skill Level 1
1
Admissions and Dispositions
2
Patient Trust Fund
3
Medical Records
4
Casualty Reporting
5
Third Party Liability
6
Evacuation and Transfer
7
Coding
8
CHCS
9
TAMMIS
10 Miscellaneous
Skill Level 2
11 Administration (SL 2)
Skill Level 3
12 Administration (SL 3)
13 TAMMIS (SL 3)
Skill Level 4
14 Administration (SL 4)
15 TAMMIS (SL 4)
2-3
STP 8-91G15-SM-TG
2-3. Part One, Section II. Duty Position Training Requirements.
DUTY POSITION
SUBJECT
AREAS
CROSS
TRAIN
TRAIN-UP/
MERGER
SL 1
Patient Administration
Specialist
1-10
NA
91G2 Patient Administration
Specialist
SL 2
Patient Administration
Specialist
1-11
NA
91G3 Patient Administration
Specialist
SL 3
Patient Administration
Specialist
1-13
NA
91G4 Patient Administration
Specialist
SL 4
Patient Administration
Specialist
1-15
NA
NA
SL5
Patient Administration
Specialist
1-15
NA
NA
2-4
STP 8-91G15-SM-TG
2-4. Part Two. Critical Tasks List.
MOS TRAINING PLAN
91G15
CRITICAL TASKS
Subject
Area
Task Number
Title
Training
Location
Sust
Tng
Freq
Sust
Tng SL
Skill Level 1
1.
Admissions
and
Dispositions
2. Patient
Trust Fund
3. Medical
Records
081-866-0003
VERIFY THE ELIGIBILITY OF A PATIENT
AIT
AN
1-5
081-866-0057
COMPLETE DA FORM 2985 (ADMISSION
AND CODING INFORMATION)
AIT
AN
1-5
081-866-0118
PREPARE A PATIENT ADMISSION PACKET
AIT
AN
1-5
081-866-0122
PREPARE AN ADMISSION AND
DISPOSITION (AAD) REPORT
AIT
AN
1-5
081-866-0061
INITIATE DA FORM 2173 (STATEMENT OF
MEDICAL EXAMINATION AND DUTY
STATUS)
AIT
AN
1-5
081-866-0191
PERFORM ADMISSION PROCEDURES
AIT
AN
1-5
081-866-0101
COORDINATE PATIENT CONTROL WITH A
CIVILIAN HOSPITAL REGARDING ABSENT
SICK PATIENTS
AIT
AN
1-5
081-866-0102
COORDINATE THE TRANSPORT OF AN
ABSENT SICK PATIENT TO A MILITARY
TREATMENT FACILITY
AIT
AN
1-5
081-866-0022
COMPLETE DA FORM 3696 (PATIENT'S
DEPOSIT RECORD)
AIT
AN
1-5
081-866-0123
FORWARD FUNDS AND VALUABLES AFTER
THE DISPOSITION OR TRANSFER OF A
PATIENT
AIT
AN
1-5
081-866-0124
MAKE DISPOSITION OF THE FUNDS AND
VALUABLES OF A MENTALLY
INCOMPETENT PATIENT
AIT
AN
1-5
081-866-0132
MAKE DISPOSITION OF THE FUNDS AND
VALUABLES OF A DECEASED SERVICE
MEMBER
AIT
AN
1-5
081-866-0039
PREPARE A PATIENT RECORDING CARD
AIT
AN
1-5
081-866-0199
INITIATE MEDICAL RECORDS
AIT
AN
1-5
081-866-0200
FILE FORMS IN MEDICAL RECORDS
AIT
AN
1-5
2-5
STP 8-91G15-SM-TG
CRITICAL TASKS
Subject
Area
4. Casualty
Reporting
5. Third
Party
Liability
6.
Evacuation
and Transfer
7. Coding
8. CHCS
2-6
Task Number
Title
Training
Location
Sust
Tng
Freq
Sust
Tng SL
081-866-0201
SCREEN AN INCOMING MEDICAL RECORD
AIT
AN
1-5
081-866-0202
PERFORM MEDICAL RECORDS
MANAGEMENT FUNCTIONS
AIT
AN
1-5
081-866-0027
RETRIEVE OR FILE A TERMINAL DIGIT FILE
FOR TREATMENT RECORD
AIT
AN
1-5
081-866-0105
RELEASE MEDICAL INFORMATION
AIT
AN
1-5
081-866-0040
COMPLETE DA FORM 2984 (VERY
SERIOUSLY ILL/SERIOUSLY ILL/SPECIAL
CATEGORY PATIENT REPORT)
AIT
AN
1-5
081-866-0041
PREPARE A PROGRESS REPORT FOR A
VSI, SI, OR SPECAT PATIENT
AIT
AN
1-5
081-866-0042
PREPARE A VSI, SI, AND SPECAT PATIENT
ROSTER
AIT
AN
1-5
081-866-0043
COMPLETE DA FORM 3894 (HOSPITAL
REPORT OF DEATH)
AIT
AN
1-5
081-866-0044
INITIATE DD FORM 2064 [CERTIFICATE OF
DEATH (OVERSEAS)]
AIT
AN
1-5
081-866-0145
ASSEMBLE A DEATH PACKET
AIT
AN
1-5
081-866-0062
SUBMIT AN INITIAL NOTIFICATION FOR
POSSIBLE THIRD PARTY LIABILITY
AIT
AN
1-5
081-866-0063
INITIATE DA FORM 2631 (MEDICAL CARE THIRD PARTY LIABILITY NOTIFICATION)
AIT
AN
1-5
081-866-0121
PREPARE FOR AN AEROMEDICAL
EVACUATION
AIT
AN
1-5
081-866-0129
PREPARE A PATIENT FOR AN
AEROMEDICAL EVACUATION
AIT
AN
1-5
081-866-0053
CODE A DIAGNOSIS USING ICD-9 CODES
AIT
AN
1-5
081-866-0146
CODE A PROCEDURE USING CPT-4 CODES
AIT
AN
1-5
081-866-0194
PROCESS RECORD CODING DATA USING
CHCS
AIT
AN
1-5
081-866-0154
PERFORM PATIENT REGISTRATION
FUNCTIONS USING THE CHCS
AIT
AN
1-5
081-866-1002
PERFORM PATIENT ADMISSIONS
FUNCTIONS USING THE CHCS
AIT
AN
1-5
STP 8-91G15-SM-TG
CRITICAL TASKS
Subject
Area
9. TAMMIS
10.
Miscellaneous
Task Number
Title
Training
Location
Sust
Tng
Freq
Sust
Tng SL
081-866-1003
PERFORM PATIENT DISPOSITION
FUNCTIONS USING THE CHCS
AIT
AN
1-5
081-866-0193
PERFORM RECORDS FUNCTIONS USING
CHCS
AIT
AN
1-5
081-866-0196
PROCESS DEFICIENT/DELINQUENT
RECORDS USING CHCS
AIT
AN
1-5
081-866-0197
COMPLETE MSA FUNCTIONS USING CHCS
AIT
AN
1-5
081-866-1004
PERFORM MASS CASUALTY OPERATION
FUNCTIONS USING THE CHCS
AIT
AN
1-5
081-866-0216
PREPARE COMMERCIAL-OFF-THE-SHELF
(COTS) COMPONENTS FOR OPERATION
AIT
AN
1-5
081-866-0203
PERFORM TAMMIS AD MINISTRATION
FUNCTIONS
AIT
AN
1-5
081-866-1052
COMPLETE MEDPAR FUNCTIONS USING
TAMMIS
AIT
AN
1-5
081-866-1051
PRODUCE MEDPAR REPORTS USING
TAMMIS
AIT
AN
1-5
081-866-1041
PERFORM TPOCS FUNCTIONS
AIT
AN
1-5
081-866-1042
PERFORM MASCAL FUNCTIONS
AIT
AN
1-5
Skill Level 2
11. Adminis tration (SL 2)
081-866-0292
COMPLETE DA FORM 4160 (PATIENT'S
PERSONAL EFFECTS AND CLOTHING
RECORD)
UNIT
AN
2-5
081-866-0293
PROCESS SF 523A (MEDICAL RECORD DISPOSITION OF BODY)
UNIT
AN
2-5
081-866-1016
PERFORM INPATIENT RECORDS
SUPERVISORY FUNCTIONS USING THE
CHCS
UNIT
AN
2-5
081-866-1040
SUBMIT PATIENT EVACUATION REQUESTS
UNIT
AN
2-5
Skill Level 3
12. Adminis tration (SL 3)
081-866-0095
REVIEW SF 523 (CLINICAL RECORDAUTHORIZATION FOR AUTOPSY)
BNCOC
AN
3-5
081-866-0302
COORDINATE A MEDICAL EVALUATION
BOARD (MEB) PROCEEDING
BNCOC
AN
3-5
2-7
STP 8-91G15-SM-TG
CRITICAL TASKS
Subject
Area
13. TAMMIS
(SL 3)
Task Number
Title
Training
Location
Sust
Tng
Freq
Sust
Tng SL
081-866-1045
PROCESS DECEDENT AFFAIRS FORMS
BNCOC
AN
3-5
081-866-1043
SUPERVISE TAMMIS ADMINISTRATION
FUNCTIONS
BNCOC
AN
3-5
081-866-1044
PERFORM MEDPAR CC FUNCTIONS
BNCOC
AN
3-5
081-866-1047
SUPERVISE MEDREG FUNCTIONS
BNCOC
AN
3-5
Skill Level 4
14. Adminis tration (SL 4)
15. TAMMIS
(SL 4)
2-8
081-866-0094
INITIATE NOTIFICATION TO NEXT OF KIN
(NOK) OF A DECEASED SERVICE MEMBER
ANCOC
AN
4-5
081-866-0198
PERFORM PARRTS FUNCTIONS
ANCOC
AN
4-5
081-866-0325
LOAD SOFTWARE FOR PATIENT
ACCOUNTING REPORTS AND REALTIME
TRACKING SYSTEM (PARRTS) MOBILE ON
A PERSONAL COMPUTER
ANCOC
AN
4-5
081-866-0317
GENERATE REPORTS USING MEDREG
ANCOC
AN
4-5
STP 8-91G15-SM-TG
CHAPTER 3
MOS/Skill Level Tasks
Skill Level 1
Subject Area 1: Admissions and Dispositions
VERIFY THE ELIGIBILITY OF A PATIENT
081-866-0003
Conditions: An individual has requested treatment at your medical treatment facility (MTF).
You have a copy of AR 40-400.
Standards: Determined a patient's eligibility to receive medical treatment.
Performance Steps
1. Verify the eligibility of a patient with an identification card.
a. Verify eligibility using the primary document of proof - Identification Card.
(1) DD Form 2A (ACT) - green for active duty (AD), red for reserve component (RC),
and gray or blue for retirees.
(2) DD Form 1173 - tan for family members, civilian overseas and foreign military
personnel/family members.
(3) Public Health Service (PHS) Form 1866-1 for the Commissioned Corps of the
PHS.
(4) PHS Form 1866-2 for retired PHS officers.
NOTE: A former spouse (in some cases) can receive health care depending on how long the
spouse was married to the active duty service member, the service member's time on active
duty, and the date of divorce.
b. Verify the following items on the identification card:
(1) Picture.
(2) Expiration date.
(3) Name.
(4) Medical care authorized.
2. Verify eligibility using the Defense Enrollment Eligibility Reporting System (DEERS)
automated system.
NOTE: Children under age 10 must be enrolled in the Defense Enrollment Eligibility Reporting
System (DEERS), but are not routinely issued an ID Card.
a. Conduct eligibility inquiry using a computer terminal with a direct line to the DEERS
database.
b. Conduct telephonic eligibility inquiry by calling the DEERS Eligibility Checking Center.
3. Verify the eligibility of a patient without proper identification.
3-1
STP 8-91G15-SM-TG
Performance Steps
NOTES:
1. Initiate a statement of eligibility prior to delivery of care.
a. Instruct the sponsor to sign the statement of eligibility.
b. Forward the statement of eligibility to the Medical Services Accounts Officer (MSAO).
c. Inform the sponsor if proof of eligibility is not provided by the patient or sponsor within 30
days, the patient will be billed as an emergency nonbeneficiary.
2. In an emergency situation medical care will be provided before eligibility determination is
made.
4. Verify the priority and extent of care.
a. Determine the category of the patient.
b. Determine the extent of care authorized for each category.
Performance Measures
GO
NO
GO
1. Verified the eligibility of a patient with an identification card.
——
——
2. Verified eligibility using the Defense Enrollment Eligibility System (DEERS)
automated system.
——
——
3. Verified the eligibility of a patient without proper identification.
——
——
4. Verified the priority and extent of care.
——
——
NOTE: Referred to AR 40-400 for steps 3 and 4.
Evaluation Guidance: Score the soldier GO if all steps are passed. Score the soldier NO-GO
if any step is failed. If the soldier fails any step, show what was done wrong and how to do it
correctly.
References
Required
AR 40-400
3-2
Related
AR 40-66
STP 8-91G15-SM-TG
COMPLETE DA FORM 2985 (ADMISSION AND CODING INFORMATION)
081-866-0057
Conditions: You have received an initiated DA Form 2985. Necessary materials: register
number log book and patient identification card.
Standards: Completed DA Form 2985 without error.
Performance Steps
1. Review information that must be completed by the attending physician.
a. Patient's name.
b. Diagnosis.
c. Ward assignment.
d. Clinical service code/department (e.g., Surgery).
e. Date of admission.
f. Physician's signature.
2. Check the patients identification card.
a. Expiration date.
b. Picture.
c. Medical authorization.
3. Complete applicable fields of DA Form 2985 in original and two legible copies at the time of
admission.
a. Reporting MTF (field fld 1, columns colms 2-5), source of data - IPDS User's Manual.
b. The MTF location (fld 2, colms 7-8), source of data - IPDS User's Manual.
c. Register number (fld 3, colms 9-15), source of data - assigned by:
(1) AAD office.
(2) Composite Health Care System (CHCS).
d. Name, source of data - self-explanatory.
e. Pay grade (fld 4, colms 16-17), source of data - self-explanatory.
f. Sex (fld 5, colm 18), source of data - admission interview.
g. Date of birth (fld 6, colms 19-26), source of data - admission interview.
h. Age at admission (fld 7, colms 27-29), source of data - admission interview.
i. Race (fld 8, colm 30), source of data - admission interview.
j. Ethnic background (fld 9, colm 31), source of data - admission interview.
k. Religion, source of data - admission interview.
l. Length of service (fld 10, colms 32-34), source of data - admission interview.
m. Expiration of term of service (ETS), source of data - admission interview.
n. Family member prefix (FMP) (fld 11, colms 35-36), source of data - admission
interview.
o. Social security number (SSN) (fld 12, colms 37-45), source of data - admission
interview.
p. Organization, source of data - admission interview.
q. Marital status (fld 13, colm 46), source of data - patient interview.
r. Hour of admission, Source of data - self-explanatory.
s. Branch/corps, source of data - admission interview.
t. Flying status (fld 14, colms 47-49), source of data - admission interview.
u. Beneficiary category (fld 15, colms 50-52), source of data - admission interview.
v. Previous admission, source of data - admission interview.
3-3
STP 8-91G15-SM-TG
Performance Steps
w. Source of admission/authority for admission (fld 20, colm 72), source of data - patient
interview.
x. Ward, source of data - designated by physician/care provider.
y. Name/relationship, address, and telephone number of emergency addressee, source
of data - patient interview.
z. Name and location of MTF, source of data - self-explanatory.
aa. Unit location (fld 17, colms 62-63), source of data - admission interviews.
ab. Zip code of residence (fld 16, colms 53-61), source of data - admission interview.
ac. Military occupational specialty code (MOS) (fld 18, colms 64-70), source of data (for
AD patients only) - admission interview.
ad. Trauma (fld 19, colm 71), source of data - injury diagnosis, type case, cause of injury
of ITRCS.
ae. Type of disposition (fld 21, colms 73-74), source of data - AAD Office.
af. The MTF transferred/moved to (fld 22, colms 75-80), source of data - self-explanatory.
ag. Date of disposition (fld 23, colms 81-86), source of data - self explanatory.
ah. Clinic service admitting (fld 24, colms 87-90), source of data - designated by
physician/care provider.
ai. The MTF transferred/moved from (fld 25, colms 91-96), source of data - selfexplanatory.
aj. Date of this admission (fld 26, colms 97-102), source of data - determined by AAD
office.
ak. Location of occurrence (fld 27, colms 103-104), source of data - admission interview.
al. The MTF of initial admission (fld 28, colms 105-110), source of data - assigned by:
(1) AAD office.
(2) Item 31 of ITRCS.
am. Date of initial admission (fld 29, colms 111-116), source of data:
(1) Obtained from absent sick notification.
(2) Obtained from documents accompanying transfer patient.
an. For local use. MTF will locally determine entries for this item - indicate injury specifics
(who, what, where, when, and how occurred).
ao. Name of admitting officer. Enter the name of the physician or other care provider
authorizing admission.
4. Sign DA Form 2985.
Performance Measures
GO
NO
GO
1. Reviewed information that must be completed by the attending physician.
——
——
2. Checked the patient's identification card.
——
——
3. Filled in the appropriate spaces on DA Form 2985.
——
——
4. Annotated for all injury admissions.
——
——
5. Signed DA Form 2985.
——
——
3-4
STP 8-91G15-SM-TG
Evaluation Guidance: Score the soldier GO if all steps are passed. Score the soldier NO-GO
if any step is failed. If the soldier fails any step, show what was done wrong and how to do it
correctly.
References
Required
None
Related
AR 40-2
AR 40-400
3-5
STP 8-91G15-SM-TG
PREPARE A PATIENT ADMISSION PACKET
081-866-0118
Conditions: You have received an initiated DA Form 2985. Necessary materials and
equipment: register number log, patient identification information to complete DA Form 2985 for
admission, blank identification plates, addressograph, embossing machine, blank index cards (3
x 5), blank wrist bands, and an addressograph data recorder. All required blank forms are
available.
Standards: Completed the admission packet in proper format without error and ensured the
minimum required information was in the admission packet.
Performance Steps
1. Assign all patients an admission register number in the register number log book.
NOTES:
1. In the event the medical treatment facility has been deactivated and then reactivated, use
register number 0000001 for the first admission.
2. Use the next consecutive register number.
3. In case of a backdated admission, use the next unused register number.
a. Direct.
b. Direct absent sick.
c. New born.
d. Transfer admission.
e. CRO.
2. Record, as a minimum, the following information in the log book:
a. Patient's register number.
b. Patient's name.
c. Patient's date of admission.
d. Patient's status.
e. Patient's assigned ward number.
3. Ensure the patient signs DD Form 2005.
NOTE: If the patient has a completed DD Form 2005 on file, a new one is not required.
4. Complete DA Form 2985.
a. Review the information that must be entered by the admitting physician.
(1) Patient's name.
(2) Diagnosis.
(3) Ward.
(4) Clinical services code.
(5) Date of admission.
(6) Physician's signature.
b. Complete all required fields.
5. Prepare the 5-line inpatient identification plate.
NOTE: This plate is used to imprint patient identification information on all forms in the clinical
record. Format may vary at different facilities A recommended format for this plate is as
follows:
a. Lines 1 and 2. Leave all spaces blank.
b. Line 3. Enter the patient's name (last, first, middle initial), rank, grade or status.
3-6
STP 8-91G15-SM-TG
Performance Steps
c. Line 4. Enter the register number and family member prefix (FMP).
d. Line 5. Enter the patient's sex and age.
6. Initiate DA Form 4029.
7. Prepare the patient's wrist band.
a. Enter the patient's full name and register number on the insert card for all pediatric and
adult patients by using the inpatient identification plate and embossing machine.
NOTE: It is not a requirement to make a patient wrist band for a newborn.
b. Place the insert card in a tamper proof nontransferable identification band.
c. Place the completed wrist band in the admission packet for forwarding to the ward.
8. Prepare the patient's bed card by entering the following patient information:
a. Last name, first name, and middle initial.
b. Rank, grade, or status.
c. Service affiliation.
d. Date of admission.
9. Initiate DA Form 3647 or 3647-1.
10. Prepare DA Form 3444.
a. Select the correct color of folder using the last two digits (the primary group) of the
patient's SSN.
b. Place an identification label in the PATIENT IDENTIFICATION block.
c. Place a 1/2 inch strip of black tape over the number on the right edge that is the same
as the last digit of the patient's SSN.
d. Place a 1/ 2 inch strip of black tape over the number along the top edge that is the
same as the last digit of the patient's SSN.
e. Enter the patient's SSN on the Terminal Digit File.
(1) Enter the first five numbers of the patient's SSN as the tertiary group.
(2) Enter the 6th and 7th numbers of the patient's SSN as the secondary group.
(3) Enter the 8th and 9th numbers of the patient's SSN as the primary group.
f. Enter the patient's FMP in the circles.
g. Show the retirement date of the record by putting 1/2 inch of the appropriate colored
tape over the block marked "R" that is on the right edge of the folder. Place the tape
along the top right edge of the block marked "R" also.
h. Show the status of the patient by placing 1/2 inch of the appropriate colored tape over
the block marked "S" on the right edge of the folder. Place the tape along the top right
edge of the block marked "S" also.
i. Under type of record, make a check mark in the inpatient box.
11. Initiate DA Form 3696. (See task 081-866-0022.)
12. Make disposition of packet items in accordance with local SOP.
Performance Measures
GO
NO
GO
1. Assigned all patients an admission register number in the register number
log book.
——
——
2. Recorded the required information in the log book.
——
——
3-7
STP 8-91G15-SM-TG
Performance Measures
GO
NO
GO
3. Ensured the patient signed DD Form 2005.
——
——
4. Completed DA Form 2985.
——
——
5. Prepared the 5-line inpatient identification plate.
——
——
6. Initiated DA Form 4029.
——
——
7. Prepared the patient's wrist band.
——
——
8. Prepared the patient's bed card.
——
——
9. Initiated DA Form 3647 or 3647-1.
——
——
10. Prepared DA Form 3444.
——
——
11. Initiated DA Form 3696.
——
——
12. Made disposition of packet items in accordance with local SOP.
——
——
Evaluation Guidance: Score the soldier GO if all steps are passed. Score the soldier NO-GO
if any step is failed. If the soldier fails any step, show what was done wrong and how to do it
correctly.
References
Required
None
3-8
Related
AR 310-50
AR 40-2
AR 40-400
AR 40-66
IPDS HANDBOOK
STP 8-91G15-SM-TG
PREPARE AN ADMISSION AND DISPOSITION (AAD) REPORT
081-866-0122
Conditions: Necessary materials and equipment: current control file box, AAD file box with
header cards, patient transaction list for the reporting period, typewriter, completed 9-line plates
or cards for all patient transactions during the current reporting period, and AR 40-400.
Standards: Prepared the AAD report within the required time frame and without error.
Performance Steps
1. Prepare the report as of 2400 hours each calendar day.
2. Prepare the AAD report listing the patients in the proper group and transaction format with
the required information.
NOTE: Negative entries are not required. Example: If there are no gains under the heading of
"Transfer Admission" then this category will not be listed on the report.
a. Gains.
(1) Direct from other than ER.
(2) Direct from ER.
(3) Direct, Absent Sick.
(4) Transfer Admission.
(5) Newborn.
(6) Carded for Record Only (CRO).
b. Change of Status Out.
(1) To Leave.
(2) To Subsisting Out.
(3) To AWOL.
(4) To Absent Sick.
(5) To TDY/SDY.
(6) From Absent Sick to Leave.
(7) To Supplemental Care.
(8) To Cooperative Care.
(9) To Medical Holding Unit.
(10) To PCS or VA.
c. Change of Status In.
(1) From Leave.
(2) From Subsisting Out.
(3) From AWOL.
(4) From Absent Sick.
(5) From TDY/SDY.
(6) From Supplemental Care.
(7) From Cooperative Care.
(8) From Medical Holding Unit.
d. Losses.
(1) Return to Duty.
(2) Separated from Service.
(3) Retired Length of Service.
(4) Permanent Disability Retired List (PDRL).
(5) Temporary Disability Retired List (TDRL).
(6) AWOL over 10 days.
3-9
STP 8-91G15-SM-TG
Performance Steps
(7) Discharge from Hospital.
(8) Died.
(9) Transferred.
e. Other Transactions.
(1) Interward Transfers.
(2) CRO.
(3) Transient Patients.
(4) Boarders.
(5) Corrections to prior reports.
3. Prepare and distribute a separate listing for NATO military patients if applicable.
4. Prepare a recapitulation table.
5. Ensure the designated individual authenticates the AAD report.
6. Make proper disposition of the AAD report according to local SOP.
Performance Measures
GO
NO
GO
1. Set up the AAD file box.
——
——
2. Prepared the report as of 2400 hours each calendar day.
——
——
3. Prepared the AAD report listing the patients in the proper group and
transaction format with the required information.
a. Gains.
b. Change of Status In.
c. Change of Status Out.
d. Losses.
e. Other transactions.
NOTE: The format for patient information used within each transaction group
is determined by local SOP.
——
——
4. Prepared and distributed a separate listing for NATO military patients if
applicable.
——
——
——
——
6. Ensured the designated individual authenticated the AAD report.
——
——
7. Made proper disposition of the AAD report according to local SOP.
——
——
5. Prepared a recapitulation table.
NOTE: Depending on local SOP, admissions and dispositions may be listed by
patient category.
Evaluation Guidance: Score the soldier GO if all steps are passed. Score the soldier NO-GO
if any step is failed. If the soldier fails any step, show what was done wrong and how to do it
correctly.
3-10
STP 8-91G15-SM-TG
References
Required
AR 40-400
Related
AR 25-55
AR 340-21
AR 40-3
AR 40-66
3-11
STP 8-91G15-SM-TG
INITIATE DA FORM 2173 (STATEMENT OF MEDICAL EXAMINATION AND DUTY STATUS)
081-866-0061
Conditions: The required patient information is available from the patient's medical record
and/or the attending physician. You have a blank DA Form 2173 and a completed DA Form
2985.
Standards: Initiated DA Form 2173 without error.
Performance Steps
1. Enter the required information on DA Form 2173.
NOTE: Information to complete the DA Form 2173 will be obtained from the unit commander,
attending physician, and DA Form 2985.
a. Complete the block marked "THRU."
NOTE: This is normally the unit to which the soldier is assigned.
b. Complete the block marked "TO."
NOTE: This is normally the appointing/approving authority for the unit above.
c. Complete the block marked "FROM."
NOTE: This is the initiating medical treatment facility.
d. Complete items 1 through 5.
e. Complete section I, items 6 through 17.
2. Obtain the signature of the attending physician or patient administrator.
3. Complete five copies of DA Form 2173.
a. Send the original and three copies to the soldier's unit commander.
b. Send one copy to the supporting military personnel office (MILPO).
NOTE: Complete the report within 5 calendar days after the incident or initial treatment. If the
report is late, annotate such in the Remarks section of DA Form 2173.
Performance Measures
GO
NO
GO
1. Entered the required information on DA Form 2173.
——
——
2. Obtained the signature of the patient administrator.
——
——
3. Completed five copies of DA form 2173.
——
——
Evaluation Guidance: Score the soldier GO if all steps are passed. Score the soldier NO-GO
if any step is failed. If the soldier fails any step, show what was done wrong and how to do it
correctly.
References
Required
None
3-12
Related
AR 40-4
AR 40-400
AR 600-8-1
STP 8-91G15-SM-TG
PERFORM ADMISSION PROCEDURES
081-866-0191
Conditions: You have a patient who needs to be admitted to or discharged from your facility.
Necessary materials and equipment: typewriter, DA Form 2985, DD Form 2005, DA Form
3647, DA Form 3696, DA Form 4160, DA Form 4029, register number log, patient identification
information to complete applicable forms for admission, blank identification plates,
addressograph, embossing machine, blank index cards (3 x 5), blank wrist bands, and an
addressograph data recorder. All required blank forms are available.
Standards: Completed admissions procedures without error.
Performance Steps
NOTE: Follow the procedures and guidelines in steps 1 through 10 to admit a patient. To
discharge a patient, go to step 11.
1. Assign a patient register number.
a. Issued to each admission -- includes absent sick, liveborn infants, and CRO patients.
b. Begins with number "1" for MTF -- continues consecutively thereafter.
c. Uses the next unused register number for back dated entries.
d. Closes out register series with deactivation of the MTF.
e. If an MTF is reactivated, start a new register number series with "1".
2. Make required entries in the logbook.
a. Register number -- may be pre-printed.
b. Patient's name.
c. FMP and sponsor's SSN.
d. Date and time of admission.
e. Type of case -- DIS, INJ, BC.
f. Ward.
3. Ensure the patient signs DD Form 2005.
a. Uses form data to provide, plan, and coordinate health care -- voluntarily requests
data.
b. Applies form data to all requests for personal information made by health care
treatment personnel; becomes permanent part of patient's health care record.
4. Complete applicable fields on DA Form 2985.
a. Code page 1 data during the patient interview.
(1) Include patient's name, ward, time and date of admission, and admission
diagnosis.
(2) Obtain the admitting officer's/physician's signature.
b. Obtain the remainder of the data from:
(1) ITR.
(2) Patient interview by AAD personnel in AAD office.
(3) Visit to the patient's ward.
5. Initiate required forms as applicable.
a. DA Form 3647 -- ITRCS.
(1) Forward one copy of DA Form 2985 and ITRCS to PASBA for input into IPDS
data base.
3-13
STP 8-91G15-SM-TG
Performance Steps
(2) Maintain a second copy of DA Form 2985 in the register number file with a copy of
related ITRCS for future reference.
b. DA Form 3696 -- prepared to collect and safeguard the patient's funds and valuables
in the patient trust fund.
c. DA Form 4160 -- prepared to collect and safeguard the patient's clothing.
d. DA Form 4029 -- serves as outprocessing form to disposition patients.
6. Prepare the inpatient admitting identification band.
a. Newborn.
(1) Affix the ID band to a newborn immediately following infant birth in an Army MTF.
(2) Ensure ID band placement prior to removal of the infant and mother from the
delivery room.
(3) Place one identical ID band on either wrist or ankle of the infant.
(4) Place other identical ID band on the wrist of the mother. Use the wrist NOT used
for the mother's personal ID.
(5) Include entries for:
(a) Mother's full name.
(b) Mother's register number.
(c) Sex of infant.
(d) Date of birth.
(6) Prior to infant discharge, provide positive comparison between the ID bands on
the infant and mother.
(7) Immediately prior to infant release, remove one ID band and place it in his or her
clinical record.
(8) Leave the remaining ID band with the infant until his or her release.
b. Pediatric and adult patients.
(1) Place a tamperproof nontransferable ID band on either wrist of the patient.
(2) Check the ID band prior to every procedure performed on the patient, unless you
can positively identify patient without it.
(3) Include entries for the following:
(a) Patient's full name.
(b) Patient's register number.
(4) Discard the used ID band prior to patient release.
7. Prepare an admitting plate.
a. Prepare an admitting plate for each admission.
b. Use following format:
(1) Line 1.
(a) Patient's register number.
(b) FMP and sponsor's SSN.
(2) Line 2 -- patient's name (last, first, middle initial).
(3) Line 3.
(a) Sex (male or female) [M] or [F].
(b) Patient's age -- indicate years [Y], months [M], or days [D].
(c) Religion.
(d) Patient's status or category.
(4) Line 4.
(a) Admission date.
(b) Clinic service admitting.
(c) Ward.
3-14
STP 8-91G15-SM-TG
Performance Steps
(5) Example.
--------------------------------------------4209999 20 532 68 3703
DOE JOHN Q
M 50Y BAP RET USA COL
29 AUG 9X AABA 43S
--------------------------------------------c. Use the admitting plate to emboss all patient medical and administrative forms in
records.
d. When not in use, file the admitting plate in the alphabetical locator file.
e. If a patient transfers to another ward, attach the admitting plate to the patient's chart
and transfer it with the patient.
f. Discard the admitting plate when the patient dispositions IAW local SOP.
8. Prepare the patient's recording card.
a. Use the patient's recording card to enter data on forms in the outpatient treatment
record (OTR) or health record (HREC).
b. Prepare the patient's recording card when the patient is first examined or treated in the
MTF.
c. Obtain necessary data from the patient's ID card to emboss on the patient's recording
card.
d. Use the patient's recording card as an appointment card.
(1) Attach an adhesive-backed paper appointment notice to the back.
(2) Clerk fills in date, time, and clinic on the next blank line of the appointment notice.
(3) Provides space for identity, location, and telephone number of MTF
e. Use the patient's recording card format specified in AR 40-2, Figure 3-1 (card
information may vary IAW local SOP).
f. Ensure the patient's recording card has imprinted on it the MTF where patient's
records normally reside.
9. Prepare a ward or clinic identification plate.
a. Identifies MTF and nursing unit, clinic, or other functional elements as permanent data
in imprinting device.
b. Incorporates easily changeable rotary dater.
c. Used in conjunction with inpatient identification plate or patient's recording card.
d. Uses the following format:
(1) Lines 1 and 2 -- name and location of MTF.
(2) Line 3 -- identification of nursing unit, clinic, or other functional elements using
imprinter.
10. Prepare the patient's bed card.
a. Prepare on plain 3-inch by 5-inch card stock
b. Use the following format
(1) Patient's name -- first name, middle initial(s), last name
(2) Rank, grade, or status
(3) Service component (i.e., Army)
(4) Date of admission
NOTE: The following procedures and guidelines are to be used to discharge a patient from your
facility.
3-15
STP 8-91G15-SM-TG
Performance Steps
11. Clear an inpatient by processing DA Form 4029.
a. Patient Identification.
b. Date of Discharge.
c. Time of Discharge.
d. Signature of Ward Officer.
e. Activity Clearance.
f. Remarks.
g. Date.
h. Signature of Patient Administrator.
Performance Measures
GO
NO
GO
1. Admitted a patient.
a. Assigned a patient register number.
b. Made required entries in the logbook.
c. Ensured the patient signed DD Form 2005.
d. Completed applicable fields on DA Form 2985.
e. Initiated the required forms as applicable.
f. Prepared the inpatient admitting identification band.
g. Prepared the admitting plate.
h. Prepared the patient's recording card.
i. Prepared the ward or clinic identification plate.
j. Prepared the patient's bed card.
——
——
2. Cleared a patient from the MTF by processing DA Form 4029.
a. Patient Identification.
b. Date of Discharge.
c. Time of Discharge.
d. Signature of Ward Officer.
e. Activity Clearance.
f. Remarks.
g. Date.
h. Signature of Patient Administrator.
——
——
Evaluation Guidance: Score the soldier GO if all steps are passed. Score the soldier NO-GO
if any step is failed. If the soldier fails any step, show what was done wrong and how to do it
correctly.
References
Required
None
3-16
Related
AR 40-2
AR 40-3
AR 40-400
STP 8-91G15-SM-TG
COORDINATE PATIENT CONTROL WITH A CIVILIAN HOSPITAL REGARDING ABSENT
SICK PATIENTS
081-866-0101
Conditions: You have received notification that an Army service member has been admitted to
a civilian hospital.
Standards: Completed coordination and initiated all applicable forms without error.
Performance Steps
1. Confirm that the patient is being hospitalized within the notified MTF's geographic area of
responsibility for absent sick cases.
NOTE: If the patient is in a hospital that is outside the administrative responsibility of the
notified MTF, contact the appropriate MTF.
2. Obtain and record all applicable admissions data on DA Form 2985.
3. Process the patient information as a Direct Admission-Absent Sick (Dir ABSK) effective the
actual day of admission to the civilian hospital.
NOTES:
1. Initiate possible third party liability notification, if necessary.
2. If the patient information obtained through the initial notification is from a source other than
the civilian hospital, a call is placed to the civilian hospital's registrar or the patient's attending
physician to obtain all the required admission information.
4. Notify the patient's unit.
5. Notify the casualty section and originate DA Form 2984 and/or DA Form 3894 if applicable.
(See tasks 081-866-0040 and 081-866-0043)
Performance Measures
GO
NO
GO
1. Confirmed that the patient is being hospitalized within the notified MTF's
geographic area of responsibility for absent sick cases.
——
——
2. Obtained and recorded all applicable admissions data on DA Form 2985.
——
——
3. Processed the patient information as a Direct Admission - Absent Sick (Dir
ABSK) effective the actual day of admission to the civilian hospital.
——
——
4. Notified the patient's unit.
——
——
5. Notified the casualty section and originated DA Form 2984 and/or DA
Form 3894 if applicable.
——
——
Evaluation Guidance: Score the soldier GO if all steps are passed. Score the soldier NO-GO
if any step is failed. If the soldier fails any step, show what was done wrong and how to do it
correctly.
3-17
STP 8-91G15-SM-TG
References
Required
None
3-18
Related
AR 40-16
AR 40-2
AR 40-400
AR 600-8-1
STP 8-91G15-SM-TG
COORDINATE THE TRANSPORT OF AN ABSENT SICK PATIENT TO A MILITARY
TREATMENT FACILITY
081-866-0102
Conditions: You have received instructions to coordinate the transfer of a military patient from
a civilian hospital to your military treatment facility. Necessary materials and equipment: list of
hospital services and a telephone.
Standards: Coordinated the transfer of the patient to the MTF without creating undue hardship
on the patient. Completed all administrative requirements accurately and in a timely manner.
Performance Steps
1. Ensure there is an accepting physician at your MTF.
2. Ensure there has been communication between the accepting physician and the attending
physician at the civilian hospital.
3. Verify bed availability at your MTF.
4. Contact patient transport at your MTF.
5. Contact the civilian hospital and arrange a time for patient pick-up.
6. Relay the patient pick-up time to patient transport at your MTF.
7. Inform the ward what time to expect the patient.
8. Complete the admission transaction from absent sick (ABSK) to bed occupied (BO).
Performance Measures
GO
NO
GO
1. Ensured there was an accepting physician at the MTF.
——
——
2. Ensured there had been communication between the accepting physician
and the attending physician at the civilian hospital.
——
——
3. Verified bed availability at the MTF.
——
——
4. Contacted patient transport at the MTF.
——
——
5. Contacted the civilian hospital and arranged a time for patient pick-up.
——
——
6. Relayed the patient pick-up time to patient transport at the MTF.
——
——
7. Informed the ward what time to expect the patient.
——
——
8. Completed the admission transaction from absent sick (ABSK) to bed
occupied (BO).
——
——
Evaluation Guidance: Score the soldier GO if all steps are passed. Score the soldier NO-GO
if any step is failed. If the soldier fails any step, show what was done wrong and how to do it
correctly.
3-19
STP 8-91G15-SM-TG
References
Required
None
3-20
Related
AR 40-16
AR 40-400
STP 8-91G15-SM-TG
Subject Area 2: Patient Trust Fund
COMPLETE DA FORM 3696 (PATIENT'S DEPOSIT RECORD)
081-866-0022
Conditions: A patient has been admitted and referred to the patient trust fund (PTF) office with
duplicate copies of the initiated DA Form 3696. The patient desires to deposit funds and
valuables. A witness for the transaction is available.
Standards: Completed the deposit transaction on DA Form 3696 without error.
Performance Steps
1. Direct the patient to read and sign the upper right hand block of DA Form 3696, if not
already completed.
NOTE: When the patient is unable to sign, an officer or other responsible person will witness
the transaction and sign DA Form 3696 for the patient. Enter a brief statement as to why the
patient did not sign.
2. Receive only acceptable funds and valuables for deposit.
3. Enter the proper description for each fund and valuable deposited.
a. Funds.
(1) All domestic currency and coins.
(2) Cashier's checks.
(3) Checks drawn on another PTF.
(4) Travelers checks.
(5) US treasury checks.
b. Valuables.
(1) Credit cards.
(2) Jewelry.
(3) Foreign currency.
(4) Documents.
NOTE: The description for each valuable should describe the appearance without giving it
qualitative or monetary value.
4. Sign and date the receipt of the funds and valuables in the appropriate blocks.
5. Return the copy to the patient and retain the original for the PTF files.
Performance Measures
GO
NO
GO
1. Directed the patient to read and sign the upper right hand block of DA
Form 3696, if not already completed.
——
——
2. Received only acceptable funds and valuables for deposit.
——
——
3. Entered the proper description for each fund and valuable deposited.
——
——
4. Signed and dated the receipt of the funds and valuables in the appropriate
blocks.
——
——
3-21
STP 8-91G15-SM-TG
Performance Measures
5. Returned the copy to the patient and retained the original for the PTF files.
GO
NO
GO
——
——
Evaluation Guidance: Score the soldier GO if all steps are passed. Score the soldier NO-GO
if any step is failed. If the soldier fails any step, show what was done wrong and how to do it
correctly.
References
Required
None
3-22
Related
AR 40-400
STP 8-91G15-SM-TG
FORWARD FUNDS AND VALUABLES AFTER THE DISPOSITION OR TRANSFER OF A
PATIENT
081-866-0123
Conditions: You have access to the patient's funds and valuables, the patient trust fund (PTF)
checking account, the file copy of the patient's DA Form 3696, the patient's forwarding address,
and AR 40-400.
Standards: Forwarded funds and valuables without error.
Performance Steps
1. Forward the patient's funds.
NOTE: Under ordinary circumstances, the patient will withdraw funds and valuables at the time
of departure.
a. Verify the patient's fund balance.
b. Prepare a check made out to the patient for the funds left on deposit.
c. Prepare an original and one copy of the letter of transmittal.
d. Place a copy of the letter of transmittal with the PTF records.
e. Forward the check and letter of transmittal to the patient's new address within one
working day after the patient's departure.
2. Forward the patient's valuables.
a. Inventory the patient's valuables.
b. Prepare an original and one copy of the letter of transmittal.
c. Prepare an original and two copies of the inventory.
d. File the inventory and a copy of the letter of transmittal with the PTF records.
e. Forward the valuables, letter of transmittal, and the original and one copy of the
inventory by first class registered mail, return receipt requested.
f. Request that one copy of the inventory be receipted and returned.
Performance Measures
GO
NO
GO
1. Forwarded funds after a patient had been transferred or dispositioned.
——
——
2. Forwarded valuables after a patient had been transferred or dispositioned.
——
——
NOTE: 1. Referred to AR 40-400 for steps 1 and 2.
Evaluation Guidance: Score the soldier GO if all steps are passed. Score the soldier NO-GO
if any step is failed. If the soldier fails any step, show what was done wrong and how to do it
correctly.
References
Required
AR 40-400
Related
AR 40-2
3-23
STP 8-91G15-SM-TG
MAKE DISPOSITION OF THE FUNDS AND VALUABLES OF A MENTALLY INCOMPETENT
PATIENT
081-866-0124
Conditions: You have access to the patient's funds and valuables, the patient trust fund (PTF)
checking account, the file copy of the patient's DA Form 3696, and AR 40-400.
Standards: Disposed of the patient's funds and valuables without error.
Performance Steps
1. Determine who will receive the funds and valuables.
a. A legal committee, guardian, or other representative appointed by a court of competent
jurisdiction.
b. The next of kin (NOK) in accordance with the laws of the state in which the personal
property is located.
NOTE: If the patient is not subject to military law, disposition of the property to the NOK should
not be made without notification to local authorities responsible for the disposition of psychotic
nonmilitary patients.
2. The custodian will prepare and sign an inventory, in duplicate, of the patient's valuables
and funds on deposit in the PTF.
3. Prepare a check for the patient's funds payable to the individual assuming custody.
NOTE: The check will have plainly written on the face thereon "Credit Account of (Name of
Patient)."
4. Require the individual assuming custody to sign one copy of the inventory record, for the
records of the PTF.
5. Give the check, one copy of the inventory, and the valuables to the individual assuming
custody.
6. Maintain the signed copy of the inventory.
7. If mailing a check to the NOK, send the property/check by registered mail, return receipt
requested within 5 working days.
Performance Measures
GO
NO
GO
1. Determined who would receive the funds and valuables.
——
——
2. Prepared an inventory of the patient's valuables.
——
——
3. Prepared a check for the patient's funds payable to the appropriate
individual assuming custody.
——
——
4. Gave the check, one copy of the inventory, and the valuables to the
individual assuming custody.
——
——
5. Required the individual assuming custody to sign one copy of the
inventory record.
——
——
NOTE: Referred to AR 40-400 for step 1.
3-24
STP 8-91G15-SM-TG
Performance Measures
GO
NO
GO
6. Maintained the signed copy of the inventory.
——
——
7. Mailed the patient's property/check by registered mail, return receipt
requested within 5 working days.
——
——
Evaluation Guidance: Score the soldier GO if all steps are passed. Score the soldier NO-GO
if any step is failed. If the soldier fails any step, show what was done wrong and how to do it
correctly.
References
Required
AR 40-400
Related
None
3-25
STP 8-91G15-SM-TG
MAKE DISPOSITION OF THE FUNDS AND VALUABLES OF A DECEASED SERVICE
MEMBER
081-866-0132
Conditions: You have been informed that a patient with funds and valuables on deposit has
expired at your MTF. You have access to the patient trust fund.
Standards: Determined the service member's next of kin (NOK). Established and maintained
an accurate audit trail for the disposition of the deceased service member's funds and valuables
without error.
Performance Steps
1. Forward the funds.
a. Verify the deceased's fund balance.
b. Prepare a check payable to the NOK.
c. Prepare an original and one copy of the letter of transmittal.
d. Place a copy of the letter of transmittal in the PTF records.
e. Forward or give the check to the NOK within one working day after the death of the
service member.
NOTE: If the NOK has not been established, refer to the staff judge advocate.
2. Forward the valuables.
a. Inventory the deceased's valuables.
b. Prepare an original and one copy of the letter of transmittal.
c. Prepare an inventory record.
d. Give the valuables, letter of transmittal, and the original and one copy of the inventory
record to the NOK within one working day.
e. Have the NOK sign the original of the inventory record.
f. File a copy of the letter of transmittal and signed inventory record with the PTF
records.
NOTES:
1. If the NOK is not present, forward the valuables to the NOK by first class registered mail,
return receipt requested. Enclose an extra copy of the inventory record. Request the NOK to
sign the inventory record and return it to the MTF. File the registered mail return receipt and
signed copy of the inventory record with the letter of transmittal in the PTF records.
2. If the NOK has not been established, refer to the staff judge advocate.
Performance Measures
GO
NO
GO
1. Forwarded the funds of a deceased service member.
——
——
2. Forwarded the valuables of a deceased service member.
——
——
Evaluation Guidance: Score the soldier GO if all steps are passed. Score the soldier NO-GO
if any step is failed. If the soldier fails any step, show what was done wrong and how to do it
correctly.
3-26
STP 8-91G15-SM-TG
References
Required
None
Related
AR 40-400
3-27
STP 8-91G15-SM-TG
Subject Area 3: Medical Records
PREPARE A PATIENT RECORDING CARD
081-866-0039
Conditions: Necessary materials and equipment: cardwriter/addressograph, blank recording
cards, and the patient's ID card.
Standards: Prepared a patient recording card without error.
Performance Steps
1. Obtain the required information for the recording card from the patient and patient's ID
Card.
NOTE: The patient recording card should be prepared when the patient is first examined or
treated in a medical treatment facility, troop medical clinic, or health clinic.
a. Name.
b. Social security number.
c. Rank or status.
d. Year of birth.
e. Health record/outpatient treatment record location (military treatment facility (MTF) that
maintains medical record).
2. Make the patient's recording card.
NOTE: There is not a defined format. Follow local SOP.
a. Enter the patient's name (last, first, middle initial).
b. Enter the family member prefix (FMP) and social security number.
c. Enter the patient's rank or status (USA AD SSG-United States Army Active Duty SSG)
d. Enter the patient's date of birth (08 Jun 78).
e. Enter the MTF that maintains the medical record (TMC #4 Ft. Sam Houston, TX).
3. Check the card for accuracy with the patient and the patient's ID card.
Performance Measures
GO
NO
GO
1. Obtained the required information for the recording card from the patient
and the patient's ID card.
a. Name.
b. Social security number.
c. Rank or status.
d. Year of birth.
e. Military treatment facility that maintains the medical record.
——
——
2. Made the patient's recording card.
——
——
3. Checked the card for accuracy with the patient's ID card.
——
——
3-28
STP 8-91G15-SM-TG
Evaluation Guidance: Score the soldier GO if all steps are passed. Score the soldier NO-GO
if any step is failed. If the soldier fails any step, show what was done wrong and how to do it
correctly.
References
Required
None
Related
AR 40-400
AR 40-66
3-29
STP 8-91G15-SM-TG
INITIATE MEDICAL RECORDS
081-866-0199
Conditions: A patient has arrived to your medical treatment facility for the first time.
Standards: Prepared a record jacket and initiated the required forms without error.
Performance Steps
1. Determine the types of medical records that need to be initiated.
a. Health record (HREC).
(1) Active Duty personnel.
(2) Reserve component (USAR/ARNG).
(3) Cadets of U.S. Military Academies.
(4) Military prisoners while in confinement.
b. Outpatient treatment record (OTR).
(1) Family members of active duty and retired personnel.
(2) Retired personnel.
(3) Civilian beneficiaries/civilian emergencies.
c. Inpatient treatment record (ITR).
NOTE: The ITR is used for all categories of personnel who are admitted.
2. Prepare a DA Form 3444 or 8005 series folder.
a. Select the correct color of folder using the last two digits (the primary group) of the
patient's SSN.
b. Place an identification label in the PATIENT IDENTIFICATION block.
c. Place a 1/2 inch strip of black tape over the number on the right edge and along the
top edge of the folder that is the same as the last digit of the patient's SSN.
d. Enter the patient's SSN on the Terminal Digit File.
(1) Enter the first five numbers of the patient's SSN as the tertiary group.
(2) Enter the 6th and 7th numbers of the patient's SSN as the secondary group.
(3) Enter the 8th and 9th numbers of the patient's SSN as the primary group.
e. Enter the patient's FMP in the circles.
NOTE: Refer to AR 40-66 for steps 2f, 2g, 3, and 4.
f. Show the retirement date of the record by putting 1/2 inch of the appropriate colored
tape over the block marked "R" that is on the right edge and along the top of the folder.
g. Show the status of the patient by placing 1/2 inch of the appropriate colored tape over
the block marked "S" that is on the right edge and along the top of the folder.
h. Under TYPE OF RECORD, blacken the proper box to show how the folder will be
used.
i. Blacken the proper box under the "Note to Physician", if applicable.
j. Enter the patient's blood type (HREC/OTR only).
3. Initiate DA Form 5571.
4. Initiate SF 601.
5. Prepare a Temporary Medical Record, as appropriate.
a. When a patient's medical record is delayed, use a manila folder rather than a DA Form
3444 or 8005 series folder.
b. Initiate and file DD Form 2005 (Privacy Act Statement) in the folder.
c. Print the patient's identification information on the right top edge of the folder.
3-30
STP 8-91G15-SM-TG
Performance Steps
d. Enter the date (in pencil) that the folder was initiated.
6. Prepare an Extended Ambulatory Record (EAR).
a. Observation.
b. Ambulatory procedure visit (APV).
c. Ambulatory procedure unit (APU).
Performance Measures
GO
NO
GO
1. Determined the types of medical records that needed to be initiated.
——
——
2. Prepared a DA Form 3444 series folder, as appropriate.
——
——
3. Prepared a DA Form 8005 series folder, as appropriate.
——
——
4. Initiated DA Form 5571.
——
——
5. Initiated SF 601.
——
——
6. Prepared a Temporary Medical Record, as appropriate.
——
——
7. Prepared an Extended Ambulatory Record (EAR).
——
——
Evaluation Guidance: Score the soldier GO if all steps are passed. Score the soldier NO-GO
if any step is failed. If the soldier fails any step, show what was done wrong and how to do it
correctly.
References
Required
None
Related
AR 40-66
3-31
STP 8-91G15-SM-TG
FILE FORMS IN MEDICAL RECORDS
081-866-0200
Conditions: You are in a patient administration office with access to DA Form 3444/8005-series
folders, inpatient treatment record (ITR), outpatient treatment record (OTR), health record
(HREC), medical forms, patient information, and AR 40-66.
Standards: Reviewed medical forms for accurate patient identification. Filed the medical forms
without error IAW AR 40-66.
Performance Steps
1. Check each form for required identification data.
NOTE: Mark "ADT" in the lower margin for forms on USAR and ARNG personnel.
a. Name.
b. Rank, if applicable.
c. Family member prefix.
d. Social security number.
NOTE: If the patient is a dependent, the social security number of the sponsor is required.
e. Date of birth.
f. Sex.
g. Status.
h. Service.
i. Sponsor's name, if applicable.
NOTE: Refer to AR 40-66 for steps 2, 4, 5, 7, and 8.
2. Determine if the form is an authorized form.
a. Check the title and reference number.
b. Identify the type of record in which to file the forms.
3. Retrieve the patient's terminal digit file treatment record (see task 081-866-0027).
a. Inpatient treatment record (ITR).
b. Health record (HREC).
c. Outpatient treatment record (OTR).
d. Ambulatory procedure visit record (APV).
NOTE: The APV record is filed on the left side of the ITR.
4. Determine which side of the folder the form(s) must be filed on.
a. DA Form 3444 series folder is a two-part folder (left/right).
b. DA Form 8005 series folder is a four-part folder.
5. File form(s) in an ITR, as appropriate.
6. File form(s) in an HREC, as appropriate.
7. File form(s) in an OTR, as appropriate.
8. File form(s) in the APV record, as appropriate.
9. File the form(s) in the proper sequence.
a. File forms from top to bottom, using the order listed in AR 40-66.
b. Copies of identical forms are to be grouped together and filed in reverse chronological
order with the most recent form on top.
3-32
STP 8-91G15-SM-TG
Performance Measures
GO
NO
GO
1. Checked each form for required identification data.
——
——
2. Determined if the form was authorized.
——
——
3. Retrieved the patient's terminal digit file treatment folder.
a. Inpatient treatment record.
b. Health record.
c. Outpatient treatment record.
d. Ambulatory procedure visit (APV) record.
——
——
4. Determined which side of the folder the form must be filed on.
——
——
5. Filed form(s) in an inpatient treatment record (ITR), as appropriate.
——
——
6. Filed form(s) in an health record (HREC), as appropriate.
——
——
7. Filed form(s) in an outpatient treatment record (OTR), as appropriate.
——
——
8. Filed form(s) in an ambulatory procedure visit (APV) record, as
appropriate.
——
——
9. Filed forms in the proper sequence.
——
——
Evaluation Guidance: Score the soldier GO if all steps are passed. Score the soldier NO-GO
if any step is failed. If the soldier fails any step, show what was done wrong and how to do it
correctly.
References
Required
AR 40-66
Related
None
3-33
STP 8-91G15-SM-TG
SCREEN AN INCOMING MEDICAL RECORD
081-866-0201
Conditions: A medical record has arrived in your medical treatment facility. Necessary
materials: AR 40-66.
Standards: Identified discrepancies on the record jacket and within the record without error.
Made required corrections and forwarded the record to the appropriate AMEDD personnel for
review.
Performance Steps
1. Record receipt of the incoming medical record.
a. Charge the record in by utilizing the Composite Health Care System (CHCS) and/or
log book.
b. Create a nominal index card.
2. Initiate a new jacket if the medical record jacket is mutilated.
3. Check DA Form 3444 or DA Form 8005 series for correct information and completeness
(see task 081-866-0199).
a. Patient identification.
(1) Name.
(2) Family member prefix (FMP).
(3) Social security number.
(4) Unit.
(5) Blood type.
b. Check the note to physician.
(1) Medical condition.
NOTE: This is where allergies are annotated.
(2) Personnel reliability program (screening).
(3) Radiation screening program.
(4) Flight status.
(5) Medical registries.
c. Check the type of record.
(1) Inpatient.
(2) Outpatient treatment.
(3) Health record.
NOTE: "HEALTH" should be the only box checked under the type of record on a health record.
(4) Extended Ambulatory Record
NOTE: Refer to AR 40-66 for step 4.
4. Check the record contents for proper sequence of forms and completeness of patient
identification information (see task 081-866-0200).
5. Forward the record (HREC only) to the appropriate AMEDD personnel for review.
NOTE: Review of HRECs may be conducted by a medical officer, a physician's assistant, or
other qualified individual.
3-34
STP 8-91G15-SM-TG
Performance Measures
GO
NO
GO
1. Recorded receipt of an incoming medical record.
——
——
2. Initiated a new jacket, if needed.
——
——
3. Checked the DA Form 3444 or DA Form 8005 series folder for correct
information and completeness.
——
——
4. Checked the record contents for proper sequence of forms and
completeness of patient identification information.
——
——
5. Forwarded the HREC to the appropriate AMEDD personnel for review.
——
——
Evaluation Guidance: Score the soldier GO if all steps are passed. Score the soldier NO-GO
if any step is failed. If the soldier fails any step, show what was done wrong and how to do it
correctly.
References
Required
AR 40-66
Related
None
3-35
STP 8-91G15-SM-TG
PERFORM MEDICAL RECORDS MANAGEMENT FUNCTIONS
081-866-0202
Conditions: Necessary materials: medical documents, DA Form 3444/8005 series folders,
retirement boxes, and AR 40-66.
Standards: Managed, forwarded, and/or retired medical records and documents without error
IAW AR 40-66.
Performance Steps
1. Screen an incoming medical record (see task 081-866-0201).
2. Forward medical records and loose documents to the proper custodian of the medical
record, as appropriate.
a. Cross reference Composite Health Care System (CHCS), charge-out folders, log
books, nominal index file, etc.
b. If possible, access the Defense Enrollment Eligibility Reporting System (DEERS), if
available, to determine the current custodian.
c. If the member was Army and the member in question is retired, discharged, or
separated to an inactive USAR status, forward the record/loose documents to the VA
Record Center, St. Louis, MO.
d. If the member has departed on terminal leave, but has not reached his or her actual
separation date, send the record/forms to the servicing separation point.
e. If the member is Active Army, send a request for locator service to Commander, U.S.
Army Enlisted Records, Indianapolis, IN.
f. If the member is/or was Navy, send the record/loose documents to the Naval Military
Personnel Command, WASH, DC.
g. If the member is/or was Marine Corps, send the record/loose documents to
Commandant of the Marine Corps, HQ, U.S. Marine Corps, WASH, DC.
h. If the member is/or was Air Force, send the record/loose documents to HQ, U.S. Air
Force, Randolph Air Force Base, TX.
3. Dispose of unidentifiable medical documents, as appropriate.
a. Prepare a report listing the types of documents or records (for example: Laboratory,
X-Ray reports, SF 600, etc.).
b. Obtain the Patient Administrator's signature on the report.
c. Forward the report to the MTF committee that audits medical records.
d. Upon the committee's approval, destroy the unidentifiable records and/or forms.
NOTE: Unidentifiable documents contain no identifying data or a small amount that make it
impossible to identify the person to whom it belongs.
4. Maintain accountability of records being removed from files, as appropriate.
a. Record controls begin when records are released from the files for use by the patient
or staff.
b. The current physical location or destination of each record must be known.
c. Upon removal of record, a charge-out device will replace the record.
d. Charge-out devices consist of "charge-out guides", in a series of five colors, and a
charge-out card.
e. A charge-out card contains the following:
(1) Patient identification data.
(2) Date and reason the record is charged out.
3-36
STP 8-91G15-SM-TG
Performance Steps
(3) Individual's name and clinic to whom the record is released.
f. Charge-out cards must be used in conjunction with the outguide system.
g. The card is inserted into the clear plastic pocket of the charge-out guide.
h. Retrieve the record and replace it with the charge-out guide.
5. Charge-out medical records IAW policy and procedures (see AR 40-66), as appropriate.
a. Medical Command (MEDCOM) policy for return of charged out records is 7 days.
b. Seven day charge out monitoring uses a five color outguide system.
(1) The same color outguide is used for every record charged out for any reason
during a 7-day period of time, beginning on a Sunday and ending on the following
Saturday.
(2) The following Sunday another color of outguide is used, and so on, until four
colors of the outguides have been used (white excluded).
(3) The system provides up to 4 weeks for follow up on records that have not been
returned to the records room.
(4) After 4 weeks, colored outguides from the first week that remain in the files will be
replaced by "white" outguides, annotated with the date.
(5) Sunday of the 5th week, the sequence of use of the colored outguides will be
repeated.
NOTE: If it is determined or known that a record will not be returned during the next 3 weeks
(e.g., attending PLDC, BNCOC), the colored outguide will be replaced by a white one, and the
charge out card should be annotated with the date and reason a longer period has been
recognized.
6. Transfer (disposition) health records, as appropriate.
a. For permanent change of station (PCS), records may be hand carried.
b. When a member out-processes, the MTF will record the new record's custodian in the
CHCS.
c. Record new custodian information on charge-out folders, log books, etc., so that any
late arriving documents can be forward to the current custodian.
d. When separating from the service, records will be hand carried or forwarded to the
Military Personnel Office (MILPO).
e. For AWOL (over 10 days), send the HREC to the officer holding the person's Military
Personnel Records Jacket.
f. For deceased patients, the records are forwarded to the office holding the patient's
personnel records.
g. For a patient transferred to another MTF, send the HREC with a copy of the inpatient
record to the MTF.
h. For VA hospitalization, send the HREC to the VA hospital where the patient is
hospitalized.
i. For RC patients in the Active Army or on Active Guard Reserve duty, send the HREC
to the unit health record custodian.
NOTE: The losing custodian may send the record directly to the Commander of the gaining
MTF if he feels the record should not be hand carried.
7. Transfer (Disposition) an outpatient treatment record, as appropriate.
a. The patient will sign for the OTR on DA Form 3705.
b. The parent or legal guardian will sign for the OTR of minor children.
c. The patient may hand-carry records to the next MTF.
d. When an OTR is mailed to the next MTF, the following procedures will be followed:
3-37
STP 8-91G15-SM-TG
Performance Steps
(1) The sponsor or spouse will give the MTF that provides care to his or her family
members, the information needed to identify the records to be mailed.
(2) The MTF will complete DD Form 2138.
(3) The MTF will give the completed form to the sponsor or spouse and instruct the
sponsor to present the card at the next MTF.
NOTES:
1. If the sponsor is separating from the military and the place of retirement is not near an MTF,
a copy of the family member's record will be provided. The original record is maintained by the
MTF until the retirement of that year's record.
2. File DA Form 3705 alphabetically and keep the form on file until the retirement of that year's
record.
8. Prepare outpatient treatment records for retirement, as appropriate.
NOTE: Records shall be maintained for 3 years after the end of the year in which the last
medical treatment was given.
a. Determine the appropriate year that the OTR will be retired 3 years after the end of the
year that the last medical treatment was given.
b. Retrieve the outpatient records for retirement from the OTR files.
c. Segregate the records (retired military, civilian, etc.).
d. File the records for retirement, using the terminal digit filing system, in record shipping
cartons.
(1) Record the first and last record on each carton (0000-0010).
(2) Record the carton series (1 of 12; 2 of 12, etc.) on each carton.
(3) Prepare a letter of transmittal for each shipment.
e. Forward all letter(s) of transmittal to the National Personnel Records Center for their
acceptance and issuance of accession numbers.
f. Receive the accession numbers.
g. Forward the retired records to: National Personnel Records Center, 9700 Page Blvd,
St. Louis, MO 63132.
9. Prepare an ITR for retirement, as appropriate.
a. Determine the appropriate year that the ITR/APV will be retired.
(1) Maintain the records for teaching facilities for 5 years after the end of the year that
the last medical treatment was given.
(2) Maintain the records for the U.S. Military Academy for 3 years after the end of the
year that the last medical treatment was given.
(3) Maintain the records for a nonteaching hospital 1 year after the end of the year
that the last medical treatment was given
b. Retrieve the inpatient treatment record/APV for retirement from the files.
c. Segregate the records based on retired military and civilian.
(1) Record the first and last record and carton series (1 of 12; 2 of 12, etc.) on each
carton.
(2) Prepare a letter of transmittal for each shipment, segregated by terminal digit filing
system.
d. Forward all letter(s) of transmittal to the National Personnel Records Center for their
acceptance and issuance of accession numbers.
e. Receive the accession numbers.
f. Forward the retired records to: National Personnel Records Center, 9700 Page Blvd,
St. Louis, MO 63132.
3-38
STP 8-91G15-SM-TG
Performance Measures
GO
NO
GO
1. Screened an incoming medical record (see task 081-866-0201).
——
——
2. Forwarded medical records and loose documents to the proper custodian,
as appropriate.
——
——
3. Disposed of unidentifiable medical documents, as appropriate.
——
——
4. Maintained accountability of records being removed from the files, as
appropriate.
——
——
5. Charged out medical records IAW policy and procedures, as appropriate.
——
——
6. Transferred a health record, as appropriate.
——
——
7. Transferred an outpatient treatment record, as appropriate.
——
——
8. Prepared an outpatient treatment record for retirement, as appropriate.
——
——
9. Prepared an inpatient treatment record for retirement, as appropriate.
——
——
Evaluation Guidance: Score the soldier GO if all steps are passed. Score the soldier NO-GO
if any step is failed. If the soldier fails any step, show what was done wrong and how to do it
correctly.
References
Required
AR 40-66
Related
None
3-39
STP 8-91G15-SM-TG
RETRIEVE OR FILE A TERMINAL DIGIT FILE FOR TREATMENT RECORD
081-866-0027
Conditions: A valid request has been received for a patient's treatment record or a treatment
record requires filing. A terminal digit filing system has been established. Blank OF 23s are
available.
Standards: Retrieved or filed terminal digit files without error.
Performance Steps
1. Retrieve a record, as applicable.
a. Check the patient's identification card for the sponsor's social security number.
b. Identify and remove the record from the file.
NOTE: When retrieving or filing a record, read the social security number backwards from the
primary group (8th and 9th numbers), secondary group (6th and 7th numbers), and the tertiary
group (the first five numbers).
c. Record the patient's identification, record destination, and date of sign-out on the OF
23.
d. Replace the record with the Charge-Out Record.
NOTE: Place medical forms accumulated during absence of the terminal digit file in the
Charge-Out Record until the treatment record is returned.
2. File a record, as applicable.
a. Identify and remove the record, if applicable.
b. File the forms from the record into the patient's treatment record, if applicable.
c. File the terminal digit file.
NOTE: When retrieving or filing a record, read the social security number backwards from the
primary group (8th and 9th numbers), secondary group (6th and 7th numbers), and the tertiary
group (the first five numbers).
Performance Measures
GO
NO
GO
1. Retrieved a record, as applicable.
——
——
2. Filed a record, as applicable.
——
——
Evaluation Guidance: Score the soldier GO if all steps are passed. Score the soldier NO-GO
if any step is failed. If the soldier fails any step, show what was done wrong and how to do it
correctly.
References
Required
None
3-40
Related
AR 40-400
AR 40-66
STP 8-91G15-SM-TG
RELEASE MEDICAL INFORMATION
081-866-0105
Conditions: You have received an official or unofficial request for release of medical
information. Necessary materials and equipment: duplicating machine, mailing material, DA
Form 4254-R, DA Form 5006-R, DD Form 877, and a typewriter.
Standards: Reviewed and determined the validity of the request. Prepared and released the
appropriate information without error.
Performance Steps
NOTE: For DA Form 4254-R, see steps 1-4; for DA Form 5006-R, go to steps 5-7; and for DD
Form 877, go to step 8.
1. Verify the official request for release of medical information.
a. Ensure the request is in writing.
b. Ensure the requester presents their official credentials.
c. Ensure the need for the information and the authority supporting the need is clearly
stated.
2. Complete DA Form 4254-R.
a. Ensure the requester properly completes blocks 1-6.
b. Complete blocks 7-10.
c. File submitted forms under AR 25-400-2, file number 40 (general medical services
correspondence files).
3. Release medical information under emergency situations (e.g., rape, assault, child abuse,
or death), if applicable.
a. Receive as a verbal request for release of medical information.
b. Provide verbal permission for disclosing medical information.
c. Prepare a memorandum on the release immediately after providing permission.
d. Ensure the requesting agent follows up the request with a written DA Form 4254-R.
4. Provide certified copies of the requested medical information.
NOTE: The request must be approved prior to release of information.
5. Verify the unofficial request for release of medical information.
a. Ensure the request is submitted in writing.
b. Ensure the request is signed (or authenticated) and dated by the patient.
c. Ensure the request is considered valid for no longer than 1 year.
6. Complete DA Form 5006-R.
a. Ensure the period of hospitalization or treatment for which the information is requested
is stated.
b. Identify the individual or organization to whom the information is to be released.
c. State the purpose for which the information may be used.
7. Release medical information for unofficial requests.
a. File a copy of the released information and DA Form 5006-R in the patient's medical
record.
b. File requests made for information from both the inpatient and outpatient treatment
records in the inpatient record. Properly cross-reference the outpatient record.
3-41
STP 8-91G15-SM-TG
Performance Steps
c. Annotate on the DA Form 5006-R what information was released when copies cannot
be made.
8. Complete DD Form 877.
a. Ensure the requester properly completes blocks 1-10.
NOTE: Blocks 6 and 7 are for inpatients.
b. Complete blocks 11-18, if necessary.
c. Ensure block 19 has the correct return address to which records or a final reply should
be mailed.
Performance Measures
GO
NO
GO
1. Verified the official request for release of medical information.
——
——
2. Completed DA Form 4254-R.
——
——
3. Released medical information under emergency situations (e.g., rape,
assault, child abuse, or death), if applicable.
——
——
4. Provided certified copies of the requested medical information.
——
——
5. Verified the unofficial request for release of medical information.
——
——
6. Completed DA Form 5006-R.
——
——
7. Released medical information for the unofficial request.
——
——
8. Completed DD Form 877.
——
——
NOTE: For DA Form 4254-R, evaluate steps 1-4; for DA Form 5006-R,
evaluate steps 5-7; and for DD Form 877, evaluate step 8.
Evaluation Guidance: Score the soldier GO if all steps are passed. Score the soldier NO-GO
if any step is failed. If the soldier fails any step, show what was done wrong and how to do it
correctly.
References
Required
None
3-42
Related
AR 340-21
AR 40-66
STP 8-91G15-SM-TG
Subject Area 4: Casualty Reporting
COMPLETE DA FORM 2984 (VERY SERIOUSLY ILL/SERIOUSLY ILL/SPECIAL
CATEGORY PATIENT REPORT)
081-866-0040
Conditions: You have received an initiated DA Form 2984. Necessary materials and
equipment: telephone and typewriter.
Standards: Ensured proper notifications were made. Completed DA Form 2984 without error.
Performance Steps
1. Review blocks 1 through 11 for completion. (The attending physician is required to
complete these blocks.)
2. Ensure patient recording card is correct.
3. Patient Administrator or Administrative Officer of the Day (AOD) makes required
notifications and initials blocks 13 through 18 when complete.
NOTE: Review to check for completeness and accuracy of the DA Form 2984.
4. Prepare the signature block of the Patient Administrator or AOD in Block 20.
5. Obtain the signature of the Patient Administrator or AOD in block 21.
6. File DA Form 2984 in the inpatient treatment record (ITR) or forward it to the inpatient
treatment records section for filing.
Performance Measures
GO
NO
GO
1. Reviewed blocks 1 through 11.
——
——
2. Checked patient recording card information.
——
——
3. Made required notifications for blocks 12 through 21.
——
——
4. Filled in the appropriate PAD/AOD name.
——
——
5. Obtained signature of the Patient Administrator or AOD.
——
——
6. Filed DA Form 2984 in the inpatient treatment record (ITR).
——
——
Evaluation Guidance: Score the soldier GO if all steps are passed. Score the soldier NO-GO
if any step is failed. If the soldier fails any step, show what was done wrong and how to do it
correctly.
References
Required
None
Related
AR 40-400
AR 600-8-1
3-43
STP 8-91G15-SM-TG
PREPARE A PROGRESS REPORT FOR A VSI, SI, OR SPECAT PATIENT
081-866-0041
Conditions: Patient information on VSI, SI, or SPECAT status and the address of the next of
kin (NOK) is available. Necessary materials and equipment: AR 600-8-1, typewriter, and blank
message forms.
Standards: Prepared the progress report without error.
Performance Steps
NOTE: Refer to AR 600-8-1 for steps 1 through 5. The progress report is used to report the
progress of hospitalized, wounded, and injured VSI, SI, and SPECAT patients.
1. Identify those patients that require a progress report.
2. Determine the requirement for a progress report.
a. Reports medical progress of hospitalized/wounded/injured/ill personnel in
VSI/SI/SPECAT category.
b. The next of kin of VSI, SI, and SPECAT patients are not present with the patient and
are to be notified.
3. Prepare a report on each patient identified in step 2, in the appropriate communications
medium. A letter and telegram has to be sent to the next of kin.
a. Separate progress report for each patient.
b. Required for AD patients only.
c. Furnished at 5-day intervals.
d. Required for a patient evacuated from one OCONUS MTF to another OCONUS MTF.
e. Required for a patient evacuated to CONUS from OCONUS (include evacuation date
and destination).
f. Patient arrives at a new MTF (if evacuation involved major movement).
g. Change occurs in a patient's status to VSI or SI.
4. Record the minimum required information for each report.
a. Medical progress.
b. Prognosis.
c. Morale.
d. Current and anticipated treatments to include surgical operations.
e. Additional and terminal diagnosis.
f. Anticipated period of hospitalization.
g. Evacuation.
5. Properly identify the last report.
a. Progress reports will terminate with the patient's removal from VSI/SI status.
b. The last report must be stated the "Final Progress Report".
6. Retain one copy of the completed progress report in functional files.
Performance Measures
GO
NO
GO
——
——
NOTE: Referred to AR 600-8-1 for steps 1 through 5.
1. Identified those patients that required a progress report.
3-44
STP 8-91G15-SM-TG
Performance Measures
GO
NO
GO
2. Determined the requirement for a progress report.
——
——
3. Prepared a report on each patient identified in step 2, in the appropriate
communications medium.
——
——
4. Recorded the minimum required information for each report.
——
——
5. Properly identified the last report.
——
——
6. Retained one copy of the completed progress report in functional files.
——
——
Evaluation Guidance: Score the soldier GO if all steps are passed. Score the soldier NO-GO
if any step is failed. If the soldier fails any step, show what was done wrong and how to do it
correctly.
References
Required
AR 600-8-1
Related
AR 40-400
3-45
STP 8-91G15-SM-TG
PREPARE A VSI, SI, AND SPECAT PATIENT ROSTER
081-866-0042
Conditions: You are in the patient administration office with DA Form 2984, VSI, SI, SPECAT
roster, previous day's rosters, and current patient information. Necessary equipment:
typewriter.
Standards: Entered the minimum required information on the VSI, SI, SPECAT roster without
error.
Performance Steps
1. Enter the appropriate information in the following required blocks on DA Form 2984.
a. Name.
b. Grade or status.
c. Sponsor's SSN or other identification number.
d. Ward.
e. Date first placed on the roster.
f. Present condition.
2. Have the roster authenticated by the patient administrator or other designated officer.
Performance Measures
GO
NO
GO
1. Entered the appropriate information in the required blocks on DA Form
2984.
——
——
2. Had the roster authenticated by the patient administrator or other
designated officer.
——
——
Evaluation Guidance: Score the soldier GO if all steps are passed. Score the soldier NO-GO
if any step is failed. If the soldier fails any step, show what was done wrong and how to do it
correctly.
References
Required
None
3-46
Related
AR 40-400
STP 8-91G15-SM-TG
COMPLETE DA FORM 3894 (HOSPITAL REPORT OF DEATH)
081-866-0043
Conditions: You have received an initiated DA Form 3894 and a completed SF 523 when
applicable. Necessary materials and equipment: patient's inpatient treatment record (ITR),
computer, and access to a phone.
Standards: Completed the report and notifications without error.
Performance Steps
1. Review the information in Section A of DA Form 3894 for completeness.
a. Obtain data from the patient's ward or physician who pronounced the patient dead for
items 1 through 6. If items are missing, contact the ward or the physician for those
items.
b. Obtain data from the medical officer for items 7 through 11. If items are missing,
locate the physician to complete the information.
2. Ensure PAD completes notifications in Section B-Administrative Action of DA 3894.
a. Type of Action.
(1) Next of kin.
(2) Post Adjutant General.
(3) Unit Commander.
(4) Information office.
(5) Mortuary.
(6) Red Cross.
(7) Other (Specify). Example: Casual Area Commander (CAC).
b. Hour.
c. Day.
d. Month.
e. Year.
f. Initials of responsible person (PAD clerk, AOD).
3. Complete Section C-Record of Autopsy of DA 3894.
a. Autopsy to be performed (Yes or No).
b. Signature of pathologist performing the autopsy if an autopsy is to be performed. If
not, leave blank.
4. Obtain the signature of the patient administrator.
5. Forward a copy of DA 3894 to pathology if an autopsy was requested.
6. File the original DA Form 3894 in the patient's ITR if an autopsy is not required or
requested.
Performance Measures
GO
NO
GO
——
——
NOTE: Local SOP may require the recording of a receipt time.
1. Reviewed the information in Section A of DA Form 3894 for completeness.
3-47
STP 8-91G15-SM-TG
Performance Measures
GO
NO
GO
2. Ensured notifications in Section B-Administrative Action of DA Form 3894
were made as required.
——
——
3. Completed Section C- Record of Autopsy of DA Form 3894.
——
——
4. Obtained the signature of the Patient Administrator.
——
——
5. Forwarded the DA Form 3894 to the pathologist to complete the
requirements of Section C-Record of Autopsy if an autopsy was required.
——
——
6. Filed the original DA Form 3894 in the ITR if an autopsy was not required
or requested.
——
——
Evaluation Guidance: Score the soldier GO if all steps are passed. Score the soldier NO-GO
if any step is failed. If the soldier fails any step, show what was done wrong and how to do it
correctly.
References
Required
None
3-48
Related
AR 40-400
STP 8-91G15-SM-TG
INITIATE DD FORM 2064 [CERTIFICATE OF DEATH (OVERSEAS)]
081-866-0044
Conditions: You have received a completed DA Form 3894. Necessary materials and
equipment: blank DD Form 2064 and a typewriter.
Standards: Initiated DD Form 2064 without error and forwarded it to the appropriate office.
Performance Steps
1. Transcribe the patient identification and next of kin information from DA Form 3894 to DD
Form 2064.
a. Name.
b. Grade.
c. Branch of Service.
d. SSN.
e. Organization.
f. Nation.
g. Date of Birth.
h. Sex.
i. Race.
j. Marital Status.
k. Religion.
l. Next of Kin.
m. Relationship.
n. Next of Kin Address.
o. City or Town of State.
2. Transcribe the medical statement information from DA Form 3894 to DD Form 2064.
a. Cause of Death (Disease or Condition).
b. Interval between onset (Example: 3 days, 2 months, 2 years).
3. Obtain the pathologist's autopsy Information.
a. Mode of death.
(1) Natural.
(2) Accident.
(3) Suicide.
(4) Homicide.
b. Autopsy performed.
(1) Yes or No.
(2) Major findings.
(3) Circumstances surrounding death.
(4) Name of Pathologist.
(5) Signature.
(6) Date.
(7) Date of Death.
(8) Place of Death.
4. Obtain the medical officer's signature block on DD Form 2064.
a. Name of Medical Officer.
b. Title of Degree.
c. Grade.
3-49
STP 8-91G15-SM-TG
Performance Steps
d. Installation or Address.
e. Date.
f. Signature.
5. Obtain the pathologist's signature.
6. Obtain the medical officer's signature.
7. File DA Form 3894 in the patient's inpatient treatment record (ITR).
8. Forward DD Form 2064 to pathology.
Performance Measures
GO
NO
GO
1. Transcribed the patient identification and next of kin information from DA
Form 3894 to DD Form 2064.
——
——
2. Transcribed the medical statement information from DA Form 3894 to DD
Form 2064.
——
——
3. Prepared the pathologist's signature block on DD Form 2064.
——
——
4. Prepared the medical officer's signature block on DD Form 2064.
——
——
5. Obtained the pathologist's signature.
——
——
6. Obtained the medical officer's signature.
——
——
7. Filed DA Form 3894 in the patient's inpatient treatment record (ITR).
——
——
8. Forwarded DD Form 2064 to pathology.
——
——
Evaluation Guidance: Score the soldier GO if all steps are passed. Score the soldier NO-GO
if any step is failed. If the soldier fails any step, show what was done wrong and how to do it
correctly.
References
Required
None
3-50
Related
AR 600-8-1
STP 8-91G15-SM-TG
ASSEMBLE A DEATH PACKET
081-866-0145
Conditions: You have a requirement for additional death packets for use in your hospital. You
have access to the following forms: a Certificate of Death (form determined by local
authorities), DA Form 3894, DA Form 3910, DA Form 3696, DA Form 4160, and AR 40-400.
Standards: Assembled a death packet IAW AR 40-400.
Performance Steps
1. Obtain the forms necessary for a death packet.
a. Certificate of Death Form (form determined by local state authorities).
b. DA Form 3894.
c. DA Form 3910.
d. DA Form 3696.
e. DA Form 4160.
2. Determine the type of container required by the local command for the death packet.
3. Group and package all of the forms into the container.
Performance Measures
GO
NO
GO
1. Obtained the forms necessary for a death packet.
——
——
2. Determined the type of container required by local command for the death
packet.
——
——
3. Grouped and packaged all of the forms into the container.
——
——
Evaluation Guidance: Score the soldier GO if all steps are passed. Score the soldier NO-GO
if any step is failed. If the soldier fails any step, show what was done wrong and how to do it
correctly.
References
Required
AR 40-400
Related
None
3-51
STP 8-91G15-SM-TG
Subject Area 5: Third Party Liability
SUBMIT AN INITIAL NOTIFICATION FOR POSSIBLE THIRD PARTY LIABILITY
081-866-0062
Conditions: You have received the current admission and disposition (AAD) report and the
emergency room log sheets.
Standards: Reviewed each direct admission injury case for possible third party liability.
Forwarded each DA Form 2985 or SF 558 to the recovery judge advocate (RJA).
Performance Steps
1. Review the AAD report and identify all admission injury cases.
2. Request DA Form 2985 or SF 558 on all cases identified in step 1.
3. Review each DA Form 2985 or SF 558 for possible third party liability.
NOTE: All direct admission injury cases are submitted to the RJA for possible third party
liabilities.
4. Forward DA Form 2985 or SF 558 of any patient involved with possible third party liability to
the RJA within 3 working days.
5. Review emergency room log sheets and identify all injury cases admitted on SF 558.
6. Request DA Form 2985 or SF 558 on all cases identified in step 5.
7. Review each DA Form 2985 or SF 558 for possible third party liability.
8. Forward DA Form 2985 or SF 558 of any patient involved with possible third party liability to
the RJA within 3 working days.
Performance Measures
GO
NO
GO
1. Reviewed the AAD report and identified all direct admission injury cases.
——
——
2. Requested DA Forms 2985 or SF 558 on all cases identified in step 1.
——
——
3. Reviewed each DA Form 2985 or SF 558 for possible third party liability.
NOTE: All direct admission injury cases were submitted to the RJA for
possible third party liabilities.
——
——
4. Forwarded DA Form 2985 or SF 558 of any patient involved with possible
third part liability to the RJA within 3 working days.
——
——
5. Reviewed emergency room log sheets and identified all injury cases
admitted on SF 558.
——
——
6. Requested DA Form2985 or SF 558 on all cases identified in step 5.
——
——
3-52
STP 8-91G15-SM-TG
Evaluation Guidance: Score the soldier GO if all steps are passed. Score the soldier NO-GO
if any step is failed. If the soldier fails any step, show what was done wrong and how to do it
correctly.
References
Required
None
Related
AR 40-400
3-53
STP 8-91G15-SM-TG
INITIATE DA FORM 2631 (MEDICAL CARE - THIRD PARTY LIABILITY NOTIFICATION)
081-866-0063
Conditions: You have received DA Form 2985 from the recovery judge advocate (RJA) office
that is stamped "Possible Third Party Liability." A request from the RJA to complete DA Form
2631 is received. The patient's DA Form 3647 or DA Form 3647-1 and SF 502 are available.
Necessary materials and equipment: blank DA Form 2631 and a typewriter.
Standards: Completed DA Form 2631 without error.
Performance Steps
1. Enter "Possible Third Party Liability - Public Law 87-693" in item 29 of DA Form 3647 or
3647-1.
NOTE: If the Inpatient Treatment Record Cover Sheet (ITRCS) was completed prior to the
notification, make a corrected copy of the ITRCS to include the above statement.
2. Complete DA Form 2631 as applicable.
NOTES:
1. When the TRANSFER block in item 5 is checked, forward the notification to the RJA within 3
working days after the day of the transfer.
2. When an injury transfer patient arrives without DA Form 2631, initiate one and forward it to
the RJA within 3 working days after the day of the transfer.
3. Obtain the signature of the patient administrator.
4. Attach a copy of SF 502, if available.
NOTE: If SF 502 is not available when DA Form 2631 is forwarded to the RJA, forward SF 502
to the RJA when completed.
5. Forward DA Form 2631 to the RJA.
6. File a copy of DA Form 2631 in the inpatient treatment record (ITR).
Performance Measures
GO
NO
GO
1. Entered "Possible Third Party Liability - Public Law 87-693" in item 29 of
DA Form 3647 or 3647-1.
——
——
2. Completed DA Form 2631 as applicable.
——
——
3. Obtained the signature of the patient administrator.
——
——
4. Attached a copy of SF 502 if available.
——
——
5. Forwarded DA Form 2631 to the RJA.
——
——
6. Filed a copy of DA Form 2631 in the inpatient treatment record (ITR).
——
——
Evaluation Guidance: Score the soldier GO if all steps are passed. Score the soldier NO-GO
if any step is failed. If the soldier fails any step, show what was done wrong and how to do it
correctly.
3-54
STP 8-91G15-SM-TG
References
Required
None
Related
AR 40-400
3-55
STP 8-91G15-SM-TG
Subject Area 6: Evacuation and Transfer
PREPARE FOR AN AEROMEDICAL EVACUATION
081-866-0121
Conditions: You have received a doctor's request for transfer of a patient, DA Form 3981, and
a confirmed hospital bed designation from Armed Services Medical Regulating Office/Joint
Medical Regulating Office (ASMRO/JMRO). Necessary materials and equipment: DD Form
600, DD Form 601, DD Form 602, and the patient information required for evacuation.
Standards: Performed all the steps necessary to prepare for an aeromedical evacuation
without error.
Performance Steps
1. Determine the appropriate patient classification.
a. Class 1 - Neuropsychiatric Patients.
(1) Class 1A - Severe Psychiatric Litter Patients.
(2) Class 1B - Psychiatric Litter Patients of Intermediate Severity.
(3) Class 1C - Psychiatric Walking Patients of Moderate Severity.
b. Class 2 - Litter Patients (Other than Psychiatric).
(1) Class 2A - Immobile Litter Patients.
(2) Class 2B - Mobile Litter Patients.
c. Class 3 - Inpatients (Other than Psychiatric).
d. Class 4 - Infants and Children.
e. Class 5 - All Outpatients.
f. Class 6 - Nonmedical and Medical Attendants.
2. Brief the patient, nonmedical attendants, and medical attendants.
a. The manner is which the aeromedical evacuation system operates.
b. Route itinerary.
c. Estimated time en route.
d. Baggage limitation.
e. Special equipment.
f. Medication.
g. Hazardous material.
h. Weapons.
i. The need for inspections for anti-hijacking purposes.
j. Destination hospital.
k. Attendants will pay for meals aboard the aircraft.
3. Prepare all medical records.
a. Ensure clinical records, outpatient/inpatient treatment records, health records, U.S.
Field Medical Cards, X-Rays, and any other documents relating to the final destination
are included.
b. Review the above listed documents for completeness.
c. Place all records in an envelope.
d. Mark the outside of the envelope with the patient's name, rank or status, SSN,
nationality (if not a US citizen), organization, date of departure, and destination.
3-56
STP 8-91G15-SM-TG
Performance Steps
4. Complete the anti-hijacking statement.
a. Ensure the patients, nonmedical attendants, and medical attendants are listed on the
statement.
b. Conduct a physical search of their hand carried items and annotate on the statement.
c. Ensure there are no explosive devices or unauthorized weapons and annotate on the
statement.
5. Complete DD Form 602 using information from DA Form 3981.
NOTE: The originating medical facility will prepare the DD Form 602, completing all pertinent
information except "Cabin or Compartment No." and "Bunk No.". If this information is required,
the carrier's representative will enter it.
a. Enter the originating MTF.
b. Enter the patient's name.
c. Enter the SSN, rank/status, and patient category.
d. Enter all diagnoses, including only such detail as will be useful in caring for the patient
in-flight.
(1) Enter "Prisoner" in red pencil for patients in a prisoner status.
(2) Enter "Under Investigation" in red pencil for patients under investigation but not
formally charged for serious crime.
(3) Enter "DA" in red pencil for patients with a history of drug abuse.
e. Check the "Battle Casualty" space only for patients actually qualified for this category.
f. Classify patients under treatment for nonbattle wounds or other injuries as "Injury."
g. Enter the same baggage tag numbers as shown on DD Form 600.
h. Enter the destination.
i. Enter recommended en route treatment.
j. Ensure the physician signs the form.
k. Mark regular diet or special diet as applicable. List the special diet.
NOTE: Arrange for pickup of special equipment and/or a special diet. The final destination
hospital will staple the basic tag of DD Form 602 to the SF 502 in the patient's clinical records.
For outpatients, insert DD Form 602 in the health record or outpatient record, as appropriate.
6. Complete DD Form 600.
a. Do not enter en route staging facilities as the planned itinerary is subject to change.
b. Attach one DD Form 600 to each piece of baggage accompanying the patient.
c. Do not use DD Form 600 for unaccompanied baggage.
d. Detach the Patient's Stub and give it to the patient.
NOTE: If the patient is unable to safeguard the stub, it will be given to the senior medical
attendant accompanying the patient. As the accompanying medical personnel are relieved, the
Patient's Stub will be turned over to the succeeding senior medical attendant.
7. Complete DD Form 601 if required.
a. Prepare in the number of copies required by the carrier.
b. Follow the instructions contained on the form.
c. List attendants (medical and nonmedical) immediately following the information
pertaining to the patient whom they are attending.
d. Enter the term "Prisoner" below the name of the originating medical facility for a patient
in prisoner status.
e. Enter the term "Under Investigation" below the name of the originating medical facility
for a patient under investigation but not formally charged for a serious crime.
3-57
STP 8-91G15-SM-TG
Performance Steps
f. Enter "DA" below the name of the originating medical facility for patients with a history
of drug abuse.
g. Ensure any deletions or changes are initialed by the individual who signed the
manifest.
8. Arrange for the preparation of necessary movement orders.
9. Arrange for the pickup of in-flight medication.
a. Ensure a 3-day supply of drugs is provided for patients traveling in the CONUS and
within overseas theaters.
b. Ensure a 5-day supply of drugs is provided for patients traveling from overseas to the
CONUS.
c. Ensure medication is labeled with the generic name, dosage, strength, and name of
the patient.
d. Ensure medication is delivered to the flight nurse when the patient is placed aboard
the aircraft.
10. Arrange for or coordinate ground or air transportation from the medical facility to the
departure site.
11. Coordinate the flight time with the ward nurse.
Performance Measures
GO
NO
GO
1. Determined the classification code.
——
——
2. Briefed the patient, nonmedical attendants, and medical attendants.
——
——
3. Gathered and safeguarded applicable patient records.
——
——
4. Completed the anti-hijacking statement.
——
——
5. Completed DD Form 602 using information from DA Form 3981.
——
——
6. Completed DD Form 600.
——
——
7. Completed DD Form 601 if required.
——
——
8. Arranged for the preparation of necessary movement orders.
——
——
9. Arranged for the pickup of in-flight medication, special equipment, and/or a
special diet.
NOTE: Ensured the patient has the correct amount of medication. If generic,
make sure the name, dosage, strength, and the name of the patient are
correct. Make sure the medication is delivered to the flight nurse. Arrange for
special equipment, if required.
——
——
10. Arranged for or coordinated ground or air transportation from the medical
facility to the departure site.
——
——
11. Coordinated the flight time with the ward nurse.
——
——
3-58
STP 8-91G15-SM-TG
Evaluation Guidance: Score the soldier GO if all steps are passed. Score the soldier NO-GO
if any step is failed. If the soldier fails any step, show what was done wrong and how to do it
correctly.
References
Required
None
Related
AFI 41-301
AFI 41-302
AR 40-350
AR 40-40
AR 40-400
AR 40-535
AR 40-538
DOD 4515.13-R
DODI 6000.11
FM 8-10-6
3-59
STP 8-91G15-SM-TG
PREPARE A PAT IENT FOR AN AEROMEDICAL EVACUATION
081-866-0129
Conditions: A patient requires evacuation. Necessary materials and equipment: records
packet, comfort and safety items, special equipment, medication, patient baggage, DD Form
602, DA Form 3981, patient identification items, and AR 40-535.
Standards: Performed all the steps necessary to prepare a patient for aeromedical evacuation.
Performance Steps
1. Brief the patients and all attendants.
2. Ensure all severe psychiatric patients are sedated, restrained, and placed in a litter as
applicable.
3. Ensure all psychiatric patients of intermediate severity are sedated and placed in a litter
with restraints available.
4. Check the patient's identification.
a. Wristband.
b. Identification card.
c. Identification tags if applicable.
NOTE: Refer to AR 40-535 for steps 5 through 8.
5. Ensure special diets are prepared and picked up.
NOTE: Special diets are specified on the patient's DD Form 602.
6. Ensure items are present for the patient's comfort and safety.
a. Litter patients.
(1) Hospital pajamas.
(2) Slippers.
(3) Robe.
(4) Litter straps.
(5) 2 sheets.
(6) 1 pillow.
(7) 1 pillowcase.
(8) 2 blankets.
(9) 1 litter mattress.
b. Ambulatory active duty patients. These patients will travel in service uniform except in
emergency or unusual conditions.
7. Ensure the patient has the correct amount of medication.
a. Within CONUS - a 3-day supply is required.
b. OCONUS to a CONUS port of entry or OCONUS to CONUS when the CONUS
termination is not a CONUS port of entry - a 5-day supply is required.
8. Ensure the patient's funds and valuables are processed and secured.
9. Ensure the required in-flight medical supplies and equipment are present.
10. Check the patient's records packet for completeness.
a. Medical records.
(1) Clinical records.
3-60
STP 8-91G15-SM-TG
Performance Steps
(2) Outpatient treatment record.
(3) Health record.
(4) US Field Medical Card.
b. X-rays.
c. Military personnel jacket.
d. Finance record.
11. In hostile fire areas, check the patients luggage for hazardous material.
NOTE: The patient should not have more than two pieces of baggage. The total luggage
weight should not exceed 66 pounds.
Performance Measures
GO
NO
GO
1. Briefed the patients and all attendants.
——
——
2. Ensured all severe psychiatric patients were sedated, restrained, and
placed on a litter as applicable.
——
——
3. Ensured all psychiatric patients of intermediate severity were sedated and
placed on a litter with restraints available.
——
——
4. Checked the patient's identification.
——
——
5. Ensured special diets were prepared and picked up.
——
——
6. Ensured items were present for the patient's comfort and safety.
——
——
7. Ensured the patient had the correct amount of medication.
——
——
8. Ensured the patient's funds and valuables were processed and secured.
——
——
9. Ensured the required in-flight medical supplies and equipment were
present.
——
——
10. Checked the patient's records packet for completeness.
——
——
11. In hostile fire areas, checked the patient's luggage for hazardous material.
——
——
Evaluation Guidance: Score the soldier GO if all steps are passed. Score the soldier NO-GO
if any step is failed. If the soldier fails any step, show what was done wrong and how to do it
correctly.
References
Required
AR 40-535
Related
AR 40-350
AR 40-40
AR 40-400
AR 40-538
DOD 4515.13-R
3-61
STP 8-91G15-SM-TG
Subject Area 7: Coding
CODE A DIAGNOSIS USING ICD-9 CODES
081-866-0053
Conditions: You are in a patient administration office and have the dispositioned patient's
medical record and the Generic ICD-9-CM Hospital Version.
Standards: Selected the correct diagnostic or procedural inpatient code IAW Generic ICD-9CM Hospital Version, AR 40-66, and AR 40-400 without error.
Performance Steps
1. Code a diagnosis.
a. Section 1 (Volume 2), Index to Diseases.
(1) Main terms - bold print, arranged alphabetically.
(a) May be the actual disease (cholecystitis, appendicitis).
(b) May be the actual problem (failure, congestion, infarction, distress).
(c) May never be an anatomical part or organ (heart, stomach) or a 'modifier'
(acute, fetal, allergic).
(2) Sub terms - normal print, indented, alphabetical order.
b. Section 2 (Volume 1), Tabular List of Diseases and Injuries.
(1) Used to verify the diagnostic code found in section 1.
(2) Structure.
(a) Chapter - groups of three-digit codes referring to a broad spectrum of
diseases or injuries.
(b) Sections - groups of three-digit codes that narrow down the spectrum.
(c) Categories - three-digit codes that represent specific information about a
disease or injury group.
(d) Subcategories - four-digit codes that represent specific information about a
disease or injury.
(e) Subclassifications - five-digit codes that further define a specific type disease.
c. Conventions/Instructional Notations.
(1) Abbreviations.
(a) NOS - not otherwise specified (used only in volume 1).
(b) NEC - not elsewhere classifiable. Term used in sections 1 and 3 when the
coder lacks the information necessary to code the term to a more specific
category.
(2) Punctuation.
(a) ( ) - parentheses are used to enclose supplementary words which may be
present or absent in the statement of a disease or procedure without affecting
the code number to which it is assigned (one common code).
(b) [ ] - brackets are used to enclose synonyms, alternative wordings,
explanatory phrases, possible 5th digit choices, or an additional required
code.
(c) : - colons are used in the Tabular List after an incomplete term which needs
one or more of the modifiers which follow in order to make it assignable to a
given category.
(d) { } - braces are used to enclose a series of terms, each of which is modified
by the statement appearing at the right of the brace.
3-62
STP 8-91G15-SM-TG
Performance Steps
(3) Instructional notations.
(a) Includes: - this note appears immediately under a three-digit code title to
further define, or give an example of, the contents of the category.
(b) Excludes: - terms following the word 'excludes' are to be coded elsewhere as
indicated in each case.
(c) NOTE: - certain main terms are followed by "NOTE:" which is used to define
terms and give coding instructions at the main three-digit category.
(d) Code also underlying disease: - this note requires that the underlying disease
(etiology) is recorded first and the particular manifestation recorded
secondarily. This note appears only in Volume 1 Diseases: Tabular List.
(e) Use additional code if desired: - this instruction is placed in the Tabular List in
those categories where the coder may wish to add further information (by
using additional code) to give a more complete picture of the diagnosis or
procedure.
(f) Section mark (see page xxii, Introduction) - this symbol preceding a code
denotes the placement of a footnote at the bottom of the page which is
applicable to all subdivisions of that code.
(4) Cross-references.
(a) See - an explicit direction to look elsewhere.
(b) See also - directs the coder to look under another main term if all the
information being looked for cannot be located under the first.
(5) Etiology and manifestation of disease - for certain conditions, it is important to
record both the etiology (underlying cause) and the manifestation (significant
conditions) of the disease as it is currently presented.
(a) Apply a fifth digit code.
(b) Both the etiology and the manifestation are coded individually (the Alphabetic
Index will list both codes).
2. Code a procedure.
a. Sections 3 and 4 (Volume 3) - Tabular List and Alphabetic Index of Procedures.
NOTE: Procedures are coded following the same basic concepts as were used to code a
diagnosis.
(1) Alphabetic Index. - Section 3.
(a) Used first (similar to alphabetic index in section 1).
(b) Locate main terms and subterms (modifiers).
(2) Tabular List. - Section 4.
(a) Used to verify the procedure code found in section 3.
(b) Contains special instructions and notes relevant to the coding of procedures.
Used to verify procedure codes obtained from the Alphabetic Index.
Performance Measures
GO
NO
GO
1. Coded a diagnosis.
——
——
2. Coded a procedure.
——
——
3-63
STP 8-91G15-SM-TG
Evaluation Guidance: Score the soldier GO if all steps are passed. Score the soldier NO-GO
if any step is failed. If the soldier fails any step, show what was done wrong and how to do it
correctly.
References
Required
ICD-9-CM
3-64
Related
AR 40-400
AR 40-66
STP 8-91G15-SM-TG
CODE A PROCEDURE USING CPT -4 CODES
081-866-0146
Conditions: You are in a Patient Administration office and have the patient's outpatient medical
record/health record and the CPT-4 Standard Edition manual.
Standards: Selected the correct procedural codes IAW the CPT-4, AR 40-66, and AR 40-400
without error.
Performance Steps
1. Locate the service and/or procedure code in the CPT-4 manual.
2. Assign the appropriate CPT-4 code for an outpatient.
a. Using the index.
(1) Alphabetically locate the listing of anatomical locations/regions, body systems,
procedures, or services.
(2) Annotate the procedure or service code number to the right.
(3) Refer to the main text for specifically detailed code.
b. Using the main text.
(1) Carefully read the description of the procedure from the clinical documentation
provided.
(2) Assign the code that specifically details the appropriate service and/or procedure.
Performance Measures
GO
NO
GO
1. Located the service and/or procedure code in the CPT-4 manual.
——
——
2. Assigned an appropriate CPT-4 code for an outpatient.
——
——
Evaluation Guidance: Score the soldier GO if all steps are passed. Score the soldier NO-GO
if any step is failed. If the soldier fails any step, show what was done wrong and how to do it
correctly.
References
Required
CPT-4
Related
AR 40-400
AR 40-66
3-65
STP 8-91G15-SM-TG
PROCESS RECORD CODING DATA USING CHCS
081-866-0194
Conditions: You are in a patient administration office and have a computer with access to the
CHCS, a printer (LA75 line printer or HP laser printer), and the patient's clinical record data.
Standards: Conducted clinical record processing procedures using the CHCS IAW the
SAIC/CHCS TC-4.5-0526 without error.
Performance Steps
1. Document coded diagnoses/procedures, and annotate administrative data using the CHCS
using the CHCS Inpatient Record Menu and submenu Inpatient Record Data (IRM-IRD).
a. Enter a diagnosis (access menus IRM-IRD).
(1) Enter patient identifier (register number).
(2) Choose Diagnosis (option 1) following prompts at bottom of screen on the Action
Menu Bar.
(3) Choose Add (option A) from the Diagnosis screen Action Bar and follow prompts
to complete:
(a) DX Code (Principal DX first), Enter number, Return to move cursor to next
data field, Modifier.
(b) File the data and return to the diagnosis screen Action Bar.
(4) Enter a second diagnosis, repeating step 1a(3) as stated above.
(5) File the data and return to Clinical Records Action Bar.
b. Document coded procedures.
(1) Enter a Principal Procedure.
(2) Choose Procedure (option 2) from the Clinical Records Action Bar.
(3) Choose Add (option A) from the Procedure screen Action Bar and follow prompts
to complete:
(a) Code, Modifier, Frequency, Start Date, End Date, HCP1, and HCP2 using the
first 5 letters of the last name and the first letter of the first name.
(b) File the data and return to the Procedure screen Action Bar for entry of any
remaining procedures.
(4) Enter a second procedure, repeating step 1b(3) as stated above.
(5) File the data and Return to Clinical Records Action Bar.
c. Document miscellaneous data.
(1) Enter or update miscellaneous data.
(2) Choose Miscellaneous (option 3) from the Clinical Records Action Bar.
(3) Follow prompts to enter Convalescent Leave Rec, Anesthetic Risk Code.
(4) File the data and return to Clinical Records Action Bar.
(5) Do not process final edits.
d. Enter a nonprocedural provider.
(1) Choose Nonprocedural Provider (option 8) from Clinical Records Action Bar.
(2) Enter other episode HCP.
(3) File the data and return to Clinical Records Action Bar.
e. Enter Blood utilization data.
(1) Choose Blood Utilization (option 9) from the Clinical Records Action Bar.
(2) Follow prompts to enter date/time, Data new blood utilization, Blood Component,
Unit Bag Number, Amount, Unit, Reaction, HCP Ordering. (Use last name, no
space after the comma and first initial.)
3-66
STP 8-91G15-SM-TG
Performance Steps
(3) File the data and return to the Clinical Records Action Bar.
f. Insert an Additional Procedure.
(1) Choose Procedure (option 2) from the Clinical Records Action Bar.
(2) Choose Insert (option I) from the Procedure Action Bar.
(3) Enter Insert procedure # 1and complete the procedure data prompts.
(4) File the data and return to the Clinical Records Action Bar.
(5) Return to the Inpatient Record Menu.
g. Process Final Edits and Set Record Status to Force Waiting Approval (access menus
IRM-IRD).
(1) Select Patient Identifier (register number).
(2) Choose Clerk Action (option 0) from the Clinical Records Action Bar.
(3) Choose Waiting Supervisor Approval (option W) from the Clerk Action List.
(4) Complete the prompts to Print the Data Error Report, Device, Right Margin.
(5) Do NOT request edit details.
(6) Change record status to FW - Force Waiting Approval (option 1).
(7) Return to the Inpatient Record Menu.
h. Generate a clinical record coversheet (access menus IRM-IRD).
(1) Select Patient Identifier (register number).
(2) Choose Clerk Action (option 0) from the Clinical Records Action Bar.
(3) Complete the prompts to display the Cover Sheet.
(a) Choose Print Cover Sheet from the Clerk Action List: V.
(b) At Device: Return.
(c) At Right Margin: 80// Return.
(4) Return to the PAD System Menu.
2. Create a Casualty SIDR Record.
a. Access and complete the Casualty Record Enter/Edit (CSE) option under the Casualty
SIDR Menu (CAS).
(1) Complete the Casualty SIDR Record Identification Screen.
(a) Select MTF of Treatment. Confirm that you are adding a new register
number.
(b) Enter the register number and confirm it.
(2) Complete the Casualty SIDR Demographics Screen.
(a) Patient Name.
(b) FMP (Family Member Prefix).
(c) Sponsor SSN.
(d) Sex.
(e) DOB.
(f) Race.
(g) Patient Category.
(h) Rank.
(i) Unit Location.
(3) Complete the Casualty SIDR ADT Screen.
(a) Admission Date.
(b) Source of Admission.
(c) Trauma Code.
(d) Cause of Injury.
(e) Geographic Location of Injury.
(f) Disposition Date; Type of Disposition; Disposition Clinic Service.
(4) Complete the Casualty SIDR Diagnosis/Procedures Screen.
3-67
STP 8-91G15-SM-TG
Performance Steps
(a) Enter Diagnoses and bypass unneeded Diagnosis Fields.
(b) Enter Procedures and press Return to bypass remaining Procedure fields.
(c) Enter Blood Components Indicator.
(d) File the data and return to the PAD System Menu.
Performance Measures
GO
NO
GO
1. Entered a diagnosis.
——
——
2. Entered a procedure for an inpatient.
——
——
3. Entered or updated Miscellaneous Data.
——
——
4. Added a Nonprocedural Provider.
——
——
5. Entered Blood Utilization Data.
——
——
6. Inserted an additional procedure.
——
——
7. Processed final edits and set record status to Force Waiting Approval.
——
——
8. Generated a Clinical Record Cover Sheet.
——
——
9. Created a Casualty SIDR Record.
——
——
Evaluation Guidance: Score the soldier GO if all steps are passed. Score the soldier NO-GO
if any step is failed. If the soldier fails any step, show what was done wrong and how to do it
correctly.
References
Required
None
3-68
Related
TC-4.5-0526
STP 8-91G15-SM-TG
Subject Area 8: CHCS
PERFORM PATIENT REGISTRATION FUNCTIONS USING THE CHCS
081-866-0154
Conditions: You are in a patient administration office with access to the CHCS and patient
information. Necessary materials and equipment: a label printer, an embosser, and an HP
laser printer.
Standards: Performed patient registration functions using CHCS IAW SAIC/CHCS TC-4.5-0310
without errors.
Performance Steps
1. Register a patient who is his or her own sponsor.
a. Access the Full Registration (FRG) option on the Registration Options Menu, PAD
System Menu (ROM).
(1) Select Patient Name: (your patient's name) <Return>.
(2) Enter that you are adding (your patient's name) as a new patient: Y, then
<Return>.
(3) Enter Sponsor Name: (space bar, then <Return> if Active Duty patient).
(4) Complete the Patient - Initial Information screen.
(a) FMP.
(b) DOB.
(c) SSN.
(d) Verify SSN.
(e) PAT CAT.
(5) File the initial patient information.
(6) Notice the message that the data is being processed.
(7) Process the DEERS request.
(8) Do you want to Override the DEERS Ineligibility and continue? No//Y (Yes).
(9) Complete the Patient Information screen.
(a) Sex.
(b) Religion.
(c) Ethnic Origin.
(d) Race.
(e) Marital Status.
(f) Civilian Occupation.
(g) Command Interest.
(h) Patient Address.
(i) Zip Code.
(j) Home Phone.
(k) Work Phone.
(l) O/P Rec Loc: (e.g., OUTPATIENT RECORDS).
(m) O/S Rec Loc: <Return>.
(n) Primary Physician.
Confirm the primary physician: <Return>.
(o) Registration Comment.
(10) Confirm that the patient address is the same as the emergency contact address:
YES//<Return>.
3-69
STP 8-91G15-SM-TG
Performance Steps
(11) Complete the Sponsor Information screen: Sponsor SSN: <Return>.
(a) Command Sec.
(b) Rank.
(c) Military Occupation Code.
(d) Station/Unit.
(e) Confirm the Station/Unit: <Return>.
(f) Length of Service.
(g) Flying Status.
(h) Duty Address.
(i) Zip Code.
(j) Duty Phone: <Return>.
(k) DSN.
(12) Complete the Emergency Contact/Next of Kin Information screen.
(a) Emergency Contact.
(b) Relationship.
(13) Confirm Emergency Contact is the same as the Next of Kin? YES// <Return>.
(14) Press Enter at 'Does _ want to be an organ donor?'
(15) File the registration data.
(16) Enter Allergy.
(17) Allergy Comment.
(18) File the allergy data. Press <Return>.
b. Return to the Registration Options Menu.
2. Register a John Doe patient.
a. Access the John Doe Registration (JRG) option on the Registration Options Menu,
PAD System Menu (ROM).
b. Verify that you want to add a new John Doe patient: <Return> (to accept default).
c. Review the John Doe registration display.
d. Accept the system-generated John Doe name/number: <Return>.
e. Accept the system-generated FMP: <Return>.
f. Accept the system-generated SSN: <Return>.
g. Complete John Doe registration.
(1) Sex.
(2) DOB.
h. File the data and return to the Registration Options Menu.
3. Enter insurance information using the CHCS.
a. Access the Patient Insurance Information (PII) option on the Registration Options
menu, PAD System Menu (ROM ).
b. At Select Patient Name, enter your patient's name.
c. Verify that you have accessed the correct patient: <Return>.
d. Select the Add OHI (Other Health Insurance) option: Q// A.
e. Complete the insurance information fields.
(1) Insurance Company Name.
(2) Confirm the Insurance Company Name: <Return>.
(3) Phone.
(4) Effective Date.
(5) Expiration Date.
(6) Primary Policy.
(7) Policy Type.
3-70
STP 8-91G15-SM-TG
Performance Steps
(8) Billing Status.
(9) Group Name.
(10) Group Number.
(11) Precertification/UR.
(12) PreCert/UR on Report.
(13) PreCert/UR Authorization Code: <Return>.
(14) Policy Holder Name.
(15) Confirm the policy holder name: <Return>.
(16) Policy Holder SSN.
(17) Press <Return> to accept the default SSN.
(18) Relationship to Insured.
(19) Press <Return> to advance through the Address, City, State, and Zip fields. (If
data for the policy holder exists in the system, the system automatically enters the
information in these fields.)
(20) Insured Employer Name.
(21) Phone.
(22) Street Address.
(23) Zip.
f. File the data.
4. Complete the print options for registration functions.
a. Print the emboss card.
(1) Access the Registration Output Menu (ROUT) option on the Registration Options
Menu.
(2) Select Registration Output Menu option: 1 (EMBOSS CARD).
(3) Select Patient Name.
(4) Select Embosser Format Name: OUTPATIENT (ACTIVE DUTY).
The format choices are for inpatients or for family members or retired outpatients.
(5) Choose 1-2: 1.
(6) Confirm that you wish to display the card for the selected patient: YES//
<Return>.
(7) Confirm that you wish to print Emboss Card: <Return>.
(8) Enter Device: NL.
(9) Return to the Registration Output Menu.
b. Print the registration form.
(1) Access the Registration Form (2) option on the Registration Output Menu.
(2) Select Patient Name.
(3) Choose 1-2: 1.
(4) Display the report on your terminal screen.
(5) Select Device: <Return>.
(6) Right Margin: 80// <Return>.
(7) Print the registration form.
(8) Select patient name: spacebar, then <Return>.
(9) Device: NL.
(10) Return to the Registration Output Menu.
5. Enter a patient name change.
a. Access the Full Registration (FRG) option on the Registration Options Menu.
b. Select Patient Name.
c. Change patient's maiden name to her married name.
3-71
STP 8-91G15-SM-TG
Performance Steps
d. Confirm that you would like to make the change: Y.
e. Access and update marital status field: M.
f. Press <F10> (to exit the screen).
g. File the changed data: F.
h. Confirm that you would like to make the change: Y.
i. Does (your patient's name) want to be an organ donor? Y.
j. Press <Return> to continue.
k. Press <^> to bypass post registration options and return to the Registration Options
Menu.
l. Access the Former Patient Name (FPN) option on the Registration Options Menu.
m. Select Patient Name: (the patient's married name).
n. Select (the patient's maiden name) as the patient alias.
o. When the cursor is positioned, press <Select>.
p. Activate the selection by pressing <Return>.
q. Press <Return> (to scroll through the Select Alias FMP/SSN field).
r. Press <Return> to accept the patient's maiden name as an alias.
s. Return to the Registration Options Menu.
t. Access the Full Registration (FRG) option on the Registration Options Menu.
u. Select Patient Name. (When the former or maiden name is entered, married name
and maiden name display. The patient's birthday displays to distinguish her from other
patients with the same name).
v. Confirm the patient name: <Return>.
w. Confirm the sponsor name: <Return>.
x. Press <^> (to return to the Registration Options Menu).
Performance Measures
GO
NO
GO
1. Registered a patient who is his or her own sponsor using CHCS.
——
——
2. Registered a John Doe patient using CHCS.
——
——
3. Entered insurance information using CHCS.
——
——
4. Printed the emboss card using CHCS.
——
——
5. Printed the registration form using CHCS.
——
——
6. Entered a patient name change using CHCS.
——
——
Evaluation Guidance: Score the soldier GO if all steps are passed. Score the soldier NO-GO
if any step is failed. If the soldier fails any step, show what was done wrong and how to do it
correctly.
References
Required
None
3-72
Related
TC-4.5-0310
STP 8-91G15-SM-TG
PERFORM PATIENT ADMISSIONS FUNCTIONS USING THE CHCS
081-866-1002
Conditions: You are in a patient administration office with access to a computer that has CHCS
ADT and a connected printer. You also have access to patient information.
Standards: Conducted admissions transactions utilizing the CHCS without error.
Performance Steps
1. Admit a patient directly to the MTF.
a. Access the Admission (ADM) option on the ADT Processing Menu.
b. Enter Patient Name (for admission).
c. Confirm the patient name: <Return>.
d. Confirm sponsor name: <Return>.
e. Display and review the patient and sponsor information.
f. File the data.
g. Press <Return> to continue.
h. Enter a new admission: Y.
i. Enter admission date: NOW//.
j. Process DEERS request.
k. Complete the Admissions screen.
(1) Admission Date.
(2) Source of Admission: DIR//.
(3) Admitting ward.
(4) Room-bed.
(5) MEPRS/Service.
(6) Meal card required.
(7) Admitting Physician.
(8) Admitting Diagnosis.
(9) Diagnosis Text.
(10) Sched Proced(1).
(11) Sched Proced(2).
(12) Admission Comment.
(13) Type Case.
(14) Trauma.
(15) Cause of Injury.
(16) Injury D/T.
(17) Geographical Location.
(18) Press <Return>.
(19) Injury Comment.
(20) Press <Return> three more times to proceed to the next field.
(21) Register Number: <Return>.
l. File the data.
2. Transfer a patient using CHCS.
a. Access the Interward Transfer (TRA) option on the ADT Processing Menu.
b. Enter Patient Name (to transfer).
c. Confirm Patient Name.
d. Add a transfer? Y.
e. Enter transfer date/time.
3-73
STP 8-91G15-SM-TG
Performance Steps
f. Transfer date.
g. Transfer to.
h. Room/Bed.
i. MEPRS/Service.
j. Transferring physician.
k. Confirm physician name.
l. Select Diagnosis.
m. File the data.
n. Press <Return>.
Performance Measures
GO
NO
GO
1. Admitted a patient directly to the MTF using CHCS.
——
——
2. Transferred a patient using CHCS.
——
——
Evaluation Guidance: Score the soldier GO if all steps are passed. Score the soldier NO-GO
if any step is failed. If the soldier fails any step, show what was done wrong and how to do it
correctly.
References None
3-74
STP 8-91G15-SM-TG
PERFORM PATIENT DISPOSITION FUNCTIONS USING THE CHCS
081-866-1003
Conditions: You are in a patient administration office with access to the CHCS and patient
information. Necessary materials and equipment: a label printer, an embosser, and an HP
laser printer.
Standards: Conducted disposition functions without error.
Performance Steps
1. Process a routine disposition order for an active duty patient.
a. Access the Disposition (DIS) option on the ADT Processing Menu.
PAD System Menu>ADT>DIS
b. Select patient (to disposition).
c. Confirm the patient data.
d. Enter a disposition? Y.
e. Enter disposition date/time: NOW//.
f. Complete the Dispositions screen.
(1) Disposition Date: <Return>.
(2) Type of disposition: DUTY.
(3) Bypass Disposition comments.
(4) Attending physician.
(5) Dispositioning physician.
(6) Confirm the Dispositioning Physician’s data.
(7) Convalescent leave days recommended.
g. Press <Return> (to review/complete on the Disposition Diagnosis and Procedures
screens).
h. Press <Return> (to exit the ICD Operations/Procedures field).
i. File the data.
2. Place an inpatient on medical hold.
a. Access the Disposition (DIS) option on the ADT Processing Menu.
PAD System Menu>ADT>DIS
b. Select the patient to place on medical hold.
c. Confirm the patient data.
d. Enter a disposition? Y.
e. Enter disposition date/time: NOW//.
f. Complete the Disposition screen.
(1) Disposition Date: <Return>.
(2) Type of disposition: HOLD (Medical Holding).
(3) Bypass Disposition Comments: <Return>.
(4) Released From Medical Hold Date: <Return>.
(5) Released From Medical Hold Date: <Return> (to bypass this field).
(6) Attending physician: <Return> (to accept the default data).
(7) Dispositioning physician: <Return> (to accept the default data).
(8) Confirm the Dispositioning Physician's data: <Return>.
(9) Convalescent leave days recommended: <Return> (to bypass this field).
g. Press <Return> (to review data on the Disposition Diagnosis & Procedures
screens).
h. Press <Return> (to exit the ICD Operations/Procedures field).
3-75
STP 8-91G15-SM-TG
Performance Steps
i. File the data.
NOTE: To release an inpatient from medical hold, return to the DIS option and enter the date in
the 'Released from Medical Hold Date' field. The 'Type of disposition' field should not be edited,
but remain at HOLD (to indicate Medical Holding).
Performance Measures
GO
NO
GO
1. Processed a routine disposition order for an active duty patient.
——
——
2. Placed an inpatient on medical hold.
——
——
Evaluation Guidance: Score the soldier GO if all steps are passed. Score the soldier NO-GO
if any step is failed. If the soldier fails any step, show what was done wrong and how to do it
correctly.
References None
3-76
STP 8-91G15-SM-TG
PERFORM RECORDS FUNCTIONS USING CHCS
081-866-0193
Conditions: You are in an outpatient records room with access to the CHCS. Necessary
materials and equipment: a label printer, laser printer, and patient information.
Standards: Performed records functions in CHCS without error.
Performance Steps
1. Create an outpatient record for a registered patient using the CHCS.
a. Access the Create a Label/Record/Volume (CV) option on the Transaction Menu.
b. Select Patient: (enter a patient identifier).
c. Press <Return> (to continue).
d. Indicate that you wish to create a new record or volume: Y.
e. Enter new record type: O (Outpatient).
f. Visually verify the information on the RT New Record Ask screen.
g. Home Location: [default record room].
h. Current Location: [default record room].
i. Enter Associated Borrower.
j. Enter Content Descriptor.
k. If data is acceptable as is, press <Next Screen> (to display the action bar).
l. Press <Return> (to accept the default and file the data).
m. Print the labels: <Return> (to accept the default).
n. Select Label Device: <Return> (to display the output on the screen).
o. Right Margin: 80// <Return>.
p. Enter at Print Routing Cards and/or Charge Cards: C or R.
NOTE: Routing Cards are used when the patient's record is moved between locations, i.e., if
the patient has multiple clinic visits. Charge cards are used to maintain a record of the
individual/location who borrowed a record.
q. Select Clinic Appointment Date: TODAY// <Return>.
r. Select Clinic: (e.g., CARDIOLOGY).
s. Select Clinic: <Return>.
t. Select Charge Card Printer: <Return>.
u. Right Margin: 80// <Return>.
v. Select Patient: <Return> (to exit the option).
2. Inquire about a patient record.
a. Access the Record Inquiry (RI) option on the Record Information Menu.
b. Select Division: <Return>.
c. Select Patient: (Your patient ID).
d. Indicate what information to display: ?? (to display a picklist).
e. Select the volume to display.
f. Verify that you want to display all information: All// <Return>.
g. Print the record.
h. Device: <Return>.
i. Right Margin: 80// <Return>.
3. Charge-out a record.
a. Access the Charge-Out Record (OT) option on the Transaction Menu.
b. Enter Borrower: (e.g., L.ORTHO).
3-77
STP 8-91G15-SM-TG
Performance Steps
c. Press <Return> (to continue).
d. Enter Record: [Record number for OUTPATIENT VOL 1.]
e. Enter Associated Borrower: <Return>.
f. Enter Record: [Record number for OUTPATIENT VOL 2.]
g. Enter Associated Borrower: <Return>.
h. Press <Return> (to exit the option).
Note the message indicating that the records would now be charged-out.
i. Return to the Transaction Menu.
4. Charge-in a record using the CHCS.
a. Access the Check-In Record (IN) option on the Transaction Menu.
b. Enter the record to be checked in: [Record number for OUTPATIENT VOL 2.]
c. Press <Return> (to exit the option).
Notice the message indicating that the record is checked-in.
5. Recharge an inpatient treatment record (ITR) using the CHCS.
a. Access the Recharge Records (RE) option on the Transaction Menu.
b. Enter the Borrower: (e.g., SIGNATURE DESK).
c. Enter the Record Number: (e.g., 10429).
NOTE: You can enter the MRT record number to directly access the record with a picklist.
d. Enter Associated Borrower: <Return>.
e. Press <Return> (to quit selecting record numbers).
f. Notice the message indicating that the record has been recharged to the Signature
Desk.
g. Return to the Transaction Menu.
6. Flag a record as missing using the CHCS.
a. Access the Flag Record as Missing (FR) option on the Transaction Menu.
b. Refer to the Quick Reference Guide: Flag a Record as Missing.
c. Enter the missing record: [Record number for OUTPATIENT VOL 3].
d. Verify you want to flag the record as missing: NO// Y.
Notice the Missing Record Entry screen.
e. Enter Supervisor Comments: (e.g., LAST CHARGED-OUT TO ORTHO CLINIC).
f. File the data.
Notice the message indicating that the record has been flagged as Missing.
g. Press <Return> (to exit the option).
7. Remove a missing flag as records are checked-out to a patient using the CHCS.
a. Access the Patient Check-Out (PC) option on the Transaction Menu.
b. Enter the missing record: [Record number for OUTPATIENT VOL 3].
c. Indicate that you want to remove the Missing flag: Y.
d. Point out Finding Missing Records screen.
e. Enter where the record was found: (e.g., CHARGED TO PATIENT).
f. Enter the reason: (e.g., HELD BY PATIENT).
Note reasons are defined by the MTF.
g. Enter ?? to display the picklist.
h. Enter Supervisor Comments: (e.g., PATIENT FOUND RECORD IN CAR).
i. File the data.
j. Note the messages indicating that the Missing flag is removed and the record is
charged-out to the patient.
k. Charge-out Vol 2 using the Charge-out Record (OT) option.
3-78
STP 8-91G15-SM-TG
Performance Steps
l. Select Transaction Menu option: OT.
m. Select Borrower: PATIENT (for Charged to Patient).
n. Select Record: (Record number for OUTPATIENT VOL 2).
o. Associated Borrower: <Return>.
p. Select Record: <Return> (to quit selecting records to be charged-out).
q. Select Borrower: <Return> (to exit the option).
r. Return to the Medical Records Menu.
8. Remove a flag as missing during recharge using the CHCS.
a. Access the Recharge Records (RE) option on the Transaction Menu.
b. Select Borrower: (e.g., CODING).
c. Select Record: (e.g., 10429).
d. Press at Associated Borrower: <Return>.
e. Verify that you want to remove the Missing flag: Y.
f. Complete the Finding Missing Records screen.
g. Where was record found? (e.g., SIGNATURE DESK).
h. Reason: (e.g., CHARGED TO WRONG BORROWER).
i. Supervisor's Comments: (e.g., FOUND IN DR. ADDAMS' FILES).
j. File the data.
k. Press <Return> (to quit selecting records to be recharged).
l. Select Borrower: (e.g., APPROVAL).
m. Select Record: (e.g., 10429).
n. Press at Associate Borrower: <Return>.
o. Press <Return> (to quit selecting records to be recharged).
p. Point out the message that the record has been recharged to Approval.
q. Return to the Transaction Menu.
9. Trace patient records using the CHCS.
a. Access the Combination Data Trace (CD) option on the Record Information Menu.
b. Enter the patient to trace: (patient name).
c. Confirm the patient data: <Return>.
d. Verify the Trace Cut-off Date: T-100// <Return>.
e. Print the record.
f. Device: <Return>.
g. Right Margin: 80// <Return>.
h. Return to the Record Information Menu.
10. Trace movement history of record using CHCS.
a. Access the Trace Movement History (TM) option on the Record Information Menu.
b. Select patient: Patient ID.
c. Confirm the patient data: <Return>.
d. Indicate the record sort? ?? (to display a picklist).
e. Indicate a record sort: MIXED// S.
f. Print the record.
g. Device: <Return>.
h. Right Margin: 80// <Return>.
i. Return to the Medical Records Menu.
11. Create a batch list.
a. Access the Create Batch and Pull Lists from Schedules (IN) option on the Batch
Record Creation Menu. (PAD System Menu (MRM) and (PL) and (BR) and (IN)).
3-79
STP 8-91G15-SM-TG
Performance Steps
b. Enter Clinic Name: (e.g., CARDIOLOGY CLINIC).
c. Enter Pull Date: (e.g., 0624).
d. Enter Device for Message: NL.
e. Enter Requested Start Time: NOW// <Return>.
f. Point out that the system returns to the Batch Record Creation Menu.
12. Print batch list entries.
a. Access the Print Batch List (PP) option on the Batch Record Creation Menu. PAD
System.
b. Enter the Batch List: (e.g., CARDIOLOGY).
c. List entries to print: ?? (to display a picklist).
d. List Which Entries: ALL.
e. Print Routing Cards and/or Charge Cards? N.
f. Print entries.
g. Device: <Return>.
h. Right Margin: 80// <Return>.
i. Return to the Batch Record Creation Menu.
13. Delete entries from the batch list.
a. Access the Delete Entries from Batch (EB) option on the Batch Record Creation Menu.
b. Select a Batch List: (e.g., CARDIOLOGY).
c. List the entries to print: ALL.
d. Select the entry to delete: Patient ID.
e. Use the down-arrow key to position the cursor by the patient.
f. When the cursor is positioned, press <Select>.
Note the asterisk (*) that appears next to the patient after it has been selected. You
can deselect a category by pressing <Select> again.
g. Activate the selection by pressing <Return>.
h. Verify that you want to delete the selected entry: NO// Y.
14. Create records from a batch list.
a. Access the Create Records from Batch (CR) option on the Batch Record Creation
Menu.
b. Enter the Batch List: (e.g., CARDIOLOGY).
c. Enter the Record Label Printer: NL.
d. Return to the Medical Records Menu.
e. INQUIRE INTO PATIENT'S RECORD.
f. New medical records have been created for patient(s) who appeared on the Batch.
List Print.
g. Access the Record Inquiry (RI) option on the Record Information Menu.
PAD System Menu (MRM) and (IN) and (RI).
h. Select Division: <Return>.
i. Select Patient Name: (e.g., DELAFIELD,BOYD).
j. Confirm patient name: <Return>.
k. Indicate which information to display: ALL// <Return>.
l. Display the record.
m. Device: <Return>.
n. Right Margin: 80// <Return>.
o. Return to the Medical Records Menu.
3-80
STP 8-91G15-SM-TG
Performance Steps
15. Print a pull list.
a. Access the Print Pull List(s) (PT) option on the Pull List Functions Menu.
PAD System Menu (MRM) and (PL) and (PT).
b. Select Pull List: ?? (to display a picklist).
c. Enter Pull List: (e.g., CARDIOLOGY CLINIC).
d. Sort the Pull List: ?? (to display a picklist).
e. Sort the Pull List: C (for clinic name).
f. Select Type of List: ?? (to display a picklist).
g. Verify that you want to include all appointments: ALL// <Return>.
h. Enter at Print Routing Cards and/or Charge Cards: BOTH// N.
i. Select Pull List Printer: WIDE.
j. Return to the Pull List Functions Menu.
16. Charge-out a pull list.
a. Access the Charge-Out Pull List Records (OU) option on the Pull List Functions Menu.
b. Designate a request as Not Fillable: NO// Y.
c. Enter the Request: 1 (e.g., NEEB,ALTHEA).
d. Enter a double question mark (??) to display the list of requests.
e. Point out the current status of Request 1.
f. Verify that you want to change the status to Not Fillable: <Return>.
g. Select Request: <Return>.
h. Enter Pull List: (e.g., CARDIOLOGY CLINIC).
i. Verify that this record is not to be charged out to a holding area: NO//<Return>.
j. Verify that you want to charge-out records: NO// Y.
k. Enter Device: WIDE.
l. Return to the Pull List Functions Menu.
m. Access the Print Pull List(s) (PT) option on the Pull List Functions Menu.
n. Enter Pull List: (e.g., CARDIOLOGY CLINIC).
o. Sort the Pull List: C (for clinic name).
p. Verify that you want to include all types: ALL// <Return>.
q. Bypass printing Routing Cards and/or Charge Cards: N.
r. Print the Pull List to the screen.
s. Device: WIDE.
t. Return to the PAD System Menu.
Performance Measures
GO
NO
GO
1. Created an outpatient record for a registered patient using the CHCS.
——
——
2. Inquired about a patient record.
——
——
3. Charged out a record.
——
——
4. Charged in a record using the CHCS.
——
——
5. Recharged an inpatient treatment record (ITR) using the CHCS.
——
——
6. Flagged a record as missing using the CHCS.
——
——
3-81
STP 8-91G15-SM-TG
Performance Measures
GO
NO
GO
7. Removed a missing flag as records were checked out to a patient using
the CHCS.
——
——
8. Removed a flag as missing during recharge using the CHCS.
——
——
9. Traced patient records using the CHCS.
——
——
10. Traced movement history of a record using CHCS.
——
——
11. Created a batch list.
——
——
12. Printed batch list entries.
——
——
13. Deleted entries from the batch list.
——
——
14. Created records from a batch list.
——
——
15. Printed a pull list.
——
——
16. Charged out a pull list.
——
——
Evaluation Guidance: Score the soldier GO if all steps are passed. Score the soldier NO-GO
if any step is failed. If the soldier fails any step, show what was done wrong and how to do it
correctly.
References None
3-82
STP 8-91G15-SM-TG
PROCESS DEFICIENT/DELINQUENT RECORDS USING CHCS
081-866-0196
Conditions: You are in a patient administration office and have a computer with access to the
CHCS, a printer (LA75 line printer or HP laser printer), and the patient's clinical record data.
Standards: Conducted deficiency/delinquency processing procedures using the CHCS IAW
SAIC/CHCS TC-4.5-0526.
Performance Steps
1. Enter Deficient Items (access menus IRM-DDM-DDR).
a. Enter patient identifier (register number).
b. Enter Staff Physician.
c. Confirm current date/time of medical record arrival, Return.
d. File the data.
e. Enter a deficient item.
f. Complete the Deficiency/Delinquency screen by answering the prompts: Item,
AssignedDate, Action, Person Responsible, MEPERS/Service, Operation Date, and
returning through the remaining fields.
g. File the data.
h. Enter a second deficient item repeating steps 5 and 6.
i. File the data and return to the Deficiency/Delinquency record Menu.
2. Edit Deficiency/Delinquency Record Data (access menus IRM-DDM-DDR).
a. Enter Patient Identifier (register number).
b. Select DO - return - (Discharge Order) and edit data.
(1) Enter name of person now responsible for providing this item (all CAPs last namecomma-no space-first initial.
(2) File the data (Return).
c. Exit screen (F-10) and Return to the Deficiency/Delinquency Record Menu.
3. Generate an Incomplete Check List (access menus IRM-DDM-DOUT).
a. Choose #4 - Incomplete Check List.
b. Enter Patient Identifier (register number).
c. Display Incomplete Check List.
(1) At Device - Return.
(2) At Right Margin - Return.
d. Exit screen - F10 and return to the Deficiency/Delinquency Record Menu.
4. Delete an item from Deficiency/Delinquency tracking (access menus IRM-DDM-DDR).
a. Select TEST NOTES to be deleted (use arrow keys).
(1) Move arrow key to TEST NOTES.
(2) Delete TEST NOTES.
(3) Confirm removal of TEST NOTES with YES response.
b. Exit screen (F10) and return to the Deficiency/Delinquency Record Menu.
5. Enter a completion date for a deficient item (access menus IRM-DDM-DDR).
a. Enter Patient Identifier (register number).
b. Select DISCHARGE ORDER to be edited and return.
c. At the - Enter Date Completed prompt - type a T (for today).
3-83
STP 8-91G15-SM-TG
Performance Steps
d. File the data (return) and exit the screen - (F10) and return to the
Deficiency/Delinquency Record Menu.
6. Batch enter Deficient/Delinquent items (access menus IRM-DDM-BED).
a. Complete the Batch Entry screen prompts: Item, Assigned Date, Action, Person
Responsible, MEPRS/Service and press return through remaining fields.
b. Use the Return key to OK the data.
c. Identify and review the patient record which the item will be posted, confirm posting
and identify another patient record.
d. Return to Batch Entry screen and enter information for the second item repeating
steps 1 and 2.
e. Confirm patient and edit the Deficiency/Delinquency screen entering the Staff
Physician and documenting the Medical Record Arrival Date: T-1.
f. File the data and confirm posting to record.
g. Return to the Deficiency/Delinquency Record Menu.
7. Batch complete Deficient/Delinquent items (access menus IRM-DDM-BCD).
a. Confirm patient and enter Item, Enter Action, Enter Date of Completion, and press
return through remaining fields.
b. Confirm selection of records for posting.
(1) Select patient's register numbers needing batch completion.
(2) Identify (mark with the END key) records to be posted.
c. Return to the Deficiency/Delinquency Record Menu.
8. Print a Clinical Records Delinquent List (IRM-DDM-DOUT).
a. Choose #1 from the Clinical Records Delinquent List.
b. Accept the default sort criteria ALL// and return.
c. Display the Delinquent List.
(1) Device: Return.
(2) Right Margin: // 132.
d. Review the Clinical Records Delinquent List.
e. Return to the PAD System Menu.
Performance Measures
GO
NO
GO
1. Entered deficient items.
——
——
2. Edited Deficiency/Delinquency Record Data.
——
——
3. Generated an incomplete Check List.
——
——
4. Deleted an Item from Deficiency/Delinquency Tracking.
——
——
5. Entered a completion date for a Deficient item.
——
——
6. Batch entered Deficient/Delinquent items.
——
——
7. Batch completed Deficient/Delinquent items.
——
——
8. Reviewed a Clinical Records Delinquent List.
——
——
3-84
STP 8-91G15-SM-TG
Evaluation Guidance: Score the soldier GO if all steps are passed. Score the soldier NO-GO
if any step is failed. If the soldier fails any step, show what was done wrong and how to do it
correctly.
References
Required
None
Related
TC-4.5-0526
3-85
STP 8-91G15-SM-TG
COMPLETE MSA FUNCTIONS USING CHCS
081-866-0197
Conditions: You are in a patient administration office with access to the CHCS and medical
service accounts information.
Standards: Performed MSA functions without error.
Performance Steps
1. Add an insurance company.
a. Access the Copying Charges Entry (ECC) option on the Cashier Functions Menu.
MSA System Menu>CFM>ECC
b. Enter the payment date for the copy charges: T-15.
c. Confirm that a new insurance company copy charge is to be added: Y(es)
d. Complete the insurance company screen.
(1) Name of the insurance company.
(2) Short name of the insurance company.
(3) Address of the insurance company.
(4) Contact person of the insurance company.
(5) Phone number of the insurance company.
(6) Blue Cross/Blue Shield code: <Return>.
2. Record payment of copy charges.
a. Enter the patient name or account number.
b. Confirm the patient name: <Return>.
c. Confirm effective date charges/payment: <Return>.
d. Enter type of payment: Type ?? to see type of payments.
e. Enter amount of payment.
f. File the data.
3. Print I&R.
a. Device: 0.
b. Right Margin: 80// <Return>.
c. Return to the Cashier Functions Menu.
4. Generate a cashier action screen report of daily charge data and review MSA information.
a. Access the Cashier Action Screen (CLK) option on the Cashier Functions Menu.
MSA System Menu>CFM>CLK
b. Refer to Quick Reference Guide: Cashier Action Bar.
c. Enter the patient name or account number.
d. Confirm the patient name.
e. Return to the Cashier Functions Menu.
5. Review daily charges.
a. Access the Cashier Action Screen (CLK) option on the Cashier Functions Menu.
MSA System Menu>CFM>CLK
b. Enter the patient name or account number.
c. Confirm the patient name.
d. Review inpatient charges.
(1) Choose Inpatient on the Action Bar: I.
(2) Display the daily charges on the Cashier Action screen: 0.
3-86
STP 8-91G15-SM-TG
Performance Steps
6. Review inpatient status days.
a. Choose Patient on the Action Bar: P.
b. Enter the patient name or account number.
c. Confirm the patient name.
d. Review inpatient status days.
(1) Choose Status on the Action Bar: S.
(2) Display the inpatient status days on the Cashier Action screen: 0.
e. Return to the Cashier Functions Menu.
7. Post dining hall collections and generate an I&R.
a. Access the Dining Hall Collections Entry (DHE) option on the Cashier Functions Menu.
MSA System Menu>CFM>DHE
b. Refer to quick Reference Guide: MSA Dining Hall Collections.
c. Enter the collection date: T (Today).
d. Confirm that this is a new dining hall collections date: Y(es).
e. Enter type pay: Type ?? question mark to see type of pay.
f. Enter subsistence amount.
g. Enter surcharge amount.
h. File the data.
i. Print the facility I&R.
(1) Device: 0.
(2) Right Margin: 80// <Return>.
j. The Cashier Functions Menu displays.
8. Post payment received from an insurance company.
a. Access the copying charge entry option.
b. Enter the payment date for the copy charges: (Date).
c. Edit the insurance company screen.
(1) Name: (3-35 characters).
(2) Patient name or account number: (Patient identifier).
(3) Type of payment: (payment code).
(4) Amount of payment: (amount).
d. Print the I&R: 0 (Home).
e. Return to the Cashier Functions Menu.
9. Generate an initial I&R for a DRG patient clinical record that has not been approved.
a. Access the Cashier Action Screen (CLK) option on the Cashier Functions.
MSA System Menu>CFM>CLK
b. Enter the patient name or account number.
c. Confirm the patient name: <Return>.
d. Choose from the Action Bar.
e. Choose I&R on the secondary Action Bar: I.
f. Confirm the number of copies: 1//<Return>.
g. Select the device: Line printer// 0.
h. Press <Return> to view the remainder of the report.
i. Return to the Cashier Functions Menu.
3-87
STP 8-91G15-SM-TG
Performance Measures
GO
NO
GO
1. Added an insurance company.
——
——
2. Recorded payment of copy charges.
——
——
3. Printed an I&R.
——
——
4. Generated a cashier action screen report of daily charge data and
reviewed MSA information.
——
——
5. Reviewed daily charges.
——
——
6. Reviewed Inpatient Status Days.
——
——
7. Posted Dining Hall Collections and generated an I&R.
——
——
8. Posted payment received from an insurance company.
——
——
9. Generated an initial I&R for a DRG patient clinical record that has not
been approved.
——
——
Evaluation Guidance: Score the soldier GO if all steps are passed. Score the soldier NO-GO
if any step is failed. If the soldier fails any step, show what was done wrong and how to do it
correctly.
References None
3-88
STP 8-91G15-SM-TG
PERFORM MASS CASUALTY OPERATION FUNCTIONS USING THE CHCS
081-866-1004
Conditions: You are in a patient administration office with access to the CHCS and mass
casualty patient information.
Standards: Performed mass casualty operation functions without error.
Performance Steps
1. Determine bed availability.
a. From the PAD System Menu-BSM, access the Bed Availability (BAV) option on the
Bed Status Menu.
b. Enter at Bed Availability for Ward: ALL.
c. Enter at Device: <Return>.
d. Enter at Right Margin: <Return>.
2. Reserve beds.
a. From the PAD System Menu, access the Block Air Evacuation Beds (BAE) option on
the Bed Status Menu.
b. Select Ward or type 'ALL' for all wards.
c. Use the arrow keys to position the cursor by the ward name, room, or bed to be
reserved.
d. When the cursor is positioned, press <Select>. An asterisk will display, indicating the
location that has been selected.
e. Press <Return> to activate the selection.
3. Enter MASCAL admissions.
a. Access the Enter MASCAL Admission (MCA) option on the MASCAL PAD System
Menu.
b. Enter at Select MASCAL Ward:
c. Enter ?? to display a pick list of MASCAL events.
d. Select or enter MASCAL Event: (e.g., EARTHQUAKE).
e. Enter MASCAL Number: [number]// <Return>.
f. Press at Assign new MASCAL patient name? NO// <Return>.
NOTE: This prompt is used to indicate whether you want the system to assign a name for an
unknown patient (e.g., MASCAL2,JOHN DOE); or, whether you want to enter a known patient
name.
g. Enter at Select Patient Name: (Your patients name).
h. Press at OK? YES// <Return> (to verify patient information).
i. Verify Sponsor Name: <Return>.
j. Press at Select Admission Date: NOW// <Return>.
k. Complete the MASCAL Admission screen.
l. Press <Return> (to file the data).
4. Edit MASCAL admission data.
a. Access the Edit MASCAL Admission option (MCE) on the MASCAL PAD System
Menu.
NOTE: This option allows you to edit a current MASCAL admission which was entered through
the Enter MASCAL Admission (MCA) option. The MASCAL number is used to retrieve the
MASCAL admission record.
b. Enter MASCAL Number: [number].
3-89
STP 8-91G15-SM-TG
Performance Steps
c. Press <Return> until you access the 'MASCAL Event' field.
d. Enter at MASCAL Event: (The Event).
e. Press <Return> until the Action Bar displays.
f. File the data and return to the MASCAL PAD System Menu.
5. Check-out a patient.
a. Access the Check-Out & Patient Instructions (CER) option on the Emergency Room
Menu.
PAD System Menu>MCM>PAD>EMS>CER
b. Select ER patient name.
c. Verify patient information: <Return>.
d. Complete the Check-Out & Patient Instructions screen.
e. Provider: <Return>.
f. Verify Provider data: <Return>.
g. Date/Time Seen By Provider: T@[time].
h. Date/Time of Release: <Return> (to accept the default).
i. Outpatient Disposition: (e.g., FULL (for Full Duty)).
j. Confirm the outpatient disposition data: <Return>.
k. Modified Duty Until: <Return> (to bypass the field). (This field is used to specify the
date on which the patient can return to full duty.)
l. Referred To: (used to specify where the patient is referred to for further care).
m. Priority: (e.g. 7 for within 72 hours).
n. Admitted To: (used to specify the location where the patient was admitted for further
care and evaluation, after being seen in the ER).
o. .Arrival Category: <Return>. (This field is used to indicate the initial assessment of
the patient upon arrival, e.g., Emergency (E), Urgent (U), Non-Urgent (N).)
p. Release Condition: (this field is used to indicate the patient’s condition upon release
from the Emergency Room, e.g., Improved (I), Unchanged (U), or Deteriorated (D)).
q. Method of Transit: <Return> (to accept the default).
r. Complete the Check-Out & Patient Instructions -- Continuation screen.
(1) Chief Complaint: <Return> (to accept the default).
(2) Patient Instructions: (e.g., CONTINUE USE OF HUMIDIFIER THROUGHOUT
THE NIGHT; KEEP PULMONARY CLINIC APPOINTMENT).
(3) ER Comment: (e.g., VS STABLE; RESP 18; NORMAL BREATH SOUNDS).
s. File the data.
6. Generate a Daily Referral Count report.
a. Access the Daily Referral Count option on the MASCAL Report Menu.
(PAD System Menu>MCM>PAD>MCR>DRC).
b. Enter Start/Earliest Appointment Date: T-1(for Today minus one day, e.g., 20 Jun).
c. Enter End/Latest Appointment Date: T (for Today).
d. Device: <Return>.
e. Right Margin: <Return>.
f. Press <Return>.
g. Return to the MASCAL PAD System Menu.
Performance Measures
1. Determined bed availability.
3-90
GO
NO
GO
——
——
STP 8-91G15-SM-TG
Performance Measures
GO
NO
GO
2. Reserved beds.
——
——
3. Entered MASCAL admissions.
——
——
4. Edited MASCAL admission data.
——
——
5. Checked out a patient.
——
——
6. Generated a Daily Referral Count report.
——
——
Evaluation Guidance: Score the soldier GO if all steps are passed. Score the soldier NO-GO
if any step is failed. If the soldier fails any step, show what was done wrong and how to do it
correctly.
References None
3-91
STP 8-91G15-SM-TG
Subject Area 9: TAMMIS
PREPARE COMMERCIAL-OFF-THE-SHELF (COTS) COMPONENTS FOR OPERATION
081-866-0216
Conditions: You have a commercial-off-the-shelf system (COTS) preinstalled with software.
Standards: Prepare TAMMIS for operation using commercial-off-the-shelf (COTS) components.
Performance Steps
1. Perform an inventory of the COTS system.
a. Hardware consists of:
(1) Monitor (Primary/Secondary).
(2) Printer.
(3) Central Processing Unit.
(4) Uninterrupted Power Supply.
(5) Modem.
(6) Stallion Board Device.
b. Software consists of:
(1) TAMMIS Tools runtime tape application.
(2) TAMMIS Tools boot diskette.
(3) TAMMIS ethernet board diskette.
(4) TAMMIS application runtime tape (MEDPAR/MEDREG/MEDPARCC).
2. Set up COTS components.
a. Remove equipment from shipping containers with care.
b. Connect the keyboard to the five pin port located on the back of the CPU.
c. Connect the UPS to a 110 voltage power outlet.
d. Connect the CPU power cord to the UPS.
e. Connect the modem to the modem port located on the back of the CPU and power
cord to the UPS.
f. Connect a phone line to the "line in" jack located on the back of the modem.
g. Connect the monitor to the monitor port located on the back of the CPU and power
cord to the UPS.
h. Connect the printer to the printer port on the back of the CPU and the power cord to
the UPS.
i. Connect the stallion board to the stallion port on the back of the CPU.
j. Connect any additional monitors or printers to the stallion board.
3. Power up the COTS.
a. Ensure proper connection of all equipment.
b. Turn the UPS ON/OFF switch to ON.
c. Turn the monitor ON/OFF switch to ON.
d. Turn the printer ON/OFF switch to ON.
e. Turn the modem ON/OFF switch to ON.
f. Turn on the CPU.
4. Power off the COTS.
a. Perform Complete System Shutdown procedures through TAMADM.
(1) Select the desired amount of time for shutdown (0-15 minutes).
3-92
STP 8-91G15-SM-TG
Performance Steps
(2) Turn off when prompted: System is down; Press any key to reboot.
b. Power off the CPU.
c. Power off the monitor.
d. Power off the modem.
e. Power off the UPS.
Performance Measures
GO
NO
GO
1. Performed an inventory of the COTS.
——
——
2. Set up COTS components.
——
——
3. Powered up the COTS.
——
——
4. Powered off the COTS.
——
——
Evaluation Guidance: Score the soldier GO if all steps are passed. Score the soldier NO-GO
if any step is failed. If the soldier fails any step, show what was done wrong and how to do it
correctly.
References None
3-93
STP 8-91G15-SM-TG
PERFORM TAMMIS ADMINISTRATION FUNCTIONS
081-866-0203
Conditions: You have a COTS system and COTS software
Standards: Installed software and performed administrative functions in TAMMIS without error.
Performance Steps
1. Install TAMMIS software.
NOTE: Ensure the system is off.
a. Insert the TAMMIS ethernet board configuration disk into floppy drive A (3.5").
b. Perform power up procedures
NOTE: A series of screens will flash past as the ethernet board is set up automatically. When
the ethernet board has been set up you will see the following DOS prompt: "A:
c. Insert the TAMMIS Tools HK2-(version) boot disk into drive A.
d. Insert the TAMMIS Tools HK2-(version) cartridge tape into the tape drive.
e. Depress the reset button located at the top left corner on front panel of the CPU.
NOTE: The system will automatically begin to load the operating system from the tape
cartridge/floppy diskette to the CPU hard disk. This process will take approximately one hour.
You will be prompted to answer the following questions.
f. Current date, time, and time zone: (EXAMPLE) Wed Jan 24 0927 EDT 2001 Do you
wish to change it? (y / n)
g. Please enter the system name: (It's recommended that you use the unit DODAAC for
your system name.)
NOTE: The following message will display:
"Remove tape and floppy disk from drive"
"Press Return to finish"
2. Access TAMADM with logon and password.
a. Default login for TAMADM is: tamadm.
b. Default password for TAMADM is: tools4-2.
NOTE: TAMMIS tools version 04-03 will prompt the user to change the password upon the first
log in.
3. Install application software (MEDPAR, MEDREG, MEDPARCC).
NOTE: Procedures shown are for MEDPAR installation. Installation procedures for the other
two applications are relatively the same.
a. From the main menu select (3) System Maintenance Process Menu and press F1.
b. Select (5) Application Installation Menu and press F1.
c. Select (2) PAR Systems Menu and press F1.
d. Select the storage device that currently contains the TAMMIS application.
NOTE: Upon completion of installation of software the system will return you to the installation
menu.
4. Format magnetic media.
a. From the TAMADM Main Menu select (5) Media Management Menu and press F1.
b. From the Media Management Menu select Format Magnetic Media.
c. Select the system you wish to format: (C-COTS).
d. Select the desired media you wish to format: 3 1/2 diskette or 5 1/4 diskette.
e. Select the density format of the diskette: Double or High Density.
3-94
STP 8-91G15-SM-TG
Performance Steps
f. Select the format you wish to use: UNIX or DOS.
g. Insert the disk into the drive and begin.
Performance Measures
GO
NO
GO
1. Installed TAMMIS software.
——
——
2. Accessed TAMADM with logon and password.
——
——
3. Installed application software (MEDPAR, MEDREG, MEDPARCC).
——
——
4. Formatted magnetic media.
——
——
Evaluation Guidance: Score the soldier GO if all steps are passed. Score the soldier NO-GO
if any step is failed. If the soldier fails any step, show what was done wrong and how to do it
correctly.
References None
3-95
STP 8-91G15-SM-TG
COMPLETE MEDPAR FUNCTIONS USING TAMMIS
081-866-1052
Conditions: You have a COTS system with Medical Patient Accounting and Reporting software
installed and the user's manual.
Standards: Perform TAMMIS MEDPAR procedures without error.
Performance Steps
1. Perform MEDPAR system maintenance.
a. Perform setup procedures.
(1) Maintain facility data.
(a) Add Record (F4).
(b) Enter Facility Code, Facility Name, Location, Type, DODAAC, Bed Capacity,
SIDPERS Code, OR Suites, Mode of Operation, Destination MEDREG
System DODAAC, and Destination MEDPARCC System DODAAC.
(c) Save Record (F1).
(2) Maintain bed status.
(a) Add Ward (F4).
(b) Enter Ward Name; Enter Specialty by Total Beds and Operating Beds.
NOTE: Total Beds must equal Operating Beds in order to use total of bed availability.
(c) Save Ward (F1).
(3) Maintain medical specialty table.
NOTE: Add as many wards as necessary by using the same steps as above.
(4) Maintain the destination facility table.
(a) Update the Medical Specialty Table as needed by placing the letter "N" by the
specialty not used.
(b) Save Table (F1).
(5) Set up communications.
(a) Update each remote (MEDREG/MEDPARCC) with correct Description,
DODAAC, Subsystem, Communication Class, System Name, and Default
Sending Media.
NOTE: Use upper case for DODAAC and System Names. DO NOT ATTEMPT TO UPDATE
DEFAULT RECEIVING MEDIA OR THE SYSTEM WILL LOCK UP. If this happens, press the
Pause button on your keyboard.
(b) Save Remote (F1)
b. Maintain command interest data.
NOTE: Update command interest MOSs, grades, and categories as outlined by the Hospital
Commander.
(1) Update command interest MOSs.
(a) Use the (F6) key to select the MOS deemed command interest.
(b) Save record by pressing (F1).
(2) Update command interest grades.
(a) Use the (F6) key to select the Grade deemed command interest.
(b) Save record by pressing (F1).
(3) Update command interest categories.
(a) Use the (F6) key to select the category deemed command interest.
(b) Save record by pressing (F1).
c. Modify patient register.
3-96
STP 8-91G15-SM-TG
Performance Steps
NOTE: Use this function to change existing admission entries register numbers.
(1) Enter desired register number for change.
(2) Select patient (F1).
(3) Enter new register number.
(4) Finish (F1).
d. Reconcile bed status.
NOTE: Use this function to unlock the active patient file for records that have been locked in the
TAMMIS System.
e. Perform maintenance procedures on the archive log.
NOTE: Use the archive log to find a listing of all reports and communications sent or received
to the MEDPAR system. You may print, send, or delete existing entries in the archive log.
f. Edit select tables.
(1) Maintain the prognosis table.
NOTE: Update this table as required by the Chief of Medicine.
(2) Edit or add reportable conditions.
NOTE: Update this table as required by the Hospital Commander.
g. Clear system locks.
NOTE: Use this function to clear any system locks that have been activated in the TAMMIS
System.
h. Perform functions in the TAMMIS utility menu.
(1) Printer functions.
(a) Printer queue status is used to check the status of all print jobs queued for
printing in TAMMIS.
NOTE: In this function you may refresh or cancel pending jobs.
(b) Enable system printer is used to select the desired printer for use with the
TAMMIS system.
(2) Utilize the TAMMIS communication menu.
NOTE: Use this function to print BLAST or NETWORK Status Check Report. This report will
inform user of current communication status with each remote. You may also view the Commo
Queue which will give a comprehensive listing of all transactions that have been sent and
received.
(3) Format magnetic media.
NOTE: Use this function to format 3.5 & 5.25 inch diskettes
(4) Check status of magnetic media
NOTE: Use this function to check the status of 3.5, 5.25, & Cartridge Tapes for formatting
purposes.
2. Perform Admissions and Dispositions
a. Enter or update admissions & pre-admissions
(1) Add Record (F4) or update current record (F6)
(2) Enter patient all data
NOTE: All areas highlighted must be filled out in the patient admission screen.
(3) Finish (F1)
b. Enter or update dispositions
(1) Query record (F1) or use the next patient key (F3)
(2) Discharge patient (F4)
(3) Select type of discharge (F6)
(4) Enter date / time
(5) Finish (F1)
c. Load transfer data
3-97
STP 8-91G15-SM-TG
Performance Steps
NOTE: This function is used to receive a patient record from an MTF (using MEDPAR) other
than yours.
d. SIDPERS communications
NOTE: This feature has been disabled and will remain disabled until further notice.
e. Send SIDRs to PARRTS.
NOTE: Use this function to send a daily update of all transactions that have taken place in the
MTF. Information is sent to the Patient Accounting Real-time Record Tracking System
(PARRTS), located at PASBA, FSH, Texas.
3. Perform record management.
a. Create an inpatient treatment record coversheet.
(1) Enter patient name.
(2) Create ITRCS.
(3) Return to query (F8).
(4) Print ITRCS (F1).
b. Create patient labels.
(1) Enter patient name.
(2) Select record (F1).
(3) Create labels.
(4) Return to query (F8).
(5) Print labels (F1).
c. Print patient stay record.
(1) Enter patient register number.
(2) Finish (F1).
d. Archive patient records. Enter the archive date.
NOTE: Archiving Patients Records will archive all records that have been dispositioned from
the effective date entered into TAMMIS.
4. Perform patient management transactions.
a. Maintain patient status.
(1) Enter patient's name, register number, or SSN to obtain record for change of
status.
(2) Select patient (F1).
(3) Enter change of specialty and/or ward.
NOTE: You will also update SI/VSI/SPECAT status on patients in this screen.
(4) Finish (F1).
b. Change of status in.
(1) Enter patient's name, register number, or SSN to obtain record for change of
status in.
(2) Select patient (F1).
(3) Select transfer in type (F6).
(4) Finish (F1).
c. Change of status out.
(1) Enter patient's name, register number, or SSN to obtain record for change of
status out.
(2) Select patient (F1).
(3) Select transfer out type (F6).
(4) Finish (F1).
d. Delete change of status in/out.
NOTE: These functions are used for deleting previous Change of Status to patients in the MTF.
3-98
STP 8-91G15-SM-TG
Performance Steps
5. Perform patient evacuation procedures.
a. Patient evacuation request worksheet.
NOTE: Use this function to print out the evacuation worksheet. This is the first step in the
patient evacuation process. These worksheets will be completed by the attending physician.
b. Maintain evacuation status.
(1) Enter patient's name, register number, or SSN to obtain record.
(2) Select Patient (F1).
(3) Enter evacuation data obtained from evacuation worksheet.
(4) Finish (F1).
c. Send evacuation request.
NOTE: Total number of patients being requested will be prompted for send. By pressing the
(F1) you will select the method in which the evacuation request will be sent. Upon completion of
file being sent, the system will return you to the Evacuation Menu.
(1) Prepare patient manifest.
(a) Enter aircraft or vehicle number.
(b) Enter departure date and time.
(c) Enter the destination facility.
(d) Finish (F1).
NOTE: The report will print after the user has pressed (F1).
d. Send transfer data.
NOTE: This function is used to send a patient record(s) to an MTF (using MEDPAR) other than
yours.
e. Print patient evacuation roster.
NOTE: Use this function to print rosters out for pending evacuations from your facility.
f. Receive and print reports to/from MEDREG.
NOTE: Use this function to receive Patient Movement Request and Transportation instructions
from MEDREG or free text messages from MEDPAR.
g. Send bed status report to MEDREG.
NOTE: Use this function to send an updated Bed Status Report to the Medical Regulating
Officer (MEDREG).
h. Message menu.
NOTE: Use this function to create or receive free text messages.
Performance Measures
GO
NO
GO
1. Performed system setup procedures.
——
——
2. Performed admission and disposition procedures.
——
——
3. Performed record management.
——
——
4. Performed patient status procedures.
——
——
5. Performed patient evacuation procedures.
——
——
Evaluation Guidance: Score the soldier GO if all steps are passed. Score the soldier NO-GO
if any step is failed. If the soldier fails any step, show what was done wrong and how to do it
correctly.
3-99
STP 8-91G15-SM-TG
References
Required
AISM 25-HKD-RZW-ECC-UM
3-100
Related
None
STP 8-91G15-SM-TG
PRODUCE MEDPAR REPORTS USING TAMMIS
081-866-1051
Conditions: You have a COTS system with Medical Patient Accounting and Reporting software
installed and the user's manual.
Standards: Produced MEDPAR reports without error.
Performance Steps
1. Select Patient Accounting Reports option (from the main menu) by clicking F1. Use the
down arrow to the appropriate report needed, and click on F1again to access the report.
a. Print ward report.
NOTE: This report generates a printed report of patients listed by ward.
b. Print admission & disposition report.
NOTE: The "Print Admission & Dispositions" menu item generates a printed report of the
admission, disposition, and change of status activity over the last 24 hours.
c. Print recapitulation report.
NOTE: The "Print Recapitulation Report" menu generates a printed summary report of the
admission, disposition, transfer, and death activity over the last 24 hours.
d. Print allied admission & disposition report.
NOTE: The "Print Allied Admissions & Dispositions" menu item generates a printed report of
the admission, disposition, transfer, and death activity for patients from Allied nations in the
medical treatment facility for the date specified.
e. Print AAD correction report.
The "Perform AAD Corrections" menu item allows you to correct the daily Admission and
Disposition report.
f. Print VSI/SI/SC roster.
NOTE: The "Print VSI/SI/SC Roster" menu item generates a list of the patients in the facility on
Very Seriously Ill, Seriously Ill, or Special Category status.
g. Print patient alpha roster.
NOTE: The "Print Alpha Roster" menu item prints a Patient Alpha Roster of the patients
presently in the medical treatment facility.
h. Print patient roster by unit.
NOTE: The "Print Patient Roster by Unit" menu item prints a roster of patients that are currently
in the medical treatment facility, arranged by unit.
i. Print reportable condition roster.
NOTE: The "Print Reportable Condition" menu item generates a printed report of patients in the
medical treatment facility with reportable conditions. This report can be used to identify those
patients requiring submission of a Telegraphic Report of Selected Condition. Patients are
grouped on the report by the reportable condition diagnosis.
j. Print patient length of stay roster.
NOTE: The "Print Length Patient Stay Roster" menu item prints a roster of patients that have
been hospitalized for the number of days specified by the user.
2. Select Facility Management Reports option (from the main menu).
a. Print command interest roster.
NOTE: The "Print Command Interest Roster" menu item prints a report of command interest
activity over the last 24 hours.
b. Print expected disposition roster.
3-101
STP 8-91G15-SM-TG
Performance Steps
NOTE: The "Print Expected Disposition Report" menu item prints a list of current patients and
their expected disposition dates, in order of date.
c. Print bed status report.
NOTE: The "Print Bed Status Report" menu item prints a report of facility bed status information
reflecting the number of operating suites in operation, the surgical backlog, and bed status data
by medical specialty. The report also reflects expected gains and losses for the next 24, 48, or
72 hour period. MEDPAR calculates expected gains and losses for the specified time period
based on the following:
- The patient's expected disposition date if reflected in the Active Patient Information File.
- The patient's expected date of admission in the Pre-admission file.
- Patients for whom evacuation requests have been forwarded to a MEDREG system.
d. Print patient register listing.
NOTE: The "Print Register Number Listing" menu item prints a list of register numbers and
selected patient information within a user-specified range.
e. Print pre-admission report.
NOTE: The "Print Pre-Admission Report" menu item prints a report of patients listed in the PreAdmission Data file.
f. Worldwide Workload Report Menu. Enter and update outpatient data.
(1) Add record (F4).
(2) Select clinical service to enter (F6).
(3) Select patient category (F6).
(4) Enter number of inpatient visits.
(5) Enter number of outpatient visits.
(6) Finish update (F1).
NOTE: Repeat steps 2b through 2f, as needed, for all services being reported in the MTF. You
may update records that are saved by selecting the record and pressing the (F6) key to update
the record.
Performance Measures
GO
NO
GO
1. Produce patient accounting reports.
a. Print ward report.
b. Print admission & disposition report.
c. Print recapitulation report.
d. Print allied admissions & disposition report.
e. Print AAD correction request.
f. Print VSI/SI report.
g. Print alpha roster.
h. Print roster by unit.
i. Print reportable condition roster.
j. Print length of stay roster.
——
——
2. Produce facility management reports.
a. Print command interest report.
b. Print expected disposition report.
c. Print bed status report.
d. Print register listing.
e. Print pre-admission Report.
——
——
3-102
STP 8-91G15-SM-TG
Performance Measures
GO
NO
GO
f. Edit world wide workload information.
Evaluation Guidance: Score the soldier GO if all steps are passed. Score the soldier NO-GO
if any step is failed. If the soldier fails any step, show what was done wrong and how to do it
correctly.
References
Required
AISM 25-HKD-RZW-ECC-UM
Related
None
3-103
STP 8-91G15-SM-TG
Subject Area 10: Miscellaneous
PERFORM TPOCS FUNCTIONS
081-866-1041
Conditions: You have a computer with access to Third Party Outpatient Collection System
(TPOCS). Necessary materials and equipment: TPOCS data sheets, insurance information,
applicable patient encounter form, a printer, and TPOCS-NG User's Guide.
Standards: Completed TPOCS functions without error.
Performance Steps
1. Log on to TPOCS-NG.
a. Double click on the TPOCS-NG icon using the mouse.
b. At User ID: type the ID from the folder.
c. At Password: type the password from the folder.
d. Click on the white box on the bottom that states "Skip Sanity Check".
e. Click on OK.
NOTE: The password will always be TPOCS. Use your "TAB" key after each entry to get to the
next entry.
2. Add a new patient to the TPOCS database.
a. Click on "Patients" from the main menu.
b. Click on Patients & Policies.
c. Type in the patient ID (FMP & SSN) and press the TAB key.
d. Would you like to add this person as a new patient? Click "Yes".
e. Type in Last Name.
f. Type in First Name.
g. Type in Middle initial(s).
h. Type in Suffix if applicable.
i. Type in DOB (month, day, year).
j. Select "Category" by clicking on the arrow to the right from the drop down menu.
k. Select "Gender" by clicking on the arrow to the right. (TAB)
l. Select "Status" by clicking on the arrow to the right. (TAB)
m. Enter all of the patient's demographic information.
n. Click on the "Save" icon located under Edit on top or click on File, then save.
o. Do you want to save? Click "Yes".
3. Enter policy information for a patient.
a. Click on "Policies" with the umbrella.
b. Enter the policy number.
NOTE: The policy number is usually the same as the SSN.
c. Tab over to Policy Effective Date and enter the start date of the insurance policy.
d. Tab over to the "To" date and leave as is.
e. Tab down to Insurance Company and hit the "F8" key.
f. Select an insurance company and click OK.
g. Tab down to Policy Holder and click on the arrow to the right and click on the patient.
h. Click on the white box next to Insured Thru Employer and then click on the arrow to
the right.
i. Select one of the Employers.
3-104
STP 8-91G15-SM-TG
Performance Steps
j. Click on the save icon on top of the window.
4. Add a policy holder who is not a patient.
a. From the patients menu choose Patients & Policies.
b. Click the Policies tab.
c. Click on Data and then click on Insert.
d. Type in policy number.
e. Tab over to the Policy Effective date and enter the date.
f. Tab down to the insurance company and hit the F8 key.
g. Select the appropriate insurance company.
h. Tab over to Policy Holder and click on the arrow to the right.
i. Delete the patient's FMP and enter the FMP for the policy holder.
j. Enter the policyholder's information and then click OK.
k. Click on Insured Thru Employer and follow the steps from above.
l. Click on the save icon.
5. Establish a link for the insurance company.
a. Click the "Links" tab next to the umbrella.
NOTE: If this is the first link being entered for a patient, a blank set of fields will be displayed. A
sequence number will automatically be inserted. If the number is incorrect, type in the
sequence number. The number will indicate which policy is used for primary, secondary, and
tertiary billing, etc.
b. Tab over to Policy Number.
c. Click on the arrow to the right and select the primary insurance company.
NOTE: All of the information will be automatically entered for you.
d. Click on the save icon.
e. Click on "Data" then on "Insert" to link the patient to another policy.
f. Tab over to Policy number and click on the arrow.
g. Select the secondary policy information.
h. Click on the save icon.
6. Edit records in the TPOCS database.
a. Select Patients & Policies from the Patients menu and enter patient information in the
license plate.
b. Select the Policies tab.
c. Select the policy holder information that needs to be changed.
d. Click the Policy Holder Edit button and type changes to the policy holder's name.
NOTE: If the policy holder is also a patient, the policy holder name is updated from data in the
Patient table, therefore, you need to change that person's name using the Patient tab. When
you return to the policy tab for the patient you are working on click the Edit button again to make
the name in the Policy record the same as it is in the Patient Record.
e. Click and review other policies.
NOTE: If another policy has the same policy holder, you will need to make the name
corrections on that policy as well. The policy holder's name is saved in each Policy Record. It
may also be in the Patient database.
7. Create a clinic bill.
a. Select Create a bill from the billing menu.
b. Bill type is 1. (Tab over to Date of Service.)
c. Enter the date the patient was seen and then Tab over to patient ID/Name.
NOTE: Make sure the encounter dates fall within the effective dates of the policy.
3-105
STP 8-91G15-SM-TG
Performance Steps
d. Enter the patient ID and Tab over and enter the Last Name. Then hit the F8 key.
e. Click on the patient and hit OK.
f. Tab over to MEPRS and type in the code from the ADS form (e.g., BHAA).
g. Tab over to provider, hit F8, and select a provider from the list.
h. Tab over to office visit and type in an Evaluation and Management code from the ADS
form.
i. Tab over to Diagnosis code and type in the diagnosis from the ADS form.
NOTE: Once you have filled out the entire diagnosis, tab to the Procedure Code.
j. Type in the procedure code from the ADS form if appropriate.
k. Click on the save icon.
NOTE: The disposition to the top right should say "READY TO PRINT" and you will be given a
control number. Write down the control number (e.g., A98-2).
8. Print bills.
NOTE: Ensure the "Axis Print Utility" shows on the bottom window before you begin printing.
a. Select Print Bills from the Billing menu.
b. Click on Print Bills.
NOTE: You should get a message from the printer stating "Your bills were sent to the printer
and their dispositions were updated from "Ready-to-Print" to "Ready to Post".
c. Click on OK.
9. Print a UB 92 for TPOCS billing.
a. Select Print Bills from the Billing menu.
b. Select the Print Form from the Form drop down list.
NOTE: You must specify UB92.
c. Select a sort order from the Sort By drop down box.
NOTE: This affects the order in which the bills are printed.
d. Select a Disposition from the Disposition box.
e. Click the Electronic Bills radio button.
f. Choose Screen or Printer on the Destination Tab.
g. Click the Print Options or Reprints tab.
h. Select options on the tab as appropriate.
NOTE: If you are reprinting Ready To Post or Already Billed electronic bills, select the
Electronic Batch number from the drop down list. Click the Refresh button to update the drop
down list with the more recent electronic batches.
i. Click the Print Bills button to print the bills.
10. Generate specified reports from TPOCS database.
a. Change your printer to 12 characters per inch (12 cpi) and 6 lines per inch (6 lpi).
Most reports will fit on 8 1/2" wide paper. Some require wider paper.
b. Choose the desired report from the Reports menu.
c. On the Destination tab choose either Printer, Screen, or File for the report output
destination.
d. On the Report Selections tab enter the required parameters for the report.
e. Select a Reporting Code.
f. Click the Print Report button.
NOTE: If there is no information matching the selections, the system displays a message
indicating that no matching database rows were found.
3-106
STP 8-91G15-SM-TG
Performance Measures
GO
NO
GO
1. Logged on to TPOCS-NG.
——
——
2. Added a new patient to the TPOCS database.
——
——
3. Entered policy information for a patient.
——
——
4. Added a policyholder who is not a patient.
——
——
5. Established a link for the insurance company.
——
——
6. Edited records in the TPOCS database.
——
——
7. Created a clinic bill.
——
——
8. Printed a bill.
——
——
9. Printed a UB 92 for TPOCS billing.
——
——
——
——
10. Generated specified reports from the TPOCS database.
Evaluation Guidance: Score the soldier GO if all steps are passed. Score the soldier NO-GO
if any step is failed. If the soldier fails any step, show what was done wrong and how to do it
correctly.
References
Required
TC-4.5-0528
Related
None
3-107
STP 8-91G15-SM-TG
PERFORM MASCAL FUNCTIONS
081-866-1042
Conditions: You have a mass casualty situation (MASCAL) with patients requiring treatment.
Standards: Performed patient administration responsibilities in a MASCAL situation IAW AR
500-60.
Performance Steps
1. Prepare a disaster packet.
NOTE: This is a packet that is prepared in advance and maintained in a designated location to
use in an emergency situation. The MASCAL packet should have a number on the front.
a. Envelope.
b. Magic marker.
c. Identification band.
d. Paper bag.
e. Admission log/register.
f. Admission information forms.
g. DD Form 2770.
h. DA Form 3696.
i. DA Form 4160.
2. Prepare a register log.
a. Name.
b. SSN.
c. Triage Area.
d. Injury.
3. Coordinate with the Department of Nursing to obtain a revised bed status report upon
implementation of the plan.
4. Take the appropriate action to ensure the accountability of patient admissions, to transfers
between treatment areas, through final disposition.
a. Maintain a bed patient status chart in the EOC.
b. Issue emergency disaster packets (prenumbered/packaged) to all patients.
c. Provide admission clerks to Immediate, Delayed, Expectant, and Minimal areas.
d. Establish a reporting system which ensures that patient bed status is reported to the
EOC and PAD as required.
5. Account for all patients that were admitted to your facility at the end of the MASCAL.
Performance Measures
GO
NO
GO
1. Prepared a disaster packet.
——
——
2. Prepared a register log.
——
——
3. Coordinated with the Department of Nursing.
——
——
3-108
STP 8-91G15-SM-TG
Performance Measures
GO
NO
GO
4. Took the appropriate action to ensure the accountability of patient
admissions, to transfers between treatment areas, through final
disposition.
——
——
5. Accounted for all patients at the end of MASCAL.
——
——
Evaluation Guidance: Score the soldier GO if all steps are passed. Score the soldier NO-GO
if any step is failed. If the soldier fails any step, show what was done wrong and how to do it
correctly.
References
Required
None
Related
AR 40-400
AR 40-66
AR 500-60
3-109
STP 8-91G15-SM-TG
Skill Level 2
Subject Area 11: Administration (SL 2)
COMPLETE DA FORM 4160 (PATIENT'S PERSONAL EFFECTS AND CLOTHING RECORD)
081-866-0292
Conditions: A patient has reported to be admitted to the hospital. Necessary materials: DA
Form 4160.
Standards: Completed DA Form 4160 in accordance with AR 40-400 without error.
Performance Steps
1. Complete the patient's identification blocks.
a. Enter the name - last, first, and middle initial.
b. Enter the grade.
c. Enter the SSN.
d. Enter the register number and medical facility or organization.
2. Inventory the patient's personal effects and clothing.
a. Clothes.
b. Jewelry (e.g., watch, ring, necklace).
c. Toothpaste, toothbrush.
3. Document the results of this inventory in the appropriate blocks of the DA Form 4160.
4. Obtain the patient's signature on the bottom of the DA Form 4160.
NOTE: If unable to obtain the patient's signature, have the next of kin (NOK) sign for the
patient.
5. Obtain the custodian's signature on the bottom of the DA Form 4160.
NOTE: Make two copies of the DA Form 4160. Give one copy to the patient as his receipt and
retain the other copy in the patient's clothing room.
Performance Measures
GO
NO
GO
1. Filled out the DA Form 4160 with patient information.
——
——
2. Recorded the inventory of the patient's personal effects on the DA Form
4160.
——
——
3. Reviewed all signatures.
——
——
Evaluation Guidance: Score the soldier GO if all steps are passed. Score the soldier NO-GO
if any step is failed. If the soldier fails any step, show what was done wrong and how to do it
correctly.
3-110
STP 8-91G15-SM-TG
References
Required
None
Related
AR 40-400
3-111
STP 8-91G15-SM-TG
PROCESS SF 523A (MEDICAL RECORD - DISPOSITION OF BODY)
081-866-0293
Conditions: You have received notification of a death and patient information.
Standards: Completed SF 523A without error.
Performance Steps
1. Complete SF 523A.
a. Enter the name of deceased.
b. Enter the time and date the body was received.
c. Enter the name of the deceased for the certificate of removal.
d. Enter the name and address of the undertaker receiving the body.
e. Enter the time and date the undertaker receives the body.
2. Ensure both the person releasing the body and the undertaker sign the form.
3. Ensure that the physician completes and signs the "Physicians Statement" block if
required.
4. Maintain the SF 523A in the deceased's medical record.
Performance Measures
GO
NO
GO
1. Completed SF 523A.
a. Name.
b. Time.
c. Date.
d. Address.
e. Time the undertaker received the body.
f. Date the undertaker received the body.
——
——
2. Made sure both the person releasing and the undertaker signed the form.
——
——
3. Made sure the physician completed and signed the form.
——
——
4. Filed SF 523A.
——
——
Evaluation Guidance: Score the soldier GO if all steps are passed. Score the soldier NO-GO
if any step is failed. If the soldier fails any step, show what was done wrong and how to do it
correctly.
References None
3-112
STP 8-91G15-SM-TG
PERFORM INPATIENT RECORDS SUPERVISORY FUNCTIONS USING THE CHCS
081-866-1016
Conditions: You are in a patient administration off ice and have a computer with access to the
CHCS, a printer (LA75 line printer or HP laser printer), and patient's clinical record data.
Standards: Conducted inpatient records supervisory functions processing procedures using the
CHCS IAW AR 40-66, AR 40-400, and the SAIC/CHCS TC-4.5-0526.
Performance Steps
1. Approve clinical records. (Access PAD system menus IRM-IRD.)
a. Enter patient identifier (register number) and confirm patient information.
b. Choose Clerk Action (option 0) from the Clinical Records Action Bar.
c. Select Approve (option A) from the Supervisor Action List.
d. Change the record status to FA - Force Approved with option 1.
e. Display the Data Error Report.
(1) Answer YES to Print the Clinical Records Cover Sheet.
(2) At Device option, hit Return.
(3) At Right Margin: 80//. Hit Return.
f. Return to the Inpatient Record Menu.
2. Review the clerk list. (Access menus IRM-IRD.)
a. Enter patient identifier (register number) and confirm patient information.
b. Choose Clerk Action (option 0).
c. Choose Clerk List (option C) from Supervisor Action List.
d. Return to the Inpatient Record Menu.
3. Reject a clinical record. (Access menus IRM-IRD.)
a. Enter patient identifier (register number) and confirm patient information.
b. Choose Clerk Action (option 0) from the Clinical Records Action Bar.
c. Choose Reject (option X) from the Supervisor Action List.
d. Return to the Inpatient Record Menu.
4. Generate the Coded Episode Summary. (Access menus IRM-IPM-REV.)
a. Select individual register numbers (Choose option R) and Return (to accept the
default).
b. Enter patient identifier (register number) and confirm patient information.
c. Display Coded Episode Summary.
(1) Device: (press Return).
(2) Right Margin: Choose 80 and press Return.
(3) Press Return to display subsequent pages.
d. Press the SHIFT #6 (^) to Quit and return to the Inpatient Record Menu.
5. Finalize/batch approve clinical records.
a. Batch process one by one. (Access menus IRM-FIR-OBO.)
(1) Enter patient identifier (register number) and confirm patient information.
(2) Display the Data Inconsistency Error Report.
(a) At Device option, hit Return.
(b) At Right Margin prompt: 80//. Hit Return.
(3) Enter NO at prompt to see details.
(4) Enter 3 at Select option.
3-113
STP 8-91G15-SM-TG
Performance Steps
(a) Select Patient Name and hit Return.
(b) Hit Return at Yes option to process the batch.
(5) Choose option 3 to send the cover sheet to print later.
(6) Return to the Finalize Inpatient Record Menu (FIR).
b. Batch process through Select List. (Access menus IRM-FIR-PTS.)
(1) Select inpatient register number on the Review/Approve Inpatient Records List.
(a) When the cursor is positioned, press Select.
(b) Activate the selection by pressing Return.
(2) Confirm batch processing option: YES//. Press Return.
(3) Enter at Select: 1//. Press Return.
(a) At Device option, hit Return.
(b) Right Margin: 80//. Hit Return.
(4) To display subsequent pages, press Return, or hold the shift key and press #6 to
Quit.
(5) Return to the PAD System Menu.
6. Enter PAD parameters for deficiency/delinquency processing. (Access menus SDM-PAR
[System Definitions Menu-PAD Parameter Enter/Modify].)
a. Add a record completion Item.
(1) Press Next Screen (several times) until the first Division Def/Del Rec Compl
(Record Completion) is displayed.
(2) Use the down-arrow key to move the cursor to the space below the last item on
the screen.
(3) Enter PROGRESS NOTES as a new item for record completion tracking.
(4) Enter PN for an abbreviation for the record completion item.
(5) On the next screen, confirm your entries by pressing Return at the first two fields.
(6) Enter the number of days allowed to complete the action before this item becomes
delinquent: 7.
(7) Press Return (to move to the Division Def/Del Rec Action screen).
b. Add a record action.
(1) Use the down-arrow key to move the cursor to the space below the last item on
the screen.
(2) Enter CO-SIGNATURE for a new record action.
(3) Enter an abbreviation for the record action: CS.
(4) Confirm your entries by pressing Return at both fields (follow instructions on
screen).
c. File data and return to the PAD System Menu.
7. Transmit casualty SIDR records and print the transmittal list. (Access CAS-CST [Casualty
SIDR - Casualty SIDR Transmit/Retransmit ].)
a. Enter patient identifier (register number) and confirm patient information.
(1) Choose the T to get the Transmit action on the Action Bar. Hit Return.
(2) R is used for retransmit on the Action Bar.
(3) Q is used to return you to the Casualty SIDR Menu.
b. At Print Transmittal Report enter YES//. Hit Return.
(1) Device: NL.
(2) Press Return to confirm the Casualty SIDR filename to be transmitted.
c. Enter Y// and hit Return at Output will be to [default directory].
d. Access the Casualty SIDR Transmittal List (CSR) option on the Casualty SIDR Menu
(CAS-CSR).
3-114
STP 8-91G15-SM-TG
Performance Steps
e. Select Transmittal History: 1 (01 Jun 2001).
f. Press Return to generate a list of all records transmitted on 01 Jun 2001.
g. Display the Transmittal List on the terminal screen.
(1) At Device option, hit Return.
(2) At Right Margin: 80//. Hit Return (gives you the record transmitted roster).
h. Return to the PAD System Menu.
Performance Measures
GO
NO
GO
1. Approved clinical records.
——
——
2. Reviewed the clerk list.
——
——
3. Rejected a clinical record.
——
——
4. Generated the Coded Episode Summary.
——
——
5. Finalized and batch approved clinical records.
——
——
6. Entered PAD parameters for deficiency/delinquent processing.
——
——
7. Transmitted casualty SIDR records and printed the transmittal list.
——
——
Evaluation Guidance: Score the soldier GO if all steps are passed. Score the soldier NO-GO
if any step is failed. If the soldier fails any step, show what was done wrong and how to do it
correctly.
Refe rences
Required
None
Related
AR 40-400
AR 40-66
TC-4.5-0526
3-115
STP 8-91G15-SM-TG
SUBMIT PATIENT EVACUATION REQUESTS
081-866-1040
Conditions: You are required to submit an evacuation request. Necessary materials: DOD
4515.13-R and ICD-9-CM.
Standards: Submitted a patient evacuation request. All required data were entered correctly.
Performance Steps
1. Log on the TRAC 2ES.
a. Type your login ID in the User Name field.
b. Type your password in the Password field.
NOTE: These fields are case sensitive. Login Name and Password must be entered exactly as
they are given or an error message will inform you that access is denied.
c. Click the OK button. Once you log in, a screen appears with the TRAC 2ES main menu
in blue.
2. Create a Patient Movement Record.
a. Select (PMR) from the menu, and then select (Create PMR).
b. Enter the following information to search for a patient:
(1) Enter Last Name.
(2) Enter First Name.
(3) Person ID type SSN. The (Person ID Type) field contains a drop-down menu with
the three options.
(a) Select (SSN) for Social Security Number for United States personnel.
(b) Select (NATO) for North Atlantic Treaty Organization personnel.
(c) Select (Other) for individuals from other countries.
c. Select Last Name from the (Primary Sort) field.
d. Click (Search). (If your patient is found, you could select (Create from Person) and go
directly to the first edit screen to change the required administrative and medical
information and save the PMR).
e. Enter the appropriate data from the PMR Data Entry Form into the required fields.
f. Click the (Save/Edit) button or the (Save/Create Another) button, depending on
whether or not you want to create another PMR.
3. Enter Patient Administrative Data.
NOTE: Enter the patient's administrative data into the (Admin Info), enter (SSN#), and click
search.
a. Click the (Patient Info) tab and enter the required patient information data.
(1) Enter Last Name.
(2) Enter First Name.
(3) Enter Gender.
NOTE: There are three options in the (Gender) field: Male, Female and Unknown. Unknown is
used for animals (e.g., seeing eye dogs) or if the patient is so severely injured that determining
his or her gender is not possible.
(a) Enter ID type.
(b) Enter ID.
(c) Enter Insured.
b. Click the Facility tab and enter the required facility data.
(1) Enter Originating Facility.
3-116
STP 8-91G15-SM-TG
Performance Steps
(2) Enter Destination Facility.
c. Click the Movement Info tab and enter the movement data.
NOTE: Dates in the (Ready Date) field must be entered in Julian Date format followed by the
year and time. Look to the left of the field for format or select (Help) in TRAC 2ES for further
information.
(1) Enter Ready Date.
(2) Enter Reason Regulated.
(3) Enter Classification.
(4) Enter Precedence.
(5) Enter Space Estimate.
(6) Enter Space Type.
d. Click the Attendants tab and enter attendant data.
e. Click the Baggage tab and enter the baggage data.
f. Click the Billing Info and enter the billing information.
NOTE: If Yes is selected from the ensured drop-down menu on the Patient Info tab and no
information is entered for the insurance company on the Billing screen, you will receive a
warning message indicating that insurance information needs to be entered.
4. Enter patient Clinical Data/Remarks.
NOTE: These fields must be completed before submitting the PMR to the PMRC.
a. Enter Diagnosis.
(1) Enter the code into the Enter the ICD9 Code field.
(2) Click List Codes to populate the drop-down list below the Enter ICD9 Code field
with matching codes and diagnosis descriptions.
(3) Select the code in the drop-down list that most closely matches the patient's
diagnosis. A diagnosis must be selected or highlighted before the Assign Primary
button will work.
(4) Click the Assign Primary button.
NOTE: The primary diagnosis chosen will then fill the Primary Diagnosis field. (To Assign
Secondary or Other diagnoses, repeat steps 1 through 4, only select Assign Secondary or
Assign Other as it applies.)
(5) Enter remarks in the Diagnosis Remarks field (if applicable).
(6) Click on the Medical Specialty drop-down arrow to select a different medical
specialty code than automatically applied by TRAC 2ES.
(7) Click the Additional Info check boxes as they apply to your patient's situation:
(a) Restraints.
(b) Power of Attorney.
(c) Do Not Resuscitate.
NOTE: Additional direction can be found in United States Transportation Command (USTC)
Pamphlet 41-3, concerning appropriate information required to comply with your PMRC policies.
b. Enter Vital Signs.
(1) Enter data in the Recorded Date field in Julian date and Greenwich Mean Time
(GMT)/Zulu time of last recorded vital sign.
(2) Enter the appropriate data in the Temperature field and select Fahrenheit or
Celsius.
(3) Enter the appropriate data in the Pulse, Respiratory Rate, and Blood Pressure
fields.
(4) Enter the appropriate data in the Weight field in pounds or kilograms.
(5) Enter your patient's most recent recorded lab test date in the Reading Date field.
3-117
STP 8-91G15-SM-TG
Performance Steps
(6) Enter the appropriate lab values for the HGB (hemoglobin), WBC (white blood
count), HCT (hematocrit), and Glucose fields.
(7) Click the Allergies check box if your patient has any allergies.
(8) Enter a description of those allergies in the Description field.
c. Enter IV.
(1) Click the IV location drop-down arrow to select the location of the IV.
(2) Enter the location of the IV in the Location Other field if Other was selected from
the drop-down list.
(3) Click the Solution Type drop-down arrow to select your patient's IV solution.
(4) Select Solution Other and enter the solution type when the patient has an IV that
is different from those listed.
(5) Enter the rate at which the IV solution is to be administered by medical personnel
in the Rate field.
(6) Click the IV Pump check box if the patient is to have an IV pump during
movement.
(7) Click the IV Pole check box if the patient is to have an IV pole during movement.
(8) Click Add to add data to the IV table and save the IV information in the PMR.
(9) Click Remove when the IV information is changed or discontinued.
NOTE: If you go to another screen before clicking the Add button, all IV information will be lost.
This is true for any screen that has an Add button.
d. Enter the patient's medication in the Medication fields:
(1) Enter the appropriate data into the Medication, dose and Frequency fields.
(2) Click the Route Method drop-down arrow to select the route the medication is to
be given.
(3) Click Add. (All medication information will be lost if you go to another screen
before clicking Add.
(4) Repeat this process to add another medication if the patient has more than one.
(5) Click Remove to remove the medication information if it is discontinued or
changed.
e. Enter Drainage.
(1) Enter the location of the drainage device relative to the patient's body.
(2) Enter the amount of suction required.
(3) Click the Tube Type drop-down arrow and select the drainage tube to be used.
(4) If the type is not listed, select Other, and then enter the type in the Tube Type
Other text field.
(5) Click the Suction Type.
(6) Select Other if the type is not listed, and then enter the type in the Suction Type
Other text field.
(7) Click Add to place data into the Drainage Table.
(8) Click Remove to remove data from the Drainage Table.
f. Enter Diet.
(1) Select the tube from the Feeding Tube Type. Select None if your patient does not
have a feeding tube.
(2) Enter Type of tube used if Other was selected from the Tube Type Other field.
(3) Select the type of formula from the Formula drop-down list. Select None if your
patient does not have a formula.
(4) When the type of formula for your patient is not listed, select Other and then enter
name of Formula in the Formula Other Field.
(5) Click the Pump check box if the patient is being fed a continuous formula.
3-118
STP 8-91G15-SM-TG
Performance Steps
(6) Enter continuous or bolus in the Infusion Rate field as ordered by your patient's
physician. Then enter into the Amount Field.
(a) The cc's per hour for a continuous feeding.
(b) The amount of cc's and the interval for the feeding for a bolus feeding.
(7) Select the diet ordered for your patient from the Special Diet drop down list. If
selected, some of these would need more detail entered in the Description field
directly under Special Diet.
g. Enter Oxygen.
(1) Select the method your patient is to receive oxygen from the Oxygen Delivery
System Method drop-down list.
(2) Enter the rate your patient is to receive oxygen into the Rate field.
(3) Enter the percent value of blood oxygen at which the doctor wants the patient
maintained during movement in the Pulse Oximeter Setting field.
(4) Click the Reading drop-down arrow for the selections of None, Dedicated, and
Intermittent PRN to appear.
h. Enter Equipment.
(1) Check the boxes that apply to the needs of your patient.
(2) Click the Ventilator Type drop-down arrow to select Adult or Pediatric (if your
patient requires a ventilator).
(3) To enter the Orthopedic Devices data-(a) Select the appropriate device for your patient from the Orthopedic Device
drop-down list.
(b) Click the Location drop-down arrow to view the list and select the location
that applies to your patient.
(c) Enter the instructions for the orthopedic device into the Comment field.
(d) Click Add to save the orthopedic device data into the patient's PMR.
(e) Click Remove to delete any orthopedic device data.
(f) Use the Other tab to access a free text field in which to enter any other
special care instructions that the medical crew will need to care for the patient
during transport.
i. Enter the Flight Restriction data.
(1) Click the Max Stops drop-down arrow to select the number of stops allowed for
the patient.
(2) Click the Max RONs drop-down arrow to select the number of RONs allowed for
the patient.
(3) Click the Altitude Restriction drop-down arrow and select the maximum altitude
the patient can tolerate.
NOTE: The Altitude Restriction information is not only important for the patient's condition but
also for planning the flight for fuel and distance.
j. Enter Patient's history.
(1) Enter history in comments block.
(2) Type in History from SF 600 or AF Form 3899.
(3) Click on Save.
NOTE: TRAC 2ES saves automatically when you click on the tabs, but if you click on the
browser or the menu before saving, all your data entered since the last save will be lost. Each
time you click save, TRAC 2ES will give you a message if it has saved successfully or not.
k. View patient's information.
NOTE (Workaround): If when scrolling up or down the page in view PMR the fields disappear,
just click Reload on Netscape to correct the problem.
(1) Click View at the top of your patient's PMR.
3-119
STP 8-91G15-SM-TG
Performance Steps
(2) Click the Administrative Info hyperlink to view the administrative data.
(3) Click the Clinical Info hyperlink to view the clinical data.
(4) Click the Remarks hyperlink to view the remarks that have been entered.
(5) Click the Edit PMR hyperlink when you need to change your patient's PMR.
NOTE: Not all hyperlinks will be available for access depending on your user role.
l. Check Input.
(1) Click the Check Input button to identify any required fields that you still need to
complete to have your PMR Validated.
(2) Click the Message hyperlink for a description of the areas that need more detail.
This message hyperlink will list the areas that need data input or the input that is
not in the correct format.
(3) Click OK and then fix the problem or problems listed and click SAVE.
(4) Click the Check Input button to ensure there are no more warnings.
m. Edit a PMR. Navigate to the Edit PMR screen.
(1) Select PMR from the main menu and select Search PMR.
(2) Enter your patient's first and last name into the first and last name fields.
(3) Click Search.
(4) Select Edit PMR from the drop down list in the Action Column.
(5) Select the tab that applies to the edits and enter data.
(6) Click Save.
NOTE: When editing a PMR after submission, notify the PMRC of your changes.
n. Submit your patient's PMR to the PMRC. Click Submit to change the current state of
the PMR to Submitted. The PMR is now ready for the PMRC to Validate.
o. Correct the errors identified and resubmit.
(1) Click View in the Search for Patient screen.
(2) Click the hyperlink that needs data added or needs correction and enter the
information requested by the PMRC.
(3) Click Submit. Your PMR will be ready for the PMRC to validate for movement.
p. Once a PMR is canceled, it is no longer available for editing or validating. It will go to
the TRAC 2ES archive. Only the PMRC can cancel or suspend a patient's PMR.
Performance Measures
GO
NO
GO
1. Entered all required patient information.
——
——
2. Submitted the record to GPMRC to be validated.
——
——
3. Received the information for the patient to be air evacuated.
——
——
4. Accepted the patient if there are no errors.
——
——
5. Regulated the patient successfully.
——
——
Evaluation Guidance: Score the soldier GO if all steps are passed. Score the soldier NO-GO
if any step is failed. If the soldier fails any step, show what was done wrong and how to do it
correctly.
3-120
STP 8-91G15-SM-TG
References
Required
DOD 4515.13-R
ICD-9-CM
Related
AFI 41-301
AR 40-535
DODI 6000.11
USTRANSCOM PAM 41-3
3-121
STP 8-91G15-SM-TG
Skill Level 3
Subject Area 12: Administration (SL 3)
REVIEW SF 523 (CLINICAL RECORD-AUTHORIZATION FOR AUTOPSY)
081-866-0095
Conditions: You have received a completed SF 523 and DA Form 3894. You have access to
the deceased's medical records and next of kin (NOK) information.
Standards: Identified all errors and took necessary corrective action.
Performance Steps
1. In block 1, check for the name and location of the MTF and the date and time the SF 523
was prepared.
2. In block 2, confirm the name of the deceased, all restrictions for the autopsy, and other
special examinations.
3. Fill out the remaining segments in the authority block with the appropriate information.
4. Check the signature of the witnesses and the individual authorizing the autopsy.
5. Check the medical examiner/coroner information block for appropriate information.
6. Contact the medical officer for appropriate information.
7. Verify the patient's register and ward number.
8. Review the identification from the patient recording card.
9. File the original SF 523 in the patient's inpatient treatment record (ITR).
10. Forward a copy of SF 523 to pathology.
Performance Measures
GO
NO
GO
1. Checked the SF 523 for all information pertaining to the patient.
——
——
2. Checked for completeness and accuracy.
——
——
3. Checked for errors.
——
——
4. Checked for signatures.
——
——
5. Checked for dates and times.
——
——
Evaluation Guidance: Score the soldier GO if all steps are passed. Score the soldier NO-GO
if any step is failed. If the soldier fails any step, show what was done wrong and how to do it
correctly.
3-122
STP 8-91G15-SM-TG
References
Required
None
Related
AR 40-400
AR 600-8-1
3-123
STP 8-91G15-SM-TG
COORDINATE A MEDICAL EVALUATION BOARD (MEB) PROCEEDING
081-866-0302
Conditions: You have an impaired soldier with medical documentation. The soldier has a DA
Form 3349 with a numerical designation of 3. Necessary materials: DA Form 3947.
Standards: Coordinated a medical evaluation board proceeding of an impaired soldier
accurately and in a timely manner IAW AR 635-40.
Performance Steps
1. Process a DA Form 3947.
a. Complete blocks 1-11 with information from personnel or medical records.
b. Check the applicable block on item 12.
c. List all diagnoses in descending order of significance in item 13.
NOTE: For cases being recommended for referral to the physical evaluation board (PEB), note
the applicable paragraph in AR 40-501.
d. Check the applicable box in item 14.
(1) List all limitations for soldiers qualified for retention with duty limitations. Attach
DA Form 3349.
(2) Recommend referral to a PEB for patients meeting criteria listed in AR 40-501.
e. Complete item 15 only when the patient is referred to a PEB.
f. Complete item 16 only when the answer to item 15 is affirmative.
(1) Ensure it is considered medically feasible.
(2) Ensure assignment limitations and profiles are indicated in block 30.
g. Complete items 17-19 as indicated.
NOTE: When a board member must be qualified in a specific medical specialty, enter the
specialty after the name and grade.
h. Check the applicable block in items 20-22.
i. Enter the indicated information in item 23.
j. Complete item 24 when the patient is located in the vicinity of the MTF.
(1) Advise the soldier of the approved findings of the board.
(2) Instruct the patient to check the appropriate box.
(3) Instruct the patient to prepare a statement citing reasons for disagreement if the
patient disagrees with the findings.
NOTE: The patient is authorized 3 working days, with extensions permitted for reasonable
cause.
(4) Attach any patient statements.
(5) Forward the completed form to the final approving authority.
(6) Forward the case as if approved by the patient if the patient does not make an
election.
(7) Attach an explanation for the refusal or inability of the patient to make an election.
k. Complete item 24 when the patient is not located in the vicinity of the MTF.
(1) Send a certified letter to the patient.
(a) Advise the patient of board findings.
(b) Request a written reply indicating the patient's agreement or disagreement.
(c) Attach a copy of the complete MEB report.
(d) Inform the patient that he or she has 3 working days following receipt of the
letter to reply.
(2) Attach any patient statements.
3-124
STP 8-91G15-SM-TG
Performance Steps
(3) Ensure the MEBD processing, receipt of the service member's election, and
forwarding is completed at the originating MTF.
(4) Forward the completed form to the final approving authority.
(5) Forward the case as if approved by the patient if the patient does not make an
election.
(6) Attach an explanation for the refusal or inability of the patient to make an election.
l. Ensure item 25 is completed or the patient statement is attached.
m. Ensure items 26-29 are completed by the approval authority when acting on the
patient's request for reconsideration.
(1) Attach the board's action (in narrative format) if the case is returned to the MEB
for reconsideration.
(2) Ensure any further action by the approving authority will be referenced in item 30.
n. Complete item 30 when needed.
(1) Use when continuing entries or remarks are necessary.
(2) Identify continuations by the number of the appropriate item in DA Form 3947.
o. Ensure the recommended disposition of the MEB is effected at the earliest practicable
date, when the findings and recommendations are approved by the approving
authority.
NOTE: The appointing authority is also the approving authority for MEB proceedings. He or
she will not participate in the proceedings in any capacity.
p. Forward the board proceedings and all attachments to the next higher authority for
final decision if the approving authority does not concur with the reconsideration
findings.
(1) Chief Surgeon of overseas command.
(2) Commander, USAMEDCOM for all others.
2. Coordinate a physical evaluation board (PEB) proceeding.
a. Notify the soldier of the results.
b. Counsel the soldier on the findings of the PEB.
NOTE: DA Form 199 will contain the results.
c. Soldier must concur or nonconcur with PEB results.
3. Complete DA Form 3349.
a. Ensure blocks 1-9 are filled out completely by the attending physician.
NOTE: Blocks 1(Medical Condition) and 3 (Assignment Limitations are as Follows) should be
written in nonmedical language for easy understanding by nonmedical Company Commanders
and First Sergeants.
b. Ensure proper distribution of DA Form 3349.
Performance Measures
GO
NO
GO
1. Processed a DA Form 3947.
——
——
2. Coordinated a physical evaluation board (PEB) proceeding.
——
——
3. Completed DA Form 3349.
——
——
3-125
STP 8-91G15-SM-TG
Evaluation Guidance: Score the soldier GO if all steps are passed. Score the soldier NO-GO
if any step is failed. If the soldier fails any step, show what was done wrong and how to do it
correctly.
References
Required
None
3-126
Related
AR 40-400
AR 40-501
AR 635-40
STP 8-91G15-SM-TG
PROCESS DECEDENT AFFAIRS FORMS
081-866-1045
Conditions: Given notification of a deceased individual.
Standards: Selected the appropriate mortuary benefits provided by the US Army IAW AR 6008-1 and AR 40-3.
Performance Steps
1. Select the appropriate mortuary benefits provided by the US Army.
a. Provide transfer of the deceased from the place of death to the mortuary.
b. Provide preparation of the deceased for interment.
(1) Embalming.
(2) Dermasurgery or restorative arts.
(3) Placement of corpse in the casket.
c. Provide a casket and shipping case.
(1) Only an adult size is authorized and stocked by the Army; oversized caskets may
be purchased by contract.
(2) The casket may be-(a) Sealed when restoration is not possible.
(b) Prepared for viewable or nonviewable.
(c) Tagged for "contagious disease" or "not to be opened" when applicable.
d. Provide authorized attire for the deceased.
(1) Military uniform with authorized decorations.
(2) Civilian clothing may be furnished at government expense when requested by the
next of kin (NOK).
(3) Identification tags are securely attached to the remains.
e. Provided cremation services (if authorized by the next-of-kin).
(1) Charges are paid by the government.
(2) An urn is supplied with name, rank, date of birth, and date of death.
(3) The transportation of the deceased to the crematory.
f. Provide a person to escort the deceased, during travel, to the location of interment.
(1) May be military or civilian.
(2) Selected by the commander of the deceased (if military).
(3) Appearance, character, and sobriety must be above approach.
(4) Must be tactful with a pleasing personality.
(5) Must be of the same rank (or above), branch of service, and religion preference
as the deceased.
(6) Should speak the same language as the deceased's next of kin.
g. Provide an interment monetary allowance (disposition instructions are provided by the
primary next of kin (PNOK)).
(1) The deceased's service provides.
(2) Maximum allowed for burial in a private cemetery is $1,750.
(3) Maximum allowed for burial in a government cemetery by a contract civilian
funeral home is $1,180.
h. Provide a grave marker.
(1) Upright marble headstone.
(2) Flat marker (marble, granite, or bronze).
(3) Cost of the marker.
3-127
STP 8-91G15-SM-TG
Performance Steps
(a) Civilian cemetery. Cost of transportation and erecting the marker is the
NOK's responsibility.
(b) Military cemetery. All expenses are paid by the government.
2. Select mortuary benefits for other categories of personnel.
a. Family members of active duty military stationed in CONUS are authorized
transportation for their remains from the place of death to the place of interment
(civilian or government) and a grave marker (if they are buried in a government
cemetery). They are not authorized any other mortuary benefits.
b. Family members of active duty military stationed outside CONUS are authorized
transportation for their remains from the place of death to the place of interment
(civilian or government). Preparation of the remains is authorized only on a
reimbursable basis, which amounts to a temporary loan without interest to the sponsor.
Performance Measures
GO
NO
GO
1. Selected the most appropriate mortuary benefits provided by the US Army.
——
——
2. Selected the mortuary benefits for other categories of personnel.
——
——
Evaluation Guidance: Score the soldier GO if all steps are passed. Score the soldier NO-GO
if any step is failed. If the soldier fails any step, show what was done wrong and how to do it
correctly.
References
Required
None
3-128
Related
AR 40-3
AR 40-400
AR 600-8-1
STP 8-91G15-SM-TG
Subject Area 13: TAMMIS (SL 3)
SUPERVISE TAMMIS ADMINISTRATION FUNCTIONS
081-866-1043
Conditions: You have a commercial-off-the-shelf system and TAMMIS administration software.
Standards: Performed supervisor functions in the TAMMIS administration menu without error.
Performance Steps
1. Manage TAMMIS user permissions (logon/password).
a. From the main menu select (1) User definition and process menu.
(1) Select User Login and Menu Access.
(a) Add Record (F4).
(b) Enter the desired login name.
(c) Enter the subsystem for desired access (F6).
(d) Enter the user's full rank and name.
(e) Enter the level of access (F6) s elect.
(f) Enter the user's Entry Point (F6) select.
(g) Save Record (F1).
(2) User password definition.
(a) Enter Login for requested password change.
(b) Enter the new password.
(c) Re-enter the new password.
(d) Enter "Q" to quit.
2. Perform database file maintenance.
a. From the Main Menu select the Subsystem Maintenance Process Menu.
b. Select Database File Maintenance.
(1) Select the application where the error occurred.
NOTE: The file name is given at the time the error occurs.
(2) Select Database File Name.
NOTE: If using TAMMIS in multiuser mode (more than one soldier using TAMMIS at one time),
then go to the next step. If not, then go to step 4.
(3) Bring the system down to single user mode (F2).
(4) Repair File (F1).
3. Schedule an automated job.
a. From the Main Menu select Subsystem Maintenance Process Menu.
b. Select Schedule an Automated Job.
(1) Find the automated job requiring update.
(2) Select job (F6).
(3) Update the job with the desired information.
(4) Save entry (F1).
4. Restore a subsystem.
a. From the Main Menu select the Subsystem Maintenance Process Menu.
b. Select Restore a Subsystem.
(1) View File List (Y/N).
(2) Indicate Type of Media used for restoration: Cartridge or Floppy.
3-129
STP 8-91G15-SM-TG
Performance Steps
(3) Insert media and press return.
NOTE: The application will be restored. At end of restoration procedure, the system will return
to the Subsystem Maintenance Process Menu.
5. Perform COTS disk cleanup.
a. From the Main Menu select the Media Management Menu.
b. Select Disk Cleanup Functions Menu.
(1) Clean All - cleans all files.
(2) General Clean Up - cleans all files except archive files.
(3) Archive Clean Up - cleans only archive files.
(4) Database Compression - compresses the TAMMIS database after file cleanup is
performed.
6. Perform a system backup.
a. From the Main Menu select the Subsystem Maintenance Process Menu.
b. Select Back Up a Subsystem.
(1) Select subsystem desired for backup.
(2) Select F1 to back up a subsystem or F2 to back up a database.
NOTE: Backing up a subsystem will back up the entire system, to include the database.
Backing up the database will only include the database and not the subsystem.
(3) Select the media used for back up: Diskette or Cartridge Tape.
(4) Insert the media into the CPU.
NOTE: Upon completion of back up, the system will return to the back up menu.
7. Install a TAMMIS application update.
NOTE: Ensure you have backed up your database before you install an updated software
version. Once the installation has taken place, you will lose all data in the previous database.
a. From the Main menu select the Subsystem Maintenance Process Menu.
b. Select the Application Installation Menu.
NOTE: Choose the application from this menu you wish to install: MEDPAR or MEDREG.
c. Select the media for installation: Diskette or Cartridge.
d. Insert the media into the CPU.
8. Monitor the batch que status.
a. From the main menu select the Batch Que Scheduler Menu.
b. Select the Batch Que Status Menu.
c. Using your F3 key, you may scroll down to check the status of batches awaiting que.
Performance Measures
GO
NO
GO
1. Managed TAMMIS user permissions.
——
——
2. Performed database file maintenance.
——
——
3. Scheduled an automated job.
——
——
4. Restored a subsystem.
——
——
5. Performed COTS disk cleanup.
——
——
6. Performed a system backup.
——
——
3-130
STP 8-91G15-SM-TG
Performance Measures
GO
NO
GO
7. Installed a TAMMIS application upgrade.
——
——
8. Monitored the batch que status.
——
——
Evaluation Guidance: Score the soldier GO if all steps are passed. Score the soldier NO-GO
if any step is failed. If the soldier fails any step, show what was done wrong and how to do it
correctly.
References None
3-131
STP 8-91G15-SM-TG
PERFORM MEDPAR CC FUNCTIONS
081-866-1044
Conditions: You have a commercial-off-the-shelf system (COTS) with MEDPAR CC software
installed and a MEDPAR CC user manual.
Standards: Performed MEDPAR CC functions IAW the MEDPAR CC user manual without
error.
Performance Steps
NOTE: MEDPAR CC is designed as a command and control system. MEDPAR CC receives
MEDPAR reports from subordinate units and then consolidates the reports into "roll-up reports"
that are used by the command. MEDPAR CC can not function without the input of the
subordinate units.
1. Receive All Command Reports.
2. Print Command Reports.
3. Print Individual Bed Status Report.
4. Print Individual Recapitulation Report.
5. Print Consolidated Bed Status Report.
6. Print Consolidated Recapitulation Report.
7. Print Reportable Conditions (MED 16) Report.
8. Print Comment Report.
9. Print All Patient Records.
10. Print Active Patient Records.
11. Print Patient Disposition Records.
12. Send Command Reports.
13. Send Consolidated Bed Status Report.
14. Send Consolidated Recapitulation Report.
15. Send Reportable Conditions (MED 16) Report.
16. Send Comment Report.
17. Send Patient Records.
18. Send All Reports.
19. View Patient Records.
20. Check System Maintenance.
21. Maintain Facility Data.
22. Set up Communications.
3-132
STP 8-91G15-SM-TG
Performance Steps
23. Maintain Archive Log.
24. Purge Archive Files.
25. Print Queue Status.
26. Enable System Printer.
27. Check BLAST Status Report.
28. Check UUCP Status Report.
29. Check Network Status Report.
30. View Communications Queue.
31. Update Menu Access Levels.
32. Format Magnetic Media.
33. Check Status of Magnetic Media.
34. Check Designed Reports.
35. Create, Modify, Print User Reports.
36. Print User Report File Structure.
37. Update Report Print/Display Options.
Performance Measures
GO
NO
GO
1. Received All Command Reports.
——
——
2. Printed Command Reports.
——
——
3. Printed Individual Bed Status Report.
——
——
4. Printed Individual Recapitulation Report.
——
——
5. Printed Consolidated Bed Status Report.
——
——
6. Printed Consolidated Recapitulation Report.
——
——
7. Printed Reportable Conditions (MED 16) Report.
——
——
8. Printed Comment Report.
——
——
9. Printed All Patient Records.
——
——
10. Printed Active Patient Records.
——
——
11. Printed Patient Disposition Records.
——
——
12. Sent Command Reports.
——
——
13. Sent Consolidated Bed Status Report.
——
——
3-133
STP 8-91G15-SM-TG
Performance Measures
GO
NO
GO
14. Sent Consolidated Recapitulation Report.
——
——
15. Sent Reportable Conditions (MED 16) Report.
——
——
16. Sent Comment Report.
——
——
17. Sent Patient Records.
——
——
18. Sent All Reports.
——
——
19. Viewed Patient Records.
——
——
20. Checked Command System Maintenance.
——
——
21. Maintained Facility Data.
——
——
22. Setup Communications.
——
——
23. Maintained Archive Log.
——
——
24. Purged Archive Files.
——
——
25. Print Queue Status.
——
——
26. Enabled System Printer.
——
——
27. Checked UUCP Status Check Report.
——
——
28. Checked BLAST Status Check Report.
——
——
29. Checked Network Status Check Report.
——
——
30. Viewed Communications Queue.
——
——
31. Updated Menu Access Levels.
——
——
32. Formatted Magnetic Media.
——
——
33. Checked Status of Magnetic Media.
——
——
34. Checked User Designed Reports.
——
——
35. Created, Modified, Printed User Reports.
——
——
36. Printed User Report File Structure.
——
——
37. Updated Report Print/Display Options.
——
——
Evaluation Guidance : Score the soldier GO if all steps are passed. Score the soldier NO-GO
if any step is failed. If the soldier fails any step, show what was done wrong and how to do it
correctly.
References
Required
AISM 25-HKD-RZW-ECC-UM
3-134
Related
None
STP 8-91G15-SM-TG
SUPERVISE MEDREG FUNCTIONS
081-866-1047
Conditions: You have a COTS system with MEDREG software installed.
Standards: Performed supervisory functions with MEDREG without error.
Performance Steps
1. Enter facility status and unit information. (Select FACILITY STATUS & UNIT
INFORMATION MENU (on main menu) by clicking F1. Click F1 again to select each of the
options.)
a. Enter unit information.
NOTE: In order to properly regulate, the medical regulating officer must have the following units
entered in TAMMIS. MROs should ensure information entered into TAMMIS is correct such as
DODAACs and system names being entered in upper case. Get unit information from your S-3.
(1) Add Home Base MRO (F4).
(2) Add Higher Echelon MRO (F4).
(3) Add two or more Local Receiving Hospitals (F4).
(4) Add Transportation Unit (F4).
(5) Add Higher Echelon MTF (F4), if needed.
(6) Add Lower Echelon MTF (F4), if needed.
b. Update facility status.
(1) Update Facility Information for MTFs (F6), to include Primary/Secondary Airfields,
Capabilities & Constraints.
(2) Update Bed Status (F7). Enter a new bed status for each hospital or receive a
bed status from one of your MTFs. Information included for updating a bed status
is OR backlog, OR suites, beds available per medical specialty, and time of report.
c. Set up communications.
(1) Update each Remote (F6) by adding its System Name and selecting the Default
Sending Media.
(2) Save Remote (F1).
2. Enter evacuation request information. (Select EVACUATION REQUEST MENU (on main
menu).)
a. Enter Multiple Evacuation Request.
NOTE: The Multiple Evacuation Menu is primarily used in a mass casualty situation.
Casualties in this option are grouped by Patient Category and Precedence of Evacuation. You
may receive requests from your MTFs (MEDPAR) which you may choose to regulate
individually or by group. You will also be given the option of handling locally or forwarding the
request.
(1) Select Requestor.
(2) Enter Date/Time.
(3) Select Patient Category (F6).
(4) Define Handling of Request: Local or Forward to Higher MRO.
(5) Enter by medical specialty the amount of patients who are litter and ambulatory.
(6) Save Data (F1).
b. Enter Individual Evacuation Request.
(1) Add Request (F4).
(2) Select Requestor (F6).
(3) Enter Date/Time.
3-135
STP 8-91G15-SM-TG
Performance Steps
(4) Select Origin MTF (F6).
(5) Complete the rest of the worksheet ensuring all red highlighted fields have been
completed.
(6) Save Request (F1).
3. Regulate patients within the command. (Select REGULATE WITHIN THE COMMAND (on
main menu).)
NOTE: Items within this menu should be performed in the order that they appear.
a. Print Comprehensive Evacuation Request Listing.
NOTE: The Comprehensive Evacuation Request Listing acts as a checklist for the MRO to
perform all steps necessary in order to properly regulate patients. An "N" is present under each
column; this will change to "Y" as you perform the various steps for regulating each patient.
b. Designate Beds by Individual or Group.
c. Produce the Transportation Worksheet.
d. Assign Transport by Individual or Group.
e. Deny Individual or Group Request, if required.
f. Remove Movement Instructions, if required.
g. Remove Bed Designation, if required.
4. Regulate patients to higher echelon. (Select REGULATE PATIENTS TO HIGHER
ECHELON (on main menu).)
NOTE: MROs who forward an evacuation request to a higher echelon MRO for regulation will
receive the following information that they will pass on to the original requesting MTF:
a. Enter Individual or Group Movement Instructions from higher MRO.
b. Enter Individual or Group Bed Designation from higher MRO
c. Deny Individual or Group Bed Designation from higher MRO.
d. Remove Individual or Group Bed Designation from higher MRO.
5. Produce MEDREG messages. (Select MEDREG MESSAGE MENU (on main menu).)
NOTE: Once completing the steps above, you must produce the following messages that will
be forwarded to the gaining and losing MTF.
a. Bed Designation Message.
b. Patient Movement Instructions.
c. Evacuation Delay Message, if required.
d. Gaining Facility Notice.
e. Gaining Facility Movement Info Message.
f. Evacuation Denial Message, if required.
6. Send or receive automated communications. (Select SENDING/RECEIVING
AUTOMATED COMMUNICATIONS (on main menu).)
NOTE: Information sent or received must be performed through the Automated
Communications Menu.
a. Send to One/All Units.
NOTE: This communications submenu is used to send communications to other TAMMIS
systems.
b. Receive Modem Communications.
NOTE: This function is used to receive Modem, LAN, HF radio, MSE, and INMARSAT
communications.
c. Receive Communications from Tape or Floppy Disk.
d. Process Received Communications.
NOTE: Once you have received communications, you MUST process them.
3-136
STP 8-91G15-SM-TG
Performance Steps
e. Review Communications.
NOTE: This allows the user to review all communications that have been sent and received.
f. Purge Communications.
NOTE: Perform this function for communications that are out of date or not needed any more.
Performance Measures
GO
NO
GO
1. Entered facility status and unit information.
a. Entered unit information.
b. Updated facility status.
c. Set up communications.
——
——
2. Entered evacuation request information.
a. Entered Multiple Evacuation Request.
b. Entered Individual Evacuation Request.
——
——
3. Regulated patients within the command.
a. Printed Comprehensive Evacuation Request Listing.
b. Designated Beds by Individual or Group.
c. Produced Transportation Worksheet.
d. Assigned Transport by Individual or Group.
e. Denied Individual or Group Request, if required.
f. Removed Bed Designation, if required.
g. Removed Movement Instructions, if required.
——
——
4. Regulated patients to higher echelon.
a. Entered Individual or Group Movement Instructions from higher MRO.
b. Entered Individual or Group Bed Designation from higher MRO.
c. Denied Individual or Group Bed Designation from higher MRO.
d. Removed Individual or Group Bed Designation from higher MRO.
——
——
5. Produced MEDREG messages.
a. Selected Bed Designation Message.
b. Patient Movement Instructions.
c. Evacuation Denial Message, if required.
d. Evacuation Delay Message, if required.
e. Gaining Facility Notice.
f. Gaining Facility Movement Information Message.
——
——
6. Sent or received automated communications using the following functions:
a. Send to One/All Units.
b. Receive Modem Communications.
c. Receive Communications From Tape or Floppy Disk.
d. Process Received Communications.
e. Review Communications.
f. Purge Communications.
——
——
3-137
STP 8-91G15-SM-TG
Evaluation Guidance: Score the soldier GO if all steps are passed. Score the soldier NO-GO
if any step is failed. If the soldier fails any step, show what was done wrong and how to do it
correctly.
References None
3-138
STP 8-91G15-SM-TG
Skill Level 4
Subject Area 14: Administration (SL 4)
INITIATE NOTIFICATION TO NEXT OF KIN (NOK) OF A DECEASED SERVICE MEMBER
081-866-0094
Conditions: You have received a casualty report of a deceased service member. Necessary
materials and equipment: telephone and electronic transmitting device.
Standards: Made notification to the NOK of a deceased service member.
Performance Steps
1. Make notifications for active duty deaths (Section B of DA Form 3894).
a. Next of kin (if present in the hospital at the time of the member's death).
NOTE: If not present, notification is made by CNO. However, in most cases, if the NOK lives
within a reasonable distance from the hospital, he or she will be summoned to the hospital for
personal notification by the physician.
b. The unit commander.
c. The casualty area command (CAC). The CAC will take responsibility for notifying the
NOK if the hospital has not already done so.
NOTE: The casualty area commander is assigned responsibility for the area in which the
casualty occurs or the area in which the next of kin/person authorized to direct disposition
(PADD) of remains resides and who has casualty reporting responsibilities to PERSCOM and
preparation of remains responsibility. This applies to both CONUS and OCONUS.
d. The chaplain.
e. The Red Cross.
f. The installation commander or staff duty officer.
g. The hospital information service.
NOTE: This is to prevent embarrassing or traumatic incidents such as visitors, unaware of
death, being directed to the recently deceased person's room.
h. Other local notifications, as required.
NOTE: Usually the hospital commander, deputy commander, and other key hospital personnel
want to be informed of any deaths.
2. Make notifications for non-active duty deaths (retired military, dependents, and others).
a. Next of kin (unless NOK is overseas).
b. Casualty area command (retired military only).
c. The chaplain.
d. The Red Cross.
e. The hospital information service.
Performance Measures
1. Made notifications for active duty deaths.
a. Next of kin.
b. Unit commander.
c. Casualty area command (CAC).
GO
NO
GO
——
——
3-139
STP 8-91G15-SM-TG
Performance Measures
d.
e.
f.
g.
h.
GO
NO
GO
——
——
Chaplain.
Red Cross.
Installation commander or staff duty officer.
Hospital information service.
Other local notifications as required.
2. Made notifications for non-active duty deaths (retired military, dependents,
and others).
a. Next of kin (NOK).
b. Casualty area command.
c. Chaplain.
d. Red Cross.
e. Hospital information service.
Evaluation Guidance: Score the soldier GO if all steps are passed. Score the soldier NO-GO
if any step is failed. If the soldier fails any step, show what was done wrong and how to do it
correctly.
References
Required
None
3-140
Related
AR 40-400
AR 600-8-1
STP 8-91G15-SM-TG
PERFORM PARRTS FUNCTIONS
081-866-0198
Conditions: You have been given access to the Patient Accounting and Reporting Real-Time
Tracking System (PARRTS), all required information, and the PARRTS user's manual.
Standards: Accessed, added, and updated a record, created a new event, and created a user
defined multifunctional report.
Performance Steps
1. Log onto the PARRTS.
NOTE: You must have a user account to logon to PARRTS. Once you receive an account,
perform this procedure to logon.
a. Open your web browser and go to www.pasba.amedd.army.mil
b. From the PASBA website home page, click the Login button located on the lower, left
side of the screen. (If a Security Alert message box displays, click Yes to proceed.)
The system prompts for your login ID and password.
c. Type your login ID in the User Name field. Press the Tab key. Do not press Enter yet.
d. Type your password in the Password field.
NOTE: The password field is case sensitive.
e. Click the OK button or press Enter. The PASBA restricted website home page
displays.
f. From the PASBA restricted website home page, click the PARRTS button on the leftmost section of the window. A second-level menu page displays with a PARRTS Data
Management button and a PARRTS Reports button.
2. Add a new patient record to the PARRTS.
a. Log on to the PASBA web site and select the button for the PARRTS Data
Management.
b. Select the operation from the Operation pull down list. If a specific operation is not
shown in the Operation pull down list, use Unaffiliated Events.
c. Select the event from the Event pull down list.
d. Select the medical treatment facility (MTF) that identifies your location. The system
displays only those MTFs you are authorized to access.
e. Click Inpatient or Outpatient to specify the type of service given to the patient.
f. Click the New Record button. The Patient Information window displays.
(1) Continue entering the Patient Information by completing the following fields:
Field
Description
SSN:
FMP Level:
Last Name:
First Name:
Sex:
Date of Birth
The Social Security Number of the patient's sponsor. If
unknown, click the Pseudo SSN button to assign a temporary,
pseudo SSN.
The Family Member Prefix (FMP) identifies the relationship of
the patient to the military sponsor.
The patient's last name.
The patient's first name.
The patient's gender.
The patient's date of birth.
3-141
STP 8-91G15-SM-TG
Performance Steps
(2) Click the Administrative tab after entering the data on the Patient Information
screen and complete the following fields:
Field
Description
Pat Cat:
Grade:
VIP
SI/VSI
Enabling Care
VIP Title:
POC Name/Phone:
Hosp Register No:
Adm Date: or Treatment Date:
Adm Diag: or Diag:
Civ Hosp Name:
Unit:
Type Case:
MOS:
Source of Admission:
Injury Date:
Conv. Lv Return Date:
MTF Trf To:
The category to which the patient belongs.
The patient's current military pay grade.
Check this box if the patient is considered a very important
person or special interest person.
Indicate the medical condition of the patient by selecting S for
Seriously Ill or V for Very Seriously Ill from the pull down list.
The SI/VSI field does not display for outpatients.
Indicate whether enabling care is required by clicking the
boxes that define the type of enabling care. For a definition of
enabling care, refer to MEDCOM Regulation 40-7.
If the patient is considered a very important person, type the
patient's title.
The name and phone number of the patient's point of contact
or the person that can provide additional information on the
patient.
The patient's hospital register number. The Hosp Register No
field does not display for outpatients.
The date the patient is admitted or treated at the MTF. Adm
Date displays for inpatients. Treatment Date displays for
outpatients.
The description of the patient's principal diagnosis at the time
of admission. You can type the diagnosis in the field or click
the ICD9 button to select the code from a list.
The name of the civilian hospital to which the patient is
transferred or moved (if applicable). The Civ Hosp Name field
does not display for outpatients.
The name of the patient's Company, Battalion, Brigade,
Division, and Base to which they are assigned.
Select the patient's type case from the pull down list.
Select the patient's primary MOS from the pull down list. If
MOS unavailable select "Unkown".
The source of admission for this patient. The Source of
Admission field does not display for outpatients.
The date on which the patient's injury occurred.
The date the patient is expected to return from Convalescent
Leave.
The medical treatment facility to which the patient is transferred
or moved.
(3) From the Administrative window, click the Comments menu tab to enter
comments for the current patient. The Comments window displays.
(4) Select the date of the comment entry from the Comment Date pull down list
(5) Type the comments in the space below the Comment Date pull down list.
(6) Click the Add button. The comments for the selected patient display in the section
above the Comment Date pull down list.
3-142
STP 8-91G15-SM-TG
Performance Steps
3. Update or modify a patient record in the PARRTS.
a. Log on to the PASBA web site and select the button for the PARRTS Data
Management on the left of your screen.
b. Select the operation for the Operation pull down list.
c. Select the event from the Event pull down list.
d. Select the facility that identifies your location.
e. Click Inpatient or Outpatient to specify the type of service given to the patient.
f. Click the Update Record button. The Update Patient Records window displays.
g. Select the type of patient records you want to update by clicking Inpatient or
Outpatient.
h. Click the blue square under the Edit column for the patient record you want to update.
The Patient Information window displays.
i. Position the cursor in the field you want to change and select or type the new value.
To view and edit the administrative data, click the Administrative menu tab. To view or
add comments, click the Comment menu tab.
j. Click the Record List button to save your changes and return to the Update Patient
Records window.
4. Enter a new event in the PARRTS.
NOTE: If the PARRTS database does not contain a named event for a given operation when
entering a new patient record, you must create the event description. Before creating a new
event description, verify that no other user has created the event description. To prevent
duplicate events in the PARRTS database, you must coordinate the creation of event
descriptions with PASBA.
a. Log on the PASBA web site and select the button for the PARRTS Data Management.
b. To create a new event description, click the New Event button next to the Event pull
down list. The New Event window displays.
c. Complete the following fields:
Field
Description
Operation:
Event:
Select the operation from the pull down list.
Type a description for the event associated with the selected
operation beginning with the facility name (e.g., WRAMC
Range Incident).
Type the geographic location where the event occurred.
The name of the individual that created this event record in the
PARRTS database.
The telephone number of the individual that created this event
record in the PARRTS database.
The date the event occurred.
The date the event ended (if known).
The estimated number of patients associated with this
operation and event. If this value is unknown, leave this field
blank.
A description of the event.
Location:
POC:
Phone:
Event Start Date:
Event End Date:
Estimated Patients:
Nature of Event:
d. Click the Enter button. The system returns to the previous window with the new event
selected in the Event pull down window.
3-143
STP 8-91G15-SM-TG
Performance Steps
5. To generate a multifunctional report in the PARRTS and log off from the PARRTS.
a. Log on the PASBA web site and select the button for the PARRTS Reports.
b. To create a report, select the criteria you want reported from the options on the screen
and click the Run Data Report button. The criteria include:
(1) Operation. Select the operation from the Operation pull down list. Select All to
report on all operations.
(2) Events. An Event pull down displays when you select a specific operation. Select
All to report on all events associated with the selected operation.
(3) Patient Type. Select the patient type from the Patient Type pull down list.
Choose from inpatient, outpatient, or both.
(4) DMIS Code. Select the facility by clicking the DMIS Code Button. The default is
all facilities.
(5) Enabling Care. Select the category of Enabling Care you want reported or
choose All Enabling Care patients to report on all enabling care patients. If you
select Amputee, additional options display that allow you to select the cause of
the amputation.
(6) Inpatient Status. Select the patient category you want reported. Choose from All
Patients, Current Patients Only, or Discharged Patients Only.
(7) Military Service. Select the branch of military service you want reported from the
pull down list.
(8) VIPs. Select this option to report on VIPs.
(9) Deaths. Select this option to report on deaths.
(10) Adm. Date. Select the date range you want reported. The date range is optional.
NOTE: When you click on the Run Data Report button, the report displays on the screen. To
print the report, click the Print button at the bottom of the page. To return to the Report menu,
click the Previous button.
c. To exit from PARRTS:
(1) Click the Logout button on the left side of the screen.
(2) Close your browser by clicking the Close button or by clicking the X in the upper
right corner of the browser.
Performance Measures
GO
NO
GO
1. Logged onto the PARRTS.
a. Opened web browser to www.pasba.amedd.army.mil.
b. Typed login ID and password.
c. Connected with PASBA restricted website home page.
d. Displayed PARRTS second-level menu page.
——
——
2. Added a new patient record to the PARRTS.
a. Selected an operation, event, and MTF in the PARRTS Data
Management Module.
b. Selected type of service for new patient and opened Patient
Information Window.
c. Completed data elements for the patient information screen.
d. Completed data elements for the patient administrative screen.
e. Added two comments to the comments screen.
——
——
3-144
STP 8-91G15-SM-TG
Performance Measures
GO
NO
GO
3. Updated a patient record in the PARRTS.
a. Selected the operation, event, and MTF.
b. Selected the type of service given to the patient.
c. Opened Update Patient Record window and selected the type of
patient to be updated.
d. Selected the Edit button.
e. Selected the Administrative menu tab and completed Disposition Data
and Disposition Type fields.
f. Clicked the Record List button to save changes and returned to the
Update Patients Record Window.
——
——
4. Entered a new event in the PARRTS.
a. Selected PARRTS Data Management.
b. Opened the New Event Window.
c. Completed New Event Window data elements.
d. Added the New Event description to the Event pull down list.
——
——
5. Generated a multifunctional report and exited PARRTS.
a. Selected PARRTS Report from the main menu.
b. Defined the report by selecting query criteria from report options.
c. Selected the Run Data Report button.
d. Selected the Previous button to return to the Report menu.
e. Closed the PARRTS.
——
——
Evaluation Guidance: Score the soldier GO if all steps are passed. Score the soldier NO-GO
if any step is failed. If the soldier fails any step, show what was done wrong and how to do it
correctly.
References
Required
PARRTS USER'S MANUAL
Related
None
3-145
STP 8-91G15-SM-TG
LOAD SOFTWAR E FOR PATIENT ACCOUNTING REPORTS AND REALTIME TRACKING
SYSTEM (PARRTS) MOBILE ON A PERSONAL COMPUTER
081-866-0325
Conditions: You have OnLan PC PARRTS software, PARRTS software, a PARRTS user's
manual, and a computer
Standards: Installed OnLan PC PARRTS software for PARRTS Central and PARRTS Mobile
without error.
Performance Steps
1. Install OnLan PC software for PARRTS Central.
a. Install OnLan/PC software in DOS from floppy diskette.
(1) Go to the c prompt (c:.
(2) Type md OnLan. Press ENTER.
(3) Type cd OnLan. Press ENTER.
(4) Insert the diskette into the drive and type copy a:*.* (or the appropriate letter that
corresponds to the floppy drive).
b. Install OnLan/PC software in DOS from e-mail file.
(1) Create the OnLan directory as described above.
(2) Go to your e-mail program and open the message with the OnLan/PC file.
(3) Highlight the file.
(4) Select Save As from the file menu and choose Selected Items.
(5) Save the file to c:.
c. Install OnLan/PC software in Windows 3.x from floppy diskette.
NOTE: No directions are provided for setup using Windows 95 or 98. Consult your Windows
user's guide for creating directories and icons.
(1) In File Manager, double click on c:
(2) From the File menu, select Create Directory.
(3) Type OnLan.
(4) Place the OnLan/PC diskette in the drive.
(5) Copy all disk files to c:.
(6) Create the Window's icon for OnLan/PC.
(a) In Program Manager, select New from the File menu.
(b) Select Program Group.
(c) Type PARRTS or your name for the group.
(d) Select Program Item.
(e) Type PARRTS Central for the description.
(f) Select from Browse or type c:for the command line.
(g) Type c:for the working directory.
(h) Select Change Icon. Select from Browse or type c:.icl.
(i) Select the red cross icon.
d. Install OnLan/PC software in Windows 3.x from e-mail file.
(1) Create the OnLan directory in File Manager as described above.
(2) Go to your e-mail program and open the message containing the OnLan file.
(3) Highlight the file.
(4) Select Save As from the File menu and choose Selected Items.
(5) Save the file to c:.
(6) Create the Window's icon as described above.
3-146
STP 8-91G15-SM-TG
Performance Steps
e. Configure OnLan/PC.
NOTE: Before placing a call to the PARRTS Central database, OnLan/PC must be configured
to your computer's specifications and the telephone dialing sequence used from your location.
Start OnLan/PC.
(1) In Windows, double click on the PARRTS Central (OnLan) icon.
(2) In DOS-(a) Type cd onlan and press enter.
(b) Type go and press enter.
Configure OnLan/PC.
NOTE: The first screen to appear is the main menu screen. To move through the screens, use
the arrow keys. Press enter to select an item. Press Esc to accept changes and return to the
previous window. Commands are listed on the bottom of the menu screen.
(3) Highlight Configure OnLan/PC and press Enter.
NOTE: The Application Servers window will appear. There are eight telephone lines available
to access PARRTS Central. Each port will have a different telephone number. Most versions
will show only seven ports. One port has been reserved for MEDCOM headquarters.
(4) Highlight the first PARRTS server port and press Enter.
NOTE: 'The Information for: PARRTS Server (Port #1)' window will appear.
(5) Highlight <view/modify> and press Enter.
NOTE: The window changes to configuration information about your modem and ports.
(a) Select the device/port utilized by your computer.
(b) Select the modem type and baud rate.
(c) Change any other setting required by your computer.
(d) Press Esc to return to the information window.
(6) Highlight Phone Number and press Enter.
(a) Type in the correct phone number sequence.
NOTE: Use area codes and special country or line access codes as needed. You can add
commas for pauses between numbers.
(b) Press Enter when complete.
NOTE: The remaining information should have already been configured by PASBA. If a
change is necessary, highlight the field, press Enter, make the changes, and press Enter to
accept. Press Esc to save changes and select Yes. Press Esc to return to the Application
window and select a second server port for configuration or press Esc a second time to quit.
2. Install software for PARRTS Mobile.
NOTE: The Mobile software must be loaded on the user's desktop or laptop computer to view
the PARRTS database. The user must have e-mail to receive daily updates. The software can
be forwarded to the user on floppy diskettes or sent via e-mail. Mobile will only work in
Windows. It requires a mouse.
a. Load Mobile from floppy diskettes.
(1) Make a new directory.
(a) In File Manager, double click on c:
(b) From the File menu, select Create Directory.
(c) Type Bosnia.
b. Load the Database Engine.
NOTE: This is contained on 2 diskettes: dbengd1 and dbengd2.
(1) Select Run from the File menu.
(2) Insert disk 1 into the drive and double click to open that drive.
3-147
STP 8-91G15-SM-TG
Performance Steps
(3) In the file window, double click on setup.exe.
(4) Follow the screen instructions, choosing the default options. Insert disk 2 when
prompted.
c. Configure the Database Engine.
(1) In File Manager, select c:. The database engine creates this directory.
(2) Double click on bdecfg.exe.
(3) Make the following changes:
(a) Select Paradox.
(b) Select Aliases TAB. (Tabs are along bottom of window.)
(c) Select Add New Alias.
(d) Type Bosnia.
(e) Select Add New Path.
(f) Type c:.
(g) Select Date TAB, change the last two fields to true.
(h) Select Time TAB, change twelve hour to false.
(i) Save and exit.
NOTE: Copy the bosnia.exe diskette files to c:. (See 'copy files' in your Windows manual.)
d. Create the Window's icon.
(1) In Program Manager, select New from the File menu.
(2) Select Program Group.
(3) Type PARRTS or your name for the group.
(4) Select Program Item.
(5) Type PARRTS Mobile for description.
(6) Select from Browse or type c:.exe for command line.
(7) Type c:for the working directory.
(8) Select Change Icon. Select from Browse or type c:.icl.
(9) Select the ambulance icon.
e. Load Mobile from e-mail files.
(1) Make a New Directory.
(a) Go to File Manager. Double click on c:
(b) Select Create Directory from the File menu and create a directory called
bosnia.
(c) Double click on c:.
(d) Select Create Directory and create a subdirectory named Eng1.
(e) Repeat steps 2e(1)(c) and 2e(1)(d) and create a subdirectory named Eng2.
f. Return to e-mail and Save Files.
(1) Highlight all files. (Click on the first file, hold the shift key, and click on the last
file.)
(2) Select Save As from the file menu and choose Selected Items.
(3) Save Bosnia.exe and parrts.icl to c:.
(4) Save dbeng1 to c:.
(5) Save dbeng2 to c:.
g. Open zipped files.
(1) In File Manager, open c:.
(2) Double click on bosnia.exe.
NOTE: Bosnia.exe is a zipped program. Double clicking on bosnia.exe will open all files. Daily
updates will be sent in a zipped parrts.exe file. Updated files overwrite the old files. When
opening the parrts.exe file, you will be prompted to overwrite existing files. Answer yes to all.
(3) Repeat the above steps for dbeng1 and dbeng2.
h. Load the Database Engine.
3-148
STP 8-91G15-SM-TG
Performance Steps
(1) In File Manager, open c:.
(2) Double click on the file setup.exe.
(3) Follow screen instructions. When prompted for the second disk, type c:.
i. Configure the Database Engine.
NOTE: Follow the steps described under loading Mobile from floppy diskette.
j. Setup the Program Group and Item.
NOTE: Follow the steps described under loading Mobile from floppy diskette.
Performance Measures
GO
NO
GO
1. Installed OnLan PC software for PARRTS Central.
a. Installed OnLan/PC software.
b. Configured OnLan/PC.
——
——
2. Installed software for PARRTS Mobile.
a. Loaded Mobile.
b. Loaded the database engine.
c. Configured the database engine.
d. Set up a program group and item.
——
——
Evaluation Guidance: Score the soldier GO if all steps are passed. Score the soldier NO-GO
if any step is failed. If the soldier fails any step, show what was done wrong and how to do it
correctly.
References
Required
PARRTS USER'S MANUAL
Related
None
3-149
STP 8-91G15-SM-TG
Subject Area 15: TAMMIS (SL 4)
GENERATE REPORTS USING MEDREG
081-866-0317
Conditions: You have a COTS system installed with Medical Regulating software and the
user's manual.
Standards: Generated reports in MEDREG without error.
Performance Steps
NOTE: MEDREG reports are com pleted through the MEDREG Report Menu by clicking on F1
to select each report, and then completing the required information needed to process the
reports.
1. Print a Consolidated Bed Status Report.
NOTE: This option prints a hard copy of each reporting facility's operating, occupied, and
available beds by medical specialty, as well as bed category totals, percentage of beds
occupied, surgical backlog, and current number of surgical suites.
2. Print a Patient Distribution Report.
NOTE: This report provides a consolidated report of the current and projected patient load by
medical specialty for each reporting MTF.
3. Print a Scheduled Patient Movement List.
NOTE: This report provides the movement schedule for patients with movement instructions.
4. Print a Regulating Status Report.
NOTE: This report provides a hard copy of the most recent facility status of each facility and the
numbers of patients regulated to the facility in each medical specialty since the report.
5. Print an Available Specialty Beds Report.
NOTE: This report allows the medical regulator to print a hard copy of the specialty beds
available at each facility.
6. Print an Evacuation Request Status Report.
NOTE: The report prints a status of all evacuation requests in the evacuation request file.
7. Print a Facility Information Report.
NOTE: This prints a hard copy report of one selected reporting facility's environmental
information such as capabilities, constraints, authorized medical specialties, and supporting
airfields.
8. Print an All Facilities Information Report.
NOTE: This prints the report described in step 7, but for all facilities.
9. Print a Medical Facility Airfield Report.
NOTE: This option allows users to print a report for all facility airfields.
10. Create, modify, and print Users Reports.
NOTE: This option allows users to create, modify, and print ad hoc reports.
3-150
STP 8-91G15-SM-TG
Performance Measures
GO
NO
GO
1. Printed a Consolidated Bed Status Report.
——
——
2. Printed a Patient Distribution Report.
——
——
3. Printed a Scheduled Patient Movement List.
——
——
4. Printed a Regulating Status Report.
——
——
5. Printed an Available Specialty Beds Report.
——
——
6. Printed an Evacuation Request Status Report.
——
——
7. Printed a Facility Information Report.
——
——
8. Printed an All Facilities Information Report.
——
——
9. Printed a Medical Facility Airfield Report.
——
——
——
——
NOTE: All reports were accessed through the reports menu.
10. Created, modified, and printed Users Reports.
Evaluation Guidance: Score the soldier GO if all steps are passed. Score the soldier NO-GO
if any step is failed. If the soldier fails any step, show what was done wrong and how to do it
correctly.
References
Required
AISM 25-HKE-RZR-ECC-UM
Related
None
3-151
STP 8-91G15-SM-TG
APPENDIX A
FIELD EXPEDIENT SQUAD BOOK
A-1
STP 8-91G15-SM-TG
A-2
STP 8-91G15-SM-TG
A-3
STP 8-91G15-SM-TG
A-4
STP 8-91G15-SM-TG
A-5
STP 8-91G15-SM-TG
A-6
STP 8-91G15-SM-TG
GLOSSARY
Section I
Abbreviations
AAD
admissions and dispositions
ABSK
absent sick
ACCP
The Army Correspondence Course Program
AD
active duty
AMEDD
Army Medical Department
AOD
Administrative Officer of the Day
APU
ambulatory procedure unit
APV
ambulatory procedure visit
ARNG
Army National Guard
ARTEP
Army Training and Evaluation Program
AWOL
absent without leave
BO
bed occupied
CAC
casualty area command/casualty area commander
CHCS
Composite Health Care System
CONUS
continental United States
COTS
commercial off-the-shelf
CPU
central processing unit
CRO
carded for record only
DEERS
Defense Enrollment Eligibility Reporting System
DOB
date of birth
DODAAC
Department of Defense Activity Address Code
DSN
Defense Switchboard Network
EAR
extended ambulatory record
Glossary-1
STP 8-91G15-SM-TG
EOC
emergency operations center
ER
emergency room
ETS
expiration time of service
FMP
family member prefix
GPMRC
Global Patient Movement Requirements Center
HREC
health record
IAW
in accordance with
ID
identification; infantry division
IPDS
Individual Patient Data System
ITR
inpatient treatment record
ITRCS
inpatient treatment record cover sheet
IV
intravenous
MASCAL
mass casualties
MEB
medical evaluation board
MEDCOM
medical command
MEDPAR
medical patient accounting and reporting (e.g., TAMMIS system)
MEDREG
medical regulating (e.g., TAMMIS system)
METL
mission essential task list
MILPO
military personnel office
MOPP
mission-oriented protective posture
MOS
military occupational specialty
MOSC
military occupational specialty code
MRO
materiel release order/medical regulation office(r) (depends on
use)
MSA
medical service account/moral support activities (depends on
use)
Glossary-2
STP 8-91G15-SM-TG
MSAO
medical services accounts officer
MTF
medical treatment facility
NATO
North Atlantic Treaty Organization
NCO
noncommissioned officer
NOK
next of kin
OCONUS
outside continental United States
OTR
outpatient treatment record
PAD
patient administration division
PADD
person authorized to direct disposition
PARRTS
Patient Accounting Reports and Real Time Tracking System
PASBA
Patient Administration Systems and Biostatistics Activity
PCS
permanent change of station
PDRL
permanent disability retired list
PEB
physical evaluation board
PHS
Public Health Service
PMR
patient movement record
PMRC
Patient Movement Requirements Center
PNOK
primary next of kin
PTF
patient trust fund
RC
Reserve Component
RJA
recovery judge advocate
SI
seriously ill
SL
squad leader; skill level
SM
soldier's manuals
SOP
standing operating procedures
SPECAT
special category patient
Glossary-3
STP 8-91G15-SM-TG
SSN
social security number
TAMMIS
Theater Army Medical Management Information System
TDRL
temporary disability retired list
TDY
temporary duty
TG
trainer's guide
TMC
troop medical clinic
TPOCS
Third Party Outpatient Collection System
TRAC 2ES
TRANSCOM Regulating and Command & Control Evacuation
System
UPS
uninterrupted power source
USAR
U.S. Army Reserve
VA
Department of Veterans Affairs
VSI
very seriously ill
Glossary-4
STP 8-91G15-SM-TG
REFERENCES
Required Publications
New reference material is being published all the time. Present references, as listed below may
become obsolete. To keep up-to-date, see DA Pam 25-30. Many of these publications and
forms are available in electronic format from the sites listed below:
U.S. Army Publishing Agency
Administrative Departmental Publications and Forms
(ARs, Cirs, Pams, OFs, SFs, DD & DA Forms)
General Dennis J. Reimer Training and Doctrine Digital Library (RDL)
Army Doctrinal and Training Publications
(FMs, PBs, TCs, STPs)
Required Publications
Required publications are sources that are listed in task conditions statements and are required
for the soldier to perform the task.
Army Regulations
AR 40-400
AR 40-535
AR 40-66
AR 600-8-1
Department of Army Forms
DA FORM 2173
DA FORM 2631
DA FORM 2984
DA FORM 2985
DA FORM 3153
DA FORM 3349
DA FORM 3444-Series
DA FORM 3647
DA FORM 3647-1
DA FORM 3696
DA FORM 3894
DA FORM 3910
DA FORM 3981
DA FORM 4029
DA FORM 4160
DA FORM 5006-R
Patient Administration 12 March 2001
Worldwide Aeromedical Evacuation 1 December 1975
Medical Record Administration and Health Care
Documentation 3 May 1999
Army Casualty Operations/Assistance/Insurance
20 October 1994
Statement of Medical Examination and Duty Status
Medical Care - Third Party Liability Notification
Very Seriously Ill/Seriously Ill/Special Category Patient Report
Admission and Coding Information
Medical Services Account Patient Ledger Card
Physical Profile
Terminal Digit File for Treatment Record
Inpatient Treatment Record Cover Sheet
Inpatient Treatment Record Cover Sheet
Patient's Deposit Record
Hospital Report of Death
Death Tag
Transfer of Patient
Patient's Clearance Record
Patient's Personal Effects and Clothing Record
Medical Record - Authorization for Disclosure of Information
References-1
STP 8-91G15-SM-TG
DA FORM 8005
Outpatient Medical Record (OMR ) Orange
Department of Defense Publications
DOD 4515.13-R
Department of Defense Air Transportation Eligibility Regulation
1 November 1994
Other Product Types
AISM 25-HKD-RZW-ECC-UM
AISM 25-HKE-RZR-ECC-UM
CPT-4
DD FORM 2005
DD FORM 2064
DD FORM 600
DD FORM 601
DD FORM 602
DD FORM 877
ICD-9-CM
OF 23
PARRTS USER'S MANUAL
SF 502
TC-4.5-0528
Automated Information Systems Manual, MEDPAR CC HKD
04-05, Tools HK2 04.02.F, User Manual 26 August 1996
Automated Information Systems Manual; MEDREG HKE 0402.A; User Manual 26 August 1996
Physicians' Current Procedural Terminology, Fourth Edition
1 February 1997
Privacy Act Statement - Health Care Records
Certificate of Death (Overseas)
Patient's Baggage Tag
Patient Evacuation Manifest
Patient Evacuation Tag
Request for Medical/Dental Records or Information
International Classification of Diseases, 9th Revision, Clinical
Modification 1 September 1980
Charge-Out Record
Patient Accounting & Reporting RealTime Tracking System
(PARRTS) 30 September 1996
Medical Record - Narrative Summary (Clinical Resume)
CHCS PAD Third Party Collections Student Guide
29 July 1996
Related Publications
Related publications are sources of additional information. They are not required in order to
perform the tasks in this manual.
Army Regulations
AR 25-55
AR 310-50
AR 340-21
AR 40-16
AR 40-2
AR 40-3
AR 40-350
References-2
The Department of the Army Freedom of Information Act
Program 14 April 1997
Authorized Abbreviations and Brevity Codes
15 November 1985
The Army Privacy Program 5 July 1985
Special Notification - Injury Cases 28 August 1974
Army Medical Treatment Facilities: General Administration
3 March 1978
Medical, Dental, and Veterinary Care 30 July 1999
Patient Regulating to and Within the Continental United States
30 March 1990
STP 8-91G15-SM-TG
AR 40-4
AR 40-40
AR 40-501
AR 40-538
AR 500-60
AR 635-40
Department of Army Forms
DA FORM 199
DA FORM 2028
DA FORM 3154
DA FORM 3705
DA FORM 3947
DA FORM 4254-R
DA FORM 5164-R
DA FORM 5165-R
DA FORM 5571
Army Medical Department Facilities/Activities 1 January 1980
Documentation Accompanying Patients Aboard Military
Common Carriers 15 May 1972
Standards of Medical Fitness 30 August 1995
Property Management During Patient Evacuation 1 June 1980
Disaster Relief 1 August 1981
Physical Evaluation for Retention, Retirement, or Separation
15 August 1990
Physical Evaluation Board (PEB) Proceedings
Recommended Changes to Publications and Blank Forms
MSA Invoice and Receipt
Receipt for Outpatient Treatment/Dental Records
Medical Evaluation Board Proceedings
Request for Private Medical Information
Hands-On Evaluation
Field Expedient Squad Book
Master Problem List
Department of Army Pamphlets
DA PAM 350-59
Army Correspondence Course Program Catalog
26 October 2001
Field Manuals
FM 25-100
FM 25-101
FM 8-10-6
Other Product Types
AF FORM 3838
AF FORM 3899
AFI 41-301
AFI 41-302
DD FORM 1173
DD FORM 2138
DD FORM 2239
DD FORM 2770
DD FORM 2A
DD FORM 7
DODI 6000.11
Training the Force 15 November 1988
Battle Focused Training 30 September 1990
Medical Evacuation in a Theater of Operations: Tactics,
Techniques, and Procedures 14 April 2000
Do Not Resuscitate (DNR) Certification for Aeromedical
Evacuation
Aeromedical Evacuation Patient Record
Worldwide Aeromedical Evacuation System 1 August 1996
Aeromedical Evacuation Operations and Management
28 July 1994
Uniformed Services Identification and Privilege Card
Request for Transfer of Outpatient Records
Medical Care and Transportation in the Aeromedical
Evacuation System, Consent for 1 June 1980
Medical Record - Abbreviated Medical Record 1 April 1998
U.S. Armed Forces Identification Card
Report of Treatment Furnished Pay Patients, Hospitalization
Furnished (Part A) 1 January 1976
Patient Movement 9 September 1998
References-3
STP 8-91G15-SM-TG
IPDS HANDBOOK
PHS FORM 1866-1
PHS FORM 1866-2
SF 1049
SF 523
SF 523A
SF 558
SF 600
SF 601
TC-4.5-0310
TC-4.5-0526
USTRANSCOM PAM 41-3
Individual Patient Data System (IPDS) Handbook
Commissioned Officers Identification Card-Active Duty (Public
Health Service)
Commissioned Officers Identification Card-Inactive Reserve
(Public Health Service)
Public Voucher for Refunds
Clinical Record - Authorization for Autopsy
Medical Record - Disposition of Body
Medical Record - Emergency Care and Treatment
Health Record - Chronological Record of Medical Care
1 June 1997
Health Record - Immunization Record
SAIC/CHCS PAD Registration Functions Student Guide
29 July 1996
CHCS PAD Clinical Records Student Guide 29 July 1996
Quick Reference Guide for Reporting Patients and Attendants
for Movement 1 October 2000
Soldier Training Publications
STP 21-1-SMCT
Soldier's Manual of Common Tasks, Skill Level 1
1 October 2001
STP 21-24-SMCT
Soldier's Manual Of Common Tasks (SMCT), Skill Levels 2-4
1 October 2001
References-4
STP 8-91G15-SM-TG
26 JULY 2002
By Order of the Secretary of the Army:
ERIC K. SHINSEKI
General, United States Army
Chief of Staff
Official:
JOEL B. HUDSON
Administrative Assistant to the
Secretary of the Army
0219725
DISTRIBUTION:
Active Army, Army National Guard, and US Army Reserve: Not to be distributed.
Electronic Means Only.