1
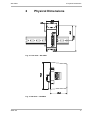
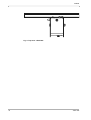
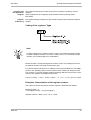
JetWeb
JX2-PRN1
Operator’s Manual
Article # 608 633 24
April 2002 / Printed in Germany
JetWeb
Edition 1.1
Jetter AG reserves the right to make alterations to its products in the interest of
technical progress. These alterations need not be documented in every single case.
This manual and the information contained herein have been compiled with due
diligence. However, Jetter AG assumes no liability for printing or other errors or
damages arising from such errors.
The brand names and product names used in this manual are trade marks or
registered trade marks of the respective title owner.
2
Jetter AG
JX2-PRN1
How to Contact us:
Jetter AG
Gräterstraße 2
D-71642 Ludwigsburg
Germany
Telephone - Switchboard:
Telephone - Sales:
Phone - Technical Hotline:
++49 7141/2550-0
++49 7141/2550-530
++49 7141/2550-444
Telefax:
E-Mail - Sales:
E-Mail - Technical Hotline:
Internet Address:
++49 7141/2550-425
[email protected]
[email protected]
http://www.jetter.de
This Manual is an Integral Part of the
JetWeb Module JX2-PRN1:
Model:
Serial Number:
Year of Manufacture:
Order Number:
To be entered by the customer:
Inventory Number:
Place of Operation:
© Copyright 2002 by Jetter AG. All rights reserved.
Jetter AG
3
JetWeb
Significance of this Operator’s Manual
This manual is an integral part of the JX2-PRN1 module, and
•
•
must be kept in a way that it is always at hand until the JX2-PRN1 module will be
disposed of;
if the JX2-PRN1 module is sold, alienated or loaned, this manual must be handed
over.
In any case you encounter difficulties to clearly understand the manual, please
contact the manufacturer.
We would appreciate any kind of suggestion and contributions on your part and
would ask you to inform or write us. This will help us to produce manuals that are
more user-friendly and to address your wishes and requirements.
From this JX2-PRN1 module may result unavoidable residual risks to persons and
property. For this reason, any person who has to deal with the operation, transport,
installation, maintenance and repair of the JX2-PRN1 module must have been
familiarised with it and must be aware of these dangers.
Therefore, this person must carefully read, understand and observe this manual, and
especially the safety instructions.
Missing or inadequate knowledge of the manual results in the loss of any claim of
liability on part of Jetter AG. Therefore, the operating company is recommended to
have the instruction of the persons concerned confirmed in writing.
4
Jetter AG
JX2-PRN1
Table of Contents
Table of Contents
Jetter AG
1
Safety Instructions
7
1.1
Ensure Your Own Safety
9
1.2
Instructions on EMI
10
2
Physical Dimensions
11
3
Operating Parameters
13
4
Technical Data
17
5
Serial Interface Module JX2-PRN1
19
5.1
Description of Connections
19
5.1.1
5.1.2
Register Description
Sample Program
22
24
5
Table of Contents
6
JetWeb
Jetter AG
JX2-PRN1
1 Safety Instructions
Table
Contents
of
1
Safety Instructions
The NThe JX2-PRN1 module is in line with the current state of the art. The JX2-PRN1
module complies with the safety regulations and standards in effect. Special
PID 1
emphasis was given to the safety of the users.
module is
Of course, the following regulations apply to the user:
in line
• relevant accident prevention regulations;
with the
• accepted safety rules;
• EC guidelines and other country-specific regulations.
current
state of
Usage as Agreed Upon
the art.
Usage as agreed upon includes operation in accordance with the operating
instructions.
This NThe JX2-PRN1 module is used to control machinery, such as conveyors, production
machines, and handling machines.
PID 1
The supply voltage of the JX2-PRN1 module is DC 24 V . This operating voltage is
module
classified as SELV (Safety Extra Low Voltage). The JX2-PRN1 module is therefore
subject to the EU Low Voltage Directive.
complies not
The JX2-PRN1 module may only be operated within the limits of the stated data.
with the
Usage Other Than Agreed Upon
safety
JX2-PRN1 module must not be used in technical systems which to a high degree
regulatio The
have to be fail-save, e.g. ropeways and aeroplanes.l
ns and
If the JX2-PRN1 module is to be run under surrounding conditions, which differ from
standard the conditions mentioned in chapter 3 "Operating Parameters" on page 13, the
manufacturer is to be contacted beforehand.
s in
Who is Permitted to Operate the JX2-PRN1 Module?
effect.
Special
Only instructed, trained and authorised persons are permitted to operate the JX2module.
emphasis PRN1
Mounting and backfitting may only be carried out by specially trained personnel, as
was given specific know-how will be required.
to the
Maintaining the JX2-PRN1 Module
safety of The JX2-PRN1 module is maintenance-free. Therefore, for the operation of the
the users. module no inspection or maintenance are required.
Decommissioning and Disposal of the JX2-PRN1
Module
Decommissioning and disposal of the JX2-PRN1 module are subject to the
environmental legislation of the respective country in effect for the operator's
premises.
Jetter AG
7
1 Safety Instructions
JetWeb
Descriptions of Symbols
This sign is to indicate a possible impending danger of serious physical damage
or death.
Danger
This sign is to indicate a possible impending danger of light physical damage.
This sign is also to warn you of material damage.
Caution
This sign is to indicate a possible impending situation which might bring damage
to the product or to its surroundings.
Important!
You will be informed of various possible applications and will receive further
useful suggestions.
Note!
· / -
Enumerations are marked by full stops, strokes or scores.
Operating instructions are marked by this arrow.
Automatically running processes or results to be achieved are marked by this
arrow.
Illustration of PC and user interface keys.
8
Jetter AG
JX2-PRN1
1 Safety Instructions
1.1
Ensure Your Own Safety
Disconnect the JX2-PRN1 module from the mains to carry out
maintenance work. By doing so, you will prevent accidents resulting from
electric voltage and moving parts.
Safety and protective devices, e.g. the barrier and cover of the terminal
box must never be shunted or by-passed.
Dismantled protective equipment must be reattached prior to
commissioning and checked for proper functioning.
Modifications and Alterations to the Module
For safety reasons, no modifications and changes to the JX2-PRN1 module and its
functions are permitted. Any modifications to the module not expressly authorised by
the manufacturer will result in a loss of any liability claims to Jetter AG.
The original parts are specially designed for the JX2-PRN1 module. Parts and
equipment of other manufacturers are not tested on our part, and are, therefore, not
released by us. The installation of such parts may impair the safety and the proper
functioning of the JX2-PRN1 module.
For any damages resulting from the use of non original parts and equipment any
claims with respect to liability of Jetter AG are excluded.
Malfunctions
Malfunctions or other damages are to be reported to an authorised person
immediately.
Safeguard the JX2-PRN1 module against misuse or accidental use.
Only qualified experts are allowed to carry out repairs.
Information Signs and Labels
Writings, information signs, and labels always have to be observed and
kept readable.
Damaged or unreadable information signs and labels are to be
exchanged.
Jetter AG
9
1 Safety Instructions
JetWeb
1.2
Instructions on EMI
The noise immunity of a system corresponds to the weakest component of the
system. For this reason, correct wiring and shielding of the cables is important.
Important!
Measures for increasing immunity to interference:
On principle, physical separation should be maintained between signal
and voltage lines.
Shield both sides of the cable.
The entire shield must be drawn behind the isolation, and then be clamped
under an earthed strain relief with the greatest possible surface area.
When male connectors are used:
Only use metallised connectors, e.g. SUB-D with metallised housing.
Please take care of direct connection of the strain relief with the housing
here as well (refer to Fig. 1).
Fig. 1: Shielding of SUB-D connectors in conformity with the EMC standards.
10
Jetter AG
JX2-PRN1
2 Physical Dimensions
2
Physical Dimensions
Fig. 2: Front View - JX2-PRN1
Fig. 3: Side View - JX2-PRN1
Jetter AG
11
JetWeb
Fig. 4: Top View - JX2-PRN1
12
Jetter AG
JX2-PRN1
3 Operating Parameters
3
Operating Parameters
Environmental Operating Parameters
Parameter
Value
Reference
Operating
Temperature Range
0 °C through 50 °C
Storage Temperature
Range
-25 °C through +70 °C
DIN EN 61131-2
DIN EN 60068-2-1
DIN EN 60068-2-2
Air Humidity /
Humidity Rating
5 % to 95 %
No condensing
DIN EN 61131-2
Pollution Degree
2
DIN EN 61131-2
Corrosion Immunity/
Chemical Resistance
No special protection against
corrosion. Ambient air must be
free from higher concentrations
of acids, alcaline solutions, corrosive agents, salts, metal vapours, or other corrosive or electroconductive contaminants.
Operating Altitude
Up to 2000 m above sea level
DIN EN 61131-2
Mechanical Operating Parameters
Jetter AG
Parameter
Value
Reference
Free Falls
Withstanding Test
Height of fall (units within
packing): 1 m
DIN EN 61131-2
DIN EN 60068-2-32
Vibration Resistance
10 Hz - 57 Hz: with an amplitude of 0.0375 mm for continuous operation (peak amplitude
of 0.075 mm)
57 Hz -150 Hz: 0.5 g constant
acceleration for continuous
operation (1 g constant acceleration as peak value),
1 octave per minute,
10 frequency sweeps (sinusoidal), all spatial axes
DIN EN 61131-2
IEC 68-2-6
Shock Resistance
15 g occasionally, 11 ms,
sinusoidal half-wave, 2 shocks
in all three spatial axes
DIN EN 61131-2
IEC 68-2-27
Degree of Protection
IP20, rear: IP10
DIN EN 60529
Mounting Position
Any position, snapped on DIN
Rail
13
JetWeb
Operating Parameters - Electrical Safety
Parameter
Value
Reference
Class of Protection
III
DIN EN 61131-2
Dielectric Test
Voltage
Functional ground is connected
to chassis ground internally.
DIN EN 61131-2
Overvoltage
Category
II
DIN EN 61131-2
Operating Parameters (EMC) - Emitted Interference
Parameter
Value
Reference
Enclosure
Frequency 30 -230 MHz,
limit 30 dB (µV/m) at 10 m
distance
frequency band 230-1000
MHz, limit 37 dB (µV/m)
at 10 m distance
(class B)
DIN EN 50081-1
DIN EN 55011
DIN EN 50081-2
Operating Parameters (EMC) - Immunity to
Interference of Housing
14
Parameter
Value
Reference
Magnetic Field with
Mains Frequency
50 Hz, 60 Hz
30 A/m
DIN EN 61000-6-2
DIN EN 61000-4-8
RF Field, amplitudemodulated
Frequency band 27 - 1000
MHz
Test field strength 10 V/m
AM 80 % with 1 kHz
Criterion A
DIN EN 61131-2
DIN EN 61000-6-2
DIN EN 61000-4-3
ESD
Discharge through air:
Test peak voltage 15 kV
(Humidity Rating RH-2 / ESD-4)
Contact Discharge:
Test peak voltage 4 kV
(severity level 2)
Criterion A
DIN EN 61000-6-2
DIN EN 61131-2
DIN EN 61000-4-2
Jetter AG
JX2-PRN1
3 Operating Parameters
Operating Parameters (EMC) - Immunity to
Interference of Signal Ports
Parameter
Value
Reference
Asymmetric RF,
amplitude-modulated
Frequency band 0.15 -80 MHz
Test voltage 10 V
AM 80 % with 1 kHz
Source impedance 150 Ohm
Criterion A
DIN EN 61000-6-2
DIN EN 61000-4-6
Burst
Test voltage 1 kV
tr/tn 5/50 ns
Repetition rate 5 kHz
Criterion A
DIN EN 61131-2
DIN EN 61000-6-2
DIN EN 61000-4-4
Operating Parameters (EMC) - Immunity to
Interference of DC Power Supply In- and Outputs
Jetter AG
Parameter
Value
Reference
Asymmetric RF,
amplitude-modulated
Frequency band 0.15 -80 MHz
Test voltage 10 V
AM 80 % with 1 kHz
Source impedance 150 Ohm
Criterion A
DIN EN 61000-6-2
DIN EN 61000-4-6
Burst
Test voltage 2 kV
tr/tn 5/50 ns
Repetition rate 5 kHz
Criterion A
DIN EN 61131-2
DIN EN 61000-6-2
DIN EN 61000-4-4
15
JetWeb
16
Jetter AG
JX2-PRN1
4 Technical Data
4
Technical Data
Technical Data - JX2-PRN1
Power Supply
Jetter AG
•
centralised arrangement: via basic unit;
•
decentralised arrangement: via power supply
module JX2-PS1
Connections to the basic unit
via JETTER system bus
Male connector SUB-D, 9 pins
Parallel interface port
Male connector SUB-D, 25 pins
Enclosure
Aluminium, powder coated, black
Dimensions (H x W x D in mm)
114 x 45 x 69
Weight
192 g
Mounting
DIN Rail
Centronics Interface
25-pin socket
Electrical Isolation
None
Heat loss of CPU logic circuit
0.35 Watt
Rated current consumption
approx. 35 mA
17
JetWeb
18
Jetter AG
JX2-PRN1
5 Serial Interface Module JX2-PRN1
5
Serial Interface Module JX2-PRN1
The JX2-PRN 1 module allows data and control information to be output to a printer
and status information to be read out of the printer.
Output of data is carried out via a CENTRONICS interface.
5.1
Description of Connections
Pin Assignment - 25 pin male SUB-D connector
PIN
Jetter AG
Signal
Meaning
Signal Direction
1
STROBE
Signal to start data transfer
to the printer
2
DATA 1
Data bit 1
to the printer
3
DATA 2
Data bit 2
to the printer
4
DATA 3
Data bit 3
to the printer
5
DATA 4
Data bit 4
to the printer
6
DATA 5
Data bit 5
to the printer
7
DATA 6
Data bit 6
to the printer
8
DATA 7
Data bit 7
to the printer
9
DATA 8
Data bit 8
to the printer
10
ACKNLG
Acknowledgement signal
from the printer
11
BUSY
Printer is busy
from the printer
12
PAPER END
Paper tray is empty
from the printer
13
SELECT
Printer is on-/off-line
from the printer
14
AUTO FEED
Line feed
to the printer
15
ERROR
Fault message
from the printer
16
INIT
Initialisation
to the printer
17
SELECT IN
Switch printer on-line
to the printer
18
GND
Parallel ground line
19
GND
Parallel ground line
20
GND
Parallel ground line
21
GND
Parallel ground line
22
GND
Parallel ground line
23
GND
Parallel ground line
24
GND
Parallel ground line
25
GND
Parallel ground line
19
5.1 Description of Connections
JetWeb
Important!
•
•
20
In case you buy a printer cable or fabricate your own cable, the following
minimum requirements, also with a view to EMC, must be met:
1. Number of cores:
25
2. Core cross-sectional area:
0.25 mm²
3. Connector (male):
SUB-D, metallised
4. Maximum cable length:
2m
5. Shield:
complete shielding, no paired shielding
The shield must be connected to the metallised connector housings on both
ends of the cable with the greatest possible surface area. The braided shield
has to be made of tin-coated copper wires with a minimum degree of coverage
of 85 %.
Jetter AG
JX2-PRN1
Interface with
the Application
Program
Register
Addressing
5 Serial Interface Module JX2-PRN1
The interface between the module and the user's program is made up of three
registers.
These registers are for configuring of the modules and for querying status
information.
The register address is made up of the module number and the respective register
number.
Coding of the registers: 3yyz
Note!
For determination of the module number, only the non-intelligent modules will be
counted. Intelligent modules, such as SV1, SM1D, PID1, etc., located among the
modules, are not being taken into consideration.
Module number 1 is always assigned to the basic control unit. Starting from there,
the module numbers are being counted left to right.
For communication with the CPU, 3 registers have been provided by the JX2-PRN1
module. The operating system version number of the module can always be read
from register 9. The other module registers are being defined by the function of the
module. The registers are addressed as follows:
Register number = 3000 + (module number - 2) * 10 + local register number
Examples: Determination of the register numbers
The number of the first expansion module’s register is determined as follows:
Module number = 2
Local register number = 3 (control register)
Register number = 3000 + (2-2) * 10 +3 = 3003
Jetter AG
21
5.1 Description of Connections
5.1.1
JetWeb
Register Description
Note!
With the JX2-PRN1 module, register 3yy0 has got no function.
Register 3yy1: Data Register
Function
Read
Description
Last sent character
Value following reset: 0
Write
Sending the character to the printer *)
Value Range
0 .. 255
*)
Once a character is entered into this register, this character is sent to the printer.
Prior to sending this character, a STROBE pulse with a pulse length of 5 µs is
generated and sent.
Register 3yy2: Status register
Function
Read
Description
present interface state
Bit 0: 1 = No function
Bit 1: 1 = No function
Bit 2: 1 = No function
Bit 3: 0 = Error message
Bit 4: 1 = Printer is online
Bit 5: 1 = Paper tray is empty
Bit 6: 0 = Acknowledge
Bit 7: 0 = Printer is busy
Value following reset: Depending on printer status
Write
Illegal
Value Range
0 .. 255
The status register is bit-coded, i.e. each bit indicates a specific state.
The status register is cleared when reading.
Note!
In case the printer is ready, register 3yy2 contains the value 223 (0xDF)
22
Jetter AG
JX2-PRN1
5 Serial Interface Module JX2-PRN1
Register 3yy3: Control Register
Function
Read
Description
Status of the control lines
Value following reset: 0
Write
Setting the status of the control line
Bit 0: 1 = Signal for starting data transmission is
activated
Bit 1: 1 = Line feed
Bit 2: 0 = Printer reset
Bit 3: 0 = Select printer
Bit 4: 0 = No function
Bit 5: 0 = No function
Bit 6: 0 = No function
Bit 7: 0 = No function
Value Range
0 .. 15
Note!
Following reset, the value 4 should be written into register 3yy3 to select the
printer and to terminate the reset state.
Register 3yy9: Version Number of the Operating
System
Function
Read
Description
Version number of the operating system
e.g. 101 = V 1.01
Value following reset: Version number of the
operating system
Jetter AG
Write
Illegal
Value Range
0 .. 8388607
23
5.1 Description of Connections
JetWeb
5.1.2
Sample Program
The usage of the N-PRN 1 module will be illustrated by the following exemplary
program.
Program Listing
0:
;*******************************************************
1:
;* Output of the characters A through Z
*
2:
;* on the printer by the program
*
3:
; ******************************************************
4:
; ++++++++++++++++++++++++++++++++++++++++++++++++++++++
5:
; +
The function Print sends
+
6:
; +
a character to the printer
+
7:
; ++++++++++++++++++++++++++++++++++++++++++++++++++++++
8:
; DEF_FUNCTION [Print, PR]
Par: rChar
9:
WHEN
10:
11:
BIT_SET [REG=rStatus, Bit=zbBusy]
REGISTER_LOAD [rData with R(rChar)]
;Output of character
THEN
14:
15:
;Busy?
THEN
12:
13:
;Wait until the
printer is ready
RETURN
END_DEF
16:
;
17:
TASK tPrinter -----------------------------------------------
18:
;Terminate reset and
select printer
19:
REGISTER_LOAD [rControl with 4]
20:
;
21:
REGISTER_LOAD [rChar with zFirstChar]
22:
23:
;First character
MARKE sPrnLoop
IF
24:
REG rChar
25:
<
26:
zLastChar
27:
;Reset=1, Select=0
;Check character
;Last character?
THEN
28:
Print [rChar=R(rChar)]
29:
REGINC rChar
;Next character
30:
GOTO sPrnLoop
;Repeat
31:
32:
33:
34:
35:
36:
ELSE
;Output of character
;Received character
Print [rChar=10]
;Line feed
Print [rChar=13]
;Carriag return
THEN
;End of program
LABEL sPrnLoop1
GOTO sPrnLoop1
End of program
24
Jetter AG
JX2-PRN1
5 Serial Interface Module JX2-PRN1
Symbollisting
;**********
tPrinter
Task
******************
0
;**********
Labels
sPrnLoop
!
sPrnLoop1
!
;**********
****************
Registers
**************
;The following register values are for a module located
;on the first module position after the NANO-B controller!
rData
3001
;Data register
rStatus
3002
;Status register
rControl
3003
;Control register
rChar
100
;Character
;**********
Jetter AG
Numbers
****************
zbBusy
7
;Busy bit (0=Busy)
zbError
3
;Error bit in the status register
(0=Error)
zFirstChar
65
;First character (A)
zLastChar
90
;Last character (Z)
25