1
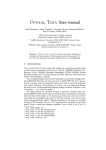
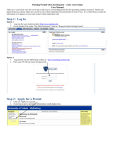
USER’S MANUAL
1. Login using your ESSA account on http://webs2.amaes.edu.ph/rfpsys/login.asp or
login on myhronline and click this link Portal:eRFP on Work Links(lower right corner).
2. Choose responsibility.
• REQUESTOR – Allow users to create and manage RFP for assigned
department.
• PROCESSOR – Allow users to monitor the status and detail of RFP.
3. You can access E-RFP’s functionalities on the main page.
• CREATE RFP – click create button on the upper left corner
of your screen. See instruction number 4.
• SEARCH RFP – provide search key such as rfp no., payee, payment for, and
rfp status then click search button.
•
HELP – displays user’s manual.
•
VIEW RFP – click notepad icon on the left side of the rfp to view its
details. See instruction number 5.
•
ATTACHMENT – click paperclip icon on the left side of the rfp to attach
supporting documents related to it. See instruction number 6.
•
CANCEL RFP – click cross icon on the left side of the rfp to cancel.
•
SUBMIT RFP – click check icon to submit rfp. Note: If not yet submitted
this will not be available for viewing on the processor side.
•
•
•
PRINT RFP – click printer icon on the left side of the rfp to print its
details. Note: You don’t have access on this if you have not yet
submitted your RFP.
CHANGE ACCESS – click change button on the upper right corner of the
screen.
LOGOUT – click logout button on the upper right corner of the screen.
4. Create RFP.
a) RFP no. will be assigned after you created the rfp.
b) Select PAYEE from the drop down list or select Others then encode specific
payee on the textbox provided.
c) Select PAYMENT TYPE from the drop down list or select Others then
encode specific payment type on the textbox provided.
d) Select ACCOUNT from the drop down list or select Others then encode
specific account on the textbox provided or select n/a if not applicable.
e) Encode DUE DATE.
f) Select CURRENCY and encode AMOUNT.
g) Encode APPLICABLE PERIOD.
h) Encode PAYMENT INSTRUCTIONS.
i) Encode PARTICULARS.
j) Click Create button to create RFP or click Abort button to cancel.
5. View RFP.
•
View details of selected RFP.
6. View/Attach supporting documents.
7. Print RFP for submission.