1
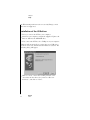
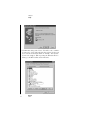
User Manual MT 4 Unitor 8 Control Version 1.2 Manual Rev. C Windows 98 and MacOS –english– 4 E Soft- und Hardware GmbH All trademarks are property of their individual owners. “Unitor” and “SoundDiver” are registered trademarks of Emagic Soft- und Hardware GmbH. Credits The contributors to the Unitor8/AMT8/MT4 product line are: Concept, AMT, Project Manager Dr. Gerhard Lengeling Hardware, Firmware EES Technik für Musik Unitor 8 Control, SoundDiver MT 4 Module Michael Haydn Windows Drivers Andreas Tofahrn USB Driver Markus Fritze OMS Driver Michael Haydn User Manual Clemens Haas, Michael Haydn, Ronald Bias, Jeff Bohnhoff EG-Konformitätserklärung DECLARATION OF CONFORMITY Wir bestätigen, daß das Produkt / We confirm that the product Emagic MT4 den Schutzanforderungen entspricht, die in der EG - Richtlinie 89/336/EWG zur Angleichung der Rechtsvorschriften der Mitgliedstaaten über die Elektromagnetische Verträglichkeit festgelegt sind. / is in conformity with the E.C. directive 89/336/E.E.C. relating to the Electromagnetic Compatibility. Diese Erklärung gilt für alle Exemplare, die nach den anliegenden technischen Unterlagen - die Bestandteil dieser Erklärung sind - hergestellt werden. / This declaration is valid for all products which are produced in accordance with the technical documentation which is a part of this declaration. Zur Beurteilung des Erzeugnisses hinsichtlich der Elektromagnetischen Verträglichkeit wurden die folgenden harmonisierten Vorschriften angewendet: / For verification of conformity with regard to Electromagnetic Compatibility the following harmonized standards are applied: ♦ EN 50081 - 1 / 03.93 Fachgrundnorm Störaussendung (Wohnbereich) Generic emission standard, residential environment ♦ EN 50082 - 1 / 03.93 Fachgrundnorm Störfestigkeit (Wohnbereich) Generic immunity standard, residential environment Diese Erklärung wird verantwortlich für den Hersteller: This declaration is given under the sole responsibility of: EES Technik für Musik Dipl. Ing. Thomas Wieschiolek Kolberger Straße 2 D - 23879 Mölln abgegeben durch: / from: Herrn Thomas Wieschiolek Technical Manager D -23879 Mölln 10. 5. 2000 . . Dipl. Ing. Thomas Wieschiolek (For the USA:) FCC Statement This equipment has been tested and found to comply with the limits for a Class B digital device, persuant to Part 15 of the FCC Rules. These limits are designed to provide reasonable protection against harmful interference in a residental installation. This equipment generates, uses and can radiate radio frequency energy and if not installed and used in accordance with the instructions, may cause harmful interference to radio communications. However, there is no guarantee that interference will not occur in a particular installation. If this equipment does cause harmful interference to radio or television reception, which can be determined by turning the equipment off and on, the user is encouraged to try to correct the interference by one or more of the following measures: - Reorient or relocate the receiving antenna. - Increase the separation between the equipment and receiver. - Connect the equipment into an outlet on a circuit different from that to which the receiver is connected. - Consult the dealer or an experienced radio/TV technician for help. Important This equipment was tested for FFC compliance under conditions that include the use of shielded cables and connectors between it and the peripherals. It is important that you use shielded cables and connectors to reduce the possibility of causing Radio and Television interference. Unauthorized changes or modifications of the unit or its connection cable in any way can void the users authority to operate this equipment. 4 Table of Contents Congratulations! . . . . . . . . . . . . . . . . . . . . . . . . . . . . . . . . . . . . . 7 The MT4 Package . . . . . . . . . . . . . . . . . . . . . . . . . . . . . . . . . . . . 7 Feature Survey . . . . . . . . . . . . . . . . . . . . . . . . . . . . . . . . . . . . . . . 8 Differences . . . . . . . . . . . . . . . . . . . . . . . . . . . . . . . . . . . . . . . . 10 Chapter 1 1.1 1.2 1.3 1.4 Chapter 2 2.1 2.2 2.3 2.4 Chapter 3 3.1 3.2 3.3 Setup Setup—All Platforms . . . . . . . . . . . . . . . . . . . . . . . . . . . . . . . . . Setup—MacOS . . . . . . . . . . . . . . . . . . . . . . . . . . . . . . . . . . . . . Internet Update under MacOS 9 . . . . . . . . . . . . . . . . . . . . . . . . OMS Driver . . . . . . . . . . . . . . . . . . . . . . . . . . . . . . . . . . . . . . . . Setup—Windows. . . . . . . . . . . . . . . . . . . . . . . . . . . . . . . . . . . . Which Windows version?. . . . . . . . . . . . . . . . . . . . . . . . . . . . . . Installation of the USB driver . . . . . . . . . . . . . . . . . . . . . . . . . . . Installation of the MIDI driver. . . . . . . . . . . . . . . . . . . . . . . . . . . Unitor8 Control Setup . . . . . . . . . . . . . . . . . . . . . . . . . . . . . . . . Windows Driver Settings . . . . . . . . . . . . . . . . . . . . . . . . . . . . . . Driver Update . . . . . . . . . . . . . . . . . . . . . . . . . . . . . . . . . . . . . . Connecting Several MIDI Interfaces . . . . . . . . . . . . . . . . . . . . . . The MT4—Expandability? . . . . . . . . . . . . . . . . . . . . . . . . . . . . . 11 12 13 13 13 13 14 17 19 19 21 21 21 Operation—MT4 The LEDs on the MT4 . . . . . . . . . . . . . . . . . . . . . . . . . . . . . . . . The USB LED . . . . . . . . . . . . . . . . . . . . . . . . . . . . . . . . . . . . . . . The Patch Mode LED . . . . . . . . . . . . . . . . . . . . . . . . . . . . . . . . . The MIDI In and MIDI Out LEDs . . . . . . . . . . . . . . . . . . . . . . . . . Patch Mode . . . . . . . . . . . . . . . . . . . . . . . . . . . . . . . . . . . . . . . . Computer Mode . . . . . . . . . . . . . . . . . . . . . . . . . . . . . . . . . . . . Mac only: OMS Integration . . . . . . . . . . . . . . . . . . . . . . . . . . . . Processing of Real-time Messages . . . . . . . . . . . . . . . . . . . . . . . 23 23 23 23 24 24 25 25 Unitor8 Control First Program Launch . . . . . . . . . . . . . . . . . . . . . . . . . . . . . . . . . Running Unitor8 Control together with… . . . . . . . . . . . . . . . . . … Logic. . . . . . . . . . . . . . . . . . . . . . . . . . . . . . . . . . . . . . . . . . . … OMS-compatible Software on MacOS . . . . . . . . . . . . . . . . . . … Windows MIDI Software . . . . . . . . . . . . . . . . . . . . . . . . . . . . Memory Manager . . . . . . . . . . . . . . . . . . . . . . . . . . . . . . . . . . . User Manual Version 1.2 5 27 28 28 28 28 29 Table of Contents 3.4 3.5 Virtual Devices . . . . . . . . . . . . . . . . . . . . . . . . . . . . . . . . . . . . . . Parameter Column. . . . . . . . . . . . . . . . . . . . . . . . . . . . . . . . . . . Patch Mode: Configuration of MIDI Routings. . . . . . . . . . . . . . . Edit Patch . . . . . . . . . . . . . . . . . . . . . . . . . . . . . . . . . . . . . . . . . Reorganize or Copy Patches. . . . . . . . . . . . . . . . . . . . . . . . . . . . Global Mode Setup . . . . . . . . . . . . . . . . . . . . . . . . . . . . . . . . . . Patch Select . . . . . . . . . . . . . . . . . . . . . . . . . . . . . . . . . . . . . . . . 29 30 31 31 33 34 34 Appendix A.1 A.2 A.3 Troubleshooting. . . . . . . . . . . . . . . . . . . . . . . . . . . . . . . . . . . . . Platform-independent Problems . . . . . . . . . . . . . . . . . . . . . . . . . Problems under MacOS . . . . . . . . . . . . . . . . . . . . . . . . . . . . . . . Windows Driver Specifications . . . . . . . . . . . . . . . . . . . . . . . . . . Information for Windows Developers. . . . . . . . . . . . . . . . . . . . . Abbreviations . . . . . . . . . . . . . . . . . . . . . . . . . . . . . . . . . . . . . . 35 35 35 36 37 38 Index . . . . . . . . . . . . . . . . . . . . . . . . . . . . . . . . . . . . . . . . . . . . 39 6 Emagic MT4 4 Congratulations! The MT4 is a reliable piece of equipment. It is compatible with the MacOS and Windows 98 operating systems. Operating the MT4 is far from being complicated. Simply plug in the cable—switch on—that’s it! The MT4 Package Please make sure your package is complete. It should contain the following components: • • • • • This manual (so far so good…) a CD-ROM containing - “Unitor8 Control” software which is used to configure your MT4 for stand-alone Patch operation, - installation programs to install Unitor8 Control, the USB driver for MacOS, and the MME drivers for Windows. a USB cable, a registration card, and, of course, your new MT4 unit. If one of the above-mentioned components is not included in this package, please don’t hesitate to contact your retailer at once. The missing component will be delivered to you as soon as possible. However, we are confident that everything is in order and that we can now tackle the next step: setup of your MT4. Please send your completed registration card to your country’s distributor, because it is only after you have registered that you will have access to: • • Free updates of the Unitor8 Control software, support via your country’s Emagic distributor. You can look up the contact information in Unitor8 Control in the Apple User Manual Version 1.2 7 (MacOS) or Help (Windows) menu, menu item “Emagic distributors”, or at our web site http://www.emagic.de Feature Survey Here is a complete summary of your new MT4’s features… Easy-to-use 2 × 4 MIDI Interface Using an MT4, two MIDI Inputs and four MIDI Outputs are available to your computer. USB Compatibility The MT4 can be connected to the computer via a USB interface. Therefore, the installation is very easy. Hot Swapping One of USB’s advantages is its ability to “hot swap” connected devices. This means that USB devices may be powered on or off, or their USB cable may be connected or disconnected, while the computer and the programs accessing the device are running. The system and the programs adjust themselves to the new situation. Hot swapping is supported by MT4 and its USB driver, as well as Logic Audio and SoundDiver. Compatibility with OMS, FreeMidi and MME MacOS: The MT4 is compatible with nearly every existing MacOS software package, including OMS and FreeMidi. The included OMS driver provides access to all features of the MT4, including stacking of up to eight units, when used with OMS. 8 Emagic MT4 4 Feature Survey PC: Using a PC running Windows98, the Multimedia Extension (MME) driver enables the MT4 to operate with nearly all MME compatible software. Please note that USB devices are neither tested nor supported by Emagic when operated under Windows 95 and the existing USB patch. Patch Mode Operation With “Patch Mode” it is possible to use the multiple routing modes of the MT4, even when your computer is not running the usual software. The MT4 will keep 32 different routing settings (“Patches”) in its memory. These Patches can be activated via MIDI Program Change commands, for example by using a master keyboard. Programming of the Patches has to be done with your computer beforehand. The Patches are backed up by EEPROM, so you have access to them at any time you supply power to the unit. There is only one condition for using the Patch Mode: the MT4 must be connected to an external power supply. One solution would be a computer with a USB port (without the MT4 using the communication functions of USB). Another solution would be an active USB Hub. User Manual Version 1.2 9 Differences The MT4 is a stripped-down version of the Unitor8/AMT8 products. The following list shows the differences in detail, also comparing them to the old Unitor8 model. Feature Unitor8 Unitor8 Mk II AMT8 MT4 MIDI Inputs/MIDI Outputs 8/8 8/8 8/8 2/4 32 Patches • • • • Computer Mode • • • • up to 8 units stackable • • • Patch Mode • • • • LTC synchronization • • VITC synchronization • • Click input • • Updatable firmware • • Mac Thru jack/switch • • • • USB RS422 • • • RS232 • • • 10 Emagic MT4 4 Differences Chapter 1 Setup Setting up the MT4 involves two basic steps: connecting the hardware components, and then installing the control software. 1.1 Setup—All Platforms Connect the MIDI Outs of your MIDI devices to the MIDI Ins of the MT4, and vice versa. With those MIDI devices which send MIDI data but do not receive it (such as master keyboards, drum pads or fader boxes), you need only connect the MIDI out of the device to a MIDI in of the MT4. Likewise, it is not generally necessary that MIDI devices such as sound modules or samplers send MIDI data to the sequencer—you just need to connect the MIDI Ins of the these MIDI devices to a MIDI Out of the MT4. If you want to manage and edit the sounds of your instruments with a an editor/ librarian program like SoundDiver, then cabling your sound modules in both directions is necessary for full functionality. (It is a good idea to label all of your MIDI cables to avoid confusion when troubleshooting problems later on.) For information about the setup of Windows, please turn to the section “Setup—Windows” on page 13. User Manual Version 1.2 11 Chapter 1 Setup 1.2 Setup—MacOS You can connect your MT4 only to MacOS computers with a built-in USB port (e.g. iMac, G3/G4, etc.), or equipped with a USB PCI card supported by Apple (e.g. the KeySpan USB Card). You should always use the latest MacOS version, but at least OS 8.6 offers significantly improved USB support. This should especially improve MIDI timing. Please make sure that the system folder contains all important USB extensions. This is the case after a standard installation of MacOS 8.6 or higher, or, from another perspective, if you are already successfully using USB devices on the computer you will be using. • Insert the provided CD-ROM and start the setup (in case it does not start automatically). It will install the Unitor8 Control software, the USB driver and the OMS driver. A restart is not required. • Connect the MT4 to the USB connector of your MacOS computer, using the provided USB cable. If you get the message “The software needed to use the USB device “MT4” cannot be found. Please refer to the device documentation to install the necessary software.”, you must install the driver from the CD, then power the MT4 off and on by temporarily disconnecting it from the USB port on the computer. Setup is now complete. You may now switch on your MIDI devices and start Unitor8 Control, or your preferred sequencer software. 12 Only Emagic Logic Audio 4.0.1 or higher and SoundDiver 2.1 or higher can access the MT4 connected to USB without the OMS driver. For any third-party software, you must use OMS, even if the software is MTP compatible. For SoundDiver to be able to recognize the MT4 you need SoundDiver version 2.1 or higher. Emagic MT4 4 Internet Update under MacOS 9 Internet Update under MacOS 9 If you are using MacOS 9.0 or newer and have access to the internet, you do not have to install the USB driver from the CD. When connecting the MT4, you will be asked whether the corresponding driver should be searched for on the internet. If you confirm this dialog, the driver will be installed automatically via the internet. OMS Driver If you intend to run the MT4 with OMS (Open Music System), it is necessary to install the OMS software. For OMS use, there is a dedicated driver for the MT4. If you want to use an MT4 unit with OMS, version 1.1 or higher of the MT4 OMS driver is required. If OMS has already been installed, this driver will automatically be installed during the installation of the Unitor8 Control software. In other cases, the OMS driver for the Unitor family (file name: ›Unitor Family OMS Driver‹) must be copied into the folder “OMS Folder” in the System folder. Then you can start “OMS Setup”, and scan for interfaces. If you are a Logic user and therefore do not need OMS, you should de-install it in order to optimize the timing of MIDI communication. Please see the section “Operation—MT4” on page 23. 1.3 Setup—Windows Which Windows version? USB is a relative new standard, not supported by Windows95 and earlier Windows versions. For Windows95, there is a USB patch. However, we recommend an upgrade to Windows98, as User Manual Version 1.2 13 Chapter 1 Setup the Windows95 patch has not been tested by Emagic, and is therefore not supported. Installation of the USB driver • • Do not yet connect the MT4 to your computer. • Now, connect the MT4 to a free USB port on your computer. Switch on your computer, and put the supplied “Updates & Drivers“ CD into the CD ROM drive. Windows will automatically recognize that a new USB device has been connected, and will start the hardware assistant. The following dialog will appear. • 14 Click on “Next“, and, in the resulting window, select “Search for the best driver for your device (Recommended).”, and click on “Next”. Emagic MT4 4 Installation of the USB driver • Here, select “CD-ROM drive” and click on “Next”. The following dialog will appear: Now, you must decide, whether Windows will use the Emagic driver or another USB driver (e.g. from the Win98 CD). Select the path to the Emagic driver. User Manual Version 1.2 15 Chapter 1 Setup • 16 Confirm this window with “Next”. The following dialog will appear: Emagic MT4 4 Installation of the MIDI driver Installation of the MIDI driver • Click on “Finish”. • Click on “Next”, and, in the resulting window, select “Search for the best driver for your device (Recommended).”, and click on “Next”. • Here, select “CD-ROM drive” and click on “Next”. The following dialog will appear: User Manual Version 1.2 17 Chapter 1 Setup • 18 Confirm this dialog with “Next”. You will see the confirmation message again, indicating that the software for the new device has been installed. Click on “Finish“. The installation is now complete. When opening the Windows Device Manager, the MT4 will be shown like this: Emagic MT4 4 Unitor8 Control Setup • When opening the Multimedia control panel, under “Devices”, you will recognize the MT4 by the following entries: Unitor8 Control Setup • To install the Unitor8 Control software, double-click the Setup program, and follow the on-screen instructions. Windows Driver Settings By default, the driver configures itself correctly when it is installed. In the event that you want to adjust the configuration, here is how: • • • • • • Select the menu “Start > Settings > Control Panel”. Double-click the “System” control panel. Select the page “Device Manager”. Double-click “Sound, video and game controllers”. Double-click “emagic MT4—MIDI”. Select the “Settings” tab. Inputs—Number Defines the number of MT4 inputs available on the PC. User Manual Version 1.2 19 Chapter 1 Setup Inputs—Port Here you select a port, in order to rename it, in the field to the right. Inputs—Title Here you can change the name of the port selected in “Inputs—Port”. SoundDiver 2.0.6 and older do not support this option of the MT4 driver, and instead assumed that all MT4 ports contain the word “Unitor” in their names.Deleting the word “Unitor” here may lead to malfunctions in SoundDiver. You should update to version 2.0.7 or newer. This version (as well as Logic Audio 4.0 or newer), recognizes the MT4 ports in a more elegant way. Outputs—Number Defines the number of available outputs for the MT4. Outputs—Port Here you select a port in order to rename it in the field to the right. Outputs—Title Here you can change the name of the port selected in “Outputs—Port”. SoundDiver 2.0.6 and older do not support this option of the MT4 driver, and instead assumed that all MT4 ports contain the word “Unitor” in their names. Deleting the word “Unitor” here may lead to malfunctions in SoundDiver. You should update to version 2.0.7 or newer, especially when sending MIDI data to all ports with ›Enable Port 0‹ checked. This version (as well as Logic Audio 4.0 or newer), recognizes the MT4 ports in a more elegant way. Enable Port 0 (send to all) An additional port is created if this option is checked. If applications send to this port, this data is transferred to all outputs of 20 Emagic MT4 4 Driver Update the connected MT4. (This is equivalent to “Cable 0” on the MIDI Time Piece.) The MT4 sends realtime messages on all ports by default. Therefore, it is not necessary to enable this option for that purpose. Driver Update If you receive a driver update from Emagic, open the tab labeled “driver” (see “Configuration of the driver”), and click “Change driver”. Select the driver by clicking “Have Disk…”, and then proceed as previously described at the beginning of this section. 1.4 Connecting Several MIDI Interfaces The MT4—Expandability? The MT4 can only be operated on a computer offering a USB port. If you want to expand your MIDI port capabilities (e.g. using an AMT8 or a Unitor8), you have the following choices: Using MacOS: You may simultaneously use an MT4 connected to the USB port with a Unitor8 (or even a chain of several Unitor8 units) connected to one or even both serial ports (modem and printer ports). There never were, are or will be stock MacOS computers offering both USB and serial ports at the same time. Therefore, for this solution, in an older PCI PowerMac or a beige G3, you would have to install a USB PCI card supported by Apple (and at least system 8.6.1), or, in a B/W-G3 or G4, you would have to install a serial port instead of the modem (Stealth, gPort, or similar). User Manual Version 1.2 21 Chapter 1 Setup The option of using a Unitor8 Mk II or AMT8 (or a chain of several units) together with the MT4 on the USB port is in development. Using Windows: You may simultaneously use an MT4 connected to the USB port with a Unitor8 (or even a chain of several Unitor8 units) connected to one single COM port or USB. 22 Emagic MT4 4 The USB LED Chapter 2 Operation—MT4 The MT4 does not have any controls and is operated using the program “Unitor8 Control”. If you followed the steps detailed in the previous chapters, then you are all set to start working. 2.1 The LEDs on the MT4 The USB LED This LED lights up, when the unit is connected to an active USB port, while there is no traffic on the port. Each time there is data traffic on the USB port, the LED goes out, indicating USB activity. The Patch Mode LED This LED lights up, when the MT4 is in Patch Mode. Please read the section “Patch Mode” on page 24. The MIDI In and MIDI Out LEDs The 2 MIDI in and 4 MIDI out lights are illuminated if the respective MIDI port of the MT4 is receiving or sending a MIDI signal. A low-level illumination indicates incoming MIDI Clock or MIDI Time Code. Don’t panic, this is normal. User Manual Version 1.2 23 Chapter 2 Operation—MT4 2.2 Patch Mode The Patch Mode of the MT4 is used for the interconnection of MIDI devices when no MIDI software on the computer is using the interface. After powering-up, the MT4 enters Patch Mode, with the most recently selected Patch active. If you have not used the Unitor8 Control software, this is Patch 1, which contains default settings: all MIDI data received on a given MIDI In port is sent to all MIDI Out ports, except the port which has the the same number as the In port. If you play on a keyboard connected to In port 2 for example, the MIDI events will be sent to Out ports 1, 3 and 4. You can create custom routings for Patch Mode with Unitor8 Control (see the chapter “Unitor8 Control” on page 27). Please note the special treatment of Real-Time messages (see “Processing of Real-time Messages” on page 25.). 2.3 Computer Mode In this mode, all data received at any In port is sent to the computer, and the computer can send data to particular Out ports independently. Unlike Patch mode, there are no direct connections between In ports and Out ports. This gives your MIDI software complete control over MIDI routing, as you would want. If the MT4 receives messages from sequencer software or OMS at the USB port, it will immediately switch to Computer Mode. 24 This switching function is done by the driver, and quitting all MIDI applications will set MT4 back to Patch mode. Emagic MT4 4 Mac only: OMS Integration MT4 will not switch to Computer mode if it receives a system or realtime message. This is important if you work with MIDI software which sends System messages before sending Channel messages (e.g. Patch editor/librarians such as Opcode Galaxy). For this reason, SoundDiver sends a “harmless” Controller message at startup, to let the MT4 switch to Computer mode. Mac only: OMS Integration The provided OMS driver integrates the MT4 completely into the OMS environment—operation is the same as usual with your sequencer software (such as in the Logic environment) or with OMS. If you are not familiar with these concepts, please consult your software manuals. 2.4 Processing of Real-time Messages The MT4 processes Real-Time messages independently of whether Patch or Computer Mode is active. “Real-Time message” means in this context: F8 MIDI Clock (increases the clock by 1/24 note) FA Start (starts playback at the beginning) FB Continue (starts playback at the current clock position) FC Stop (stops playback) F2 xx xx Song Position Pointer (sets a new clock position) Only one MIDI In port is allowed to route Real-Time messages at any given time. Real-Time messages received by the other MIDI In ports at the same time are ignored. The purpose of this limitation is to prevent merging of RealTime messages from several inputs, which would cause to a lot of confusion. An important term in this context is the “clock master”, a specially designated MIDI In port on the MT4. User Manual Version 1.2 25 Chapter 2 Operation—MT4 • Real-time messages received by the clock master are always routed to the computer as well as to all MIDI Out ports. • After powering-up the MT4, MIDI Clock is not routed to any of the ports (as no clock master has been found yet). • The MIDI In port which receives a Start (FA, see above) or Continue (FB) message first, becomes clock master. For the time being, only Real-Time message received by this port are routed. • When the clock master receives a Stop message (FC, see above), every other MIDI In port may become clock master by receiving a Start message. • Until a new clock master has been found, the “old” clock master keeps routing Real-Time messages. This is important for some sequencer programs which need to receive MIDI clock while in external sync mode. • The above mentioned change of clock master is not possible i.e. it is “locked” again) if the “old” clock master receives a Start or Continue message in the meantime. 26 Emagic MT4 4 Mac only: OMS Integration Chapter 3 Unitor8 Control Unitor8 Control is a customized descendant of the extremely powerful editor/librarian software SoundDiver, specially designed to work with the MT4. When creating Unitor8 Control, we concentrated on the basic features, in order to prevent unnecessary confusion for our users. Unitor8 Control is not the only means for editing your MT4. The MT4 can also be edited with the complete version of SoundDiver, which offers a lot of additional features. Usually, the parameters which are displayed in Unitor8 Control correspond to the data actually stored in the MT4. They are automatically transferred to the MT4 and stored in non-volatile memory. In very few cases, however, it is possible that contents may be different. In order to ensure data consistency, you can use the feature “Request” (transfers the settings from the MT4 to Unitor8 Control). Moreover, the feature “Transmit” will transfer the settings from Unitor8 Control to the MT4. This option is accessed either from the MIDI menu, or the corresponding icons in the Memory Manager. 3.1 • First Program Launch Start the Unitor8 Control software. MacOS: double-click Unitor8 Control program icon. Windows: select the menu “Start > emagic > Unitor8 Control > Unitor8 Control”. A warning is displayed if your Unitor8 Control is unable to detect any connected MT4 units. In this case, quit Unitor8 Control, inspect the USB connection between the MT4 and your computer, and restart Unitor8 Control. You may simulate the existance of the MT4 (“Assume x MT4”) for demonstration purposes. User Manual Version 1.2 27 Chapter 3 Unitor8 Control 3.2 Running Unitor8 Control together with… … Logic Unitor8 Control for MacOS supports AutoLink, a special communication protocol which enables it to route MIDI input/ output via Logic or Logic Audio: • • First run Logic. • Then run Unitor8 Control. Make sure that the preferences option “Use AutoLink with SoundSurfer/Diver” (Options > Settings > MIDI-Interface Communication)is enabled in Logic. Logic will make a “plop” sound to indicate that AutoLink has been established with Unitor8 Control. You can check this by checking Logic’s above mentioned Preferences window. For AutoLink on MacOS, Logic 2.5 or newer is required. On Windows, Logic Audio 4.0 or newer (Silver, Gold, or Platinum) is required. … OMS-compatible Software on MacOS Unitor8 Control supports OMS. Simply run all the OMS applications you need, including Unitor8 Control, in any order. Make sure that “Use OMS if available” is set to “Ask” or “Always” in Unitor8 Control’s preferences. … Windows MIDI Software As the MT4 MME driver is multi-client capable, you can run the Windows version of Unitor8 Control simultaneously with other MIDI applications. Simply run all the applications you need, including Unitor8 Control, in any order. 28 Emagic MT4 4 Virtual Devices 3.3 Memory Manager Initially, the Unitor8 Control software opens to the Memory Manager window. This window can also be opened by using the command “Open Memory Manager” in the Windows menu). The Memory Manager is the “main level” of Unitor8 Control, and manages the 32 MIDI port configurations (Patches) which are stored in the MT4. These can be recalled later via Program Change commands. The Memory Manager also controls the Global Setup options, which will be explained later. • A Patch is immediately activated when clicked. After clicking, the MT4 will switch to Patch Mode if Computer Mode was active before. • The mode will not change if Global Setup is clicked. Virtual Devices The concept of SoundDiver and Unitor8 Control is that every “real” device has a “virtual” counterpart on the screen. If you are using another Emagic MIDI interface, in addition to the MT4, Unitor8 Control will manage this interface as a single virtual device, even if the other interface consists of a chain of several Unitor/AMT8 units. User Manual Version 1.2 29 Chapter 3 Unitor8 Control Parameter Column The parameter column is located on the left side of the Memory Manager. This column can be hidden or shown from the Options menu. From top to bottom and left to right, you find: • the “Window Link” button. If enabled, it synchronizes the window’s contents with the currently selected device. If you have no other Emagic interfaces, this switch has no function. • the “Request” button, which requests the selected entries from the MT4; • the “Transmit” button, which overwrites the selected entries in the MT4 with the ones currently in Unitor8 Control; • the global Device parameter box. It can be collapsed by clicking the small triangle to the left, uncollapsed you see: - The name of the connected MT4. You can change the name by clicking it. - “Out Port”: the name of the computer port the MT4 is connected to. Under MacOS, this port is always ›USB All‹; under Windows ›MT4Out 0 (all)‹. • the “Special Parameters” (again, this box can be collapsed by clicking the small triangle), displaying the connected MT4, as well as it’s respective model name and firmware version. This table can be updated by clicking it. Since the MT4 may not be cascaded, only the line ›1..8‹ is active. • the panic button is designed to send an “All Notes Off” command in case of stuck MIDI notes, and is followed by discrete Note Off commands for each note. 30 Emagic MT4 4 Edit Patch • the Help button accesses the on-line help system. You can also call up the on-line help with the command “Windows > Open Help”. 3.4 Patch Mode: Configuration of MIDI Routings Programming Patches involves defining which MIDI In port(s) will be connected to which MIDI Out port(s). Patches are only valid for operation in Patch Mode. The computer need not be connected for using Patches—for instance while playing live on stage. As long as (or from the moment) there is MIDI activity on the USB port (and the MT4 therefore is in Computer Mode), this task is performed by your sequencer software or OMS. Edit Patch Click the Patch you want to edit (for example Patch 1), and open the editor in the Windows menu with the “Open Editor” command, or simply hit R. A third option is to simply doubleclick the Patch. You should now see a matrix which represents the available MIDI In and Out ports. The MIDI Ins are displayed as rows, while the MIDI Out ports are displayed as columns. This matrix contains two rows and four columns, which is a 2 × 4 matrix. To connect a MIDI In port to a MIDI Out port, click the field in the matrix where the the MIDI In and Out ports you wish to connect intersect. For example, you would click the field “first row/fourth column” in order to connect MIDI In port1 to MIDI Out port4. A mark in this field indicates the connection. To disconnect MIDI ports, click the respective field again. The ports are then disconnected, and the mark deleted. User Manual Version 1.2 31 Chapter 3 Unitor8 Control All marked or deleted connections are immediately effective. Real-Time messages are processed in a special way, independent from the current routings. For details, see see “Processing of Real-time Messages” on page 25. Copy Port Settings To copy a connection setup from one output port to another output port, hold down S, then use the mouse to drag the respective column onto the target column (while still holding S). Check Connections If you want to know which MIDI Out ports are connected to a specific MIDI In port, just click the icon of the In port. The connections of the selected In port, as well as all connected Out ports will be colored in red, and the cable connections are given as plain text. To see the connections of the input ports, you proceed similarly: Click the icon of the Out port. Name Patch You can name a Patch to facilitate its identification—for example, you may choose the title of a song where the respective Patch is to be used. To name the Patch, click the field “Name” in the editor then enter the name, or select the function “Rename” in the Memory Manager (MacOS key command: COn; PC key command: çSn). On the PC, you may also click with the right mouse button on the desired entry, and select “Rename” from the pop-up menu. 32 Emagic MT4 4 Reorganize or Copy Patches Link Windows When you wish to open the editor window to edit another Patch, you can proceed as explained above, i.e., open the Patch with a double-click in the Memory Manager. However, there is more efficient option, referred to as “Linking Windows”. This option causes the editor window to automatically display the settings for the currently selected Patch in the Editor window. To enable this option, check “Link Windows” (MacOS key command: COl) in the editor window. Now simply click the Patch you wish to edit, (with mouse click or cursor) and the editor automatically will change to the selected Patch. Edit all 32 Patches in this manner (or as many as you need). You can switch between these Patches with MIDI Program Change commands in Patch Mode. The Port and MIDI channel, on which MT4 receives Program Change commands, are established in the Global Mode Setup (see the section “Global Mode Setup” on page 34). Reorganize or Copy Patches If you want to change the order of the Patches, simply click a Patch in the Memory Manager and drag it to the desired destination location (drag and drop). A dialog window labeled “Swap entry”opens. Click “Store”, if you want to exchange the Patches. Prior to the latter step, you have the option of selecting another destination Patch in the flip menu. If you change your mind about the exchange, click “……….”. If one Patch should be copied to another, press A (MacOS: O) prior to releasing the mouse button. Then the dialog window “Enter Entry” will be opened. In order to proceed, use the steps explained above with the exchange function. Naturally, Unitor8 Control offers the Cut/Copy/Paste commands and other standard operating techniques you are used to. User Manual Version 1.2 33 Chapter 3 Unitor8 Control 3.5 Global Mode Setup Patch Select Select the MIDI In port and channel on which you would like incoming Program Change messages to cause the MT4 to recall Patches. It is useful to select the port your master keyboard is connected to, or the channel which your master keyboard uses to send change commands. If you don’t want to use this feature, deactivate it with the “On” switch. 34 Emagic MT4 4 Appendix A.1 Troubleshooting Platform-independent Problems ? Having switched to Patch Mode, the MT4 always resets to Computer Mode. ! The computer is running a program which has MIDI Thru activated, or generates MIDI events in another way. Any Channel MIDI message received by the USB connector causes the MT4 to switch to Computer Mode. While the MT4 is running in Patch Mode, no MIDI software should be run on the computer (except Unitor8 Control). If you run SoundDiver with the MT4 Module instead of Unitor8 Control, or use MT4 in AutoLink mode, make sure that MIDI Thru is switched off. * Problems under MacOS ? The MT4 is not recognized on the USB port. ! The USB Unitor Family Driver doesn’t recognize the MT4. * Please use the supplied USB Unitor Family Driver, version 1.1 or higher. ! * The USB Unitor Family Driver has been copied to the system folder while the MT4 was already connected. In this case, the driver will not be started. Disconnect the USB cable at the MT4 and reconnect the cable. This causes the USB driver to be started. User Manual Version 1.2 35 Appendix ! Your USB PCI card is not supported by Apple. * Use a different USB card. ! The software does not support the MT4 connected to USB * * * directly. If you use Logic Audio: update to version 4.0.1 or higher If you use SoundDiver: update to version 2.0.7 or higher If you use other software: install the OMS driver (see the section “OMS Driver” on page 13), and run the software in OMS mode. ! The OMS Unitor8 Driver doesn’t recognize the MT4. * Please use the supplied OMS Unitor Family Driver, version * ? 1.2 or higher. Use OMS 2.38. Earlier versions will not work. Unitor8 Control does not work with OMS. An error message appears that a port is already in use by another application. ! Unitor8 Control is not configured correctly. * Set the option “Use OMS if available” in the preferences to “Always”. A.2 Windows Driver Specifications • The driver features multi-client operation: Several MIDI applications can access the MT4 simultaneously. In this case, MIDI commands are merged and dispatched properly. • MIDI Time Code (MTC, F1 xx), Song Position Pointer (SPP, F2 xx xx), MIDI Clock (F8), Start (FA), Stop (FB) and Continue (FC) are always routed to port “MT4 In 1”. All other messages are routed to the port of the respective Input. 36 Emagic MT4 4 Information for Windows Developers • The driver supports Time Stamps (Information about reception time of a MIDI message). This is only relevant for software packages which decode the Time Stamps. • You will find further information regarding the drive in the info file on the supplied CD. Information for Windows Developers IDs Beginning with driver version 1.31, the following IDs are provided: The manufacturer code (MIDIINCAPS/MIDIOUTCAPS.wMid) of Emagic is 0xD0 (208 decimal). MIDIINCAPS/MIDIOUTCAPS.wPid is 0x01 (1 decimal) for the MT4 driver. Exception: for output port 0 (All Ports), MIDIOUTCAPS.wPid is 0x103 (259 decimal). Registry The MT4 driver stores some information in the Registry, subtree HKEY_LOCAL_MACHINE\System\CurrentControlSet\ Services\Class\MEDIA\<DevNode>\: DetectedInPorts number of port which detected MT4 last DetectedOutPorts Number of the actually existing out ports DetectedPort COM ports where the MT4 has been detected NumInPorts number of installed In ports for MT4 NumOutPorts number of installed Out ports for MT4 RtMsgToCable0 if 1, incoming Realtime messages are sent received by input port 1 UnitorVersions version numbers of connected MT4 unit found UseOmniIn switch “Allow port messages (F5 xx) on Port 1” UseOmniOut switch “Enable Port 0 (send to all)” User Manual Version 1.2 37 Appendix A.3 Abbreviations EEPROM Electrically Erasable Programmable ROM EPROM Erasable Programmable ROM HDR Hard Disk Recorder LED Light Emitting Diode MacOS Macintosh Operating System MIDI Musical Instrument Digital Interface MME Multimedia Extension MTC MIDI Time Code OMS Open Music System / Opcode MIDI System PC Personal Computer ROM Read Only Memory SysEx System Exclusive USB Universal Serial Bus 38 Emagic MT4 4 Index B H Bi-directional cabling 11 HDR 38 Hot Plugging C 8 L Clock master 25 Computer Mode 24 LED 38 Continue 25 Link Windows 33 Logic Copy Patches 33 Logic Audio port settings 32 LTC D 13 20, 36 10 M Driver MacOS 7, 12, 38 Configuration 19 Matrix 31 Update 21 Memory Manager 29 MIDI 38 MIDI Clock 25 E MIDI Interface EEPROM 9, 38 EPROM 38 8 MME 8, 38 MTC 38 Multimedia Extension F 9 O FreeMidi 8 OMS G G3 8, 13, 24, 36, 38 OMS driver 36 On-line help 31 Open Music System 13 12 Galaxy 25 Global Setup 29, 34 P Panic button 30 Parameter column 30 Patch User Manual Version 1.2 9, 29 39 Index Editing ~ 31 Name 32 Patch Mode 9, 24, 29, 31 Patch Select 34 PC 38 Program Change 9, 34 R Real-Time messages Registration card 25 7 Reorder Patches 33 Request 27 ROM 38 S Song Position Pointer SoundDiver 25 11, 20, 25, 27, 36 Stand-alone operation 9 Start 25 Stop 25 Support 7 Swap Patches 33 SysEx 38 T Transmit 27 U Unitor8 Control USB driver 40 7, 12 35, 38 12 Emagic MT 4 V VITC 10 W Windows 95 9 Windows 98 7