1
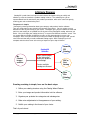
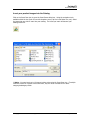
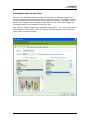
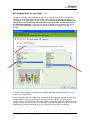
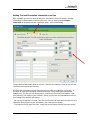
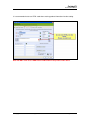
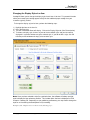
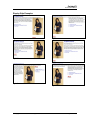
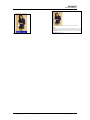
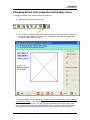
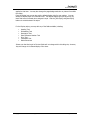
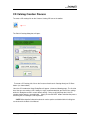
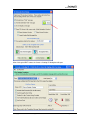
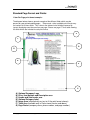
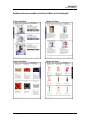
CatalogVX
Quick Start Manual
Quick Start Manual Prerequisites:
•
•
•
!
!
!
!
" #
% !& '
& (!
$
!
)
*
" #
(
!
+
,
!
+
,
-
/
+
.
* ,
-
.
!
%http://www.chronsystems.com/Manual.pdf
.
%http://www.chronsystems.com/CatalogVXhelp.
01
21
$1 3
41 /
51 &
61 *
!
!
!
"
#$
7
!
%
&
!
+
++
+
8
)9 !
!
,
(
- .
+
© Copyright 2002-2013 Chronicles Systems, Inc.
%
'
'
'
.
Page 2 of 28
CatalogVX
Quick Start Manual
A Simple Process
CatalogVX is professional and sophisticated software designed to help you swiftly and
effortlessly create and maintain a product catalog in-house. The software gives you an
unprecedented level of control over your product presentation, while at the same time greatly
reducing your sales and marketing costs.
The process is simple:
You begin by entering information about your company and products into the software.
Then you simply publish your catalog in the format of your choice. You can create as many
different versions of your catalog as you require. CatalogVX gives you the freedom to create and
publish a new catalog, or an updated version of your existing CatalogVX catalog, whenever you
desire. You can change your catalog “on the fly” in response to different customers’ needs. You
can create different catalogs for different seasons or help draw attention to current sale
campaigns. And, since you are able to print only the number of catalogs that you need, you will
never have to throw away unused or outdated catalogs again! With CatalogVX you have
complete control and are never at the mercy of expensive print shop minimums.
Autorun
CD
Catalog
CatalogVX
Software
Stores and manages
all the information
about your products
and catalogs
My
Product
Images
and info
PDF or
Print
Catalog
Creates multiple
catalogs on demand
Web
Site
Catalog
Creating a catalog is simple, here are the basic steps:
0
)9
(
2 3
$ 7
9
4 .#
5 &
*
:
:
;
© Copyright 2002-2013 Chronicles Systems, Inc.
Page 3 of 28
CatalogVX
Quick Start Manual
The Toolbar
The toolbar is shown below. Each icon within the toolbar contains a descriptive tool tip. To view
the tool tip simply move your mouse cursor over the icon.
The toolbar icons are shortcuts for the most commonly used menu items. They are described in
more detail below:
My Available Catalogs: Click here to view all the catalogs available on your computer
or network. This feature also allows you to view statistical information on each of the
available catalogs.
The Catalog Wizard: Click here to activate the Catalog Wizard and begin the catalog
creation process. Utilizing the Catalog Wizard is the best way to make sure that you
have completed all the necessary steps prior to publishing your catalog.
Search by Keyword Index: Click here to search the catalog by predefined keywords.
You will set up these keywords during the catalog creation process.
Item/Product Search: Click here to search the catalog using item numbers,
categories, price ranges, names, labels, or descriptions.
Create a New Catalog: Click here to create a new catalog.
Open Catalog File: Click here to open a catalog file.
Save Catalog File: Click here to save the current catalog.
Insert Items: Click here to insert a new item into the catalog.
Bulk Insert Tool: Click here to insert a group of items instead of inserting items one
at a time. CatalogVX has many ways of adding items to your catalog, Insert and Bulk
Insert are just a few.
No Picture Item: Click here to Insert an item with no pictures.
Edit Custom Categories: Click here to create and edit your custom category folders.
Edit Predefined Categories: Click here to use or edit the predefined categories.
Shopping Cart: Click here to access the shopping cart. In licensed versions of the
software this is a working copy of the shopping cart as it would appear on a CD
catalog.
Create a Catalog CD: Click here to burn an Auto-Launch catalog to CD, to save a
Preview Catalog to your hard drive, or to create an HTML based catalog for your
company website.
Print Publisher: Click here to access many of the printing formats available for
publishing a hard copy or PDF catalog. Additional printing formats may be accessed
by clicking on the Printing menu option.
Publishing Options: Click here to display most of the publishing options available on
a single screen. Use this time saving icon to bypass the menus and go directly to the
publishing option you need.
© Copyright 2002-2013 Chronicles Systems, Inc.
Page 4 of 28
CatalogVX
Quick Start Manual
Quick Catalog Setup
The first time you use the software you will see the Welcome Dialog, please select the
CATALOG WIZARD to quickly set up your catalog by following the step by step dialogs.
You can also access the Catalog Wizard by clicking on the icon shown below on the toolbar.
© Copyright 2002-2013 Chronicles Systems, Inc.
Page 5 of 28
CatalogVX
Quick Start Manual
Define your folders by creating Categories and Subcategories.
,
!
*
#
9
*
+
* #
!
+
*
!
!
#
*
&
8
%
01
*
3
#
3
3
21
© Copyright 2002-2013 Chronicles Systems, Inc.
#
(
8
<
(
Page 6 of 28
CatalogVX
Quick Start Manual
Insert your product images into the Catalog
#
+
8=
> #
8 ! - 7 >+
8
+
!
1/
*
:
''(
>
0?
!
'
© Copyright 2002-2013 Chronicles Systems, Inc.
Page 7 of 28
CatalogVX
Quick Start Manual
Selecting the folder for your items
Once you have selected the items for insertion, the Edit Item Entry dialog will prompt you to
select the category and subcategory for the item(s) within your catalog. This dialog box contains
the Item Information Sheet and is used to move or add the items to specific categories. You will
notice that the categories and subcategories shown within this box are the same category and
subcategory folders that you created in the previous steps.
Next, you must select the category and subcategory for your item(s). This is done on the General
Information tab as shown below. On this tab, you may also enter keywords which will be used
later the Index and Search functions.
© Copyright 2002-2013 Chronicles Systems, Inc.
Page 8 of 28
CatalogVX
Quick Start Manual
Selecting the folder for your items
Continued
To choose a category and subcategory for the item(s) simply left click once over the desired
category and once over the desired subcategory. When they are selected the category and
subcategory will be highlighted in blue as seen below. You must select BOTH a category and
subcategory or the software will not know where to put your items and will place them in
an “Unassigned Category”. After you have chosen a category and subcategory you can left
click once in the Keywords box and enter any desired keywords. Once done, click OK to
continue.
The item(s) will be added to the category/subcategory folder that you selected from the list, as
shown in the picture below.
You are required to select a category and subcategory for each item that you want to add to your
catalog. When using the Insert Items icon you can insert up to 10 items at a time into your
catalog. There is also a Bulk Insert Tool icon that allows you to enter more than 10 items at a time
into your catalog. A discussion of the use of the Bulk Insert tool is beyond the scope of this Quick
Start Manual, but further information on its use can be found in the Basic User Manual.
© Copyright 2002-2013 Chronicles Systems, Inc.
Page 9 of 28
CatalogVX
Quick Start Manual
Adding Text and Description Information to an Item
With CatalogVX you have the ability to add prices, descriptions, reference numbers, heading,
subheadings, and bullet points to each of your items. You can do this from the Product
Information tab located on the Item Information Sheet. (See Picture Below)
To open the Item Information Sheet for any item, select the item from the list tree on the left hand
side of the screen and hit the Enter Key.
All of the fields are optional and the information that you’d like to include may vary by item. As
you begin to create your catalog we recommend that you start by adding your most popular
products first. This way you can quickly publish a preliminary CD catalog for distribution. With
your preliminary CD catalog in your customer’s hands, you can relax and add additional items to
your catalog at any time that you choose.
You can also change the Text Color, Text Size, and Text Style for each item from within the Item
Information Sheet by pressing the color buttons (see arrow in picture above)
To change the Display Style of an item, simply click on the Display Style tab (See next section).
© Copyright 2002-2013 Chronicles Systems, Inc.
Page 10 of 28
CatalogVX
Quick Start Manual
It is recommended not to use HTML code when entering product information into the catalog.
Note: DO NOT TYPE or CUT AND PASTE HTML CODE in the product fields above.
© Copyright 2002-2013 Chronicles Systems, Inc.
Page 11 of 28
CatalogVX
Quick Start Manual
Changing the Display Style of an Item
CatalogVX allows you to change the display style of each item, if desired. This powerful function
allows you to make your catalog appear exactly like the traditional paper catalogs that your
customers typically receive.
To change the display style of an item, perform the following steps.
1)
2)
3)
4)
(
Highlight the item on the item list.
Press the Enter key.
The Item Information Sheet will display. Click on the Display Style tab (See Picture below).
To choose a display style, click on any one of the 8 available styles and your item will be
displayed in a preview window using the selected style. If you do not like a style, click OK
from the preview window and simply select another style.
7
+
!
+
*
@*.>
!
+
Examples of the 8 display styles are shown on the following pagse.
© Copyright 2002-2013 Chronicles Systems, Inc.
Page 12 of 28
CatalogVX
Quick Start Manual
Display Style Examples
Style 1
Style 2
Style 3
Style 4
Style 5
© Copyright 2002-2013 Chronicles Systems, Inc.
Style 6
Page 13 of 28
CatalogVX
Quick Start Manual
Style 7
© Copyright 2002-2013 Chronicles Systems, Inc.
Style 8
Page 14 of 28
CatalogVX
Quick Start Manual
Changing default color properties and display styles
*
8 9
%
01 /
21 * A
8
!
*8
* 8 / 9!
!
B
/
+
* +
3
3
!
)
/
*
>
!
+
+
:3
+
+
+
+
3
3
3
© Copyright 2002-2013 Chronicles Systems, Inc.
@
!
8
+!
+
+
:+
Page 15 of 28
CatalogVX
Quick Start Manual
#
(
8
+
*
+
(
!
•
•
•
•
•
•
•
&
#
@
/
&
,
*8
*8
*8
<
*8
*8
&
8
+
C
& +/
!
D
C
<8/
D
8!
+!
%
*8
8
© Copyright 2002-2013 Chronicles Systems, Inc.
Page 16 of 28
CatalogVX
Quick Start Manual
CD Catalog Creation Process
To create a CD catalog click on the Create a Catalog CD icon on the toolbar.
The Publish Catalog dialog box, will open.
To create a CD Catalog, left click on the Create an Auto-Launch Catalog directly on CD Rom
button. (as shown above)
Next, the CD Introduction Setup Dialog Box will appear. (shown on following page) The first few
times that you are creating a CD Catalog it is highly recommended that you leave all the settings
within this dialog box on their current default settings. Doing so will help keep the initial CD
catalog creation process uncomplicated. Simply click on the NEXT button and allow the process
of burning the CD catalog to a CD to proceed.
*NOTE--More detailed information about the various options available within this dialog box
can be found in the Basic User Manual.
© Copyright 2002-2013 Chronicles Systems, Inc.
Page 17 of 28
CatalogVX
Quick Start Manual
After clicking the NEXT button, the Create a Catalog CD dialog box will open
© Copyright 2002-2013 Chronicles Systems, Inc.
Page 18 of 28
CatalogVX
Quick Start Manual
It is recommended that you once again leave all the settings on their default values at this time
and simply click on the Create Disc icon as shown above and the disc burning process will begin.
Once you begin to burn the catalog CD, remember to wait for the “Catalog CD Complete”
message before you do anything else with the software. In most cases, the CD-ROM drive will
eject the catalog CD after the process is completed. If you quit the program, or attempt to do
anything else with the software, while the catalog creation is in progress you may damage the
CD, rendering it unusable.
After you have received the “Catalog CD Complete” message, simply click “OK” on the message
box, close the Create a Catalog CD dialog box, and click the green arrow (DONE) button on the
Publish catalog dialog box to return to the main page of the CatalogVX software.
Testing the CD catalog.
After burning the CD catalog, it is recommended that you test it. The best way to do this is to exit
the CatalogVX software (*NOTE--be sure to save your work when prompted), and then reinsert
the catalog CD back into the CD drive. The catalog’s auto-launch process should start the
catalog CD automatically. *Note: In order for the Auto-Launch feature of the CD to work, you will
need to have Autorun enabled on your computer system.
© Copyright 2002-2013 Chronicles Systems, Inc.
Page 19 of 28
CatalogVX
Quick Start Manual
Printing your Catalog - an introduction
Catalog items will be printed in the order that they appear on your item list. Therefore, it is
important to arrange your items in the desired sequence prior to printing.
Arranging the item tree.
You may reorder the Categories, Subcategories, and the Items within the item tree. To reorder
the tree, use the Layout menu and select the level that you want to rearrange.
© Copyright 2002-2013 Chronicles Systems, Inc.
Page 20 of 28
CatalogVX
Quick Start Manual
Depending on which level you have chosen to reorder—either the Reorder Categories Folders or
the Reorder Subcategory Folders dialog box will appear. Highlight the category that you wish to
move by left clicking over it one time, and then click the blue arrow keys within the box to move
the Category or Subcategory into position in the New Category Order box. Continue on in this
manner until the folders appear as you would like them to in your printed or PDF catalog.
Arranging Individual Items within the Tree.
To arrange the individual items within any subcategory
1. Select the item from the item tree.
2. Press the Control + Up Arrow keys on your keyboard to move the item up by 1 level or
Control + Down Arrow keys to move the item down by 1 level.
Creating PDF and Print Catalogs.
To access the Print and PDF catalog features.
1. Click the print icon from the tool bar.
© Copyright 2002-2013 Chronicles Systems, Inc.
Page 21 of 28
CatalogVX
Quick Start Manual
The Print Job Control dialog box will display. The Basic Edition of the software allows you to print
your catalog in any of the following formats: 1, 2, 3, 4, 6, or 9 items per page.
These print format options are all listed in the left side panel of the Print Job Control dialog box
under Select your catalog print format—as indicated by the red arrow below.
*Note-- The center and right panels of the Print Job Control dialog box contain additional printing
formats which are available only in the Professional version of the software and above.
From the Print Job Control dialog box you may also choose to include an optional company logo
which will be printed at the top of each page of your catalog. To include the optional company
logo, simply enter the file path for your desired company logo file in the white box at the center
top of the Print Job Control dialog box—as shown above by the blue arrow.
The path for the logo file may be entered in one of three ways—
1. by typing the path information in the white box
2. by copying and pasting the path information in the white box
3. by browsing to the file utilizing the Browse button available just to the right side of the white
box.
The logo file must be a jpeg image. It is recommended that you make the size of the image file
1000 x 50 pixels utilizing a separate image editing program prior to inserting it. At 1000 x 50
pixels the final image will fit properly on the top of each catalog page without any overlap.
Now you are ready to print your catalog! Left click on the format of your choice and a Print
Preview screen will be displayed.
See the Print Preview screen appears on the next page.
© Copyright 2002-2013 Chronicles Systems, Inc.
Page 22 of 28
CatalogVX
Quick Start Manual
Print Management using Print Preview
The Print Preview screen offers various options for viewing your catalog prior to
actually printing it. From this screen, you can view your catalog 1 page at a time or as a
series of thumbnails.
Initially, the Print Preview screen will display your catalog 2 pages side by side—as
shown below.
© Copyright 2002-2013 Chronicles Systems, Inc.
Page 23 of 28
CatalogVX
Quick Start Manual
In order to view your catalog either as a series of thumbnails or one page at a time click
on the View Style menu and choose the desired viewing option.
Alternatively, you may click on either the magnifying glass icon
on the toolbar to
view the catalog one page at a time or the View as Thumbnails button
on the toolbar to view your catalog as a series of thumbnails. See example images of
these options on the next page
© Copyright 2002-2013 Chronicles Systems, Inc.
Page 24 of 28
CatalogVX
Quick Start Manual
To print your catalog from the Print Preview screen, simply click the print icon
on
the toolbar. If you’d like to see your catalog in a different print format just close the Print
Preview screen and choose the format you’d like to preview.
From the Print Preview Screen you can also convert your catalog into a PDF file and
save it to a designated folder on your computer simply by clicking the Convert to PDF
button on the toolbar.
With CatalogVX, publishing your catalog in different formats is quick and easy!
© Copyright 2002-2013 Chronicles Systems, Inc.
Page 25 of 28
CatalogVX
Quick Start Manual
Standard Page Format and Fields:
1 Item Per Page print format example:
The diagram below shows a general example of the different fields which may be
present on your printed catalog pages. *Please note –other available print formats may
not contain all of these fields. This is due to the inherent size limitation imposed by
layouts displaying more than one item per page. Please see page 27 for a table showing
the fields which are included in each print format.
A
C
B
D
E
F
G
A)
B)
C)
D)
E)
F)
G)
Optional Company Logo
Price, Item Number and Description area
Header and Sub-header area
Optional Category Label
Image Area (automatically resizes to fit the print format chosen)
Table Area (available only in Professional version and above)
Page Footer (company name, phone number, and page number )
© Copyright 2002-2013 Chronicles Systems, Inc.
Page 26 of 28
CatalogVX
Quick Start Manual
Additional formats available in the Basic Edition of the CatalogVX.
3 Items Per Page
4 Items Per Page
6 Items Per Page
9 Items Per Page
© Copyright 2002-2013 Chronicles Systems, Inc.
Page 27 of 28
CatalogVX
Quick Start Manual
Predefined Print Formats for Basic Edition Version.
Catalog Formats
1 item per page
2 items per page
3 items per page
4 items per page
In Product
Version
All
All
All
All
6 items per page
All
9 items per page
All
Fields Used
Menu
•
•
•
•
•
Print Icon from the
tool bar
•
•
•
•
•
•
•
•
•
•
•
•
•
•
•
•
•
•
•
•
•
•
•
•
•
•
•
•
•
•
Product Image
Price
Description
Item Number
Bullet Points
Page Header
Optional Table
Product Image
Price
Description
Item Number
Page Header
Optional Table
Product Image
Price
Description
Item Number
Page Header
Optional Table
Product Image
Price
Description
Item Number
Page Header
Optional Table
Product Image
Price
Description
Item Number
Page Header
Product Image
Price
Description
Item Number
Page Header
Print Icon from the
tool bar
Printing –
Catalog Pages
In Fix Format
Printing –
Catalog Pages
In Fix Format
Printing –
Catalog Pages
In Fix Format
Printing –
Catalog Pages
In Fix Format
* Note--Additional print formats are available in the Professional, Wholesale, and
Enterprise versions of the software. Please contact us at [email protected]
for more details or to easily upgrade your existing version.
Congratulations on creating and publishing your first catalog!
Should you require any additional assistance with your CatalogVX software,
please contact our technical support department at [email protected]
© Copyright 2002-2013 Chronicles Systems, Inc.
Page 28 of 28